Here we are. The end. Together, we've begun the process of creating a pretty good game idea. We started with a basic level that, when it comes right down to it, is simply two rooms connected by a hallway with a simple crate. From humble beginnings, our game has grown, as have our skills. Our simple cargo ship leads the player to a larger space station level. This level includes scripted events to move the story along and a game asset that looks great and animates. However, we are not done. How do we end our journey? We blow things up, that's how!
In this chapter, we will cover the following topics:
- Using class blueprints to bring it all together
- Creating an explosion using sound effects
- Adding particle effects
We begin with the first step of any type of digital destruction, creation. Over the last few chapters, we have created a disturbing piece of ancient technology. The Artifact stands as a long forgotten terror weapon of another age, somehow brought forth by an unknown power. But we know the truth. That unknown power is us, and we are about to import all that we need to implement the Artifact on the deck of our space station. Players beware!
Take a look at the end result:

The finished asset inside the level!
To get started, we will need to import the Artifact body, the tentacle, and all of the texture maps from Substance Painter. Let's start with exporting the main body of the Artifact.
- In Blender, open our file with the complete Artifact. The FBX file format will allow us to export both the completed 3D model and the animations we created, all in a single file.
- Select the Artifact only. Since it is now bound to the skeleton we created, the bones and the geometry should all be one piece.
- Now press Alt + S to reset the scale of our game asset. Doing this will make sure that we won't have any weird scaling problems when we import the Artifact into Unreal.
- Head to the File menu and select Export. Choose FBX as our file format.
- On the first tab of the export menu, select the checkbox for Selected Objects. This will make sure that we get just the Artifact and not the tentacle.
- On the Geometries tab, change the Smoothing option to Faces.
- Name your file and click Export!
Alright, we now have the latest version of the Artifact exported as an FBX. Now that we have exported a few things over the course of the book, do you feel like you have a good handle on the process? Try repeating the process with the tentacle now.
Time to bring up Unreal. Open the game engine and load our space station level. It's been a while since we've taken a look at it, and there is no doubt in my mind that you've probably thought of improvements and new sections you would love to add. Don't forget them! Just set them aside for now. Once we get our game assets in there and make them explode, you will have plenty of time to add things.
Time to import into Unreal!

Importing a skeletal mesh is a bit different than a static mesh
- Before we begin importing our pieces, let's create a folder to hold our custom assets. Click on the Content folder in the Content Browser and then right-click on it. At the top of the menu that appears, select New Folder and name it
CustomAssets. It's very important not to use spaces or special characters (besides the underscore). - Select our new folder and click Import. Select the Artifact FBX file.
- At the top of the Import menu, make sure Import as Skeletal and Import Mesh are selected. Now click the small arrow at the bottom of the section to open the advanced options. Lastly, turn on the check box to tell Unreal to use To As Reference Pose. A Reference Pose is the starting point for any animations associated with a skeletal mesh.
- Next, take a look at the Animation section of the menu. Turn on Import Animations to tell Unreal to bring in our open animation for the Artifact.
- Once all that is done, it's time to click Import!
Unreal will create a Skeletal Mesh, an Animation, a Physics Asset, and a Skeleton asset for the Artifact. Together, these pieces make up a fully functioning skeletal mesh that can be used within our game.

Importing the Artefact will create four important assets: the Skeletal Mesh, the Animation, the Physics Asset, and the Skeleton
Take a moment and repeat the process for the tentacle, again being careful to make sure to export only selected objects from Blender. Next, we need to import all of our texture maps from Substance Painter:

Substance Painter stores its exported texture maps in DocumentsSubstance Painterexport
In the last part of Chapter 6, Monster Assets – The Level Totally Needs One of These, we exported several texture maps for the Artifact that should be still be in the Export folder:
- Locate the
Exportfolder for Substance Painter. By default it is located in the Documents folder, under Substance Painter, and finally under Export. - Head back into Unreal and then bring up the Export folder from your computer's task bar. Click and drag each of the texture maps we need into the Content Browser. Unreal will import them automatically.
- Time to set them all up as a usable material! Right-click in the Content Browser and select Material from the Create Basic Asset section of the menu. Name the material
Artifact_MAT. This will open a Material Editor window:
The Material Editor window
The Material Editor works similar to programming in Blueprint and uses a similar node structure. The large node in the center represents the final result.
Tip
Tip: Creating materials and shaders for video games is an art form all its own. Here I will talk about creating materials in basic terms, but I would encourage you to check out the Unreal documentation, open up some of the existing materials in the
Starter Contentfolder, and begin exploring this highly versatile tool. - So we need to add our textures to our new material. An easy way to add texture maps to any material is to click and drag them from the Content Browser into the Material Editor. This will create a node called a Texture Sample, which can plug into the different sockets on the main material node.
- Now to plug in each map. Drag a wire from each of the white connections on the right side of each Texture Sample to its appropriate slot on the main material node. The Metallic and Roughness texture sample will be plugged into two slots on the main node.
- Let's preview the result. Back in the Content Browser, select the Artifact. Then, in the Preview Window of the Material Editor, select the small button on the far right that reads Set the Preview Mesh based on the current Content Browser selection.

Each of the four maps we imported has a corresponding socket on the main material node
- The material has come out just a bit too shiny. The large amount of shine given off by the material is called the specular highlight and is controlled by the Specular connection on the main material node. If we check the documentation, we can see that this part of the node accepts a value between
0and1. How might we do this? Well, the Material Editor has a Constant node that allows us to input a number and then plug that in wherever we may need it. This will work perfectly! Search for a Constant in the search box of the Palette, located on the right side of the Material Editor. Drag it into the area with your other nodes and head over to the Details panel. In the Value field, try different values between0and1and preview the result. I ended up using0.1. Save your changes.Time to try it out on our Artifact!
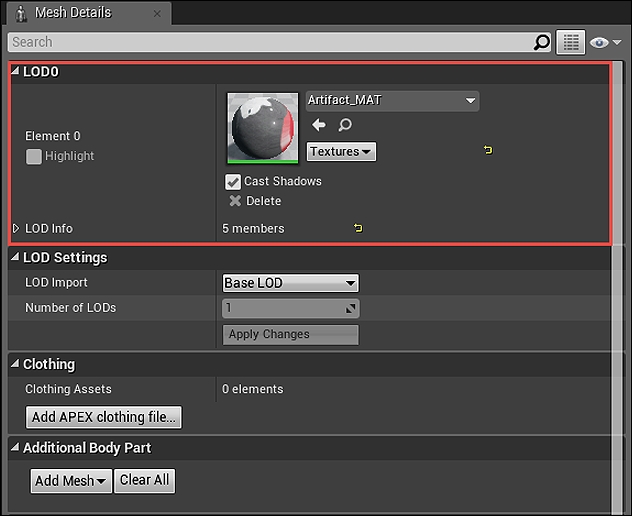
In the Skeletal Mesh editor, assign our new material to the Artefact in the Mesh Details panel
- Double-click on the Skeletal Mesh to open the Skeletal Mesh editor window. On the left-hand side, look for the LOD0 section of the menu. This section has an option to add a material (I have highlighted it in the preceding image). Head back to the content browser and select our Artifact_MAT material. Now select the small arrow in the LOD0 box to apply the selection to the Artifact.
How does it look? Too shiny? Not shiny enough? Feel free to adjust our Constant node in the material node until you are able to get the result you want. When you are happy, repeat the process for the tentacle. We will import it as a static mesh (since it doesn't have any animations) and create a material for it made out of the texture maps we created in Substance Painter.
Now we will use a Class Blueprint for final assembly.

The Artefact Class Blueprint
Class Blueprints are a form of standalone Blueprint that allows us to combine art assets with programming in an easy-to-use and, most importantly, reusable package. For example, the player is a class Blueprint as it combines the player character's Skeletal Mesh with Blueprint code to help the player move around:

The First Person Character is a great example of a class Blueprint
So how and when might we use class Blueprints instead of just putting the code in the level Blueprint? The level blueprint is great for anything that is specific to just that level. Such things would include volcanoes on a lava-based level, or spaceships in the background of our space station level. Class Blueprints work great for building objects that are self-contained and repeatable, such as doors, enemies, or power-ups. These types of item would be used frequently and would have a place in several levels of a game.
Let's create a class blueprint for the Artifact:
- Click on the Blueprints button and select the New Empty Blueprints tab. This will open the Pick Parent Class menu. Since we are creating a prop, and not something that the player needs to control directly, select the Actor Parent Class.
- The next screen will ask us to name our new class and for a location to save it to. I chose to save it in my CustomAssets folder and named it
Artifact_Blueprint. - Welcome to the Class Blueprint editor:

The Class Blueprint editor has several panels in common with the other editors inside Unreal
- Similar to other editor windows within Unreal, the Class Blueprint editor has both a Details panel and a Palette. However, there is a panel that is new to us. The Components panel contains a list of the art types that makes up a class Blueprint. These components are various pieces that make up the whole object. For our Artifact, this would include the main piece itself, any number of tentacles, and a collision box. Other components that can be added include particle emitters, audio, and even lights.
- Let's add the Artifact. In the Components section, click the Add Component button and select Skeletal Mesh from the drop-down list. You can find it in the Common section. This adds a blank Skeletal Mesh to the viewport and the Components list. With it selected, check out the Details panel. In the Mesh section is an area to assign the skeletal mesh you wish it to be. Back in the Content Browser, select the Artifact. Lastly, back in the Details panel of the Blueprint Editor, click the small arrow next to the Skeletal Mesh option to assign the Artifact. It should now appear in the viewport.
- Back to the Components list. Let's add a Box Collision. Click Add Component and select Box Collision from the Collision section of the menu:

Select the Add Component button and choose Box Collision from the dropdown
- Click it and in the Details panel, increase the Box Extents to a size that would allow the player to enter within its bounds. I used
180for x, y, and z. - Repeat the last few steps and add the tentacles to the Artifact using the Add Component menu. We will use the Static Mesh option. The design calls for three, but add more if you like.
- Time to give this class Blueprint a bit of programming. We want the player to be able to walk up to the Artifact and press the E key to open it.

Programming the Artefact
- When we created a similar type of control for the elevator back in Chapter 2, Starting Our First Project, we used a Gate to control the flow of information through the Blueprint. However, Gates don't function the same within class Blueprints, so we require a slightly different approach. The first step in the process is to use the Enable Input and Disable Input nodes, to allow the player to use input keys when they are within our box collision. Using the search box located within our Palette, grab an Enable Input and a Disable Input. Now we need to add our trigger events. Click on the Box variable within the Variable section of the My Blueprint panel. This changes the Details panel to display a list of all the Events that can be created for this component. Click the + button next to the OnComponentBeginOverlap and the OnComponentEndOverlap events. Connect the OnComponentBeginOverlap event to the Enable Input node, and the OnComponentEndOverlap event to the Disable Input node.
- Next, create an event for the player pressing the E key by searching for it and dragging it in from the Palette.

Creating the toggle for opening the Artefact
- To that, we will add a Do Once node. This node works similar to a Gate in that it restricts the flow of information through the network, but it does allow the action to happen once before closing. This will make it so the player can press E to open the Artifact, but the animation will only play once. Without it, a player can press E as many times as they want, playing the animation over and over again. It's fun for a while, since it makes it look like a mouth trying to eat you, but it's not our original intention (I might have spent some time pressing it repeatedly and laughing hysterically). Do Once can be easily found in the Palette. Lastly, we will need a Play Animation node. There are two versions, so be sure to grab this node from the Skeletal Mesh section of your search so that its target is Skeletal Mesh Component. Connect the input E event to the Do Once node, and the Do Once node to the Play Animation.
- One last thing to complete this sequence. We need to set the target and animation to play on the Play Animation node. So the target will be our Skeletal Mesh component. Click on the Artifact component in the Components list, drag it into the Blueprint window, and plug that into the Target on our Play Animation. Lastly, click the dropdown under the New Anim to Play option on the Play Animation node and select our animation of the Artifact opening. We're done!
Let's save all of our files and test this out. Drag the Artifact into our space station and position it in the Import/Export Broker's shop. Build the level and then drop it in and test it. Did it open? Does it need more tentacles? Debug and refine it until it is exactly what you want.