
In this chapter, we will learn the techniques of assessing different types of devices. We will also look at the methods of testing weak filters during our testing engagement. We will cover the following topics:
- Assessing routers
- Evaluating switches
- Attacking the firewall
- Identifying firewall rules
- Tricks of penetrating filters
This chapter will provide us with a methodology to assess what devices are in place and how they are protected; it is important to discover the level of skill of the administrator that we are going up against. A hardened and well-configured environment will present a significant challenge. However, our job as professional testers is to accept the challenge, see what we can discover, and draft a report of the findings.
The first thing we will encounter from the testing position of an external attacker is most likely a router. There is a chance it will be an appliance, but since we work mainly from the standpoint of building ranges for testing, it is unlikely we will be able to carry around a device with us. We have shown places to get devices earlier in the book; so, if you have the luxury of this, you can build your own stationary lab from the information we have provided.
The external architecture we built in the last chapter is our foundation for all of the testing we will practice. An example of our layered architecture is shown in the following diagram:
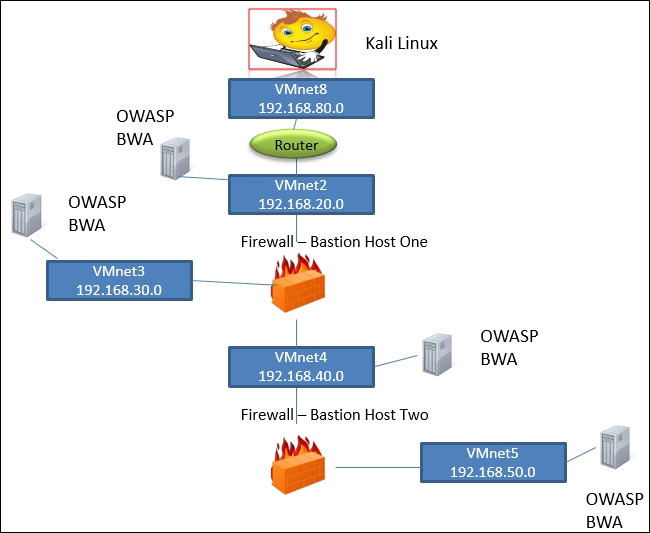
The previous diagram shows our entire external architecture, and the first thing that we encounter is the router; therefore, it is the first device we will use to perform our testing against.
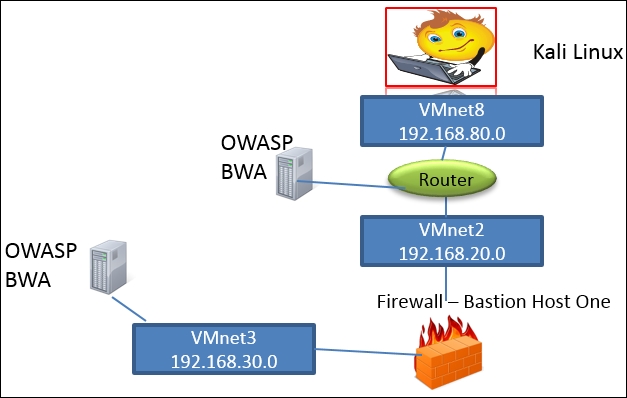
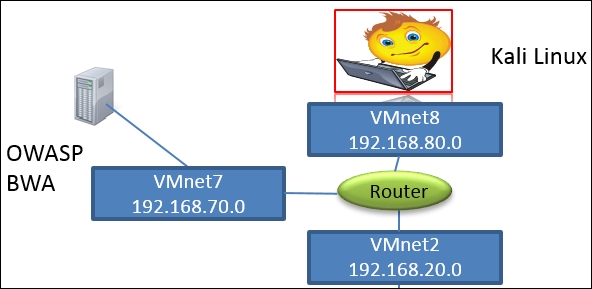
As we have done throughout the book, we want to concentrate on the area of the architecture that we will deal with at the given point of time; consequently, for this section, the architecture we will focus on is in the following diagram:
To prepare for this testing, start up your virtual machines for the Router and Kali Linux distributions. We will use Kali to carry out the testing of the router. After the machines have powered on, log in to both of them with the required usernames and passwords that you created.
In the Router machine, you have to start the router, open a terminal window, and then enter dynamips -H 7200 to start the router. Once it starts, you need to load the configuration file by opening another terminal window and entering dynagen config.net. Once the configuration loads, enter console R1 and access the running router and type en to enter the privileged mode on the router at the router prompt. At this point, we enter show ip int brief to show the configuration of the router interfaces. Based on the screenshot we see that the router has three interfaces. An example of this is shown in the following diagram:
As the previous diagram shows, the three interfaces are as follows:
F0/0| VMnet8 |192.168.80.0F0/1| VMnet7 |192.168.70.0F1/0| VMnet2 |192.168.20.0
Once the dynamips router is running, configure the interfaces with the following commands:
en
conf t
int f0/0
ip address 192.168.80.20 255.255.255.0
int f0/1
ip address 192.168.70.20 255.255.255.0
int f1/0
ip address 192.168.20.20 255.255.255.0
An example at the completion of these commands is shown in the following screenshot:
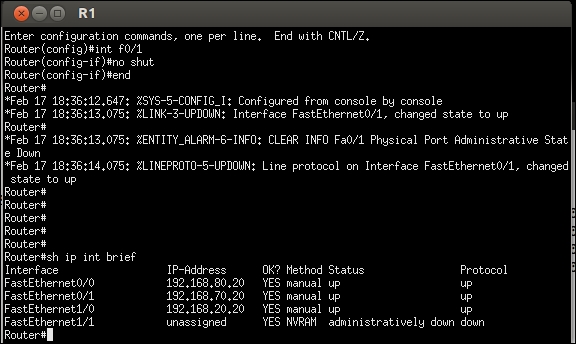
As before, we want to make sure our interfaces are in a state of line and protocol up, as shown in the previous screenshot. Once we have established this, we will turn our attention to other matters.
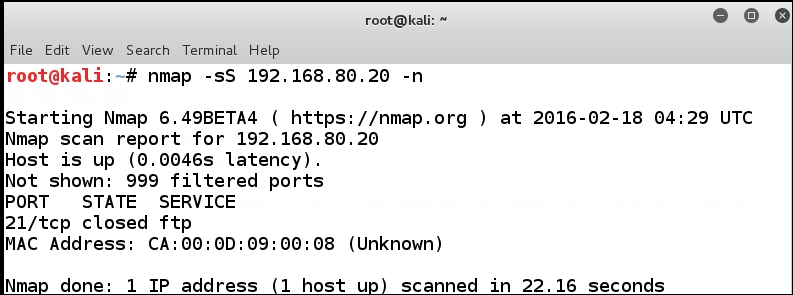
Within the Kali distribution, there are a number of tools we can use when we perform testing of our ranges; one of the most popular ones is the network mapping tool Nmap. Open a terminal window on Kali and conduct a scan against the router interface that is connected to the VMnet8; if you have configured your machine to match what we use in the book, you will enter nmap -sS 192.168.80.20 -n to conduct the scan.
This conducts an SYN or half-open scan of the target, which in this case is the f0/0 interface of the router. The n option tells Nmap not to do name lookups and helps our scan complete faster. An example of the results of this scan is shown in the following screenshot:

For those of you reading this, you are most likely aware that we have 65536 possible ports and the Nmap tool is only looking at 1,000 of them in the scan. This is the default setting for Nmap, so we can change this to scan all the ports, and we will do that now. Enter nmap -sS -p 0-65535 192.168.80.20 -n to scan all the possible ports. If the discovered service is the one you want to attack, then you can skip the scan of the entire port range.
This scan will take a long time to complete; you can get a live update by pressing the spacebar at any time.
Once this very long scan completes, there will be only one port open on the router, and as such, this serves as our one vector of attack against the router. An example of the scan is shown in the following screenshot:
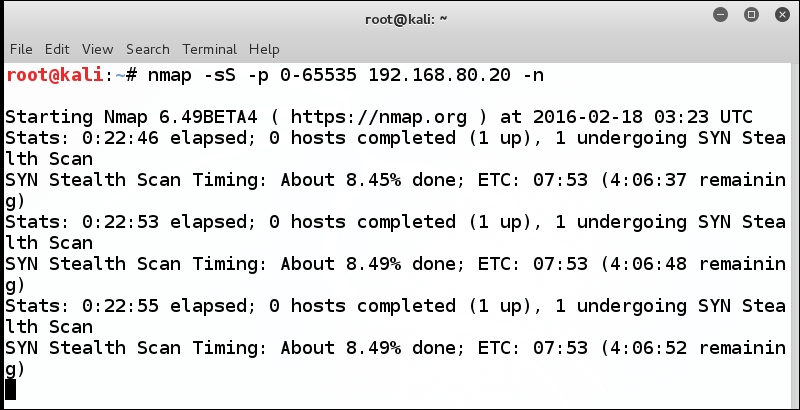
As the previous screenshot shows, the scan takes a very long time to complete, and we especially do not like the fact that the total time taken is increasing. This is because the scan has to send packets to all 65536 ports. There are methods to speed up the scan, but we will not worry about that here. Since we only have one port open on the router, and as such, this is the one vector we have for an attack, we can connect to it and see what the response will be. For those of you who want to know more, refer to the following site, which has many examples of scanning, and methods to make them less noisy, and more:
It is important to note that this is just a default configuration of a router, and no hardening or anything has taken place; yet, we really do not have much attack surface to deal with. We do have the advantage that this is an old IOS version of the Cisco software and that might help us going forward, but we will try some basic things first. Since there is a port 23 for telnet open, we can connect to it and see what the results of the connection are. In a terminal window on Kali, enter telnet 192.168.80.20 to connect to the telnet service on the router. An example of this is shown in the following screenshot:
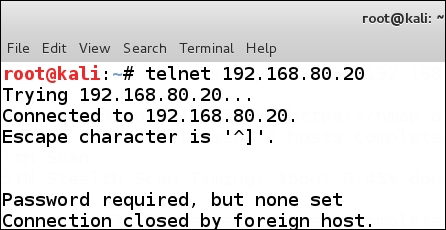
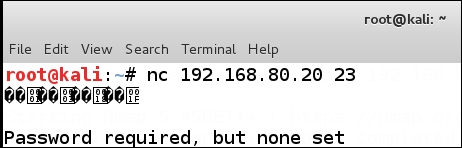
The good news is there is a service running on the port and we can connect to it; the bad news is the password has never been set, and as such, we cannot access the port for long. Another method to connect to the port is to use the Netcat tool, and we will try that now to see if there is any difference in the results. In the terminal window, enter nc 192.168.80.20 23 to connect to the service with the Netcat tool and see if we have any better luck. An example of this is shown in the following screenshot:
Once again, we don't really get anything of value, so we move on to another method. First, we need to realize we are kind of cheating, since we know that there is only a virtual router. This, of course, is not how it is going to be when you do an actual test; therefore, we need to look at how we can determine that we are dealing with a router. To do this, we have to look at the network traffic at the packet level. Another added benefit of this is we are only sending one connection request, and as such, this is much quieter than virtually any scan. Finally, we need a note of caution here, as there is a chance this port could be part of a decoy and a honeypot. If the port shows as open, but we cannot really connect to it, this in itself is suspicious and could indicate a honeypot.
Open a terminal window in Kali and enter wireshark & to start the tool. When the tool comes up, you start a capture on the interface that is connected to the VMnet8 switch, which should be eth0. An example is shown in the following screenshot:
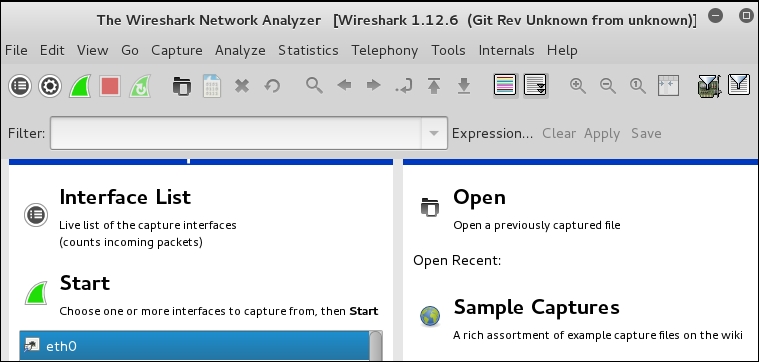
Once you have verified your settings, click on Start to start the capture on the eth0 interface. Once the capture has started, conduct another scan against the router and review the results in Wireshark. An example is shown in the following screenshot:
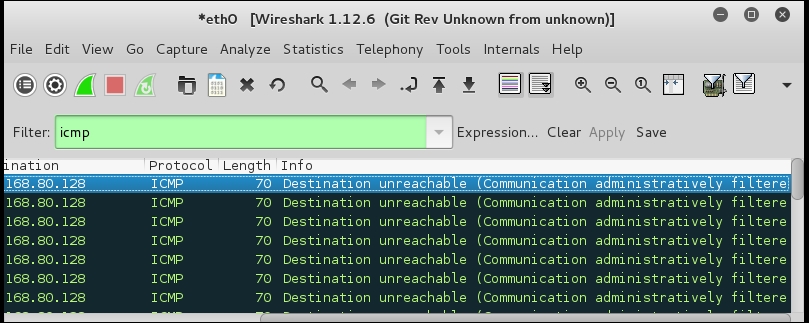
As the previous screenshot shows, this is a router that has an Access Control List (ACL) in place; any time you see ICMP Destination unreachable with the message Communication administratively filtered, you know you have a router that you will encounter. An example of the ACL scan in Kali is shown in the following screenshot:
So, what do we do now? We know there is a router in place, and it has an ACL. You will also notice that the results returned now will have an ACL in place and will only show one port as being closed. Where did our telnet go? The telnet port was open because there was no ACL on that router, but as soon as you apply the ACL, the rules are set to the default, deny, and as such, all that you will see open are the things that the administrator explicitly allowed.
This is the reality of testing. We are fortunate that this administrator has not blocked the ICMP reply messages, so we can at least identify that we have a router in place. The next thing we can attempt is to see what Nmap tells us about the router.
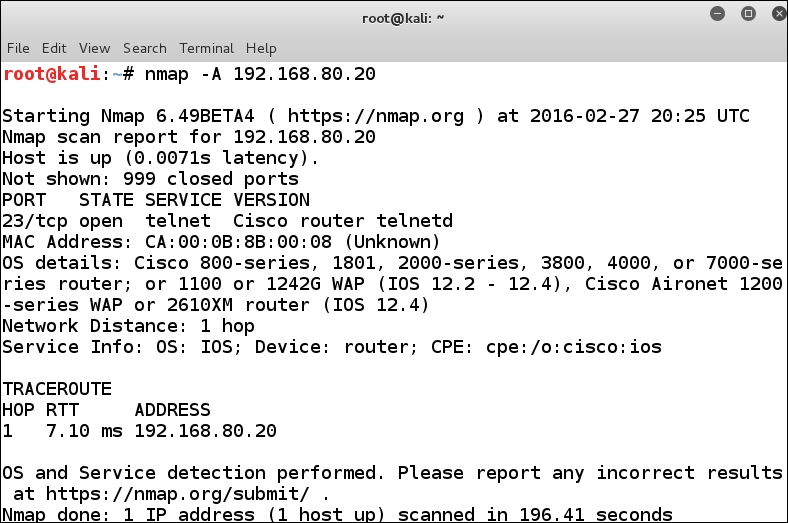
With the Nmap tool, we can try to do an enumeration scan. To do this, we can use the -A option, so we will try this now. In the terminal window, enter the nmap -A 192.168.80.20 command to see what we can gather from the router. An example of the results from this scan is shown in the following screenshot:
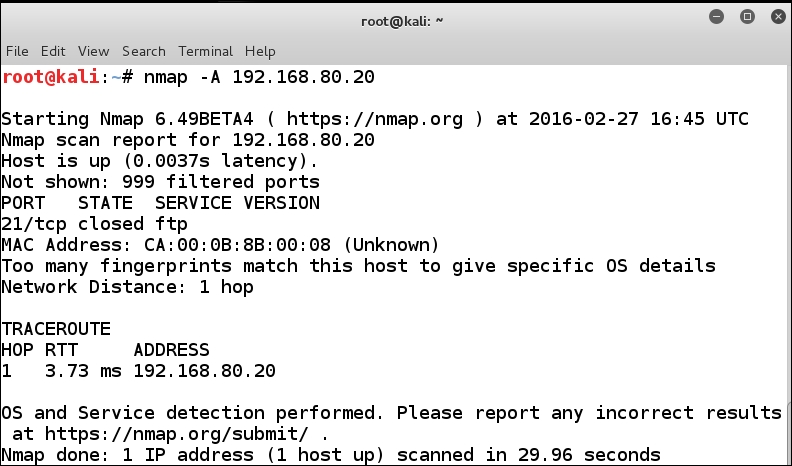
As it turns out, even the enumeration scan is not of much help. This is because the router does not provide much help to the tool. Again, we know that we will run into a router, and this is why we have started with it. We see that port 80 reports as being closed, so let us investigate this further. An important thing to maintain any time you do your testing is to capture the traffic in Wireshark and see how the target responds at the packet level.
Since we know we have a port 80 response, we can use it as our next attempt to get information. In your terminal window, enter nmap -sS -p 80 192.168.80.20 to direct the scan at the port that provides us with a response; in your Wireshark display, you may want to set a filter of tcp.port == 80 to concentrate on the traffic that we send. An example of the results is shown in the following screenshot:
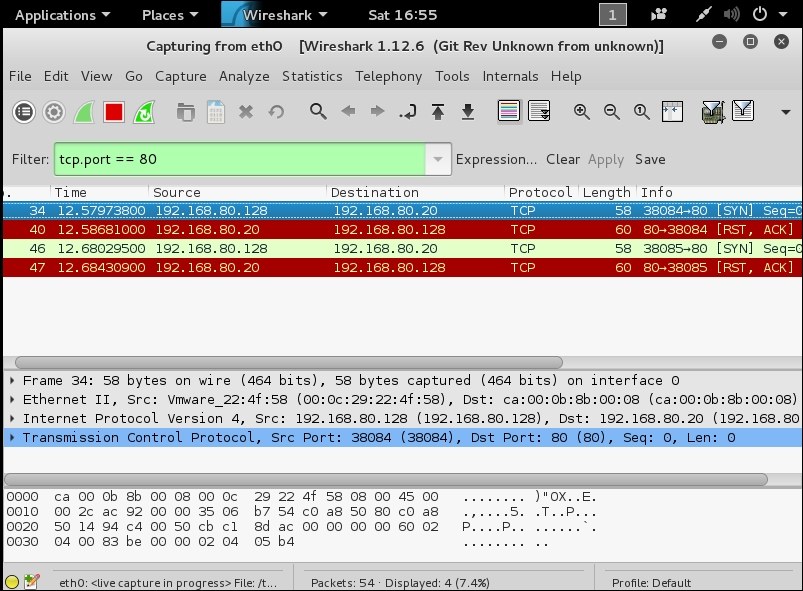
This shows us that when we connect to port 80, we get an RST and ACK packet; this means the port is closed in accordance with Request For Comment (RFC). Before we continue, a word about RFCs: if you want to master the art of testing, especially at the packet level, you need to be familiar with them; however, as many of you reading this will more than likely know, they are not exciting to read. A site that can help you with information on RFCs is the Network Sorcery site; it has excellent information on all the protocols and other network data, and it is highly recommended that you spend some time reviewing them when you are not sure how something works. You can find the site at http://www.networksorcery.com/. An example of the HTTP protocol information from the site is shown in the following screenshot:
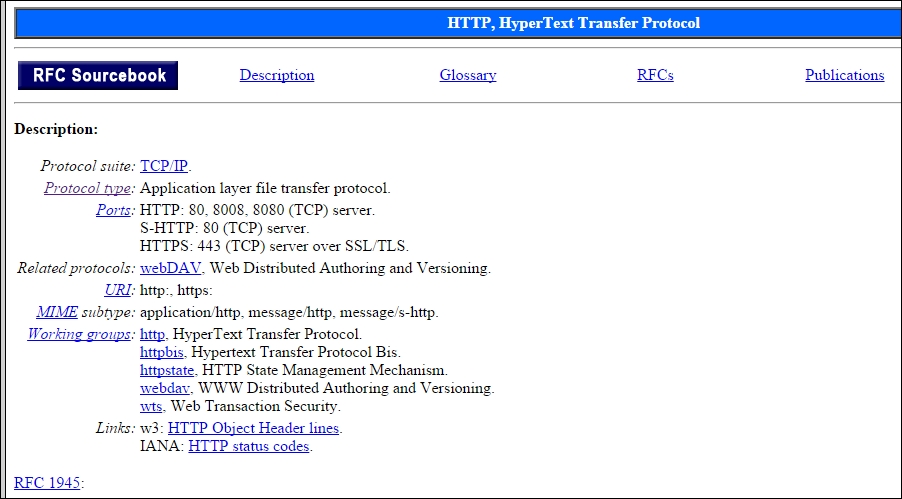
As the screenshot shows, the site has the references listed for the protocols you research. Within the protocol pages you can find information about the protocol and standard, and it is in an easier to read format than most RFCs. An example of some of the additional information that is important to us as penetration testers is shown in the following screenshot:
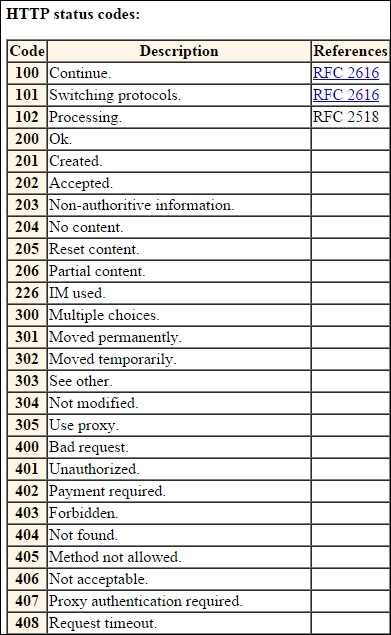
The example in the screenshot shows the HTTP status codes, and this is something that is very important when we are doing web application penetration testing. We will revisit this topic later in the book.
Okay, it is time to get back to the task at hand. Why is it that Nmap shows only port 80, and no other ports, as closed? We used Wireshark to determine that the port responds with RST and ACK flags when a SYN packet is sent to it, so what shall we do next?
This is where we can try a few other things to see what the response to the port is. We know that the port reports as closed; so, let's try the HTTPS port and see what kind of response we get. In your Wireshark filter, you enter tcp.port == 443, and it is also a good idea to restart your packet capture. Navigate to Capture | Restart to clean up all the traffic you have collected. In your terminal window, enter nmap -sS -p 443 192.168.80.20 to probe the HTTPS port 443. Once the scan reaches completion, note the results. An example of the results is shown in the following screenshot:
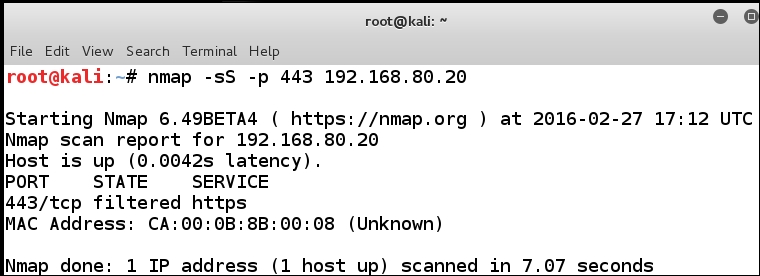
As you can see from the previous screenshot, the port is not reported in a closed state, but in a filtered state; why the difference? First, let's look at the results in Wireshark. An example of the results from Wireshark is shown in the following screenshot:
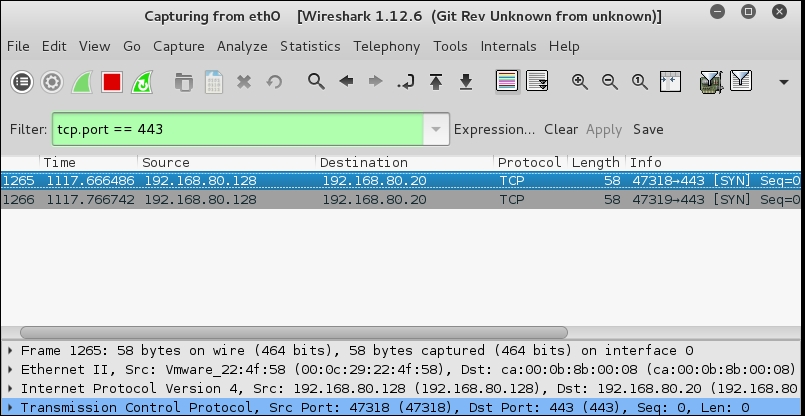
As we see from the previous screenshot, there is no response from the target now, and that is why Nmap reports it as filtered; so, we see that port 80 generates a response and port 443 does not, which tells us that there is some form of rule for the port 80 traffic and not for the port 443 traffic. These are the things we should be documenting so that when we see it again, we have an idea of what is going on.
We have one more attempt to make, and then we will move on to try and get more results to go against a router. According to RFC 793, when a port sends a packet that contains an illegal flag combination, it should not respond if it is open, and it should respond with a packet with the RST flag set if it is closed. We will attempt this now. In your terminal window, enter nmap -sX -p 80 192.168.80.20 to send an illegal flag packet to the port; in this case, this is a Christmas tree scan. Once the scan is complete, do the same scan again to port 443; enter nmap -sX -p 443 192.168.80.20 and compare the results. An example of the result is shown in the following screenshot:

So, what have we been able to determine? From the previous screenshot, we see that the machine that serves as a router does appear to follow RFC 793; this can help reduce the possible devices, since some vendors, such as Microsoft and OpenBSD UNIX, do not follow RFC. We could also make the assumption that since the majority of the market runs Cisco routers, this is probably what we are dealing with. Unfortunately, thus far, we really do not know much about the device's flavor, but we do know that it runs an ACL and it has a rule in it for port 80. What if we try some more techniques? We will do this now (remember one of the reasons you are building a range environment is to practice) enter nmap -sC 192.168.80.20. This scan will use the default Nmap scripting engine against the target. Unfortunately, we still are not getting anything more than before, so we need to try harder! Let us take a look at the netdiscover tool; enter netdiscover -r 192.168.80.0/24. This scan will report the MAC addresses; we could use the -p option which would be passive. Our logic here is we might be able to see the target has the vendor MAC address. An example of the results from this scan is shown in the following screenshot:
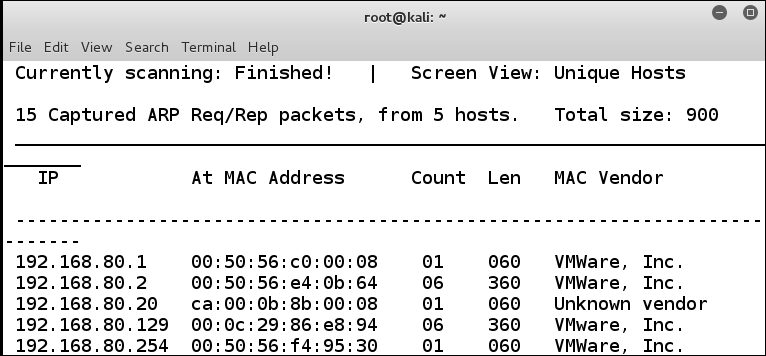
Unfortunately; in this instance we do not have the vendor MAC address for the router device, we should be able to tell it is a Cisco, but we do not have that, we just have the listed Unknown vendor. So, what do we do now? We need to continue to try and see what we can find; furthermore, we need to document everything we have discovered so far, not only for the current testing, but just as importantly for our testing tips and techniques archives. Remember, we more than likely will see Cisco routers when we do our testing, so we can try and see how they respond after we use different tools. Prior to Kali 2.0, there were a number of Cisco router-specific tools, so we could boot an earlier version of the tool and then explore the results with those tools. Remember, it is always good to keep multiple versions of our toolkits around just for these purposes; we can attempt to install them in Kali 2.0, but if they are already working in another version we may as well use them there. After all, time is usually a critical element in our research. An example of the tools in the Kali 1.10 distribution is shown in the following screenshot:
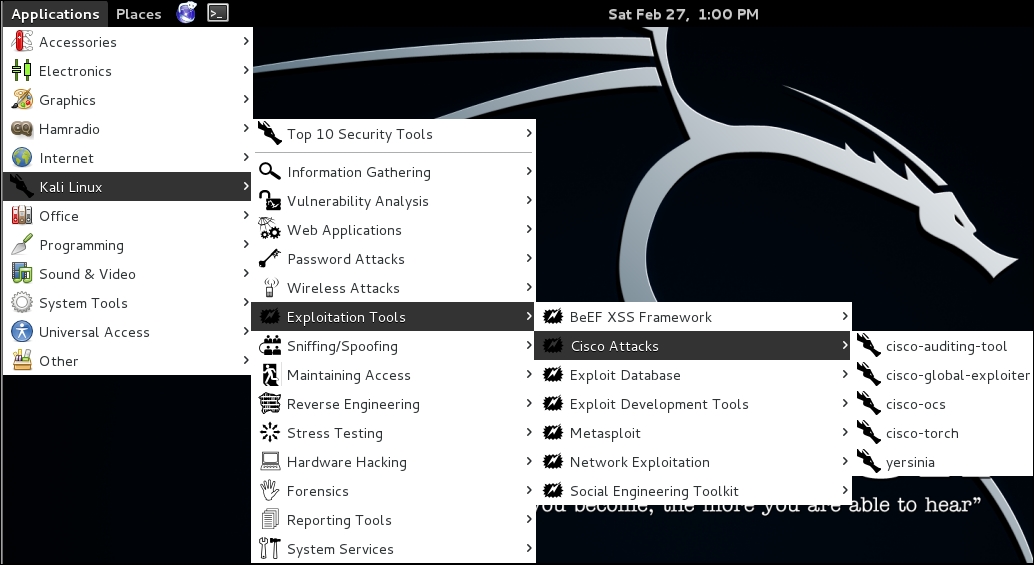
We will not run through these tools, but you are encouraged to explore them and any others you can discover. This is one of the reasons for working with the process, we want to ensure we practice with a number of the different tools that exist.
We have pretty much exhausted the Nmap scan options to go directly against the router interface. We will attempt more with the tool when we go through the device; for now, we will just test the device, and of course, document the results.
We have one more thing to do before we move on to the next step, and that is to verify our assumptions. When we scan with Nmap, port 80 shows as closed, and when we try the port 443, we get a filtered report. We assumed that this is because there must be some rule in place for port 80 in the ACL. Well, we never want to assume, we want to make sure our assumptions are right; therefore, our best option is to add rules for more ports and see what happens. We will do that now. In your router, enter the following commands:
conf t
ip access-list extended External
permit tcp any any eq 80
permit tcp any any eq 22
permit tcp any any eq 443
permit tcp any any eq 25
Press Ctrl + Z, and then enter the following command:
show access-lists
An example of this is shown in the following screenshot:

As the previous screenshot shows, we now have a rule that allows port 22, 25, 80 and 443 traffic.
We are now ready to test our theory. In your Kali distribution, enter nmap 192.168.80.20 -n in the terminal window to conduct a default scan with Nmap. As has been discussed earlier, the n option will hopefully speed up our scan. Once the scan has completed, review the results; an example is shown in the following screenshot:
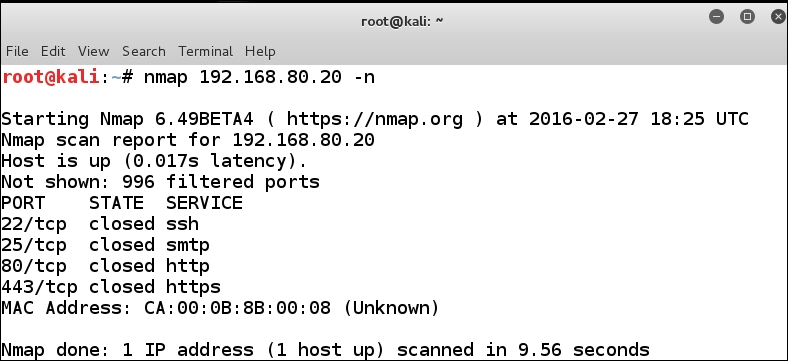
Mission successful! We have now proven that when a router (in this case, a Cisco router) has a rule in place for a port, it will respond for that port. We now have the information that in this instance there are four ports open; therefore, we have four potential vectors to provide us access to the router for our attack. We are now ready to move on and try and find ways to attack the router device. One last point to make is we have the four ports available THROUGH the device as well, but for now we are only concerned with the device.
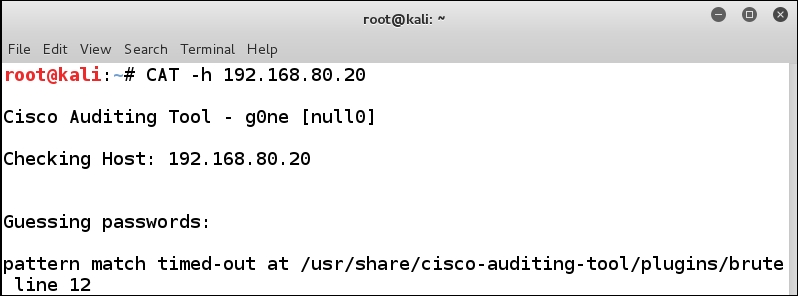
We have shown some of the tools of the Kali 1.10 distribution, but we will continue with the Kali 2.0 and see if some of the tools are located there. One of the tools we want to take a look at is the Cisco Auditing Tool. In a terminal window on Kali enter CAT -h 192.168.80.20. This will conduct an audit of the router; an example of the output is shown in the following screenshot:
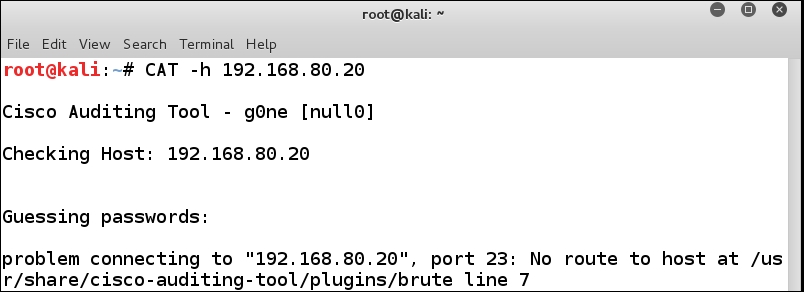
The output reflected in the previous screenshot does not provide us much. We next want to determine if it is any better when an ACL is not in place. In the Cisco router enter the following:
conf t
int f0/0
no access-group external in
Once we have made the changes, return to the Kali Linux tool, and run the CAT command again. Once the tool has completed, review the results. An example of this is shown in the following screenshot:
Without the ACL, we now have more success with respect to reaching the target, but we really do not get much from the tool, so, we try harder! Since we have not had a lot of success, let us take a look at what the tool is actually attempting to do when it does the audit. The best way to do this is with Wireshark. Start a capture on Wireshark and run the tool again. Once the tool has finished, return to the Wireshark capture and review what is taking place when the tool attempts to access the router. An example of this is shown in the following screenshot:
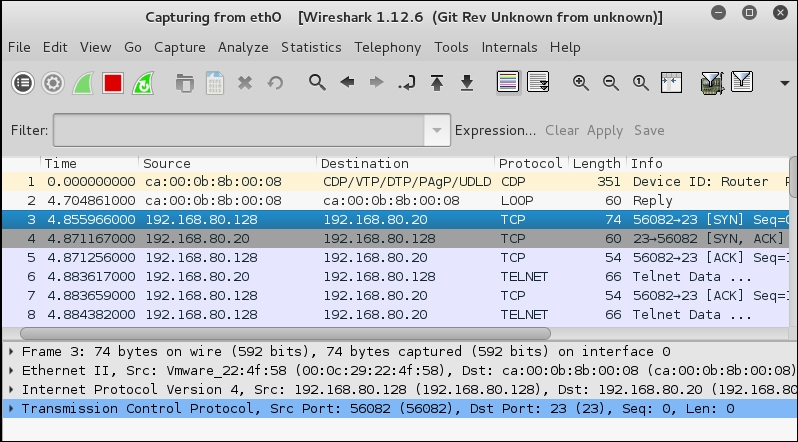
As the previous screenshot shows, the tool is connecting to port 23 (Telnet), and we see that the three-way handshake does complete, so let us take a deeper look. Right-click on the packets to port 23 and select Follow TCP Stream. An example of this is shown in the following screenshot:
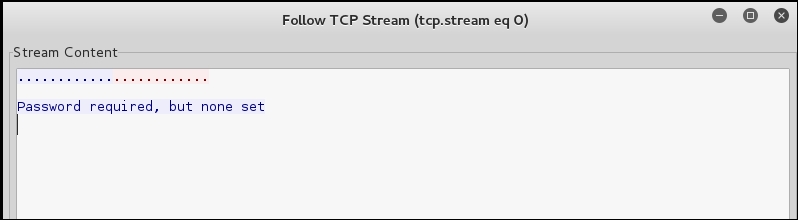
As the previous screenshot shows, we are running into the same problem when we were manually trying to connect to the router; since we have control of the router, let us test our tool by entering a password for the router that will allow the tool to continue on, and more importantly let us see what the tool does when auditing a router. This is all part of the process of seeing how the device reacts when targeted by different tools, and one of the most important things is to make sure we are recording the information that the tool is using, so we have it as part of our arsenal in subsequent tests. Next, we will configure a password on the router. In the router, from the global configuration prompt, enter the following commands:
aaa new-model
aaa authentication login default local enable
username kevin password cisco
enable password password
We are purposefully making the passwords easy, so we can test the tool. It is true we might not see this easy of a password in our testing, but the process is the same, we might have to use other things from our information gathering stages to identify the credentials to use, then we just add them to our wordlist. Now we need to create a password list to test the tool. In the Kali terminal navigate to the tool folder, enter the following commands:
cd /usr/local/share/cisco-auditing-tool/lists
ls
more passwords
An indication of the directory listing and the contents of the passwords file is shown in the following screenshot:
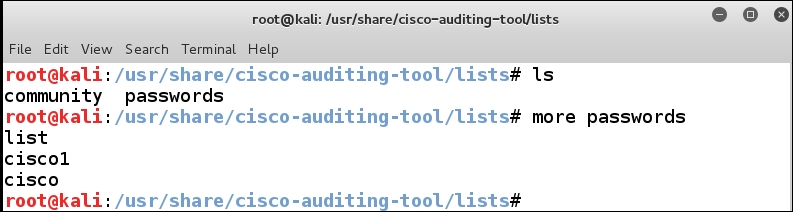
We see that there are only three passwords in the list, so we need to add the passwords that we have configured for our router to see what the tool will do when it does have the correct credentials, once you have done this, enter the following command:
CAT -h 192.168.80.20 -a passwords
An example of the output of this command is shown in the following screenshot:
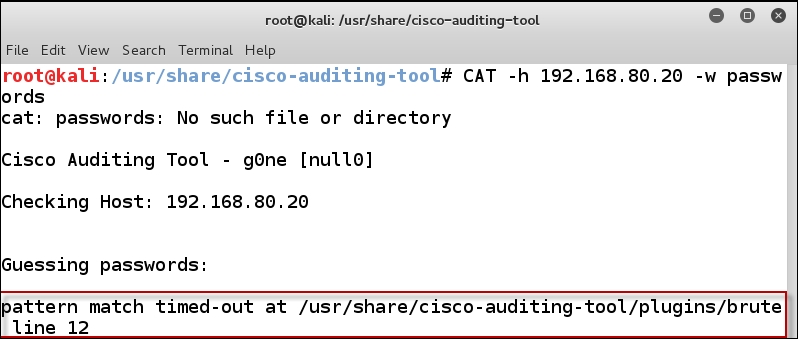
Well, the previous screenshot shows we really have not gotten very far with this tool, but the process we have been covering is essential when it comes to understanding the tools. We do see that there is a reference to a plugin, so the next step in the process is to look at the code. Navigate to the folder for the plugins and enter gedit brute.
An example of the file is shown in the following screenshot:
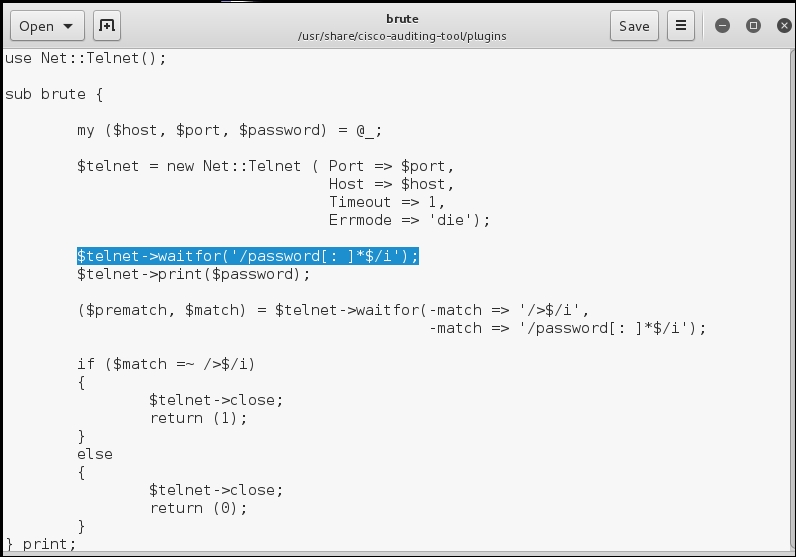
As the code shows, line #12 is the problem we are running into, as we review the results when running the tool, we see that the first prompt on the Telnet is the username, and there is no plugin for the username, so the tool is not handling the returned data properly, we could try and change or fix the code, but since the tool relies on a number of parameters such as no ACL and Telnet, we will move on and look at another tool to add to our arsenal. But, as you do your testing you will see the remaining tools require a Telnet or web server to be accessible. Since we know this to not be the case we will save some time and move on. The process we have covered is the most important thing.
Since we have the ACL disabled on the router, we will do the enumeration scan and then scripting scan to see what the results are. An example of the enumeration scan with Nmap is shown in the following screenshot:
Wow! What a difference the ACL makes, without it now we can enumerate the device and also the version of the IOS! This is great information to have. Now, if we can just get the administrators to all not place an ACL on their routers! Of course, this is not something that we are going to be able to do, there is virtually no chance we will discover a router without an ACL, but we might find them with default credentials. The main thing is we know the process and approach to use when we encounter a router. Since we more than likely will encounter an ACL, what should we do? Well, in the initial discovery, you can ask for the information, and they may provide it. You can also try at different locations; while it is very common for the external interface to be protected, this is much less common for the inside interface. So, in some cases, this will be the best option to proceed.
From here, you will note the different results and then document what works and what does not work; furthermore, you will note the different configuration changes that you can make and how these changes impact the results. In fact, you should now run all of the tools in Kali, and see what the difference is without the ACL in place; as always, document your findings.
We can always attack the router if we find something to go on, but more importantly, it is the fact that the router is a protection device on the inside that our way forward is to see how to get through the router; this is what we will do later in the chapter. For now, we want to discuss what the results are when we encounter someone using a Linux machine or another device as their router and filtering device.
Since we have pretty much exhausted working with a router that we may encounter as a perimeter device, it is time to look at the results if and when we encounter an environment that uses iptables as its router and to provide ACL capability. To do this, we need to bring up the virtual machine we configured iptables on in Chapter 4, Identifying Range Architectures. You may want to suspend the machine that we have been using as our router to avoid conflicts and system resources. We will revisit the machine and the router device later in the chapter.
Once your virtual machine has come up, log into it with the required credentials and open a terminal window. In the terminal window, enter iptables -L to display the current configuration, as shown in the following screenshot:
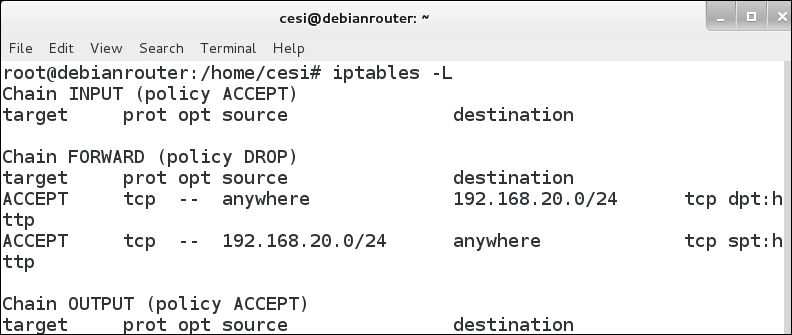
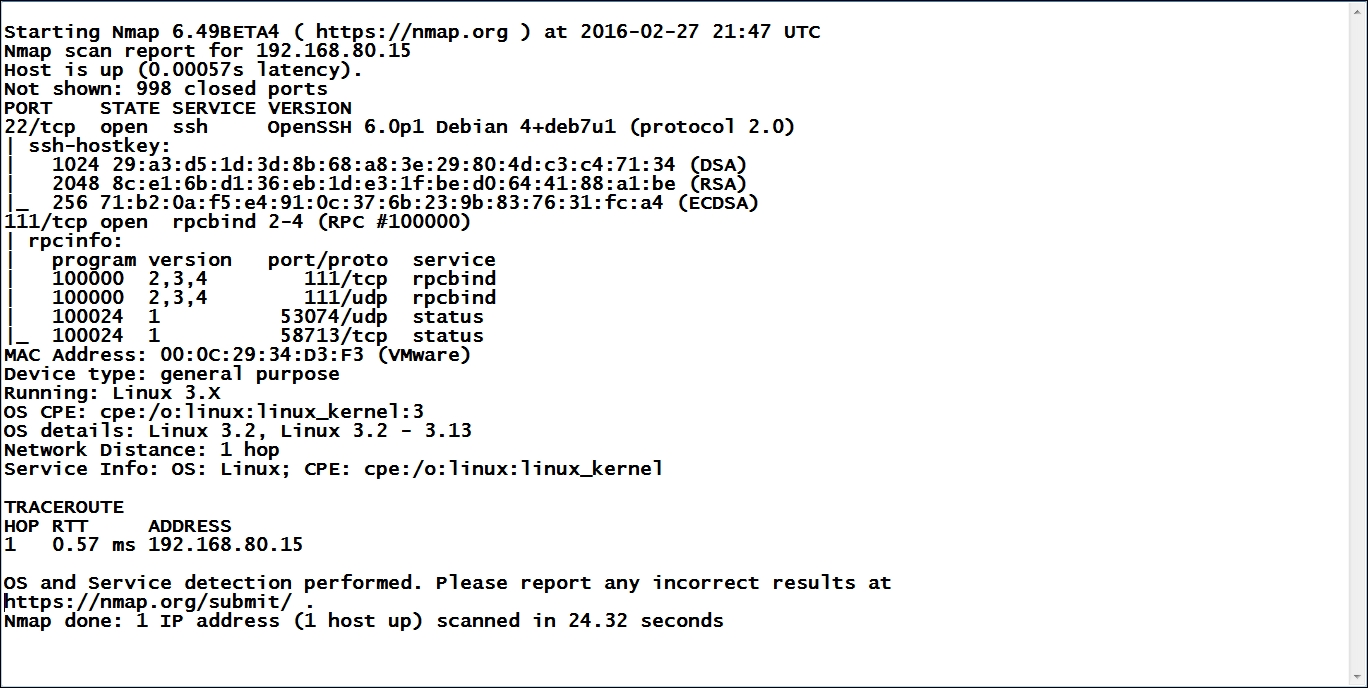
We see that we have a rule set for the HTTP traffic, so now we know that we want to scan the machine using our Kali Linux machine. In your Kali Linux machine, open a terminal window and enter nmap 192.168.80.15 to scan the iptables eth0 interface. An example of the results of this scan is shown in the next screenshot:

From the previous screenshot that shows the results of our scan, we know that we have ssh and port 111 open. This is a notable difference from when we scanned the router because the iptables are running on the machine; therefore, the results will show what is open on the machine. This provides us with some avenue of attack, but the problem is we do not have a true test of the iptables rules. This is because we are not concerned with the iptables rules; this scan only scanned the interface of the machine and had nothing to do with our iptables rules. With the router, we had an interface we could scan. Since we do not have that here, we only scan the machine; but this is a good way to determine whether you will encounter a machine acting as router or an actual router device.
So, what do we do now? Well, we have a couple of options. Since ssh is open, we could try to brute force it, or if we know we have ports open, it will help Nmap do a better job with enumeration. So, we will try that now. In the terminal window, enter nmap -A 192.168.80.15 to do the enumeration scan.
An example of a portion of this output is shown in the following screenshot:
From the previous screenshot, we see that we do have additional information. Again, this is because we are just looking at the machine that iptables is on, and not the rules. We have a couple of things we can do to get the iptables rules involved, but we will save this for later in the chapter. Based on what we see here, is there anything else we can do? The answer is yes. We see that we have the OpenSSH version, so we can use the techniques we discussed throughout the book and try to find any vulnerabilities that may be available for this version of SSH. We can do a search on the Internet. At the time of writing, there are a couple of mentions of version 6.0 that have some denial of service vulnerabilities, but since that is rarely asked for in a penetration testing scope of work, we will not address them here, and you are welcome to experiment on your own. As a reminder, you can use the sites we have discussed and see if you can come up with some form of a reference, such as a CVE number or a Bugtraq ID (BID). If you can find something as a reference, then you can look within the Metasploit tool and search for it.
We do have port 111 open, and as you can see from the output in the previous screenshot we have rpc information. We can query the information directly, so we will do that now. Enter rpcinfo -p 192.168.80.15. An example of the output from this command is shown in the following screenshot:
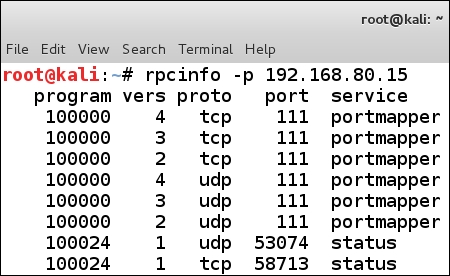
From the previous screenshot we can see that the rpc programs are all registered to portmapper, so there is not a lot we can do against it. If there was a mounted or another program mapped, then we might be able to do some more damage. So, for now we will move on.
One last thing to do before we move on is to look at the traffic at the packet level. Start your Wireshark tool by entering wireshark & in a terminal window in Kali Linux. When the tool opens, start a capture on your eth0 interface by navigating to eth0 | Capture. Once the capture has started, run your Nmap scan in another terminal window, and then review the results in Wireshark. Since we really just want to see if there are any messages to show that we encounter in a filter, you can enter a display filter. We will do this now. In the filter window, enter icmp to see if any ICMP traffic was sent by the target.
An example of this is shown in the following screenshot:
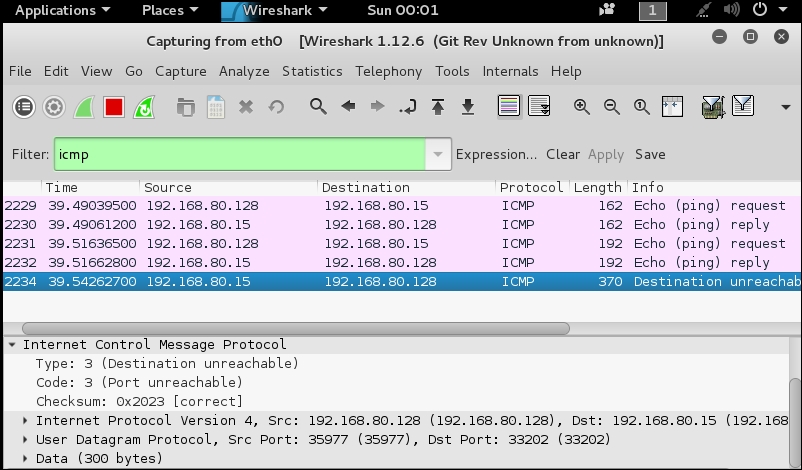
The previous screenshot does show some ICMP, but you will notice none of these are the type of ICMP we would have seen if a filter was in place. Packet 2234 is the response in accordance with the RFC for a User Datagram Protocol (UDP) port that is closed. So, we have learned that a default rule in iptables within Debian Linux will not respond when we scan it, so unless an administrator makes a mistake we will not be able to glean much information from a machine configured at the defaults. We can of course use this knowledge to our advantage with respect to identify the filter, but a further escalation will more than likely not be possible.
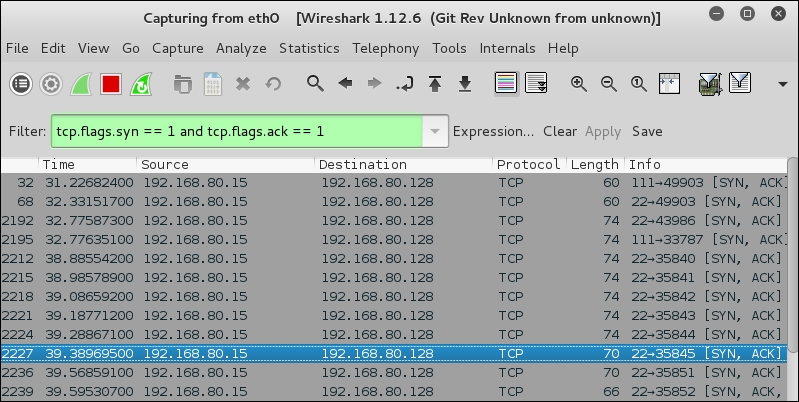
We have one more filter that we will apply to close out this section. As testers, it is important that we get to the data as expeditiously as we can, and this is where the power of the Wireshark filters come in. However, before we do this, is there something we have missed? Hopefully, you will remember that Nmap only scans 1000 ports by default, and as such, we don't scan all the ports. You have probably already scanned the ports; as a reminder, we use the -p option for port scanning, and you should scan all ports so that your testing results are more complete. Remember that on that rare occasion you are asked to evade then we NEVER want to do a default scan with any tool, we have to customize them or we will be detected. Once you have completed your scan, there will be several packets in Wireshark that you will have to look through. So, to make our job easier, enter the following in the filter window in Wireshark:
tcp.flags.syn == 1 and tcp.flags.ack == 1
Once you have entered the filter, click on Apply to apply the filter. Now, all the packets that have the SYN and ACK flags set will be displayed; therefore, you now have a quick reference of what ports are open on the target. An example of this is shown in the following screenshot:
If you prefer to see the port numbers and not the names of the protocol that is usually assigned to that port, you can change this in the settings of Wireshark. Navigate to Edit | Preferences | Name Resolution and remove the check mark under the Resolve transport names.
This is all we will do with the iptables machine.