
The CoreMotion framework implements many motion-related classes. The functionality for these classes varies from counting steps with CMStepCounter to figuring out the user's altitude with CMAltimeter to accessing gyroscope data with CMGyroData or even to reading whether a user is walking, running, or driving with CMMotionActivityManager. Reading the hardware sensors, such as the gyroscope, is done through an instance of CMMotionManager. The motion manager class provides an interface that enables developers to read data from the accelerometer, gyroscope, and more.
Our application will use a combination of sensors to function properly. However, before we get to that, we'll explore the available sensors a bit more because there are a lot of interesting features present in CoreMotion. We'll cover the pedometer first, and then we'll take a look at reading other sensors, such as altitude, accelerometer, and gyroscope.
The first sensor we will take a look into is the pedometer. The pedometer is generally used to track the amount of steps a user takes and to measure the distance a user has walked. This information is exposed to your application through the CMPedometer class. The pedometer data you retrieve from this class should be consistent regardless of the way the user holds their phone. Apple even stated in a WWDC session from 2015 that the pedometer adapts to its user in order to become more accurate over time.
If you're looking to build an application that tracks a user's running or walking activity, CMPedometer is perfect for calculating the distance your user has traveled over a given time. There's more than one way for us to grab information about the user's walking distance. One is to rely on real-time updates. This kind of update can be listened to using the startUpdates(from:withHandler:) method. If you call this method, you have to supply a start date and a handler.
The start date tells the method from which point we want to accumulate the data. You could use a date in the past if you like, and your handler will be called with the amount of steps and the distance traveled since the date you specified.
The handler you supply is called with two arguments: an instance of CMPedometerData and an instance of Error. Both of the arguments are Optionals, so if there's no error or no data, the corresponding argument will be passed in as nil. The following code serves as an example of how you'd call this method in your own application; the example assumes that you imported the CoreMotion framework at the top of the file:
let pedometer = CMPedometer()
pedometer.startUpdates(from: Date(), withHandler: { data, error in
    print(data)
    print(error)
})
A snippet as simple as this is all you will need to start receiving updates about the pedometer data. This data isn't provided to your application in real time. You will receive updates as they become available through the framework.
If you're building an application that tracks runs, you could have the users start and stop their workout. If you want to get the number of steps and distance traveled for that run, you can use the queryPedometerData(from:to:handler:) method. This method allows you to query the pedometer for up to one week in the past. The following example assumes that your users have started and stopped their workout, and the start and end dates for the workout are stored in workoutStart and workoutEnd properties:
let pedometer = CMPedometer()
pedometer.queryPedometerData(from: workoutStart, to: workoutEnd, handler: { data, error in
    print(data)
    print(error)
})
This snippet looks very similar to the previous snippet. They work pretty differently from each other though because the latter example's handler is only called once when the query data becomes available.
The pedometer provides a nice interface that makes it easy for us to track walks and runs. However, there is one issue with this. If a user is running or walking and temporarily has to stop for any reason, we can't really detect this. Better said, we couldn't do this prior to iOS 10, because the CMPedometer class can now inform your app about these stops.
To listen to these start and stop events, you can use CMPedometerEvent. To obtain these events, you ask the pedometer for event updates and, just as we did before, we implement a handler that will be called whenever an update becomes available, as shown in the following code snippet:
if CMPedometer.isPedometerEventTrackingAvailable() {
    pedometer.startEventUpdates(handler: { update, error in
        print(update)
        print(error)
    })
}
One important thing to notice in this snippet is the use of CMPedometer.isPedometerEventTrackingAvailable(). We must check whether event tracking is available because this feature isn't just new for iOS 10, it's available only on iPhone 6s, iPhone SE, and newer versions.
The updates we receive in this handler are CMPedometerEvent objects. These objects have a date and a type property. The date will tell you when the event occurred. The type property informs you whether the user stopped walking or started walking.
Storing these events for the duration of a workout enables you to compute a better workout result because temporary stops don't count toward the total activity time if you subtract the pause time from the total time.
One last thing you should know about the pedometer is that its distance calculations are more accurate if your app has access to the device's GPS coordinates. How you can obtain access will be discussed later in this chapter. If your app has access to GPS, the pedometer will combine its own readings and estimations with the GPS data. If the GPS seems accurate enough, the pedometer will have to do almost no calculations on its own for the distance traveled. However, if the GPS is drifting, the pedometer will use its own readings to calculate the traveled distance; this makes the pedometer even more accurate.
The CoreMotion framework provides access to several motion sensors. In order to access these sensors, you will make use of CMMotionManager. This class enables you to read data from the following sensors:
- Gyroscope
- Accelerometer
- Magnetometer
The gyroscope sensor provides information about the device's current rotation rate in 3D space. The rotation of the device is measured in relation to a variable frame. This means that you can't make any assumptions about the orientation the device is actually in. If you lay the device flat on a table and raise it, the gyroscope will provide an increasing value on the X-axis if we pick the phone up in the portrait mode. Once we stop rotating the device, the value will be close to zero again.
The accelerometer also measures in a 3D space, and it's very easy to get confused about the differences between the accelerometer and the gyroscope. Both sensors respond to movement, but while the gyroscope measures rotation, the accelerometer measures acceleration. So if we pick up our phone from a table and the gyroscope measures an X-axis rotation, the accelerometer will measure more movement on the Y-axis. This is because the phone is accelerating upward, on the Y-axis. This distinction is very important. The gyroscope measures rotation around an axis and the accelerometer measures movement along an axis.
The last sensor we can individually target is the magnetometer. This sensor uses the earth's magnetic field to determine a device's orientation in the physical world. The CoreLocation framework uses this sensor to determine in which direction a user is headed. The ratings you get from this sensor are fairly abstract, and if you're looking to determine the exact device orientation, it's a lot easier to use the CMAttitude class. We'll cover this class soon.
All three of the above sensors can be monitored individually on the CMMotionManager. The following example shows how you can read the data you receive from the gyroscope; the APIs for reading the accelerometer or the magnetometer follow the same pattern, so for brevity, there is just a single version shown:
let motionManager = CMMotionManager()

func startTracking() {
    motionManager.gyroUpdateInterval = 1
    motionManager.startGyroUpdates(to: OperationQueue.main, withHandler: { data, error in
        guard let gyroData = data
            else { return }

        print("gyro data: (gyroData)")
    })
}
Note how the motionManager is defined outside of the startTracking method. This is important because if we declare the manager inside of the function, the manager will be de-allocated after the function is executed. We need to make sure that there is something referencing, or holding on to, the manager for as long as we will use it. Defining it inside of a function means that by the time the function is executed, nothing holds on to the manager, so the system will clean it up by removing it. If our class is holding on to it, the manager will exist until the instance of the class stops existing.
Also, note that we specify an operation queue that we will want to use for our motion updates. Depending on your use case, your app might do some in-depth analysis on the received data, or maybe you're storing it somewhere in a database instead of directly displaying it. If this is the case, you might want to handle the incoming motion data on a background queue to prevent the interface from locking up. In the above, we're using the main operation queue so that we may immediately make use of the data in the user interface.
The updating interval that is specified is a value (in seconds) that specifies how often we want to receive updates from the motion manager.
If your app needs a more refined output than what the raw sensor data gives you, the CMDeviceMotion class contains exactly the thing you're looking for. This class contains processed and ready-to-use information about a device's orientation, rotation, magnetic field, and acceleration. A great use case for this class is to figure out whether a device is currently laid out flat on a table or mounted on a dock. To do this, you will use the attitude property of CMDeviceMotion. The attitude provides information about a device's yaw, pitch, and roll. The yaw is the rotation along the Y-axis, pitch is the rotation along the X-axis, and roll is the rotation on the Z-axis. The following example shows how you can read the device rotation through CMDeviceMotion:
motionManager.startDeviceMotionUpdates(to: OperationQueue.main, withHandler: {
  data, _ in
    self.xLabel.text = "mag pitch: (data?.attitude.pitch ?? 0.0)"
    self.yLabel.text = "mag roll: (data?.attitude.roll ?? 0.0)"
    self.zLabel.text = "mag yaw: (data?.attitude.yaw ?? 0.0)"
})
The API for device motion is set up the same way as the raw sensor APIs. We tell the motion manager to start updating, provide an operation queue, and process the incoming data as it's being pushed to our app.
Just like before, we'll implement the required code and set up the outlets we need before we actually implement the interface in Interface Builder. Apple recommends that apps that make use of a CMMotionManager only use a single motion manager throughout their app. To make this manageable and to follow dependency injection's best practices, we will make AppDelegate inject a motion manager into our view controller. You saw this approach before when we injected a managed object context into a view controller.
Add the following code to your AppDelegate's application(_:didFinishLaunchingWithOptions:) method:
if let viewController = window?.rootViewController as? ViewController {
    viewController.motionManager = CMMotionManager()
}
Even though this code isn't spectacularly complex, it follows the best practices that make code more maintainable in the long run.
Next, add the following properties to ViewController.swift:
@IBOutlet var hConstraint: NSLayoutConstraint!
@IBOutlet var vConstraint: NSLayoutConstraint!

var motionManager: CMMotionManager!
var startRoll: Int?
var startPitch: Int?
The properties you just added will aid us in the following three areas:
- We can manipulate constraints to move the login fields across the screen.
- There is an implicitly unwrapped motion manager instance. It's okay to implicitly unwrap this Optional because whenever we will use this class we will require an instance of
CMMotionManagerto be set. - Then, there are start values for the device attitude. These values will help us determine how much the device has moved.
The final step we need to take is to begin listening for device motion updates and handle them to subtly make our interface move. Add the following code to viewDidLoad:
motionManager.startDeviceMotionUpdates(to: OperationQueue.main) { data, _ in
    guard let motionData = data
        else { return }

    let roll = Int(motionData.attitude.roll * 180 / .pi)
    let pitch = Int(motionData.attitude.pitch * 180 / .pi)

    if self.startRoll == nil { self.startRoll = roll }
    if self.startPitch == nil { self.startPitch = pitch }

    guard let startRoll = self.startRoll,
        let startPitch = self.startPitch
        else { return }

    self.vConstraint.constant = CGFloat(pitch - startPitch)
    self.hConstraint.constant = -CGFloat(roll - startRoll)
}
The preceding code starts the motion updates, just as we saw before. It then makes sure that the data is there, and we read the roll and pitch values from the attitude. Because these values are presented to us in radians, we will need to convert them to degrees, which is done by multiplying them by 180 and then dividing by .pi.
Then, we set the start values if they aren't set already, and after this we safely unwrap the values using guard. This is just a double safety measure and force unwrapping startPitch and startRoll shouldn't hurt much because we actually set these values a few lines earlier.
Finally, the horizontal and vertical constraints are adjusted to suit the new positions on screen and that wraps up the processing we want to do on the motion data.
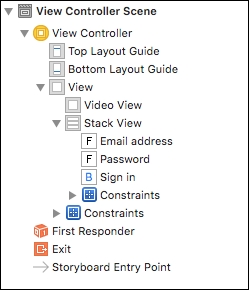
All that's left to do now is to add the login interface. We will use a UIStackView to implement an input for e-mail, password, and a login button. Open the Main.storyboard file and start by dragging out a UIStackView. Now, drag out two UITextField instances and a UIButton and add them to the stack view. Make sure that your view hierarchy looks exactly as shown in the following screenshot so the Stack View and the Video View are siblings and the Video View is positioned below the Stack View:
Now that the views are in place, let's make sure that they're laid out properly. Add a width constraint to the stack view and set the width to 250. Do this by holding ctrl and dragging inside of the stack view in a horizontal direction and letting go. You can add a width constraint like that. Go to the Size Inspector panel to change the constant for the constraint.
Also, add constraints to center the stack view horizontally and vertically so it's positioned nicely, and finally, change the spacing inside of the stack view to 8. Use the Attributes Inspector for the stack view to do this.
Lastly, select the entire view controller and connect the vConstraint outlet to the center.y constraint for the stack view. Do this by dragging from the Outlets Inspector to the Document Outline. Also, connect the hConstraint to the center.x constraint on the stack view.
You can build and run your app now, and you should see the login interface displayed on top of the camera preview. If you move your phone around a bit, you'll notice that the login fields respond to this movement by moving it to the opposite direction of your phone.
The effect you've implemented here uses a lot of sensors under the hood, but CoreMotion made it fairly simple for us to read the sensor data and use it to create a simple, effective user-driven animation.
Our final task is to fetch the GPS location of the users so we can inform them about the number of Augmented Reality art pieces that are available nearby their current location. Let's do this.