
In the previous sections, we learned how to use standard JSR-303 Bean Validation annotations to validate fields of our domain object. This works great for simple validations, but sometimes we need to validate some custom rules that aren't available in the standard annotations. For example, what if we need to validate a newly added product's ID, which should not be the same as any existing product ID? To accomplish this type of thing, we can use custom validation annotations.
In this exercise we are going to learn how to create custom validation annotations and how to use them. Let's add a custom product ID validation to our Add new product page to validate duplicate product IDs:.
- Create an annotation interface called
ProductId(ProductId.java) under the packagecom.packt.webstore.validatorin the source foldersrc/main/java, and add the following code snippet:package com.packt.webstore.validator; import static java.lang.annotation.ElementType .ANNOTATION_TYPE; import static java.lang.annotation.ElementType.FIELD; import static java.lang.annotation.ElementType.METHOD; import static java.lang.annotation.RetentionPolicy.RUNTIME; import java.lang.annotation.Documented; import java.lang.annotation.Retention; import java.lang.annotation.Target; import javax.validation.Constraint; import javax.validation.Payload; @Target( { METHOD, FIELD, ANNOTATION_TYPE }) @Retention(RUNTIME) @Constraint(validatedBy = ProductIdValidator.class) @Documented public @interface ProductId { String message() default " {com.packt.webstore.validator.ProductId.message}"; Class<?>[] groups() default {}; public abstract Class<? extends Payload>[] payload() default {}; } - Now, create a class called
ProductIdValidatorunder the packagecom.packt.webstore.validatorin the source foldersrc/main/java,and add the following code into it:package com.packt.webstore.validator; import javax.validation.ConstraintValidator; import javax.validation.ConstraintValidatorContext; import org.springframework.beans.factory.annotation .Autowired; import com.packt.webstore.domain.Product; import com.packt.webstore.exception.ProductNotFoundException; import com.packt.webstore.service.ProductService; public class ProductIdValidator implements ConstraintValidator<ProductId, String>{ @Autowired private ProductService productService; public void initialize(ProductId constraintAnnotation) { // intentionally left blank; this is the place to initialize the constraint annotation for any sensible default values. } public boolean isValid(String value, ConstraintValidatorContext context) { Product product; try { product = productService.getProductById(value); } catch (ProductNotFoundException e) { return true; } if(product!= null) { return false; } return true; } } - Open our message source file
messages.propertiesfrom/src/main/resourcesin your project and add the following entry into it:com.packt.webstore.validator.ProductId.message = A product already exists with this product id.
- Finally, open our
Product(Product.java) domain class and annotate ourproductIdfield with our newly createdProductIdannotation, as follows:@Pattern(regexp="P[1-9]+", message=" {Pattern.Product.productId.validation}") @ProductId private String productId;` - Now run our application and enter the URL
http://localhost:8080/webstore/market/products/add. You should be able to see a webpage showing a web form to add product info. Enter all the values in the form, particularly filling in the product ID field with the valueP1234,and simply click the Add button. - You will see validation messages at the top of the form, as shown in the following screenshot:
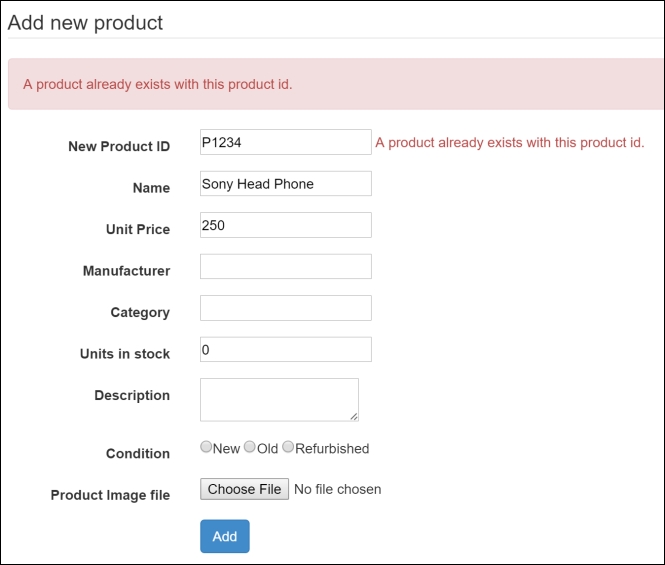
The Add new product web form showing custom validation.
In step 1 we just created our custom validation annotation called ProductId. Every custom validation annotation we create needs to be annotated with the @Constraint (javax.validation.Constraint) annotation. The @Constraint annotation has an important property called validatedBy, which indicates the class that is performing the actual validation. In our case, we have given a value ProductIdValidator.class for the validatedBy property. So our ProductId validation annotation would expect a class called ProductIdValidator. That's why in step 2 we have created the class ProductIdValidator by implementing the interface ConstraintValidator (javax.validation.ConstraintValidator).
We annotated the ProductIdValidator class with the @Component (org.springframework.stereotype.Component) annotation; the @Component annotation is another stereotype annotation that is available in Spring. It is very similar to the @Repository or @Service annotations; during the booting of our application, Spring would create and maintain an object for the ProductIdValidator class. So ProductIdValidator will become a managed bean in our web application context, which is the reason we were able to autowire the productService bean in ProductIdValidator.
Next we autowired the ProductService object in the ProductIdValidator class. Why? Because, inside the isValid method of the ProductIdValidator class, we have used the productService to check whether any product with the given ID exists:
public boolean isValid(String value, ConstraintValidatorContext context) {
      Product product;
      try {
         product = productService.getProductById(value);

      } catch (ProductNotFoundException e) {
         return true;
      }

      if(product!= null) {
         return false;
      }

      return true;
   }
If any product exists with the given product ID, we are invalidating the validation by returning false, otherwise we are passing the validation by returning true.
In step 3 we just added our default error message for our custom validation annotation in the message source file (messages.properties). If you observed carefully, the key (com.packt.webstore.validator.ProductId.message) we have used in our message source file is the same as the default key that we have defined in the ProductId (ProductId.java) validation annotation:
String message() default "{com.packt.webstore.validator.ProductId.message}";
So, finally, in step 4 we have used our newly created ProductId validation annotation in our domain class (Product.java). So it will act similarly to any other JSR-303 Bean Validation annotation.
Thus, you were able to see the error message on the screen when you entered the existing product ID as the product ID for the newly added product.
Create a custom validation annotation called @Category, which will allow only some of the predefined configured categories to be entered. Consider the following things while implementing your custom annotation:
- Create an annotation interface called
CategoryValidatorunder the packagecom.packt.webstore.validator - Create a corresponding
ConstraintValidatorcalledCategoryValidatorunder the packagecom.packt.webstore.validator - Add a corresponding error message in the message source file
- Your
CategoryValidatorshould maintain a list of allowed categories (List<String> allowedCategories) to check whether the given category exists under the list of allowed categories - Don't forget to initialize the
allowedCategorieslist in the constructor of theCategoryValidatorclass - Annotate the
categoryfield of theProductdomain class with the@Categoryannotation
After applying your custom validation annotation @category on the category field of the Product domain class, your Add new product page should reject products of categories that have been not configured in the CategoryValidator.