
So far, the examples we have considered are no more than just a simple "Hello world." Putting together what we have learned, this section demonstrates an end-to-end Customer Profile microservice implementation. The Customer Profile microservices will demonstrate interaction between different microservices. It also demonstrates microservices with business logic and primitive data stores.
In this example, two microservices, the Customer Profile and Customer Notification services, will be developed:
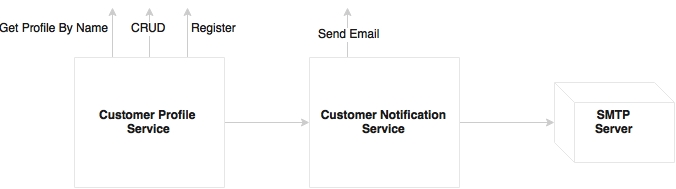
As shown in the diagram, the Customer Profile microservice exposes methods to create, read, update, and delete (CRUD) a customer and a registration service to register a customer. The registration process applies certain business logic, saves the customer profile, and sends a message to the Customer Notification microservice. The Customer Notification microservice accepts the message sent by the registration service and sends an e-mail message to the customer using an SMTP server. Asynchronous messaging is used to integrate Customer Profile with the Customer Notification service.
The Customer microservices class domain model diagram is as shown here:

CustomerController in the diagram is the REST endpoint, which invokes a component class, CustomerComponent. The component class/bean handles all the business logic. CustomerRepository is a Spring data JPA repository defined to handle the persistence of the Customer entity.
- Create a new Spring Boot project and call it
chapter2.bootcustomer, the same way as earlier. Select the options as in the following screenshot in the starter module selection screen:
This will create a web project with JPA, the REST repository, and H2 as a database. H2 is a tiny in-memory embedded database with which it is easy to demonstrate database features. In the real world, it is recommended to use an appropriate enterprise-grade database. This example uses JPA to define persistence entities and the REST repository to expose REST-based repository services.
The project structure will be similar to the following screenshot:

- Start building the application by adding an Entity class named
Customer. For simplicity, there are only three fields added to theCustomerEntity class: the autogeneratedidfield,name, andemail. Take a look at the following code:@Entity class Customer { @Id @GeneratedValue(strategy = GenerationType.AUTO) private Long id; private String name; private String email; - Add a repository class to handle the persistence handling of Customer.
CustomerRepositoryextends the standard JPA repository. This means that all CRUD methods and default finder methods are automatically implemented by the Spring Data JPA repository, as follows:@RepositoryRestResource interface CustomerRespository extends JpaRepository <Customer,Long>{ Optional<Customer> findByName(@Param("name") String name); }In this example, we added a new method to the repository class,
findByName, which essentially searches the customer based on the customer name and returns aCustomerobject if there is a matching name. - The
@RepositoryRestResourceannotation enables the repository access through RESTful services. This will also enable HATEOAS and HAL by default. As for CRUD methods there is no additional business logic required, we will leave it as it is without controller or component classes. Using HATEOAS will help us navigate through Customer Repository methods effortlessly.Note that there is no configuration added anywhere to point to any database. As H2 libraries are in the class path, all the configuration is done by default by Spring Boot based on the H2 autoconfiguration.
- Update the
Application.javafile by addingCommandLineRunnerto initialize the repository with some customer records, as follows:@SpringBootApplication public class Application { public static void main(String[] args) { SpringApplication.run(Application.class, args); } @Bean CommandLineRunner init(CustomerRespository repo) { return (evt) -> { repo.save(new Customer("Adam","[email protected]")); repo.save(new Customer("John","[email protected]")); repo.save(new Customer("Smith","[email protected]")); repo.save(new Customer("Edgar","[email protected]")); repo.save(new Customer("Martin","[email protected]")); repo.save(new Customer("Tom","[email protected]")); repo.save(new Customer("Sean","[email protected]")); }; } } CommandLineRunner, defined as a bean, indicates that it should run when it is contained inSpringApplication. This will insert six sample customer records into the database at startup.- At this point, run the application as Spring Boot App. Open the HAL browser and point the browser to
http://localhost:8080. - In the Explorer section, point to
http://localhost:8080/customersand click on Go. This will list all the customers in the Response Body section of the HAL browser. - In the Explorer section, enter
http://localhost:8080/customers?size=2&page=1&sort=nameand click on Go. This will automatically execute paging and sorting on the repository and return the result.As the page size is set to
2and the first page is requested, it will come back with two records in a sorted order. - Review the Links section. As shown in the following screenshot, it will facilitate navigating first, next, prev, and last. These are done using the HATEOAS links automatically generated by the repository browser:

- Also, one can explore the details of a customer by selecting the appropriate link, such as
http://localhost:8080/customers/2. - As the next step, add a controller class,
CustomerController, to handle service endpoints. There is only one endpoint in this class,/register, which is used to register a customer. If successful, it returns theCustomerobject as the response, as follows:@RestController class CustomerController{ @Autowired CustomerRegistrar customerRegistrar; @RequestMapping( path="/register", method = RequestMethod.POST) Customer register(@RequestBody Customer customer){ return customerRegistrar.register(customer); } } - A
CustomerRegistrarcomponent is added to handle the business logic. In this case, there is only minimal business logic added to the component. In this component class, while registering a customer, we will just check whether the customer name already exists in the database or not. If it does not exist, then we will insert a new record, and otherwise, we will send an error message back, as follows:@Component class CustomerRegistrar { CustomerRespository customerRespository; @Autowired CustomerRegistrar(CustomerRespository customerRespository){ this.customerRespository = customerRespository; } Customer register(Customer customer){ Optional<Customer> existingCustomer = customerRespository.findByName(customer.getName()); if (existingCustomer.isPresent()){ throw new RuntimeException("is already exists"); } else { customerRespository.save(customer); } return customer; } } - Restart the Boot application and test using the HAL browser via the URL
http://localhost:8080. - Point the Explorer field to
http://localhost:8080/customers. Review the results in the Links section: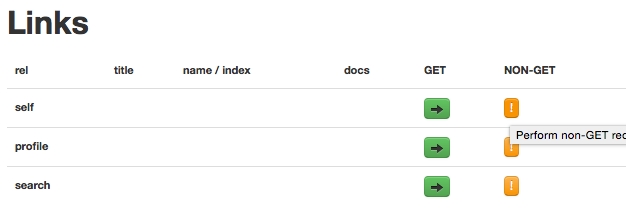
- Click on the NON-GET option against self. This will open a form to create a new customer:

- Fill the form and change the Action as shown in the diagram. Click on the Make Request button. This will call the register service and register the customer. Try giving a duplicate name to test the negative case.
- Let's complete the last part in the example by integrating the Customer Notification service to notify the customer. When registration is successful, send an e-mail to the customer by asynchronously calling the Customer Notification microservice.
- First update
CustomerRegistrarto call the second service. This is done through messaging. In this case, we injected aSendercomponent to send a notification to the customer by passing the customer's e-mail address to the sender, as follows:@Component @Lazy class CustomerRegistrar { CustomerRespository customerRespository; Sender sender; @Autowired CustomerRegistrar(CustomerRespository customerRespository, Sender sender){ this.customerRespository = customerRespository; this.sender = sender; } Customer register(Customer customer){ Optional<Customer> existingCustomer = customerRespository.findByName(customer.getName()); if (existingCustomer.isPresent()){ throw new RuntimeException("is already exists"); } else { customerRespository.save(customer); sender.send(customer.getEmail()); } return customer; } } - The sender component will be based on RabbitMQ and AMQP. In this example,
RabbitMessagingTemplateis used as explored in the last messaging example; take a look at the following:@Component @Lazy class Sender { @Autowired RabbitMessagingTemplate template; @Bean Queue queue() { return new Queue("CustomerQ", false); } public void send(String message){ template.convertAndSend("CustomerQ", message); } }The
@Lazyannotation is a useful one and it helps to increase the boot startup time. These beans will be initialized only when the need arises. - We will also update the
application.propertyfile to include Rabbit MQ-related properties, as follows:spring.rabbitmq.host=localhost spring.rabbitmq.port=5672 spring.rabbitmq.username=guest spring.rabbitmq.password=guest
- We are ready to send the message. To consume the message and send e-mails, we will create a notification service. For this, let's create another Spring Boot service,
chapter2.bootcustomernotification. Make sure that the AMQP and Mail starter libraries are selected when creating the Spring Boot service. Both AMQP and Mail are under I/O. - The package structure of the
chapter2.bootcustomernotificationproject is as shown here:
- Add a
Receiverclass. TheReceiverclass waits for a message on customer. This will receive a message sent by the Customer Profile service. On the arrival of a message, it sends an e-mail, as follows:@Component class Receiver { @Autowired Mailer mailer; @Bean Queue queue() { return new Queue("CustomerQ", false); } @RabbitListener(queues = "CustomerQ") public void processMessage(String email) { System.out.println(email); mailer.sendMail(email); } } - Add another component to send an e-mail to the customer. We will use
JavaMailSenderto send an e-mail via the following code:@Component class Mailer { @Autowired private JavaMailSender javaMailService; public void sendMail(String email){ SimpleMailMessage mailMessage=new SimpleMailMessage(); mailMessage.setTo(email); mailMessage.setSubject("Registration"); mailMessage.setText("Successfully Registered"); javaMailService.send(mailMessage); } }Behind the scenes, Spring Boot automatically configures all the parameters required by
JavaMailSender. - To test SMTP, a test setup for SMTP is required to ensure that the mails are going out. In this example, FakeSMTP will be used. You can download FakeSMTP from http://nilhcem.github.io/FakeSMTP.
- Once you download
fakeSMTP-2.0.jar, run the SMTP server by executing the following command:$ java -jar fakeSMTP-2.0.jarThis will open a GUI to monitor e-mail messages. Click on the Start Server button next to the listening port textbox.
- Update
application.propertieswith the following configuration parameters to connect to RabbitMQ as well as to the mail server:spring.rabbitmq.host=localhost spring.rabbitmq.port=5672 spring.rabbitmq.username=guest spring.rabbitmq.password=guest spring.mail.host=localhost spring.mail.port=2525
- We are ready to test our microservices end to end. Start both the Spring Boot apps. Open the browser and repeat the customer creation steps through the HAL browser. In this case, immediately after submitting the request, we will be able to see the e-mail in the SMTP GUI.
Internally, the Customer Profile service asynchronously calls the Customer Notification service, which, in turn, sends the e-mail message to the SMTP server:
