
The Spring Cloud Config server is an externalized configuration server in which applications and services can deposit, access, and manage all runtime configuration properties. The Spring Config server also supports version control of the configuration properties.
In the earlier examples with Spring Boot, all configuration parameters were read from a property file packaged inside the project, either application.properties or application.yaml. This approach is good, since all properties are moved out of code to a property file. However, when microservices are moved from one environment to another, these properties need to undergo changes, which require an application re-build. This is violation of one of the Twelve-Factor application principles, which advocate one-time build and moving of the binaries across environments.
A better approach is to use the concept of profiles. Profiles, as discussed in Chapter 2, Building Microservices with Spring Boot, is used for partitioning different properties for different environments. The profile-specific configuration will be named application-{profile}.properties. For example, application-development.properties represents a property file targeted for the development environment.
However, the disadvantage of this approach is that the configurations are statically packaged along with the application. Any changes in the configuration properties require the application to be rebuilt.
There are alternate ways to externalize the configuration properties from the application deployment package. Configurable properties can also be read from an external source in a number of ways:
- From an external JNDI server using JNDI namespace (
java:comp/env) - Using the Java system properties (
System.getProperties()) or using the–Dcommand line option - Using the
PropertySourceconfiguration:@PropertySource("file:${CONF_DIR}/application.properties") public class ApplicationConfig { } - Using a command-line parameter pointing a file to an external location:
java -jar myproject.jar --spring.config.location=
JNDI operations are expensive, lack flexibility, have difficulties in replication, and are not version controlled. System.properties is not flexible enough for large-scale deployments. The last two options rely on a local or a shared filesystem mounted on the server.
For large scale deployments, a simple yet powerful centralized configuration management solution is required:
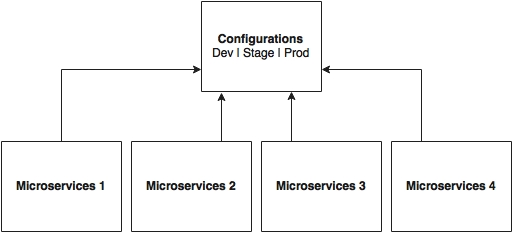
As shown in the preceding diagram, all microservices point to a central server to get the required configuration parameters. The microservices then locally cache these parameters to improve performance. The Config server propagates the configuration state changes to all subscribed microservices so that the local cache's state can be updated with the latest changes. The Config server also uses profiles to resolve values specific to an environment.
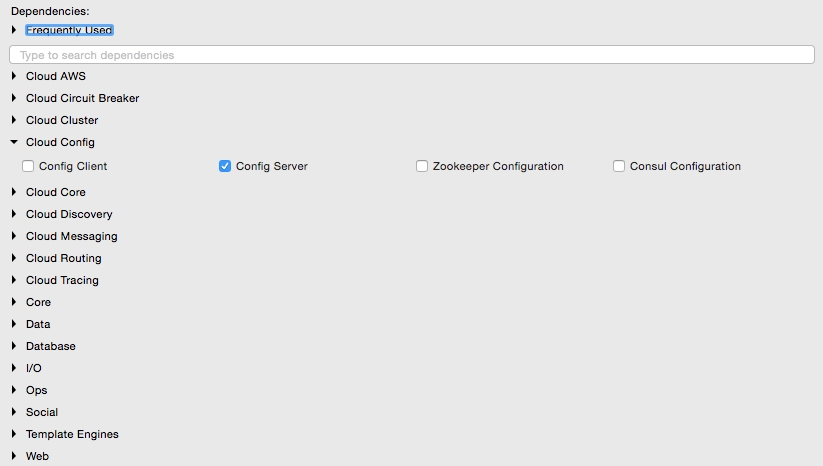
As shown in the following screenshot, there are multiple options available under the Spring Cloud project for building the configuration server. Config Server, Zookeeper Configuration, and Consul Configuration are available as options. However, this chapter will only focus on the Spring Config server implementation:

The Spring Config server stores properties in a version-controlled repository such as Git or SVN. The Git repository can be local or remote. A highly available remote Git server is preferred for large scale distributed microservice deployments.
The Spring Cloud Config server architecture is shown in the following diagram:
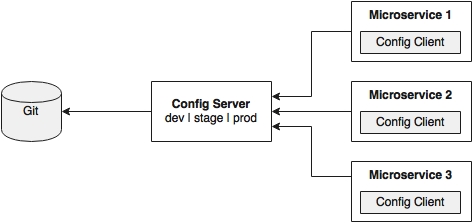
As shown in the preceding diagram, the Config client embedded in the Spring Boot microservices does a configuration lookup from a central configuration server using a simple declarative mechanism, and stores properties into the Spring environment. The configuration properties can be application-level configurations such as trade limit per day, or infrastructure-related configurations such as server URLs, credentials, and so on.
Unlike Spring Boot, Spring Cloud uses a bootstrap context, which is a parent context of the main application. Bootstrap context is responsible for loading configuration properties from the Config server. The bootstrap context looks for bootstrap.yaml or bootstrap.properties for loading initial configuration properties. To make this work in a Spring Boot application, rename the application.* file to bootstrap.*.
The next few sections demonstrate how to use the Config server in a real-world scenario. In order to do this, we will modify our search microservice (chapter5.search) to use the Config server. The following diagram depicts the scenario:
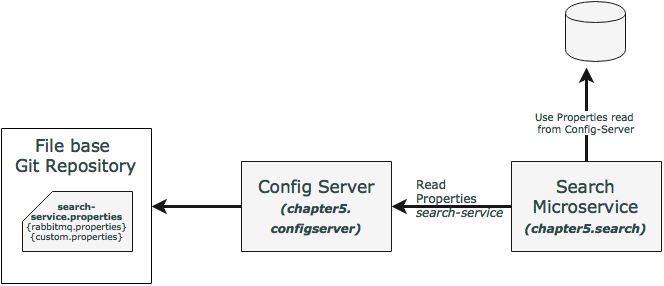
In this example, the Search service will read the Config server at startup by passing the service name. In this case, the service name of the search service will be search-service. The properties configured for the search-service include the RabbitMQ properties as well as a custom property.
The following steps need to be followed to create a new Config server using STS:
- Create a new Spring Starter Project, and select Config Server and Actuator as shown in the following diagram:
- Set up a Git repository. This can be done by pointing to a remote Git configuration repository like the one at https://github.com/spring-cloud-samples/config-repo. This URL is an indicative one, a Git repository used by the Spring Cloud examples. We will have to use our own Git repository instead.
- Alternately, a local filesystem-based Git repository can be used. In a real production scenario, an external Git is recommended. The Config server in this chapter will use a local filesystem-based Git repository for demonstration purposes.
- Enter the commands listed next to set up a local Git repository:
$ cd $HOME
$ mkdir config-repo
$ cd config-repo
$ git init .
$ echo message : helloworld > application.properties
$ git add -A .
$ git commit -m "Added sample application.properties"
This code snippet creates a new Git repository on the local filesystem. A property file named
application.propertieswith amessageproperty and valuehelloworldis also created.The file
application.propertiesis created for demonstration purposes. We will change this in the subsequent sections. - The next step is to change the configuration in the Config server to use the Git repository created in the previous step. In order to do this, rename the file
application.propertiestobootstrap.properties:
- Edit the contents of the new
bootstrap.propertiesfile to match the following:server.port=8888 spring.cloud.config.server.git.uri: file://${user.home}/config-repoPort
8888is the default port for the Config server. Even without configuringserver.port, the Config server should bind to8888. In the Windows environment, an extra/is required in the file URL. - Optionally, rename the default package of the auto-generated
Application.javafromcom.exampletocom.brownfield.configserver. Add@EnableConfigServerinApplication.java:@EnableConfigServer @SpringBootApplication public class ConfigserverApplication { - Run the Config server by right-clicking on the project, and running it as a Spring Boot app.
- Visit
http://localhost:8888/envto see whether the server is running. If everything is fine, this will list all environment configurations. Note that/envis an actuator endpoint. - Check
http://localhost:8888/application/default/masterto see the properties specific toapplication.properties, which were added in the earlier step. The browser will display the properties configured inapplication.properties. The browser should display contents similar to the following:{"name":"application","profiles":["default"],"label":"master","version":"6046fd2ff4fa09d3843767660d963866ffcc7d28","propertySources":[{"name":"file:///Users/rvlabs /config-repo /application.properties","source":{"message":"helloworld"}}]}
In the previous section, we used http://localhost:8888/application/default/master to explore the properties. How do we interpret this URL?
The first element in the URL is the application name. In the given example, the application name should be application. The application name is a logical name given to the application, using the spring.application.name property in bootstrap.properties of the Spring Boot application. Each application must have a unique name. The Config server will use the name to resolve and pick up appropriate properties from the Config server repository. The application name is also sometimes referred to as service ID. If there is an application with the name myapp, then there should be a myapp.properties in the configuration repository to store all the properties related to that application.
The second part of the URL represents the profile. There can be more than one profile configured within the repository for an application. The profiles can be used in various scenarios. The two common scenarios are segregating different environments such as Dev, Test, Stage, Prod, and the like, or segregating server configurations such as Primary, Secondary, and so on. The first one represents different environments of an application, whereas the second one represents different servers where an application is deployed.
The profile names are logical names that will be used for matching the file name in the repository. The default profile is named default. To configure properties for different environments, we have to configure different files as given in the following example. In this example, the first file is for the development environment whereas the second is for the production environment:
application-development.properties
application-production.properties
These are accessible using the following URLs respectively:
- http://localhost:8888/application/development
- http://localhost:8888/application/production
The last part of the URL is the label, and is named master by default. The label is an optional Git label that can be used, if required.
In short, the URL is based on the following pattern: http://localhost:8888/{name}/{profile}/{label}.
The configuration can also be accessed by ignoring the profile. In the preceding example, all the following three URLs point to the same configuration:
- http://localhost:8888/application/default
- http://localhost:8888/application/master
- http://localhost:8888/application/default/master
There is an option to have different Git repositories for different profiles. This makes sense for production systems, since the access to different repositories could be different.
In the previous section, a Config server is set up and accessed using a web browser. In this section, the Search microservice will be modified to use the Config server. The Search microservice will act as a Config client.
Follow these steps to use the Config server instead of reading properties from the application.properties file:
- Add the Spring Cloud Config dependency and the actuator (if the actuator is not already in place) to the
pom.xmlfile. The actuator is mandatory for refreshing the configuration properties:<dependency> <groupId>org.springframework.cloud</groupId> <artifactId>spring-cloud-starter-config</artifactId> </dependency> - Since we are modifying the Spring Boot Search microservice from the earlier chapter, we will have to add the following to include the Spring Cloud dependencies. This is not required if the project is created from scratch:
<dependencyManagement> <dependencies> <dependency> <groupId>org.springframework.cloud</groupId> <artifactId>spring-cloud-dependencies</artifactId> <version>Brixton.RELEASE</version> <type>pom</type> <scope>import</scope> </dependency> </dependencies> </dependencyManagement> - The next screenshot shows the Cloud starter library selection screen. If the application is built from the ground up, select the libraries as shown in the following screenshot:

- Rename
application.propertiestobootstrap.properties, and add an application name and a configuration server URL. The configuration server URL is not mandatory if the Config server is running on the default port (8888) on the local host:The new
bootstrap.propertiesfile will look as follows:spring.application.name=search-service spring.cloud.config.uri=http://localhost:8888 server.port=8090 spring.rabbitmq.host=localhost spring.rabbitmq.port=5672 spring.rabbitmq.username=guest spring.rabbitmq.password=guest
search-serviceis a logical name given to the Search microservice. This will be treated as service ID. The Config server will look forsearch-service.propertiesin the repository to resolve the properties. - Create a new configuration file for
search-service. Create a newsearch-service.propertiesunder theconfig-repofolder where the Git repository is created. Note thatsearch-serviceis the service ID given to the Search microservice in thebootstrap.propertiesfile. Move service-specific properties frombootstrap.propertiesto the newsearch-service.propertiesfile. The following properties will be removed frombootstrap.properties, and added tosearch-service.properties:spring.rabbitmq.host=localhost spring.rabbitmq.port=5672 spring.rabbitmq.username=guest spring.rabbitmq.password=guest
- In order to demonstrate the centralized configuration of properties and propagation of changes, add a new application-specific property to the property file. We will add
originairports.shutdownto temporarily take out an airport from the search. Users will not get any flights when searching for an airport mentioned in the shutdown list:originairports.shutdown=SEA
In this example, we will not return any flights when searching with
SEAas origin. - Commit this new file into the Git repository by executing the following commands:
git add –A .
git commit –m "adding new configuration"
- The final
search-service.propertiesfile should look as follows:spring.rabbitmq.host=localhost spring.rabbitmq.port=5672 spring.rabbitmq.username=guest spring.rabbitmq.password=guest originairports.shutdown:SEA
- The
chapter5.searchproject'sbootstrap.propertiesshould look like the following:spring.application.name=search-service server.port=8090 spring.cloud.config.uri=http://localhost:8888
- Modify the Search microservice code to use the configured parameter,
originairports.shutdown. ARefreshScopeannotation has to be added at the class level to allow properties to be refreshed when there is a change. In this case, we are adding a refresh scope to theSearchRestControllerclass:@RefreshScope
- Add the following instance variable as a place holder for the new property that is just added in the Config server. The property names in the
search-service.propertiesfile must match:@Value("${originairports.shutdown}") private String originAirportShutdownList; - Change the application code to use this property. This is done by modifying the
searchmethod as follows:@RequestMapping(value="/get", method = RequestMethod.POST) List<Flight> search(@RequestBody SearchQuery query){ logger.info("Input : "+ query); if(Arrays.asList(originAirportShutdownList.split(",")).contains(query.getOrigin())){ logger.info("The origin airport is in shutdown state"); return new ArrayList<Flight>(); } return searchComponent.search(query); }The
searchmethod is modified to read the parameteroriginAirportShutdownListand see whether the requested origin is in the shutdown list. If there is a match, then instead of proceeding with the actual search, the search method will return an empty flight list. - Start the Config server. Then start the Search microservice. Make sure that the RabbitMQ server is running.
- Modify the
chapter5.websiteproject to match thebootstrap.propertiescontent as follows to utilize the Config server:spring.application.name=test-client server.port=8001 spring.cloud.config.uri=http://localhost:8888
- Change the
runmethod ofCommandLineRunnerinApplication.javato query SEA as the origin airport:SearchQuery = new SearchQuery("SEA","SFO","22-JAN-16"); - Run the
chapter5.websiteproject. TheCommandLineRunnerwill now return an empty flight list. The following message will be printed in the server:The origin airport is in shutdown state
This section will demonstrate how to propagate configuration properties when there is a change:
- Change the property in the
search-service.propertiesfile to the following:originairports.shutdown:NYC
Commit the change in the Git repository. Refresh the Config server URL (
http://localhost:8888/search-service/default) for this service and see whether the property change is reflected. If everything is fine, we will see the property change. The preceding request will force the Config server to read the property file again from the repository. - Rerun the website project again, and observe the
CommandLineRunnerexecution. Note that in this case, we are not restarting the Search microservice nor the Config server. The service returns an empty flight list as earlier, and still complains as follows:The origin airport is in shutdown stateThis means the change is not reflected in the Search service, and the service is still working with an old copy of the configuration properties.
- In order to force reloading of the configuration properties, call the
/refreshendpoint of the Search microservice. This is actually the actuator's refresh endpoint. The following command will send an empty POST to the/refreshendpoint:curl –d {} localhost:8090/refresh - Rerun the website project, and observe the
CommandLineRunnerexecution. This should return the list of flights that we have requested from SEA. Note that the website project may fail if the Booking service is not up and running.The
/refreshendpoint will refresh the locally cached configuration properties, and reload fresh values from the Config server.
With the preceding approach, configuration parameters can be changed without restarting the microservices. This is good when there are only one or two instances of the services running. What happens if there are many instances? For example, if there are five instances, then we have to hit /refresh against each service instance. This is definitely a cumbersome activity:
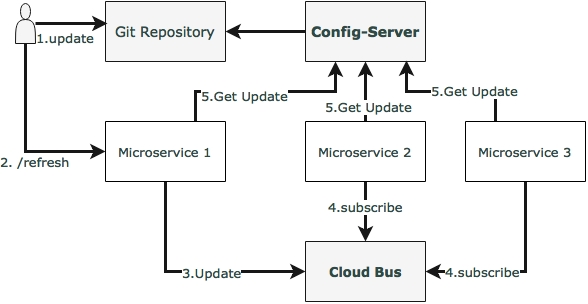
The Spring Cloud Bus provides a mechanism to refresh configurations across multiple instances without knowing how many instances there are, or their locations. This is particularly handy when there are many service instances of a microservice running or when there are many microservices of different types running. This is done by connecting all service instances through a single message broker. Each instance subscribes for change events, and refreshes its local configuration when required. This refresh is triggered by making a call to any one instance by hitting the /bus/refresh endpoint, which then propagates the changes through the cloud bus and the common message broker.
In this example, RabbitMQ is used as the AMQP message broker. Implement this by following the steps documented as follows:
- Add a new dependency in the
chapter5.searchproject'spom.xmlfile to introduce the Cloud Bus dependency:<dependency> <groupId>org.springframework.cloud</groupId> <artifactId>spring-cloud-starter-bus-amqp</artifactId> </dependency>
- The Search microservice also needs connectivity to the RabbitMQ, but this is already provided in
search-service.properties. - Rebuild and restart the Search microservice. In this case, we will run two instances of the Search microservice from a command line, as follows:
java -jar -Dserver.port=8090  search-1.0.jar
java -jar -Dserver.port=8091  search-1.0.jar
The two instances of the Search service will be now running, one on port
8090and another one on8091. - Rerun the website project. This is just to make sure that everything is working. The Search service should return one flight at this point.
- Now, update
search-service.propertieswith the following value, and commit to Git:originairports.shutdown:SEA
- Run the following command to
/bus/refresh. Note that we are running a new bus endpoint against one of the instances,8090in this case:curl –d {} localhost:8090/bus/refresh - Immediately, we will see the following message for both instances:
Received remote refresh request. Keys refreshed [originairports.shutdown]The bus endpoint sends a message to the message broker internally, which is eventually consumed by all instances, reloading their property files. Changes can also be applied to a specific application by specifying the application name like so:
/bus/refresh?destination=search-service:**
We can also refresh specific properties by setting the property name as a parameter.
The previous sections explored how to set up the Config server, allowing real-time refresh of configuration properties. However, the Config server is a single point of failure in this architecture.
There are three single points of failure in the default architecture that was established in the previous section. One of them is the availability of the Config server itself, the second one is the Git repository, and the third one is the RabbitMQ server.
The following diagram shows a high availability architecture for the Config server:
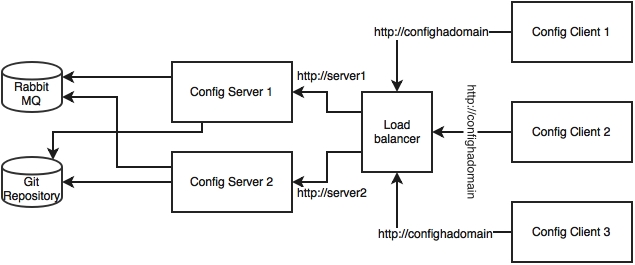
The architecture mechanisms and rationale are explained as follows:
The Config server requires high availability, since the services won't be able to bootstrap if the Config server is not available. Hence, redundant Config servers are required for high availability. However, the applications can continue to run if the Config server is unavailable after the services are bootstrapped. In this case, services will run with the last known configuration state. Hence, the Config server availability is not at the same critical level as the microservices availability.
In order to make the Config server highly available, we need multiple instances of the Config servers. Since the Config server is a stateless HTTP service, multiple instances of configuration servers can be run in parallel. Based on the load on the configuration server, a number of instances have to be adjusted. The bootstrap.properties file is not capable of handling more than one server address. Hence, multiple configuration servers should be configured to run behind a load balancer or behind a local DNS with failover and fallback capabilities. The load balancer or DNS server URL will be configured in the microservices' bootstrap.properties file. This is with the assumption that the DNS or the load balancer is highly available and capable of handling failovers.
In a production scenario, it is not recommended to use a local file-based Git repository. The configuration server should be typically backed with a highly available Git service. This is possible by either using an external highly available Git service or a highly available internal Git service. SVN can also be considered.
Having said that, an already bootstrapped Config server is always capable of working with a local copy of the configuration. Hence, we need a highly available Git only when the Config server needs to be scaled. Therefore, this too is not as critical as the microservices availability or the Config server availability.
Note
The GitLab example for setting up high availability is available at https://about.gitlab.com/high-availability/.
RabbitMQ also has to be configured for high availability. The high availability for RabbitMQ is needed only to push configuration changes dynamically to all instances. Since this is more of an offline controlled activity, it does not really require the same high availability as required by the components.
RabbitMQ high availability can be achieved by either using a cloud service or a locally configured highly available RabbitMQ service.
Note
Setting up high availability for Rabbit MQ is documented at https://www.rabbitmq.com/ha.html.
The Config server is nothing but a Spring Boot application, and is, by default, configured with an actuator. Hence, all actuator endpoints are applicable for the Config server. The health of the server can be monitored using the following actuator URL: http://localhost:8888/health.
We may run into scenarios where we need a complete configuration file such as logback.xml to be externalized. The Config server provides a mechanism to configure and store such files. This is achievable by using the URL format as follows: /{name}/{profile}/{label}/{path}.
The name, profile, and label have the same meanings as explained earlier. The path indicates the file name such as logback.xml.
In order to build this capability to complete BrownField Airline's PSS, we have to make use of the configuration server for all services. All microservices in the examples given in chapter5.* need to make similar changes to look to the Config server for getting the configuration parameters.
The following are a few key change considerations:
- The Fare service URL in the booking component will also be externalized:
private static final String FareURL = "/fares";

@Value("${fares-service.url}")
private String fareServiceUrl;

Fare = restTemplate.getForObject(fareServiceUrl+FareURL +"/get?flightNumber="+record.getFlightNumber()+"&flightDate="+record.getFlightDate(),Fare.class);
As shown in the preceding code snippet, the Fare service URL is fetched through a new property:
fares-service.url. - We are not externalizing the queue names used in the Search, Booking, and Check-in services at the moment. Later in this chapter, these will be changed to use Spring Cloud Streams.