
We have seen how to incorporate JSR-303 Bean Validation with Spring MVC. In addition to Bean Validation, Spring has its own classic mechanism to perform validation as well, which is called Spring vValidation. The JSR-303 Bean Validation is much more elegant, expressive, and, in general, simpler to use when compared to the classic Spring validation. But the classic Spring validation is very flexible and extensible. For example, consider a cross field validation where we want to compare two or more fields to see whether their values can be considered as valid in combination. In such a case we can use Spring validation.
In the last section, using JSR-303 Bean Validation we have validated some of the individual fields on our Product domain object; we haven't done any validation that combines one or more fields. We don't know whether the combination of different fields makes sense.
For example, say we have a constraint that we should not allow more than 99 units of any product to be added if the unit price is greater than $ 1,000 for that product. Let's see how to add such a validation using Spring validation in our project:
- Create a class called
UnitsInStockValidatorunder the packagecom.packt.webstore.validatorin the source foldersrc/main/java, and add the following code into it:package com.packt.webstore.validator; import java.math.BigDecimal; import org.springframework.stereotype.Component; import org.springframework.validation.Errors; import org.springframework.validation.Validator; import com.packt.webstore.domain.Product; @Component public class UnitsInStockValidator implements Validator{ public boolean supports(Class<?> clazz) { return Product.class.isAssignableFrom(clazz); } public void validate(Object target, Errors errors) { Product product = (Product) target; if(product.getUnitPrice()!= null && new BigDecimal(1000).compareTo(product.getUnitPrice())<=0 && product.getUnitsInStock()>99) { errors.rejectValue("unitsInStock", "com.packt.webstore.validator .UnitsInStockValidator.message"); } } }
- Open our message source file
messages.propertiesfrom/src/main/resourcesin your project and add the following entry into it:com.packt.webstore.validator.UnitsInStockValidator.message = You cannot add more than 99 units if the unit price is greater than 1000.
- Open the
ProductControllerclass and autowire a reference to theUnitsInStockValidatorclass as follows:@Autowired private UnitsInStockValidator unitsInStockValidator;
- Now, inside the
initialiseBindermethod in theProductControllerclass, add the following line:binder.setValidator(unitsInStockValidator);
- Now run our application and enter
http://localhost:8080/webstore/market/products/add, and you will be able to see a webpage showing a web form to add product info. Enter all the valid values in the form; particularly fill in the Unit Price field with the value1500and Units in stock field with the value150. Now simply click on the Add button and you will see validation messages at the top of the form as shown in the following screenshot: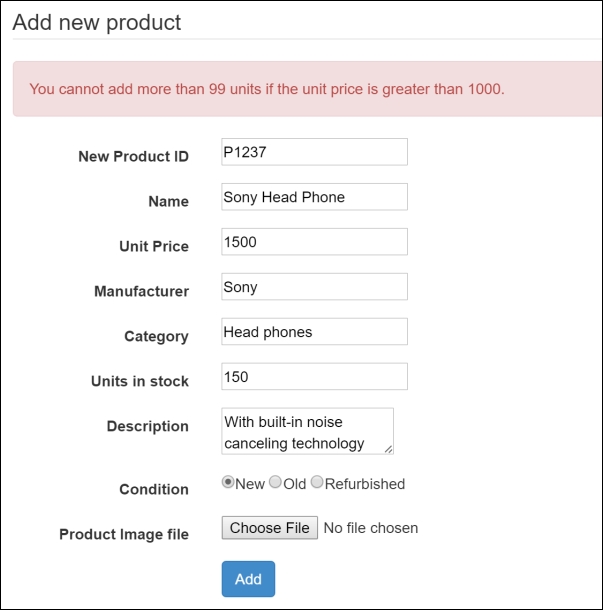
The Add new product web form showing cross field validation.
In classic Spring validation, the main validation construct is the Validator (org.springframework.validation.Validator) interface. The Spring Validator interface defines two methods for validation purposes, namely supports and validate. The supports method indicates whether the validator can validate a specific class. If so, the validate method can be called to validate an object of that class.
Every Spring- based validator we are creating should implement this interface. In step 1 we just did just that; we simply created a class called UnitsInStockValidator, which implements the Spring Validator interface.
Inside the validate method of the UnitsInStockValidator class, we simply check whether the given Product object has a unit price greater than 1,000 and the number of units in stock is more than 99; if so, we reject that value with the corresponding error key to show the error message from the message source file:
@Override
public void validate(Object target, Errors errors) {
   Product product = (Product) target;

   if(product.getUnitPrice()!= null && new BigDecimal(1000).compareTo(product.getUnitPrice())<=0 && product.getUnitsInStock()>99) {
      errors.rejectValue("unitsInStock", "com.packt.webstore.validator.UnitsInStockValidator.message");
   }
}
In step 2 we simply added the actual error message for the error key com.packt.webstore.validator.UnitsInStockValidator.message in the message source file (messages.properties).
We created the validator but, to kick in the validation, we need to associate that validator with the controller. That's what we did in steps 3 and 4. In step 3 we simply added and autowired the reference to UnitsInStockValidator in the ProductController class. And we associated the unitsInStockValidator with WebDataBinder in the initialiseBinder method:
@InitBinder
public void initialiseBinder(WebDataBinder binder) {

   binder.setValidator(unitsInStockValidator);

   binder.setAllowedFields("productId",
         "name",
         "unitPrice",
         "description",
         "manufacturer",
         "category",
         "unitsInStock",
         "condition",
         "productImage",
         "language");
}
That's it, we created and configured our Spring-based validator to do the validation. Now run our application and enter http://localhost:8080/webstore/market/products/add to show the web form for adding product info. Fill all the values in the form, particularly fill the Unit Price field with the value 1000 and Units in stock field with the value 150, and click on the Add button. You will see validation messages at the top of the form saying You cannot add more than 99 units if the unit price is greater than 1000.
It is good that we have added Spring-based validation into our application. But since we have configured our Spring-based validator (unitsInStockValidator) with WebDataBinder, the Bean Validation that we have configured earlier would not take effect. Spring MVC will simply ignore those JSR-303 Bean Validation annotations (@Pattern, @Size, @Min, @Digits, @NotNull, and more).
So we need to write those Bean Validations again in classic Spring-based validation. This is not a good idea but, thanks to the flexibility and extensibility of Spring validation, we can combine both Spring-based validation and Bean Validation together with a little extra code. Let's do that:
- Create a class called
ProductValidatorunder the packagecom.packt.webstore.validatorin the source foldersrc/main/java, and add the following code into it:package com.packt.webstore.validator; import java.util.HashSet; import java.util.Set; import javax.validation.ConstraintViolation; import org.springframework.beans.factory .annotation.Autowired; import org.springframework.validation.Errors; import org.springframework.validation.Validator; import com.packt.webstore.domain.Product; public class ProductValidator implements Validator{ @Autowired private javax.validation .Validator beanValidator; private Set<Validator> springValidators; public ProductValidator() { springValidators = new HashSet<Validator>(); } public void setSpringValidators(Set<Validator> springValidators) { this.springValidators = springValidators; } public boolean supports(Class<?> clazz) { return Product.class.isAssignableFrom(clazz); } public void validate(Object target, Errors errors) { Set<ConstraintViolation<Object>> constraintViolations = beanValidator.validate(target); for (ConstraintViolation<Object> constraintViolation : constraintViolations) { String propertyPath = constraintViolation.getPropertyPath().toString(); String message = constraintViolation.getMessage(); errors.rejectValue(propertyPath, "", message); } for(Validator validator: springValidators) { validator.validate(target, errors); } } } - Now open our web application context configuration file
WebApplicationContextConfig.javaand add the following bean definition into it:@Bean public ProductValidator productValidator () { Set<Validator> springValidators = new HashSet<>(); springValidators.add(new UnitsInStockValidator()); ProductValidator productValidator = new ProductValidator(); productValidator.setSpringValidators(springValidators); return productValidator; } - Open our
ProductControllerclass and replace the existing reference of theUnitsInStockValidatorfield with our newly createdProductValidatorclass, as follows:@Autowired private ProductValidator productValidator;
- Now, inside the
initialiseBindermethod of theProductControllerclass, replace thebinder.setValidator(unitsInStockValidator)statement with the following statement:binder.setValidator(productValidator);
- Now run our application and enter the URL
http://localhost:8080/webstore/market/products/addto check whether all the validations are working fine. Just click the Add button without filling anything in on the form. You will notice Bean Validation taking place; similarly fill the Unit Price field with the value1500and the Units in stock field with the value150to see Spring validation, as shown in the following screenshot: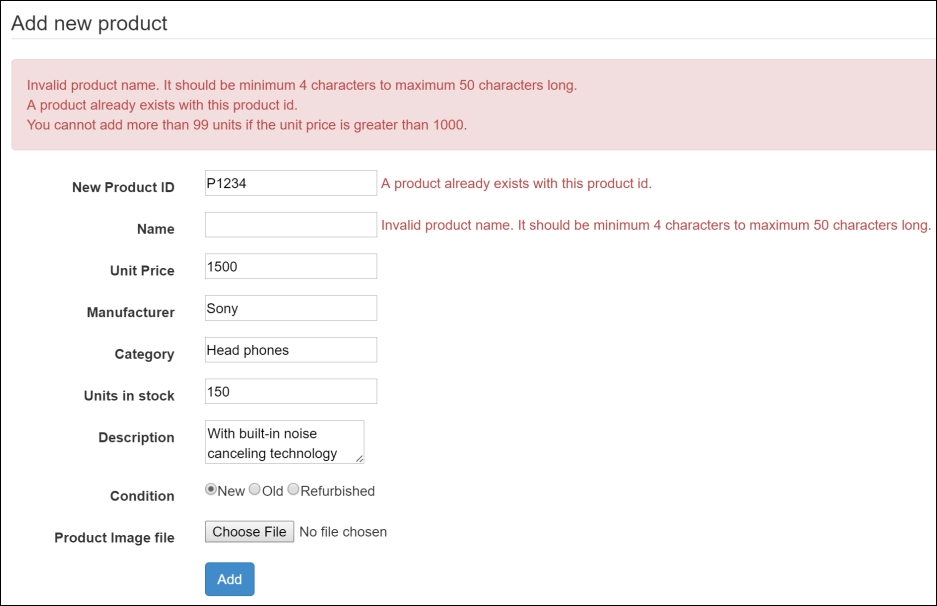
The Add new product web form showing Bean Validation and Spring validation together
Well, our aim was to combine Bean Validations and our Spring-based validation (unitsInStockValidator) together, to create a common adapter validator called ProductValidator. If you notice closely, the ProductValidator class is nothing but an implementation of the regular Spring validator.
We have autowired our existing bean validator into the ProductValidator class through the following line:
@Autowired private javax.validation.Validator beanValidator;
Later, we used this beanValidator reference inside the validate method of the ProductValidator class to validate all Bean Validation annotations, as follows:
Set<ConstraintViolation<Object>> constraintViolations = beanValidator.validate(target); for (ConstraintViolation<Object> constraintViolation : constraintViolations) { String propertyPath = constraintViolation.getPropertyPath().toString(); String message = constraintViolation.getMessage(); errors.rejectValue(propertyPath, "", message); }
The beanValidator.validate(target) statement returned all the constraint violations. Then, using the errors object, we threw all the invalid constraints as error messages. So every Bean Validation annotation we specified in the Product domain class will get handled within a for loop.
Similarly, we have one more for loop to handle all Spring validations in the validate method of the ProductValidator class:
for(Validator validator: springValidators) {
validator.validate(target, errors);
}
This for loop iterates through the set of Spring validators and validates them one by one, but if you notice, we haven't initiated the springValidators reference. Thus, you may wonder where we have initiated the springValidators set. You can find the answer in step 2; we have created a bean for the ProductValidator class in our web application context (WebApplicationContextConfig.java) and assigned the springValidators set:
      @Bean
      public ProductValidator productValidator () {
         Set<Validator> springValidators = new HashSet<>();
         springValidators.add(new UnitsInStockValidator());

         ProductValidator productValidator = new
      ProductValidator();
         productValidator.setSpringValidators(springValidators);

         return productValidator;
      }
So now we have created a common adapter validator that can adopt Bean Validation and Spring validation, and validates all Spring and Bean-based validations together. Now we have to replace the UnitsInStockValidator reference with the ProductValidator reference in our ProductController class to kick in our new ProductValidator, which we have done in steps 3 and 4. We simply replaced the UnitsInStockValidator with ProductValidator in the binder, as follows:
@InitBinder
public void initialiseBinder(WebDataBinder binder) {

   binder.setValidator(productValidator);

   binder.setAllowedFields("productId",
         "name",
         "unitPrice",
         "description",
         "manufacturer",
         "category",
         "unitsInStock",
         "condition",
         "productImage",
         "language");

}
So we have successfully configured our newly created ProductValidator with ProductController. To see it in action, just run our application and enter the URL http://localhost:8080/webstore/market/products/add. Then, enter some invalid values such as an existing product ID, or fill the Unit Price field with the value 1000 and the Units in stock field with the value 100. You will notice the Bean Validation error messages and Spring validation error messages on the screen.
Create a Spring validation class called ProductImageValidator, which will validate the size of the product image. It should only allow images whose size is less than or equal to the predefined configured size. Consider the following things while implementing your ProductImageValidator:
- Create a validation class called
ProductImageValidatorunder the packagecom.packt.webstore.validatorby implementing theorg.springframework.validation.Validatorinterface - Add a corresponding error message in the message source file
- Your
ProductImageValidatorshould maintain a long variable calledallowedSizeto check whether the given image size is less than or equal to it
- Create a bean for the
ProductImageValidatorclass in the servlet context and add it under thespringValidatorsset of theproductValidtorbean - Remember, don't forget to set the
allowedSizeproperty in theProductImageValidatorbean
After applying your custom validation annotation @category on the category field of the Product domain class, your Add new product page should reject products of other categories that have been not configured in the CategoryValidator.