
In this section, the dockerized Brownfield microservice developed in Chapter 8, Containerizing Microservices with Docker, will be deployed into the AWS cloud and managed with Mesos and Marathon.
For the purposes of demonstration, only three of the services (Search, Search API Gateway, and Website) are covered in the explanations:

The logical architecture of the target state implementation is shown in the preceding diagram. The implementation uses multiple Mesos slaves to execute dockerized microservices with a single Mesos master. The Marathon scheduler component is used to schedule dockerized microservices. Dockerized microservices are hosted on the Docker Hub registry. Dockerized microservices are implemented using Spring Boot and Spring Cloud.
The following diagram shows the physical deployment architecture:

As shown in the preceding diagram, in this example, we will use four EC2 instances:
- EC2-M1: This hosts the Mesos master, ZooKeeper, the Marathon scheduler, and one Mesos slave instance
- EC2-M2: This hosts one Mesos slave instance
- EC2-M3: This hosts another Mesos slave instance
- EC2-M4: This hosts Eureka, Config server, and RabbitMQ
For a real production setup, multiple Mesos masters as well as multiple instances of Marathon are required for fault tolerance.
Launch the four t2.micro EC2 instances that will be used for this deployment. All four instances have to be on the same security group so that the instances can see each other using their local IP addresses.
The following tables show the machine details and IP addresses for indicative purposes and to link subsequent instructions:

|
Instance ID |
Private DNS/IP |
Public DNS/IP |
|---|---|---|
|
|
|
|
|
|
|
|
|
|
|
|
|
|
|
|
Replace the IP and DNS addresses based on your AWS EC2 configuration.
The following software versions will be used for the deployment. The deployment in this section follows the physical deployment architecture explained in the earlier section:
- Mesos version 0.27.1
- Docker version 1.6.2, build 7c8fca2
- Marathon version 0.15.3
Note
The detailed instructions to set up ZooKeeper, Mesos, and Marathon are available at https://open.mesosphere.com/getting-started/install/.
Perform the following steps for a minimal installation of ZooKeeper, Mesos, and Marathon to deploy the BrownField microservice:
- As a prerequisite, JRE 8 must be installed on all the machines. Execute the following command:
sudo apt-get -y install oracle-java8-installer - Install Docker on all machines earmarked for the Mesos slave via the following command:
sudo apt-get install docker - Open a terminal window and execute the following commands. These commands set up the repository for installation:
sudo apt-key adv --keyserver hkp://keyserver.ubuntu.com:80 --recv E56151BF
DISTRO=$(lsb_release -is | tr '[:upper:]' '[:lower:]')
CODENAME=$(lsb_release -cs)
# Add the repository
echo "deb http://repos.mesosphere.com/${DISTRO} ${CODENAME} main" |
  sudo tee /etc/apt/sources.list.d/mesosphere.list
sudo apt-get -y update
- Execute the following command to install Mesos and Marathon. This will also install Zookeeper as a dependency:
sudo apt-get -y install mesos marathon
Repeat the preceding steps on all the three EC2 instances reserved for the Mesos slave execution. As the next step, ZooKeeper and Mesos have to be configured on the machine identified for the Mesos master.
Connect to the machine reserved for the Mesos master and Marathon scheduler. In this case, 172.31.54.69 will be used to set up ZooKeeper, the Mesos master, and Marathon.
There are two configuration changes required in ZooKeeper, as follows:
- The first step is to set
/etc/zookeeper/conf/myidto a unique integer between1and255, as follows:Open vi /etc/zookeeper/conf/myid and set 1. - The next step is to edit
/etc/zookeeper/conf/zoo.cfg. Update the file to reflect the following changes:# specify all zookeeper servers # The first port is used by followers to connect to the leader # The second one is used for leader election server.1= 172.31.54.69:2888:3888 #server.2=zookeeper2:2888:3888 #server.3=zookeeper3:2888:3888Replace the IP addresses with the relevant private IP address. In this case, we will use only one ZooKeeper server, but in a production scenario, multiple servers are required for high availability.
Make changes to the Mesos configuration to point to ZooKeeper, set up a quorum, and enable Docker support via the following steps:
- Edit
/etc/mesos/zkto set the following value. This is to point Mesos to a ZooKeeper instance for quorum and leader election:zk:// 172.31.54.69:2181/mesos
- Edit the
/etc/mesos-master/quorumfile and set the value as1. In a production scenario, we may need a minimum quorum of three:vi /etc/mesos-master/quorum - The default Mesos installation does not support Docker on Mesos slaves. In order to enable Docker, update the following
mesos-slaveconfiguration:echo 'docker,mesos' > /etc/mesos-slave/containerizers
All the required configuration changes are implemented. The easiest way to start Mesos, Marathon, and Zookeeper is to run them as services, as follows:
- The following commands start services. The services need to be started in the following order:
sudo service zookeeper start
sudo service mesos-master start
sudo service mesos-slave start
sudo service marathon start
- At any point, the following commands can be used to stop these services:
sudo service zookeeper stop
sudo service mesos-master stop
sudo service mesos-slave stop
sudo service marathon stop
- Once the services are up and running, use a terminal window to verify whether the services are running:

In this example, instead of using the Mesos slave service, we will use a command-line version to invoke the Mesos slave to showcase additional input parameters. Stop the Mesos slave and use the command line as mentioned here to start the slave again:
$sudo service mesos-slave stop

$sudo /usr/sbin/mesos-slave  --master=172.31.54.69:5050 --log_dir=/var/log/mesos --work_dir=/var/lib/mesos --containerizers=mesos,docker --resources="ports(*):[8000-9000, 31000-32000]"
The command-line parameters used are explained as follows:
--master=172.31.54.69:5050: This parameter is to tell the Mesos slave to connect to the correct Mesos master. In this case, there is only one master running at172.31.54.69:5050. All the slaves connect to the same Mesos master.--containerizers=mesos,docker: This parameter is to enable support for Docker container execution as well as noncontainerized executions on the Mesos slave instances.--resources="ports(*):[8000-9000, 31000-32000]: This parameter indicates that the slave can offer both ranges of ports when binding resources.31000to32000is the default range. As we are using port numbers starting with8000, it is important to tell the Mesos slave to allow exposing ports starting from8000as well.
Perform the following steps to verify the installation of Mesos and Marathon:
- Execute the command mentioned in the previous step to start the Mesos slave on all the three instances designated for the slave. The same command can be used across all three instances as all of them connect to the same master.
- If the Mesos slave is successfully started, a message similar to the following will appear in the console:
I0411 18:11:39.684809 16665 slave.cpp:1030] Forwarding total oversubscribed resourcesThe preceding message indicates that the Mesos slave started sending the current state of resource availability periodically to the Mesos master.
- Open
http://54.85.107.37:8080to inspect the Marathon UI. Replace the IP address with the public IP address of the EC2 instance:
As there are no applications deployed so far, the Applications section of the UI is empty.
- Open the Mesos UI, which runs on port
5050, by going tohttp://54.85.107.37:5050: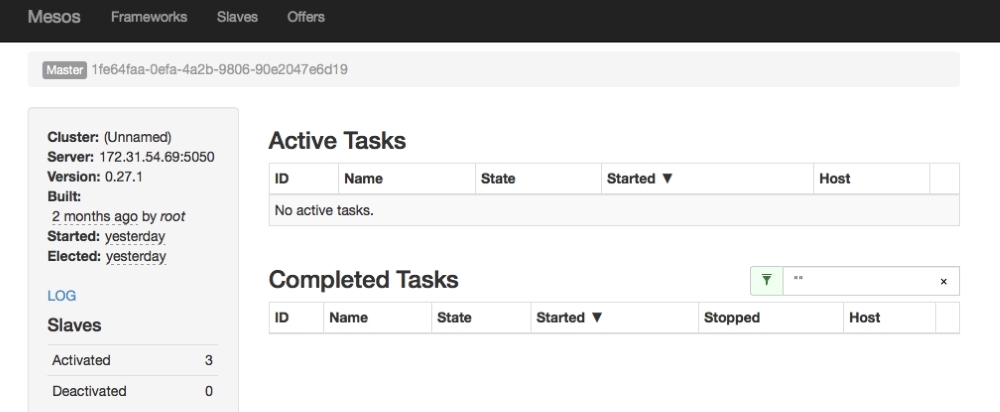
The Slaves section of the console shows that there are three activated Mesos slaves available for execution. It also indicates that there is no active task.
In the previous section, we successfully set up Mesos and Marathon. In this section, we will take a look at how to deploy the BrownField PSS application previously developed using Mesos and Marathon.
- Before we deploy any application, we have to set up the Config server, Eureka server, and RabbitMQ in one of the servers. Follow the steps described in the Running BrownField services on EC2 section in Chapter 8, Containerizing Microservices with Docker. Alternately, we can use the same instance as used in the previous chapter for this purpose.
- Change all
bootstrap.propertiesfiles to reflect the Config server IP address. - Before we deploy our services, there are a few specific changes required on the microservices. When running dockerized microservices with the BRIDGE mode on, we need to tell the Eureka client the hostname to be used to bind. By default, Eureka uses the instance ID to register. However, this is not helpful as Eureka clients won't be able to look up these services using the instance ID. In the previous chapter, the HOST mode was used instead of the BRIDGE mode.
The hostname setup can be done using the
eureka.instance.hostnameproperty. However, when running on AWS specifically, an alternate approach is to define a bean in the microservices to pick up AWS-specific information, as follows:@Configuration class EurekaConfig { @Bean public EurekaInstanceConfigBean eurekaInstanceConfigBean() { EurekaInstanceConfigBean config = new EurekaInstanceConfigBean(new InetUtils(new InetUtilsProperties())); AmazonInfo info = AmazonInfo.Builder.newBuilder().autoBuild("eureka"); config.setDataCenterInfo(info); info.getMetadata().put(AmazonInfo.MetaDataKey.publicHostname.getName(), info.get(AmazonInfo.MetaDataKey.publicIpv4)); config.setHostname(info.get(AmazonInfo.MetaDataKey.localHostname)); config.setNonSecurePortEnabled(true); config.setNonSecurePort(PORT); config.getMetadataMap().put("instanceId", info.get(AmazonInfo.MetaDataKey.localHostname)); return config; }The preceding code provides a custom Eureka server configuration using the Amazon host information using Netflix APIs. The code overrides the hostname and instance ID with the private DNS. The port is read from the Config server. This code also assumes one host per service so that the port number stays constant across multiple deployments. This can also be overridden by dynamically reading the port binding information at runtime.
The previous code has to be applied in all microservices.
- Rebuild all the microservices using Maven. Build and push the Docker images to the Docker Hub. The steps for the three services are shown as follows. Repeat the same steps for all the other services. The working directory needs to be switched to the respective directories before executing these commands:
docker build -t search-service:1.0 .
docker tag search-service:1.0 rajeshrv/search-service:1.0
docker push rajeshrv/search-service:1.0

docker build -t search-apigateway:1.0 .
docker tag search-apigateway:1.0 rajeshrv/search-apigateway:1.0
docker push rajeshrv/search-apigateway:1.0

docker build -t website:1.0 .
docker tag website:1.0 rajeshrv/website:1.0
docker push rajeshrv/website:1.0
The Docker images are now published to the Docker Hub registry. Perform the following steps to deploy and run BrownField PSS services:
- Start the Config server, Eureka server, and RabbitMQ on its dedicated instance.
- Make sure that the Mesos server and Marathon are running on the machine where the Mesos master is configured.
- Run the Mesos slave on all the machines as described earlier using the command line.
- At this point, the Mesos Marathon cluster is up and running and is ready to accept deployments. The deployment can be done by creating one JSON file per service, as shown here:
{
  "id": "search-service-1.0",
  "cpus": 0.5,
  "mem": 256.0,
  "instances": 1,
  "container": {
   "docker": {
    "type": "DOCKER",
      "image": "rajeshrv/search-service:1.0",
       "network": "BRIDGE",
       "portMappings": [
        {  "containerPort": 0, "hostPort": 8090 }
      ]
    }
  }
}
The preceding JSON code will be stored in the
search.jsonfile. Similarly, create a JSON file for other services as well.The JSON structure is explained as follows:
id: This is the unique ID of the application. This can be a logical name.cpusandmem: This sets the resource constraints for this application. If the resource offer does not satisfy this resource constraint, Marathon will reject this resource offer from the Mesos master.instances: This decides how many instances of this application to start with. In the preceding configuration, by default, it starts one instance as soon as it gets deployed. Marathon maintains the number of instances mentioned at any point.container: This parameter tells the Marathon executor to use a Docker container for execution.image: This tells the Marathon scheduler which Docker image has to be used for deployment. In this case, this will download thesearch-service:1.0image from the Docker Hub repositoryrajeshrv.network: This value is used for Docker runtime to advise on the network mode to be used when starting the new docker container. This can be BRIDGE or HOST. In this case, the BRIDGE mode will be used.portMappings: The port mapping provides information on how to map the internal and external ports. In the preceding configuration, the host port is set as8090, which tells the Marathon executor to use8090when starting the service. As the container port is set as0, the same host port will be assigned to the container. Marathon picks up random ports if the host port value is0.
- Additional health checks are also possible with the JSON descriptor, as shown here:
"healthChecks": [ { "protocol": "HTTP", "portIndex": 0, "path": "/admin/health", "gracePeriodSeconds": 100, "intervalSeconds": 30, "maxConsecutiveFailures": 5 } ] - Once this JSON code is created and saved, deploy it to Marathon using the Marathon REST APIs as follows:
curl -X POST http://54.85.107.37:8080/v2/apps -d @search.json -H "Content-type: application/json"Repeat this step for all the other services as well.
The preceding step will automatically deploy the Docker container to the Mesos cluster and start one instance of the service.
The steps for this are as follows:
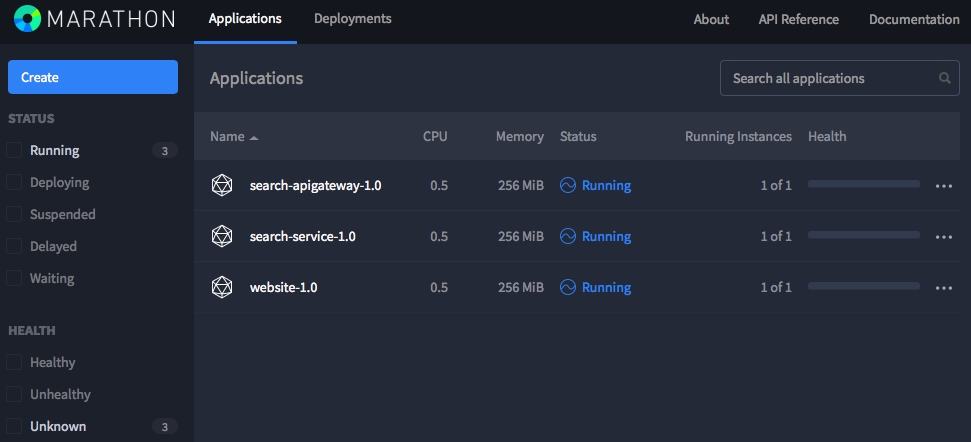
- Open the Marathon UI. As shown in the following screenshot, the UI shows that all the three applications are deployed and are in the Running state. It also indicates that 1 of 1 instance is in the Running state:
- Visit the Mesos UI. As shown in the following screenshot, there are three Active Tasks, all of them in the Running state. It also shows the host in which these services run:

- In the Marathon UI, click on a running application. The following screenshot shows the search-apigateway-1.0 application. In the Instances tab, the IP address and port in which the service is bound is indicated:
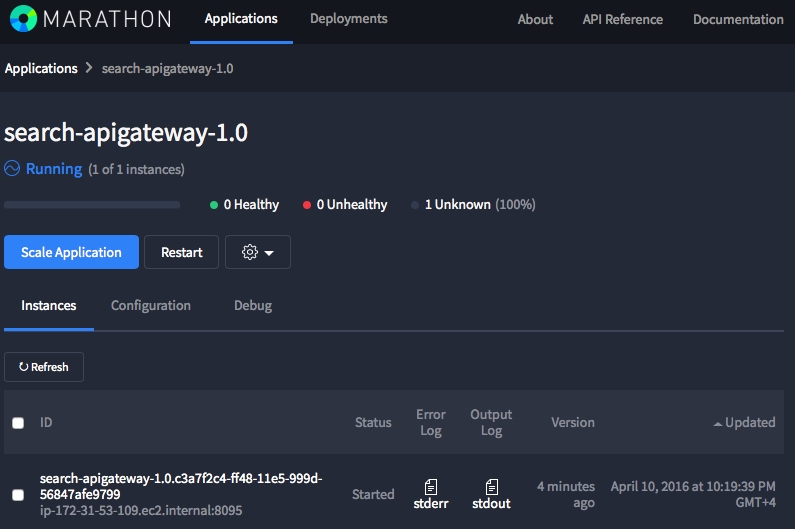
The Scale Application button allows administrators to specify how many instances of the service are required. This can be used to scale up as well as scale down instances.
- Open the Eureka server console to take a look at how the services are bound. As shown in the screenshot, AMIs and Availability Zones are reflected when services are registered. Follow
http://52.205.251.150:8761:
- Open
http://54.172.213.51:8001in a browser to verify the Website application.