
It is important to secure microservices. In this section, some basic measures to secure Spring Boot microservices will be reviewed using chapter2.bootrest to demonstrate the security features.
Adding basic authentication to Spring Boot is pretty simple. Add the following dependency to pom.xml. This will include the necessary Spring security library files:
<dependency>
  <groupId>org.springframework.boot</groupId>
  <artifactId>spring-boot-starter-security</artifactId>
</dependency>
Open Application.java and add @EnableGlobalMethodSecurity to the Application class. This annotation will enable method-level security:
@EnableGlobalMethodSecurity
@SpringBootApplication
public class Application {
    public static void main(String[] args) {
        SpringApplication.run(Application.class, args);
    }
}
The default basic authentication assumes the user as being user. The default password will be printed in the console at startup. Alternately, the username and password can be added in application.properties, as shown here:
security.user.name=guest
security.user.password=guest123
Add a new test case in ApplicationTests to test the secure service results, as in the following:
  @Test
  public void testSecureService() {
    String plainCreds = "guest:guest123";
    HttpHeaders headers = new HttpHeaders();
    headers.add("Authorization", "Basic " + new String(Base64.encode(plainCreds.getBytes())));
    HttpEntity<String> request = new HttpEntity<String>(headers);
    RestTemplate restTemplate = new RestTemplate();

    ResponseEntity<Greet> response = restTemplate.exchange("http://localhost:8080", HttpMethod.GET, request, Greet.class);
    Assert.assertEquals("Hello World!", response.getBody().getMessage());
  }
As shown in the code, a new Authorization request header with Base64 encoding the username-password string is created.
Rerun the application using Maven. Note that the new test case passed, but the old test case failed with an exception. The earlier test case now runs without credentials, and as a result, the server rejected the request with the following message:
org.springframework.web.client.HttpClientErrorException: 401 Unauthorized
In this section, we will take a look at the basic Spring Boot configuration for OAuth2. When a client application requires access to a protected resource, the client sends a request to an authorization server. The authorization server validates the request and provides an access token. This access token is validated for every client-to-server request. The request and response sent back and forth depends on the grant type.
Tip
Read more about OAuth and grant types at http://oauth.net.
The resource owner password credentials grant approach will be used in this example:
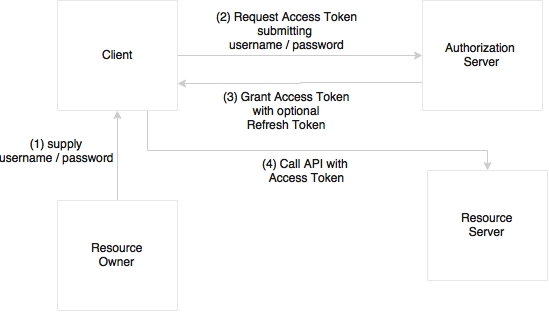
In this case, as shown in the preceding diagram, the resource owner provides the client with a username and password. The client then sends a token request to the authorization server by providing the credential information. The authorization server authorizes the client and returns with an access token. On every subsequent request, the server validates the client token.
To implement OAuth2 in our example, perform the following steps:
- As a first step, update
pom.xmlwith the OAuth2 dependency, as follows:<dependency> <groupId>org.springframework.security.oauth</groupId> <artifactId>spring-security-oauth2</artifactId> <version>2.0.9.RELEASE</version> </dependency>
- Next, add two new annotations,
@EnableAuthorizationServerand@EnableResourceServer, to theApplication.javafile. The@EnableAuthorizationServerannotation creates an authorization server with an in-memory repository to store client tokens and provide clients with a username, password, client ID, and secret. The@EnableResourceServerannotation is used to access the tokens. This enables a spring security filter that is authenticated via an incoming OAuth2 token.In our example, both the authorization server and resource server are the same. However, in practice, these two will run separately. Take a look at the following code:
@EnableResourceServer @EnableAuthorizationServer @SpringBootApplication public class Application { - Add the following properties to the
application.propertiesfile:security.user.name=guest security.user.password=guest123 security.oauth2.client.clientId: trustedclient security.oauth2.client.clientSecret: trustedclient123 security.oauth2.client.authorized-grant-types: authorization_code,refresh_token,password security.oauth2.client.scope: openid
- Then, add another test case to test OAuth2, as follows:
  @Test
  public void testOAuthService() {
        ResourceOwnerPasswordResourceDetails resource = new ResourceOwnerPasswordResourceDetails();
        resource.setUsername("guest");
        resource.setPassword("guest123");
          resource.setAccessTokenUri("http://localhost:8080/oauth/token");
        resource.setClientId("trustedclient");
        resource.setClientSecret("trustedclient123");
        resource.setGrantType("password");

        DefaultOAuth2ClientContext clientContext = new DefaultOAuth2ClientContext();
        OAuth2RestTemplate restTemplate = new OAuth2RestTemplate(resource, clientContext);

        Greet greet = restTemplate.getForObject("http://localhost:8080", Greet.class);

        Assert.assertEquals("Hello World!", greet.getMessage());
  }
As shown in the preceding code, a special REST template,
OAuth2RestTemplate, is created by passing the resource details encapsulated in a resource details object. This REST template handles the OAuth2 processes underneath. The access token URI is the endpoint for the token access. - Rerun the application using
mvn install. The first two test cases will fail, and the new one will succeed. This is because the server only accepts OAuth2-enabled requests.
These are quick configurations provided by Spring Boot out of the box but are not good enough to be production grade. We may need to customize ResourceServerConfigurer and AuthorizationServerConfigurer to make them production-ready. This notwithstanding, the approach remains the same.