
Chapter 7: Configure Azure Virtual Desktop Host Pools
In this chapter, we look at configuring Azure Virtual desktop host pools. This includes license configuration for server-based multi-session deployments, configuring host pool settings, using PowerShell to customize Remote Desktop Protocol (RDP) properties, configuring host pool load balancing methods, personal desktop assignment, and security for host pools and session hosts.
We start this chapter by looking at deploying Windows Server licensing for those who want to move existing Server session hosts from on-premises to Azure Virtual Desktop. This may not be a common use case for Azure Virtual Desktop deployments, however, it's important that we cover this concept for those who require the use of Server session hosts within Azure Virtual Desktop.
We will cover the following topics in this chapter:
- Windows Server session host licensing
- Configuring host pool settings
- Configuring Azure Virtual Desktop load balancing methods
- Assigning users to host pools
- Applying OS and application updates to a running Azure Virtual Desktop host
- Applying security and compliance settings to session hosts
Important Note
It is important to note that Windows 10 and Windows 11 including multi-session do not require a licensing server.
Windows Server session host licensing
This section looks at installing the Remote Desktop (RD) licensing role and activating the licensing server to use server operating systems in Azure Virtual Desktop. To use a server operating system in Azure Virtual Desktop, you will need to deploy a server with the RD licensing role installed and configured on the Azure virtual network. The following steps summarize the installation and configuration of the RD licensing rol:.
- Sign in to the server with an administrator account.
- In the Server Manager console, click Roles Summary, and then click Add Roles. Click Next on the first page of the roles wizard.
- Select Remote Desktop Services, click Next, and then Next on the Remote Desktop Services page.
- Select Remote Desktop Licensing, and then click Next:
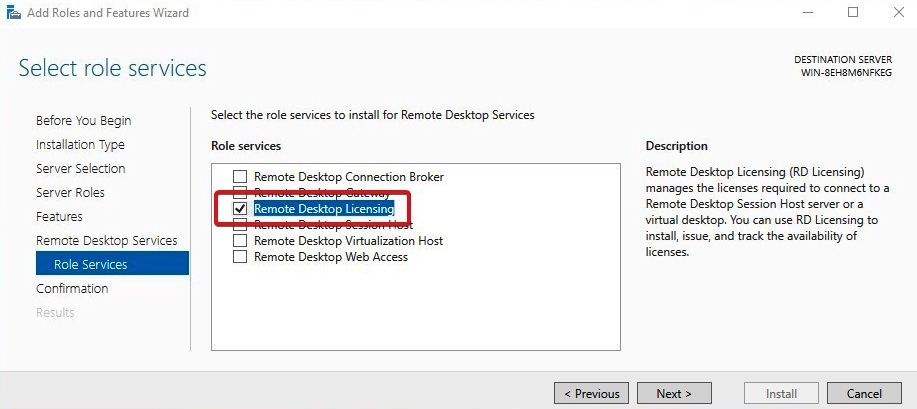
Figure 7.1 – The Add Roles and Features Wizard for the server OS
- To configure the domain, select Configure a discovery scope for this license server, click This domain, and then click Next.
- Then click Install:
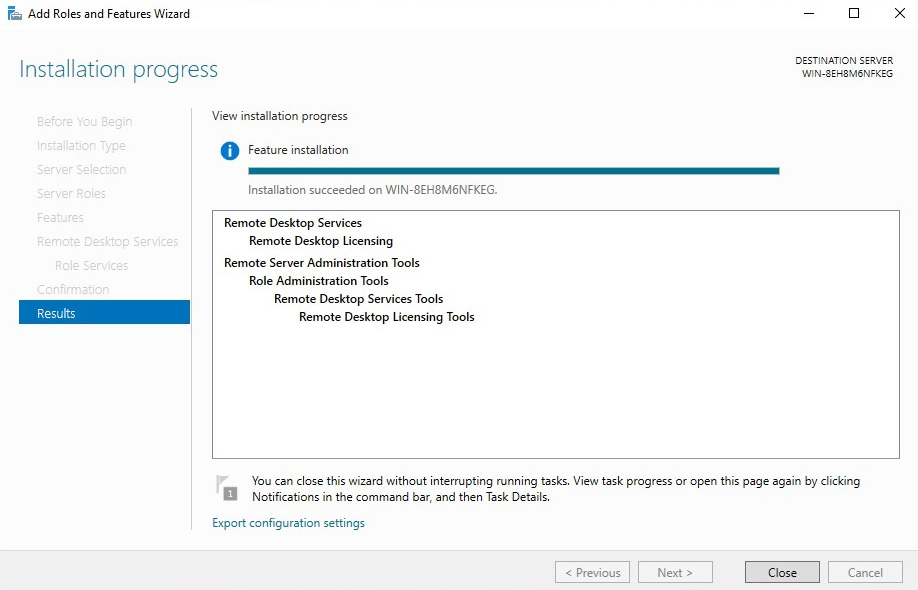
Figure 7.2 – Installation progress of the RD licensing server role
Once installed, the Remote Desktop Licensing Manager app will appear in the Start menu.
To activate the licensing server, please see the following steps:
- Open the Remote Desktop Licensing Manager app, and go to Start | Administrative Tools | Remote Desktop Services | Remote Desktop Licensing Manager:
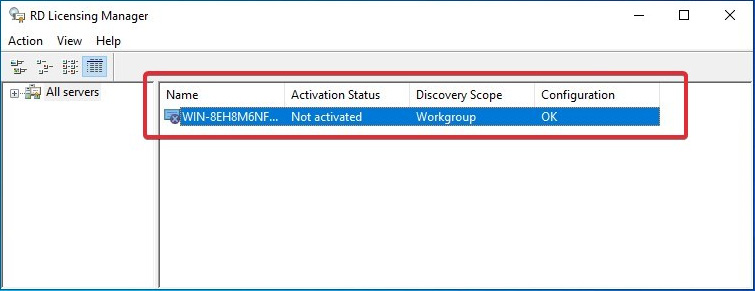
Figure 7.3 – License server role installed but not activated
- Right-click the license server, and then click the Activate Server option.
- Click Next on the welcome page.
- For the connection method, select Automatic connection as recommended by Microsoft, and then click Next:
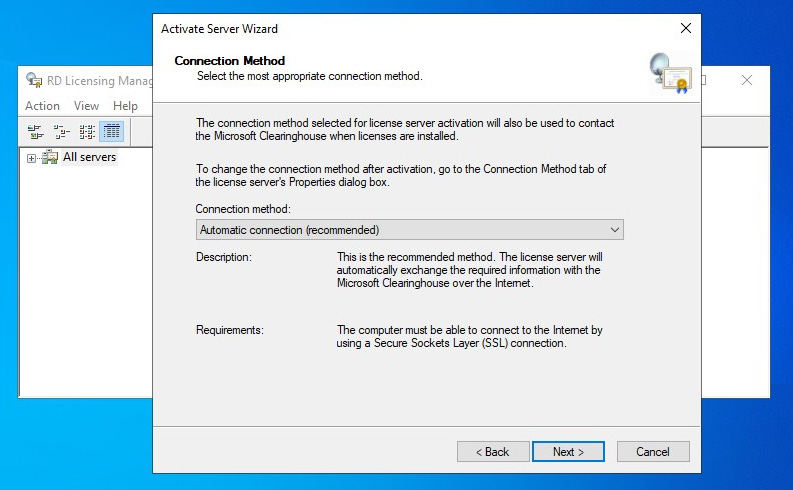
Figure 7.4 – Active RD license server wizard
- Enter your company details (your name, the company name, and the geographic region), and then click Next.
- You can also enter optional information (for example, email and company addresses) and then click Next.
- Ensure that Start Install Licenses Wizard is not selected as this is done later, and then click Next. Your license server is ready to start issuing and managing licenses:
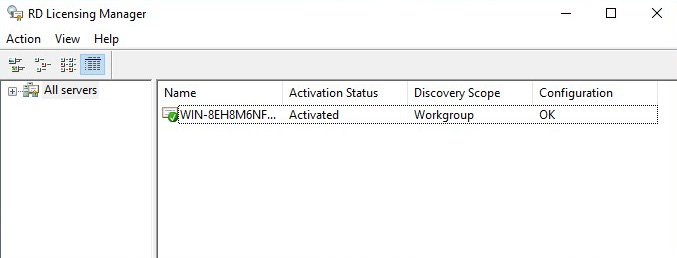
Figure 7.5 – RD license server activated
For information on installing the RDS client access license, please see the following link to the Microsoft article: https://docs.microsoft.com/windows-server/remote/remote-desktop-services/rds-install-cals.
There you have it; we have now configured an RD licensing server for use when using server operating systems as session hosts on our Azure Virtual Desktop environment. In the next section, we take a look at configuring host pool settings.
Configuring host pool settings
This section looks at customizing a host pool, including RD properties, load balancing methods, and configuring personal host pool assignment types.
Customizing RDP properties
Azure Virtual Desktop allows you to configure and customize host pool settings using the RDP properties. This allows you to configure things such as audio redirection, video playback, and drive redirections.
The supported RDP settings are split into five different areas:
- Connection information
- Session behavior
- Device redirection
- Display settings
- RemoteApp
These different categories contain a wide range of settings you can apply to your host pool configuration.
You can find a complete list of settings that can be applied or changed here: https://docs.microsoft.com/windows-server/remote/remote-desktop-services/clients/rdp-files.
You can change the RDP settings by navigating to the host pool within the Azure portal and selecting RDP Properties. You will then see five tabs:
- Connection information
- Session behaviour
- Device redirection
- Display settings
- Advanced
Important Note
You can read more about redirection support for each different client type here: https://docs.microsoft.com/en-us/windows-server/remote/remote-desktop-services/clients/remote-desktop-app-compare#redirection-support.
The tabs are shown in the following screenshot:
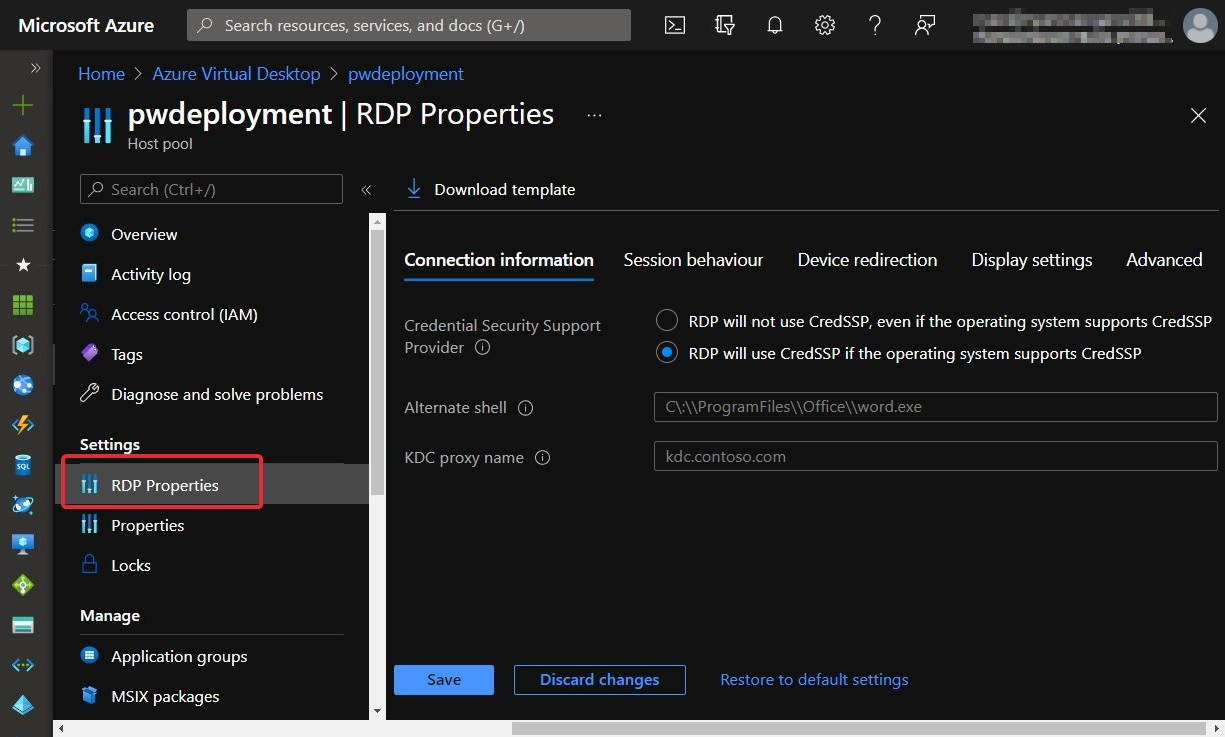
Figure 7.6 – RDP properties within a host pool
The Azure portal makes it easy for IT admins to make changes to the RDP properties as you can set parameters in the Advanced section or use the specific tabs that have radio buttons and drop-down boxes. You can see in the following screenshot an example of what to expect in the tabs:
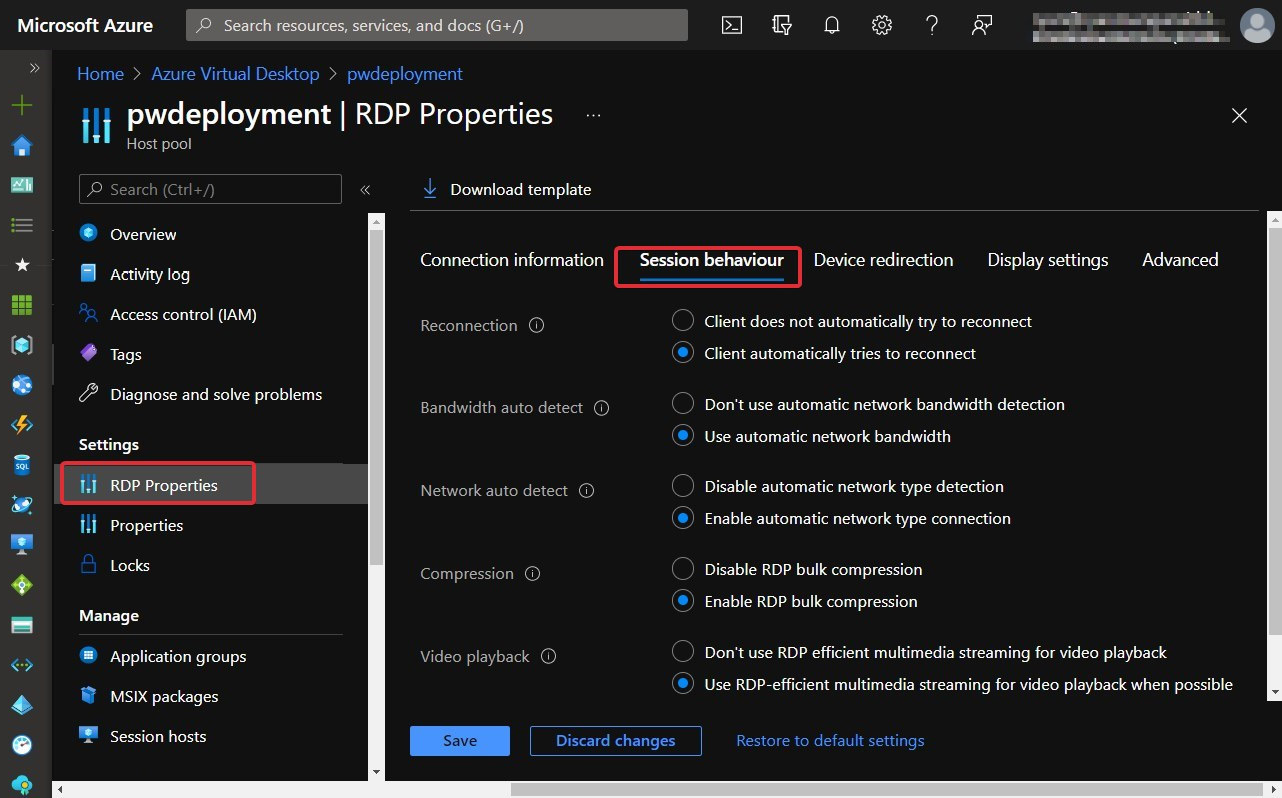
Figure 7.7 – The Session behaviour tab for RDP properties with a host pool
If you are looking to make more specific changes and customizations to the host pool's RDP properties, you can make changes within the Advanced tab as shown in Figure 7.8. It is also important to note that there are three buttons at the bottom of this Azure blade: Save, Discard changes, and Restore to default settings:
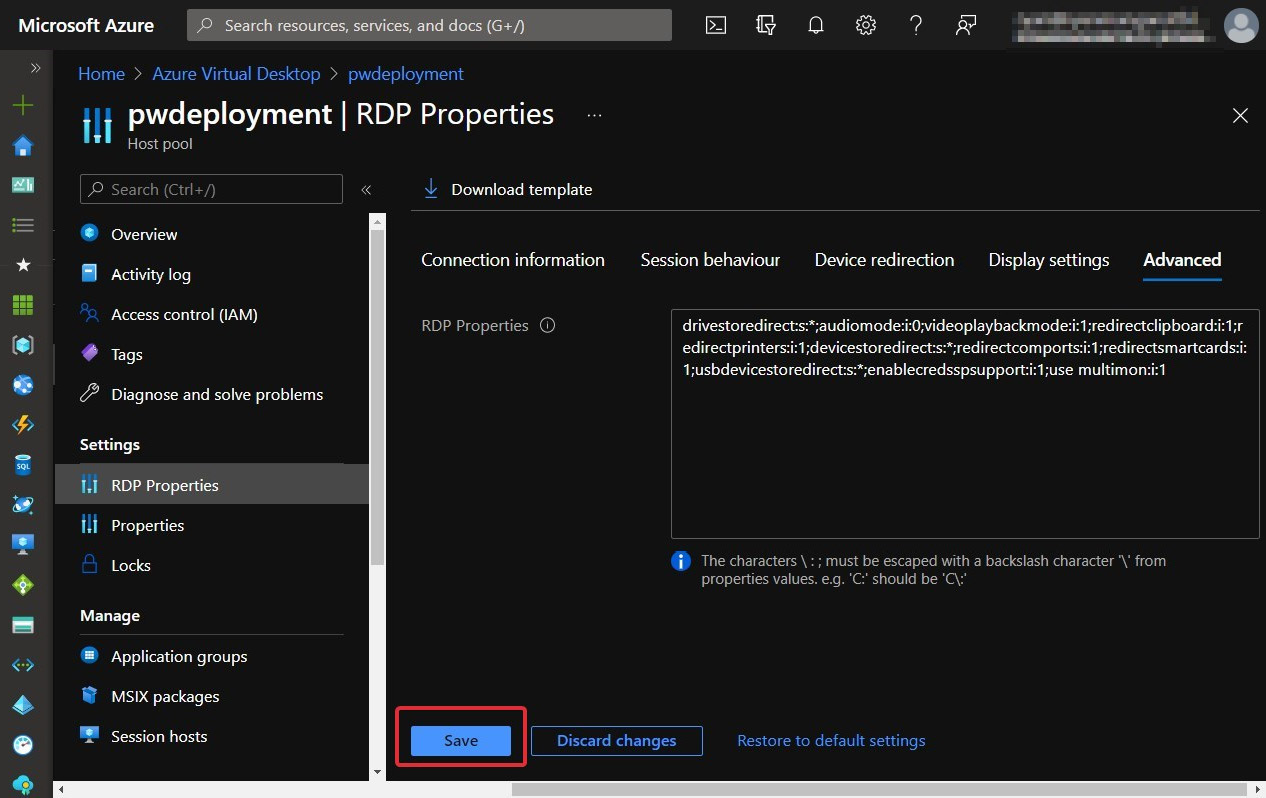
Figure 7.8 – Advanced tab of RDP properties of a host pool
Remember to click Save to apply customized settings and Discard changes if you want to revert before choosing customizations. It's also important to note that you can also use the Restore to default settings link to revert the custom RDP properties back to the defaults.
The step-by-step process of configuring RDP properties for a host pool is as follows:
- Sign in to the Azure portal using https://portal.azure.com.
- Enter Azure Virtual Desktop into the search bar located at the top of the page.
- Under Services, select Azure Virtual Desktop.
- Within the Azure Virtual Desktop page, select host pools on the left-hand side of the screen.
- Choose the host pool you want to update.
- Select RDP Properties in the menu on the left-hand side of the screen.
- Set the property you want.
- As mentioned, you can also use the Advanced tab to add/customize RDP properties in a semicolon-separated format.
- Select Save to save changes when you have finished.
In the next section, we examine using PowerShell to configure RDP properties for a host pool.
Using PowerShell to customize RDP properties
Before you can use PowerShell to customize your host pool RDP properties, you will need to configure the PowerShell module for Azure Virtual Desktop as a prerequisite. I showed you how to do this in Chapter 5, Implementing and Managing Storage for Azure Virtual Desktop.
Adding or editing a single RDP property
In this subsection, we look at adding and editing a single/multiple RDP properties.
The following shows you the cmdlet parameters for updating an RDP property. This is useful for when you want to change an existing configuration:
Update-AzWvdHostPool -ResourceGroupName <resourcegroupname> -Name <hostpoolname> -CustomRdpProperty <property>
In this example, I apply the redirect clipboard custom RDP property by specifying the redirectclipboard:i:1 custom RDP property. This property enables the clipboard feature when copying and pasting files between the remote session and the local desktop:
Update-AzWvdHostPool -ResourceGroupName az140pw -Name pwdeployment -CustomRdpProperty redirectclipboard:i:1
Here's the output:
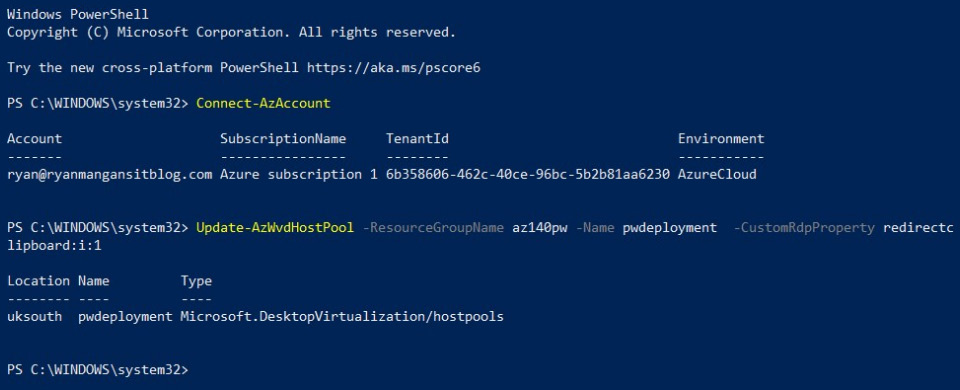
Figure 7.9 – Cmdlets and output from running custom RDP property cmdlets
To check what RDP properties are applied to the host pool, you can use the following:
Get-AzWvdHostPool -ResourceGroupName <resourcegroupname> -Name <hostpoolname> | format-list Name, CustomRdpProperty
The following provides an example of the usage:
get-AzWvdHostPool -ResourceGroupName az140pw -Name pwdeployment | format-list name, customRdpProperty
The following screenshot shows the Get-AzWvdHostpool cmdlet output; as you can see, the redirect clipboard property we added is now set:
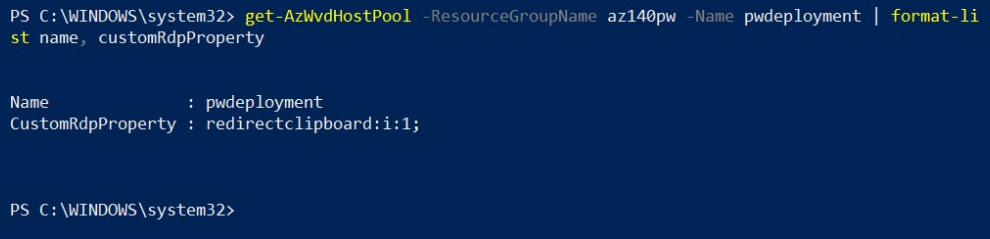
Figure 7.10 – Get-AzWvdHostpool cmdlets for checking the custom RDP properties
Adding or editing multiple custom RDP properties
To add multiple custom RDP properties, you can use the following PowerShell variables to add multiple properties with a semicolon, as follows:
$properties="<property1>;<property2>;<property3>"
Update-AzWvdHostPool -ResourceGroupName <resourcegroupname> -Name <hostpoolname> -CustomRdpProperty $properties
The following provides an example of the usage:
$properties="redirectclipboard:i:1;use multimon:i:1;drivestoredirect:s:*"
Update-AzWvdHostPool -ResourceGroupName az140pw -Name pwdeployment -CustomRdpProperty $properties
The following screenshot shows the output from running the PowerShell cmdlet for adding multiple RDP properties:
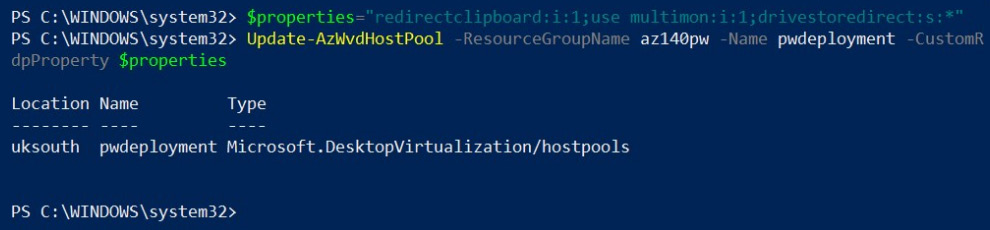
Figure 7.11 – Cmdlets for assigning multiple RDP properties using PowerShell
Using the same get-AzWvdHostPool powershell cmdlet, you can check to see if these properties have been applied.
The following screenshot shows the get-azwvdhostpool cmdlet being run to confirm that the RDP properties have been set:
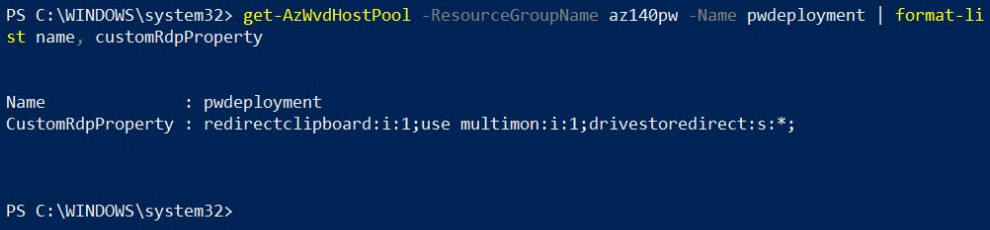
Figure 7.12 – get-azwvdhostpool cmdlets for checking the custom RDP properties have been set
Resetting all custom RDP properties using PowerShell
To reset the RDP properties to the default, you would use the following cmdlets:
Update-AzWvdHostPool -ResourceGroupName <resourcegroupname> -Name <hostpoolname> -CustomRdpProperty ""
The following provides an example of the usage:
Update-AzWvdHostPool -ResourceGroupName az140pw -Name pwdeployment -CustomRdpProperty ""
The following screenshot shows the reset PowerShell cmdlets being run:
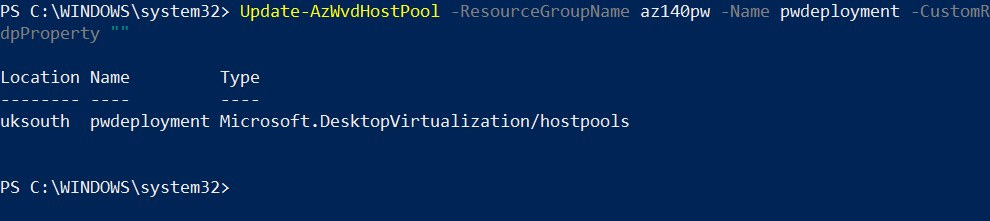
Figure 7.13 – Cmdlets for resetting the custom RDP properties with PowerShell
Again, you can use the same get-AzWvdHostPool cmdlet; you can check to see if these properties have been applied. The following screenshot shows the RDP properties being reset:
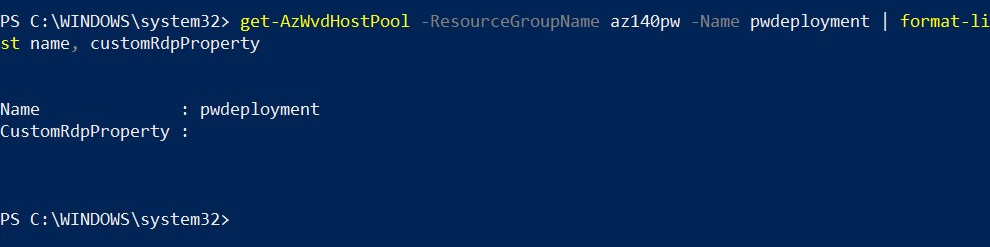
Figure 7.14 – get-azwvdhostpool cmdlets for checking the reset has been completed
In this section, we looked at configuring custom RDP properties for host pools. This covered both the configuration through the Azure portal and using PowerShell. In the next section, we take a look at configuring load balancing methods on host pools.
Methods for configuring Azure Virtual Desktop load balancing
In the previous chapter, we looked at the different types of session load balancing. We will now take a look at configuring load balancing within the Azure portal and PowerShell.
This section examines configuring the load balancing method for Azure Virtual Desktop using both the Azure portal UI and PowerShell.
Let's now take a look at how to configure load balancing.
Configuring load balancing
We'll now look at configuring host pool load balancing. The following steps walk you through configuring load balancing within the Azure portal:
- Sign in to the Azure portal using the following URL: https://portal.azure.com.
- Search for and select Azure Virtual Desktop under Services.
- On the Azure Virtual Desktop page, select Host pools.
- Select the name of the host pool you want to edit.
- Select Properties.
- Select the load balancing algorithm you want for this host pool in the drop-down menu.
- Enter the required Max session limit into the field:

Figure 7.15 – Change the load balancing method of a host pool in the Azure portal
- Select Save. This applies the new load balancing settings.
You have now configured your load balancing settings. Let's move on to the next section, where we will take a look at the option to configure load balancing settings using PowerShell.
Using PowerShell to configure load balancing methods
Before you can use PowerShell to customize your host pool load balancing methods, you will need to set up and load the PowerShell module for Azure Virtual Desktop as a prerequisite. I showed you how to do this in Chapter 5, Implementing and Managing Storage for Azure Virtual Desktop.
Breath-first load balancing
In this subsection, we take a look at the breadth-first load balancing method using PowerShell. Breadth-first is the default configuration when deploying pooled session hosts in a host pool. As a recap, this method distributes connections evenly to available session hosts within the host pool.
Important Note
MaxSessionLimit is used to control the maximum number of sessions allowed per session host in the Azure Virtual Desktop host pool. When using depth-first load balancing, the value is used to determine when to stop allocating users to one host and start sending user sessions to the next host.
The following cmdlets are used for configuring the load balancing methods:
Update-AzWvdHostPool -ResourceGroupName <resourcegroupname> -Name <hostpoolname> -LoadBalancerType 'BreadthFirst' -MaxSessionLimit ###
The following example demonstrates how to change/update the load balancing method:
Update-AzWvdHostPool -ResourceGroupName az140pw -Name pwdeployment -LoadBalancerType 'BreadthFirst' -MaxSessionLimit 999999
Here's the output:
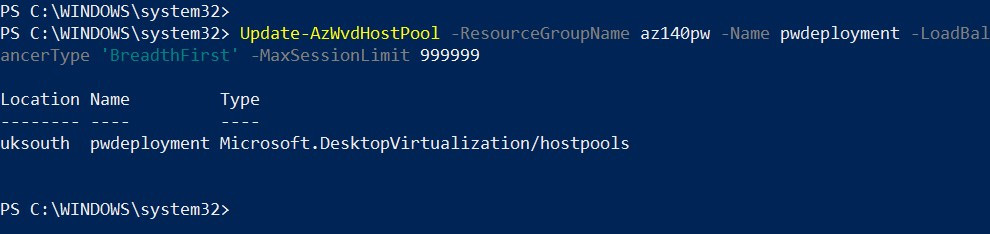
Figure 7.16 – Cmdlets for setting the load balancing method to breadth-first
To check that the setting has applied, you can run the following cmdlet:
Get-AzWvdHostPool -ResourceGroupName <resourcegroupname> -Name <hostpoolname> | format-list Name, LoadBalancerType, MaxSessionLimit
The following example demonstrates how to check that breadth-first has been set:
Get-AzWvdHostPool -ResourceGroupName az140pw -Name pwdeployment | format-list Name, LoadBalancerType, MaxSessionLimit
Here's the output:
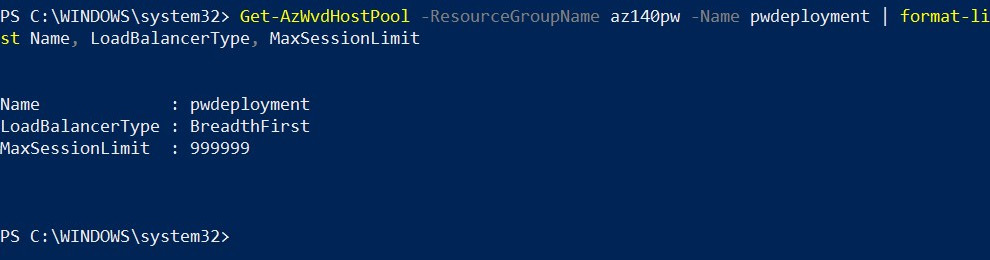
Figure 7.17 – Cmdlets for checking the load balancing method set on a host pool
Depth-first load balancing
Depth-first load balancing is used to populate session hosts with the highest number of connections that have not reached the maximum session limit threshold.
Important Note
You must enter a maximum session limit per session host within the host pool when configuring depth-first load balancing.
To set depth-first load balancing in your host pool, you need to use the following cmdlets:
Update-AzWvdHostPool -ResourceGroupName <resourcegroupname> -Name <hostpoolname> -LoadBalancerType 'DepthFirst' -MaxSessionLimit ###
The following provides an example of the usage:
Update-AzWvdHostPool -ResourceGroupName az140pw -Name pwdeployment -LoadBalancerType 'DepthFirst' -MaxSessionLimit 999999
Here's the output:
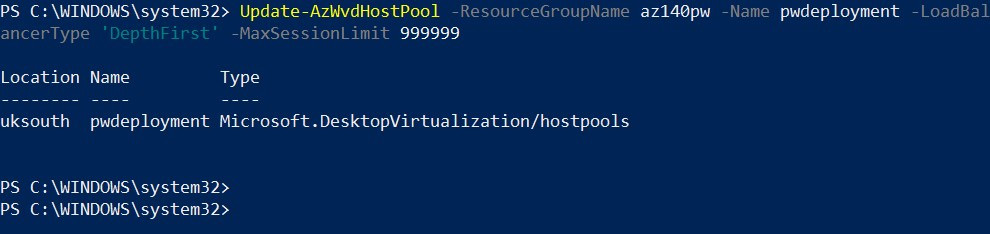
Figure 7.18 – Update cmdlet for changing the load balancing method of a host pool
To confirm settings have been applied, use the following cmdlets as shown in the breadth-first example:
Get-AzWvdHostPool -ResourceGroupName az140pw -Name pwdeployment | format-list Name, LoadBalancerType, MaxSessionLimit
Here's the output:

Figure 7.19 – Cmdlets and output of checking the load balancing method of a host pool
This section looked at the configuration and updating of the load balancing method within a host pool. I covered both ways – the Azure portal UI and PowerShell. We'll now move on to assigning users to host pools.
Assigning users to host pools
Multi-session is great for when you want to provide a desktop experience to users where they all share the same compute resource of a session host. In this section, we take a look at assigning personal desktops to users. Personal host pools allow you to commit compute resource per user as you are allocating a session host per user. When you deploy a personal host pool, users are not assigned to specific session hosts. Instead, personal session hosts are used for specific use cases such as developers or users who need administrator access to the desktop. Other user cases include software license requirements that do not allow multiple users to connect to the device.
Assigning users to a session host in the Azure portal
In this subsection, we will look at assigning users to personal session hosts using the Azure portal.
Important Note
Please note this example is for assigning users and groups to personal desktops, however, the process is the same for both personal and multi-session based deployments.
The following steps show you how to assign a user to a personal desktop:
- Sign in to the Azure portal at https://portal.azure.com.
- Enter Azure Virtual Desktop into the search bar located at the top of the page.
- Under Services, select Azure Virtual Desktop.
- Within the Azure Virtual Desktop page, on the window's left-hand side, select Host pools.
- Select the host pool you want to update.
- Next, go to the menu on the left-hand side of the page and select Application groups:
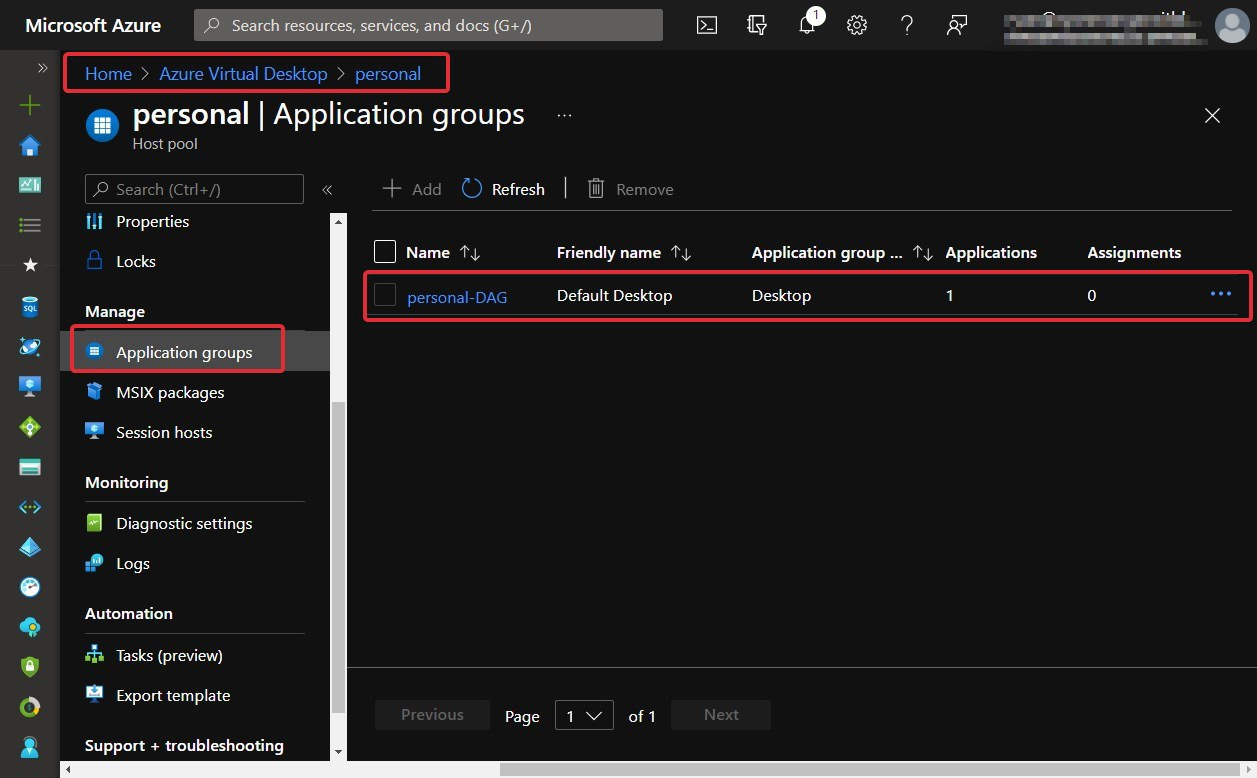
Figure 7.20 – The application groups within a host pool
- Select the desktop app group name you want to edit, then select Assignments in the menu on the left-hand side of the window.
- Select + Add, then select the users or user groups you want to publish in the desktop app group:
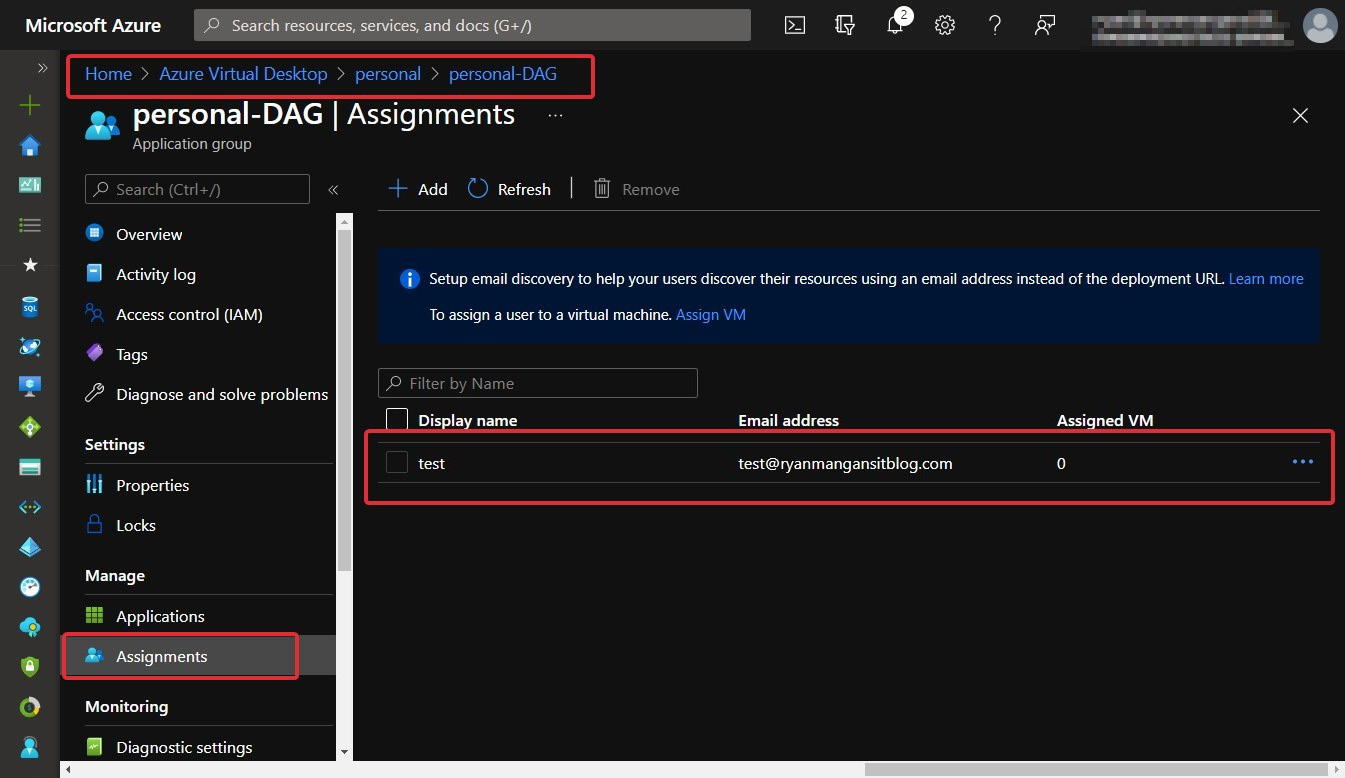
Figure 7.21 – User assignments within an app group
- Select Assign VM in the information bar to assign a session host to a user.
- Select the session host you want to assign to the user, then select Assign:
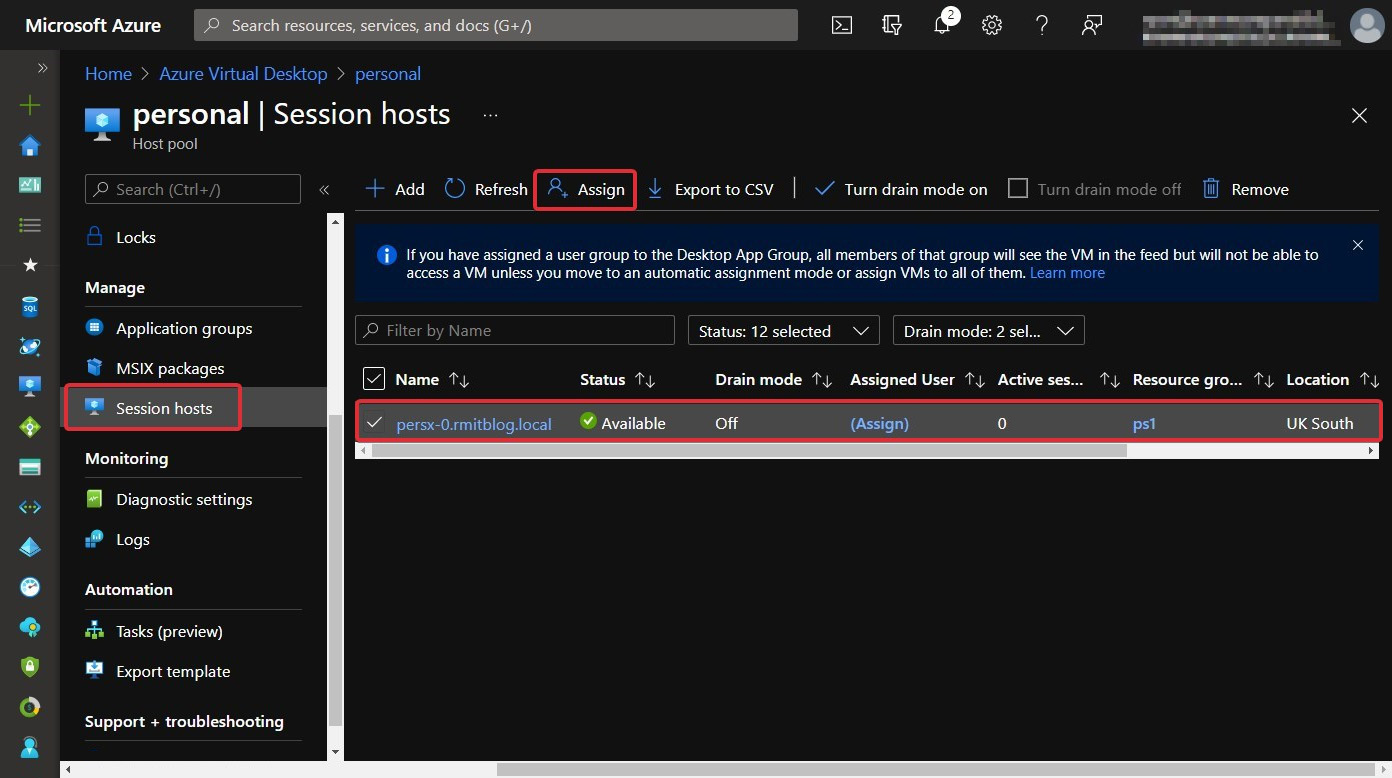
Figure 7.22 – The Assign button for assigning a user a personal session host within the host pool
- Select the user you want to assign the session host to from the list of available users as shown in the following screenshot:
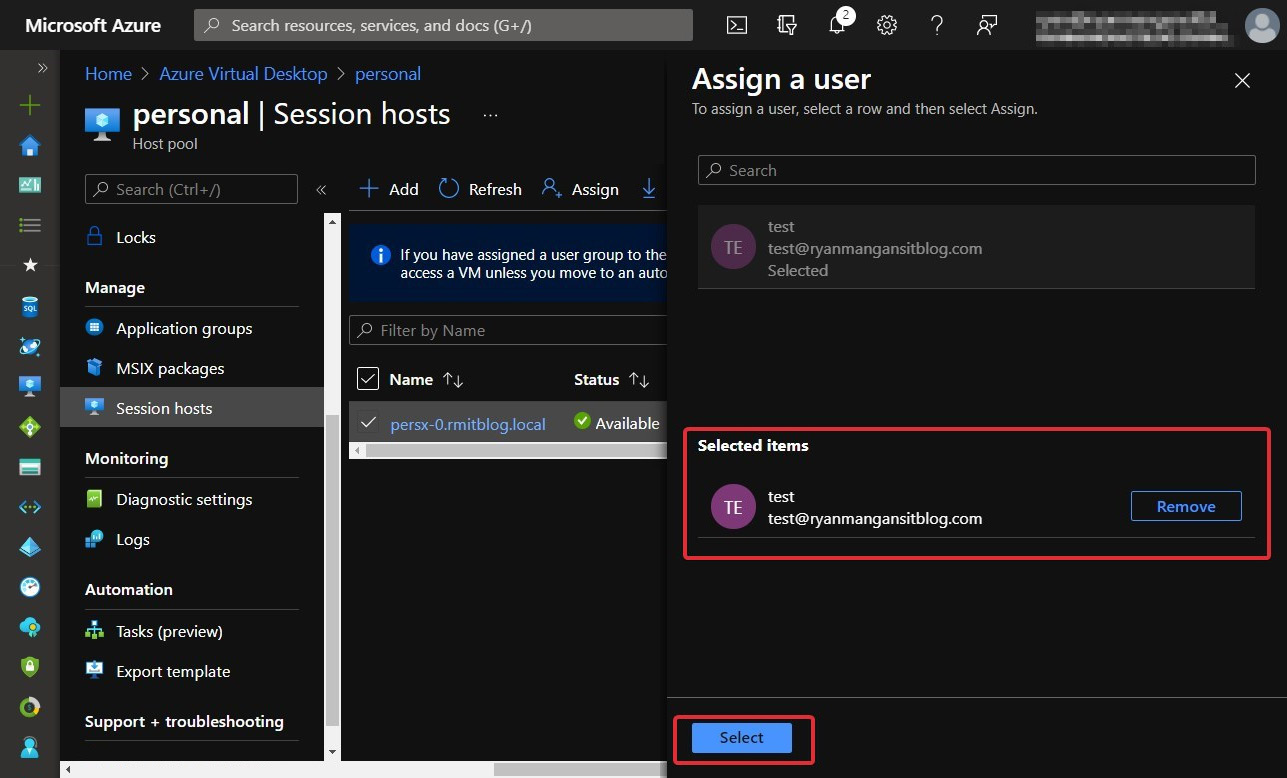
Figure 7.23 – Assign a user blade within the host pool
There you have it – you have assigned a user to a session host:
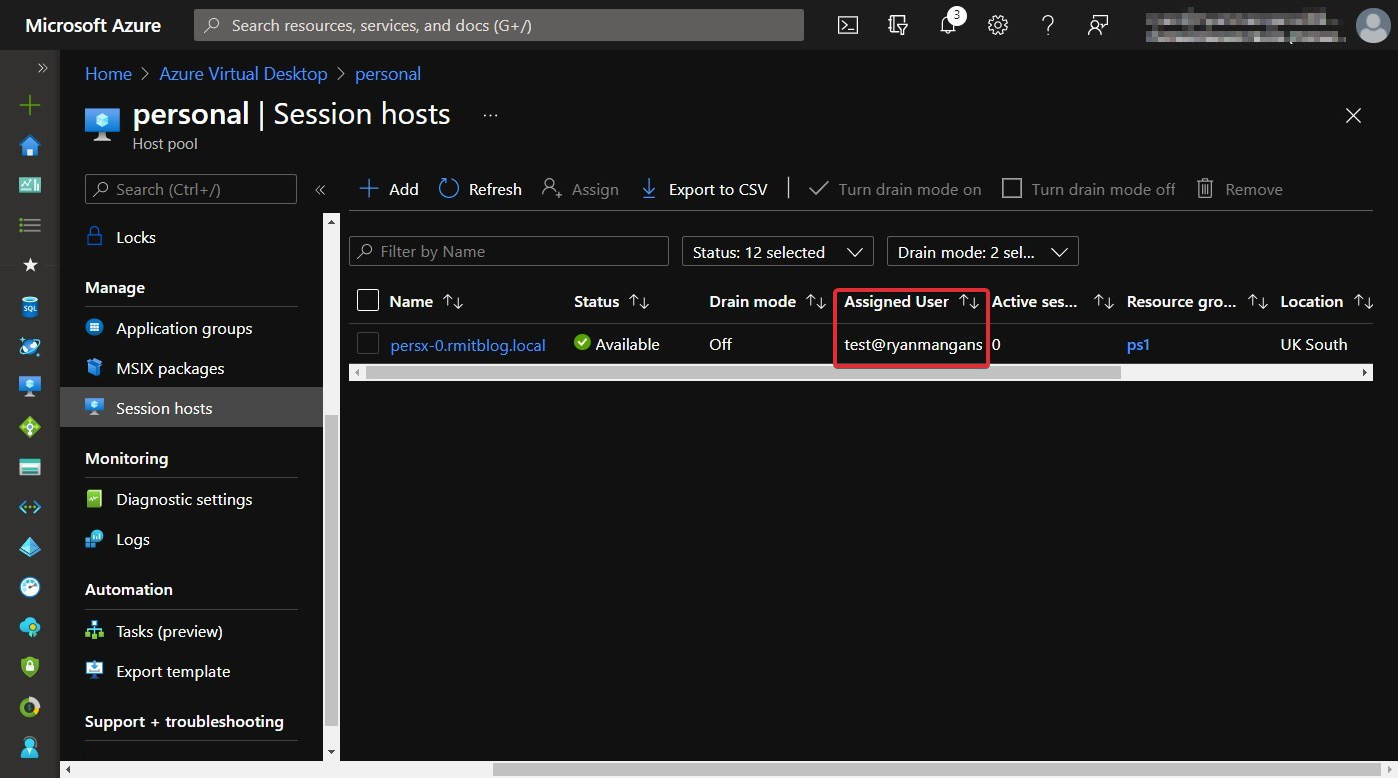
Figure 7.24 – User now assigned to a personal session host within the host pool
In this section, we looked at assigning users personal desktop hosts via the Azure portal UI. We will now take a look at how to do it via PowerShell.
Assigning users to host pools via PowerShell
Before you can use PowerShell to assign personal desktops, you will need to set up and load the PowerShell module for Azure Virtual Desktop as a prerequisite. I showed you how to do this in Chapter 5, Implementing and Managing Storage for Azure Virtual Desktop.
Configuring automatic assignment
In this subsection, we look at configuring automatic assignments, which is helpful for users who do not need or require a specific session host.
Automatic assignment works by first assigning users to the desktop in the personal host pool. Then, when the user opens the RD client and clicks on the advertised resources in their feed, they will be allocated an available session host, which completes the automatic assignment process.
To enable automatic assignment, you need to run the following PowerShell cmdlets:
Update-AzWvdHostPool -ResourceGroupName <resourcegroupname> -Name <hostpoolname> -PersonalDesktopAssignmentType Automatic
The following example shows the assignment:
Update-AzWvdHostPool -ResourceGroupName ps1 -Name personal -PersonalDesktopAssignmentType Automatic
Here's the output:
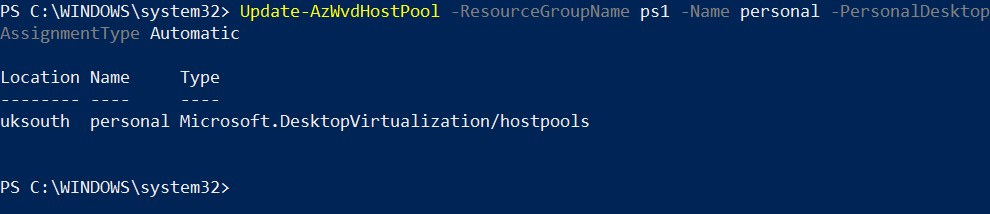
Figure 7.25 – Cmdlets for setting the personal assignment to automatic
To assign users to a personal desktop host pool, you use the following cmdlets:
New-AzRoleAssignment -SignInName <userupn> -RoleDefinitionName "Desktop Virtualization User" -ResourceName <appgroupname> -ResourceGroupName <resourcegroupname> -ResourceType 'Microsoft.DesktopVirtualization/applicationGroups'
The following provides an example of the usage:
New-AzRoleAssignment -SignInName [email protected] -RoleDefinitionName "Desktop Virtualization User" -ResourceName personal-DAG -ResourceGroupName ps1 -ResourceType 'Microsoft.DesktopVirtualization/applicationGroups'
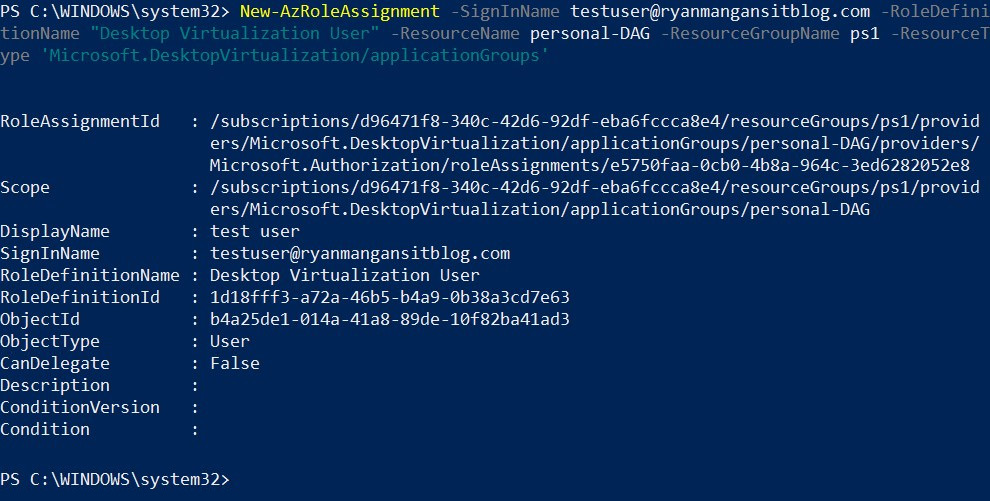
Figure 7.26 – Assignment of a user to an app group
You can check in the following screenshot that the assignment worked:
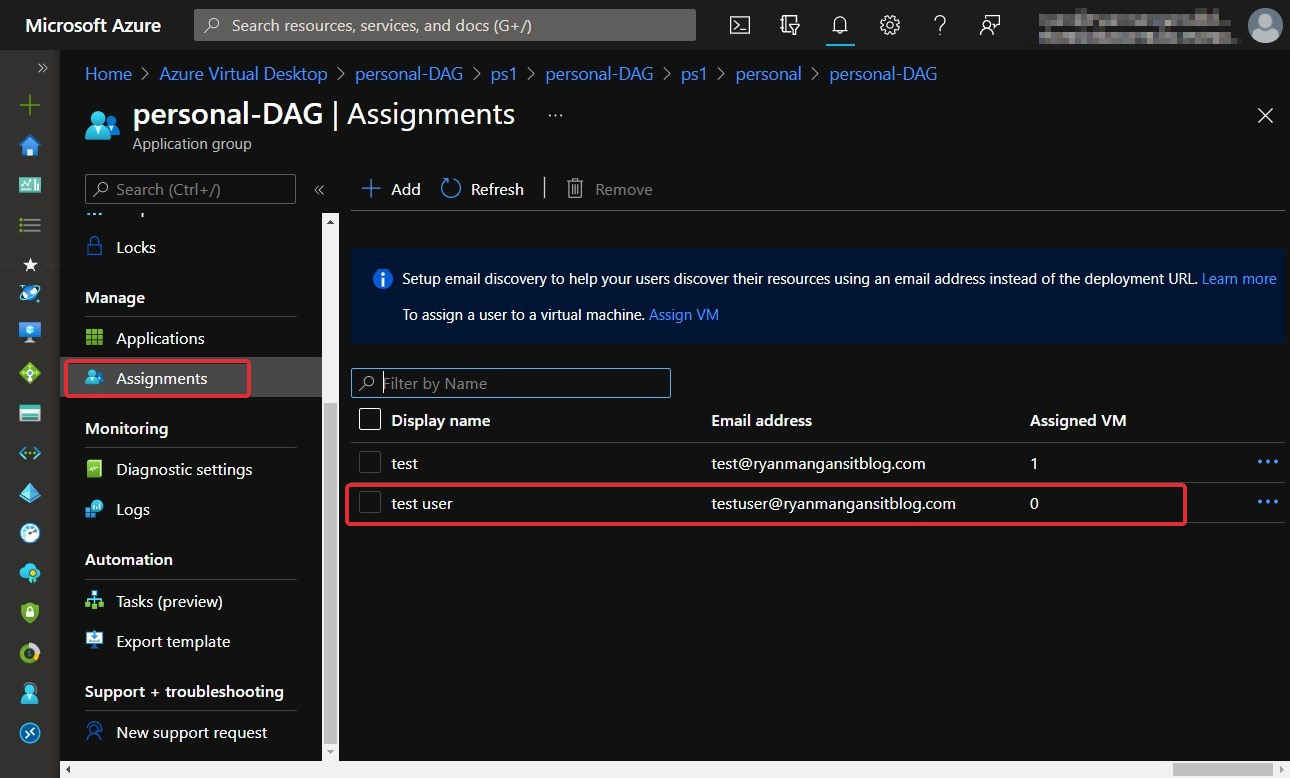
Figure 7.27 – The same user in the Azure portal confirming the assignment worked
As shown in the preceding screenshot, the user has been added to the app group.
Tip
You can also assign group object IDs to the app group rather than assigning individual users.
In this section, I showed you how to enable automatic assignment and assign users to an app group associated with a personal host pool. We will now look at direct assignments using PowerShell.
Configuring direct assignment using PowerShell
This section looks at assigning users to personal host pool session hosts using direct assignment. The key difference between direct assignment and automatic assignment is that with direct assignment, the user must be assigned to the personal session host before they can access the resources.
Remember
You need to follow the steps in Chapter 5, Implementing and Managing Storage for Azure Virtual Desktop, to configure PowerShell for Azure Virtual Desktop before proceeding.
Step 1: The first step is to configure the host pool for the direct assignment of users to session hosts. Use the following cmdlets to complete this:
Update-AzWvdHostPool -ResourceGroupName <resourcegroupname> -Name <hostpoolname> -PersonalDesktopAssignmentType Direct
The following provides an example of the usage:
Update-AzWvdHostPool -ResourceGroupName <resourcegroupname> -Name <hostpoolname> -PersonalDesktopAssignmentType Direct
The following screenshot shows the update of a host pool to direct assignment:

Figure 7.28 – Cmdlets for setting the direct assignment type
Tip
You can change between direct and automatic personal session host assignments. All you need to do is run the cmdlets for your chosen configuration.
Step 2: Once we have set the host pool to Direct, as shown previously, we then need to assign a user to the personal desktop host pool:
New-AzRoleAssignment -SignInName <userupn> -RoleDefinitionName "Desktop Virtualization User" -ResourceName <appgroupname> -ResourceGroupName <resourcegroupname> -ResourceType 'Microsoft.DesktopVirtualization/applicationGroups'
As you will note from the previous section, the cmdlets are the same for assigning users to direct or automatic personal desktop host pools.
Step 3: The final step is to assign the user to a specific session host; you need to use the following cmdlets:
Update-AzWvdSessionHost -HostPoolName <hostpoolname> -Name <sessionhostname> -ResourceGroupName <resourcegroupname> -AssignedUser <userupn>
The following provides an example of the usage:
Update-AzWvdSessionHost -HostPoolName personal -Name persx-1.rmitblog.local -ResourceGroupName ps1 -AssignedUser [email protected]
The following screenshot shows the cmdlets for assigning a user to a specific session host:
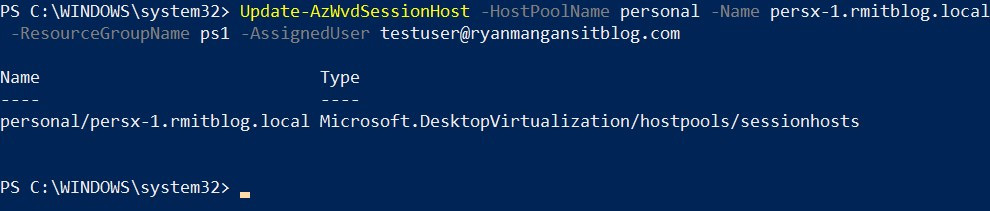
Figure 7.29 – Assignment of a session host to a specific user
Once the cmdlets have been run successfully, you will then see the user assigned in the portal:
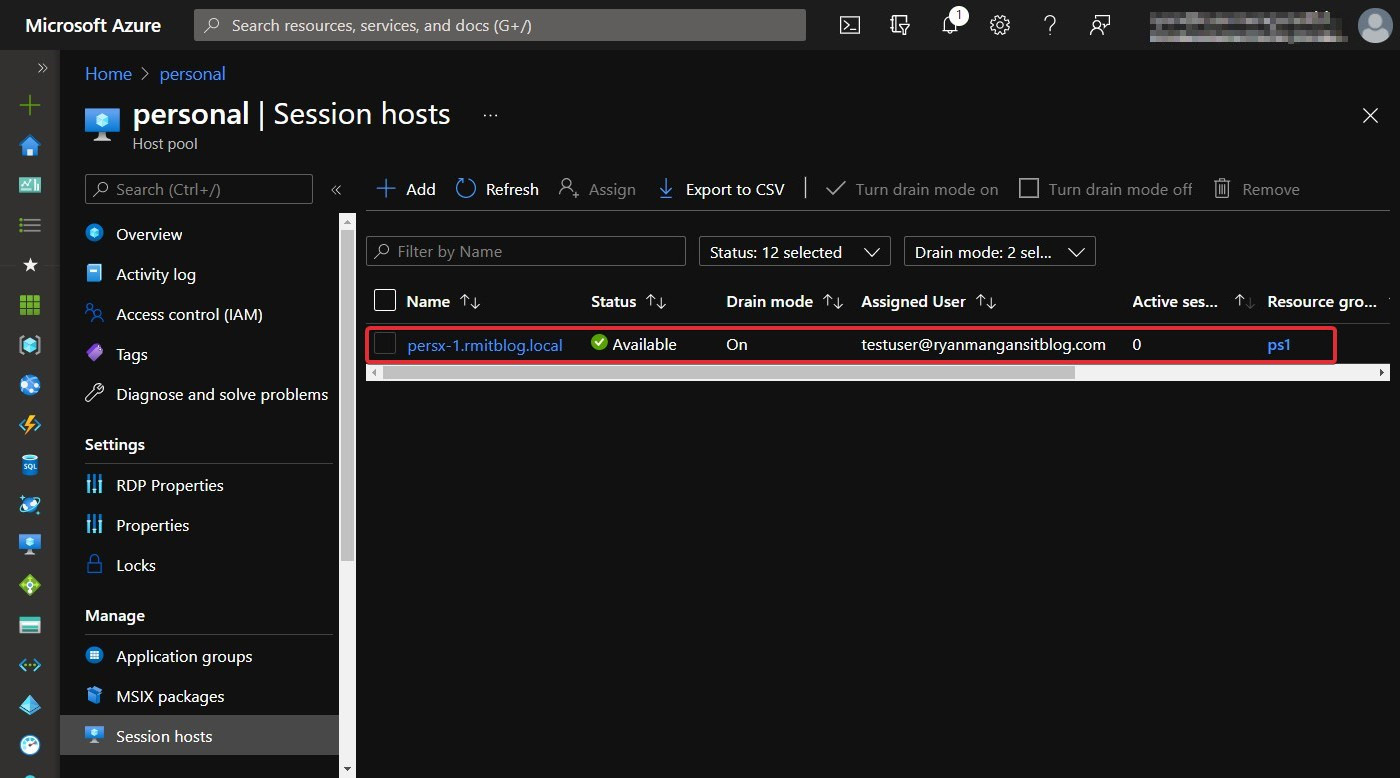
Figure 7.30 – Assignment in the Azure portal
There you have it – users assigned using direct assignment via PowerShell.
Important Note
Don't forget to link your application group to your workspace. Workspaces are a logical grouping of app groups. Each app group must be linked with a workspace for users to see the desktops and remote apps published to them. See the following screenshot, showing how to add an app group under the Workspaces tab.
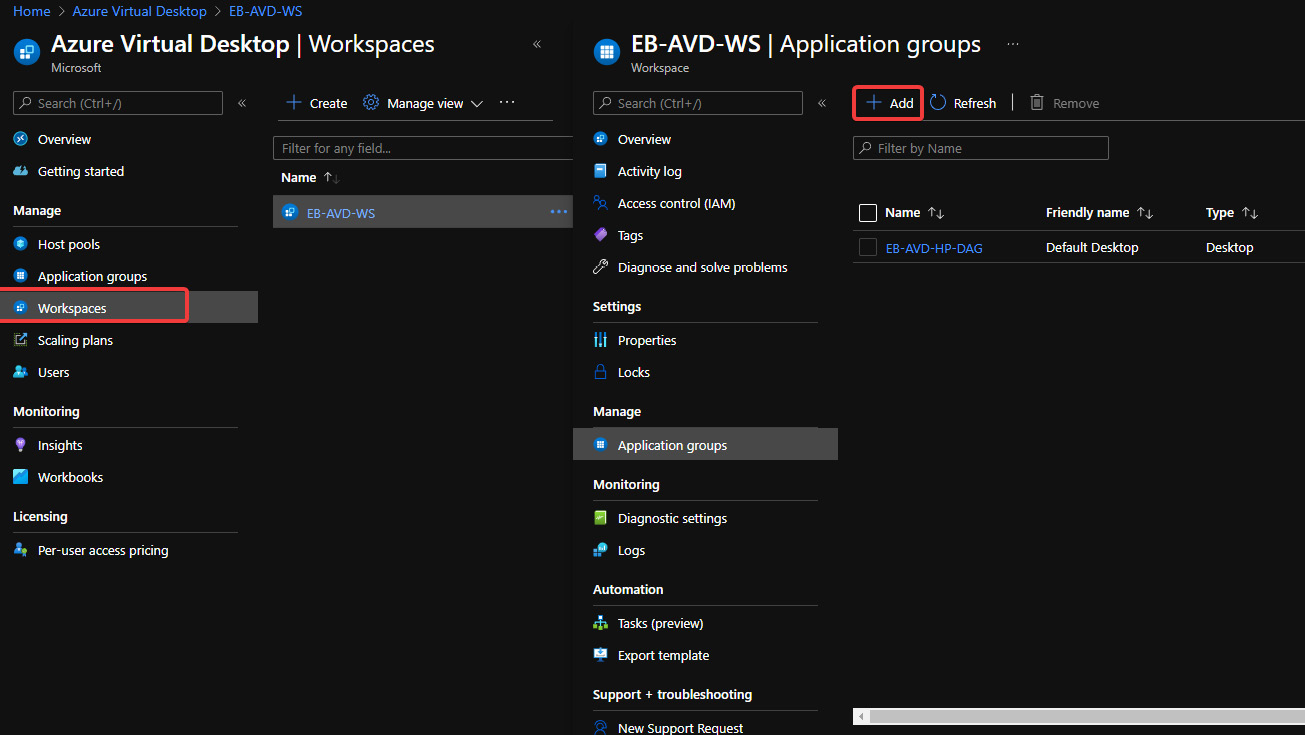
Figure 7.31 – Add an app group to a workspace in Azure Virtual Desktop
This section looked at the two options for personal session host assignment in Azure Virtual Desktop. We covered both automatic assignment and direct assignment.
We'll now move on to applying operating system and application updates on a running Azure Virtual Desktop host.
Applying OS and application updates on an Azure Virtual Desktop host
When it comes to updating Azure Virtual Desktop personal desktops or multi-session, it's recommended that you use Microsoft Endpoint Manager. However, you can carry out manual update tasks on the image and then update the version within the Azure Compute Gallery.
Important Note
The use of Azure Update Management is not supported for client Windows operating systems. You can read more here: https://docs.microsoft.com/azure/automation/update-management/operating-system-requirements#supported-operating-systems.
It is recommended that you use automatic enrollment to Microsoft Endpoint Manager using Group Policy. It is also advised that you use device credentials for enrollment rather than user credentials.
Configuring a validation pool
Validation pools are great for validating Azure Virtual Desktop service updates. Validation host pools are where services updates are applied in the first instance. This essentially allows you to monitor and test service updates before they are applied to your production or non-validation environment.
Validation host pools help you identify and discover issues from changes that are introduced from service updates. If you don't use a validation host pool, you may not discover any changes or errors introduced, which could impact your production environment.
Tip
It's recommended that you deploy a validation host pool to enable the testing of all future updates to the Azure Virtual Desktop service.
You can also change non-validation host pools to a validation environment; here is how:
- Sign in to the Azure portal UI using the following URL: https://portal.azure.com.
- Search for and select Azure Virtual Desktop within the search bar located at the top of the web page.
- On the Azure Virtual Desktop page, from the left-hand side menu, select Host pools.
- Select the name of the host pool you want to edit.
- Select Properties:
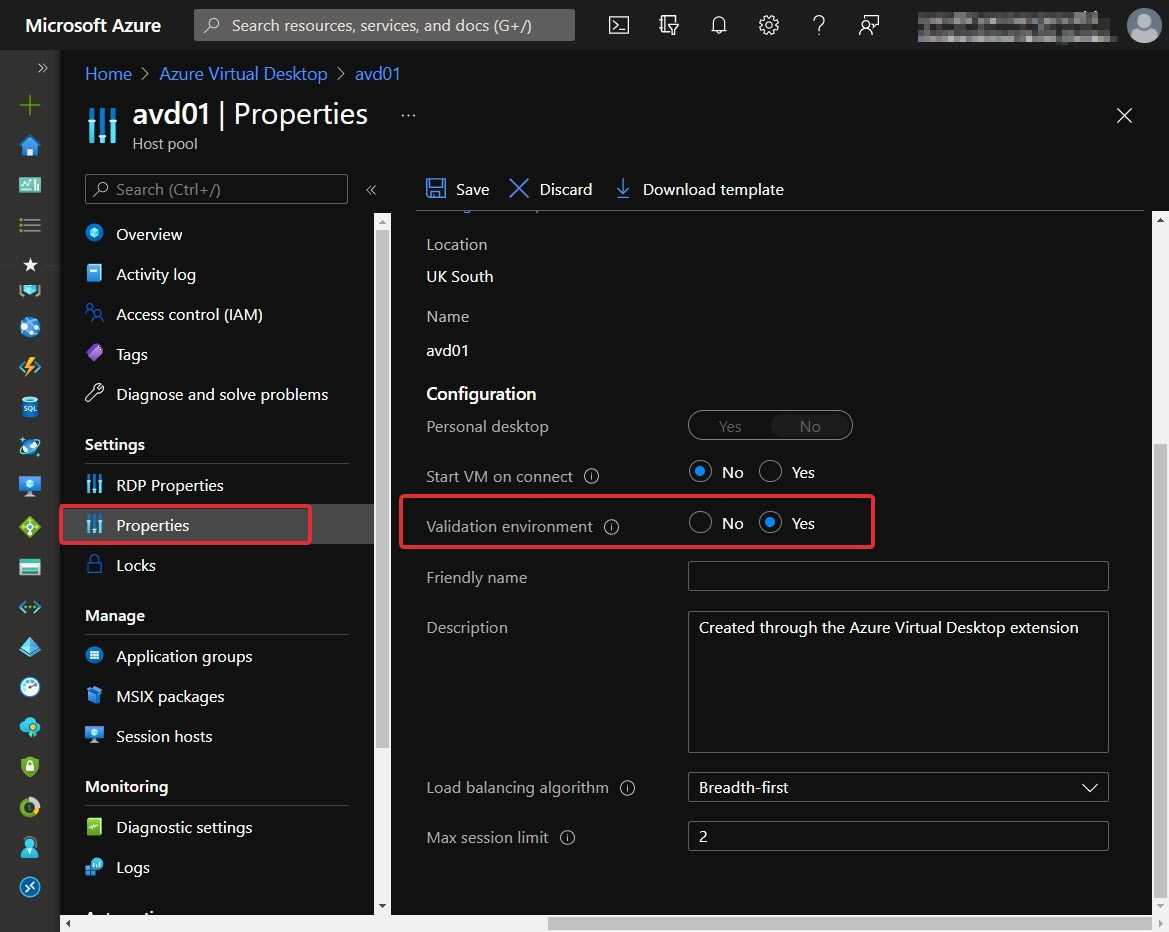
Figure 7.32 – Validation environment field within the properties of a host pool
- Change Validation environment to Yes to enable the validation environment.
- Select Save. Then the settings will be applied
To configure the validation environment using PowerShell, use the following cmdlets:
Update-AzWvdHostPool -ResourceGroupName <resourcegroupname> -Name <hostpoolname> -ValidationEnvironment:$true
The following example shows you how to set an existing host pool to a validation environment:
Update-AzWvdHostPool -ResourceGroupName az140pw -Name pwdeployment -ValidationEnvironment:$true
Here's the output:
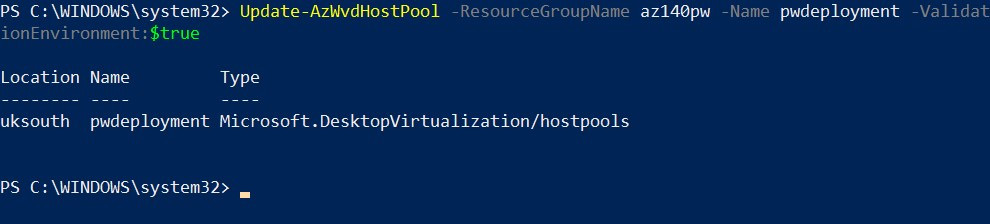
Figure 7.33 – Set a host pool to be a validation environment via PowerShell
There you have it – you've changed an existing host pool to a validation pool using the Azure portal and PowerShell. We'll now move on to looking at security and compliance settings that you can apply to session hosts.
Applying security and compliance settings to session hosts
Session hosts are virtual machines that run within your Azure subscription, which are connected to an Azure virtual network. The overall security of an Azure Virtual Desktop deployment depends on the security controls you apply to your session hosts.
Here are some tips for session host security: https://docs.microsoft.com/azure/virtual-desktop/security-guide.
Endpoint protection/detection and threat response and vulnerability management
It is advised that you should enable a supported endpoint production product on your Azure Virtual Desktop session hosts. There is the option of using Microsoft Defender antivirus or third-party vendors.
Tip
When configuring antivirus for Azure Virtual Desktop, make sure you exclude FSLogix VHD/VHDX and MSIX App Attach VHD/VHDX/CIMFS file extensions.
As security threats are becoming a daily occurrence and threats are becoming more complex, it is recommended that you deploy some form of endpoint detection and response (EDR) product to enable advanced detection and response capabilities. For example, you can use Microsoft Defender for Endpoint or others, including network virtual appliances that come with built-in threat detection capabilities that listen on the Azure virtual network.
You can use Azure Security Center to identify vulnerabilities in applications and operating systems. This helps you identify problems using vulnerability assessments. You can also use Microsoft Defender for Endpoint, which offers a level of vulnerability management for desktop operating systems and web content filtering. You can read more about web content filtering here: https://docs.microsoft.com/microsoft-365/security/defender-endpoint/web-content-filtering.
As shown in the previous section, Azure helps you address vulnerabilities within your environment by allowing you to schedule updates and apply patches to your session hosts. These can be both personal and pooled host pools.
Session screen locks
As the world has made a significant shift to working anywhere, especially from home, due to the global COVID-19 pandemic, you may want to consider configuring a machine's screen to lock during idle time, requiring the user to reauthenticate when they come back to unlock the screen. This is to prevent unauthorized access to company devices. This not only applies to Azure Virtual Desktop but should apply to all devices deployed in a business. It's also important to not get confused between screen locks and session timeouts. Screen locks are useful for thin client devices where the device is static and usually installed within the organization's offices. Session time outs are for remote connections where a user has not used the keyboard or mouse for a period of time and the session disconnects.
Configuring maximum inactive time and disconnection policies
A good security hardening technique for Virtual Desktop environments is configuring maximum inactive times and disconnection policies. The inactive time and disconnection policies can vary for each organization. However, it's suggested that 5 to 15 minutes is the time range you should consider when configuring these settings.
The following screenshot shows the user settings within a Group Policy Object for the Set time limit for active but idle Remote Desktop Services sessions setting. This setting is used for controlling idle settings.
You can configure the policy setting using the following group policy path Computer ConfigurationAdministrative TemplatesWindows ComponentsRemote Desktop ServicesRemote Desktop Session HostSession Time Limits:
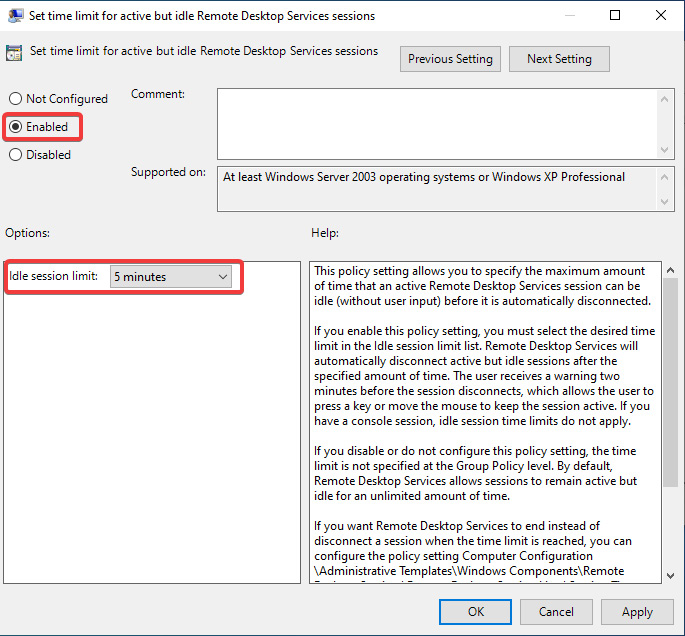
Figure 7.34 – Idle session limit set to 5 minutes
The following screenshot shows you the setting for Set time limit for disconnected sessions. This is used to remove any disconnected sessions from a Session Host after the specified time value set:
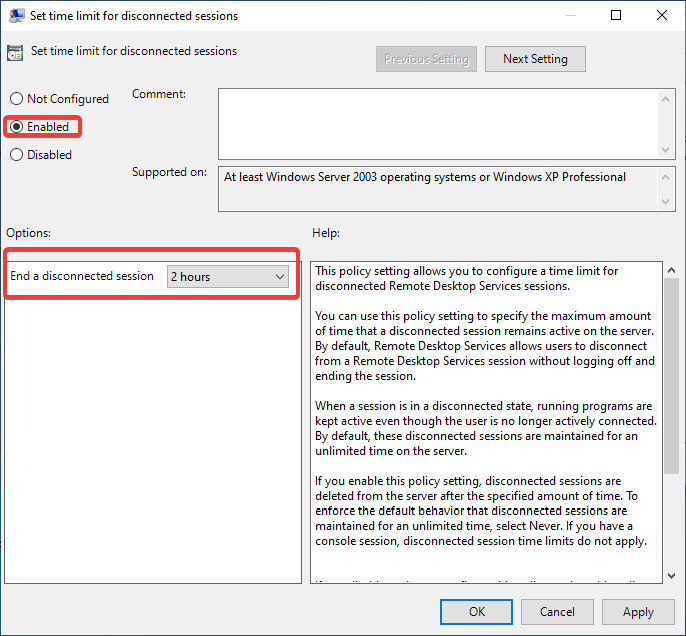
Figure 7.35 – Setting for Set time limit for disconnected sessions
The following screenshot shows all the policies you can configure within the Session Time Limits folder:
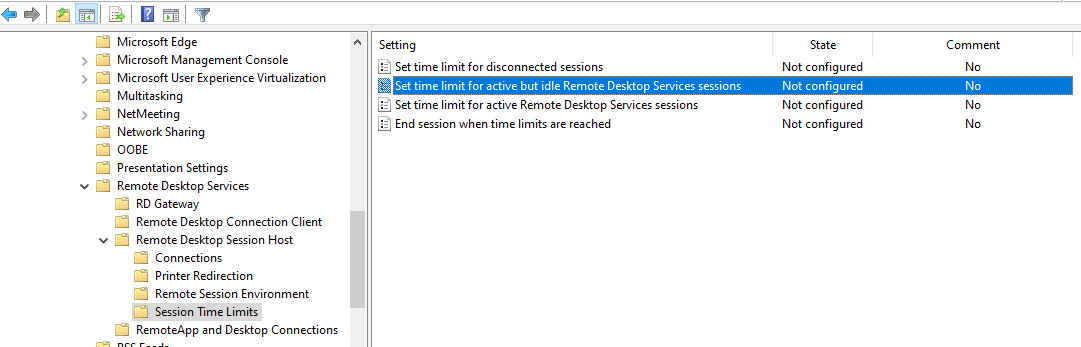
Figure 7.36 – Settings available under Session Time Limits
Important Note
Please note that disconnecting idle tasks such as rendering or simulations can interrupt users. It's advised that you check before enabling such policies.
Application security within session hosts
It is important to secure the applications running within the session host. It is recommended that you use tools such as Microsoft Security Policy Advisor (https://docs.microsoft.com/en-us/DeployOffice/overview-of-security-policy-advisor) to help identify possible issues with Microsoft 365 Apps for enterprise.
Tip
Remember to check other applications and apply the appropriate AppLocker and firewall rules to limit communication if not required for use within the organization.
Limiting operating system capabilities
It is advised that you go through a security hardening exercise to ensure you have limited security exposure and to reduce it if not. Some of the additional ways of achieving this are to use Group Policy and RDP custom policies.
You can control device redirection by redirecting drives, USB devices, and printers to a user's local device remotely.
The following link details the different device redirections and the restrictions you can set:
https://docs.microsoft.com/azure/virtual-desktop/configure-device-redirections
You can find the full list of RDP settings here:
https://docs.microsoft.com/windows-server/remote/remote-desktop-services/clients/rdp-files
Recommendation
Microsoft recommends you assess/evaluate your security requirements and check which features you need and should disable.
A common VDI practice is to restrict Windows Explorer access by hiding local and remote drive mappings. This still applies with Azure Virtual Desktop. This prevents users from discovering unwanted information about systems and other users.
You should avoid direct RDP access to session hosts in your environment. If you need direct RDP access for administration or troubleshooting, enable just-in-time access, use Azure Bastion as covered in Chapter 6, Creating Host Pools and Session Hosts, or use Quick Assist if you are supporting a user.
Consider limiting user permissions for accessing local and remote file systems. You can restrict user permissions by ensuring that your local and remote file systems use access control lists with the least privilege configured. This ensures that users can only access what they need and can't change or delete critical resources.
Prevent users from installing and running unwanted software on session hosts. As mentioned previously, you can enable AppLocker for additional security on session hosts, ensuring that only the apps you allow can run on the host. You can also use app masking for applications you don't want specific user groups to see.
In this section, we took a look at some high-level session host security tips. However, we look at security in more detail in Chapter 11, Managing Security.
Summary
In this chapter, we built on the previous chapter, where we deployed a session host.
In addition, this chapter looked at configuring session hosts within a host pool. We learned how to deploy and configure a Windows Server session host licensing server to support the use of the Windows Server operating system within Azure Virtual Desktop. We then looked at the configuration of host pool settings, RDP properties, load balancing methods, and assigning users to host pools. We then finished off the chapter by learning how to apply operating system and application updates to a session host as well as applying security compliance settings to session hosts.
In the next chapter, we will take a look at creating and managing session host images.
Questions
- When using server-based operating systems for Azure Virtual Desktop, what resource do you require?
- What is the purpose of MaxSessionLimit within a host pool?
- What considerations are there to be taken into account when configuring antivirus for Azure Virtual Desktop?
- Which group policy would you set for controlling idle time out session settings within Azure Virtual Desktop?
Answers
- When using server-based operating systems, you will need an additional server to host the RD client access licenses that the server license will require.
- MaxSessionLimit is used to limit the number of user sessions on a single session host.
- Ensure that you have set the exclusion rules for both FSLogix profiles and MSIX app attach on the appropriate file shares/storage.
- Set time limit for active but idle Remote Desktop Services sessions.