
Chapter 14: MSIX App Attach
In this chapter, we take a deep dive into MSIX app attach and the various terms and features associated with it. We then look at how to create an MSIX package and MSIX image. Then we progress on to configuring MSIX app attach and publishing a remote app using MSIX app attach. To finish off the chapter, we cover high-level troubleshooting for common issues.
In this chapter, we look at the following:
- Configuring dynamic application delivery by using MSIX app attach
- What is MSIX?
- What does it look like inside MSIX?
- What is MSIX app attach?
- MSIX app attach terminology
- An overview of how MSIX app attach works
- Prerequisites
- Creating an MSIX package
- Creating an MSIX image
- Configuring Azure files for MSIX app attach
- Importing the code-signed certificate
- Uploading MSIX images to Azure Files
- Configuring MSIX app attach
- Publishing an MSIX app to a RemoteApp
- Troubleshooting MSIX app attach
Configuring dynamic application delivery by using MSIX app attach
In this section, we'll look at MSIX app attach – a dynamic application delivery capability for Azure Virtual Desktop. This is a relatively new technology to the application delivery market that offers the ability to deliver applications to users by logging on or in-session. Let's learn more about it in detail.
What is MSIX?
MSIX is a modern application packaging format and development framework positioned as the future application packaging format. When combined with MSIX app attach, it provides a modern and dynamic application delivery mechanism.
MSIX offers a container-based packaging solution for Windows applications, simplifying the application installation process for IT admins and users. Applications packaged using MSIX run in a lightweight application container. The MSIX app and child processes run inside this container and are isolated using the filesystem and registry virtualization rather than natively on the operating system.
MSIX applications can read the global registry. Additionally, an MSIX app writes to its own virtual registry and application data folder. This app data is then deleted when the app is uninstalled or reset using the apps and features settings page. Other applications do not have access to the virtual registry or virtual filesystem of an MSIX application.
Tip
Services work slightly differently from typical applications where the service runs outside of the container. If an application has a service, the service component does not run within the container.
Existing applications can be repackaged or converted to MSIX using the Microsoft MSIX packaging tool or via third-party packaging products such as appCURE.
Here are some of the benefits of using MSIX as a packaging format:
- Clean removal: When you remove MSIX apps, you can delete all associated application data. As a result, no data remains in the registry or filesystem. However, there is the caveat that you must ensure the MSIX package has not written any configurations outside the container.
- Container-type technology that isolates the application from the rest of the operating system for security reasons.
- Predictable and secure deployment.
- The MSIX packaging format removes the deduplication of files across applications, and Windows manages the shared files across different applications. The applications are independent of each other, so updates will not impact other applications that share the file. A clean uninstall is guaranteed even if the platform manages shared files across applications.
Let's now explore the inner workings of MSIX and how the container architecture works.
What does it look like inside MSIX?
To recap on the previous section, we looked at applications that are packaged in an MSIX lightweight container. The MSIX package writes to its own virtual registry and application data folder. It is important to note that the application processes run inside that container.
Applications installed in the MSIX packaging format are located in the C:program filesWindowsApps folder. Each package folder contains a set of standard files required for the MSIX application to communicate with the Windows operating system API.
The following figure shows the structure of a typical MSIX package:

Figure 14.1 – Structure of an MSIX package
The following table details the core contents of an MSIX package:

Now that we have finished looking at the fundamentals of MSIX, we will progress with looking at MSIX app attach.
What is MSIX app attach?
MSIX app attach a relatively recent technology advancement and addition to the Azure Virtual Desktop feature portfolio. This technology facilitates the delivery of applications to a user session within Azure Virtual Desktop by dynamically attaching the applications in an MSIX image. This new capability delivers applications on logon and/or in-session hence the term dynamic.
One of the critical benefits of MSIX app attach over other application delivery technologies is that it has been designed to deliver applications that do not impact or delay user login times. It also offers reduced management that IT needs to perform as applications are not installed natively on the Azure Virtual Desktop image. This allows organizations to modernize/enhance their virtual desktop estate and move from dedicated/specific virtual machines for applications. When using MSIX app attach, applications are delivered dynamically to any VM that a user may log in to. This saves on complexity, time, and costs.
The following figure depicts some of the benefits of MSIX app attach:

Figure 14.2 – The four key benefits of MSIX app attach
Important Note
It is important to note that MSIX app attach requires that an MSIX package is in an expanded state, also known as an MSIX image (a virtual disk or Composite File System (CimFS) image). Expanding is the process term for taking the MSIX package, unzipping it, and applying the appropriate system permissions to the file structure inside the chosen virtual disk or CimFS image.
The following figure illustrates both FSLogix profile containers and MSIX app attach in Azure Virtual Desktop:

Figure 14.3 – MSIX app attach and FSLogix profile containers working together
From the preceding diagram, you will note that typical applications are installed within the operating system image. The user profiles are attached on logon, and departmental/group applications are dynamically delivered to the user on logon.
Important Note
The term dynamically refers to the process of attaching a virtual disk or CimFS image to the operating system rather than the traditional method of installing an application natively.
MSIX app attach terminology
There are five different process stages to call out for MSIX app attach in terms of terminology:

We'll now move on to looking at how MSIX app attach works within Azure Virtual Desktop.
An overview on how MSIX app attach works
There are typically five steps to delivering applications using Azure Virtual Desktop and MSIX app attach:
- You would sign in and select the host pool you should have access to from the Azure Virtual Desktop client. The process is similar to opening published desktops or RemoteApp applications from the Azure Virtual Desktop environment.
- You're assigned a virtual machine within the host pool from which a RemoteApp or Remote Desktop session is created. Then, the Azure Virtual Desktop client interacts with the session.
- If the user profile is configured, the FSLogix agent on the session host provides the user profile from the file share. The file share can be Azure Files, Azure NetApp Files, or an infrastructure as a service (laaS) file server.
- Applications that are assigned to you are read from the Azure Virtual Desktop service.
- MSIX app attach applications are registered to the operating system for you from the attached MSIX virtual disk. For example, the virtual disk might be on an IaaS file share or Azure NetApp Files.
The following diagram highlights the preceding five key steps:

Figure 14.4 – Five steps for delivering MSIX app attach to Azure Virtual Desktop users
Now that we have covered the basics of MSIX app attach, we'll move on to the prerequisites and getting started with MSIX app attach.
Prerequisites
Before we can start provisioning MSIX images and applications to users, we first need to package some applications into the MSIX app attach format.
Important Note
You will need a code-signing certificate to create MSIX packages, and MSIX app attach. The certificate can either be a public, domain, or self-signed certificate.
The five steps to prepare your package for MSIX applications are as follows:

It is important to note that you cannot use Azure Active Directory Domain Services with MSIX app attach.
Tip
Azure Files has a maximum concurrent handle limit of 2,000. It is advised that enterprises use Azure NetApp Files when planning to use MSIX app attach. Read more on this limitation here: https://docs.microsoft.com/en-us/azure/storage/files/storage-files-scale-targets#file-scale-targets.
In the next section, we look at creating an MSIX package.
Creating an MSIX package
Before we can create an MSIX image, we need the application in the correct format, which is an MSIX package. You will first need to package your application with the MSIX packaging tool or a third-party tool such as appCURE Studio.
Important Note
MSIX app attach does not support automatic application updates. Therefore, you must disable automatic updates on the operating system. Otherwise, you could end up with unusable applications for the end user(s) if updates occur. It is also important to note that you may need to turn off auto-updating within the application if it supports such a feature.
To turn off automatic updates on the operating system image, you need to run the following script within Command Prompt:
rem Disable Store auto-update:
reg add HKLMSoftwarePoliciesMicrosoftWindowsStore /v AutoDownload /t REG_DWORD /d 0 /f
Schtasks /Change /Tn "MicrosoftWindowsWindowsUpdateAutomatic app update" /Disable
Schtasks /Change /Tn "MicrosoftWindowsWindowsUpdateScheduled Start" /Disable
rem Disable Content Delivery auto download apps that they want to promote to users:
reg add HKCUSoftwareMicrosoftWindowsCurrentVersionContentDeliveryManager /v PreInstalledAppsEnabled /t REG_DWORD /d 0 /f
reg add HKLMSOFTWAREMicrosoftWindowsCurrentVersionContentDeliveryManagerDebug /v ContentDeliveryAllowedOverride /t REG_DWORD /d 0x2 /f
Important Note
You can create your own MSIX packages or you can download them from the Integrated Software Vendor (ISV). More and more ISVs are turning to MSIX as the packaging format of choice. A good example is Mozilla Firefox. You can read more here: http://gecko-docs.mozilla.org-l1.s3.us-west-2.amazonaws.com/browser/installer/windows/installer/MSIX.html.
To get started with creating your first MSIX package, you will need to download the MSIX package tool from the following URL:
https://www.microsoft.com/p/msix-packaging-tool/9n5lw3jbcxkf
The following screenshot shows the main UI page of the MSIX packaging tool:

Figure 14.5 – The main page of the MSIX packaging tool
We'll now move on to look at packaging a simple application in the MSIX packaging format.
Packaging a simple application in an MSIX container
Before we take a look at creating a package, I want to briefly cover some of the options available to you when you create an MSIX package. Firstly, even though it's common, you don't have to package one app per MSIX package. What this means is you can package multiple packages in the same MSIX package if required.
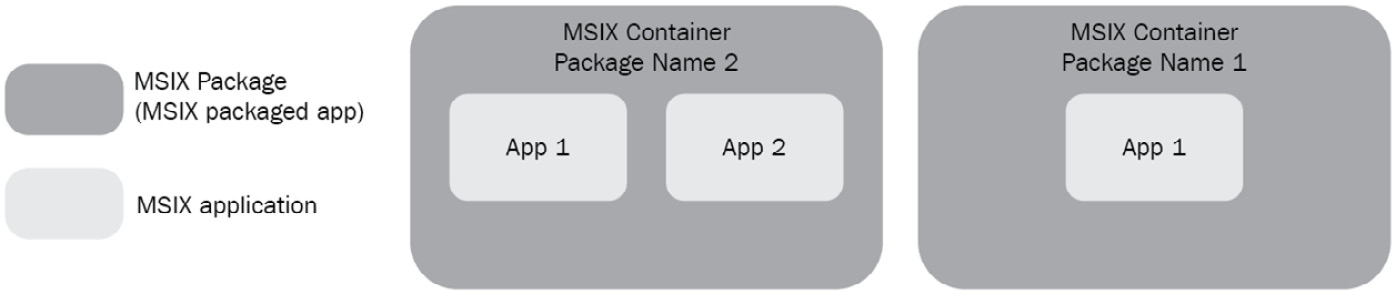
Figure 14.6 – Two different options when creating an MSIX package
Before we create an MSIX package, we need a certificate. As an example, I will create a self-signed certificate.
To create a self-signed certificate, you can use the following PowerShell script:
New-SelfSignedCertificate -Type Custom -Subject "CN=RMSITBLOG, O=Ryanmangansitblog, C=GB" -KeyUsage DigitalSignature -FriendlyName "Your friendly name goes here" -CertStoreLocation "cert:CurrentUser my" -TextExtension @("2.5.29.37={text}1.3.6.1.5.5.7.3.3", "2.5.29.19={text}")
Once you have the CER certificate, you can use the following PowerShell cmdlets to convert it into a PFX certificate:
$password = ConvertTo-SecureString -String -Force -AsPlainText Export-PfxCertificate -cert "Cert:CurrentUserMy" -FilePath .pfx -Password $password
We'll now move on to looking at creating an MSIX package:
- First, download and install the MSIX Packaging Tool.
- Launch the application and you should see the following screen:

Figure 14.7 – The home page of the MSIX Packaging Tool
- Click the cog located in the top-right and corner of the home page.
- Scroll down to the certificate section:

Figure 14.8 – Save the certificate settings for application packaging
- Select Sign with a Certificate (.pfx) and enter the path of the certificate and password.
- Optional, however somewhat important, enter a time stamp URL so that your packages do not stop working when the certificate expires.
- Click Save settings.
We'll now move on to creating the MSIX package:
- On the home page of the MSIX Packaging Tool, click Application package:
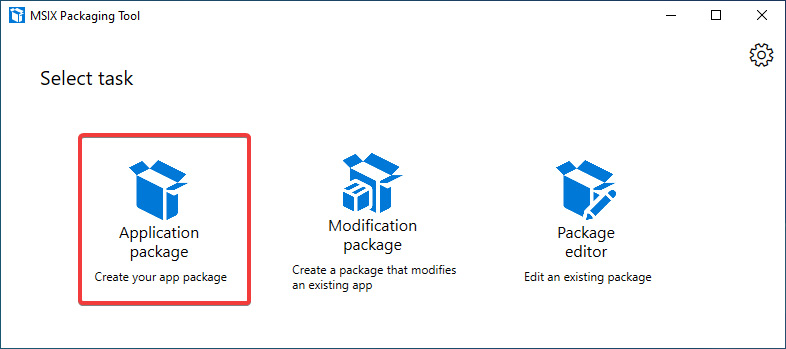
Figure 14.9 – Application package icon highlighted
- Select Create package on this computer:

Figure 14.10 – Create package on this computer
- Click Next.
- Within the Create new package screen, you will see two sections, Additional preparations and Recommended action items:

Figure 14.11 – Prepare computer page
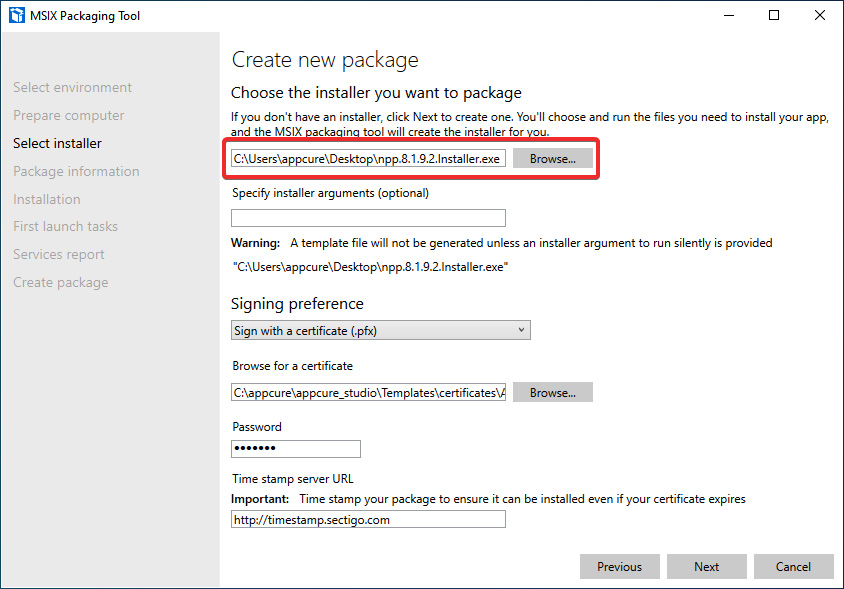
Figure 14.12 – Installer selection page
Important Note
Please note that if you have not set a time stamp server URL, then when the certificate expires, you will no longer be able to use the app. This will require the application to be signed again with an in-date certificate.
- Select the application installer you want to use. In this example, we are using Notepad++.
- You will also note that the certificate settings we previously configured are now shown within the Signing preference section.
- Click Next to continue.
- You will now be presented with the Package information page.
- All fields marked with an asterisk are mandatory:

Figure 14.13 – Package information page
Type
It's important that the private key and CN (organization's name) matches the package for the code-signing process to work when the package is created. You should see the notification alongside the publisher name field stating Subject of the certificate provided. If you do not see this, then you may want to check your certificate.
- Once you have filled out all the application information, you can proceed with the next page, Installation. Click Next.
- You will then see the Installation page and the application installer will launch:

Figure 14.14 – Installation page
- Follow the steps to install the package and launch it on install completion.
- Once installed and launched, make the required setting changes within the app and, when complete, close the application.
- Click Next within the MSIX Packaging Tool:

Figure 14.15 – Entry points for the application
- Ensure you have set the required entry points on the Manage first launch tasks page, then click Next. You will then be prompted with the following:

Figure 14.16 – Prompt
- Click Yes, move on if you have finished installing apps.
- On the Services report page, exclude any services if required. In this example, there are none. Click Next to continue.
- On the final page, Create package, select the save location and click Create package:

Figure 14.17 – Package successfully created
- The final step is to launch the app to make sure it's working:
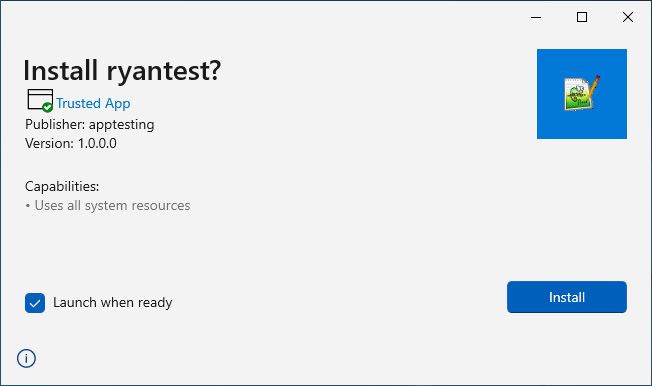
Figure 14.18 – MSIX package ready to install on the operating system
There you have it – we just walked through the steps of creating an MSIX package.
The final point to cover in this section is the Package Editor feature within the MSIX Packaging Tool.
Using the Package Editor feature offers the ability to set app capability declarations for the MSIX package, which are essentially used for specifying specific access to areas of the Windows APIs and resources such as pictures, music, and devices such as a microphone or camera:

Figure 14.19 – Package editor
The Package Editor also enables the ability to add and remove files and modify the virtual registry, which includes the importing and exporting of registry settings.
Let's now move on to taking a look at creating an MSIX image.
Creating an MSIX image
An MSIX image is essentially one of three different disk types: VHD, VHDX, or a CIM image. These virtual disks/images are mounted or attached to the session host, and the content is then registered using the native operating system APIs.
The following figure shows the typical structure of an MSIX image. As you can see from the key elements, three layers make up the structure of the MSIX image:

Figure 14.20 – An illustration of the structure of an MSIX image
What is the Composite File System (CimFS)?
The CIM image is essentially a file-backed image format that is a similar concept to WIM. Read more on WIM here: https://docs.microsoft.com/en-us/windows-hardware/manufacture/desktop/wim-vs-ffu-image-file-formats.
The term composite is used as it can contain multiple file system volumes that can be mounted individually but still share the same data files.
The following figure shows you the three types of files that you should expect to see when creating a CIM image:

Figure 14.21 – The structure of a composite image (CIM)
When you create a CIM image, you will see three file types in the folder: ObjectID, region files containing the data, and the composite image file, .cim, that contains the metadata.
Tip
When creating a CIM image, it's advised that you create one per folder. If you create multiple CIM images in the same folder it will be very difficult for you to separate the package files. This is something I call CIM sprawl.
The following link will help you address this issue: https://ryanmangansitblog.com/2021/02/11/msix-app-attach-how-to-manage-cimfs-file-sprawl-tips-and-tricks/.
CimFS does offer performance benefits compared to traditional virtual disk types (VHD and VHDX). You can read more on the performance benefits here: https://docs.microsoft.com/en-us/azure/virtual-desktop/app-attach-glossary#cim.
Creating an MSIX image
To create an MSIX image, you will need to download the MSIXMGR tool used for creating MSIX images. You can download the MSIXMGR tool from here: https://aka.ms/msixmgr.
The following steps detail the process to expand an MSIX file:
- Download the MSIXMGR tool if you haven't already.
- Unzip MSIXMGR.zip into a local folder.
- Open Command Prompt in elevated mode.
- Find the local folder from step 2.
- Run the following command in Command Prompt to create an MSIX image:
msixmgr.exe -Unpack -packagePath -destination [-applyacls] [-create] [-vhdSize ] [-filetype ] [-rootDirectory ]
Here's an example of the use of the MSIXMGR tool:
msixmgr.exe -Unpack -packagePath "C:apps otepadpp_1.0.0.0_x64__ekey3h7rct2nj.msix" -destination "C:apps estapp.vhdx" -applyacls -create -vhdSize 2048 -filetype VHDX -rootDirectory MSIX
The output should look similar to the following screenshot:
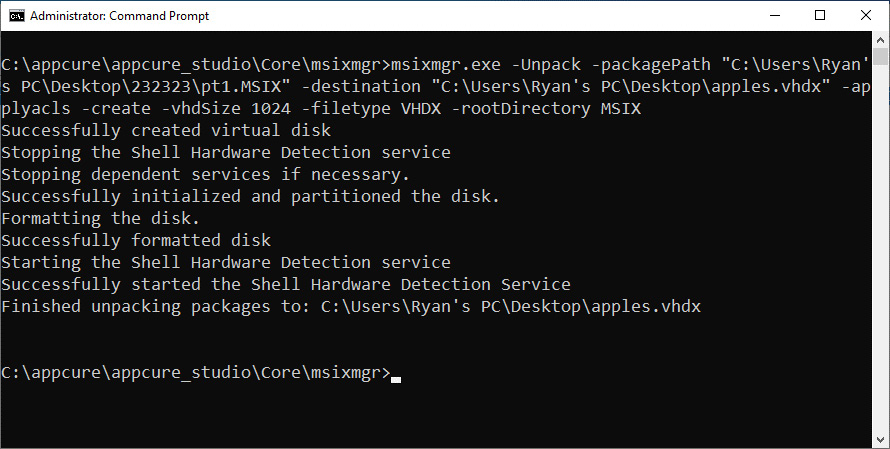
Figure 14.22 – The output of running the msixmgr.exe cmdlet
Once you have created your MSIX image, we need to progress to configuring Azure Files for MSIX app attach:
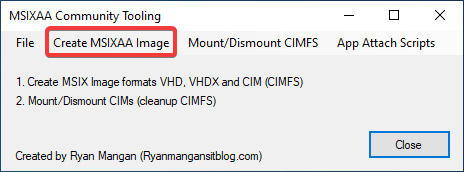
Figure 14.23 – MSIXAA community application main page
Select the Create MSIXAA Image button on the main form. This will then load the MSIXAA image creation form.
Within the form shown in the following screenshot, you have the option to create an MSIX image of one of the three types of MSIX images. Once you have selected the MSIX package you want to convert into an MSIX image and completed the required fields of the form, you can proceed to create an MSIX image by clicking Create MSIX Image:

Figure 14.24 – MSIXAA community tooling app that can be used to create MSIX images
You can also use the MSIXAA Community Tooling application found on GitHub: https://github.com/RMITBLOG/MSIX_APP_ATTACH/releases/download/2.1/MSIXAA_27052021.msi.
For more information on using the Microsoft MSIXMGR tool, you can visit this link: https://docs.microsoft.com/azure/virtual-desktop/app-attach-msixmgr.
For more information on creating MSIX packages and images with appCURE, see the following link: https://www.appcure.io.
Configuring Azure Files for MSIX app attach
In this section, we take a look at configuring Azure Files for MSIX app attach. This is an important step as incorrectly configuring the storage and permissions will impact users when applications are trying to attach and register within user sessions. The file share is a process similar to FSLogix in terms of setting up. However, a significant difference is you need to ensure that the specific permissions are assigned correctly.
Important Note
Make sure the storage used has a latency of less than 400 ms as per Microsoft's recommendations.
There are nine steps required for configuring Azure Files for MSIX app attach. The following table summarizes these steps:

Let's now take a look at these steps in more detail:
- We first need to create the security group within Active Directory Domain Services. To do this, we would create a security group in Active Directory, as shown in the following screenshot:
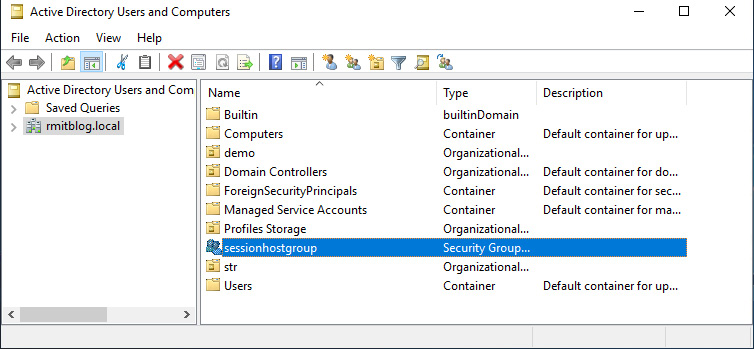
Figure 14.25 – The session host group being created
- Once the group has been created, we then add the computer accounts to the group, as shown in the following screenshot:

Figure 14.26 – Session host computer accounts added to the synchronized AD group
- Once complete, you then need to ensure the security group has been synchronized with Azure Active Directory to ensure that the computer accounts are synced:

Figure 14.27 – Active Directory Domain Services group synchronized with Azure Active Directory
- Create an Azure storage account as shown in Chapter 5, Implement and Manage Storage for a Windows Virtual Desktop Environment, in the Configure storage accounts section.
- Create a file share within the storage account as shown in Chapter 5, Implement and Manage Storage for a Windows Virtual Desktop Environment, in the Configure file shares section.
- Join the storage account to Active Directory Domain Services. To complete these steps, you will need to follow the guidance in the Microsoft documentation detailed here: https://docs.microsoft.com/azure/storage/files/storage-files-identity-auth-active-directory-enable.
Once configured, you should see the Active Directory field shows Configured on the File shares page | File share settings as shown in the following screenshot:

Figure 14.28 – Active Directory is configured for Azure Files
- Add the storage file data SMB share contributor role to the synced AD DS group that contains the computer object of the session hosts:

Figure 14.29 – Role assignment for the storage file data SMB share contributor role assigned to the session host group
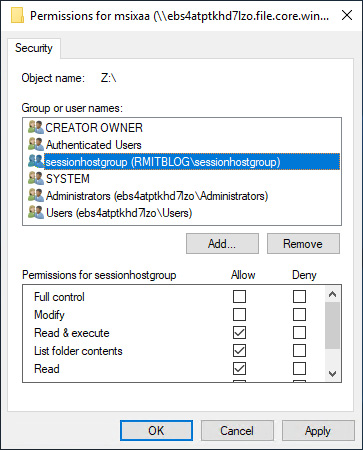
Figure 14.30 – Adding the sessionhostgroup group to grant NTFS permissions for the session hosts on the file share

Figure 14.31 – Admin user account added for accessing and managing the file share
Important Note
It is recommended that you reboot the session hosts once the configurations are complete, as access may fail until reboots have been completed.
Once all steps are complete and you have rebooted the session hosts, you should be able to navigate to the share path using the Active Directory user account you set in step 9 to test connectivity to the file share:

Figure 14.32 – Active Directory access to the Azure Files file share and a test file created to prove permissions are configured correctly
Important Note
You can also use private endpoints when using Azure Storage to improve security. This enables you to configure network traffic between clients on the VNet and storage account to traverse over the VNet via a private link rather than publicly. This essentially means using the Microsoft backbone network rather than the public internet.
This section provided a high-level overview of configuring the Azure Files File share for MSIX app attach, including the nine steps required for Active Directory authentication. In the next section, we look at how to install the certificate to all the required session hosts using MSIX app attach.
Importing the code-signed certificate
Before we upload MSIX images into the file share, we'll take a look at installing the code-signed certificate on all required session hosts.
You can essentially use three types of code-signed certificate with MSIX app attach:
- Self-signed certificates
- Public code signed certificates
- Internal certificate authority certificates
Tip
Enterprises should use public code-signed certificates or an internal certificate authority. It's not recommended that you use a self-signed certificate for production use. It is also important to note that you should time stamp your application packages as if the certificate expires and you have not signed the MSIX package, then the app will stop working.
To install the certificate on a session host, you would open a new MMC snap-in for the local computer. You would then add the Certificates (Local Computer) snap-in and click OK:

Figure 14.33 – MMC snap-in and adding the Certificates snap-in for the local computer
Once you are in the Certificates (Local Computer) snap-in, right-click within the Certificates window, typically the middle panel within the MMC console. Right-click and select All Tasks | Import:

Figure 14.34 – Import button within the MMC snap-in
You now need to follow the wizard by selecting the certificate you want to import and ensure that you import it to the Trusted People certificate store:
Tip
You have the choice of importing the certificate as Current User or Local Computer. There is no right or wrong answer as it's dependent on your chosen design. Some may argue that controlling the installation of a certificate per user has security benefits, whereas other organizations may prefer the local machine certificate installation option.
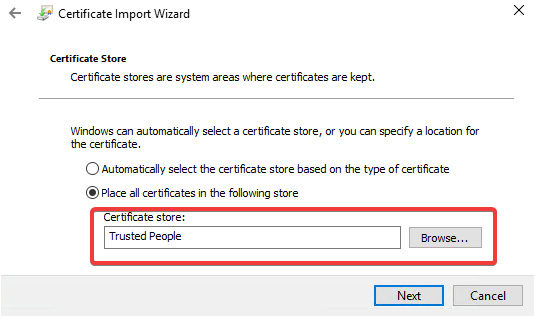
Figure 14.35 – Trusted People
Once imported, you will see the certificate inside the Trusted People folder as can be seen in the following screenshot:
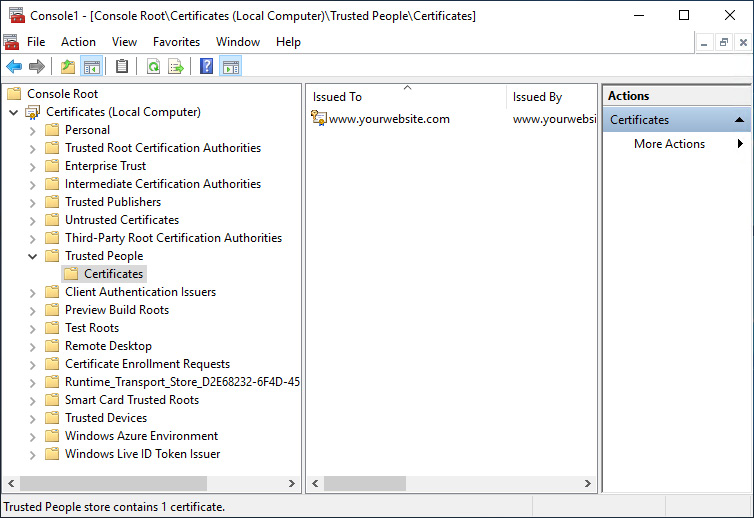
Figure 14.36 – Certificate has now been imported into the Trusted People store
You have now completed the steps for installing a code signing certificate on a session host.
Important Note
It is recommended that you deploy the certificate to a template image or use custom script extensions to automate the deployment of certificates to your session hosts.
Now that we have covered creating and installing certificates, we'll move on to looking at uploading MSIX images to Azure Files.
Uploading MSIX images to Azure Files
In this section, we will briefly look at how to upload the required MSIX images to Azure Files.
Tip
In larger environments, it is recommended that you package your applications on an isolated session host to keep file transfer times down. You will appreciate this as it's much faster to copy files from a packaging virtual machine within Azure than it would be from on-premises to Microsoft Azure.
The most common method for transferring MSIX image files to Azure Files is by connecting to the SMB share directly on your network. However, there are a few other tools and methods you can use, such as the following:
- The Azure portal: You can upload files within the Azure portal using your web browser. You simply click the upload icon within the share as shown in the following screenshot:

Figure 14.37 – The feature to upload files to Azure Files within the Azure portal
- You can also use AzCopy, which is a command-line transfer tool. You can download this from the following URL: https://docs.microsoft.com/azure/storage/common/storage-use-azcopy-v10.
AzCopy also offers the capability to preserve file permissions during copying, similar to how Robocopy works if you have ever used it.
- The final tool I wanted to cover is Storage Explorer. This is a standalone application that you can run on the packaging machine. It simplifies the transfer of files to Azure Files and other storage offerings within Microsoft Azure.
You can download Storage Explorer here: https://www.storageexplorer.com/.
The following screenshot shows the Microsoft Azure Storage Explorer application:

Figure 14.38 – Storage Explorer
This section looked at some of the options available to you for uploading files to Azure Files. Now that we have covered all the pre-MSIX app attach configuration tasks, we'll move on to look at configuring MSIX app attach.
Configuring MSIX app attach
In this section, we'll look at adding MSIX packages to a host pool within the Azure portal:
Important Note
Ensure you have installed the required code-signed certificates before proceeding with the steps detailed in this section. The configuration will fail on certificate validation if not installed on each session host within the host pool.
- To add MSIX packages, you will need to navigate to the MSIX packages blade located within the host pool. You will see the icon and the name MSIX packages in the Manage section in the menu on the left side:

Figure 14.39 – MSIX packages page within the host pool
- To add a package, you would simply have to click the Add button located within the menu bar.
The following steps detail how to add MSIX packages to your host pool. In the Add MSIX package tab, enter the following values:
- For MSIX image path, enter a valid UNC path pointing to the MSIX image on the file share (for example, \storageaccount.file.core.windows.netmsixshareappfolderMSIXimage.vhd). Select Add to query the MSIX container to check whether the path is valid when you're done:

Figure 14.40 – Add MSIX package blade
- To configure the MSIX package, select the required MSIX package name from the drop-down menu in the MSIX package field. This menu will only be populated if you've entered a valid image path in the MSIX image path textbox. If there is an error, you will see an error message appear onscreen in message format.
- For package applications, make sure the list contains all the MSIX applications you want to be available to users.
- Alternatively, enter a display name if you want your package to be more user-friendly in your user deployments:

Figure 14.41 – Add MSIX package blade and the package we are adding in this example
- Ensure the version number is correct.
- Select the Registration type you want to use. This will depend on your needs:
- On-demand registration essentially postpones the complete registration of the MSIX application until the user has launched the application. This is the registration type Microsoft recommends.
- Log on blocking is used to only register apps while the user is signing in. This is not recommended for most deployments as it can increase sign-in times for users.
- For the State field, select your preferred state:
- The Active status is used to enable users to interact with the package.
- The Inactive status instructs Azure Virtual Desktop to ignore the package and not deliver the package to users.
- When you're done, select Add.
- Once complete, you will see the package appear on the MSIX packages page, as shown in the following screenshot:

Figure 14.42 – The added package on the MSIX packages page
Now that we have added an MSIX package to the host pool, we'll now move on to assigning packages to an application group, also known as publishing an MSIX app to an application group.
Publishing an MSIX app to a RemoteApp
This section looks at assigning MSIX apps to a RemoteApp application group.
The following steps will guide you through publishing MSIX apps to application groups as remote apps:
Important Note
You can deliver MSIX applications to both remote app and desktop app groups. In this example, we are creating a remote app group for MSIX packages. To add applications to a desktop app group, navigate to the desktop app group and add the applications you require.

Figure 14.43 – The Add button to add applications to a desktop application group
- Navigate to the Azure Virtual Desktop page within the Azure portal, then select the Applications group button.
- Click Create.
- You will then be presented with the page Create an application group:

Figure 14.44 – Create an application group page
- Within the Basics tab, select the Host pool and provide an application group name, then click Next.
- You will then be presented with the Applications tab, where you can add applications by clicking Add applications. This will open the Add application blade, as shown in the following screenshot:

Figure 14.45 – Add application
- Once you have added the application(s), you can proceed to the next tab, Assignments. This is where you select the users and/or groups you would like to access the published applications. Once complete, click Next, which will show the Workspace tab.
- Within the Workspace tab, set the Register Application Group to Yes, then click Next.
- You can enable diagnostic settings and add Tags. If you don't need these two features, skip to Review + create and check your configuration:

Figure 14.46 – The Review + create section of Create an application group

Figure 14.47 – The created application group
There you have it – we have created an application group and assigned an MSIX package.
Important Note
When publishing applications, the default time for the update will be 5 minutes. The IT admin can adjust this. To change the default check interval, you can use the following registry key that checks it in the order of minutes:
[HKEY_LOCAL_MACHINESOFTWAREMicrosoftRDInfraAgentMSIXAppAttach] "PackageListCheckIntervalMinutes"=dword:00000001
You should now see the application within the Remote Desktop client, and when launching the app, you should see the app appear as shown in the following three screenshots:

Figure 14.48 – Remote app published to the user's Remote Desktop client
The following screenshot shows the ICON for Iviewer:

Figure 14.49 – Remote app on the taskbar
The following screenshot shows the Iviewer application launched as an MSIX app attach package:
Figure 14.50 – MSIX app attach application launched as a remote app
When establishing a desktop session, you should see a mounted virtual disk, and the application should appear in the Start menu:

Figure 14.51 – Application delivered using MSIX app attach
This concludes the section on configuring MSIX app attach. In this section, we looked at creating an application group and assigning MSIX packages. In the next section, we move on to looking at some troubleshooting hints and tips.
Troubleshooting
In this section, we'll look at some of the common issues when working with MSIX app attach.
Important Note
To use MSIX app attach, you need to use one of the following supported versions: Windows 10 Build 2004 onwards, Windows 11, and Windows Server 2022.
You will not be able to use MSIX app attach on any other version of Windows or Server operating systems.
It is also important to note that MSIX app attach using Azure Virtual Desktop is not supported when using Azure Active Directory joined virtual machines.
One of the most common issues is the certificate not being installed on the target session hosts or having expired. You need to ensure that the certificate is installed on all the required session hosts and the MSIX image certificate is in date or time-stamped.
When expanding the MSIX image, you need to make sure that the required ACL permissions are applied or the applications within the MSIX image will be unusable.
Another issue that we covered in this chapter is NTFS and role-based access control permissions before adding MSIX images to the Azure portal. If these are incorrect, when configuring the MSIX package, you will be prompted with an error message as shown in the following screenshot:
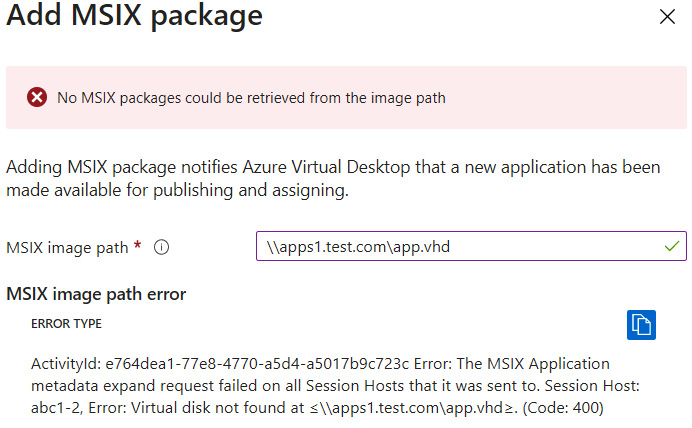
Figure 14.52 – An error relating to the session hosts not seeing the virtual disk
You can also view the MSIX event logs, and MSIX app attach event logs using the tool MSIX Log Explorer, which is a free tool you can download from here: https://github.com/RMITBLOG/MSIX_APP_ATTACH/releases/tag/1.
The following screenshot shows MSIX Log Explorer, which can be used to view the events of both MSIX and MSIX app attach on Azure Virtual Desktop session hosts:

Figure 14.53 – The MSIX Log Explorer community tool
One of the final points to check is to make sure you exclude the storage path and MSIX image extensions using third-party antivirus to prevent any performance issues or bottlenecks.
Tip
The two most common issues with MSIX app attach are certificate and storage permissions. Always check that permissions are configured correctly and each session host in the host pools has the correct certificates installed.
You can read more on MSIX troubleshooting here: https://docs.microsoft.com/windows/msix/msix-core/msixcore-troubleshoot.
In this section, we looked at some of the common issues or problems relating to MSIX app attach. Remember to check those certificates!
Published MSIX app attach applications not showing in the Start menu
In this short section, I cover an issue that can occur relating to newly published MSIX app attach apps not showing in the Start menu. This issue is related to applications that have been removed still showing in the Start menu and new applications not showing. This issue itself is related to the redirection of the Start menu to the profile container.
To fix this issue if it occurs, you would create an FSLogix profile container redirection exclusion using the redirections.xml. This is a topic we covered in Chapter 12, Implement and Manage FSLogix, in the Microsoft Teams exclusions section.
You would essentially need to exclude the following from the FSLogix profile container: the %localappdata%packagesMicrosoft.Windows.StartMenuExperienceHost_cw5n1h2txyewyTempState folder and the %localappdata%packages folder.
This would be added to the redirections.xml file and it should look similar to the following:
<?xml version="1.0" encoding="UTF-8"?>
<FrxProfileFolderRedirection ExcludeCommonFolders="0">
<Excludes>
<Exclude Copy="0">AppDataLocalPackagesMicrosoft.Windows.StartMenuExperienceHost_cw5n1h2txyewyTempState</Exclude>
<Exclude Copy="0">AppDataLocalPackages</Exclude>
</Excludes>
</FrxProfileFolderRedirection>
Ensure you follow the same configuration process as stipulated in Chapter 12, Implement and Manage FSLogix, in the Microsoft Teams exclusions section.
In this short section, we looked at how to solve the challenge of newly published MSIX app attach applications not showing in the Start menu.
Summary
In this chapter, we took a detailed look at MSIX app attach and learned how to configure it for Azure Virtual Desktop. We discussed the creation of MSIX packages and MSIX images, the configuration of Azure Files, and the configuration and publication of MSIX packages using MSIX app attach in Azure Virtual Desktop. In the next chapter, we will take a look at some of the other capabilities Azure Virtual Desktop has to offer including FSLogix Application Masking, deploying applications as remote apps and Microsoft Teams AV redirection.
Further reading
You'll find a list of approved Microsoft third-party packing partners here: https://docs.microsoft.com/windows/msix/desktop/desktop-to-uwp-third-party-installer.
Questions
- Which certificate store would you use for MSIX and MSIX app attach?
- Can you use Azure Active Directory Domain Services with MSIX app attach?
- Which are three different code-signed certificate types you can use with MSIX and MSIX app attach?
- What is the registry key for setting the MSIX app attach package check interval for Azure Virtual Desktop?
Answers
- The Trusted People store
- AADDS is not supported
- Self-signed, domain, and public certificates.
- [HKEY_LOCAL_MACHINESOFTWAREMicrosoftRDInfraAgentMSIXAppAttach] "PackageListCheckIntervalMinutes"=dword:00000001