
Chapter 4: Implementing and Managing Networking for Azure Virtual Desktop
In this chapter, we will take a look at the implementation and management of networking for Azure Virtual Desktop (AVD). First, we will look at an overview of designing an Azure Virtual Desktop environment and the differences and requirements between a single and multi-region deployment. We will then look at the AVD networking considerations and understand Virtual Machine (VM) sizing and scale. Then we will understand the Active Directory (AD) considerations with AVD, maintenance, and how to support AVD.
The following topics will be covered in this chapter:
- Implementing Azure Virtual Network connectivity
- Managing connectivity to the internet and on-premises networks
- Implementing and managing network security
- Managing AVD session hosts by using Azure Bastion
- Monitoring and troubleshooting network connectivity
Implementing Azure Virtual Network connectivity
Before we start building out an AVD environment, we need to look at the network requirements and some of the different components and configuration options available to you.
Azure Virtual Network
When deploying an AVD environment, one of the first things you need to ensure that you have configured correctly is the Virtual Network (VNet).
The VNet is essential for enabling Azure resources such as Azure Virtual Machines to communicate and access the internet and on-premises networks.
The VNet is similar to a traditional network you would operate within your environment; however, you get to take advantage of Microsoft Azure's infrastructure, including availability, scaling, and isolation.
Azure VNets
Azure VNets allow resources to communicate securely, connect to services and communicate, and access on-premises resources. VNets have several features and configurable options to filter and route traffic and integration to Azure services. These next couple of sections detail some of the features and what they do specifically.
Communication between Azure resources
Azure resources communicate with each other through a virtual network, using network interfaces or service endpoints. Different VNets can be connected via VNet peering.
The following is a table listing the various Azure resources and their descriptions:

Communication with on-premises networks
The following table shows you the options available when you want to connect your on-premises computers and networks to an Azure virtual network:

Filtering and routing Azure network traffic
You can filter network traffic between subnets using one or both of the following two features within Azure:

By default, you can route Azure traffic between subnets, connected virtual networks, on-premises networks, and the internet. You can configure both options shown in the following table:

Understanding what virtual network integration is for Azure services
One of the features you are most likely to use within AVD is the integration of Azure services with an Azure virtual network. This is because of the requirement for Azure Files and the ability to create a private endpoint. This allows traffic from the service to communicate on the VNet rather than publicly.
The following options are available to you when integrating Azure services into your virtual network:
- You can deploy a dedicated instance of a service into a virtual network. The services can then be accessed within the virtual network and from on-premises networks that are connected to Microsoft Azure.
- A private link is used to access a specific instance of a service privately from your virtual network and from on-premises networks.
- You can also access services using public endpoints by extending a virtual network to the service. This is done through service endpoints. Service endpoints allow service resources to be secured through a virtual network.
Important Note
There are limits regarding the number of Azure resources you can deploy. Check out https://docs.microsoft.com/en-us/azure/azure-resource-manager/management/azure-subscription-service-limits#networking-limits, which shows the Azure networking limits and maximum values.
In this section, I provided an introduction to the chapter, why there is a requirement to use Azure virtual networks, communication between Azure and on-premises, and an overview of filtering and routing. In the next section, we will see how to manage connectivity to the internet and on-premises networks.
Managing connectivity to the internet and on-premises networks
In this section, we look at the different options available to you for VPN gateway design. This should enable you to make an informed choice that best suits your deployment needs. Please note that the VPN is only required for connecting resources between on-premises and cloud platforms. For client connectivity to the AVD platform, you would use the reverse connect feature built into the AVD Management plane.
Types of VPN available to you
The following sections cover several different configurations available for VPN connections. In the following sections, I have provided a summary of each type and a diagram to help you decide on which topology meets your requirements.
Site-to-Site
Site-to-Site, also known as an S2S VPN gateway connection, is an IPsec/IKE (IKEv1 or IKEv2) VPN tunnel. This type of connection can be used for cross-premises and hybrid connectivity. A S2S connection does require an on-premises VPN device with an assigned public IP address.
Figure 4.1 shows a S2S VPN:

Figure 4.1 – S2S connection
You can configure a VPN gateway in active-standby mode using one public IP address, or alternatively, you can configure an active-active connection using two public IP addresses. Further details regarding these follow here:
- Active-standby: This enables the switch-over of traffic to the standby tunnel in the event of an issue.
- Active-active: This is the recommended option in which both tunnels are active, which allows higher throughputs as well as the active-active mode to prevent noticeable failure. Throughput may be constrained in a partial failure scenario.
Multi-site
A multi-site VPN connection allows you to have more than one VPN connection from a virtual network gateway. This allows you to connect to multiple sites, which are typically on-premises. Note that you must use a route-based VPN (https://docs.microsoft.com/en-us/azure/vpn-gateway/vpn-gateway-connect-multiple-policybased-rm-ps#about) type when using multiple connections, also known as a dynamic gateway. This is because each virtual network can only have one VPN gateway and all connections through a gateway share the bandwidth.
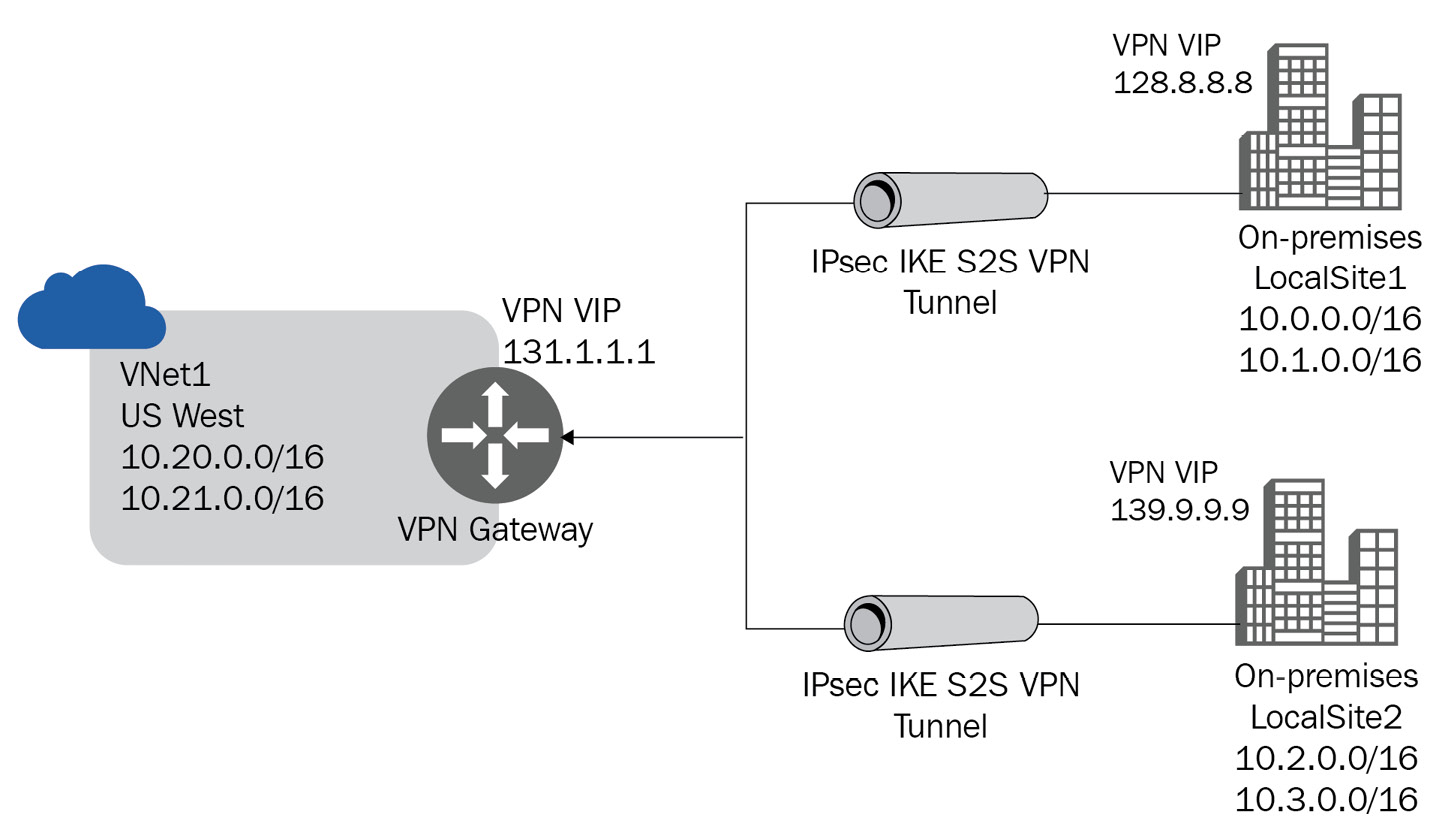
Figure 4.2 – Multi-site connection
Point-to-Site VPN
Point-to-Site (P2S) VPN connections are established from a client computer. This solution is helpful for telecommuters who need to connect to an Azure VNet from a remote location such as a home office or a conference center. P2S connections do not require a public-facing IP address or a VPN device:
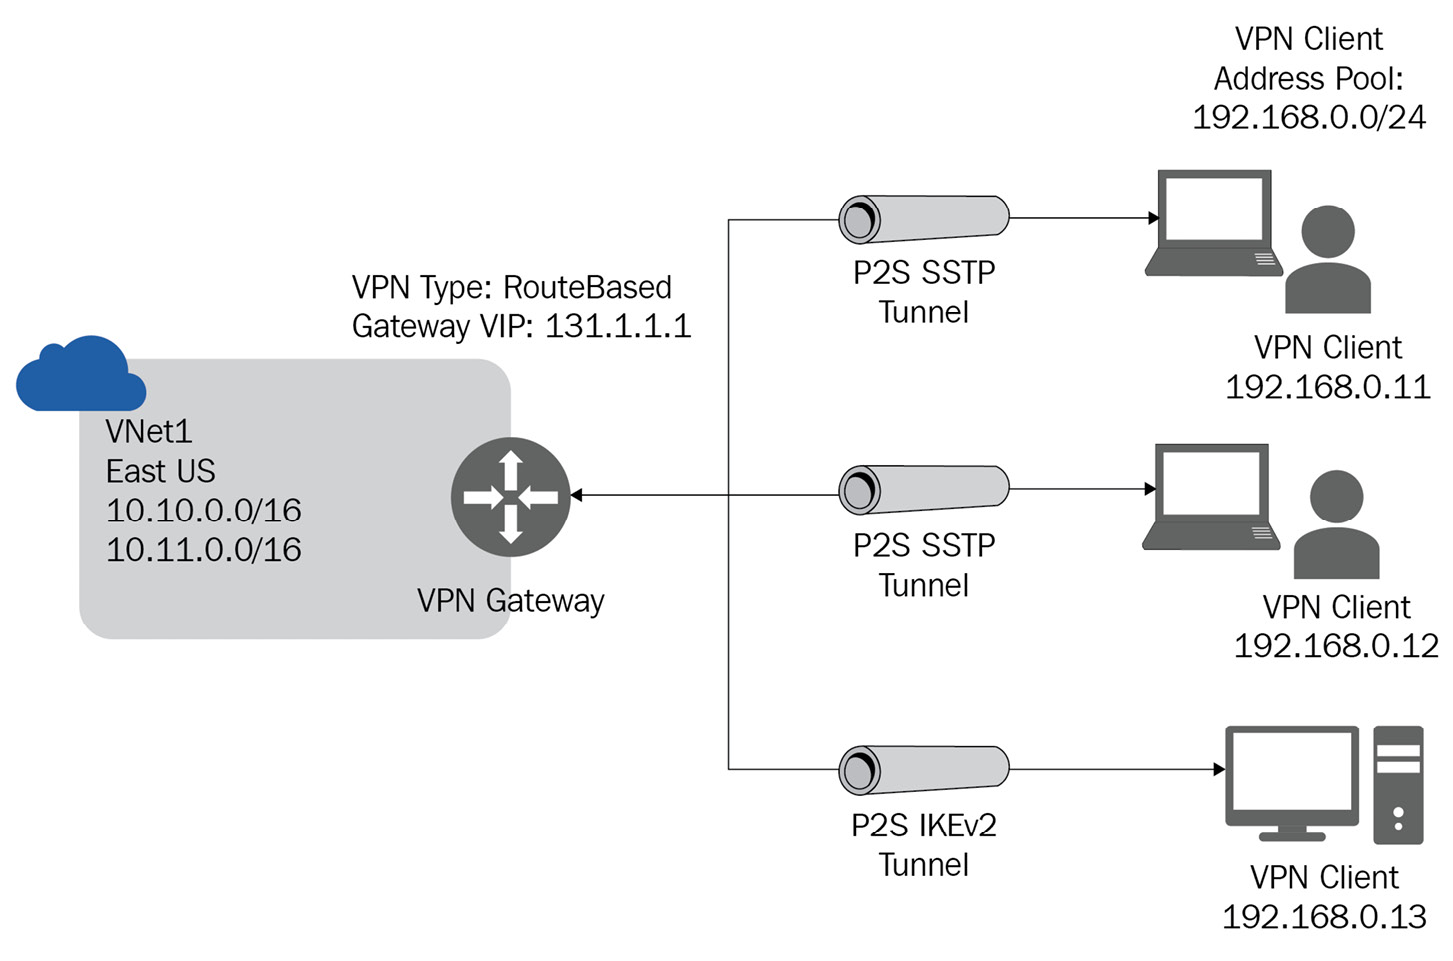
Figure 4.3 – P2S connection
VNet-to-VNet connections (IPsec/IKE VPN tunnel)
VNet-to-VNet connections are essentially a connection from one virtual network to another. This type uses IPsec/IKE (https://docs.microsoft.com/en-us/azure/vpn-gateway/vpn-gateway-ipsecikepolicy-rm-powershell) to provide a secure tunnel between the same or different regions/subscriptions/deployment models. You can also combine VNet-to-VNet communication with multi-site connection configurations.

Figure 4.4 – VNet-to-VNet connection
VNet peering
VNet peering is a way of connecting two VNets without using a virtual network gateway. You can connect VNets in the same and different subscriptions. Traffic is essentially routed through Microsoft's backbone infrastructure, meaning there is no public network involved.
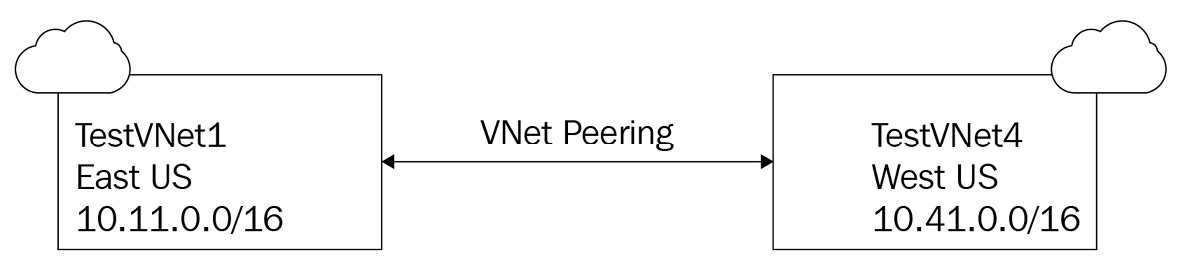
Figure 4.5 – VNet peering
ExpressRoute (private connection)
ExpressRoute is a typical deployment option within an enterprise. This connection type enables you to extend your on-premises network to Microsoft Azure over a private connection. This is something that an Internet Service Provider (ISP), also known as a network service provider, can facilitate.
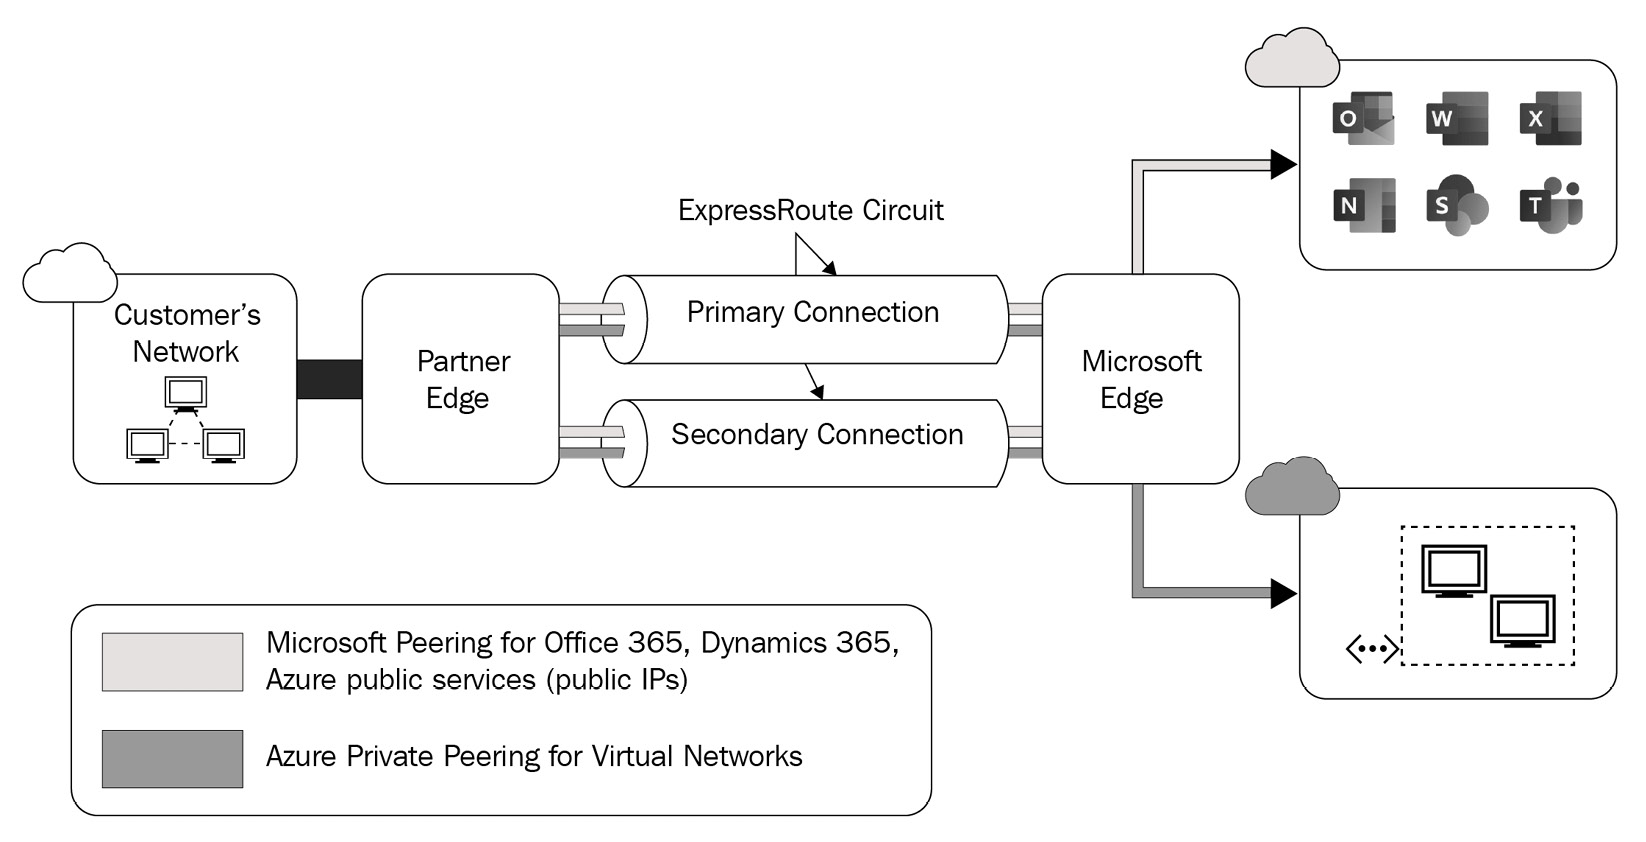
Figure 4.6 – ExpressRoute connection
ExpressRoute allows connections to Microsoft Cloud services such as Microsoft Azure, Microsoft 365, and CRM Online. There are several connectivity options available, including any-to-any, point-to-point, or virtual cross-connection options.
ExpressRoute is a private connection that is slightly different compared to other connection types that use the public internet. This provides better reliability, faster speeds, lower latency, and higher security than the traditional connection types that use the internet. It's also important to note that ExpressRoute offers a 99.95% uptime SLA for each ExpressRoute deployed. You can read more about the ExpressRoute SLA here: https://azure.microsoft.com/en-gb/support/legal/sla/expressroute/.
Important Note
You can have multiple VNets in different subscriptions that connect using the same ExpressRoute. This offers a benefit compared to using VPN connections. You can read more on this here: https://docs.microsoft.com/en-us/azure/expressroute/expressroute-howto-linkvnet-portal-resource-manager#connect-a-vnet-to-a-circuit---same-subscription.
When configuring an ExpressRoute, you need to select the gateway type as ExpressRoute instead of VPN.
Important Note
ExpressRoute traffic is not encrypted by default; however, it is possible to send encrypted traffic over an ExpressRoute circuit.
S2S and ExpressRoute coexisting connections
As well as an ExpressRoute, you can configure a S2S VPN as a secure failover path for the ExpressRoute. The capability of being able to configure both S2S VPN and ExpressRoute connections for a virtual network has benefits.
You can connect to sites that are not part of your ExpressRoute network as well as add a failover path using the S2S VPN:

Figure 4.7 – S2S and ExpressRoute connections
This section provided an overview of the different connectivity options available to you within Azure to connect on-premises infrastructure. In the next section, we take a look at network security for AVD.
Implementing and managing network security
In this section, we cover some of the network security features available for AVD.
Azure network security overview
Microsoft Azure offers a wide range of protecting resources to prevent unauthorized access or attacks by applying network controls to the Azure VNet. These are as follows:
- Azure networking
- Network access control
- Azure Firewall
- Secure remote access and cross-premises connectivity
- Availability
- Name resolution
- Perimeter network (DMZ) architecture
- Azure DDoS protection
- Monitoring and threat detection
This section provides a high-level overview and we will now look at specific network connectivity requirements for AVD.
Understanding AVD network connectivity
AVD uses the Remote Desktop Protocol (RDP) to connect to an AVD deployment. The RDP connection is responsible for providing display and input functions over a network connection.
When we look at the connection data flow for AVD, the client starts with a Domain Name Server (DNS) lookup for the nearest Azure data center. The lookup uses round trip time (RTT) to identify the nearest data center. The gateway is used as an intelligent reverse proxy that manages all session connectivity, with nothing but the RDP bitmap (pixels) reaching the client.
The following are the five connection flow process steps for AVD:
- The user first authenticates in Azure AD; a token is returned to the Remote Desktop Services client.
- The AVD gateway checks the token with the AVD connection broker.
- The broker queries the AVD Azure SQL database for resources assigned to the user.
- The AVD gateway and the AVD broker select the session host for the connected client.
- The session host creates a reverse connection to the client by using the AVD gateway.

Figure 4.8 – Connection flow process
Important Note
AVD uses the same TLS 1.2 ciphers as Azure Front Door. You would need to make sure that the client computers and session hosts can use these ciphers.
Reverse connect
Reverse connect is a technology that removes the requirement for a session host within AVD to have any inbound ports opened. By default, the RDP port, TCP/3389, doesn't have to be open. Instead, the agent on the session host creates an outbound connection using TCP/443 to the Azure Virtual Desktop Management plane. This is essentially a reverse proxy for RDP traffic.
Virtual machines in AVD are not publicly exposed to the internet directly. They use a private IP address within an Azure VNet and run isolated from other workloads or even the internet if required.
Important Note
Where possible, avoid direct access to session hosts in your environment. Suppose you need direct access for troubleshooting or administration. In that case, you should connect from an internal network or by enabling just-in-time access to reduce the attack surface on a session host or by using a bastion host.
Network security groups and service tags
Network security groups (NSGs) are an excellent way to control/limit AVD traffic. You can configure network security on both a VM and an Azure Virtual Network, making it easy to restrict network access.
You can also use service tags within NSG rules to allow or deny traffic to a specific Azure service per Azure region or globally.
An NSG is essentially a collection of rules for inbound/outbound traffic, allowing you to control network traffic flow in and out of Azure resources.
Each rule can be configured with the following properties: name, priority, source or destination, protocol, direction, port range, and action.
Important Note
NSGs are a layer 3 and layer 4 network security service. An NSG consists of several security rules (allow or deny). This is achieved using a 5-tuple hash. A 5 tuple-hash is based on the source and destination IPs, the protocol, and destination ports.
When you create an Azure VM for AVD, you must configure security network filtering using NSGs or another chosen configuration to grant access to the following URLs:


What is Azure Firewall?
Azure Firewall is a Microsoft-managed network security service that protects your Azure virtual network resources. This is a fully stateful firewall with the added benefits of cloud high availability and scalability.

Figure 4.9 – Azure Firewall standard
It is also important to note that there is also an Azure Firewall Premium version that offers advanced capabilities, including signature-based IDPs.
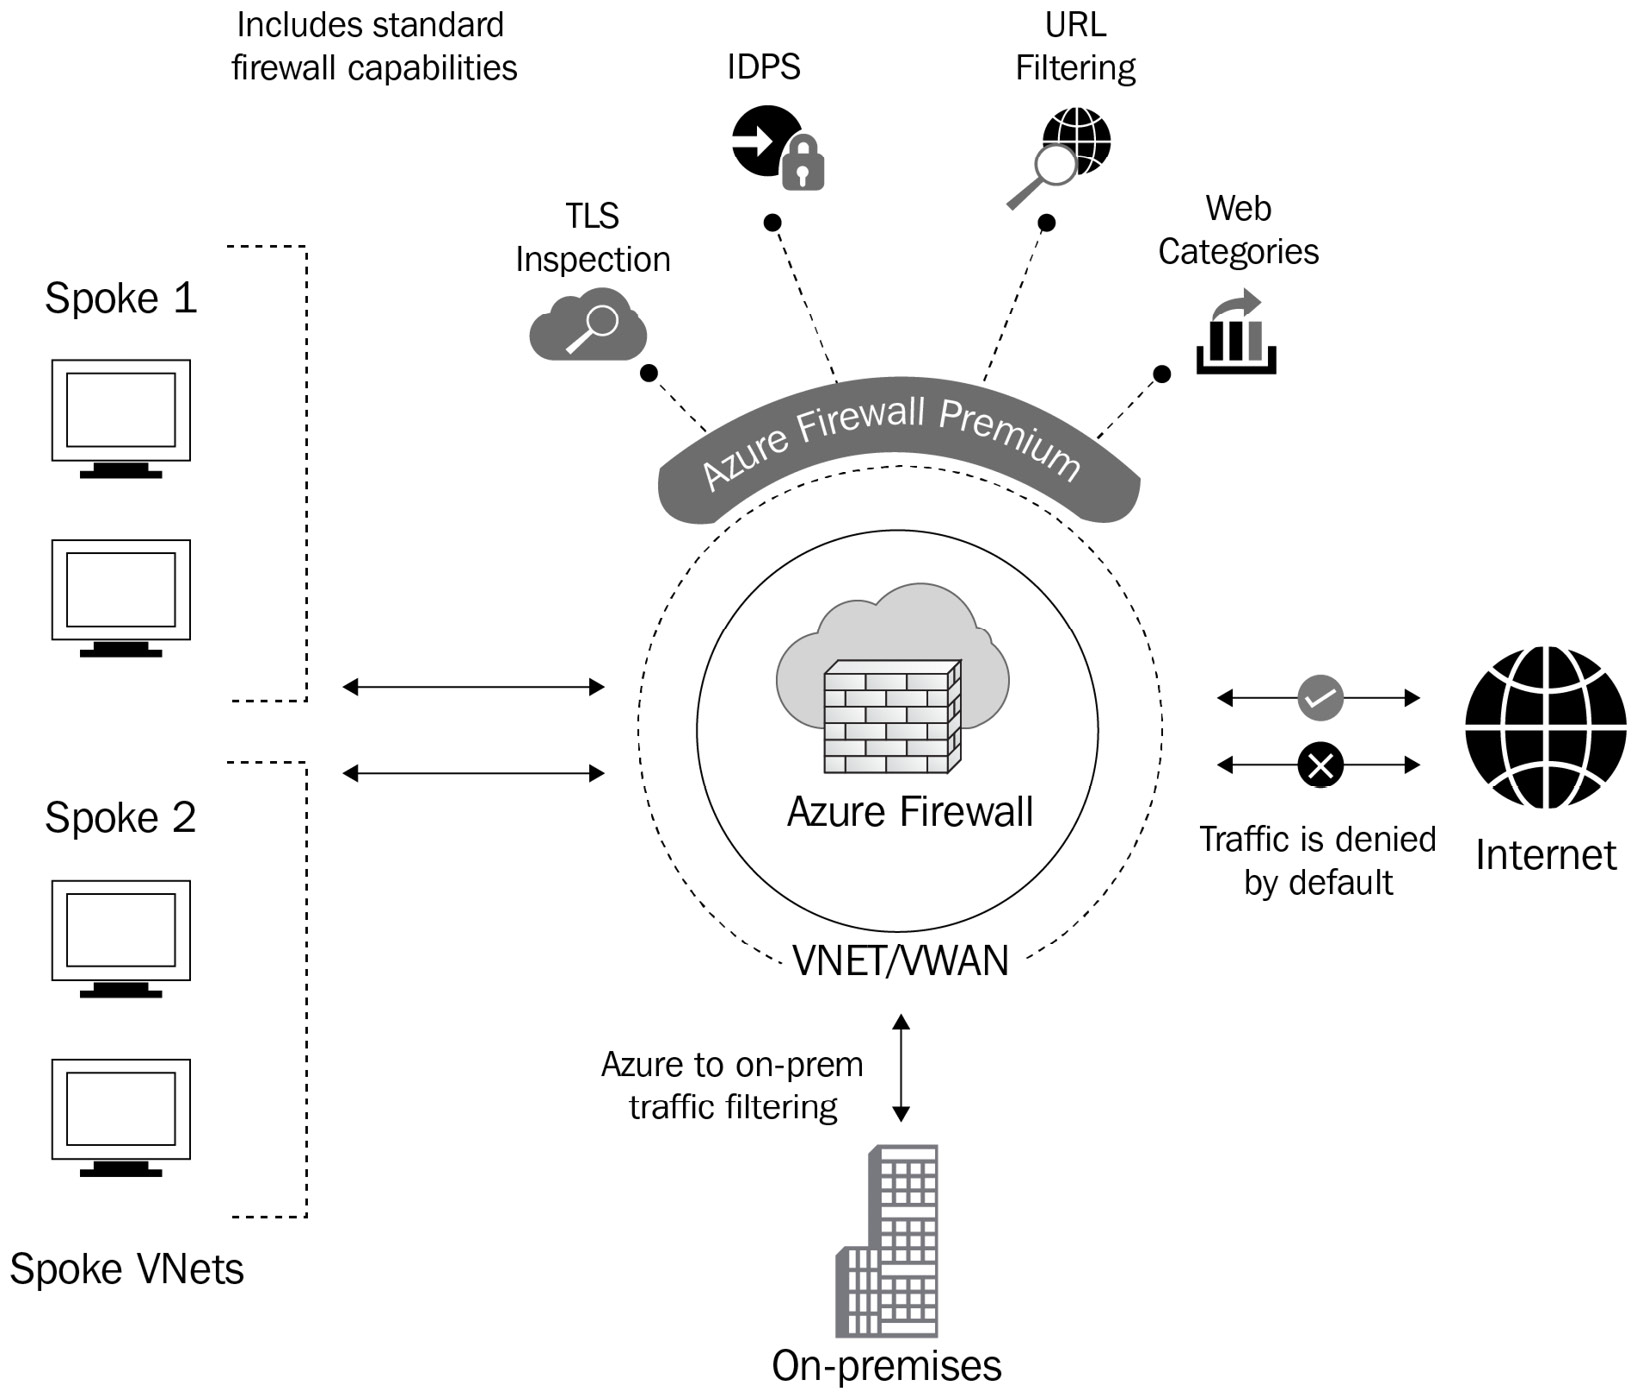
Figure 4.10 – Azure Firewall Premium
Azure Firewall allows you to create, configure, and log network and application connectivity policies across Azure subscriptions and virtual networks. You can even integrate with the Azure Monitor service for logs and analytics.
Important Note
Azure Firewall uses a static public IP address for virtual network resources for external network devices to identify traffic originating from your Azure virtual network.
Azure Firewall for application-level protection
Azure Firewall provides an AVD Fully Qualified Domain Name (FQDN) tag to simplify the deployment and configuration of allowed URLs.
The following four steps will guide you through allowing outbound AVD traffic using Azure Firewall:
- Deploy Azure Firewall and configure your AVD host pool subnet User Defined Route (UDR) to route all traffic via Azure Firewall.
- Create an application rule collection and add a rule to enable the AVD FQDN tag.
- As the set of required storage and service bus accounts for your AVD host pool is unique to your deployment, this information will not be captured in the AVD FQDN tag by default. You can resolve this by allowing HTTP access from your host pool subnet to the specific service using wildcard FQDNs, for example, *app.blob.core.windows.net.
- Create a network rule collection and allow traffic from your Active Directory Domain Services (ADDS) private IP address to * for TCP and UDP port 53 and allow traffic from your AVD VMs to Windows Activation Service TCP port 1688.
Tip
Under step 3, you can also use a log analytics query to list the exact required FQDNs and then allow them explicitly in your firewall application rule. This provides more granular control over access.
These wildcard FQDNs enable the required access but are less restrictive.
Host pool outbound access to the internet
There may be a need to enable secure outbound internet access for users. In scenarios where the list of allowed destinations is defined, you can use the Azure Firewall application and network rules to control the required access granularly. You may also want to include whitelists for required destinations such as web services that the organization's users may use.
Important Note
You can configure AVD host pools using an explicit proxy configuration using an existing on-premises secure web gateway. However, this may impact performance. You may want to consider using Azure Network Virtual Appliances (NVAs) to offer content filtering/proxy-based filtering services. You can also use Microsoft Defender for endpoints and Azure Firewall using the web categories feature.
Network Virtual Appliances
To benefit from standardization and comply with any organizational technology policies, you can deploy An NVA to your Azure Virtual Network. These NVAs can be firewalls deployed as VMs on Azure. Routing would be configured so that the NVA controls inbound and outbound traffic flow as well as the publishing of network services through the use of public IP addresses.
NVAs can be used with AVD, which can add benefits such as advanced network security to your VNet and content filtering and threat detection capabilities.
In this section, we looked at the implementation of network security for AVD, NSGs, Reverse Proxy, Azure Firewall, and NVAs. We will now look at how to manage session hosts using Azure Bastion.
Managing AVD session hosts by using Azure Bastion
In this section, we look at Azure Bastion as an additional layer of security for accessing VMs securely through an HTML5 browser within the Azure portal.
What is Azure Bastion?
Azure Bastion is a platform-managed service that enables admins to connect to VMs in Azure using your web browser. The service makes it easy to connect securely to your VMs directly from the Azure portal over a Transport Layer Security (TLS) connection. Azure Bastion also removes the need for public IPs or Remote Desktop Services ports to open on your NSGs for the internet.
When using Azure Bastion, you use the Azure portal to connect the VM, which is essentially an HTML5 TLS connection. The Bastion deployment then connects to the resources securely inside the virtual network using RDP or Secure Shell (SSH) protocol, depending on the VM remote protocol requirement.
Important Note
Azure Bastion uses port 443; ensure that you configure the NSG for this port when using Bastion deployments.
Azure Bastion is deployed per virtual network, which means that if you use multiple virtual networks for AVD, you will need multiple Bastion deployments.
The benefit of Bastion is that standard RDP/SSH ports are not exposed over the internet, providing a secure connection to Azure resources. This also reduces the threat surface for an attacker.
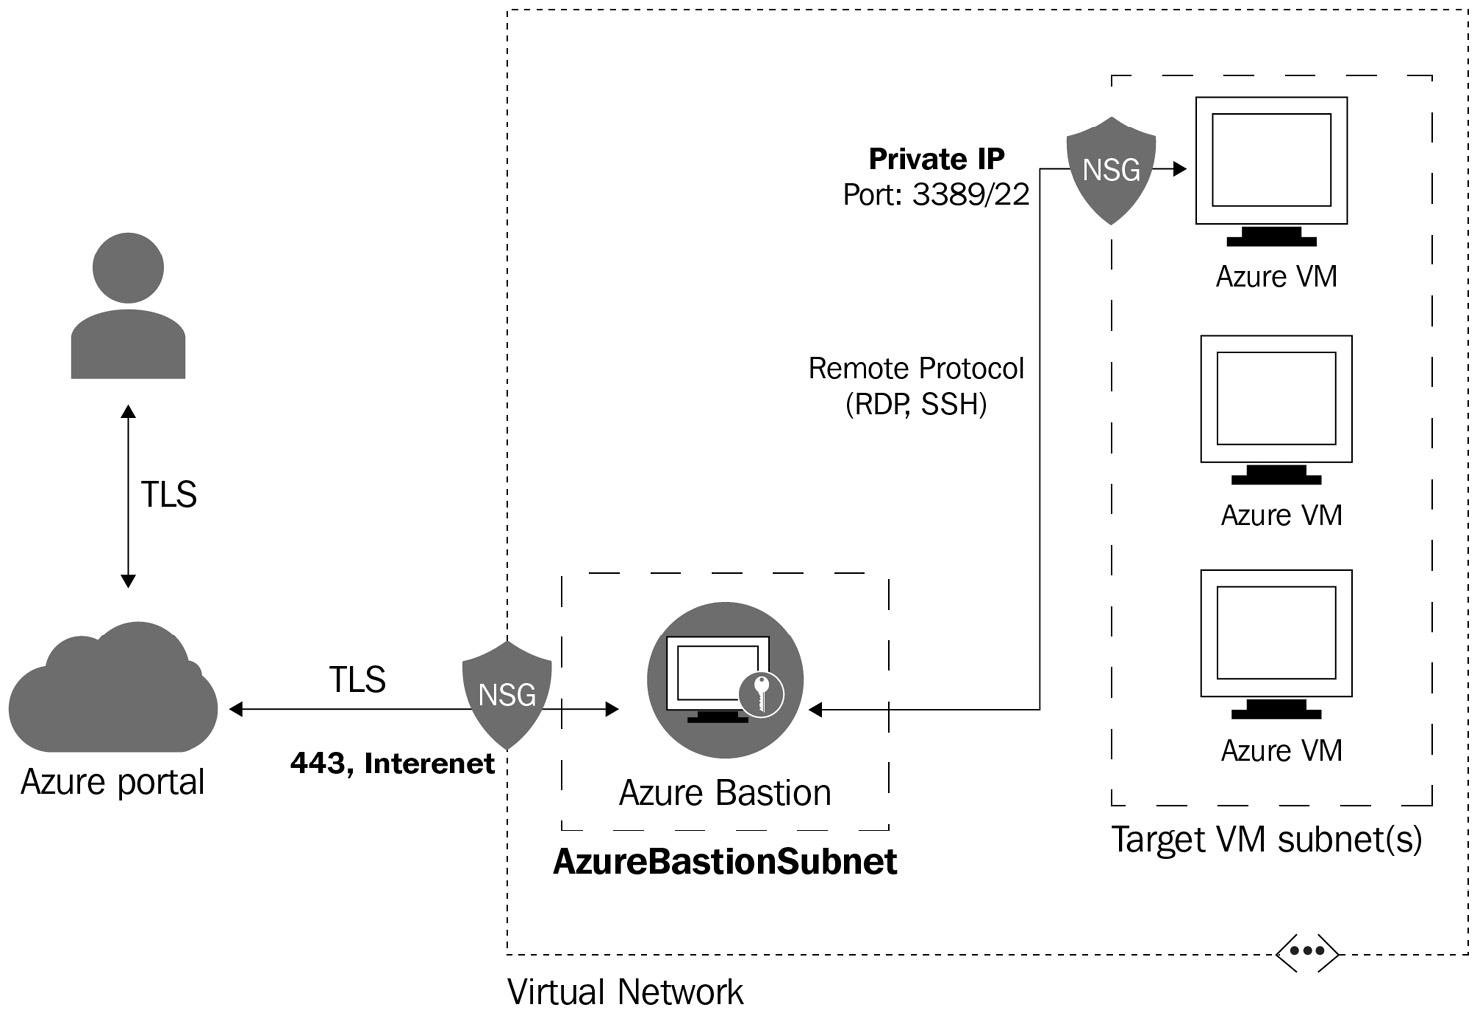
Figure 4.11 – Diagram showing the communication followed for Azure Bastion
Setting up Azure Bastion
This section provides a high-level deployment guide for setting up your first Bastion object within the Azure portal.
Important Note
You will need to deploy a Bastion instance for each virtual network you wish to connect to.
The steps are as follows:
- From the Azure portal Home page, select + Create a resource.
- On the New page, in the Search box, type Bastion, and then click Enter to get to the search results. On the result for Bastion, verify that the publisher is Microsoft.
- Select Create.
- On the Create a Bastion page, configure a new Bastion resource, as shown in the following screenshot:

Figure 4.12 – Create a Bastion page
You will then be presented with the Create a Bastion page. Ensure that you fill out the following:
a) Select the required Azure subscription.
b) Choose the resource group in which you will deploy the Bastion resource.
c) Give the Bastion resource a name.
d) Select the required Azure region.
e) Select the virtual network where the Bastion will be created. You can create a new virtual network or use an existing one.
f) The Bastion host is deployed to its own dedicated subnet.
g) Use an existing public IP address or a new one.
h) You cannot change the public IP address SKU.
i) Assignment should be the default setting of Static.
- Once you have finished specifying the required settings, select Review + create.

Figure 4.13 – Review + create page
Connecting to a VM using Azure Bastion
The steps for this are as follows:
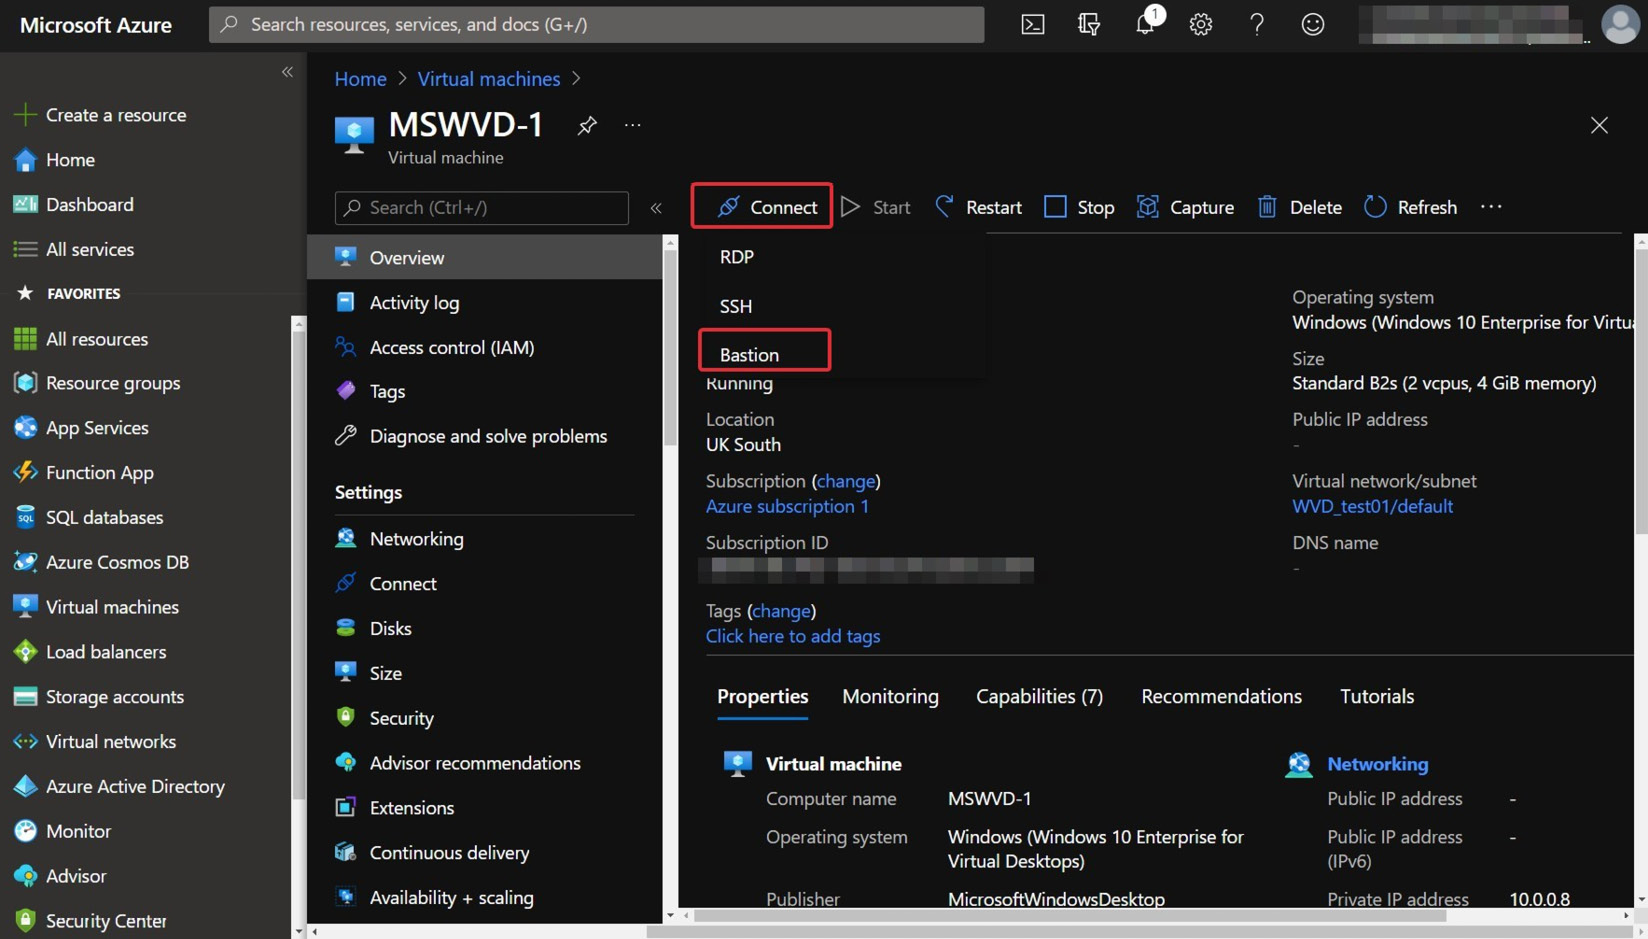
Figure 4.14 – Connecting to a VM using Bastion
- You should see the Connect using Azure Bastion page. Enter the username and password for the VM and then click Connect.

Figure 4.15 – Connecting using the Azure Bastion page
- The administrative RDP connection to the VM will be completed using Bastion, and then the session will be streamed over HTML5 using port 443. The following screenshot shows a session using the Bastion service:

Figure 4.16 – A session using Bastion
In this section, we took a look at what Azure Bastion is and how to configure/deploy Azure Bastion for AVD. In the next and final section, we will provide an overview of monitoring and troubleshooting network connectivity.
Monitoring and troubleshooting network connectivity
This section briefly covers some of the tools you can use to monitor and troubleshoot network connectivity issues for AVD. This section provides a high-level overview as we cover both Log Analytics and Azure Monitor in Chapter 18, Monitoring and Managing Performance and Health.
Important Note
Ensure that you have configured DNS correctly since, if the session hosts cannot see the domain controller, the provisioning process may fail on the next step. You should ensure that the VNet is configured with AD as a DNS server.
Using Azure Monitor to diagnose network issues
Azure Monitor Logs is a collection of features that collects and organizes log and performance data from Azure resources (monitored).
The data is collected from different sources, such as Azure services and VM agents, which are then consolidated into a single Log Analytics workspace to be analyzed. You can perform simple queries that retrieve specific datasets or perform sophisticated data analysis to identify any critical patterns within your monitored data.
You work with log queries using Log Analytics and create alert rules to notify you about issues or visualize results in a dashboard or workbook.
The following diagram depicts the log collection and output capabilities of Azure Monitor, which is using Azure Log Analytics:
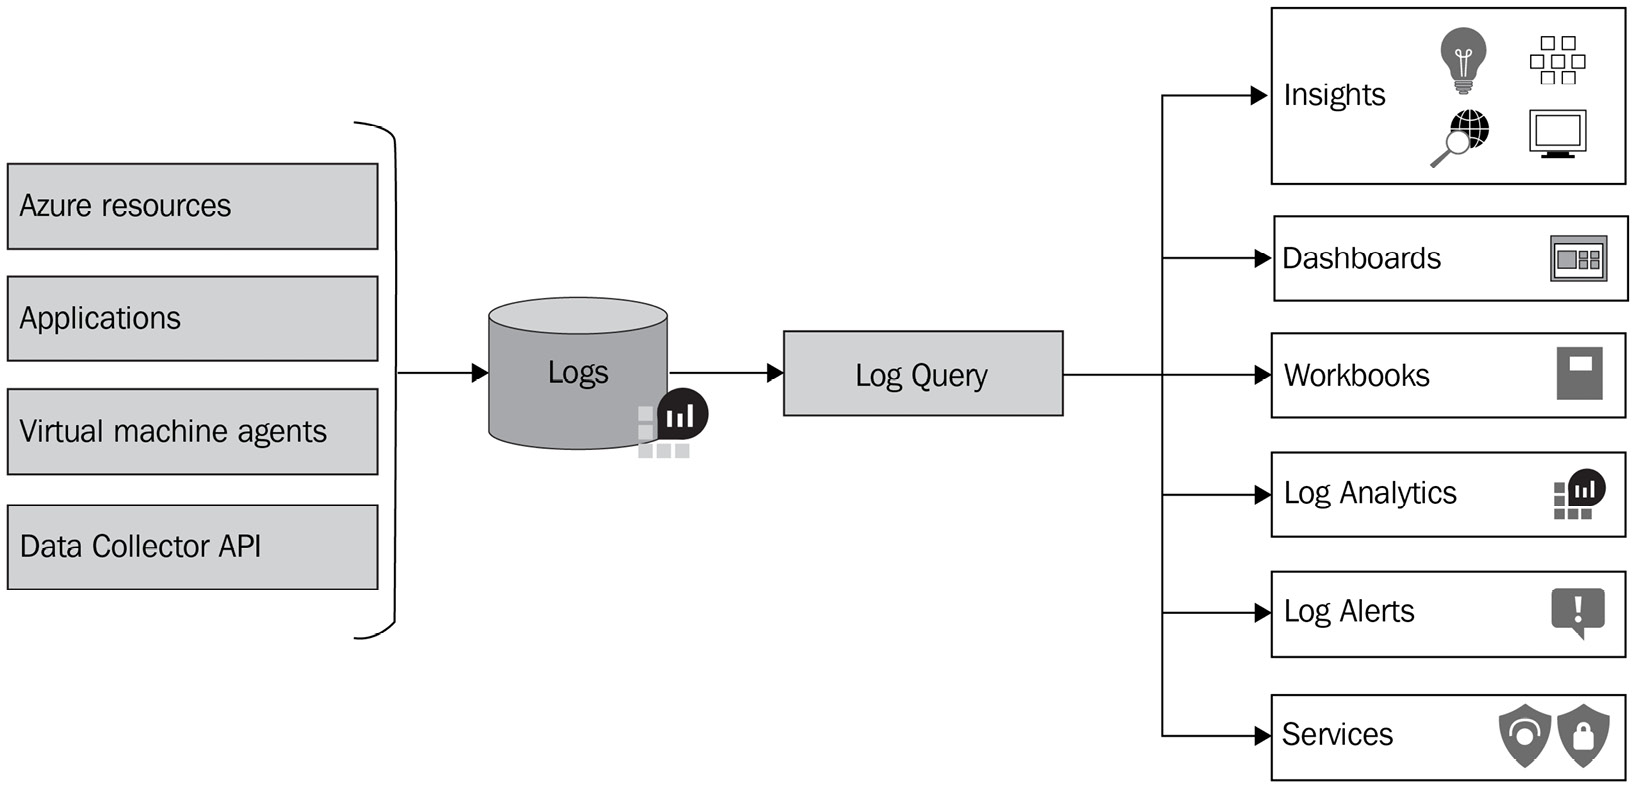
Figure 4.17 – Log collection and output capabilities
Some of the examples when working with AVD are as follows:
- The following screenshot shows the Azure Monitor dashboard for AVD. This dashboard comprises several Azure log sources reported centrally in a single dashboard:

Figure 4.18 – Azure Monitor dashboard for AVD
- The following screenshot shows Connections Overview from a VM using Log Insights:

Figure 4.19 – Connections Overview page
- The following screenshot shows the Insights workspace for AVD, allowing you to explore different tabs from Overview to Alerts:

Figure 4.20 – AVD Insights page
You need to enable Log Analytics and the collection of logs on the various components for AVD before reviewing and monitoring log data for AVD.
Important Note
I will show you how to enable monitoring for AVD in Chapter 18, Monitoring and Managing Performance and Health. The key takeaway is that you can use Azure Monitor and Log Analytics to diagnose network issues.
Confirming all required URLs are not blocked
To confirm that you have set up your Azure virtual network correctly and allowed the required URLs, you can run a built-in tool called WVDAgentURLTool.exe. You can find this command-line tool within the RD agent folder on the session host.
Tool Requirements
The RD agent needs to be version 1.0.2944.400 or higher. See the link here for the latest version: https://docs.microsoft.com/en-us/azure/virtual-desktop/safe-url-list.
You can find your agent version from the host pool within the Azure portal, as shown in the following screenshot:

Figure 4.21 – AVD Session hosts page
Using the URL check tool
Before starting, please check your agent version as the folder may vary depending on the AVD agent version.
To use the tool, perform the following steps:
- On the session host, open a command prompt as an administrator.
- Run the following command to change the directory to the same folder as the AVD build agent:
cd C:Program FilesMicrosoft RDInfraRDAgent_1.0.2944.1400
- Then, run the tool:
WVDAgentUrlTool.exe
- Once you run the command-line app, you'll see a list of accessible and inaccessible URLs for AVD, as shown in the following screenshot:
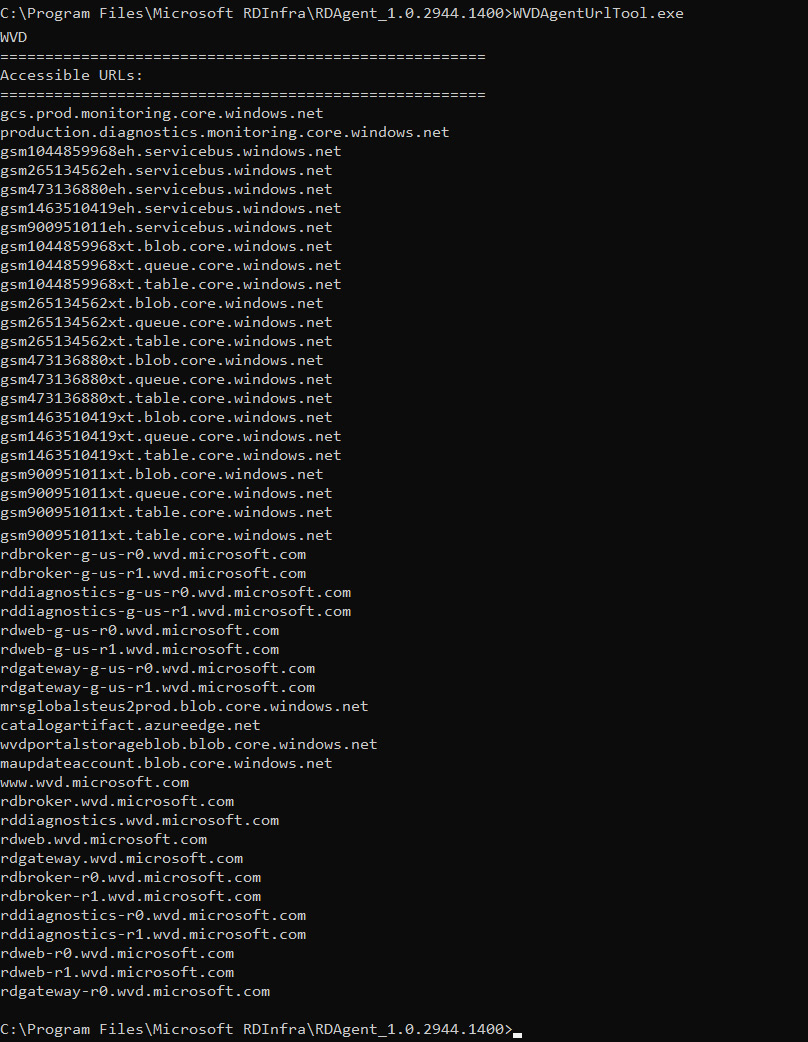
Figure 4.22 – List of accessible and inaccessible URLs for AVD
As shown in the preceding screenshot, you can see that the tool has output all the accessible URLs, meaning the network configuration is correct.
In this section, we looked at how to test to ensure that the URLs for AVD are accessible using the WVDAgentURL tool. Based on the results, this will confirm whether everything is working correctly or guide you to the missing URLs that you need to add, check, and possibly configure.
Summary
Networking is the core of how AVD functions and it is essential that you design and configure the appropriate connectivity to ensure you can communicate with your Azure Virtual Desktop environment.
In this chapter, we took a look at Azure virtual network connectivity for AVD. We covered implementing Azure virtual network connectivity, managing connectivity between on-premises and the internet, implementing network security, Azure Bastion, and monitoring and troubleshooting network connectivity within Azure.
In the next chapter, we will look at implementing and managing storage for Azure Virtual Desktop.
Questions
- What tool can you use to check the AVD URLs?
- Is Azure Bastion configured per subnet or virtual network?
- What can you use to secure the networking of Azure Virtual Desktop?
- What Azure feature can you use to monitor and diagnose AVD networking issues?
Answers
- WVDAgentURLTool.exe
- Virtual network
- Azure Firewall
- Azure Monitor