
Chapter 16: Planning and Implementing Business Continuity and Disaster Recovery
This chapter takes a look at planning and implementing a business continuity and disaster recovery solution for Azure Virtual Desktop. We first take a look at what's required before we can configure a business continuity and disaster recovery solution and then we take a look at the options available to you.
In this chapter, we take a look at the following topics:
- Designing a backup strategy for Azure Virtual Desktop
- Planning and implementing a disaster recovery plan for Azure Virtual Desktop
- Configuring backup and restore for FSLogix user profiles and personal virtual desktops
- Infrastructure and golden images
Designing a backup strategy for Azure Virtual Desktop
Before we get started, I wanted to remind you of the shared responsibilities of using Azure Virtual Desktop. The following illustration details the responsibilities managed by Microsoft and what the customer controls. Within this chapter, we will look at all of the items within the customer section for which you are responsible.
The following screenshot shows the different responsibilities for both the customer and Microsoft. You will note that Microsoft takes care of the management plane, while the customer is responsible for everything inside the subscription.
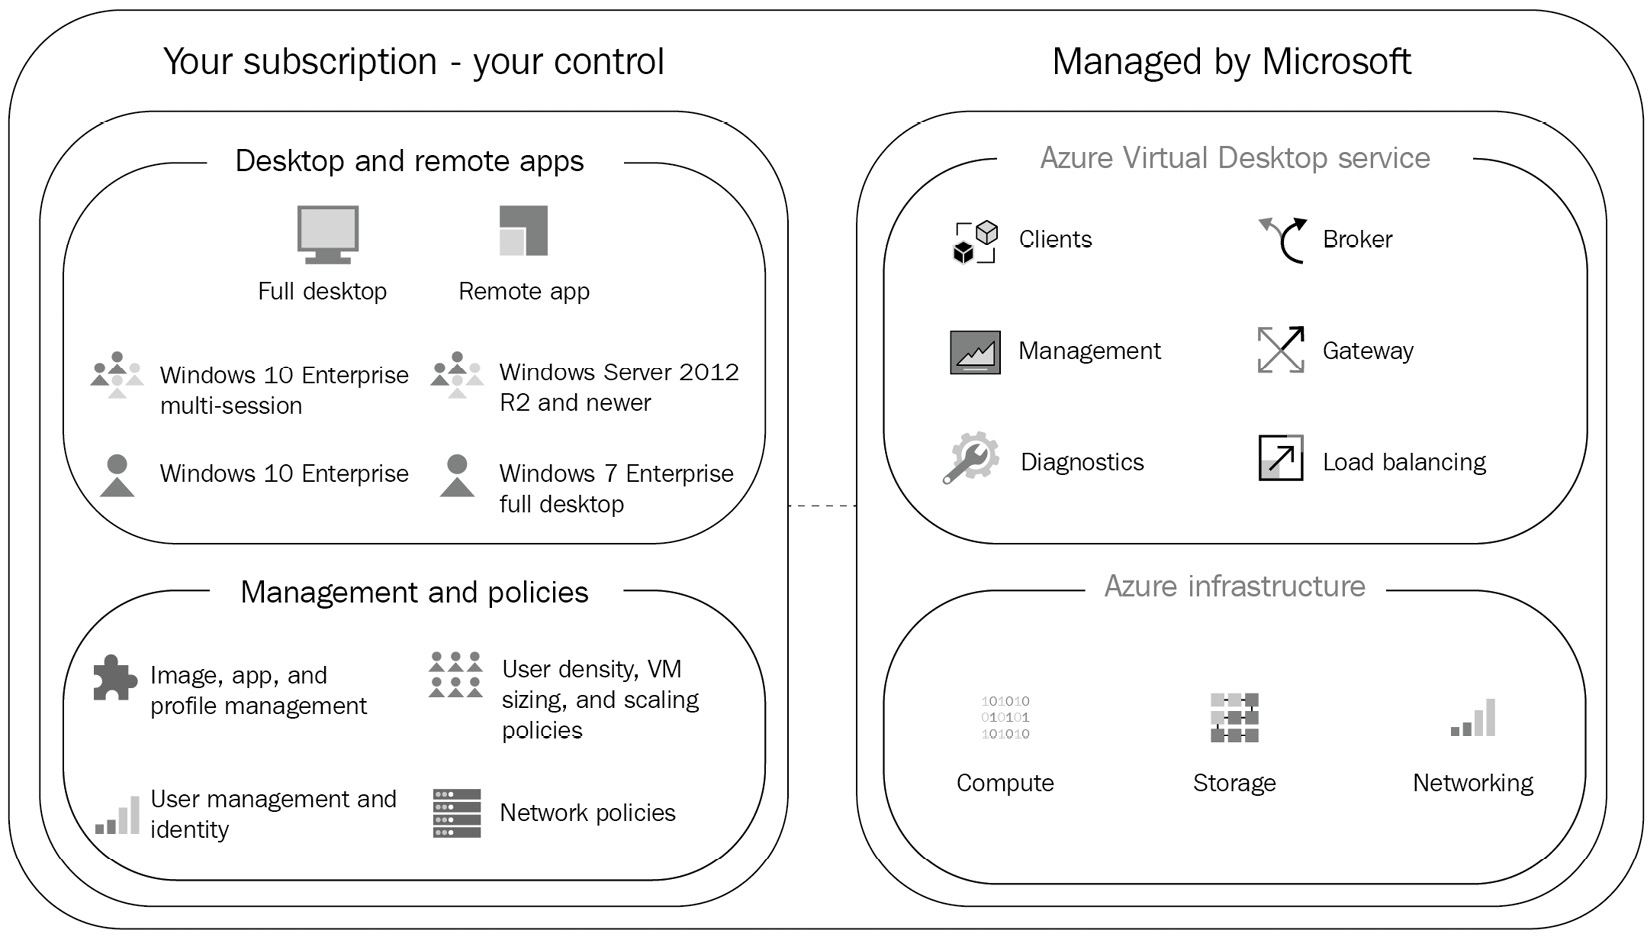
Figure 16.1 – Shared responsibilities of Microsoft and the customer for Azure Virtual Desktop
A robust business continuity and disaster recovery strategy keeps your applications and workloads running during unplanned and planned service outages. For example, when an outage occurs in an Azure region, the Azure Virtual Desktop service infrastructure components will failover to a secondary location and continue to function.
Important Note
Where required, you should ensure that your business applications that rely on data in the primary region can failover to ensure that all services function correctly.
We'll look at the two types of host pool as each type will have a different backup strategy due to the design and use cases associated with the host pool type:
- Personal desktops: These are typically used for those who need admin permissions to the local machine or are completing specific tasks requiring a dedicated virtual machine. A personal desktop commonly has specific user data and operating system customizations that need to be protected.
- Pooled desktops: In contrast, pooled desktops are designed to provide users with any desktop in the pool. All the data is typically stored in a central profile store, such as FSLogix profile containers or others. Furthermore, in most environments, a pooled desktop host pool is treated as disposable. This is because personal data is not stored on the virtual machine, and the operating system is typically delivered from an image template.
Depending on your chosen host pool type, you will need to consider the required backup strategy. When using both host pool types, you should design a strategy for both.
The five crucial areas to consider for Azure Virtual Desktop business continuity and disaster recovery strategies are detailed in the following table:

We will take a more detailed look at these five critical components in the next section of this chapter.
Planning and implementing a disaster recovery plan for Azure Virtual Desktop
This section looks at the five critical components for implementing a disaster recovery plan for Azure Virtual Desktop. First, we start with virtual networks, which underpin the Azure Virtual Desktop environment.
Virtual network
In this section, we take a look at the network requirements for disaster recovery in an Azure Virtual Desktop environment.
Connectivity is the first consideration when planning and implementing a disaster recovery plan for Azure Virtual Desktop. Before resources can communicate in a secondary region, you need to ensure that VNet has been set up in your secondary region/location. You may also need to consider connectivity between on-premises and the secondary region.
The most common connectivity type to use between on-premises and the Azure virtual network would be a VPN gateway. The following diagram depicts a simple VPN gateway connecting to an on-premises site:
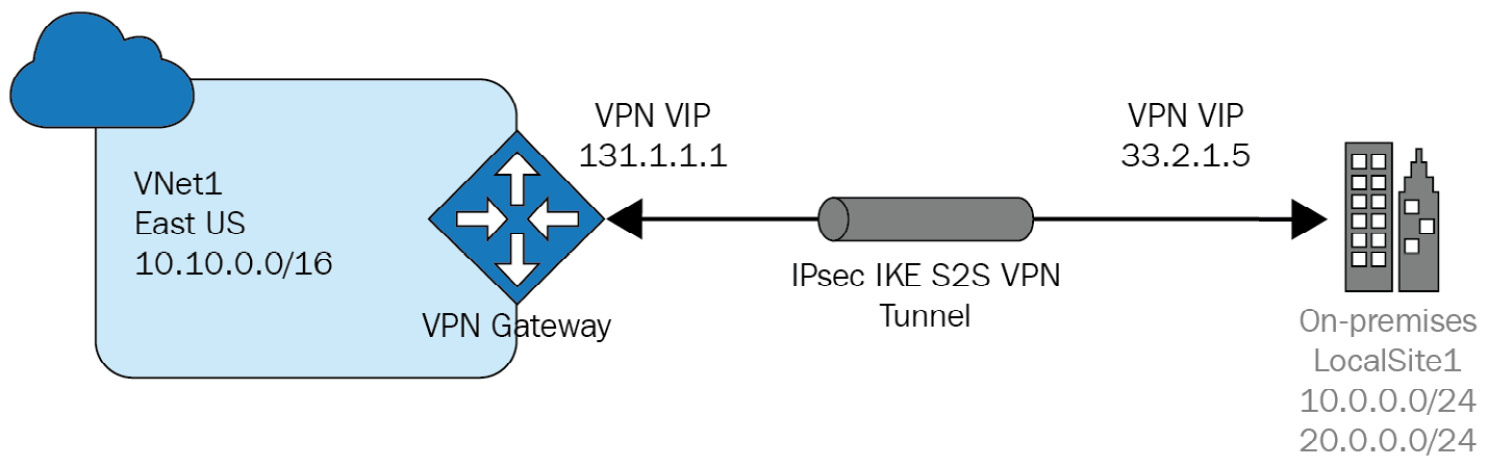
Figure 16.2 – A simple site-to-site VPN connecting an on-premises site to Azure
For smaller Azure Virtual Desktop deployments, you can use Azure Site Recovery (ASR) as this can be configured to set up the VNet in a secondary (failover) region. ASR can preserve your primary settings and does not require network peering.
One of the most important things to remember when working with Azure Virtual Desktop and multiple regions is DNS. A common problem customers face in Azure Virtual Desktop is DNS configuration issues relating to the virtual network. Ensure that you have configured the VNet's DNS to communicate with the required domain controller.
One final point within this section is the fact that you need to ensure that all the required URLs are included within the Network Security Group or other security technology you may have deployed on the virtual network. For more information on the URL list for Azure Virtual Desktop, please refer to Chapter 4, Implementing and Managing Networking for Azure Virtual Desktop.
Virtual machines
When we look at business continuity and disaster recovery options for virtual machines (session hosts) for Azure Virtual Desktop, two specific options are available. The first is active-active, and the second is active-passive.
Let's first take a look at the active-active option.
The active-active option
When using the active-active option, you can have a single host pool that is stretched across multiple Azure regions. This means creating a single host pool and deploying the virtual machines across a primary and secondary region. You need to use FSLogix Cloud Cache to handle profiles to replicate user data between the regions.
Important Note
This option should only be considered for pooled desktop host pools.
If you choose active-active, you can protect against short storage outages without the user having to log in again. This also means that you can adopt continuous testing of disaster recovery locations as you can use both regions in a normal operating condition. This option does not provide any cost savings and has no benefits in terms of performance; however, as stated, you can continually test disaster recovery.
You can only manage connection using this option via the session host drain stop; otherwise, incoming user connections will be equal. What this means is that user connections could be directed to either the primary region or the secondary region.
We now move on to take a look at the active-passive option.
The active-passive option
The active-passive option should be considered for personal desktop host pools where you need to replicate the dedicated virtual machines over to the second region. You can use the active-passive option for pooled desktops as well if required.
Similar to the active-active option, you can use a single host pool. This is the recommended approach for simplicity. You can also deploy a new host pool in the secondary region with all associated resources turned off. There is still a cost associated with this and you would need to regularly power these virtual machines on to prevent the machine account passwords from expiring. In the event of an outage, you can turn on those resources for the organization to access as a disaster recovery solution. For this method, as with all new host pool configurations, you would need to set up application groups for the required users within the failover region. You can also use an ASR plan to turn on the resources orchestrating the overall process.
Important Note
It is recommended that you use Azure Site Recovery (ASR) for personal desktop host pools.
Virtual machine availability sets versus availability zones
The default resiliency option for a host pool deployment is Availability Set. The resiliency provided by an availability set is at the single Azure data center level. Microsoft provides a 99.5% SLA on an availability set.
The second option would be to use something called an availability zone. This is where virtual machines within a host pool are distributed across different data centers in a region. Again, this offers a higher resiliency, and Microsoft provides a 99.9 SLA on availability zones.
It is recommended that you consider multi-region resilience over availability sets/zones for better coverage. The following link details some of the challenges you may face in larger organizations relating to availability sets and allocation failures: https://docs.microsoft.com/troubleshoot/azure/virtual-machines/allocation-failure#allocation-failures-for-large-deployments-more-than-500-cores.
We now move on to take a look at managing user identities.
Managing user identities
In this section, we take a look at managing user identities and some of the different options available to you. The first thing you need to think about when managing user identities is that when you failover to a secondary region, you need to ensure that the domain controller is available so your virtual machines can communicate with it.
I have listed three different options for enabling communication with the domain controller in the secondary region.
Deploying a domain controller in the failover region
Using virtual network peering, you can configure both Region A and Region B virtual networks to communicate using network peering. The following diagram shows how network peering facilities the communication of domain controllers between the two regions:
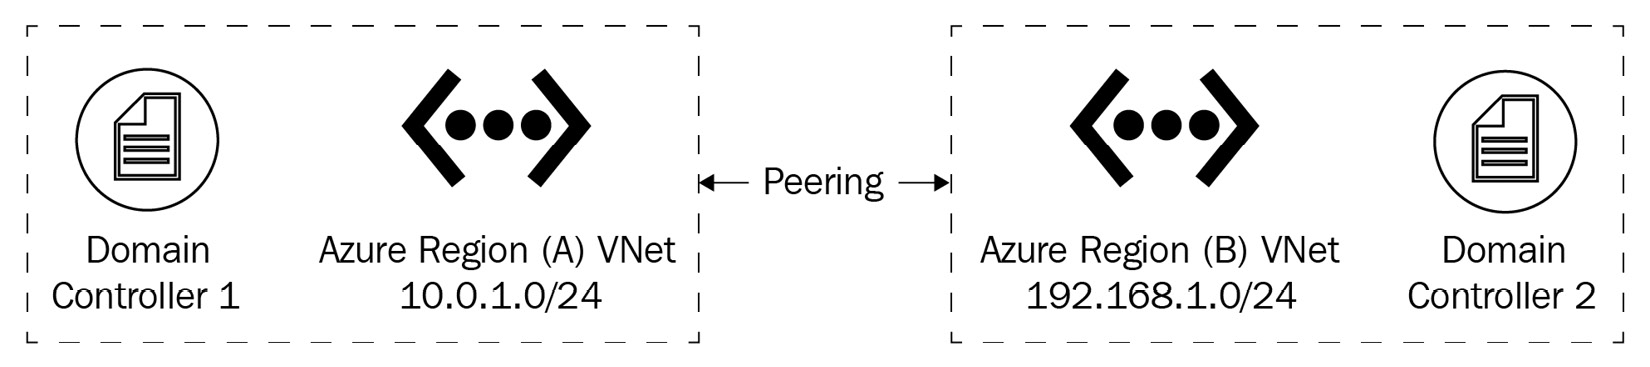
Figure 16.3 – Network peering used to enable domain controllers to communicate across Azure regions
Now that we have looked at deploying a domain controller in the failover region, let's look at how you would use an on-premises domain controller.
Using an on-premises domain controller
Another option would be to use a virtual network gateway to connect multiple virtual networks and an on-premises site enabling you to use the on-premises domain controller for multiple regions, as you can see in the following diagram:

Figure 16.4 – This diagram shows multiple regions connecting via a VPN gateway to an on-premises site
Tip
Make sure you configure the DNS settings on the VNet to point to the domain controller. This is quite a common issue.
Let's now take a look at how you would logically use ASR to replicate your domain controller between regions.
Using ASR to replicate your domain controller
One of the most common approaches for ensuring that Azure Virtual Desktop resources can access the domain controller in the failover region is to use Azure Site recovery in a similar manner to what we discussed earlier in the virtual machine part of this section.
The following screenshot shows the use of ASR replication to replicate the domain controller from Azure Region A to Azure Region B:
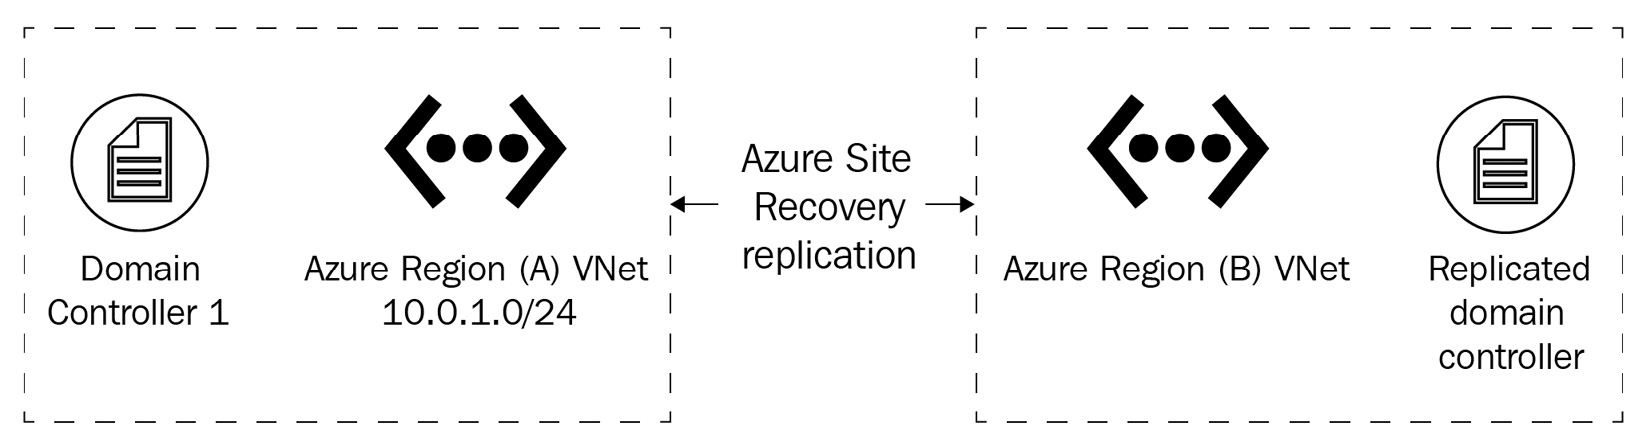
Figure 16.5 – This diagram shows the replication of the domain controller from Region A to Region B
Now that we have taken a look at user identify options, let's move on to learn how best to configure user and app data.
Configuring user and app data
In this section, we take a look at profiles and user data. When using local profiles, it's recommended that you use ASR to replicate user data and the session hosts to the failover region. This is a common approach for those who are using personal host pools.
FSLogix offers the ability to separate both the user profile and office container disks. This also enables you to split user data components into different storage locations. In a typical environment, the office container would consume more disk space than a profile disk. The backup, replication, and user profile disk would be significantly quicker than using office containers as part of the solution.
In most cases, it is typical to expect organizations to use user profile containers only.
The three recommended storage options for storing FSLogix profile containers are as follows:
- Azure files
- Azure NetApp files
- FSLogix Cloud Cache
There are multiple options available in terms of storing your FSLogix profile containers. To find out more about the options available to you and the limitations, please refer to Chapter 5, Implementing and Managing Storage for Azure Virtual Desktop.
Important Note
Microsoft recommends storing FSLogix profile containers on Azure files and NetApp files for the majority of scenarios.
When looking to configure disaster recovery for user profiles, you have the following options:
- Use Azure replication (for example, Azure NetApp Replication or Azure Files Sync for file servers).
- Configure FSLogix Cloud Cache for both application and user data.
- Configure app data for disaster recovery only. What this means is that your users would have new user profiles, and the first-time sign-in experience would occur.
- OneDrive is also an option to consider as it can redirect well-known folders, including Desktop, Documents, and Pictures. Again, this offers a level of resilience without any specific business continuity or disaster recovery considerations.
Important Note
When using Cloud Cache, make sure that your session hosts are configured using Premium SSD disks for the local cache file to help with no loss of data.
For more information on Cloud Cache, please refer to the Configuring Cloud Cache section in Chapter 12, Implementing and Managing FSLogix.
Disaster recovery considerations for MSIX app attach
MSIX app attach is a dynamic application delivery feature in Azure Virtual Desktop. MSIX app attach delivers MSIX applications using a virtual disk or CimFS image to pooled and personal desktop host pools within Azure Virtual Desktop.
When implementing a disaster recovery plan, there are two areas of consideration for MSIX app attach. The first is storage; you need to ensure that the MSIX images are accessible in the failover region. Similar to FSLogix, MSIX app attach requires network storage for the application disks/images.
The second consideration relates to the configuration of MSIX app attach. If the storage path changes in a disaster recovery scenario, you will need to change all the MSIX image paths or reconfigure all applications configured within a host pool.
To avoid the requirement to reconfigure MSIX app attach in a disaster recovery scenario, it is recommended that you use one of the following options:
- Create a separate host pool for the secondary region pre-configured for MSIX app attach.
- Use Azure files with geo-redundant storage.
- Implement Azure NetApp Files cross-region replication.
Tip
For enterprise deployments, it is recommended that you configure Azure NetApp Files cross-region replication.
To learn more about MSIX app attach, please refer to Chapter 14, MSIX App Attach. In the next section, we will take a high-level look at application dependencies.
Application dependencies
When an outage occurs, it may not just impact your Azure Virtual Desktop environment but also any critical business applications that rely on data located in the primary region. This could be web services, SQL databases, and more.
You should also consider any specific settings required for the applications and any additional configurations for these services once you have set up replication or high availability.
You can use ASR plans to model application dependencies, and you could consider configuring the app to use the second region as its default configuration or as part of the failover process.
Please note the following:
- You need to ensure that users can access on-premises applications in the event of a failover. See the Virtual network section for more details.
- You need to ensure that you review all dependent applications and any other resources to ensure availability in the disaster recovery location.
In this section, we looked at planning and implementing a disaster recovery plan for Azure Virtual Desktop, looking at the five critical areas: virtual network, virtual machines, managing user identities, configuring user and app data, and application dependencies.
In the next section, we look at configuring backup and restore for FSLogix user profiles.
Configuring backup and restore for FSLogix user profiles, personal virtual desktop infrastructures (VDIs), and golden images
In this section, we look at backing up and restoring Azure Virtual Desktop components. We first take a look at backup and restore.
Virtual machine backup and restore
When managing personal host pools, you may want to back up the session hosts when local profiles are used. In this section, we'll look at how to take a backup of a session host virtual machine.
We start by creating an Azure Recovery Vault for Azure Virtual Desktop, the steps for which are as follows:
- First, navigate to the Azure portal.
- Search for Backup Center in the Azure portal and navigate to the Backup Center dashboard.
- Click on Vault, located in the main menu of the page.

Figure 16.6 – Azure Backup center page
- Within the Create Vault page, select Recovery Services vault and then click Continue:
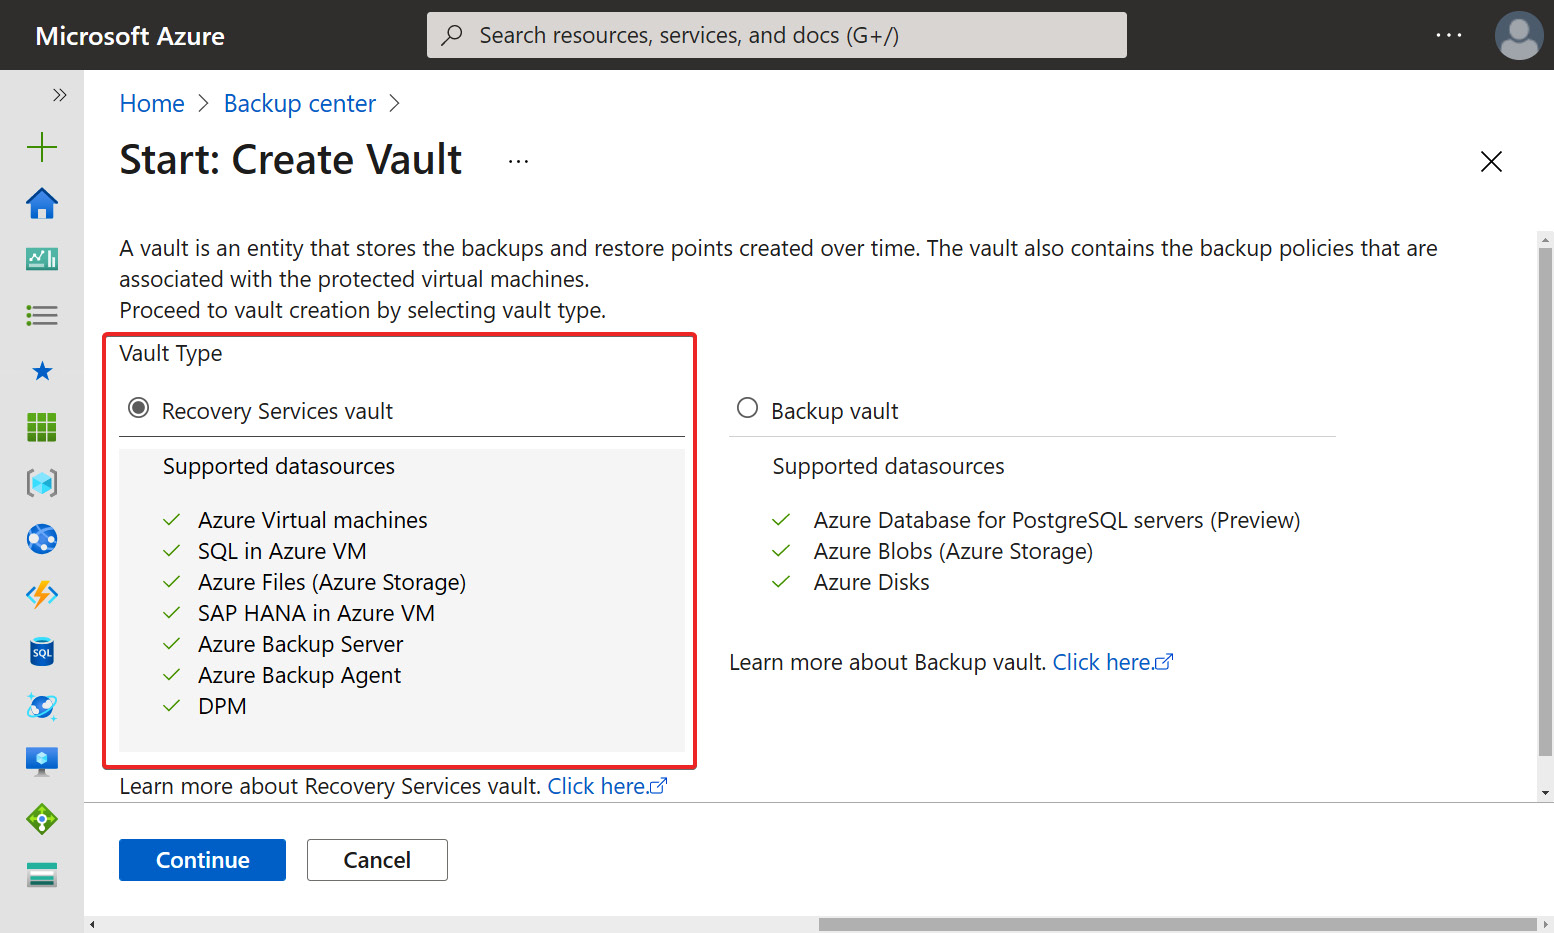
Figure 16.7 – Create Vault page within Backup center
- Select the Resource group option or create a new one and specify a vault name and region.

Figure 16.8 – Create Recovery Services vault page
- Once configured, proceed to Review + create.
- Once complete, you will see the new Recovery Services vault in Backup center.
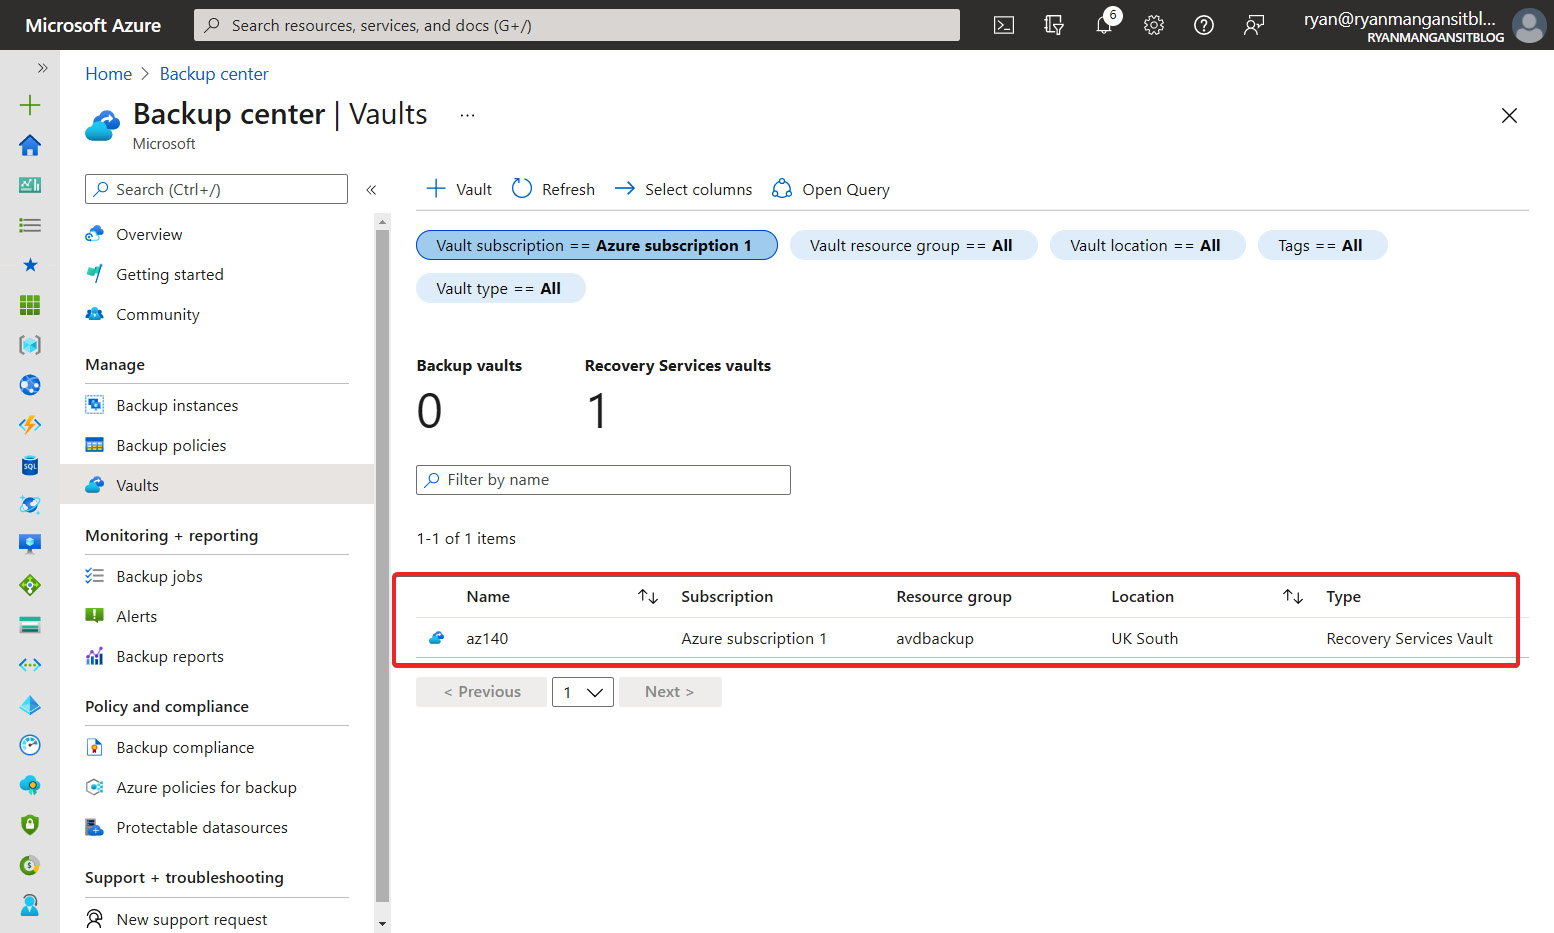
Figure 16.9 – New Recovery Services vaults in Backup center
Now that we have created a recovery services vault, we can progress with backing up a session host virtual machine.
- Within Backup center, select the recently created recovery services vault.
- Within the recovery services vault, select Backup, located on the left-hand side under Getting started.

Figure 16.10 – Backup highlighted in the Getting started section
- Once selected, you will see the Backup blade appear. Choose Azure for Where is your workload running, and Virtual machine for What do you want to backup, and then click Backup.
- You can use a default policy or create a new policy customized to your specific requirements.
- Click the Add button under the Virtual Machines section, choose the virtual machines you wish to back up, and then click OK.
- Once you have selected the backup policy and added the virtual machines, click Enable Backup.
- You should now see the virtual machine listed within backup jobs with the completed Configure backup operation. When the scheduled backup runs, you will also see the following within the backup jobs:

Figure 16.11 – Configuring a backup operation as completed
We now move on to take a look at restoring a virtual machine.
- To restore a virtual machine, you will first navigate to the Azure Backup center.
- On the main page of the Azure Backup center, click Restore, as shown in the following screenshot:
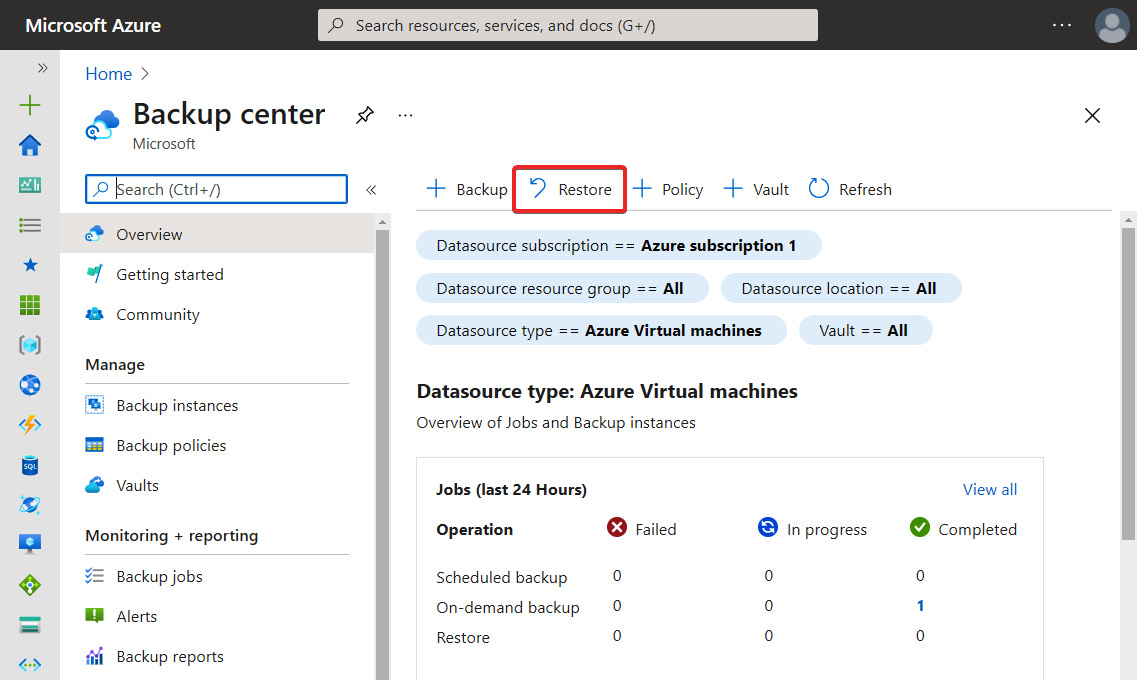
Figure 16.12 – Restore button highlighted in Backup center
- You will now see the Start: Restore page appear. Select the virtual machine backup instance you require to restore.
- Under the Restore Region section, you have a choice of selecting a primary region or a secondary region. In this example, we will select Primary Region. Once you have completed the required fields on the page, click Continue.
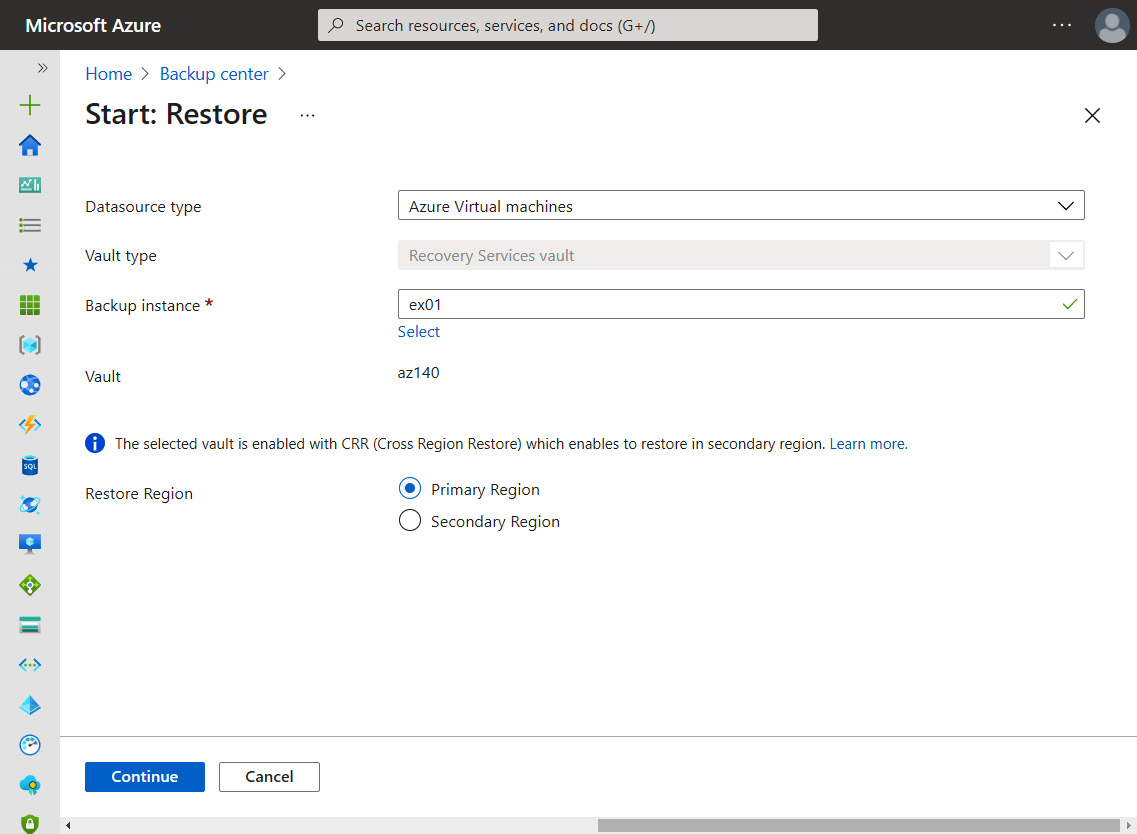
Figure 16.13 – Start: Restore page when restoring a virtual machine within Microsoft Azure
Important Note
You can configure your Recovery Vault for Cross Region Restore, allowing the restoration of virtual machines to the secondary region. This is useful for those who are using a single host pool for both a primary and secondary region. In the event of a primary region outage, you can restore the virtual machine to the secondary region. You may want to consider configuring your disaster recovery within a paired region to take advantage of Cross Region Restore (CRR). You can find out more on the region pairs here: https://docs.microsoft.com/en-us/azure/availability-zones/cross-region-replication-azure#azure-regional-pairs.
- You will now see the Restore Virtual Machine page appear. Click Select, which will launch the selected Restore point blade.
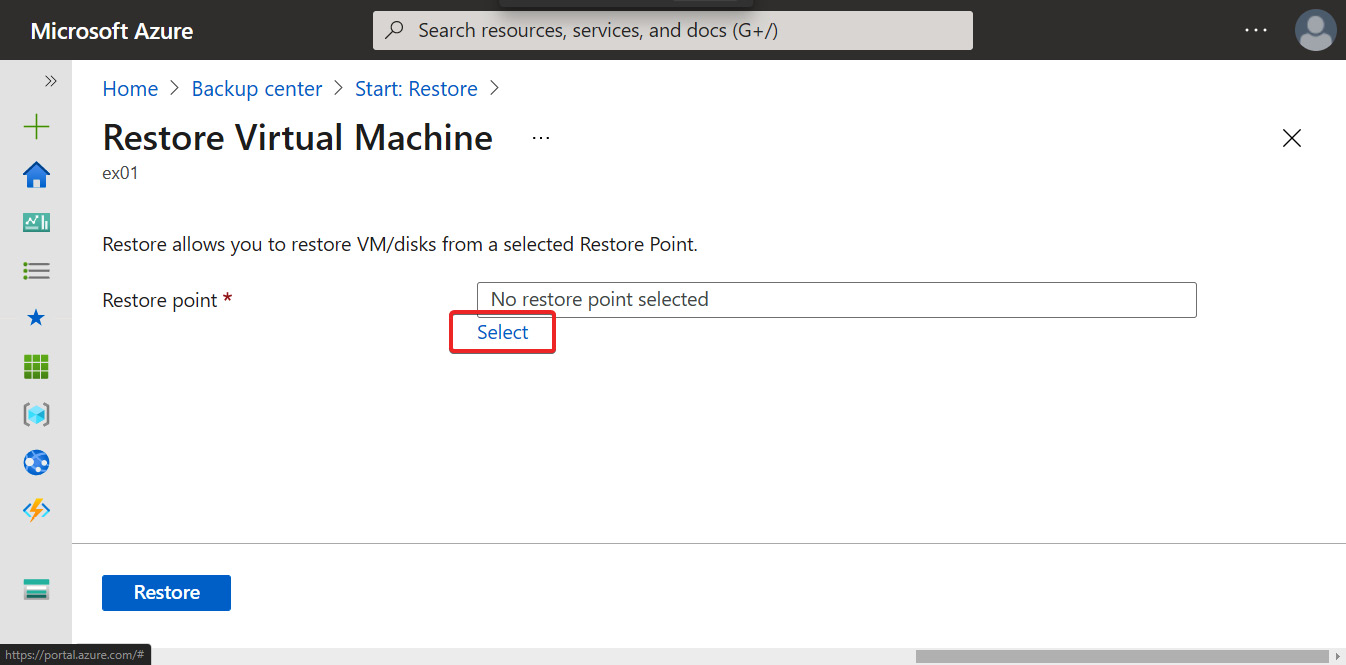
Figure 16.14 – Restore point page within the virtual machine restore wizard
- Choose the required restore point and then click Continue.

Figure 16.15 – Select restore point blade
- The final part is to specify whether you want to create a new virtual machine or replace the existing one. In this example, we will select Create new.
- Complete the Virtual Machine type fields, Resource group, Virtual network, and Subnet, and select a staging location.
- Once all the fields have been completed, click Restore.
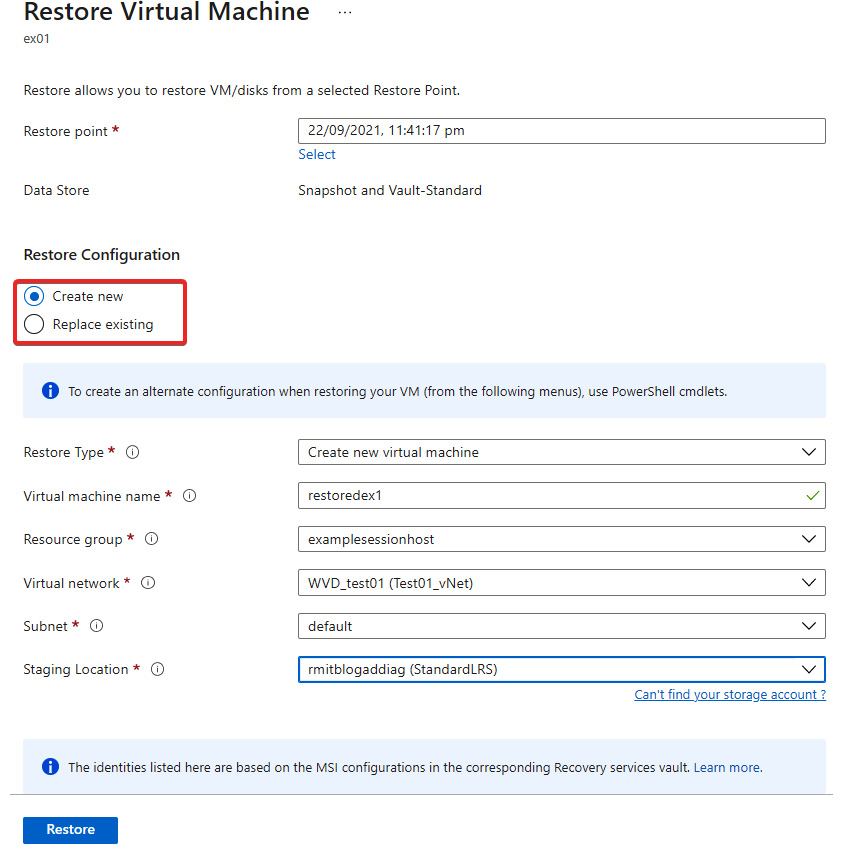
Figure 16.16 – Restore Virtual Machine page
- Once the restore job has been started, you should see the restore operation within the Backup jobs section in Backup center:
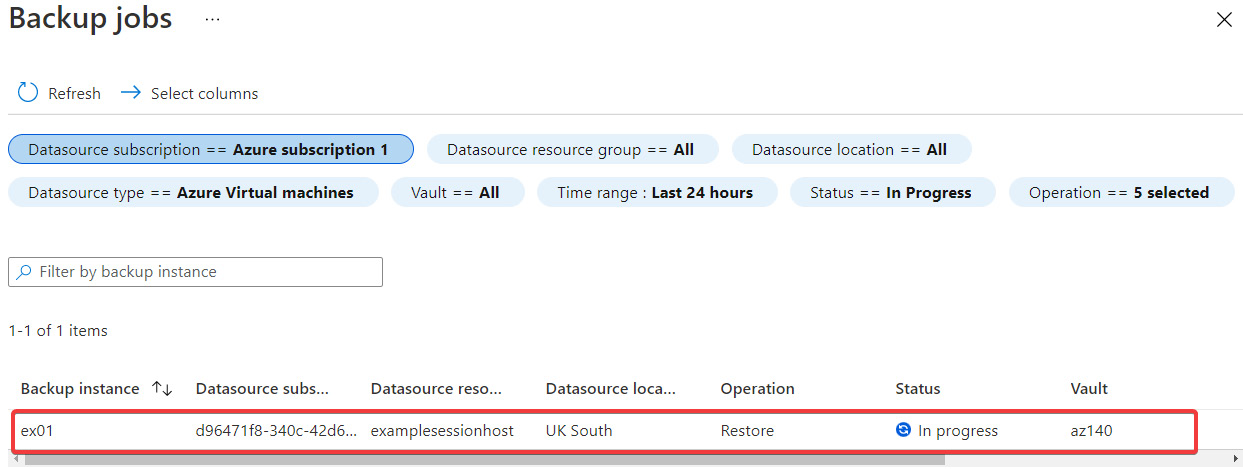
Figure 16.17 – Restore operation in Backup jobs within Backup center
- Once the restore operation has been completed, you will also see the operation showing completed from the main page in Backup center. This information is pulled from the Backup jobs section of the Recovery Services vault.

Figure 16.18 – Shows the Restore Operation has completed under jobs (last 24 hours)
Now that we have looked at backing up virtual machines and restoring them, which is extremely useful for personal desktop host pools, we now move on to backing up Azure files and restoring them.
Zone-redundant storage
The use of zone-redundant storage (ZRS) should be regarded as a redundancy option. ZRS essentially replicates your Azure managed disk synchronously over three availability zones within your chosen Azure region.
Read more on ZRS here: https://docs.microsoft.com/azure/virtual-machines/disks-deploy-zrs.
Azure file backup and restore
It is recommended that you back up your FSLogix profile containers for Azure Virtual Desktop. You can do this in a similar way to how you would back up a virtual machine. We will now take a look at the steps for backing up FSLogix Profile container stores:
- Navigate to Backup center.
- Select Backup on the main page.
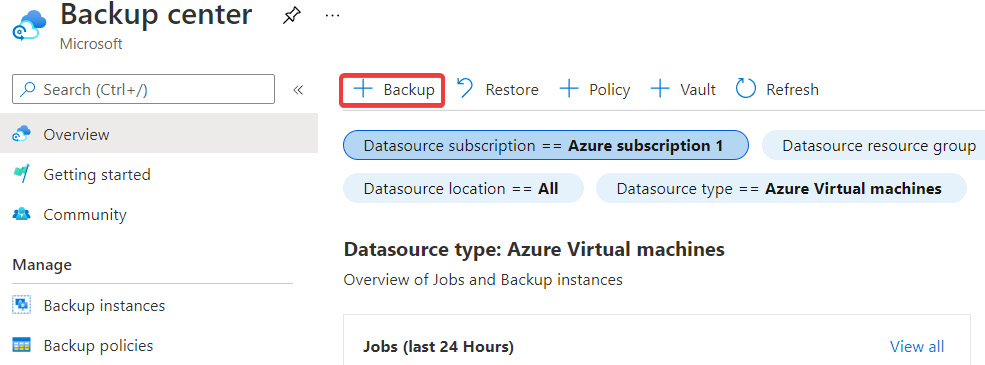
Figure 16.19 – The Backup button in Backup center
- Within the Start: Configure Backup section, choose Azure Files (Azure Storage) and the required vault. In this example, we choose az140 for Vault. Once all the fields have been populated, click Continue.
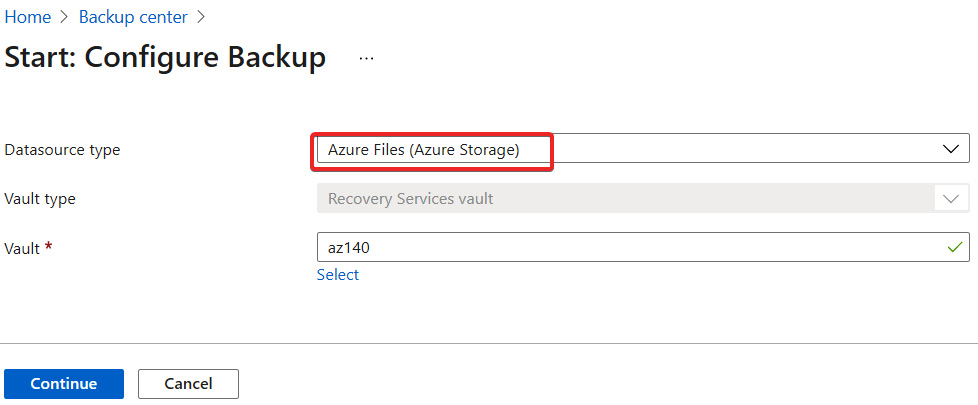
Figure 16.20 – Azure Files and the vault when configuring Azure Files for Backup
- You will now see the Configure Backup page. Within this section, you need first to select Storage Account. Once it's selected, in the Select storage account blade, click OK.
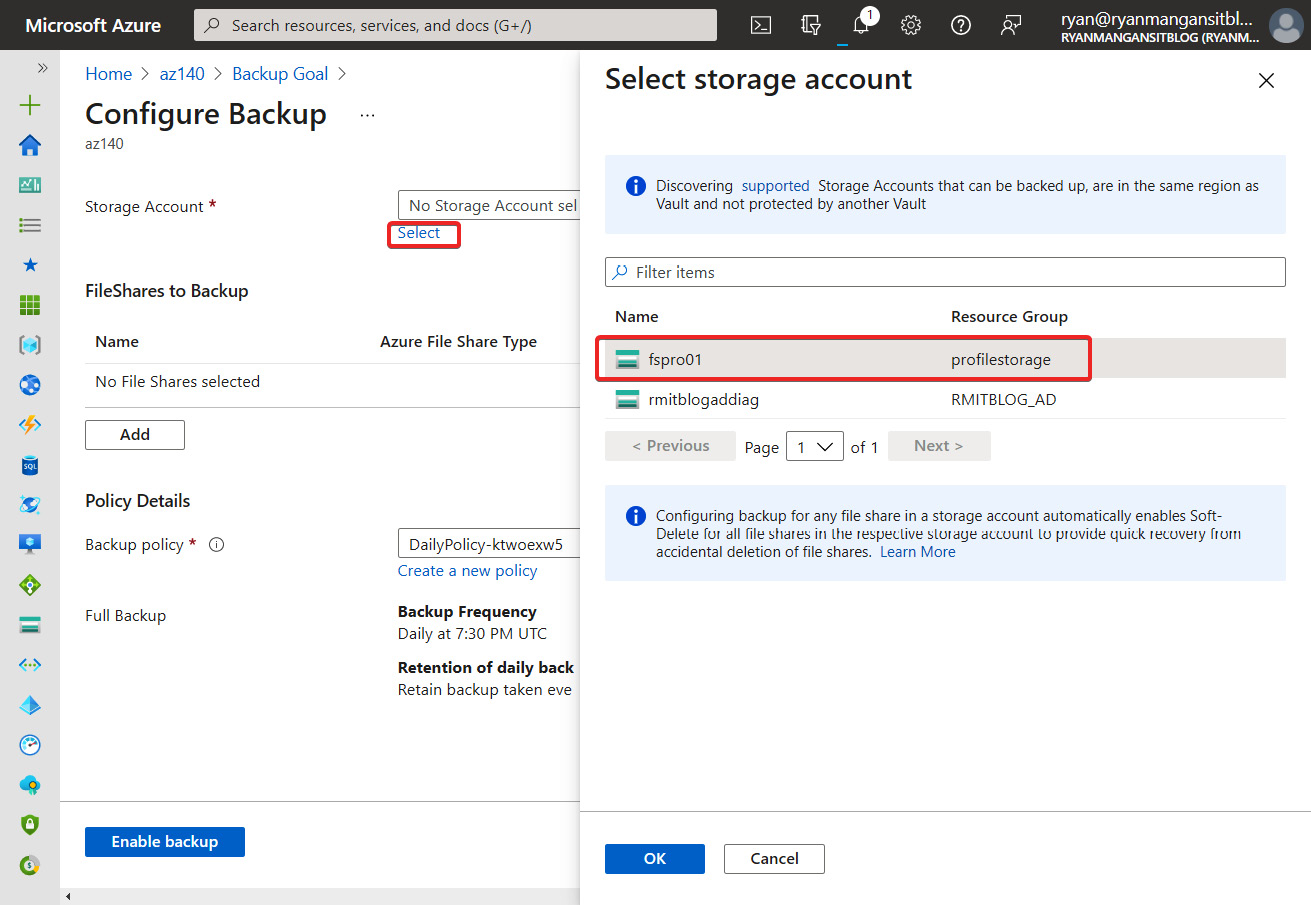
Figure 16.21 – Storage account selection for Backup
- You will then need to add the required shares on the same page by clicking the Add button within the FileShares to Backup section. Once you have selected the required file shares, click OK within the Select file shares blade.

Figure 16.22 – The file share selected that you want to back up
- Use the default policy details section or create a specific backup policy to suit your requirements within the Policy details section. Once you are finished, click Enable to perform a backup.
- Once a backup has been taken, you should see the last backup status as being successful. You can find this information by navigating to the recovery vault, selecting Backup Items and Azure Storage (Azure Files).
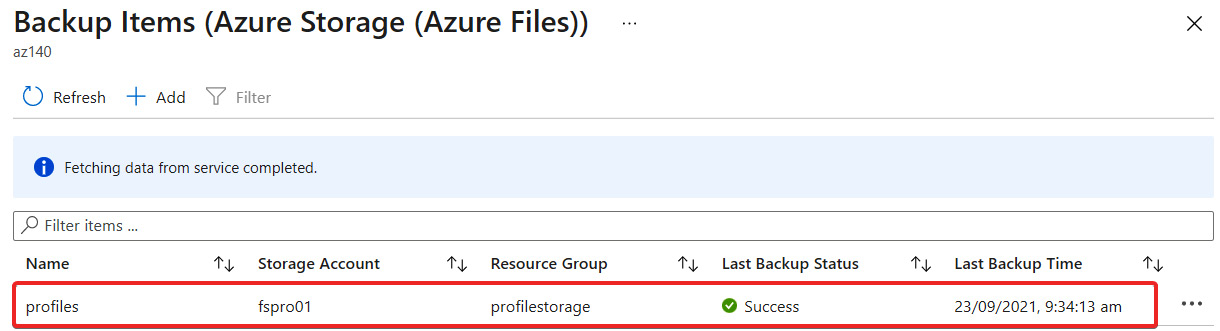
Figure 16.23 – The first backup job has been completed
Now that we have taken a look at backing up an Azure Files share, let's now recover an Azure Files share:
- Navigate to Backup center.
- Click Restore on the main page, as shown in the following screenshot:
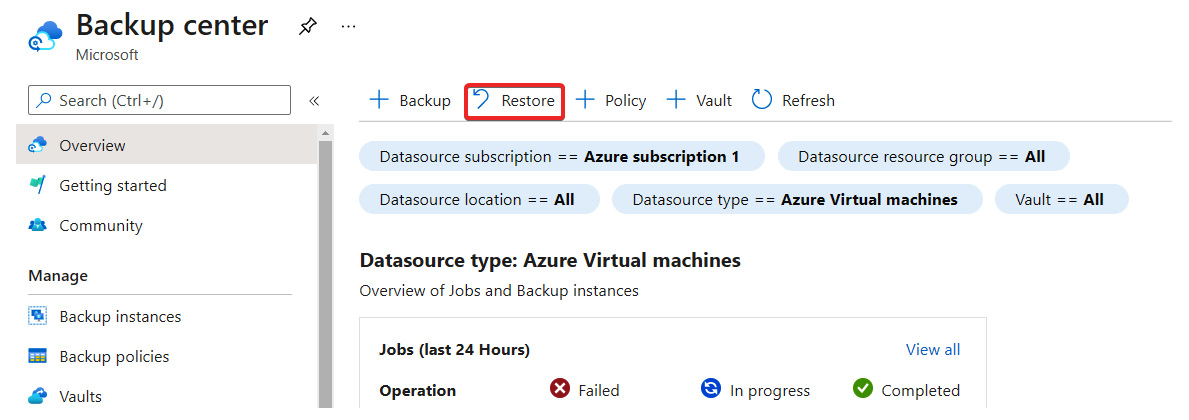
Figure 16.24 – Restore button highlighted within Backup center
- Select Azure Files (Azure Storage) for Datasource type.
- Select the file share you wish to restore.
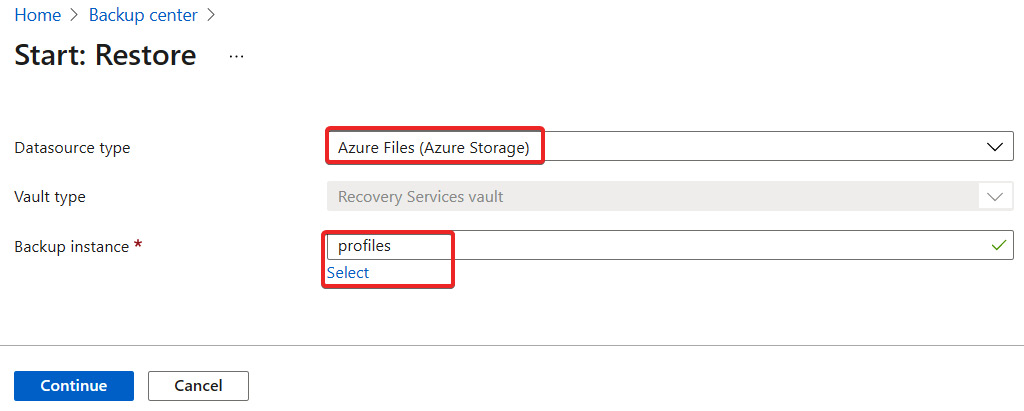
Figure 16.25 – Start: Restore populated for Azure Files
- Within the Restore page, select a restore point for the backed-up file share.
- Then you need to select a restore destination. In this example, we will choose Original Location; however, you can choose an alternative location if required.
- In the In case of Conflicts section, you can choose to skip or overwrite. In this example, we will skip. Once you have finished, click Restore.
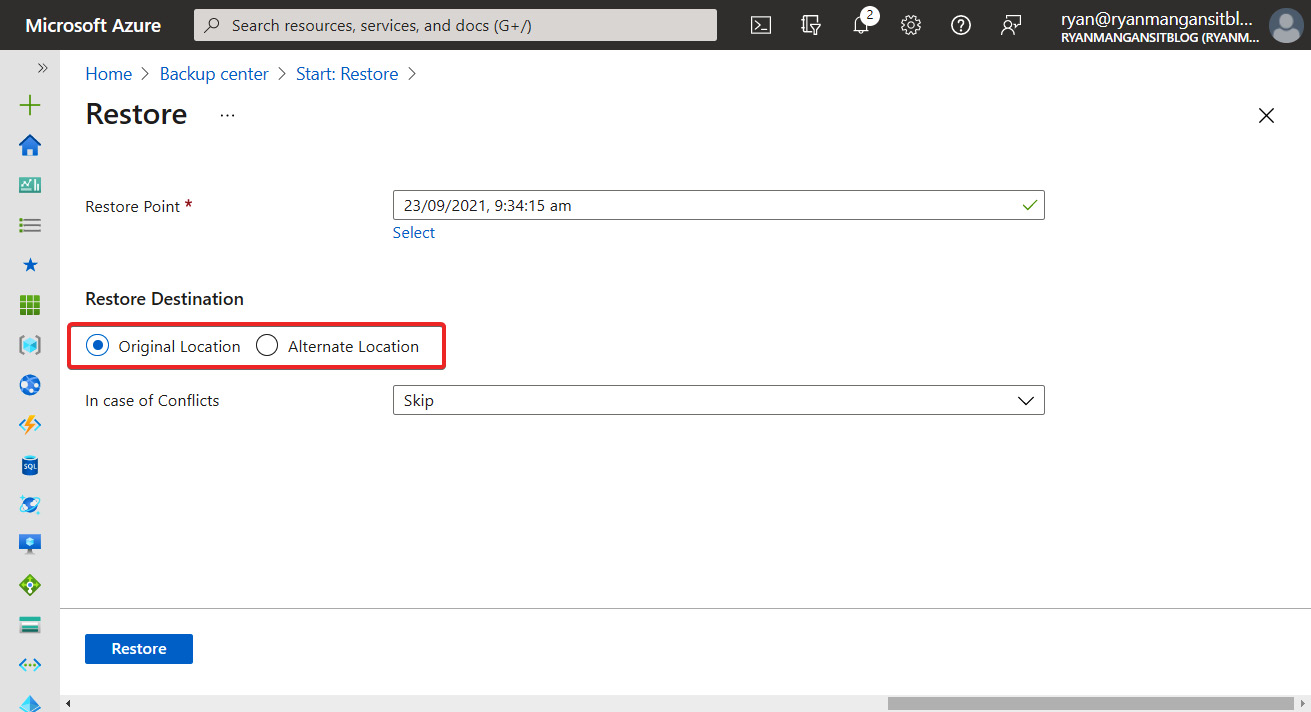
Figure 16.26 – Restore page
- You can then view pending, in progress, and completed restore jobs within the Recovery services vault under Backup Jobs, as shown in the following screenshot:
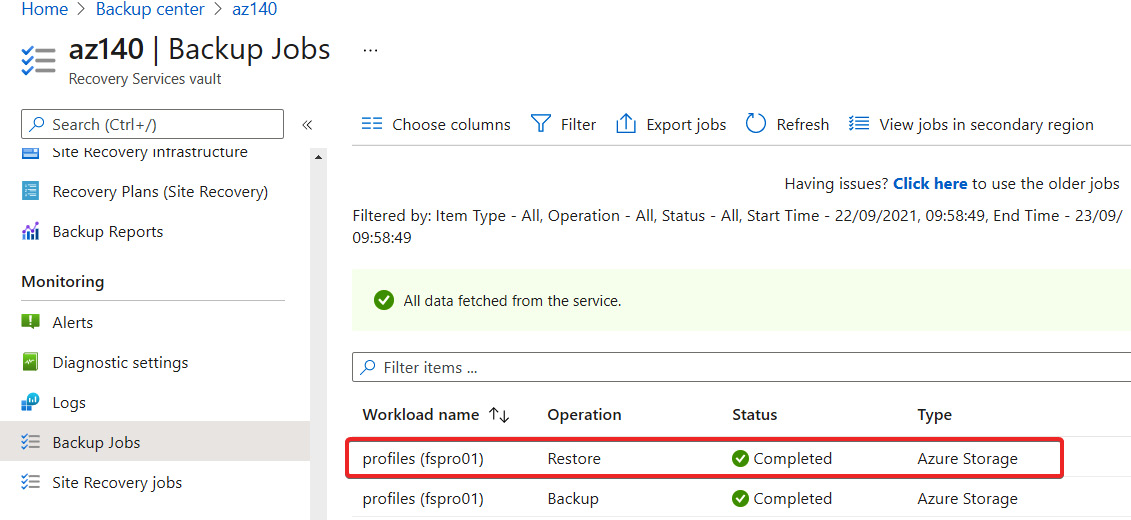
Figure 16.27 – The complete restore job for the Azure Files file share
That concludes backing up and restoring an Azure Files file share. We now move on to the final section of the chapter, where we briefly look at replicating images across multiple images.
Replicating virtual machine images between regions
In Chapter 9, Creating and Managing Session Host Images, we looked at shared image galleries. A shared image gallery enables you to replicate across multiple regions. When working with pooled desktop session host pools, you may want to consider using the replication feature within shared image galleries to distribute the image template across multiple regions. In the event of an outage, you can spin up new virtual machines at the failover.
As shown in the following screenshot, you can see updated image versions target replications. This enables you to push out a central operating system template image to multiple regions quickly. You should consider image replication when implementing a disaster recovery solution:
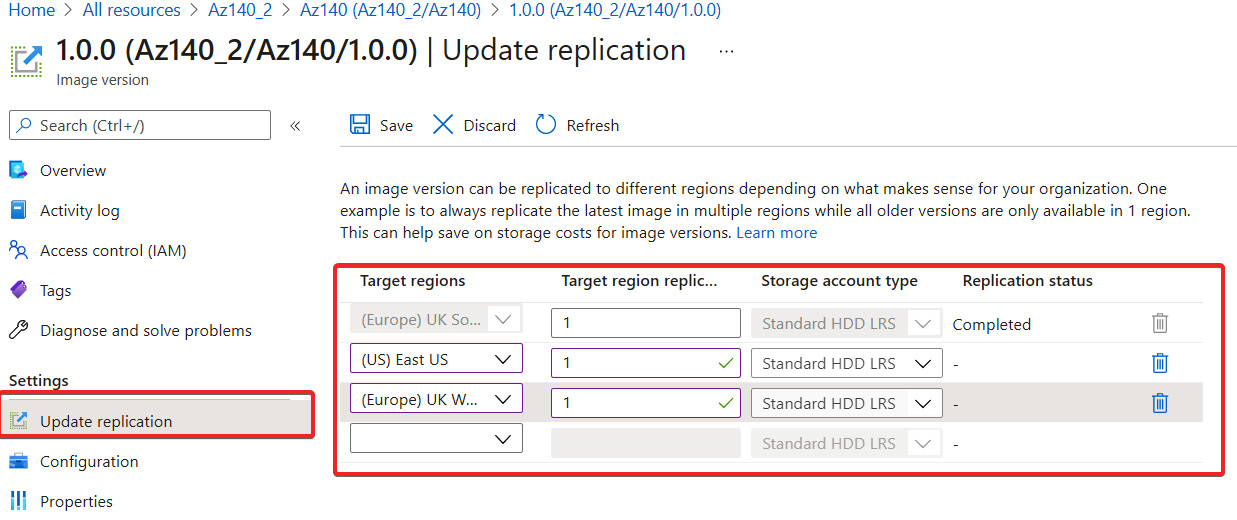
Figure 16.28 – Replication update for an image version within a shared image gallery
This concludes the short section on image replication. For more information on setting up a shared image gallery and using image versions, please refer to the Azure Compute galleries section in Chapter 9, Creating and Managing Session Host Images.
Summary
This chapter looked at planning and implementing business continuity and disaster recovery for Azure Virtual Desktop.
We started by looking at designing a backup strategy for Azure Virtual Desktop. We then moved on to look at the five critical components of an Azure Virtual Desktop environment, which are virtual networks, virtual machines, user identities, configuring user and app data, and application dependencies.
We then looked at how to back up and restore virtual machines and Azure files. We then finished the chapter by reiterating the benefit of using shared image galleries to replicate a gold image/image template across multiple Azure regions.
In the next chapter, we will take a look at automating Azure Virtual Desktop management tasks.
Questions
- When configuring a VNet for an Azure Virtual Desktop environment, what should you ensure you have checked before deploying virtual machines?
- Which Azure service would you use to ensure that your Azure Virtual Desktop template/master image is resilient?
- Which feature within FSLogix can be used to provide resilience if there is a storage failure?
Answers
- DNS settings have been configured on the VNet.
- Use Azure Compute Galleries to replicate your virtual machine image across multiple regions.
- FSLogix Cloud Cache.
|
Azure component |
Description of component | |
|
1 |
Virtual network |
You should consider the design of your network connectivity during an outage. |
|
2 |
Virtual machines |
Depending on the host pool type and requirement, you may wish to replicate your virtual machines to the second region or replicate an image template using Azure Compute Galleries to deploy new session hosts within the second region. Availability zones should also be considered within a local region. Read more here: https://docs.microsoft.com/azure/availability-zones/az-overview. |
|
3 |
User and app data |
For user profile containers, you should set up data replication in the second region, and consider features such as MSIX app attach. |
|
4 |
User identities |
Ensure you can access your user identities within the second region. |
|
5 |
Application dependencies |
Any line-of-business applications will need to be failed over to the secondary region in the event of an outage. |
Configuring backup and restore for FSLogix user profiles, personal virtual desktop infrastructures (VDIs), and golden images
Configuring backup and restore for FSLogix user profiles, personal virtual desktop infrastructures (VDIs), and golden images
Configuring backup and restore for FSLogix user profiles, personal virtual desktop infrastructures (VDIs), and golden images
Configuring backup and restore for FSLogix user profiles, personal virtual desktop infrastructures (VDIs), and golden images
Configuring backup and restore for FSLogix user profiles, personal virtual desktop infrastructures (VDIs), and golden images
Configuring backup and restore for FSLogix user profiles, personal virtual desktop infrastructures (VDIs), and golden images
Configuring backup and restore for FSLogix user profiles, personal virtual desktop infrastructures (VDIs), and golden images
Configuring backup and restore for FSLogix user profiles, personal virtual desktop infrastructures (VDIs), and golden images