
Chapter 3: Designing for User Identities and Profiles
In this chapter, we will look at designing for user identities and profiles. This is important as a poor design can impact the user experience and, in turn, affect other components such as applications, as well as the overall functionality of Azure Virtual Desktop.
In this chapter, we'll cover the following topics:
- Selecting a licensing model for your Azure Virtual Desktop deployment
- Planning for user profiles
- Planning for Azure Virtual Desktop client deployment
- Summarizing the prerequisites for Azure Virtual Desktop
Selecting a licensing model for your Azure Virtual Desktop deployment
This section will introduce Azure Virtual Desktop licensing and the entitlements associated with it. You need to make sure that you are properly licensed.
Important Note
Before getting started, please note that the previously named Microsoft 365 for Business is now known as Microsoft 365 Business Premium. Users can use Azure Virtual Desktop from their non-Windows pro devices if they have a Microsoft 365 E3/F3/E5/Business/A3/Student user or a Windows 10 VDA per-user license.
The following table details the licenses and their eligibility for Azure Virtual Desktop:

The preceding table was taken from the Microsoft licensing page at: https://azure.microsoft.com/en-gb/pricing/details/virtual-desktop/.
You will also need an Azure subscription to be able to deploy and manage your desktop virtualization environment. The following Azure components are key areas when you're looking at Azure Virtual Desktop deployment costs:
- Networking and any third-party Network Virtual Appliances (NVAs)
- Virtual machines (VMs) and operating system (OS) storage
- Data disk (optional)
- Storage for user profiles
Important Note
Session host VMs on Azure deployments are billed at Linux compute rates for the following OS versions: Windows 10 single, Windows 10 multi-session, and Windows Server. You can read more on this here: https://azure.microsoft.com/en-us/pricing/details/virtual-desktop/.
Applying the Azure Virtual Desktop licensing to VMs
This section covers how to check if your Azure Virtual Desktop session hosts have the correct licensing applied.
Important Note
This process is typically taken care of for you when creating VMs from the wizard. However, it's worth checking to ensure the license type is set correctly. It's also advised that you check this when you deploy from a custom or imported image.
One way you can apply a license to a VM is by using the following PowerShell cmdlet:
$vm = Get-AzVM -ResourceGroup <resourceGroupName> -Name <vmName>
$vm.LicenseType = "Windows_Client"
Update-AzVM -ResourceGroupName <resourceGroupName> -VM $vm
Here's what the output looks like:

Figure 3.1 – PowerShell script showing how to apply Azure Virtual Desktop licensing to VMs
Once you have set the license type, you can check it using the following cmdlet:
Get-AzVM -ResourceGroupName <resourceGroupName> -Name <vmName>
Here's what it looks like:
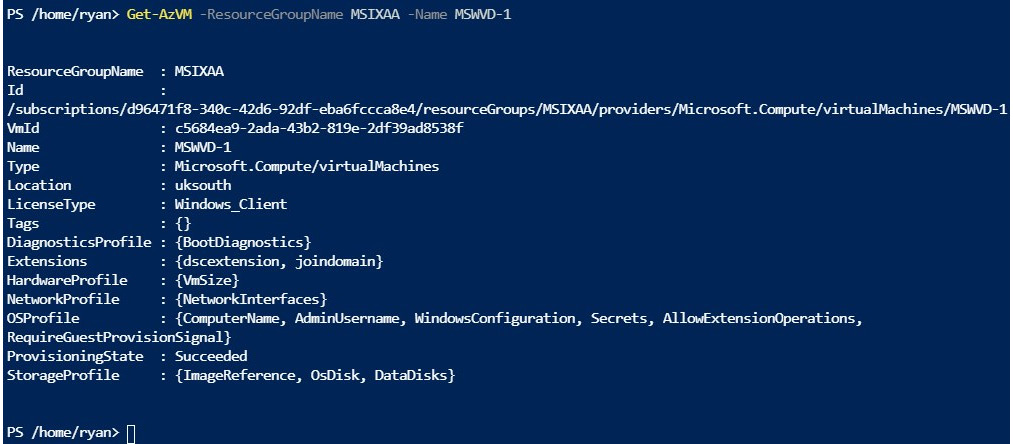
Figure 3.2 – The output of running the get-AZVM cmdlet
If you run the following cmdlet, this will provide you with a list of all the VMs licensed under Windows_client:
$vms = Get-AzVM
$vms | Where-Object {$_.LicenseType -like "Windows_Client"} | Select-Object ResourceGroupName, Name, LicenseType
Here's what the output looks like:

Figure 3.3 – The licensed VMs
In the next section, we look at the recommended storage solutions for Azure Virtual Desktop.
Recommended storage solution
FSLogix is a profile container technology that is included with Azure Virtual Desktop at no extra cost. FSLogix lets you roam profiles in desktop virtualization environments such as Azure Virtual Desktop.
There are multiple storage options available to use for storing your FSLogix Profile Containers. The most common option organizations use is Azure Files.
Important Note
Microsoft recommends Azure Files for typical FSLogix profile container deployments, though it's recommended that you use Azure NetApp Files for enterprise environments.
When a user signs into an Azure Virtual Desktop session, the container (container FSLogix (profile container)) is attached (dynamically) to the allocated session host using a natively supported virtual disk, known as Virtual Hard Disk/Hyper-V Hard disk (VHD/VHDX).
The user's profile is made available and provides the same user experience, just like a native user profile would.
The following table provides a comparison between the three common storage solutions available for FSLogix Profile Containers with Azure Virtual Desktop:
Azure Storage platform comparison
.jpg)
.jpg)
The following table provides a comparison between the features of these three storage solutions available for FSLogix Profile Containers with Azure Virtual Desktop:
Azure Storage feature comparison

You can review the pricing for each storage method using the Azure pricing calculator: https://azure.microsoft.com/pricing/details/virtual-desktop/.
Azure Files tiers
In this section, we will look at the different Azure Files tiers and the benefits of each.
There are two types of storage when it comes to Azure Files: standard and premium. These two tiers offer different performance requirements and costs. The following is to help you weigh up which is more suited to your needs.
The key differences between the two tiers are the type of disks in use. Premium uses solid-state drives (SSDs), while standard uses traditional hard disk drives (HDDs):
- Premium file shares provide high performance and low latency for input and output (I/O)-intensive workloads. This is useful for the larger organizations or user profiles that require higher I/O.
- Standard file shares are suitable for the less intensive I/O workloads, such as general-purpose file shares and dev/test environments. These are more suitable for the smaller Azure Virtual Desktop environments.
The following table provides guidance when it comes to choosing a recommended file tier:

This section provided an overview of the storage options available to you when using FSLogix Profile Containers with Azure Virtual Desktop. Next, we will look at the installation and configuration of the Azure Virtual Desktop client.
Planning for user profiles
In this section, we will discuss user profiles and some of the considerations for Azure Virtual Desktop.
User profiles
A user profile comprises several data elements of a user. This can include desktop settings, persistent network connections, and application configuration settings. On the first login, Windows creates a (local) user profile from the default template. The user profile is tightly integrated within the Windows OS and is required for the user session to function correctly.
When comparing a remote user profile to a local profile, the key difference is that the remote profile allows the Windows OS to be replaced without impacting the user data. This means you can log into another session host and will still have the same settings that you did previously. Remote profiles are typically used in a pooled (non-persistent) desktop virtualization environment.
Microsoft has several products available for delivering remote user profiles, including the following:
- User profile disks (UPD)
- Enterprise state roaming (ESR)
- Roaming user profiles (RUP)
UPDs were previously the most widely used profile technology for desktop virtualization. There has been a significant shift toward FSLogix Profile Containers after their acquisition in 2019.
Challenges with previous user profile technologies
Traditional user profile solutions present a few challenges. For example, a lot of organizations that wanted to migrate to Microsoft 365 struggled with UPDs. Some of the issues with traditional profile disks were related to caching mailboxes problems and other applications not functioning correctly as the redirection was not seamless.
When using the Azure Virtual Desktop service, it is recommended that user profiles are configured using FSLogix Profile Containers. FSLogix has been designed to enable roaming profiles for desktop virtualization environments such as Azure Virtual Desktop. It stores the user profile in a single VHD/VHDX container. When a user initiates the connection to a virtual desktop, the user profile is made available and appears exactly like a local user profile would.
Now, let's take a deeper look into FSLogix and build on the information that we've covered within this and the previous chapter.
An introduction to FSLogix Profile Containers
Microsoft acquired the vendor FSLogix on November 19, 2018, which came with a set of products and solutions to improve desktop virtualization products. One of the main driving forces for the acquisition was so that Microsoft could replace UPDs with FSLogix Profile Containers. This was due to the limitations within the UPD, which had an impact on those who wanted to use Microsoft 365.
The FSLogix product portfolio includes the following:
- Profile Container
- Office Container
- Application Masking
- Java Version Control
Some of the key benefits when using FSLogix include the following:
- The ability to minimize sign-in times for pooled virtual desktop environments, also known as non-persistent desktops.
- Using FSLogix's filter driver enables a much better profile experience and removes many of the traditional compatibilities with UPD relating to what some describe as visible redirection.
- One of the features that can be sometimes forgotten is Java Version Control. This is a very useful tool that lets you specify the version of Java for a specific URL or/and application.
- Application masking enables you to hide applications on a central desktop image from users who have not been assigned permission via a security group.
FSLogix capabilities
This section provides an introduction to some of FSLogix's capabilities and the benefits associated with them:
- Redirecting user profiles to a network storage location. Profile Containers can be stored as VHD or VHDX files. As the profiles are accessed via a network share, this eliminates delays that are typically seen with profile solutions that copy files from the share to the target device.
- FSLogix can also maintain the Windows Index and the result is a smoother login on new VMs (there is no requirement to recreate the index).
- FSLogix offers Office containers. These types of containers allow you to solve Office issues within a non-persistent desktop virtualization environment. One common use case is how to handle Outlook .ost files or the Microsoft Teams cache, which we cover in Chapter 12, Implementing and Managing FSLogix.
- FSLogix's filter driver architecture redirects the profile so that applications and the Windows OS do not recognize that the user profile is stored outside the host. Typically, most applications won't work on user profiles stored on remote storage.
- FSLogix Cloud Cache enables you to create a highly available desktop virtualization environment. The technology works by placing a portion of the user profile on the host's local disk. With Cloud Cache, you can also configure multiple remote profile locations, which protect users from network and storage issues/failures.
- Application masking enables you to control access to applications and other items, such as fonts. Application masking helps you segregate apps and other items via user groups or other IP addresses to provide better segregation on a central gold image.
FSLogix requirements
To be entitled to use Profile Containers and the other suite of tools by FSLogix, you will need to ensure you have one of the following licenses:
- Microsoft 365 E3/E5
- Microsoft 365 A3/A5/Student Use Benefits
- Microsoft 365 F1/F3
- Microsoft 365 Business
- Windows 10 Enterprise E3/E5
- Windows 10 Education A3/A5
- Windows 10 VDA per user
- RDS CAL
- RDS SAL
You can use the FSLogix products on any public or private data center with the correct license. The following link goes to the Microsoft official documentation on the eligibility requirements: https://docs.microsoft.com/en-us/fslogix/overview.
FSLogix filter driver architecture
Traditional profile technologies copy the user profile to and from the network during sign-in and sign-out. The problem is that this can cause delays and, if profiles are larger, which can often be the case, the sign-in and sign-out times could reach unacceptable time frames. One of the key differences with FSLogix is that the user profile is stored centrally on a network share rather than being copied. The profile is essentially redirected when the profile disks are mounted when the user logs in. As the profile is being mounted, this reduces the traditional delays associated with the copy.
The following diagram depicts the architecture of how FSLogix works within a Windows OS. Two filter drivers are injected into the OS, which are then installed when you run the FSLogix installer. We will learn how to install FSLogix in Chapter 12, Implementing and Managing FSLogix. The diagram depicts Azure Storage. Using the OS registry or group policies (ADMX), you can specify the location of where to store your VHD or VHDX container:

Figure 3.4 – FSLogix architecture
Exploring the differences between Profile Containers and office containers
FSLogix offers two types of containers for profiles – Profile Containers and office containers. You should note that the office container is essentially a subset of the profile container. There are use cases of when you should use these together, particularly in larger organizations where you want to split the profile from the Office data. It is important to fully understand the process of configuring them together to avoid impacting user profiles.
The key differences between the two containers are that the office container is specifically for improving the performance of Microsoft Office within a non-persistent desktop virtualization environment. The benefit of using both allows you to segment office profile components on one office container disk and everything else on a profile container disk.
Important Note
When using FSLogix in an Azure Virtual Desktop environment, it is recommended that you only use Profile Containers unless there is a specific requirement for Business Continuity and Disaster Recovery (BCDR).
Let's briefly take a look at the concept of multiple profile connections.
Multiple profile connections
This refers to a user connected to multiple desktop virtualization sessions. This could be multiple hosts or one concurrently using the same profile. It's important to not get confused with the term multi-session.
Important Note
Concurrent or multiple connections are not recommended when using Azure Virtual Desktop. Microsoft suggests that you should create a different profile location for each host pool.
Some of the limitations associated with multiple connection deployments are as follows:
- Microsoft OneDrive is not supported with multiple connection environments.
- You could experience data loss when attempting to use OneDrive with multiple profile connections.
- There is limited support with Microsoft Outlook for multiple connections.
- End user training would be required as the user experience changes. Using a read, the only container changes how they should use the virtual desktop session. Without training or proper context, users could experience data loss.
FSLogix performance requirements
When you're planning for an FSLogix profile container deployment, you need to consider a few things. The overall profile size and limitations will depend on the storage type you use, as well as the chosen disk format type – VHD or VHDX.
It is recommended that you plan for 5 – 30 IOPS per user profile as profile requirements can widely vary, depending on the exact usage. The performance requirements are most likely different for each organization. Each user is different, and it is suggested that you review a subset of users, their applications, and their activity to gain an understanding of true profile performance needs.
It is also recommended that you conduct profile assessments to establish your current profile utilization, which will help you scope more accurate storage requirements. There are several community tools available to help you assess your current profile size state and these tools can also shrink the profiles reducing the overall storage size.
Tip
Jim Moyle created a community tool that can be used to shrink FSLogix and O365 dynamically expanding disks. You can read more here: https://github.com/FSLogix/Invoke-FslShrinkDisk.
The following table provides an example of the typical resources a profile needs to have to support each user:

For example, you have 100 users within an organization. Using the preceding table as a baseline, you may require around 1,000 IOPS. You would also need a suggested 5,000 IOPS at login or sign up. You should also factor in login storms. If any users log in at the same time, it would likely create a login storm. To avoid this, you should factor in any additional IOPS to reduce the likelihood of a login storm.
Now, let's recap the storage options from the previous chapter.
Storage options for FSLogix Profile Containers
There are multiple storage solutions available to you for use with FSLogix Profile Containers. Azure Files is recommended for most scenarios; however, there are multiple storage options available for FSLogix Profile Containers. It is recommended that enterprises use Azure NetApp Files to benefit from high-performance storage in larger deployments.
Tip
It is not recommended for production use, but you can use Storage Spaces Direct (S2D) with FSLogix and Azure Virtual Desktop.
FSLogix storage best practices
This section will specify the best practices you should remember when deploying and configuring FSLogix Profile Containers:
- Ensure that your chosen storage and host VMs are within the same data center location for optimal performance.
- Ensure you set exclusions for antivirus scanning on VHD and VHDX disks to prevent antivirus-induced performance bottlenecks.
- Exclude the VHD(X) files for Profile Containers from antivirus scanning to avoid performance bottlenecks.
- Use separate Profile Containers per host pool when you want to use multiple active sessions.
The following table details the recommended Azure Storage permissions for use with an FSLogix profile container:

The following table shows the required permissions you should set for Azure Files:

Azure Files integration with Active Directory Domain Services
Microsoft announced the general availability of Azure Files authentication with Active Directory Domain Services (ADDS) on August 7, 2019. This lets you use NTFS permissions with Azure Files.
The following diagram details the steps of on-premises AD DS authentication to Azure Files using Server Message Block (SMB). The AD DS environment must be synced with Azure Active Directory (Azure AD) using Azure AD Connect Sync. Only configured hybrid users in Azure AD and Active Directory Domain Services can access and be authorized to use Azure File shares. This is because the share-level permissions are configured against the identity represented in Azure AD, while the directory or file is enforced with AD DS. Therefore, you need to ensure that you configure the permissions correctly for hybrid users.
The following diagram shows the process of using AD credentials for Azure Files:

Figure 3.5 –Azure Files integration with ADDS
This provides seamless integration for those who want to integrate Azure Files into Active Directory, including the use of FSLogix and MSIX app attach. It is also important to note that using Azure Files with integration with Active Directory Domain Services offers improved security as it allows you to configure access control lists (ACLs), similar to a traditional Windows File Server. Without ADDS integration, you will only have basic security features, which may not be suitable for the organization you are deploying Azure Files to.
Important Note
You can use Azure Active Directory Domain Services (AADDS) for domain joins. The best practice would be to use Active Directory Domain Services where possible as AADDS does have limitations.
This section discussed the topic of planning for user profiles; this included using Azure Files storage, FSLogix Profile Containers, recommendations, and best practices.
Planning for user identities
Before you can get started with Azure Virtual Desktop, you need to choose an identity strategy. The following identity strategies could apply to your Azure Virtual Desktop and Azure infrastructure:

Important Note
Most organizations choose option one or three when choosing an identity strategy.
If you're using native Active Directory, identities must be synchronized with Azure AD. Azure AD Connect is used to link on-premises Active Directory to Microsoft Azure, providing a seamless single sign-on experience between cloud and on-premises services.
Some of the key benefits of using AD Connect are as follows:
- You can use a single identity to access cloud services, such as Microsoft 365, and on-premises applications.
- A simple tool that takes care of the deployment, sign in, and synchronization.
- Replaces older versions of identity synchronization such as Azure AD Sync and DirSync.
- Azure AD Connect is included in your Azure subscription at no cost.
The following diagram depicts how Azure AD Connect works logically:
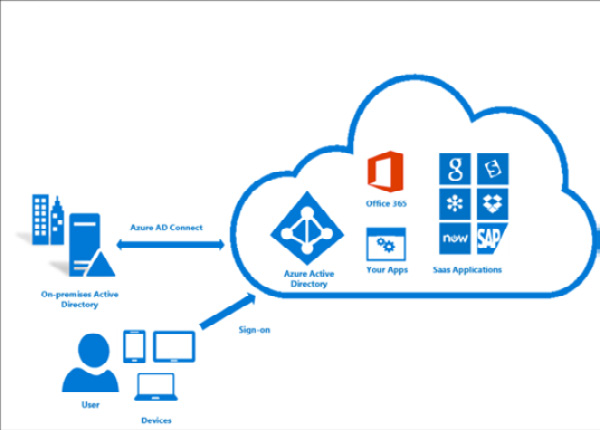
Figure 3.6 – A logical diagram showing how Azure AD Connect works
Domain join VMs
Azure Virtual Desktop does not support the use of workgroups. Here, you need an Active Directory domain.
To domain join the VMs you create, you need to specify the full Active Directory domain name to join, such as RMITBLOG.com. If you've set up a test environment with Azure AD DS, use the DNS domain name that's on the properties page for Azure AD DS; for example, RMITBLOG.onmicrosoft.com.
You will also need to specify an administrator account so that the provisioning process can join the VMs to the domain. This account should be delegated with the correct permissions so that you can join session hosts to the domain.
Firewall and other network requirements
Azure Virtual Desktop requires a specific set of firewall rules to function correctly. Failing to ensure these rules are applied to the VM, Azure Firewall, or a third-party firewall could result in networking communication issues with Azure Virtual Desktop. One example of this is Windows activation failing as the outbound 1688 TPC port for kms.core.windows.net being blocked.
There are mandatory firewall rules for Azure VMs:

It may be worth checking the following: https://docs.microsoft.com/en-us/azure/virtual-desktop/safe-url-list#virtual-machines
The following are not mandatory; however, it advised that these URLs be added:

The mandatory Remote Desktop client URLs are as follows:

In this section, we looked at planning for user profiles comprised of licensing, storage, profile options, and Azure AD. In the next section, we look at the Azure Virtual Desktop Client.
Planning for Azure Virtual Desktop client deployment
The Windows Remote Desktop client can access Azure Virtual Desktop on devices within Windows 10, Windows 10 IoT Enterprise, and Windows 7.
In this example, we will deploy a Windows Remote Desktop client.
Important Note
The Windows Desktop client does not support Windows 8 or Windows 8.1.
Installing the Windows Desktop client
In this section, we will cover how to install and set up Windows Desktop Client:
- Open the Remote Desktop Setup client and click Next:
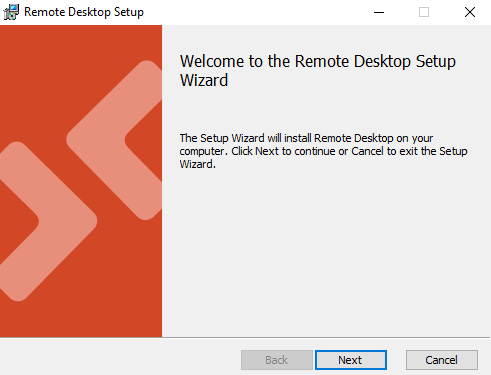
Figure 3.7 – Remote Desktop Setup wizard
- Select I accept the terms in the License Agreement and click Next:
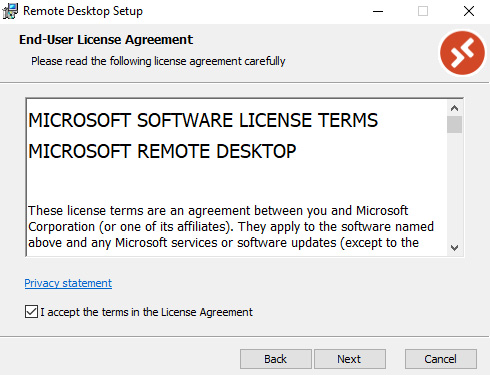
Figure 3.8 – Licence agreement
- After downloading the Remote Desktop client installer, when you run it, you will have two options:
- Install just for you
- Install for all users of this machine (requires admin rights):
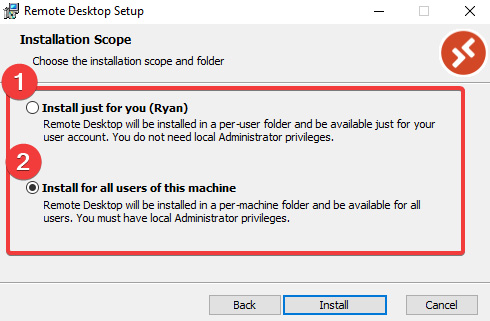
Figure 3.9 – Installation scope
- If more than one user uses the client device, make sure option 2 is selected and click Install.
- When the installation is completed, click Finish:

Figure 3.10 – Remote Desktop Setup wizard completed
With that, we are done with installing the Remote Desktop client.
Subscribing to a workspace
When you subscribe to a workspace or multiple workspaces, you will be provided with a list of managed resources you can access that the admin has provided you with. When subscribing, the resources become available on your supported device. The Windows Desktop client supports Azure Virtual Desktop published resources.
There are two options for subscribing to a workspace. One way is that the client can discover the resources available to you using a work or school account. The second is by directly specifying the URL where the resources are. The second option is typically used when the client cannot find the resources.
Once subscribed to a workspace, you will be able to launch resources using one of the following two methods:
- Using the Start menu, navigate to the workspace's name or enter the resource name in the search bar.
- Within Connection Center, double-click the required resource to launch it.
The following URLs are used for subscribing to a workspace:

Access client logs
If you do experience issues with the Remote Desktop client, you can investigate a problem using the client logs.
To collect the client logs, follow these steps:
- Close all the sessions on the client's device first.
- Also, ensure that the client process isn't running in the background. You can complete this by right-clicking on the Remote Desktop icon in the system tray and selecting Disconnect all sessions.
- Open File Explorer.
- Navigate to the %temp%DiagOutputDirRdClientAutoTrace path:
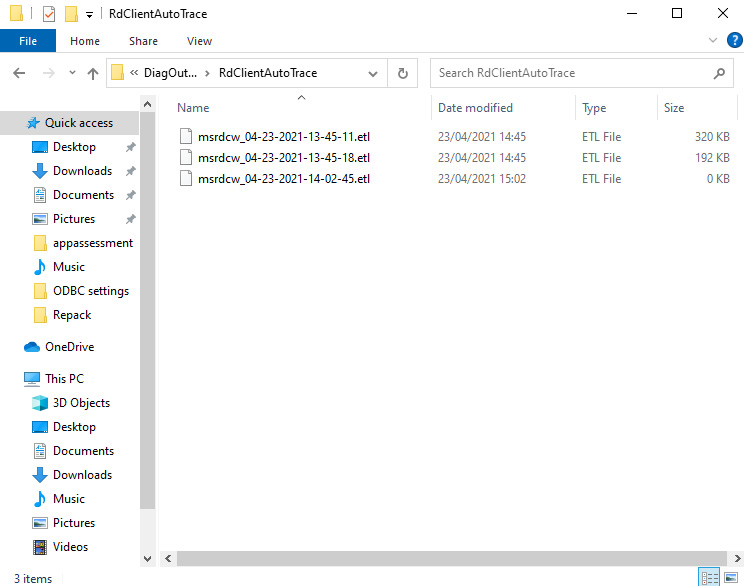
Figure 3.11 – Remote Desktop client log files
You will then see the Event Trace Log (ETL) files for the Remote Desktop client.
Connecting to Azure Virtual Desktop using the Web Client
Azure Virtual Desktop lets users connect to resources using a supported browser.
Important Note
At the time of writing, the Web Client does not support mobile OS support.
The following table details the supported web browsers for accessing Azure Virtual Desktop:

To access the Web Client, you must navigate to https://rdweb.wvd.microsoft.com/arm/webclient using one of the supported browsers, as shown here:

Figure 3.12 – Remote Desktop Web Client – All Resources page
In this section, we covered the Azure Virtual Desktop client and Web Client. Microsoft does offer mobile client support and a Microsoft Store client version. You can find out more here: https://docs.microsoft.com/en-us/azure/virtual-desktop/app-attach-image-prep.
Setting up email discovery to subscribe to the Azure Virtual Desktop feed
This section will show you how to set up a DNS record to enable email discovery to subscribe to an Azure Virtual Desktop feed.
You can improve the user experience when connecting to a workspace by configuring a DNS record so that users can use their email address to discover the subscription. This makes it very easy for users to access their desktops and RemoteApps.
Important Note
Azure Virtual Desktop (ARM) requires the following URL: https://rdweb.wvd.microsoft.com/api/arm/feeddiscovery.
To set up email discovery, you need to configure a few things.
Within your domain registrar or DNS, you will need to enter a new DNS record with the following properties:
- Host: _msradc
- Text: <RD Web Feed URL>
- TTL: 300 seconds
- TXT: https://rdweb.wvd.microsoft.com/api/arm/feeddiscovery
The names of the DNS records fields can vary, depending on the domain name registrar. The generic process will result in a TXT record named _msradc.<domain_name> (like as _msradc.rmitblog.com) that has the value of the full Remote Desktop web feed.
The following screenshot depicts the steps within Azure DNS:

Figure 3.13 – Adding a DNS record for email discovery
In this section, we showed you how to configure DNS to enable email discovery within workspaces. Next, we'll summarize the prerequisites for Azure Virtual Desktop.
Summarizing the prerequisites for Azure Virtual Desktop
The following table summarizes the prerequisites for deploying an Azure Virtual Desktop environment:
.png)
.png)
Summary
In this chapter, we covered the requirements for designing user identities and profiles. This included the licensing options available for Azure Virtual Desktop, the available storage solutions, and the recommended solutions, such as Azure Files, Azure Virtual Desktop client deployments, planning for user profiles, identity strategies, firewalls, and other network requirements.
In the next chapter, we will look at implementing and managing networking for Azure Virtual Desktop.
Questions
Here are a few questions to test your understanding of this chapter:
- What is the recommended profile container technology for Azure Virtual Desktop?
- FSLogix Profile Containers
- User profile disks
- Local profiles
- Is there a license you should apply to an Azure Virtual Desktop VM?
- Yes
- No
- What types of storage can you use for Azure Virtual Desktop?
- Azure Files, Azure NetApp Files, and Storage Spaces Direct
- Local storage
- When configuring an Azure Storage account for FSLogix, which two privileges do you need to assign administrators (storage admins)?
- Storage File Data SMB Share Contributor role, Full Control NTFS permissions
- Blob Data Contributor role, Modify NTFS permissions
Answers
- A
- A
- A
- A