
Chapter 6: Creating Host Pools and Session Hosts
This chapter takes a look at creating host pools and deploying session hosts. We will cover the creation process first using the Azure portal in the web browser and then using PowerShell, which is great for automation and repeat processes.
The following topics are covered in this chapter:
- Creating a host pool by using the Azure portal
- Automating the creation of AVD hosts and host pools
Creating a host pool by using the Azure portal
In this section, we'll look at creating and configuring host pools and session hosts. Host pools are essentially a collection of one or more virtual machines (VMs) within Azure Virtual Desktop (AVD) environments. These are typically identical and are created from a central image or the Azure Gallery, or a custom image. We'll also take a look at Azure Compute Galleries for template deployment in Chapter 9, Creating and Managing Session Host Images. In addition, each host pool can contain app groups that are used for user assignments. This section looks at creating a host pool for AVD through the Azure portal.
Before we get started, you need to ensure you have the following host pool prerequisites ready:
- The VM image name
- VM configuration
- Domain and network properties
- AVD host pool properties
Important Note
You need to ensure that a virtual network exists in the Azure region of your choice and that it has a "line of sight" with the domain.
You also need to consider the following:
- Are you using an operating system image from the Azure Gallery or a custom image?
- Domain join credentials to connect your session hosts to your domain.
Tip
Make sure you have registered the Microsoft.DesktopVirtualization resource provider before attempting to deploy a host pool. When using an account with Global Administrator admin rights, the registration is automatically done during the host pool creation.
Host pool creation
In this section, we will create our first host pool using the Azure portal:
- First, sign in to the Azure portal at https://portal.azure.com.
Important Note
If you're signing in to the US government portal, go to https://portal.azure.us/ instead.
- Enter Azure Virtual Desktop into the search bar; from the results, select Azure Virtual Desktop under Services.
- On the Azure Virtual Desktop overview page, select Create a host pool.
- You will then be presented with the Basics tab. Select the correct subscription under Project details.
- Select Create new to create a new resource group or select an existing resource group you may have created previously in the drop-down menu.
- Enter a unique name for your new host pool.
- Select the Azure region to create the host pool using the drop-down menu in the Location field.
The Azure geography associated with the Azure region you selected is where the metadata for this host pool and related objects will be stored. Make sure you choose the region inside the geography you want the service metadata to be stored in:
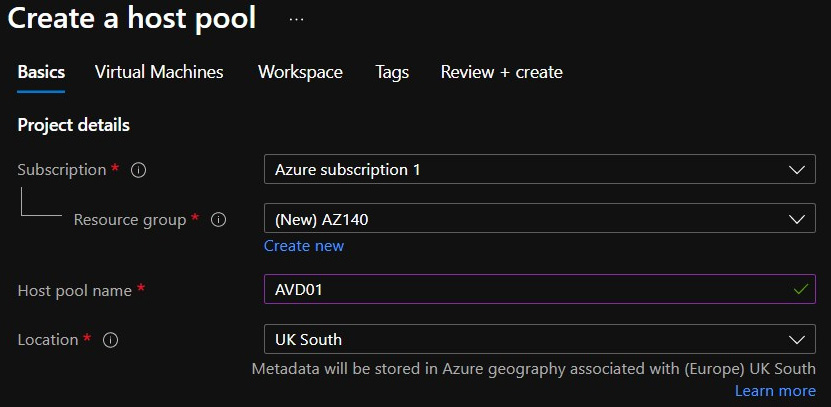
Figure 6.1 – Screenshot showing the Create a host pool page
Important Note
The AVD service metadata is independent of the VM location. It is also important to understand that the metadata locations are not available for all Azure regions.
- Under Host pool type, select whether you want to create a Personal or Pooled host pool. If you choose Personal, you will need to select Automatic or Direct in the Assignment type field:

Figure 6.2 – Screenshot showing Personal host pool type options
If you choose Pooled, you need to specify the following information:
- For Max session limit, enter the maximum number of users you want load-balanced on a single session host.
- For Load balancing algorithm, choose either Breadth-first or Depth-first, depending on your usage pattern.
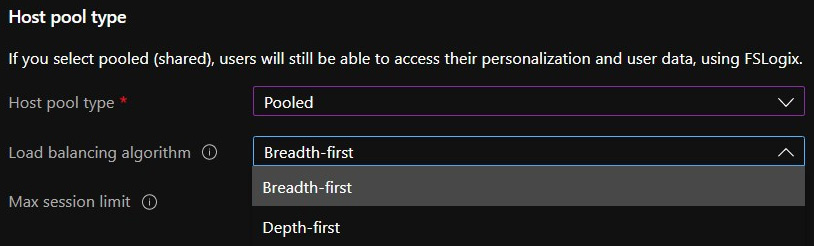
Figure 6.3 – Screenshot showing pooled host pool options
Load balancing algorithm has the following two options:
- Breadth-first: The breadth-first load balancing mechanism is essentially a method that uses an algorithm to determine the fewest sessions on a session host for the placement of new sessions. For example, say a user connects to an AVD host pool with Breadth-first configured. During the login process, a query is run against the available session hosts within the host pool. The load balancing method selects the session host with the fewest sessions. If there are two or more session hosts with the same number of sessions active, then the method selects the first session host identified in the query:
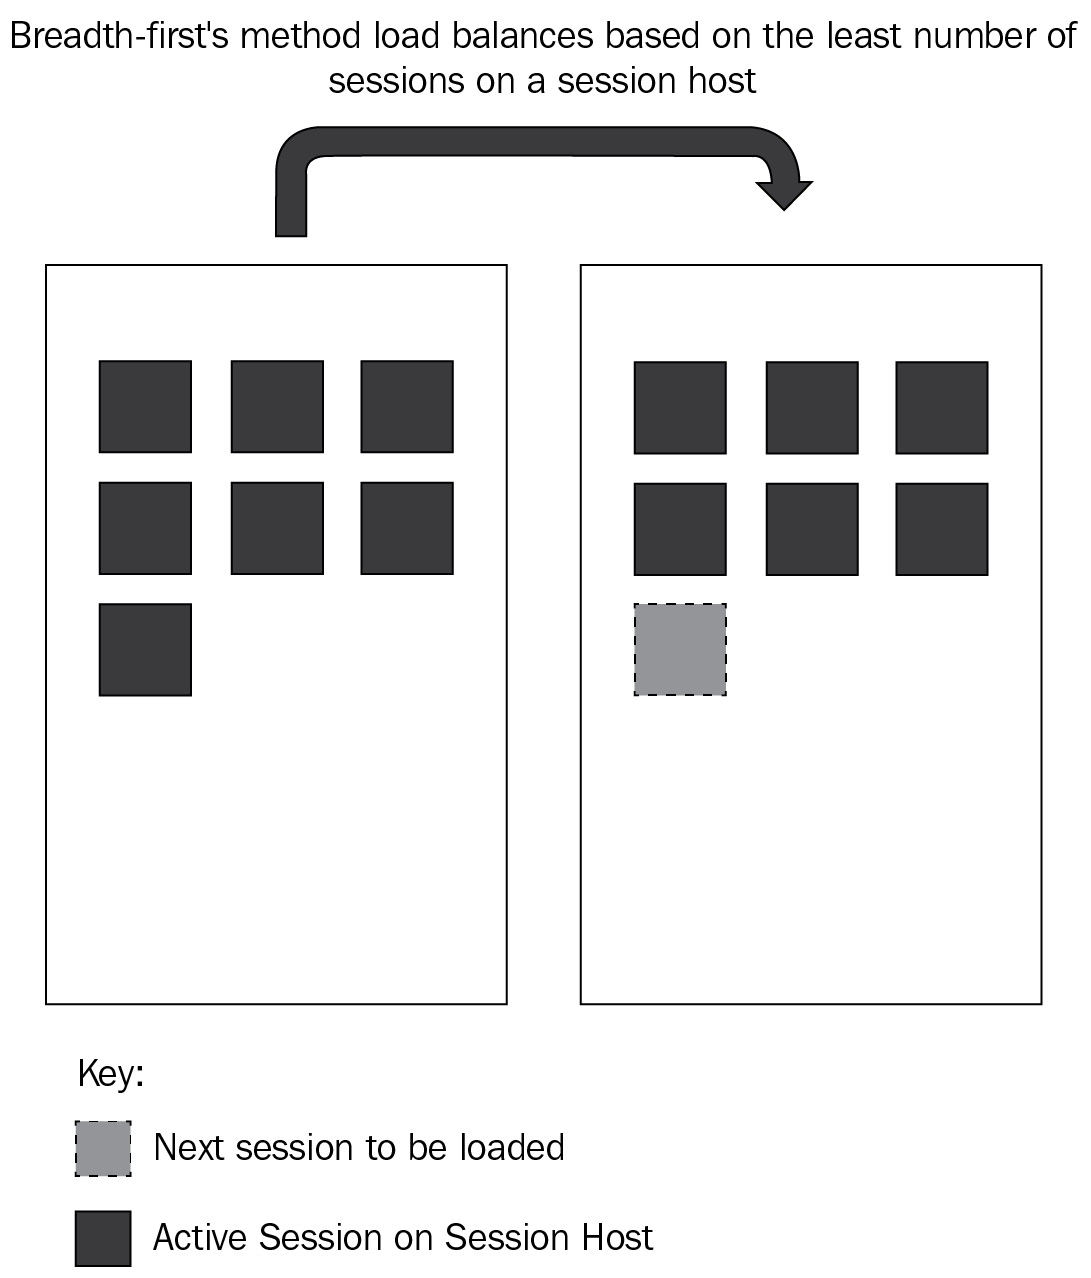
Figure 6.4 – Diagram showing an example of how breadth-first load balancing works
- Depth-first: The depth-first load balancing method maximizes session utilization of a session host before loading sessions onto the next available session host. It is suggested that this algorithm is for organizations who want to operate an active/passive AVD deployment or reduce costs. The depth-first method queries the available session hosts to establish where to place new sessions. If a session host has exceeded the maximum session limit specified against the host pool, new sessions will be loaded onto the next available session host. Again, if there are two session hosts with the same number of sessions, then the first is selected in the query. This process is depicted in the following diagram. Using depth-first load balancing in conjunction with scaling plans enables you to power on session hosts when a session host reaches near session capacity, thus enabling cost management based on compute resource utilization. This means additional session hosts are powered on when needed and powered off outside peak times:
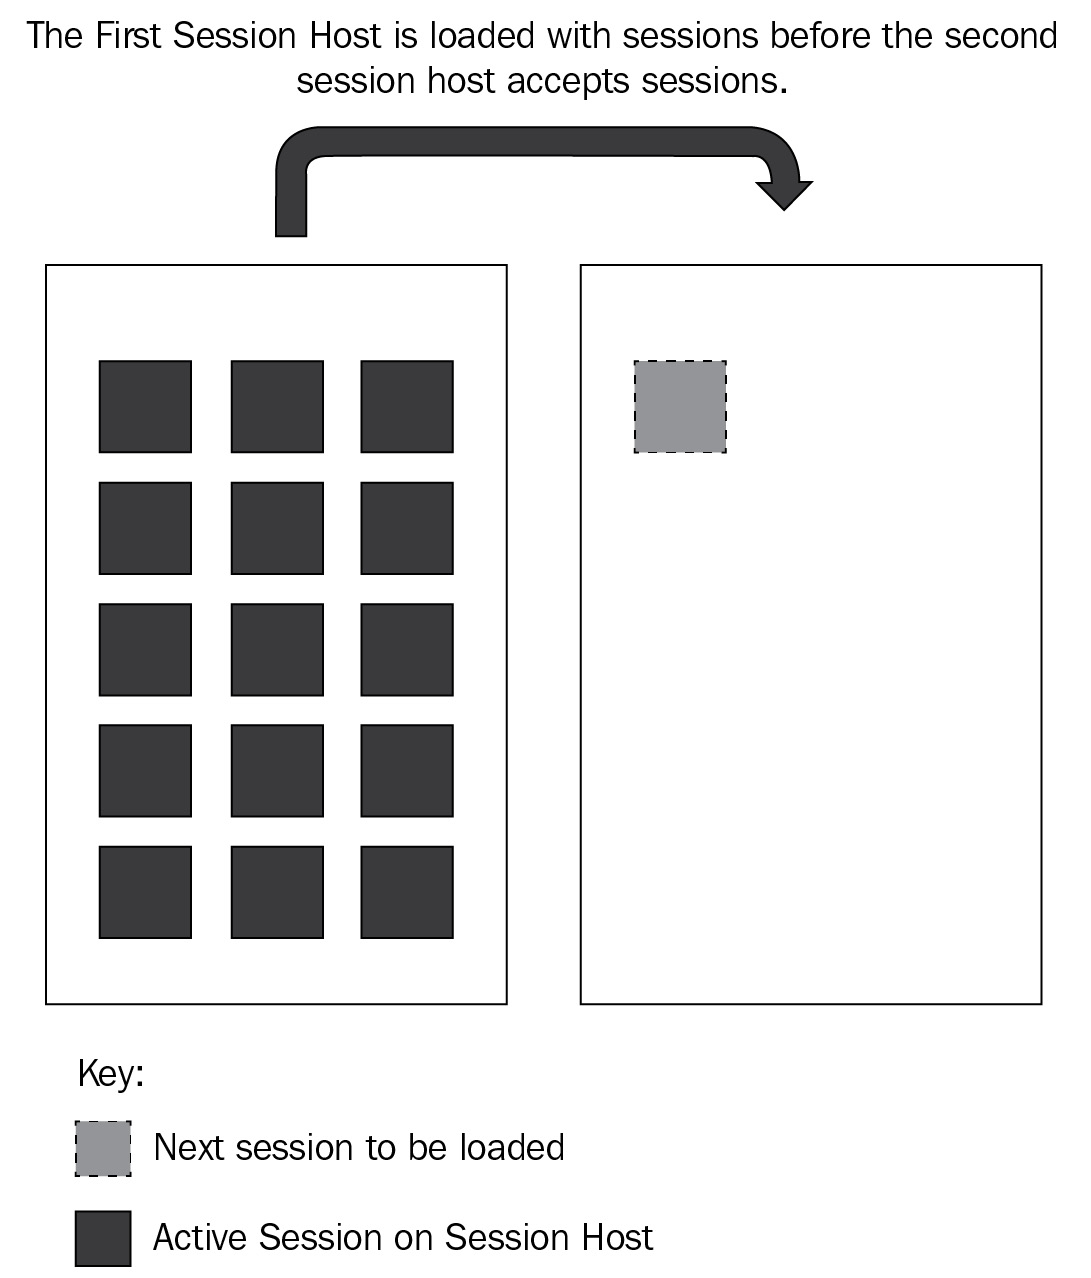
Figure 6.5 – Diagram showing an example of depth-first load balancing
- Select Next: Virtual Machines. If you have already created VMs and want to use them with this new host pool, select No then Next: Workspace and move on to the Workspace information section. However, if you want to create new VMs and register them to the new host pool, click Yes, as highlighted in the screenshot in Figure 6.6:

Figure 6.6 – Screenshot showing the tab to create VMs in the host pool
Important Note
A workspace is a logical grouping of application groups within AVD. Each AVD application group must be associated with a workspace for users to see the remote apps and desktops published to the workgroup.
We now take a look at creating VMs within the Create a host pool tab.
Creating VMs within the Create a host pool tab
When setting up your VM within the host pool setup process, you need to complete the following:
- In the Resource group section, choose the resource group where you want to create the VMs (session hosts). This can be a different resource group than the one you used for the host pool or the same.
- After that, you will need to provide a name prefix, which is used to assign names to the VMs during the creation process. The suffix will be – with numbers starting from 0.
- Choose the location where you want to create the VMs. The location can be the same as your host pool or different. It is advised that you deploy VMs in the same region unless there is a specific reason.
- Next, choose the availability option that best suits your needs.
Important Note
Availability sets offer a 99.95% Azure Service Level Agreement (SLA) and essentially provide a logical grouping of VMs. Microsoft recommends that you use two or more VMs within an availability set to provide high availability.
Availability zones allow you to control where in the Azure region your VMs are stored. There are three availability zones per supported Azure region. Each zone has what Microsoft describes as a distinct power source, network, and cooling. This enables you to split session host deployments between different zones.

Figure 6.7 – Screenshot showing the Virtual Machines tab
- Next, choose the VM image that needs to be used to create the VM. You can choose either Gallery or Storage blob.
If you choose Gallery, select one of the images from the drop-down menu:
Important Note
The Gallery images created by Microsoft include the FSLogix agent. Microsoft maintains these and keeps them updated with the latest patches and updates.
- Windows 11 Enterprise multi-session
- Windows 11 Enterprise
- Windows 10 Enterprise multi-session, Version 1909
- Windows 10 Enterprise multi-session, Version 1909 + Microsoft 365 Apps
- Windows Server 2019 Datacenter
- Windows 10 Enterprise multi-session, Version 2004
- Windows 10 Enterprise multi-session, Version 2004 + Microsoft 365 Apps
- Windows 10 Enterprise multi-session, Version 20H2
- Windows 10 Enterprise multi-session, Version 20H2 + Microsoft 365 Apps

Figure 6.8 – Screenshot showing images within the Gallery
- If you do not see the image you require, select See all images and browse to another image in your Gallery or an image provided by Microsoft or other third-party publishers. Make sure that the image you choose is one of the supported images shown in the following table:

This table was taken from https://docs.microsoft.com/azure/virtual-desktop/overview#supported-virtual-machine-os-image.
The following screenshot in Figure 6.9 shows you some of the images available within the Azure Marketplace:
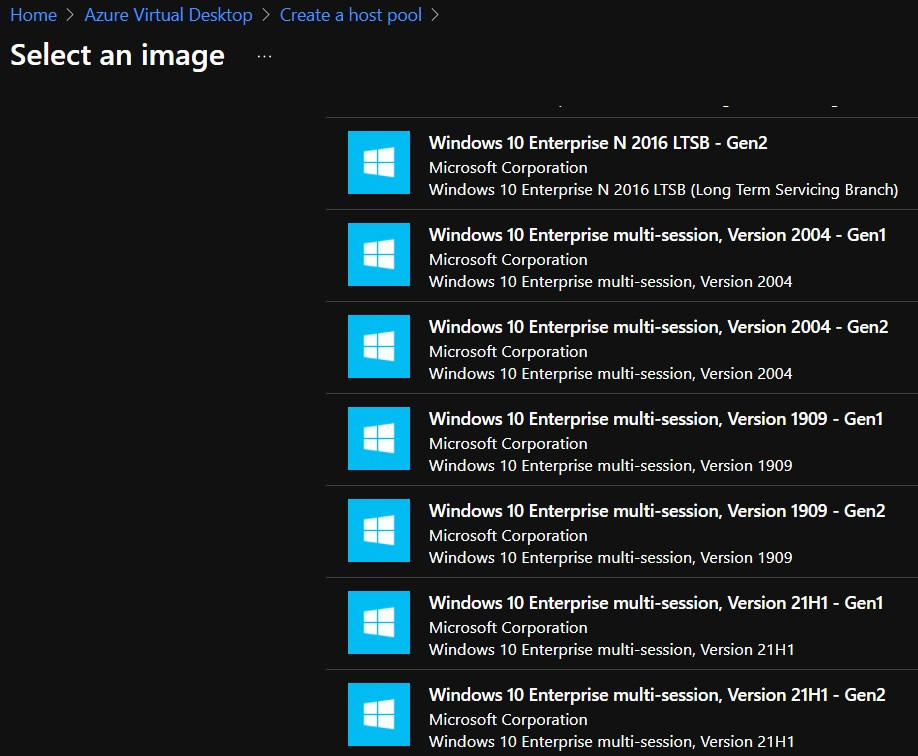
Figure 6.9 – Screenshot showing images in the Marketplace

Figure 6.10 – Screenshot showing selecting an image from My Images
If you choose Storage Blob, you can use your image build through Hyper-V or an Azure VM. To do this, you need to enter the location of the image in the storage blob as a URI.
Tip
The image's location is independent of the availability option, but the image's zone resiliency determines whether that image can be used with the availability zone. Therefore, if you select an availability zone while creating your image, make sure you are using an image from the Gallery with zone resiliency enabled.
- After that, choose the Virtual machine size value you want to use. You can keep the default size as is or select Change size to change the size. If you select Change size, choose the size of the VM suitable for your workload in the window that appears.
- Under Number of VMs, provide the number of VMs you want to create for your host pool.
Important Note
The deployment process can create up to 400 VMs while setting up your host pool, and each VM setup process creates four objects in your resource group. The creation process doesn't check your subscription quota, so you need to ensure the number of VMs you enter within the Azure VM and the API limits for your resource group and subscription do not exceed the maximums. You can add more VMs after you finish creating your host pool.
- Choose the type of operating system disks you want your VMs to use: Standard SSD, Premium SSD, or Standard HDD.
Tip
Microsoft recommends using Premium SSD for AVD session hosts. See Chapter 5, Implementing and Manage Storage for Azure Virtual Desktop.
- Under the Network and Security section, select the virtual network and subnet where you want the VMs to reside.
Tip
Ensure the virtual network can connect to the domain controller as the VMs need to join the domain. You should configure the virtual network DNS to be configured with the IP address of your domain controller.
The following screenshot shows where you would configure the virtual network DNS to point to the domain controller:

Figure 6.11 – Screenshot showing the domain controller added as a custom DNS entry on the Azure virtual network
- Select the security group type you want: Basic, Advanced, or None. If you select Basic, you will need to select whether you want any inbound ports open. If you select Yes, choose from the list of standard ports to allow inbound connections to:
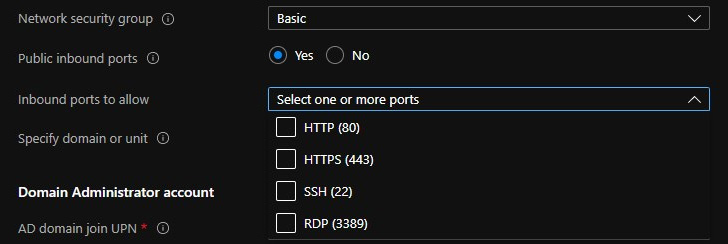
Figure 6.12 – Screenshot showing network security options
If you choose the Advanced option, select an existing network security group that you have already configured.
Important Note
For enhanced security, Microsoft recommends that you don't open public inbound ports.
- Once selected, you will need to select whether you want the VMs to be joined to a specific domain and organizational unit. If you choose Yes, make sure to specify the domain to join. You can optionally add a specific organizational unit you want the VMs to be in. If you choose No, the VMs will be joined to the domain matching the suffix of the AD domain join UPN.
Tip
When you specify an organizational unit, make sure you use the full path known as the distinguished name (DN). You can find a DN by enabling advanced settings within Active Directory and navigating to the Attributes section of an organizational unit.
- In the Domain Administrator account section, enter the credentials for the Active Directory domain admin account of the virtual network you selected. This admin account can't have multi-factor authentication (MFA) enabled as this will cause the deployment to fail. It is recommended that you use a service account with specific permissions on the target organizational unit.
When joining an Azure Active Directory Domain Services (Azure AD DS) domain, the account must be part of the Azure AD DS Administrators group. Additionally, the account password must also work in Azure AD DS.

Figure 6.13 – Screenshot showing the Virtual Machine Administrator account section
Important Note
It is now possible to join session hosts directly to Azure Active Directory.
- As an optional setting, you can set post-update custom configurations using Azure Resource Manager (ARM) templates.
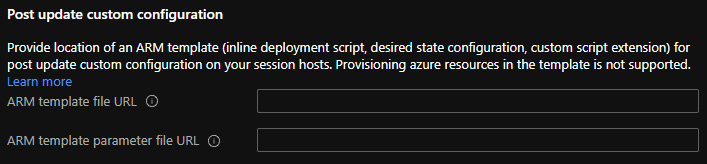
Figure 6.14 – Screenshot showing the option to add post-update custom configurations
- Select the Next: to the Workspace tab.
We'll now move on to setting up your new host pool: registering an app group to a workspace.
Workspace information
The host pool deployment process creates a desktop application group by default. This is the default app group of a host pool. For the host pool to function correctly, you'll need to publish this app group to users or user groups, and you must also register the app group to a workspace.
To register the desktop app group to a workspace, you need to complete the following steps:
- Select Yes under Register desktop app group.
If you select No, you can register the app group later. However, Microsoft recommends you complete the workspace registration during the host pool deployment.
- Next, choose to create a new workspace or select from existing workspaces. Only workspaces created in the same location as the host pool will register the app group:
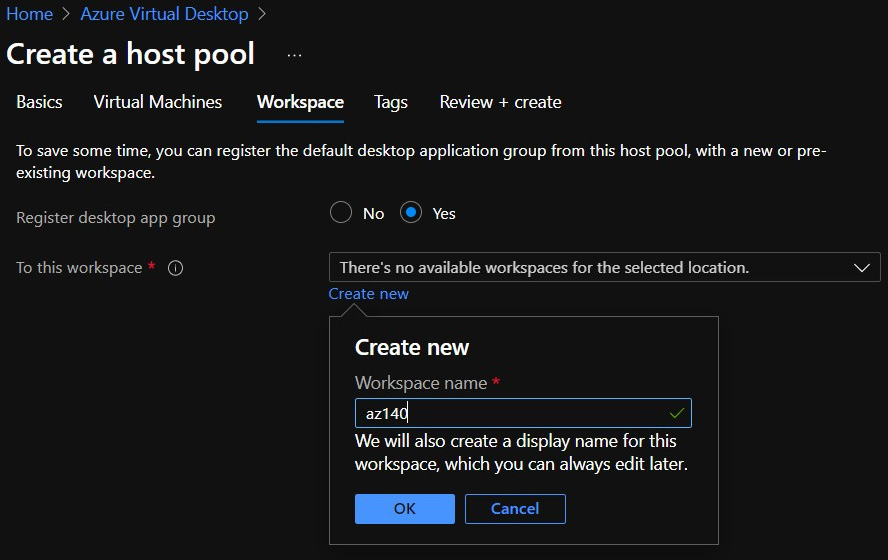
Figure 6.15 – Screenshot showing the creation of a new workspace
- Optionally, you can select Next: Tags.
Tip
Adding tags to group the objects with metadata is helpful for IT admins.
- When you have finished, select Review + create.
Important Note
The Review + create validation process doesn't check whether your admin password meets security standards or your architecture is correct. You must check your deployment before continuing.
- Before proceeding with the deployment, you should review the information about your deployment to make sure everything looks correct. When you have finished, select Create.
This starts the deployment process, which creates the following Azure objects:
- The new host pool.
- The desktop app group.
- A workspace if you choose to create it.
- Registration of the desktop app group; the registration will be completed.
- If you choose to create VMs, they are joined to the domain and registered with the new host pool.
- A download link for an ARM template based on your configuration:

Figure 6.16 – Screenshot showing the Review + create page
After that, you just need to wait for your deployment to finish:
Figure 6.17 – Screenshot showing an example of the created host pool
This section looked at creating a host pool and deploying VMs into the new host pool. We will now take a look at an automated approach to creating AVD host pools using PowerShell.
Automating the creation of AVD hosts and host pools
This section looks at setting up PowerShell for AVD and deploying a new host pool using PowerShell.
Setting up PowerShell for AVD
Before we can get started, you first need to install the PowerShell module for AVD. You can do this by opening PowerShell in elevated mode.
Tip
Make sure you install the Az module. If you haven't already done so, run the Install-Module -Name Az -Force command.
Once you have opened PowerShell in elevated mode, run the following cmdlet:
Install-Module -Name Az.DesktopVirtualization
The following screenshot shows you how to install the Az.DesktopVirtualization PowerShell module:

Figure 6.18 – Screenshot showing the installation of the PowerShell module for Az.DesktopVirtualization
As shown in Figure 6.18, you may be asked to confirm whether you trust the repository.
Next, you will need to connect to Microsoft Azure using the following cmdlet:
Connect-AzAccount
Once you have run the cmdlet, you will then see the Sign in to your account popup:

Figure 6.19 – Screenshot showing the Sign in to your account popup
Enter your username/password and any MFA details that may be requested.
The output from completing this process is shown in Figure 6.20:

Figure 6.20 – Screenshot showing cmdlet to connect to Azure
As shown in Figure 6.20, once you have connected to Azure, you should see the details of any subscriptions in the tenant.
The final step is to select the required subscription you plan to deploy AVD resources into.
Select the subscription you want to use; you can use the out-gridview cmdlet to select the one you want:
Get-AzSubscription | Out-GridView -PassThru | Select-AzSubscription
Once you have selected the subscription you require, click OK. In this example, there is only one subscription available:

Figure 6.21 – Screenshot showing the grid view for selecting an available Azure subscription
In this section, we looked at setting up PowerShell for AVD. It is important to ensure you have the correct PowerShell modules and Azure connectivity via PowerShell working before continuing. We will now move on to deploying a host pool using PowerShell.
Creating an AVD host pool with PowerShell
In this section, we'll look at creating some resources for AVD using PowerShell.
We will use PowerShell to do the following:
- Create a resource group.
- Create a host pool.
- Create a registration token.
- Assign users to a host pool application group.
- Assign groups to a host pool application group.
Once connected to Azure via PowerShell following the instructions set out in the Setting up PowerShell for AVD section, you can start to deploy your AVD host pool using PowerShell.
First, we need to create a resource group.
To do this, you can use the following cmdlets:
New-AzResourceGroup -Name <Resource Group Name> -Location <Region>
Example:
#Create Resource Group
New-AzResourceGroup -Name az140pw -Location "UK South"
Once we have created the resource group, we can then proceed with creating the host pool:
New-AzWvdHostPool -ResourceGroupName "<Resource Group Name>`
-Name <Host Pool Name> -WorkspaceName <Workspace Name> -HostPoolType <Host Pool Type>
-LoadBalancerType <Load balancer method> -Location <Region> -DesktopAppGroupName <App group Name> -PreferredAppGroupType <App group type>
Example cmdlets used to deploy a host pool using PowerShell are as follows:
#Create Host Pool
New-AzWvdHostPool -ResourceGroupName "az140pw"`
-Name "pwdeployment" -WorkspaceName "workspacename1" -HostPoolType "Pooled"`
-LoadBalancerType "BreadthFirst" -Location "UK South"-DesktopAppGroupName "az140pw" -PreferredAppGroupType "Desktop"
Figure 6.22 shows the output from running the creation of both a resource group and host pool:
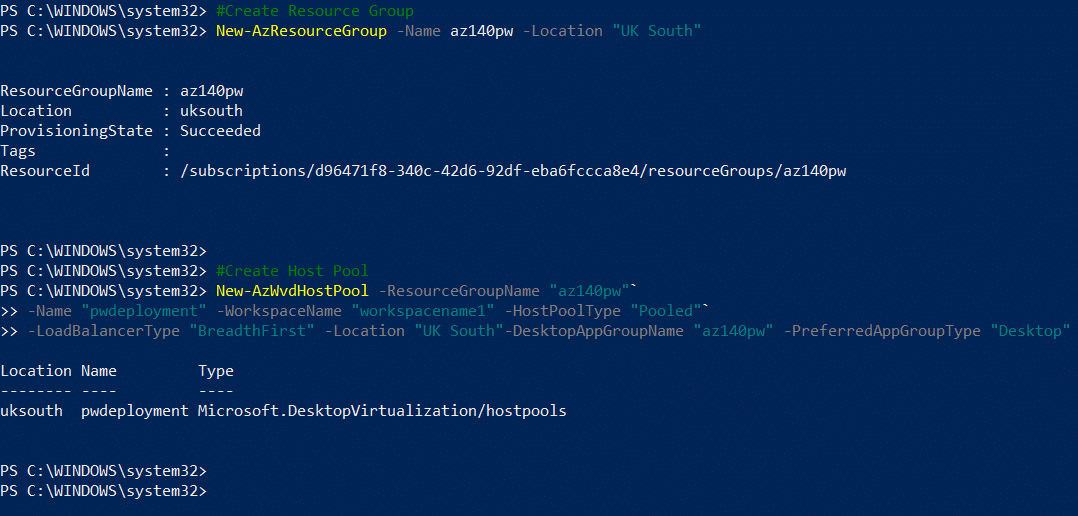
Figure 6.22 – Screenshot showing creating a resource group and creating a host pool
As shown in Figure 6.22 we have now deployed our host pool using PowerShell. You can find out more about the cmdlets for creating a host pool at https://docs.microsoft.com/en-us/powershell/module/az.desktopvirtualization/new-azwvdhostpool?view=azps-6.1.0.
You can check that the resource group and host pool have been created by navigating to the path in the Azure portal. As shown in the following screenshot, you can see the AVD resources have been deployed into the resource group:
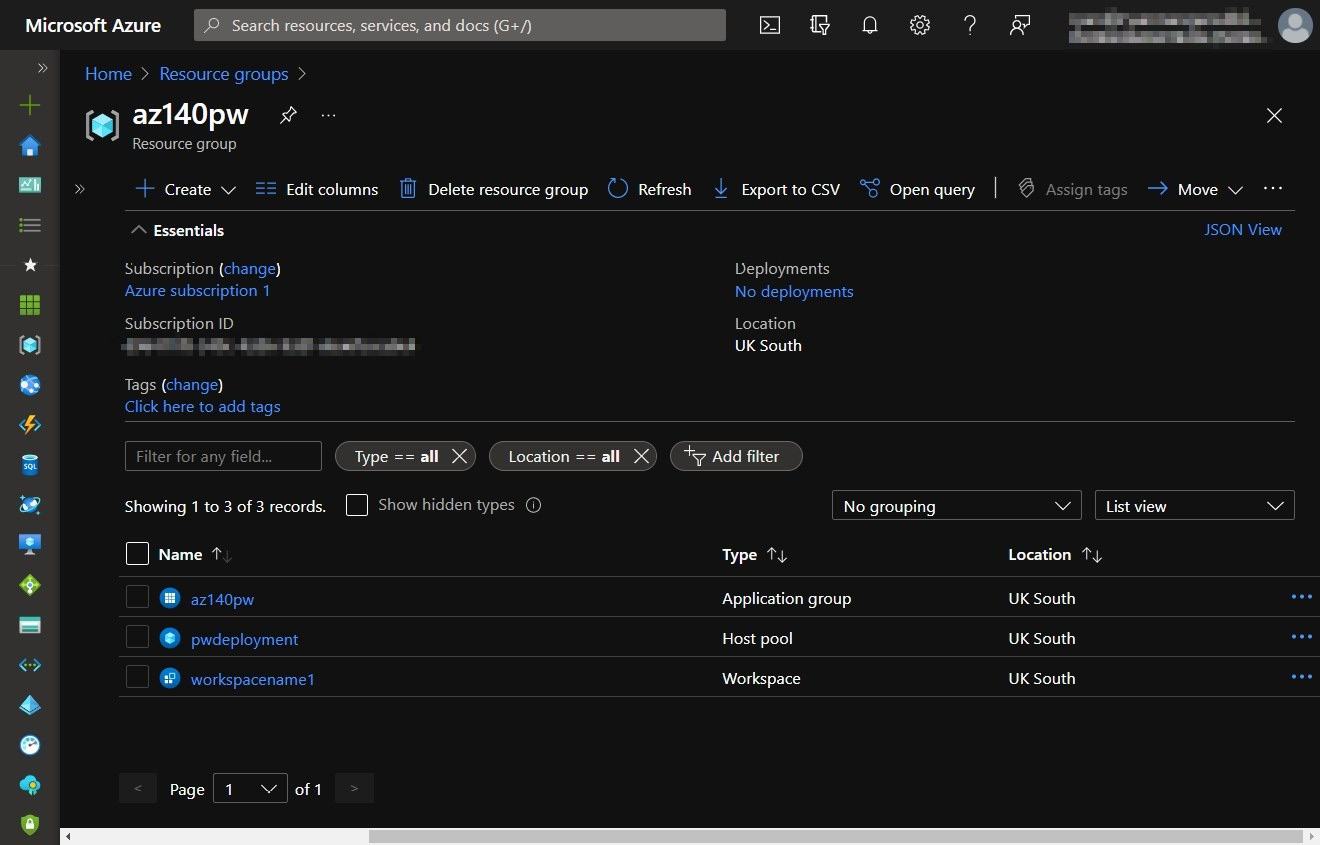
Figure 6.23 – Screenshot showing resources created using PowerShell for AVD
The next step would be to create a registration token for the deployment of session hosts into a host pool. This can be done by using the following cmdlets:
New-AzWvdRegistrationInfo -ResourceGroupName <Resource group name> -HostPoolName <Host pool name> -ExpirationTime $((get-date).ToUniversalTime().AddHours(<hours eg (2)>).ToString('yyyy-MM-ddTHH:mm:ss.fffffffZ'))
The following provides an example of what the cmdlet should look like:
# create a registration token
New-AzWvdRegistrationInfo -ResourceGroupName az140pw -HostPoolName pwdeployment -ExpirationTime $((get-date).ToUniversalTime().AddHours(2).ToString('yyyy-MM-ddTHH:mm:ss.fffffffZ'))
The following screenshot, Figure 6.24, shows the output of generating a new registration token:
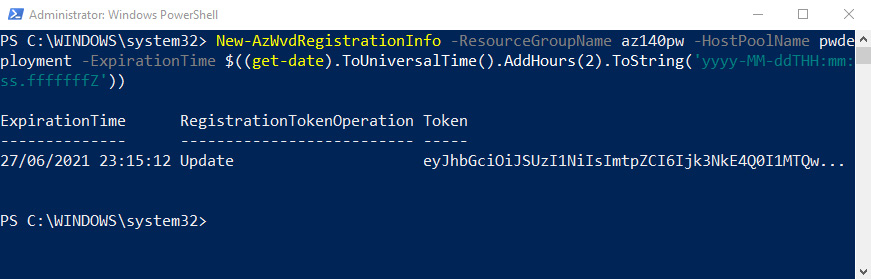
Figure 6.24 – Screenshot showing the creation of a registration token
As shown in Figure 6.24, you can see that the new token has been generated ready for deploying VMs in a custom deployment. Token generation is taken care of natively.
Before we recap on deploying session hosts into a host pool, let's look at adding users and groups to a host pool via app groups.
To assign a user to an app group, you would use the following cmdlets:
New-AzRoleAssignment -SignInName <User UPN [email protected]> -RoleDefinitionName "Desktop Virtualization User" -ResourceName <App group Name> -ResourceGroupName <Resource Group Name> -ResourceType 'Microsoft.DesktopVirtualization/applicationGroups'
The following example shows the assignment of a user to an app group within a host pool:
New-AzRoleAssignment -SignInName [email protected] -RoleDefinitionName "Desktop Virtualization User" -ResourceName az140pw -ResourceGroupName az140pw -ResourceType 'Microsoft.DesktopVirtualization/applicationGroups'
The following screenshot, Figure 6.25, shows the output of running the New-AzRoleAssignment cmdlet:
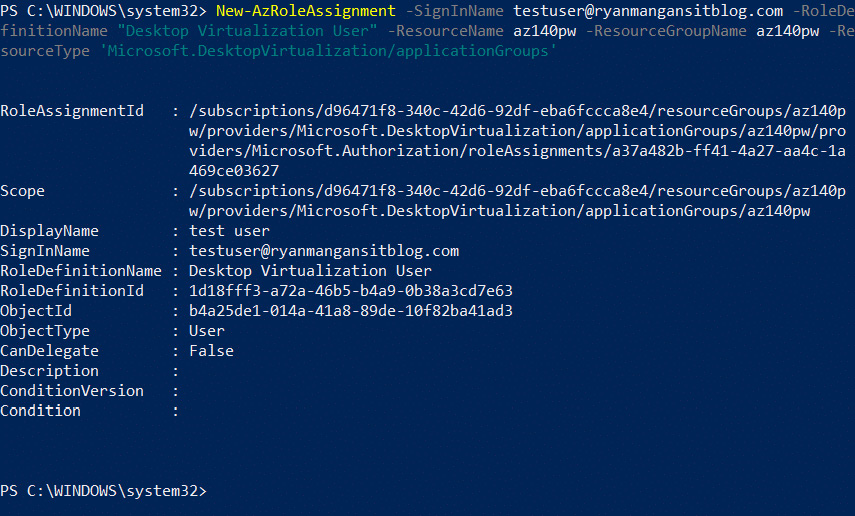
Figure 6.25 – Screenshot showing user assignment to AVD resource group
Figure 6.25 shows the assignment of a user to the app group for the newly created host pool.
You can also assign a group rather than a user using the object ID of the group. You would use the following cmdlets to add a group to an app group:
New-AzRoleAssignment -ObjectId <Group Object ID> -RoleDefinitionName "Desktop Virtualization User" -ResourceName <App Group Name> -ResourceGroupName <Resource Group Name> -ResourceType 'Microsoft.DesktopVirtualization/applicationGroups'
An example showing the cmdlets to add a group to an app group is as follows:
New-AzRoleAssignment -ObjectId c203d0fa-a05a-40be-acd5-d203b252435a -RoleDefinitionName "Desktop Virtualization User" -ResourceName az140pw -ResourceGroupName az140pw -ResourceType 'Microsoft.DesktopVirtualization/applicationGroups'
The screenshot in Figure 6.26 shows the use of the New-AzRoleAssignment cmdlet to assign a group via object ID:

Figure 6.26 – Screenshot showing group assignment to AVD resource group
As shown in Figure 6.26, the group has been assigned to the app group.
Once we have finished setting up the host pool and assigning users and groups, we can add session hosts to the host pool. This is typically done using the UI. You can follow the steps detailed in the Creating VMs within the Create a host pool tab section.
To add VMs, you need to make sure that you have created a registration token and the previous one has not expired. If it has expired, you will need to run the Create registration token cmdlets script again to enable the ability to add VMs to the host pool.
The following details the process to add or expand a host pool by adding VMs:
- Sign in to the Azure portal.
- Search for and select Azure Virtual Desktop.
- In the menu on the left side of the screen, select Host pools, then select the name of the host pool you want to add VMs to.
- Select Session hosts from the menu on the left side of the screen.
- Select + Add to start creating your host pool, as shown in Figure 6.27.
The screenshot in Figure 6.27 shows the button to add session hosts to a host pool:

Figure 6.27 – Adding session hosts to the new deployment
Figure 6.28 shows the Add virtual machines to a host pool page within the Azure portal for deploying VMs into a host pool:
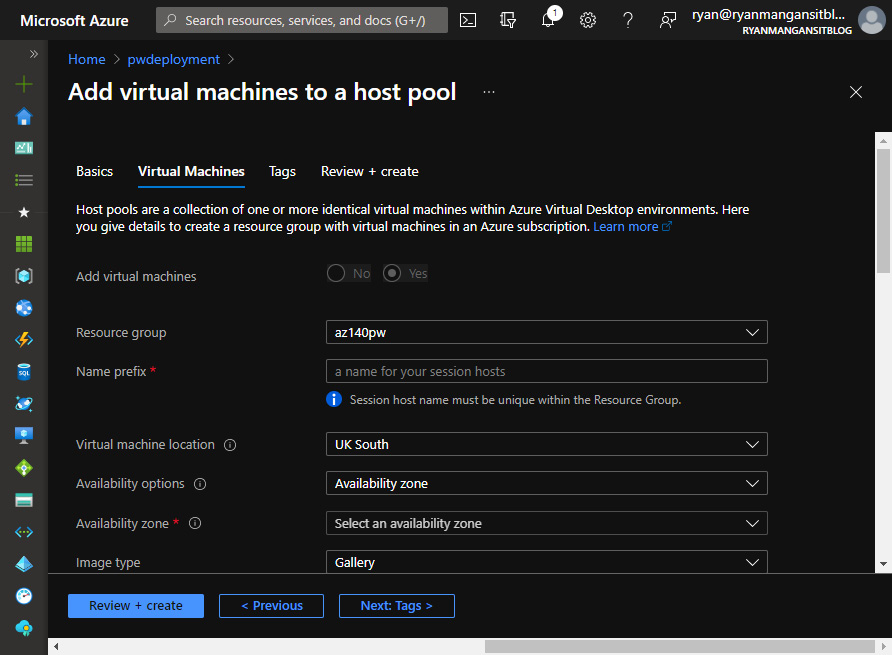
Figure 6.28 – Screenshot showing the Add virtual machines to a host pool page
- Ignore the Basics tab as this is not required; instead, select the Virtual Machines tab. On this tab, you can view and edit the details of the VM you want to add to the host pool.
- Select the resource group you want to create the VMs under, then select the Azure region. You can also choose the current Azure region you're using or a new Azure region.
- Enter the required number of session hosts you want to add to your host pool. For example, if you're expanding your host pool by two hosts, enter 2.
Important Note
Although it's possible to edit the image and prefix of the VMs, Microsoft does not recommend editing them if you have VMs with different images in the same host pool. Edit the image and prefix only if you plan on removing VMs with older images from the affected host pool.
- For virtual network information, select the virtual network and subnet to which you want the VMs to join. You can select the same virtual network your existing machines currently use or choose a different one that's more suitable to the Azure region you should have selected in step 7.
- For Administrator account, enter the username and password associated with ADDS or AADDS on the virtual network you selected. These credentials will be used to join the VMs to the virtual network. Ensure you check the password as the deployment will fail if incorrect.
Tip
Ensure your admin names comply with the information given onscreen and MFA is not enabled on the account.
- Select the Tag tab or skip if not required.
- Select the Review + create tab. Review your configuration and if everything looks fine, select Create to start the deployment.
- Once the deployment has finished, check your VMs and you should be ready to test.
Tip
You can also deploy the host pool and create session host VMs using an ARM template. You can download an example from https://github.com/Azure/RDS-Templates/tree/master/ARM-wvd-templates.
It is also important to note that if you are using an automated process to build your AVD environment, you will need to use the latest configuration JSON file available. You can download this from https://wvdportalstorageblob.blob.core.windows.net/galleryartifacts/armtemplates/Hostpool_10-13-2021/CreateHostpoolTemplate.json.
You are now skilled with configuring PowerShell, then creating a resource group, deploying a host pool, generating a registration token, and configuring users/groups.
Summary
In this chapter, we looked a creating a host pool using the Azure portal and using PowerShell. We looked at some of the requirements and gotchas associated with creating a host pool and how to overcome them. We also deployed a host pool using PowerShell and assigned users access to the host pool via app groups.
In the next chapter, we will continue our journey through AVD and take a look at configuring host pools and session hosts. This includes creating Windows Server session hosts, configuring host pool settings, assigning users to host pools, and finally, applying updates and security and compliance settings to session hosts.
Questions
- Before creating a host pool, what is the first thing you should check?
- Which load balancing method is used to consolidate sessions onto a session host before allocating sessions to a new session host?
- You plan to deploy your first AVD host pool. What do you need to configure on the virtual network before you deploy your first host pool?
Answers
- That the Microsoft.DesktopVirtualization resource provider is registered.
- The breadth-first load balancing method.
- Modify the DNS settings of the virtual network (“line of sight” with the Active Directory domain).