As you have now experienced firsthand, ArcGIS Pro contains a wealth of tools and methods for editing data, creating maps, and performing analysis. In many cases, there are two or three different ways to do the same thing. Also, many geoprocessing tools are very similar, such as Union, Intersect, and Identity. Though these are similar, each is designed to be used in specific circumstances.
All these different tools and methods make ArcGIS Pro a very powerful application. However, it can also make it confusing for the new users and allow experienced users to perform functions very differently. This can result in inaccurate or just wrong results. Things would be much simpler if you could develop standard workflows that everyone could use with step-by-step instructions required to complete specific tasks.
With ArcGIS Pro, you can do just that. They are called tasks. Tasks provide step-by-step workflows that can be saved along with your project. There is no limit to the number of tasks you can save with your project. You can save and share them to a network folder, ArcGIS Online, Portal for ArcGIS, and more.
In this chapter, you will learn how to create and use tasks within ArcGIS Pro. This will include the following topics:
- What a task is and considerations to take into account before creating one
- How to create a task
- How to use a task
Once you've completed the chapter, you will better understand what a task is, how to create one, and more importantly, how to use them to standardize common workflows in your organization.
Technical requirements
To complete the exercises in this chapter, you will need ArcGIS Pro 2.6 or higher installed. Any license level will be acceptable.
Understanding what a task is
Simply put, a task is a series of preconfigured steps required to complete a specific process. Tasks can be very simple, containing only three or four steps, or they can be very complex, containing group tasks within a task and each group can contain multiple steps. It is entirely up to you depending on the purpose of the task and the skill level of those that will be using the task. Tasks allow you to be as detailed as you believe you need to be for your user audience.
This section will help you learn about the components of a task. We will also get some hands-on experience with an exercise on running a task.
Tasks are stored as a task item within an ArcGIS Pro project. You access your tasks from the Catalog pane. When you open a specific task, it will appear in a new pane called the Tasks pane.
Components of a task
Each task that you create in ArcGIS Pro will consist of several components. They are as follows:
- Task item: The first is the task item, which is stored in the project. It is basically a folder for storing related tasks within your project. You will access Task Items from the Catalog pane, as shown in the following screenshot:

- Task group: The second component is the task group. The task group is a subfolder within the task item for grouping related tasks by function or purpose. The following screenshot shows you an example of a task group:
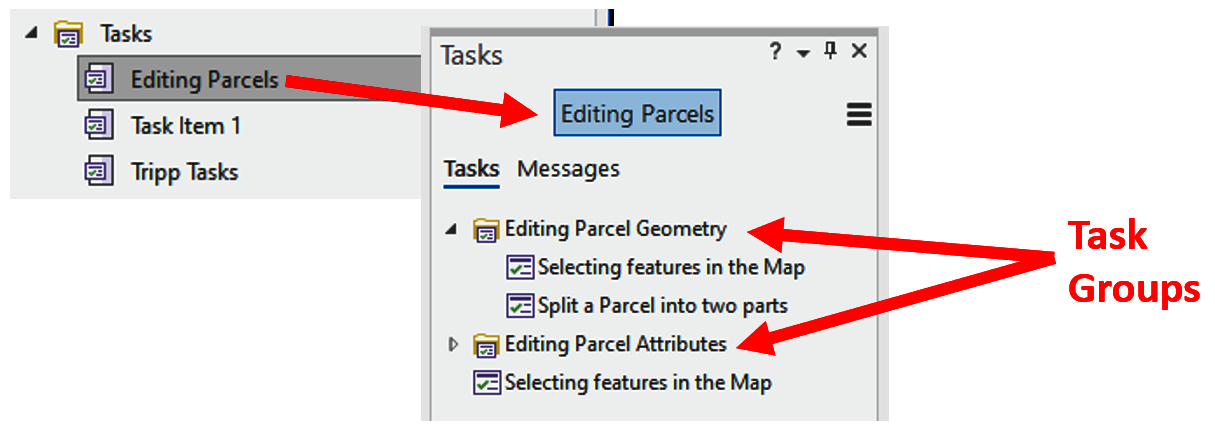
As you can see from the preceding screenshot, you can create task groups inside other task groups, just as you can create folders inside other folders in Microsoft Windows. This allows you to create an organizational structure for storing your tasks so that they are easier to find and manage.
- Task: The third component is the task itself. This is a collection of steps needed to complete a given process such as splitting a parcel, adding a new water line, or geocoding a new address. Tasks can be stored inside a task group or a standalone task, as shown in the following screenshot:

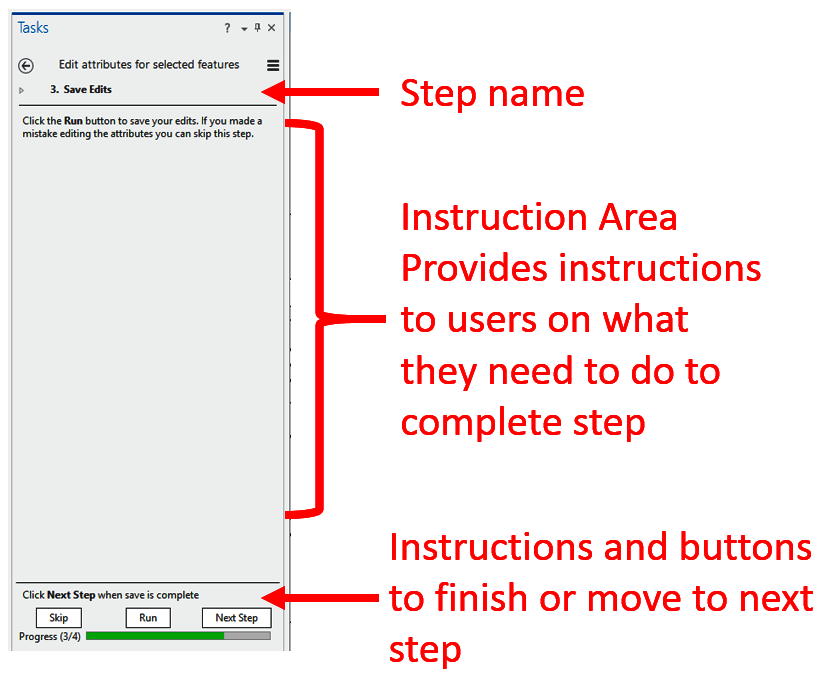
- Step: The last component is a step. A task will generally contain multiple steps. Steps refer to actions, buttons, geoprocessing tools, models, or scripts accessible in ArcGIS Pro. A common step would be to use the Explore tool to zoom to the location of a feature. Another example of a step would be selecting a given feature once the user has zoomed to the right area:

Each step is going to have several parameters that you can set for that step. You will provide general information regarding each step such as a name, instructions for users to follow, and how the step will be run, as shown in the following screenshot:
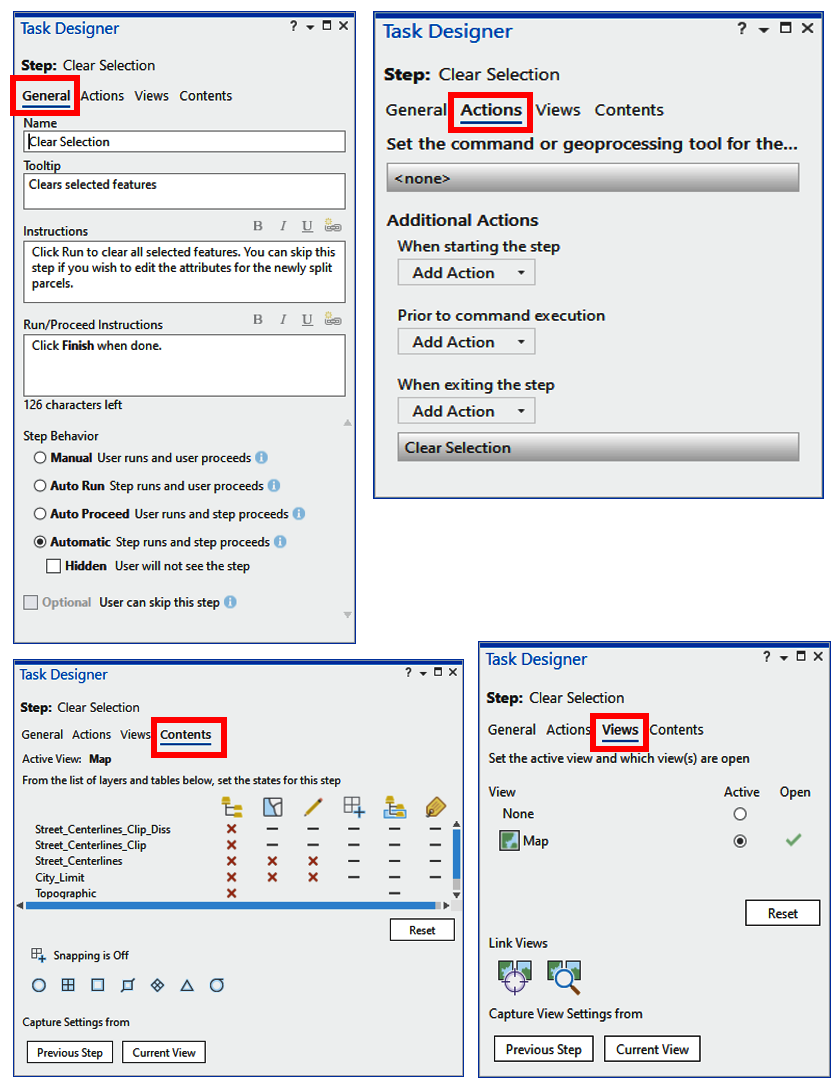
You can reference specific geoprocessing tools or commands within a Step under Actions. In the preceding illustration, this step references clearing the selection of the Select by Rectangle command. You have options to control which map and view the step should use. Lastly, you can control the contents within that view via the step. You can decide which layers will be visible, selectable, or editable.
You can have steps that simply provides instructions for the user and that run automatically. You can hide steps from users if desired. You will learn more about the steps and how to create them later in this chapter.
We will now move on to the next section about running a task.
Running a task
Tasks are run from the Tasks pane. The steps are presented to the user as they complete each one and move on to the next step. To get a task to open in the Tasks pane, you must first open the task item that contains the desired task you wish to run.
Once you open the task item from the Catalog pane, the Tasks pane will open and you will be able to select which task stored in the selected task item that you wish to run. You may need to expand a task group in order to find the specific task you are looking for. When you find the specific task you wish to run, simply double-click on it within the Tasks pane to run it.
Now let's give you a chance to experience what it is like to run a task with a hands-on exercise.
Exercise 11A – Running a simple task
In this exercise, you will run a simple task that steps you through the process of selecting a feature in the map. This will allow you to get first-hand experience of how to access and run a task in ArcGIS Pro.
Step 1 – Starting ArcGIS Pro and opening a project
You first need to open a project containing stored tasks. In this step, you will start ArcGIS Pro and open a project that has several tasks:
- Start ArcGIS Pro.
- Open the Ex11.aprx file located in C:StudentIntroArcProChapter11.
When your project opens, you should see a single two-dimensional map that contains layers representing the city limits, streets, and parcels for the city of Trippville.
- In the Catalog pane, expand the Tasks folder so you can see the task items saved in this project.
We will now move on to the next step.
Step 2 – Opening and running a task
In this step, you will open a task item and then run a task that steps you through the process of selecting a feature in the map:
- Double-click on the Selecting Features task item in the Catalog pane.
- The Catalog pane should open on the left side of the ArcGIS Pro interface. Take note of the tasks included in this task item.
- Double-click on the Selecting Features in the Map task to open it.
- Follow the instructions provided within the task's steps. When asked to zoom to an area on the map, you may zoom to any location for this exercise. Make sure to read and follow all the instructions:
- When you are done running the task, clear your selection.
- Close the Tasks pane.
- Close ArcGIS Pro without saving the project.
You have just experienced how a task works from the user's perspective. This was a very simple task. Tasks can be as complex or as simple as you want them to be. Feel free to try some of the other tasks included in this project.
We will now move on to the next section about creating tasks.
Learning how to create tasks
Creating a successful task is not unlike creating a map or a layout and requires thought and planning. Time spent on the frontend of creating a task will alleviate a lot of frustration and headaches later for yourself and for those that use the tasks you create.
This section will take you through exercises about exploring and creating a task. You will also gain an understanding of the things to consider before creating a task.
Just as you did before when creating a layout, you need to answer several questions:
- What is the purpose or goal of the task?
- What is the workflow that supports this purpose?
- How will the task be used?
- Who is the audience for your task?
The answers to these questions will impact the design of your tasks. They will help determine the number of steps to include, which steps may need to be run automatically, the level of instruction you need to provide, what tools need to be included in each step, and more.
After answering those questions, you will then be ready to start creating your task. This may require you to start by creating a new task item and then creating tasks or task groups within that item, or you can add new tasks to an existing task item.
As you create new tasks, you will use the Task Designer pane. The Task Designer allows you to add or modify steps. Steps are the heart of any task. They provide users with the instructions needed to complete the task. Steps themselves have several parameters that you will need to configure as you create your task. Again, the answers to the aforementioned questions will help guide the creation of each step.
Before you begin creating a task, let's explore an existing task.
Exercise 11B – Exploring a task
In this exercise, you will take a closer look at the task you ran in Exercise 9A from Chapter 9, Learning about Editing Tabular Data. You will verify whether it contained the number of steps you thought it did, or if there was more than met the eye.
Step 1 – Opening a project
In this step, you will open the same project you used in Exercise 10A from Chapter 10, Performing Analysis with Geoprocessing Tools. This will allow you to access the task you ran previously:
- Open ArcGIS Pro and select Ex11 from the list of previously opened projects.
- Expand the Tasks folder in the Catalog pane.
- Verify you see the Selecting Features task item in the Tasks folder.
Now that you have opened the correct project and verified that you see the task item you used in the last exercise, you will now learn how to open it for editing in the Task Designer.
Step 2 – Opening a task in the Task Designer
You will now open the task item in Task Designer. This will allow you to see all parameters, tasks, and steps included within the task item:
- Right-click on the Selecting Features task item and select Edit in Designer. The Tasks pane opens in designer mode on the left side of the interface and the Task Designer pane opens on the right side of the interface.
- Review the parameters for the task item in the Task Designer pane. Notice that in addition to standard parameters such as name, author, and description, you can also see what version of ArcGIS Pro the task was created with and track the version of the task as you update and modify it.
- Now you will make a couple of changes to this task item. Change the name of the task item to Selecting Features in ArcGIS Pro by typing it into the cell located under Name.
- Change the Author's Name to your own.
- Change the description to This task item contains various tasks that demonstrate different methods for selecting features within ArcGIS Pro.
- Lastly, enable Auto Increment of the task item version.
- Save your project.
Now that you know how to open a task in the Task Designer so you can see the various components that are included in a given task, you will explore the components inside the task you just opened.
Step 3 – Reviewing a task's steps
Now that you have the task item opened in the Task Designer, you will now explore the steps of a specific task. In this case, it will be the same task you ran in Exercise 11A:
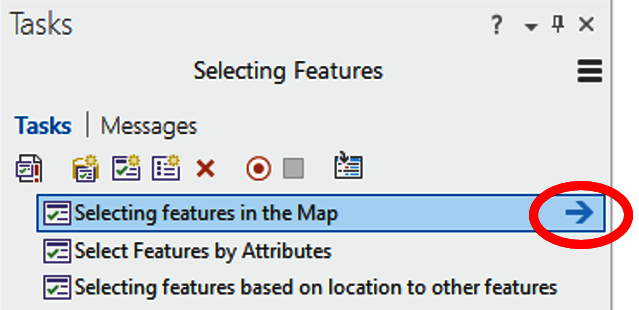
- In the Tasks pane, select the Selecting featuresin theMap task.
- Click on the blue arrow that appears to the right of the task name to access the task's steps:
- Select each step and review the General, Actions, Views, and Contents parameters associated with each step. They will be displayed in the Task Designer pane located on the right side of the interface.
- Click the back arrow located in the upper-left corner of the Tasks pane once you have reviewed each step.
- Review the other tasks located within this task item and their associated steps.
- Close the Tasks pane when you are done reviewing tasks.
- Save your project and close ArcGIS Pro.
Now you have a much better idea of how a task is configured and the way steps work. Let's now start looking more closely at the process of creating a task.
Things to consider when creating a task
As mentioned in the previous section, you need to answer those three questions before you begin creating any task. The answers to those questions will guide much of the task design. So how do those three questions impact or guide the design of your task?
Understanding the purpose of the task
Like a map, you are creating a task for a reason. For instance, it could be to show everyone in your organization the proper workflow for splitting a parcel so that everyone does it the same way. It might be to develop a workflow for identifying all parcels located within 300 feet of another parcel that is to be re-zoned so you can create a notification mailing list. Each of these represents a purpose.
Understanding the purpose of the task will help you determine which tools will need to be referenced in your task. The purpose will also help you answer the next question concerning the overall workflow that will be addressed via your task.
Determining the workflow to support the purpose
The task workflow is made up of the steps that will be included in the task. This includes the tools and actions that need to be performed, as well as the order in which those tools and actions need to be performed to achieve the purpose and goal of the task.
One of the best ways to validate or even develop the initial workflow for a task is to work through the entire process manually within ArcGIS Pro. If you are validating a workflow, make sure to follow it exactly as you have written it down. This will help you to identify any steps you may have missed.
Following your own instructions will be harder than you think. You will want to just do it instinctively, but do not fall into that trap. Make sure you take your time and follow the steps as you have outlined them. Remember, others that may use the task might not have the same skill level as you do. So, missing a tool or step that is intuitive to you may not be to others.
If you work through the process manually to actually develop the steps, then record each step as you do it. Make sure to note the tools associated with that step. Creating a document with screenshots can also be helpful as you do this. That helps ensure you remember all the requirements associated with a given step when you go to create the task.
Using tasks in different ways
There are several reasons you create a task. For instance, you may want to standardize a common workflow within your organization to ensure everyone is doing it the same way; you might want to use it as a training tool for new users; or you may want to establish a best practice for your organization to ensure accuracy and efficiency.
No matter what the purpose of the task is, it impacts the complexity and level of documentation needed for the task. Here are a few examples:
- If you are creating a task that will be used to train new users, you will need to make sure you include exact step-by-step instructions with very thorough documentation on exactly what the user needs to do to complete the step. You will want many of the steps to be manually interactive so the user learns the process completely and understands the reasons for each step.
- If you are just trying to establish a common workflow within an organization of experienced users, you can often reduce the number of interactive steps and use automatic steps since the users are already familiar with ArcGIS Pro functionality. Also, due to that experience level, you can reduce the level of instructional documentation required for each step.
- Tasks created for training or to establish best practices need more time to create as they typically require more effort due to the higher level of complexity of their design and documentation.
- Another consideration that falls under how the task will be used is the license level required to perform the steps within a task. Steps often refer to the use of specific geoprocessing tools or ArcGIS Pro commands. As you have learned, some geoprocessing tools are only available with certain licensing levels or extensions.
So as you are developing a task, you need to always consider what skill level, license level, and extensions are required to complete a task. If your task makes use of tools that require a specific license level or extension, you might want to include a step that has the user verify they have the correct license level or extension needed to complete the task.
Determining the audience for a task
Lastly, you need to determine the audience for the task you are creating. You need to know whether your audience is experienced ArcGIS Pro users or new users, or if they have used other GIS software.
The level of experience and skill of your audience will impact your task design. The lower the skill and experience level, the more instruction you will need to provide. You may also need to include steps that would be intuitive to experienced users.
If your audience is a group that is familiar with another GIS software application such as ArcMap, you might need to include references to tools or processes in that application so they can more easily relate ArcGIS Pro functionality to something they are familiar with. This may increase the amount of instruction you create for each step.
Now that you know what you need to consider before creating a task, it is time to learn how to actually create a task.
Creating a task yourself
As you have learned, a task has several components. When creating a new task, you will need to create these components. The first step in creating any task is to have a task item to contain it. This can be an existing or a new task item.
Once you create or identify the existing task item that will contain your task, you then need to decide whether you want the task to be standalone or contained within a task group.
If the task you are creating is not related to other processes or workflows, it is good to leave it as standalone. However, if the task is part of a larger workflow or process, then it is a good idea to store those related tasks within a task group. This makes it easier to find. If you want to store your task within a task group, you would need to create it after you create the task item.
At this point, you are now ready to create your first task. You will use the Task Designer and the answers to those four questions that were listed in the Learning to create a task section of this chapter to create a new task.
Creating a task item
There are several ways to create task items. They are as follows:
- If this is the first task item you are adding to your project, go to the Insert tab on the ribbon and select the Task button in the Project group. This will create a new blank task item in your project, as illustrated in the following screenshot:

- If you already have task items in your project, then you can add new ones from the Catalog pane. You just simply right-click on the Task folder and select New Task Item, as shown in the following screenshot:
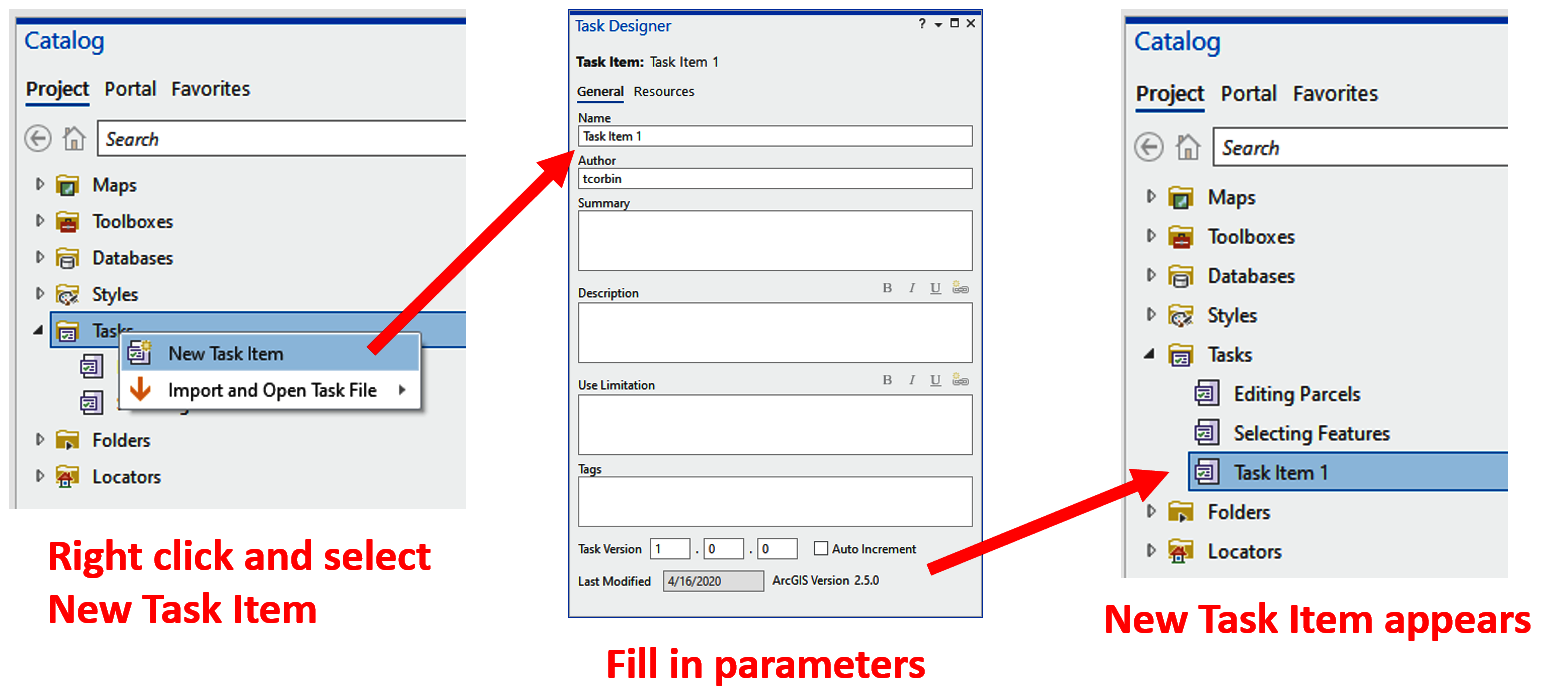
As you have now seen from the preceding screenshot, there is more than one way to create a task item in ArcGIS Pro. It is not unusual in ArcGIS Pro to have more than one way to accomplish something. This provides flexibility and allows you to determine the method that works best for you.
We will now see how to create a task group.
Creating a task group
If you want to store your task within a task group, you will need to create it within the task item. You will do this from the Tasks pane while in designer mode.
Simply click on the New Group button and fill in the parameters, as illustrated in the following screenshot:

The previous screenshot shows how easy it is to create a new task group. Task groups can help you organize your tasks based on function, usage, or intended audience so that they may be located quickly when needed.
Let's move on to learn how to create a task.
Creating a task
Now you are ready to create the actual task. Remember that you can add tasks to existing task items and task groups. Creating a task is very similar to creating a task group, as shown in the following screenshot:

As you can see from the preceding screenshot, to create a task, click on the New Task button in the Tasks pane while in designer mode. You can then fill in the associated parameters and the new task is created as illustrated.
Let's now move on to the next section about creating a task.
Exercise 11C – Creating a task
In this exercise, you will create a new task in a project. In the later Exercise 11D, you will add steps to this task.
The purpose of the new task is to create a list of parcels located along a road. This will help the city notify those that live and work along the road when it is being repaired. This task will be used as a common workflow for existing and new GIS staff.
Step 1 – Opening a project and creating a task item
In this step, you will open a project and then create the task item that will contain the task you will create in a later step:
- Start ArcGIS Pro and open the Ex11 project from your list of recently opened projects.
- Expand the Tasks folder in the Catalog pane.
- Right-click on the Tasks folder and select New Task Item. The Task and Task Designer panes will open automatically.
- In the Task Designer pane, fill in the parameters of your new task item as follows:
- In the Name field, type Road Repair Tasks.
- In the Author field, type your name.
- In the Description field, type This task item contains tasks associated with road repair projects such as generating notification lists, locating nearby parcels, calculating total lengths, and more.
- In the Task versionfield, enter 1.0.0.
- Enable Auto Increment.
- Save your project.
You have just created your first task item. Now you need to add a task to that item.
Step 2 – Creating a new task
You are now ready to create the task. This will ultimately serve as the container for the steps needed to create the list of parcels located along a road that you will create in Exercise 11D. You will create a standalone task for this exercise since it is the only task you will create. If this was part of a large set of tasks you were creating, you would have to create task groups to help organize them:
- In the Tasks pane on the left side of the interface, click on the New Task button.
- In the TaskDesigner pane, fill in the parameters for the new task indicated as follows:
- In the Name field, type Create a list of nearby parcels.
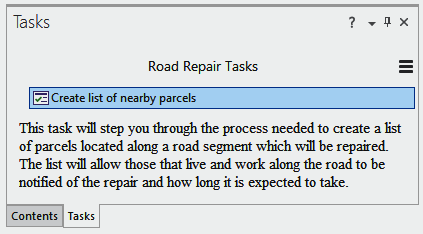
- In the Description field, add This task will step you through the process needed to create a list of parcels located along a road segment which will be repaired. The list will allow those that live and work along the road to be notified of the repair and how long it is expected to take.
- Close the Task designer pane.
Your Tasks pane should now look similar to this:
- Save your project and close the Tasks pane.
You have learned about tasks and how to create one for yourself. You also have understood the things to consider while creating a task.
You now have created a task, but it is empty. You still need to add the steps to the task to tell users the process needed to produce the list of parcels located near the road segments that will be repaired. We will do this in the next section.
Adding task steps
Steps are really the meat of your tasks. They provide instructions for completing a process or workflow to the users. Steps can be simple text instructions that tell users how to perform an action. For instance, a step could be as simple as "use the Explore tool to zoom to the area of interest". However, steps can also be very complex. You can include specific tools, layer behavior, and selection controls within a step.
In this section, you will learn about the components of a step, followed by an exercise for adding steps to a task where you will get some hands-on experience.
The complexity of the steps and how many you need will be driven by the answers to those four questions we discussed earlier in this chapter. If you are trying to standardize a specific workflow for experienced users, you may choose to increase the complexity of the step structure to automate it as much as possible. This will increase the efficiency of your team while also ensuring everyone performs the process the same way. If you are designing the task to be a training tool, you may want the steps to be more manual and instructional to allow the user to gain a better understanding of what tools are used and how they work.
So let's take a closer look at the components that make up a step and what purpose they serve. This will provide you with a good understanding so you can build effective steps within your tasks.
Learning about the components of a step
A single step can include several components depending upon its purpose. You can include instructions for the user, determine how the step will run, link it to geoprocessing tools or commands, control view and layer behavior, and manage selections within a single step. Let's look at these components or parameters more closely.
General
The first component of a step is the general information and behavior of the step. This includes the step name, tooltip, instructions, and step run behavior, as shown in the following screenshot:

As you can see in the preceding screenshot, there are few fields or parameters in the General tab. They are as follows:
- The Name of the step is what the user first sees listed in the task. The name should give the user a general idea of what the step is supposed to accomplish, such as Zoom to area or Select parcel to edit.
- The Tooltip is a pop-up window that appears when you move your mouse pointer over the object in question. This should provide more information for the user but still be limited to a short paragraph at most. It will often be very similar to the name.
- Instructions are one of the most important parameters of a step. They are where you provide users with instructions on what they need to do during the given step to complete it. These can be as long and detailed as you feel they need to be based on the purpose of the step and the intended audience. They should always be clear and easy to follow. Try to avoid using abbreviations or acronyms if possible since these can cause confusion.
- Run/Proceed Instructions tell the user what they need to do once they have completed the instructions to proceed to the next step. For example, click the Run button to start the step. Once you have completed the step, click the Next Step button to continue.
- Lastly, you will need to determine how the step will run. You have four basic options to choose from, namely, Manual, AutoRun, Auto Proceed, and Automatic. The following table helps us understand these four options better:
| Step Behavior | Description | Example of Use |
| Manual | The user must manually click the Run button to start the step and the Next Step button to proceed. | You want the user to activate the Explore tool and then zoom to a specific area. You are using this as a training tool so you need them to see the Explore tool being activated for use. |
| Auto Run | This runs the command or geoprocessing tool automatically. The user performs an action with the associated tool and manually clicks the Next Step to proceed. | You want the user to select features from the map, so you have linked the Select by Rectangle tool to the step and it runs automatically so the user does not need to activate it. They just select features from the map. |
| Auto Proceed | The user clicks the Run button and runs the step, then it automatically advances to the next step when complete. | You want the user to buffer a feature but the distance will be different depending on circumstances. The user will enter the appropriate buffer distance, then click the Run button. When the buffer is complete, it automatically advances to the next step. |
| Automatic | The step enters step runs without any user interaction. Automatic steps have the option to be hidden. | Your user is working on one map and you need them to change to another. You can include an automatic step that switches the currently active map to a different one before you proceed to the next step. |
Now let's move on to the next section about the second component of a step.
Actions
The next component of a step is an action. Actions allow you to link an ArcGIS Pro command or geoprocessing tool to the step. An ArcGIS Pro command is any button or tool you see in a ribbon, such as Add Data or Measure. A geoprocessing tool is any tool available in a toolbox, including custom Python scripts or models you or others may have created. A step is not required to have an action – it can be strictly instructional.
The following screenshot shows you the Action tab in the Task Designer pane:

You can add a command or geoprocessing tool to a step in two ways:
- The first is to edit the action. This allows you to pick a command or geoprocessing tool from a list. You have the option to search using keywords.
- Another method is to record. When you record, you simply find the command or geoprocessing tool you wish to use from the ArcGIS Pro interface and click on it. This is a great option if you have performed the step manually in the past and know exactly which tool you need.
You can also manage selections associated with a step using a feature called Additional Actionsforwhen the step starts, prior to running a command, or when exiting the step. Within the step, you can create, modify, save, or clear a new selection, as shown in the following screenshot:

You can save currently selected features to a selection set. This selection set can then be used by later steps in the task. You can also save features created or modified by this or previous steps, as shown in the following screenshot:

For example, if in a previous step you split a parcel into multiple parcels that remained selected after being split, and you wanted in a later step to edit the attributes for those new parcels, you could save the selection of those split parcels to a selection named Split Parcels that could then easily be recalled in a later step.
You can also clear the selection or create a custom query to select features. The custom query is very similar to the Select by Attribute tool and the definition queries that you have used in past chapters.
The use of additional actions is also optional. A step may have no actions or additional actions defined, it may just have a command or geoprocessing tool indicated, or it may have just additional actions defined or even a combination of a command or geoprocessing tool with additional actions.
Views
Views allow you to control what maps, scenes, or layouts are open and active within your project as you run the step. You will see all the views contained in the project that you have open. While you can have many views open at any one time, only a single one can be active.
The following screenshot shows you the Views tab in the Task Designer pane:

The active view will be the one the step and defined actions are applied to. So if you are creating a step to select a zoning polygon, you might want to make sure the Zoning view is active. If your step has someone adding a north arrow to a layout, you will want the proper layout to be open and active. You may want to close some views to remove possible confusion on the part of the user, as well as to reduce the number of computer resources that might be used.
As you can see in the preceding screenshot, you can set these parameters manually for the step, capture them from the previous step, or base them on your project's current settings as you create the step.
Contents
Just as you can control which views are open and active, you can also control the layers within your Active View. Within the step, you can control a layer's visibility, whether it is selectable or not, editable or not, snappable or not, whether it is a selected layer, and the label visibility.
The following screenshot shows you the Contents tab in the Task Designer pane:
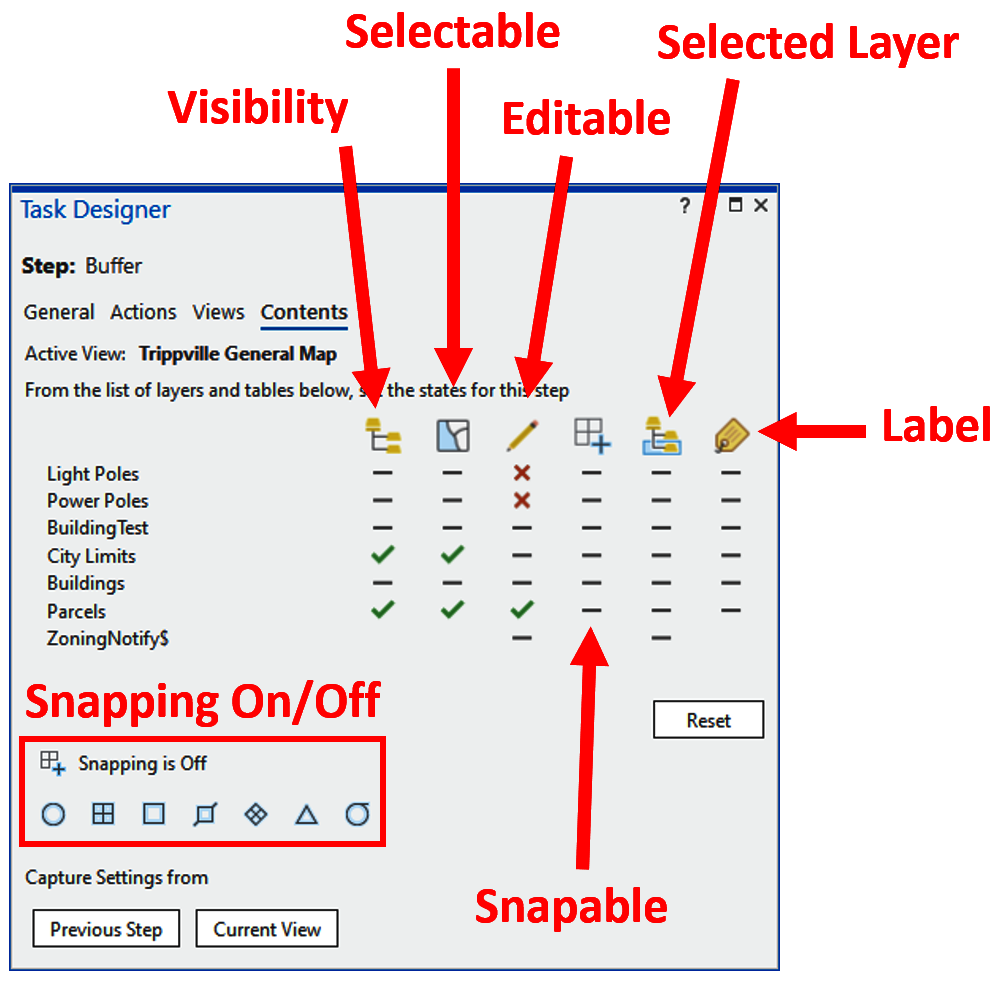
The level of layer control is very powerful. It ensures that your data is protected and only works with the layers you need to in any given step. For example, if you are editing a parcel within a step, you would want to make sure the Parcel layer is set as the only editable layer. This will ensure the user doesn't accidentally edit the City Limits or Buildings layers by accident, as an example.
Now that you have a much greater understanding of how steps are configured and work within a task, you are now ready to begin adding steps to the task you created in the previous exercise.
Exercise 11D – Adding steps to a task
In this exercise, you will add steps to the task you previously created to walk users through the process of generating a list of parcels near a selected road segment that is to be repaired so the land owners can be notified.
Step 1 – Opening the task in the Task Designer
In this step, you will open the task you created in the Task Designer so you can begin creating your steps:
- Start ArcGIS Pro and open Ex11 using the skills that you have already learned in previous exercises.
- Expand the Task folder in the Catalog pane.
- Double-click on the Road RepairTasksitem that you created in the last exercise. This will open the Tasks pane.
- Right-click on Create list of nearby parcels task and select Edit in Designer. The Task Designer pane should open on the right side of the interface and the Tasks pane should enter the designer mode.
You are now ready to add tasks. If this was not a classroom exercise, you would begin referencing your notes from the answers to those four questions from the Learning to create a Task section that you need to consider before creating a task. You would pay particularly close attention to the workflow that you outlined for the second question of the four.
For the sake of the exercise, this has already been done and you will just need to follow the exercise instructions.
Step 2 – Adding a step to zoom
In this step, you will add a step that will instruct the user to zoom to the location of the road in question. You will have them use the Explore tool to zoom to the location:
- Click on the New Step button in the Tasks pane. The new step is automatically listed in the Tasks pane and the parameters for the step are displayed in the Task Designer pane.
- Set the General parameters as follows:
- In the Name field, add Zoom to the street using the Explore tool.
- In the Tooltip field, add Zoom to the street to be repaired.
- In the Instructions field, type Using the Explore tool located on the Map tab, zoom to the location of the street segment which will be under repair in the map. If you are already zoomed to the correct area, you may skip this step.
- In the Run/Proceed Instructions field, type Once you have successfully zoomed to the location of the street, click Next Step to proceed.
I personally like to present the name of any tools or buttons I name in the instructions in a bold font. This helps the user spot them as important. So, in the preceding Instructions and Run/ProceedInstructions fields, I would have made Explore and Next Step in bold.
- In Step Behavior, set this as an Auto Run step. You will be connecting the Explore tool as an action to this step. By making it an Auto Run step, the step will automatically enable the Explore tool without the user having to. All the user will need to do is begin zooming to the proper area within the map.
- Lastly for the General settings, set this as an optional step that allows the user to skip the step if they already are zoomed into the proper location for the street which will be repaired when they start the task.
You have configured the General parameters for this step. You now will link it to an action. The action will be the Explore tool.
- Click on Actions at the top of the Task Designer pane.
- Move your mouse pointer to where it says <none>. Three icons should appear to the right. Click on the Edit icon.
- Click on the drop-down arrow located to the right of <none> in the Command/Geoprocessing pane.
- Select Command from the drop-down list.
- Click on the Browser button that appears to the right of the selected Command.
- In the search area of the pop-up window, type Explore and select Explore (Open current explore tool) and click OK:

- Click the Done button located at the bottom of the Task Designer pane.
You do not need to configure additional actions or change the settings for views or contents in this step since you are just having the user zoom to a location. So, you are done creating this step. Remember, there is no save task or step button. They are saved when you save the project.
- Save your project.
Congratulations, you have created your first step. But you are not done yet. You have several more steps that need to be created to complete this workflow.
Step 3 – Selecting the road segment
Now you need to add a step that instructs the user to select the road segment that will be repaired. You will use the Select by Rectangle tool and instruct the user to select the road from the map:
- Click the New Step button in the Tasks pane to create another new step.
- Complete the General parameters as follows:
- In the Name field, add Select Road Segment.
- In the Tooltip field, add Select the road segment which will be repaired.
- In the Instruction field, addClick the Run button to start this step. Then, using the Select by Rectangle tool, select the road segment from the map that is scheduled to be repaired. If you have already selected the road segment, you may skip this step.
- In the Run/Proceed Instructions field, add Once you have selected the road segment scheduled for repair, click the Next Step button.
- Select Manualin the Step Behavior field.
- Enable Optional to allow the user to skip this step if they have already selected a road segment.
- Click on the Actions option at the top of the Task Designer pane.
- Move your mouse pointer to the area the says <none> and click on the record icon.
- Click on the Select tool located in the Map tab. Notice this tool is automatically added as the action.
Since you will have the user select a feature on a specific layer in this step, you want to limit the selectable layers available when they run this step. As you learned earlier, you can do this through the Contents settings in a step.
- Click on Contents located at the top of the Task Designer pane.
- When this task is run, you want to make sure the Streets layer is visible and selectable. Click on the – located next to Streets under the Visibility column until it becomes a green checkmark. Do the same for the Select column.
- To ensure no other layers are accidentally selected, you want to set the remaining layers to be non-selectable by clicking on the – in the Select column until they all have a red X by them.
Your Task Designer pane should look like this when you are done:

- Save your project.
You have now provided users with the instructions they need to zoom to the location of the road scheduled for repair and how to select it. Now you need to tell them how to select the surrounding parcels.
Step 4 – Selecting nearby parcels
In this step, you will create a step that tells users how to select the parcels near the road segment they selected in the last step. You will be using the Select by Location command to do this:
- Click on the New Step button once again to create the new step.
- Set the General parameters as follows:
- In the Name field, add Select nearby parcels.
- In the Tooltip field, add Select parcels that are near the road segment you selected in the previous step.
- In the Instructions field, add Using the Select by Location tool, you will select parcels that are located within a distance of 100 feet from the selected road segment.
- Ensure this tool is configured as follows:
- Set the Input Feature Layer field to Parcels.
- Set the Relationship field to Within a Distance.
- Set the Selecting Features field to Streets.
- Set the Search Distance field to 100 feet.
- Set the Selection Type field to New selection.
- Once you have verified if the setting is correct, click the Run button and make sure of the following:
- In the Run/Proceed Instructionsfield, add Click Next Step to proceed.
- Select Manual under the Step Behavior option.
- Click Actions and using the Record option, set the command to Select by Location located in the Map tab.
- The Geoprocessing pane will open automatically. Since you are running this step manually, you can close it and return to the Task Designer pane.
- Click on Contents, set it so the Streets and Parcels layers will be visible, and the Parcels layer will be the only selectable layer.
- Save your project.
Now that the nearby parcels are selected, you have one last step to go. You will instruct users on how to export the selected parcels to an Excel spreadsheet.
Step 5 – Exporting the selection to an Excel spreadsheet
In this step, you will create a new step that instructs users to export the selected parcels to an Excel spreadsheet:
- Click on the New Step button in the Tasks pane.
- Set the General parameters as follows:
- In the Name field, addExport to Excel.
- In the Tooltip field, addExports selected parcels to an excel spreadsheet.
- For the Instructions field, complete the parameters for the Table to Excel geoprocessing tool indicated as follows:
- In the Input Table field, type Parcels.
- In the Ouput Table field, type C:StudentIntroArcProChapter11Parcels_TableToExcel.xls. Click Run once you have verified your settings.
- In the Run/Proceed Instructions field, click Finish to complete the task.
- In the Step Behavior options, select the run Manual option.
- Click Actions and click on the Edit icon.
- Set the Type of Command to Geoprocessing Tool.
- Click the browse button next to the selected Geoprocessing Tool.
- In the Find tools cell, type Excel.
- Select the Table to Excel Python script and click OK.
- Ensure Embed is enabled and set the parameters as described in your instructions. The Task Designer pane should look like the following:
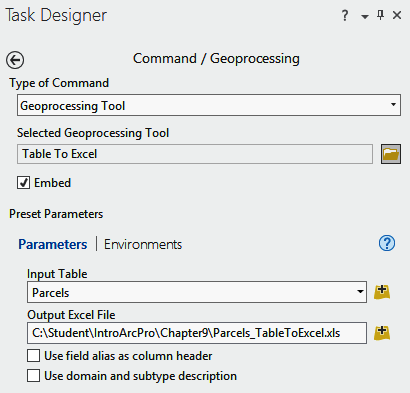
- Once you have verified your settings, click Done.
- There is no need to change the views or contents settings, so close the Task Designer and save your project.
Your task is now complete. You have added all the steps required to select the parcels near a road segment that is scheduled for repair, and then export them to an Excel spreadsheet. Now you need to test it.
Step 6 – Running your task
Now that your task is complete, you will run it to see how well it works. This will verify that the task contains all the steps needed to complete the desired process and to verify your instructions are clear and the steps flow as expected:
- Using the skills you have learned, locate and run the task you just created. Follow the instructions in each step closely. Check that they make sense and you end up with the expected results.
- Make any adjustments to the task and its steps that you believe are needed.
- Save your project and close ArcGIS Pro.
Assuming everything ran as expected, you have just created your first complete task. You developed a workflow that others will be able to follow to accomplish a specific process using your step-by-step instructions.
Challenge
Using the skills you have learned in this chapter, select a previous exercise from this book, or a common process from your office and develop a task for it. You can also develop a task to replicate that workflow.
Summary
In this chapter, you have learned how tasks can be used to standardize processes, train new users, and establish best practices within your organization. You have also gained an understanding of all the components that make up a task and the considerations you need to take into account when creating your own tasks.
Finally, you have the skills needed to create your own tasks in ArcGIS Pro. You worked through the process of creating a new task from the beginning, ultimately creating a task that exports the selected data to an Excel spreadsheet. This included creating the task item, task, and task steps.
In the next chapter, you will begin to explore ways you can automate a multi-step process using ModelBuilder and Python. These allow you to create models or scripts that can string a series of tools and workflows together into a single tool that can save you time and effort, especially with processes you perform on a regular basis.