
In the previous chapter, you learned how to edit spatial data using ArcGIS Pro. But the spatial data is only one half of the Geographical Information System (GIS) data. The other half is the attribute or tabular data that is connected to the spatial data. Being able to keep the attributes updated is just as important as maintaining the spatial data.
As you have seen in previous chapters, the attribute table, which is part of a feature class and layer, is used in many ways. You can use it to configure the symbology used to display a layer in a map. Attribute values are used to help define feature templates used to create new features. You can query values in the attribute to select features for analysis or editing. These are just a few ways you can make use of the data stored in the attribute table for a layer. So, it is just as important to ensure it stays as up to date as the spatial features that it is connected to.
Through this chapter, you will be able to edit and maintain the attribute data for the features in your GIS.
This chapter covers the following topics:
- Editing your schema
- Populating field values in a database
Upon completing this chapter, you will have gained a much better understanding of database tables in GIS and how to maintain them. You will have learned various tools and methods that you can use to keep the attributes associated with your spatial features current (that is, they match the current conditions) and accurate.
Technical requirements
Before starting the exercises in this chapter, you will need to complete all the exercises in Chapter 8, Editing Spatial Data. The exercises in this chapter build on the ones from that chapter.
Like the other chapters in this book, you will need to haveArcGIS Pro 2.6or newer installed. A basic license should be sufficient to complete the exercises contained in this chapter. You might find it helpful to have multiple monitors, though it is not required.
Editing your schema
As the needs of your organization grow and change it is important for your GIS to keep up. This means you will need to make changes to the database schema.
What does the word schema mean? Simply put, it means the structure of a database. So schema is not just a GIS term but it is also a term used for other databases as well. In the case of a GIS database, schema refers to things such as what feature classes are stored in the database, what attribute fields are linked to those feature classes, what domains are included in the database, whether any tables or feature classes are related, and more.
ArcGIS Pro allows you to make some changes to your GIS data schema. It will allow you to add new feature classes, add fields, and create domains. It does have some limitations currently such as you cannot create a topology or geometric network. Hopefully, as ArcGIS Pro continues to mature those limitations will disappear.
In this section, you will learn how to make changes to the schema of your GIS database. You will start with how to add a new field to a table. Then you will see how to import data such as a shapefile into your GIS database to create a new feature class.
Adding a field
Sometimes changing your schema is as simple as adding a new field to an attribute table. A field is a column within a database table. The actual act of adding a field within ArcGIS Pro is not overly complicated, especially when compared to editing the spatial data. However, it does require some thought.
When adding a new field, you need to think through the properties that will be associated with that field, such as field name and field type, which we will cover in the next few sections.
Field name
In a database table, each field must have a unique name. That name cannot include spaces or special characters, though underscores are allowed. The allowed length of the field name will depend on the type of database. Is it adBase,Access, orSQL Servertable? Each of these has its own limitations.
As a rule of thumb, I have learned that keeping my field names limited to 7 to 8 characters works best. This will prevent field names from getting shortened if you export the data to a different format that does not support the name length of your native database.
This often happens when your GIS data is stored as a geodatabase that supports long field names, but you export to a shapefile that does not. Shapefiles store attributes in a dBase format that does not support long field names. Being an older database type, dBase only supports field names of 7 to 8 characters. So, a field that is named as parcel_indentification_number in your geodatabase may get renamed to parcel_in when exported to a shapefile.
Alias
An alias is a more descriptive name for a field. An alias can contain special characters such as spaces and it doesn't have the length restrictions associated with the field name. Aliases allow users to better understand the purpose of a field. By default, the alias is what is displayed when a table is opened in ArcGIS Pro.
Field types
When you add a field to a database, you must decide what type of data will be stored in that field. This is the field type.
There are several field types depending on the type of database that you are working with. Here is a list of some of the most common field types you can use in ArcGIS Pro:
|
Name |
Description |
Comments |
|
Text or String |
This stores alphanumeric data. A field can be up to 255 characters long. The default length in ArcGIS Pro is 50 characters. |
It does not provide the best database performance compared to other field types. Make sure to set the size as small as possible to conserve storage space. |
|
Integer (Long and Short) |
This stores whole numbers, meaning no decimal places. The difference between long and short integer varies somewhat depending on the database, but generally short integers can store values between -33,000 to 33,000. Long will store values between approximately -2.1 billion and 2.1 billion. |
It provides the best performance of all field types. This makes them the optimum type to use if overall database performance is a concern. |
|
Float or Single |
These store decimal values out to approximately 6 to 8 decimal places depending on the database. |
They provide median database performance. |
|
Double |
This stores decimal values with 15 or more decimal places depending on the database. |
Its performance is similar to float. |
|
Date |
This stores date and time. The format depends on the database. |
|
|
Binary Large Object (BLOB) |
This is the BLOB field. It is used to store data that does not fit one of the other field types; not all databases support blobs. |
It provides the worst performance of any field type. It can cause issues if exported to a database that does not support this type. |
|
Raster |
This stores images or pictures directly in the database. It is a specialized BLOB field. |
It has the same issues as a BLOB. |
|
Global Unique Identifier (GUID) |
The GUID provides a unique identifying value to all records and tables within the database that have this field type. |
GUID fields are required if you plan to allow mobile or offline editing or use database replication. |
Now that you know what a schema is and how to add a field, it is time for you to add a field to a table.
Exercise 9A – Adding a field and populating values
The Public Works Director has asked you to determine how long each road segment is in miles for a project he is working on. While you do have the road's centerline data, it is not attributed with lengths in miles. So, you will need to add a new field to store the length in miles and then calculate that value for each segment.
We will be adding the field now. In these steps, you will open your project and then add the new field that will store the length of each road segment in miles:
- Open ArcGIS Pro and the Ex9A project located in C:StudentIntroArcProChapter9.
- In the Contents pane, select the Street Centerlines layer. The Feature Layer group tab should appear in the ribbon.
- Click on the Data tab within the Feature Layer group tab.
- In the Design group on the Data tab, select the Fields button.
A new tab should open in the main view area of the interface where the map was before. This new view shows the current attribute fields and their properties for the Street_Centerline layer.
- At the bottom of the existing fields, you should see a row that says Click here to add a field; click on that.
- Name the field Len_Mi.
- Then click on the Alias cell and give the new field an alias of Length in Miles.
- Then click on the Data Type cell and set it to Float. You are using the float data type because the Director is looking for length in miles only to two decimal places.
- Leave all the other settings the same and the table should now look like this:

- Once you have verified that your new field has been added correctly, click on the Save button located on the Fields tab in the ribbon.
If the Save button is grayed out, that most likely means you have data edits that have not been saved. You cannot make changes to the database schema if there are any pending data edits that have not been saved.
- Close the Fields view.
- Save your project and close ArcGIS Pro.
You have just added a new field to the Street_Centerlines feature class that you can use to store the length of each road segment in miles. Next, you will learn how to import data from other sources into your GIS database.
Importing a new feature class
Adding a field is just one change that you can make to the schema of your GIS database. You can also add entirely new feature classes by creating a new one from scratch or importing it from another data source.
It is not uncommon to have data stored in other formats and locations that would be beneficial in your GIS database. Moving all those different data sources into a single GIS database makes them easier to use, find, and manage. ArcGIS Pro contains tools for importing, exporting, and converting data. This allows you to build a comprehensive GIS database that can be integrated with other solutions.
So let's move on to the next exercise, which is about importing a shapefile.
Exercise 9B – Importing a shapefile
A local consultant was hired to locate all the water meters within the City of Trippville. They provided the Public Works Director with a shapefile containing the water meters that they located and attributes collected.
You now need to import this shapefile into the city's geodatabase, so it is stored in the same location as the other feature classes that make up the city's water system.
Step 1 – Opening the project and adding a layer
In this step, you will open the project that you have been working with throughout this chapter. Then you will add the shapefile that was provided to the Director by the consultant, which contains the water meter data:
- Open ArcGIS Pro and the Ex9A project that you used in the previous exercise.
- On the Map tab in the ribbon, click on the Add Data button.
- Click on Folders located under Project in the left pane of the Add Data window.
- Double-click on Chapter9 folder in the right pane of the Add Data window.
- Select Water_Valves.shp and then click the OK button.
You have now added the data collected by the consultant to your map. This data is stored as an Esri shapefile. You need to add this collected data to the city's geodatabase as a new feature class. You do that by exporting the shapefile that you just added as a layer to your map to the city's geodatabase.
Step 2 – Exporting to a geodatabase
Now you will export the shapefile to a feature class in the city of Trippville's geodatabase. You will store the newly imported feature class in the Water feature dataset along with the other water system-related feature classes:
- Right-click on the Water_Valves layer that you just added to your map.
- In the displayed context menu, go down to Data and select Export Features, as shown in the following screenshot:
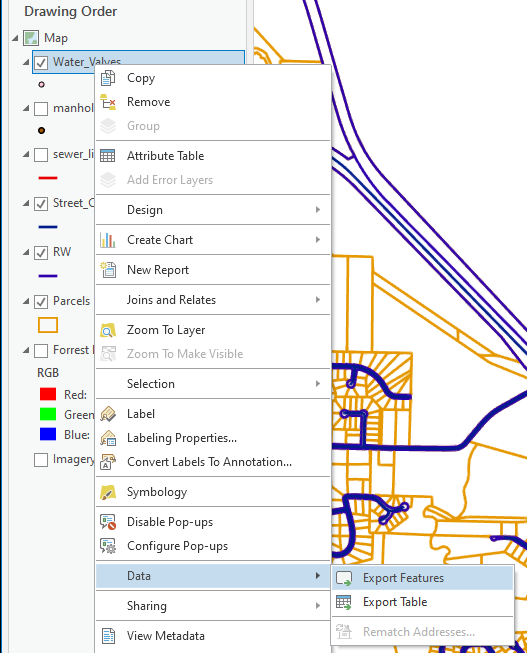
- This will open the Export Features tool within its own floating window. The Input Features value should automatically be populated with the Water_Valves layer because that was the one you right-clicked on. Now click on the browse button located to the right of the Output Location.
- Click on the Databases folder located under the Project in the left pane of the Output Location window.
- Double-click on the Trippville_GIS geodatabase that is listed in the right panel of the Output Location window.
- Then click on the Water feature dataset and click on the OK button to set the Output Location. This is where the new feature class that you are about to create will be stored.
- In the cell below the Output Feature Class, type Water_Valves.
- Verify that your Export Features tool looks like the following screenshot, then click the OKbutton at the bottom of the window:

When the tool completes its run, you should see a second Water_Valves layer added to your map. This new layer is now using a new feature class that was created in your geodatabase as its source. You will now verify that.
- Click on the List by Source button located at the top of the Contents pane.
- Verify that you see a Water_Valves layer listed under the Trippville_GIS.gdb workspace and one in the Chapter9 folder.
- Right-click on the Water_Valves layer in the Chapter9 folder and click Remove. This removes the layer that was based on the original shapefile from the map so that only the one that references the city's primary geodatabase remains.
- Save your project and close ArcGIS Pro.
You have just converted a shapefile to a geodatabase feature class and verified that the conversion was successful. Importing the data that was in the shapefile into your geodatabase created a new feature class, which is also a change to the schema.
As mentioned at the beginning of the chapter, it is important to be able to make adjustments to your GIS database schema to reflect changing requirements and conditions. You now know how to add new fields to your database so that you can collect new information as it is needed. You have also learned how to import data from outside sources into your GIS to create new layers of information.
Now that you have an understanding of fields, we will move onto the next section about populating the field values in the database.
Populating field values in a database
So far in this chapter, you have learned how to make changes to the schema of your GIS database by adding fields and importing other files. But how do you populate the new fields that you create or just make changes to the attributes associated with existing features?
In the section, we will look at several ways to do just that. We will start with ways to edit individual values for existing features. We will explore the way to perform mass edits to populate a table with values.
Understanding methods to edit or add single values
As you make changes to your spatial data you also need to get into the habit of updating the attributes associated with those features. These are stored in the attribute table for the layer. As mentioned at the beginning of this chapter, attributes are used for many operations within ArcGIS Pro including to control symbology and select features via queries. So, it is critical that the attributes for your features be as correct and up to date as your spatial data.
There are several ways that you can edit or update attribute values within ArcGIS Pro. In this section, we will focus on two of the most common methods, the Attributes window and directly in the table view.
Attributes window
The Attributes window is traditionally opened from the Edit tab in the ribbon. In this window, you can make changes to the attribute values for individually selected features. You simply click in the cell located to the right of the field name and type in a new value as shown in the following screenshot:

This window consists of two tabs:
- Selection tab: The Selectiontab includes three sections. They are Selection tool, a list of selected features, and list of attribute fields of geometry value, as illustrated in the following screenshot:

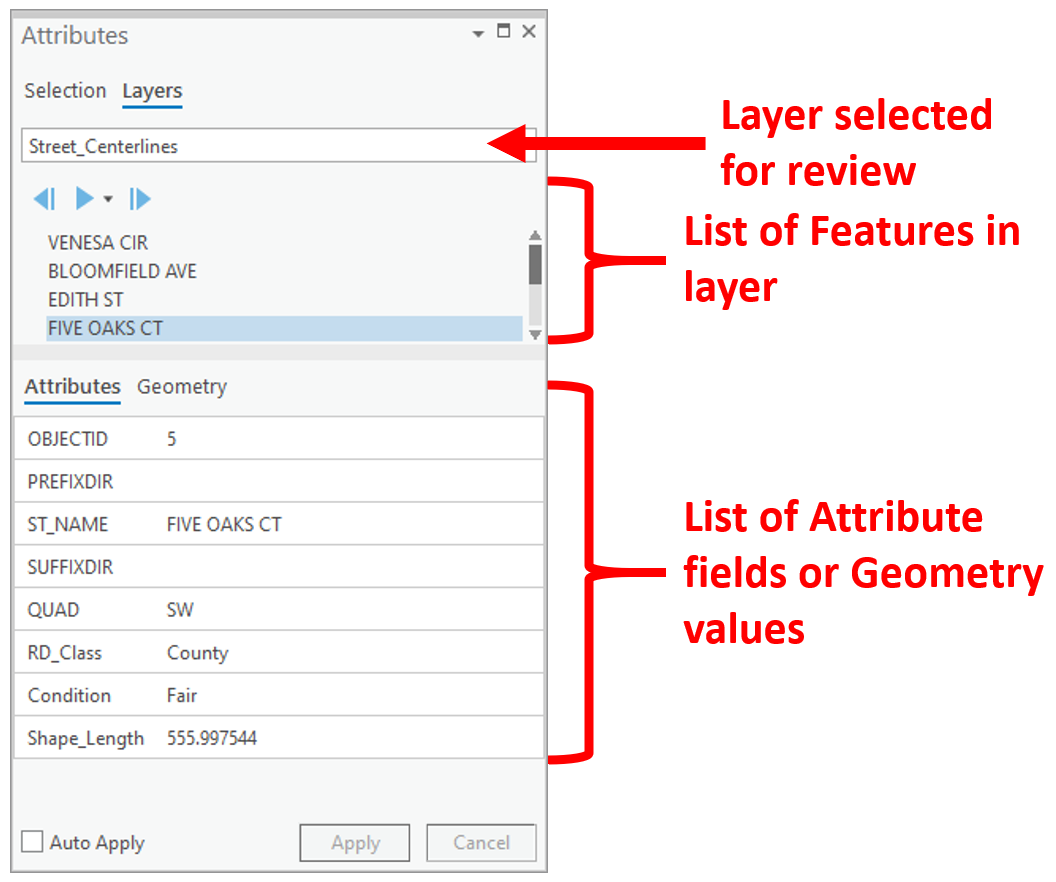
- Layers tab: The Layers tab in the Attributes window allows you to select a specific layer to review and then cycle through all the features within those layers, as shown in the following screenshot:
Each of these tabs allows you to edit the attribute values for the selected feature. You will get a chance to use the Attributes window to edit values in Exercise 9C. Before you do that though, let's look at the other method for editing attribute values directly in the attribute table.
Editing directly in the attribute table
You can also edit attribute values directly in the attribute table. This can be more efficient because you often will already have the attribute table for a layer already open for other purposes.
Editing in the attribute table can be as simple as clicking in a cell within the table and typing in a new value. This is very much like editing the data contained in an Excel spreadsheet, as you can see in the following screenshot:

As easy as this is, it also points out a danger that users of the older ArcMap software did not need to worry about. In the older ArcMap application, you were required to start an edit session before you could edit any data.
In ArcGIS Pro, this is no longer required. You can edit any data that you have permissions to, at any time. This includes the attribute values in the attribute table for a layer. So, while ArcGIS Pro makes it easier to edit data it also makes it easier to create bad information. It is important to always keep this in mind when working in ArcGIS Pro.
We will move onto the next exercise about editing attributes.
Exercise 9C – Editing attributes
In this exercise, you will update the attributes for the street centerlines that you created in Exercise 8A in Chapter 8, Learning to Edit Spatial Data. You will use the Attributes window to make these changes.
Step 1 – Opening the project and zooming to the correct location
In this step, you will open the project that you will be working in and zoom to the location of the street centerlines that you added to the Trippville_GIS geodatabase in Exercise 8A ofChapter 8, Learning to Edit Spatial Data:
- Open ArcGIS Pro and the Ex9A project that you had used in Exercise 9A and Exercise 9B.
- On the Map tab in the ribbon, click on the Bookmarks button and select New Subdivision 1 from the list that appears. This should zoom your map back to a familiar location from Exercise 8A in Chapter 8, Learning to Edit Spatial Data.
- On the Contents pane, click on the List by Editing button. Then right-click on the Street_Centerlines layer and select Make this the only editable layer from the menu that appears, as shown in the following screenshot:

- Next, click on the List by Selection button in the Contents pane. Right-click on the Street_Centerlines layer again and select Make this the only selectable layer from the menu that appears.
You have now opened the correct project and zoomed to the area where you will be editing data. Then you set the Street_Centerlines layer to be the only editable and selectable layer. This will help ensure that you only edit data in the layer you intend to in the next step. In the following step, you will enter the names for each street centerline segment you created in Exercise 8A in Chapter 8, Learning to Edit Spatial Data.
Step 2 – Adding Street_Centerline attribute values
In this step, you will update the names for each street centerline segment that you had created back in Exercise 8A inChapter 8, Learning to Edit Spatial Data, using the Attributes window:
- Click on the Edit tab in the ribbon.
- Next, click on the Select tool located in the Selection group on the Edit tab.
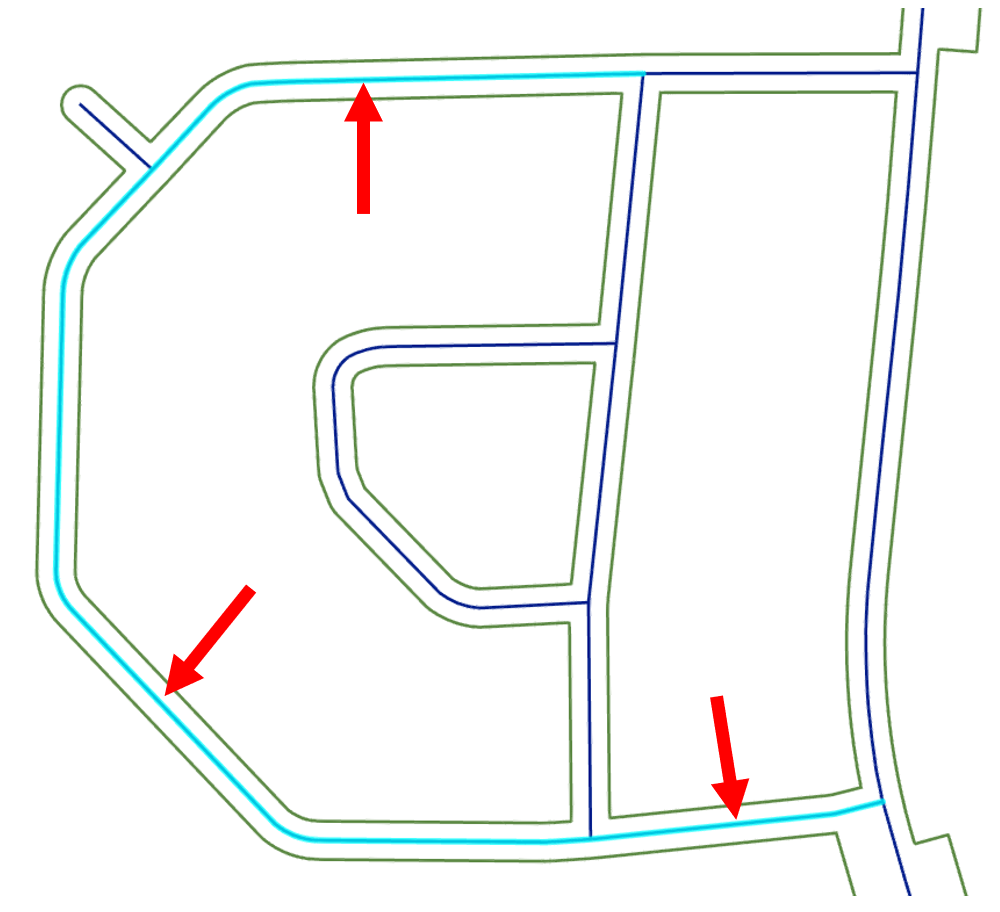
- Click on the northeastern-most street centerline segment, as shown in the following screenshot:

- Click on the Attributes button in the Selection group on the Edit tab. This will open the Attributes window.
- In the Attributes window, verify that you have one Street_Centerlines feature selected by looking at the area of the window that shows the list of selected features.
- Click in the cell to the right of ST_NAME and type OAK PL. Press your Enter key when done. Your Attributes window should look like the example provided in the following screenshot:

- Now click on the cell to the right of RD_Class and type City because the new street centerlines that you entered are city-maintained roads.
- Lastly, click on the cell to the right of Condition. Then type Good and press your Enter key when done. These are new roads so they should be in good condition.
- Press the Apply key to apply the changes to the attributes table.
- On the Edit tab, click on the Save button to save your edits back to the database.
The Apply button only applies the changes to the copy of the data stored in your computer's local memory. Remember the layers in a map within ArcGIS Pro all point back to a data source. This data is cached or copied into your computer's Random Access Memory (RAM) or local drive. When you save the edits, that is when the changes that you make are actually pushed back to the original data source for all to see.
- Using that same process, update the ST_NAME field for the remaining segments that make up Oak Place, which forms the outer circle for the subdivision, as shown in the following screenshot:
- Once you are done updating the remaining segments, make sure to save your edits and your project.
- Close ArcGIS Pro.
You have just updated the attributes for several of the street centerline segments that you created in the previous exercise. As a rule of thumb, it is best to update the attributes at the same time when you are editing the spatial data. This keeps both components of your GIS data accurate and current.
Next, we will explore tools that allow you to edit the attributes for multiple features at a time.
Mass-populating table values by using tools
Often when you add a new field to a table, or when a large number of features need to have similar values altered, it is more effective to make those changes or updates in one mass edit. ArcGIS Pro supports several tools and methods to do just that. We will review some of the most common tools now.
Calculate Field tool
The Calculate Field tool is a geoprocessing tool that will mass-populate values into the designated field within a table using an expression. This expression can be as simple as copying values from another field, or as complex as performing a series of mathematical equations and logical functions. These expressions can be written in either Python or Arcade. You will learn a little more about these two languages in Chapters 12, Automating Processes with ModelBuilder and Python, and Chapter 14, Using Arcade Expressions for Labeling and Symbology, respectively.
This is a geoprocessing tool even though it opens within its own window instead of within the Geoprocessing pane. This means, if you have records in the table selected, it will only populate values into the selected records. If you do not have any records selected, this tool will populate values in the field for all records in the table overwriting any existing information.
Calculate Geometry tool
The Calculate Geometry geoprocessing tool calculates values into the desired field based on spatial values. You can use this tool to calculate things such as area, perimeter, central coordinates, number of vertices, and more. The exact spatial characteristics that you can calculate will be dependent on the geometry type of the features in question. For example, you cannot use the Calculate Geometry tool to calculate the area for point features because a point does not have an area.
This tool can also be used to convert units, for example, if you have polygon that was created in imperial units, but you need to know its area in square kilometers. Then you can use the Calculate Geometry tool to convert from imperial units to metric units without you knowing the exact conversation factor.
Now it is time for you to see these tools in action in a hands-on exercise.
Exercise 9D – Using tools to mass-populate field values
In this exercise, you will get to use the Calculate Field and Calculate Geometry tools for multiple features at one time. You will start by using the Field Calculator tool to populate the Len_Mi field that you created in Exercise 9A. Then you will use the Calculate Geometry tool to calculate the area for Wetlands polygons in acres.
Step 1 – Populating the field using the Field Calculator tool
In this step, you will populate the length of each road segment in miles into the field you created in Exercise 9A. You could do this manually for each segment using some of the edit skills that you have already learned. That would be very time-consuming. There is a much more efficient way.
One of the fields that you identified as being associated with the street centerlines was Shape_Length. So, now you already have values showing the length of each road segment. It is in feet, though to populate your new field with the correct values in miles you will need to convert feet into miles. As you have previously learned in this section, ArcGIS Pro includes a tool called the Field Calculator, which will allow you to populate a field with values based on an expression for all features in the feature class. We will follow the next steps to do so:
- Open ArcGIS Pro and the Ex9A project that you have used in the previous exercises in this chapter.
- If needed, activate the Map view in ArcGIS Pro by clicking on the tab at the top of the view area.
- In the Contents pane, ensure the Street_Centerlines layer is editable by going to the List by Editable button.
- Right-click on the Street_Centerlines layer in the Content pane and select Attribute Table to open the Table window at the bottom of the interface.
- Right-click on the new field that you created. It should be shown using the alias that you specified when you created the new field – Length in Miles. Also, note that the field is Null. Null means it is empty. It has no values stored.
- Select Calculate Field, this will open the Geoprocessing tool within its own floating window.
- Within the Fields box, double-click on Shape_Length. This will insert the name of the field with the correct syntax into the expression box located below the Fields and Helpers as illustrated in the following screenshot:
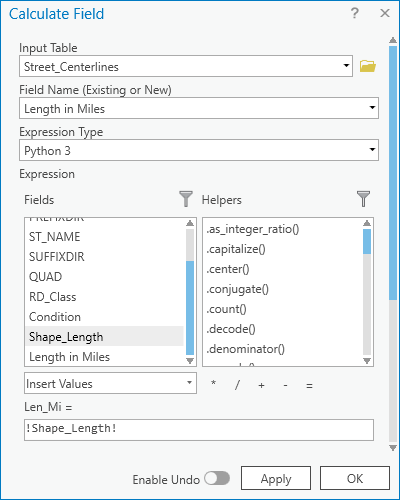
- Click on the / symbol located below the Helpers box to add that to the expression. This symbol will divide the value stored in the Shape_Length field for each record by a value that you will specify next.
- In the expression box, type 5280 after the / symbol. This is the number of feet in a mile. Your expression should look like this:

- Once you verify your expression, click the OK button located at the bottom of the Calculate Field window.
- When the Calculate Field is complete, you should now see the field that you created and filled with values now. If you scroll through the table, you will see that it calculated the lengths in miles for all the records in the table. The Calculate Field tool is a very powerful and efficient way to populate a field.
- Close the attribute table for the Street_Centerlines layer and save your project.
Next, you will use the Calculate Geometry tool to populate a field with the acreage for the polygons in the Wetlands layer.
Step 2 – Using the Calculate Geometry tool
As you were working on determining the length of the roads in miles, the Public Works Director came by and asked if you could calculate the area of the Wetlands in acres. You will do this using the Calculate Geometry tool and following these steps:
- In the Contents pane, select the Wetlands layer.
- Click on the Data tab in the ribbon and then select the Attribute Table button in the Table group. This will open the attribute table for the Wetlands layer.
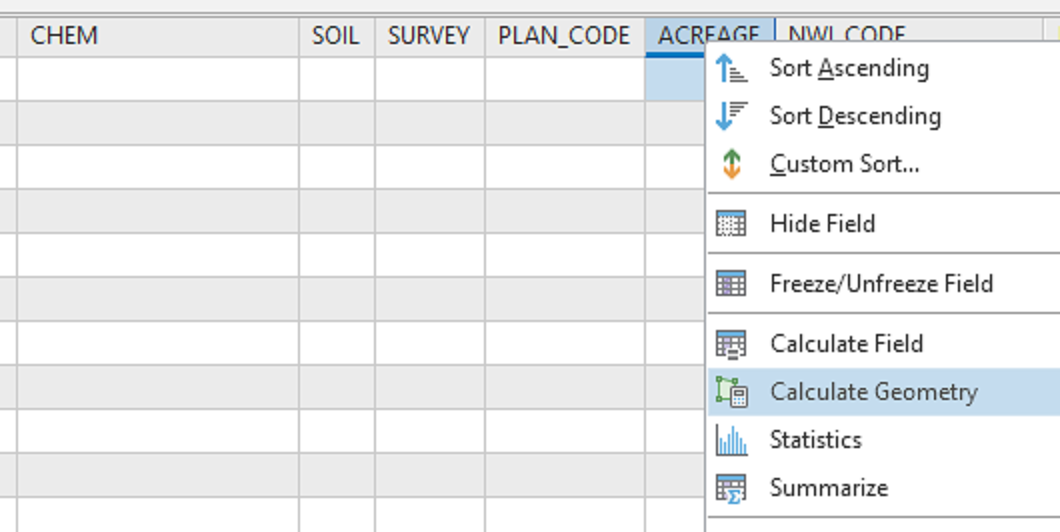
- Review the table that you just opened to see what fields exist within the table. Next, right-click on the ACREAGE field in the table and select Calculate Geometry from the menu that appears as illustrated in the following screenshot:
- In the Calculate Geometry tool window that just opened, verify the Input Features parameter is set to Wetlands.
- Under the Target Field, verify the first line is set to ACREAGE.
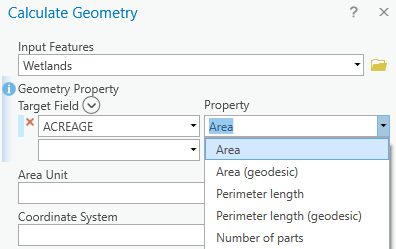
- Under the Property column next to ACREAGE, select Area using the drop-down arrow, as shown in the following screenshot:
- A new line should now appear in the Calculate Geometry tool window named Area Unit. Set this to Acres using the drop-down arrow.
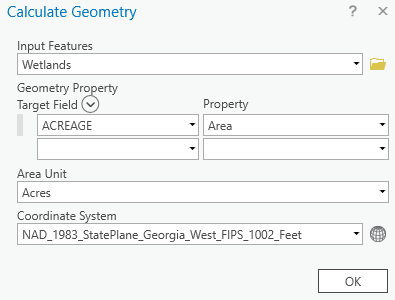
- Set the Coordinate System parameter to the Current Map (Map) using the drop-down arrow. This will set the coordinate system to NAD_1983_StatePlane_Georgia_West_FIPS_1002_Feet, which is the coordinate system assigned to the currently active map.
- Verify that your Calculate Geometry tool looks like the following and then click OK:
- Review the ACREAGE field to see the values that it now contains.
- Save your project and close ArcGIS Pro.
You have just used the Calculate Geometry tool to populate a field with the total area for the polygons in that layer. Further, this tool converted the area units from square feet into acres without you needing to know the conversion factor as you did in the previous exercise.
This section has taught you how to populate values into tables within your GIS database. You learned how to enter single values to ensure any new features that you add or change also keep their attributes current. You also learned how to use the Calculate Field and Calculate Geometry tools to populate the values for multiple records within a table at the same time.
Summary
As you have learned there will always be a need to create and update data. In a GIS, this includes both spatial and tabular information. In the previous chapter, you learned how to edit spatial data including points, lines, and polygons. In this chapter, you learned how to update and create tabular information.
The first thing that we discussed was how to make changes to your database schema. The schema is the structure of your database. This includes what feature classes are included in your GIS database, what fields are in the attribute tables for those feature classes, and a lot more. You now have the skills to add new fields to your attribute tables and can import data from other sources into your GIS database.
You also learned how to update the attribute values for the features displayed in your maps. You now know how to do that individually or en masse using the Calculate Field and Calculate Geometry tools.
So, between this chapter and the previous one, you have gained the basic skills required to keep your GIS database updated and accurate. In the next chapter, you will learn how to analyze data using ArcGIS Pro.
Further reading
If you would like to learn more about the concepts discussed in this chapter, you might want to check out the following resources:
- ArcGIS Pro 2.x Cookbook: Chapter 4 and Chapter 5
- Editing data with ArcGIS Pro playlist on eGIS Associates YouTube Channel: https://www.youtube.com/user/eGISAssociates