As you have learned throughout this book, ArcGIS Pro has powerful tools for creating amazing 2D and 3D maps, and for performing a wealth of spatial analysis tasks. All this functionality means little if you cannot get the results into the hands of those that need it.
The need to access Geographic Information System (GIS) information is also being fueled by the growing use of geospatial and mobile technologies by the masses. Almost everyone nowadays has a smartphone or tablet and has used some sort of mapping application such as Google Maps, Waze, Bing Maps, or the local county tax parcel application. All of this means that people are becoming much more geospatially and technology savvy. They expect to be able to access and use the data and analysis that you provide.
ArcGIS Pro provides several methods and tools for sharing your GIS content with others. Which of the available tools or methods will work best depends on the following several factors:
- First, what is it that you are trying to share?Is it data, an entire map, or a tool?
- Second, what software and skills do your audience possess?
- Third, what do you want to allow them to do with the shared content – print, edit, query, or download it?
- Forth, how will they connect to your GIS information?
The topics that we will cover in this chapter include the following:
- Sharing content with those on your network
- Sharing content with those not on your network
- How to export to other GIS data formats
- How to export to non-GIS data formats
- How to publish content to the web via ArcGIS Online
Throughout this chapter, you will learn about various methods for sharing data. You will be able to use these various methods to share your GIS data with others, whether or not they have GIS software.
Technical requirements
In addition to an ArcGIS Pro license, you will also need an ArcGIS Online user login that has publisher or administrator permissions to complete all the exercises in this chapter.
Sharing content with those on your network
Sharing GIS content with those that are on your computer network is relatively easy. The biggest consideration will be to is whether they have access to GIS software or not. In this section, we will see how to share information with those that are on your computer network whether they have GIS software or not.
Sharing your GIS data is easier if they also have ArcGIS Pro, ArcGIS Desktop, or some other GIS application. As long as they have the ability to access the data files, many of these applications have the ability to open the same types of data. This should allow them to add that data into their application.
If there are people on your network who do not have GIS software, it gets a bit more complicated, because while they might be able to access the data, they will not have the required software. In this situation, you will need to export your GIS content to a more common non-GIS format such as a .pdf file. Luckily, ArcGIS Pro also supports that ability.
Regardless of whether they have GIS software or not, they will need permissions and access to the databases, files, and folders where you store your GIS content. If they do not have the proper permissions, they will not be able to make use of the data or files that you create.
Sharing data if users have ArcGIS Pro
If other users on your network have ArcGIS Pro, they will be able to open the projects that you create as long as they have access and permissions to the project and data sources used in the project. You can also share layers, maps, tasks, and layout files to standardize your content. We will look at all these files in the few upcoming sections.
Understanding the layer file
A layer file in ArcGIS Pro has a .lyrx file extension. They store all the property settings associated with a layer in a map such as a source, symbology, field visibility, labeling, definition queries, and more. Layer files allow you to standardize these settings so the layer will appear the same across multiple maps and projects.
Using a layer file to add a new layer uses the same process as adding a layer using a feature class. However, instead of choosing a geodatabase, shapefile, Computer-Aided Design (CAD) file, or raster, you select the layer file instead. When you do that, your layer will be added to your map with all the properties preconfigured, so you don't need to go back and set all the layer properties manually. This can save you valuable time.
Layer files created in ArcMap may also be used in ArcGIS Pro in the same way those created in ArcGIS Pro can. However, layer files created in ArcGIS Pro cannot be used in the older ArcMap application.
Creating a layer file is relatively easy. You simply select the layer in the Content pane. Then you activate the Share tab and choose Layer File. From there, you fill out the required information and click Save. It is that easy.
Why don't you give it a try?
Exercise 13A – Creating a layer file and using it
Now, this is your opportunity to put the knowledge that you have gained into action via a hands-on exercise. In this exercise, you will create a layer file and then use it to add a new layer to a map within a project using ArcGIS Pro.
Step 1 – Creating the layer file
In this step, you will create the layer file for the Trippville Zoning layer. It appears that several people have been using the Zoning layer in several maps but have been doing so with their own personal settings. This is causing confusion, so the Community Development Director wants you to develop a standard based on the Official Zoning Map for the city:
- Start ArcGIS Pro and open the Ex13.aprx project file located in C:StudentIntroArcProChapter13.
- Examine the map, paying close attention to the Zoning layer. Note what settings such as symbology and labeling have been applied to the layer.
- Select the Zoning layer in the Contents pane and then click on the Share tab in the ribbon.
- Click on the Layer File button in the Save As group. This will open the Save Layer(s) As LYRX File window.
- Navigate to C:StudentIntroArcProChapter13 using the tree on the left side of the window.
- Name the new .lyrx file as Trippville Official Zoning and click Save.
You have just created a layer file for the Zoning layer as it appears in the Official Zoning Map in the Ex13 project. This will allow you to easily add this layer to other maps found in this project or others so that it will maintain all its existing layer properties such as symbology, labeling, definition queries, scale ranges, and more.
Step 2 – Using the layer file to add a layer to a map
In this step, you will test the layer file that you created to ensure it works as expected. You will use it to add a new layer to a new blank map in your project:
- In the Catalog pane, expand the Folders folder. Then expand the Chapter13 folder so that you can see its contents.
- Right-click on the Trippville Official Zoning.lyrx file and click the Add to New option, then select Map, as shown in the following screenshot:

A new map has just been added to your project and it should contain the Zoning layer, automatically symbolized and labeled the same way as it was in the Official Zoning Map. This was because you added the layer using a layer file instead of going directly to the feature class in the geodatabase, as you have done in past exercises.
- Save your project and close ArcGIS Pro.
As you have now experienced, a layer file can allow you to quickly add layers to a map that are already configured, which can save you and others in your organizations a great deal of time. Layer files can also be used to standardize how specific layers are displayed in various maps throughout your organization.
Let's now move on to the next section about map files.
Learning about map files
Map files are similar to a layer file except they save the settings for an entire map. This includes all the layers shown in the Contents pane when that map is active and the settings for each of those layers. Map files can be created for either a two- or three-dimensional scene from an ArcGIS Pro project. Map files have a .mapx file extension.
For those who have used ArcGIS Desktop (ArcMap and ArcCatalog), it is important to remember that a map or scene in ArcGIS Pro is just one component of a project. Unlike a map document in ArcMap, which is often called a map, maps in ArcGIS Pro are a single item and do not include things such as layouts and other maps (these are called data frames in ArcMap).
Map files allow you to share maps that you create in ArcGIS Pro so others can include them in their projects or you can use others' in yours. This can save a lot of time because the map will not need to be created from scratch. It can simply be imported into the project and then adjusted to meet the current requirements.
Adding a new map to your project from a map file is not difficult. Simply click on the Insert tab in the ArcGIS Pro ribbon, then select ImportMap. From there, you simply navigate to the location of the map file and import it.
Creating a map file follows the same basic process as creating a layer file. You go to the Share tab in the ribbon. Instead of selecting Layer File, you select Map File.
For those of you who have been using ArcGIS Desktop, remember that a map in ArcGIS Pro is not exactly the same as a map document. In an ArcGIS Pro project, you may have several maps along with separate layouts. When you create a map file in ArcGIS Pro, it will only contain the active map that was selected when you created the map file. This will not include any layouts that may include the map.
Map file challenge
Using the skills that you have learned for creating a layer file in the previous sections, create a map file based on the Official Zoning Map in the Ex13 project. Then open a new project and try to import the map file to create a new map within that project.
Next, we will look at layout files.
Understanding layout files
Layout files allow you to share layouts you create so that they can be used as templates by yourself and others. Layout files will include all the elements you see in the layout including maps, legends, borders, north arrows, scale bars, titles, logos, disclaimers, and more.
If the data referenced in the maps included in the layout is not accessible or in a different location, you will need to resend your data sources. Layout files, such as layer and map files, do not store any GIS data.
The process to create and import layout files is very similar to the process used for map files. Again, it starts on the Share tab in the ribbon, then the Layout File button in the Save As group.
Layout file challenge
Try exporting the layout included in the Ex12 project to a layer file. Then open a new blank project or one of the previous projects that you have worked with and import the layout file into the project.
Here's a hint: try using the New Layout tool on the Insert tab in the ribbon. Notice what happens when you import the layout file.
Through this section, you have learned the various ways by which you can share your GIS content with others on your network who have GIS software such as ArcGIS Pro. This included creating layer files, map files, opening existing projects, and more. This allows others throughout your organization to open and use the content you have created.
We will now discuss the scenario where the users do not have ArcGIS Pro for sharing data on the network.
Sharing data if users don't have ArcGIS Pro
If you want to share your GIS content with those users who don't have ArcGIS Pro, your options are much more limited. Depending on the software and abilities of your potential users, you can export your content to other GIS formats, non-GIS formats, or try publishing to ArcGIS Online, Portal for ArcGIS, or ArcGIS Server as a web map or layer.
Exporting to other GIS formats
ArcGIS Pro will allow you to export your data to many different GIS formats such as shapefiles, Keyhole Mark-up Language (KML/KMZ), or CAD files (.dwg, .dxf, or .dgn). Some of these allow you to export multiple layers into a single file, while others only support single layers.
Shapefiles are a very common GIS data format that originated with Esri. A shapefile (.shp) only stores a single layer or feature class. So, if you wish to use this format, you may need to export multiple layers, each to its own shapefile.
Most GIS-enabled applications such as QGIS, Grass, MapWindow, and Map3D are able to read and display shapefiles. Some even have the ability to edit. In addition, most Global Positioning System/Global Navigation Satellite System (GPS/GNSS) software applications and collectors are also able to import and export shapefiles. As a result, shapefiles have become the de facto data sharing format for many.
The KML format is also popular. It is the format used by Google Earth, which is a free application. Exporting to KML would allow you to view your data in relation to the data you see on Google's maps, as illustrated in the following screenshot:

You will find the tools to export to these other GIS formats in the Conversion Tools toolbox and their individual toolsets. Each format has its own toolset, as shown in the following screenshot:

As you can see from the preceding screenshot, ArcGIS Pro is able to convert a wide range of data formats. In the following exercise, you will learn how to export data from the city of Trippville's geodatabase to a shapefile so that it can be used in another GIS software application.
Exercise 13B – Exporting data to a shapefile
The Planning Director is working with a consultant who is using QGIS. They need to be able to open and make edits to the city zoning data to look at different options for possible future developments.
Shapefiles can easily be used in QGIS, certainly more so than the geodatabase file that the city uses to store its GIS data. So, you will export the existing zoning data to a shapefile.
Step 1 – Opening the project and verifying the data
Of course, before you can export the data, you need to open the project. In this step, you will open the appropriate project containing the data you need to export:
- Open ArcGIS Pro and the Ex13 project, if you closed it earlier.
- Select the Official Zoning Map tab at the top of the view area to make it the active map.
- Select the Analysis tab from the ribbon and click on the Tools button in the Geoprocessing group to open the Geoprocessing pane.
- In the Geoprocessing pane, click on the Toolboxes tab at the top of the pane just below the Find Tools search box.
- Expand the Conversion Tools toolbox by clicking on the small arrow located to the left. Then click on the To Shapefile toolset.
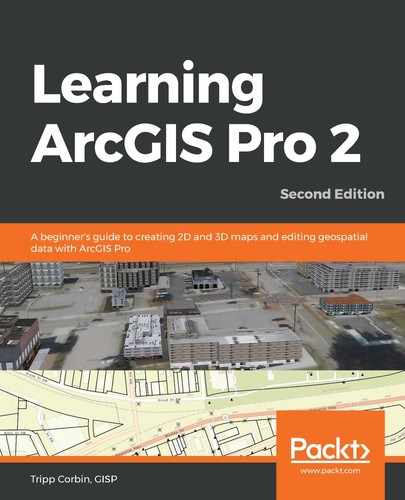
- After that, select the Feature Class To Shapefile tool.
- To set the Input Features, click on the small drop-down arrow located to the left of the cell, and select the Zoning layer.
Note that when you add the Zoning layer as an input, another input cell appears in the tool. The Feature Class To Shapefile tool allows you to convert multiple layers or feature classes to individual shapes at one time. Each input will become a unique shapefile with the same name as the input layer or feature class.
- Set the Output Folder to C:StudentIntroArcProChapter13.
Your Feature Class To Shapefile tool should look like the following screenshot:
- Once you have verified that the Feature Class To Shapefile tool is properly configured, click the Run button located at the bottom of the Geoprocessing pane.
This tool will produce a new shapefile. This new shapefile will contain all the same data that was included in the original Zoning layer, which is based on a geodatabase feature class. As mentioned earlier, shapefiles are often used to share data between software packages because just about any GIS application can read and edit them.
Now you will verify that the tool successfully created the new shapefile by adding it as a layer to a new map.
Step 2 – Creating a new map and adding the shapefile as a layer
In this step, you will add the new shapefile that you just created to a map to verify that it was successfully created:
- In the ribbon, click on the Insert tab to activate it.
- Next, click on the New Map button located in the Project group on the Insert tab. This will add a new blank map to your project.
- In the Catalog pane, expand the Folders folder, then double-click on the Chapter13 folder to see its contents.
- You should see the Zoning.shp file that you created in the Chapter13 folder. Right-click on it and select Add to Current Map.
Your map should now look similar to the following screenshot. Remember that your colors may be different because ArcGIS Pro assigns random colors to newly added layers. Your map may also contain a basemap depending on your organization's settings:

You may be wondering why the new shapefile layer that you just added does not have the same symbology as the Zoning layer that you exported from the Official Zoning Map. Remember that the actual source for a layer, be it a shapefile, geodatabase feature class, or something else, does not store the way we visualize that layer. Those settings are stored in the map, a layer file, or a layer package.
- Save your project.
We now move on to the main step in this exercise.
Step 3 – Applying symbology using a layer file
In this step, you will use a layer file to apply the symbology that you saw in the Official Zoning Map to the shapefile-based layer that you just added to your new map. This will help you verify that all the important attribute information was included in the exported shapefile:
- Select the Zoning layer in the Contents pane so that the Feature Layer group tabs appear in the ribbon.
- Next, click on the Appearance tab in the ribbon.
- Click on the Import button located in the Drawing group on the Appearance tab in the ribbon. This will open the Import Symbology tool in a floating window.
- Verify that the Input Layer is set to Zoning.
- To set the Symbology Layer, click on the browse button located at the end of the cell. It looks like a file folder.
- In the Symbology Layer window that opens, click on Folders,located beneath Project in the left panel of the window.
- In the right panel of the window, double-click on the Chapter13 folder.
- Select the Trippville Official Zoning.lyrx file and click OK.
- Notice that once you click OK, the values for type, the source field, and the target field are automatically assigned. Verify that your Apply Symbology From Layer tool window looks like the following screenshot:

You will see that the values for the Source and Target fields were automatically assigned because the fields in both the source and target were the same field type and had the same name. This tool allows you to manually assign these values using the drop-down arrows at the end of the fields.
- After you have verified the settings for the tool, click the OK button to apply the new symbology from the layer file.
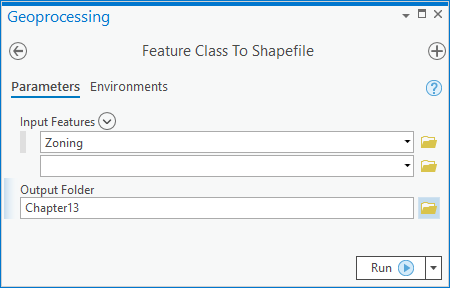
Your map should now look similar to the following screenshot:
- Save your project and close ArcGIS Pro.
You now know how to export a layer to a shapefile so that you can share it with others. You have also learned how you can apply symbology to a layer using a layer file.
The next step of sharing this data with someone else could be done by emailing it or uploading it to an online resource such as Google Drive or ArcGIS Online. We will learn how to upload to ArcGIS Online later in this chapter. When you do try to share the shapefile with someone else, remember that a shapefile actually consists of multiple files. You will need to make sure that you send all of those, and not just the .shp file that you see in ArcGIS Pro. We will learn about this in the next section.
Exporting data to non-GIS formats
ArcGIS Pro supports exporting maps, layouts, and tables to other non-GIS formats. This includes several raster and vector formats. This can allow others who don't have ArcGIS Pro to view what you have created. Many of the non-GIS formats that you can export to with ArcGIS Pro can also be inserted into other non-GIS applications as well, such as Word and PowerPoint. This will allow you to incorporate GIS information into reports and presentations.
Exporting maps and layouts
With ArcGIS Pro, you can export maps and layouts in various types of vector graphic or raster formats. This includes the following:
- Bitmap image files (.bmp) can be exported as raster format files.
- Enhanced MetaFiles (.emf) can be exported as Vector Graphics.
- Encapsulated PostScript (.eps) files can be exported as Vector Graphics.
- Graphics Interchange Format (.gif) files can be exported asraster format files.
- Joint Photographic Experts Group (.jpeg) files can be exported as raster format files.
- Portable Document Format (.pdf) files can be exported as Vector Graphics.
- Portable Network Graphic (.png) files can be exported as raster format files.
- Scalable Vector Graphics (.svg) files can be exported as Vector Graphics.
- A .svgz file, which is a .svg file compressed with gzip compression, can be exported as Vector Graphics.
- Truevision Graphics Adapter (.tga) files can be exported as raster format files.
- Tagged Image File Format (.tiff) files can be exported as raster format files.
Many of these formats can then be easily opened in other applications such as web browsers (such as Chrome, Internet Explorer, or Firefox), free applications (such as Adobe Acrobat Reader and Microsoft Paint), or other GIS applications.
Most of the raster formats can also be embedded or inserted into documents, spreadsheets, and presentations. This allows them to be included in reports, studies, letters, exhibits, and more.
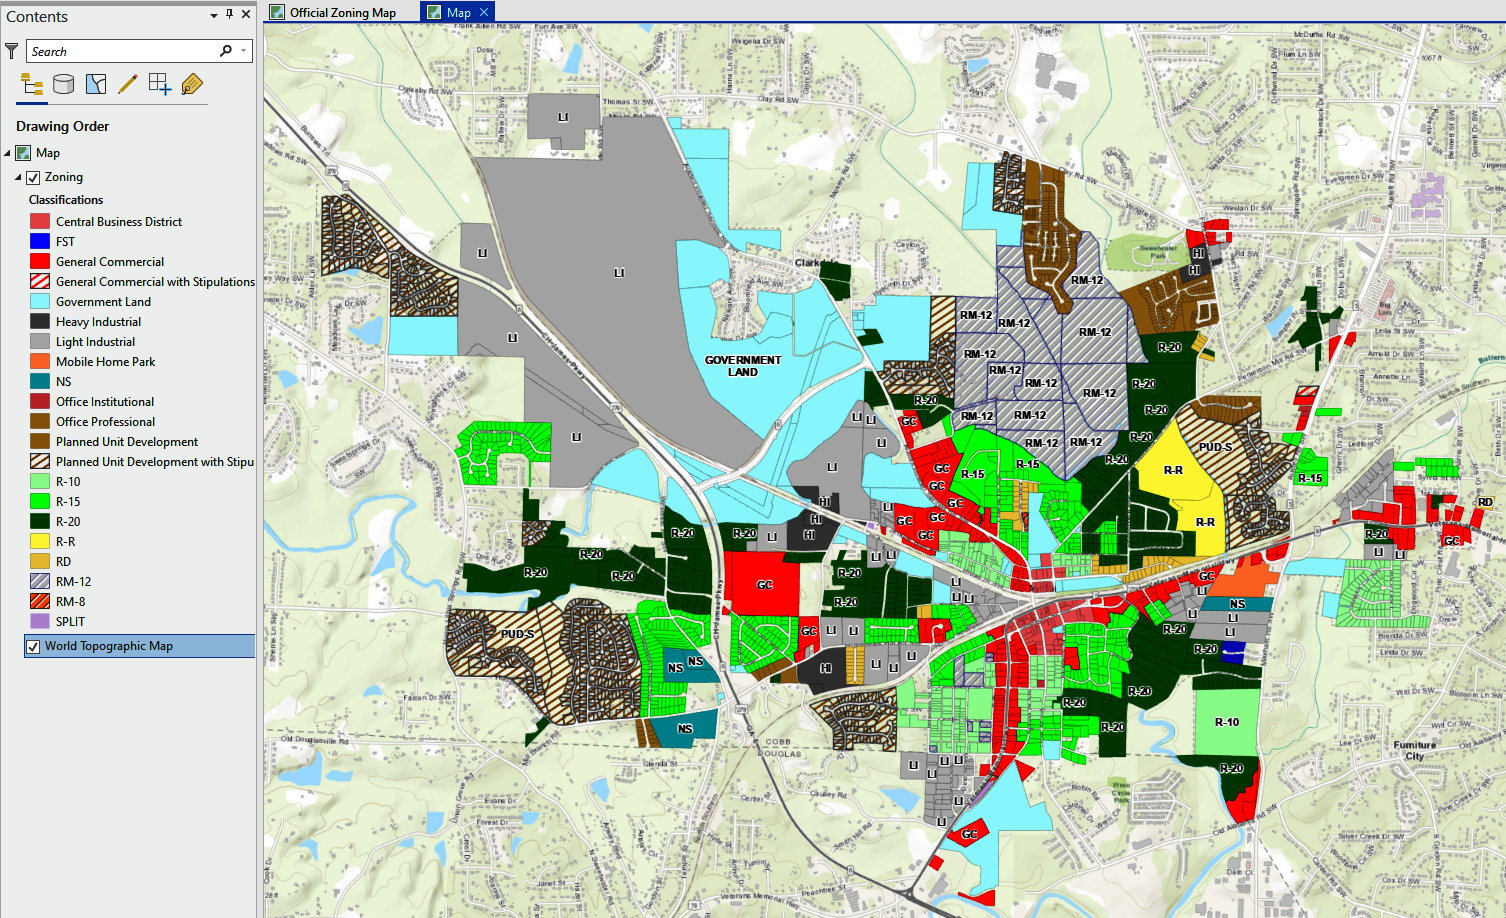
The Portable Document Format (PDF) format actually supports some ability to create an interactive file. When you export to .pdf, you have the option to include layers and/or attributes if you desire, as illustrated in the following screenshot:
As you can see from the preceding screenshot, this option is under the PDF Settings. PDFs also allow you to secure the file so that it requires a password to open it.
Next, we will learn about exporting tables in your GIS to other formats.
Exporting tables
If you just need to export the attributes found in the Attribute table for a layer, you can export the information to various formats as well. This can be accomplished in two ways:
- The first is from the Table pane. Click on the options button (the three horizontal lines) in the upper-right corner, and select the Export table option, as shown in the following screenshot:

- The second way is to go straight to the Copy Rows geoprocessing tool, located in the Data Management Tools toolbox and the Tables toolset. Both methods end up producing the same result.
Both of the previously stated methods will allow you to export an entire table or a set of selected records to another table. You have the option of exporting to the following formats and types:
- A geodatabase standalone table
- dBase (.dbf)
- Comma-delimited text files (.csv)
- Tab-delimited text files (.txt)
- Info
ArcGIS Pro also allows you to export a table to a spreadsheet. You will need to use the Table to Excel Python geoprocessing script found in the Conversion Tools toolbox and the Excel toolset. This will allow you to export an entire table or a set of selected records to an Excel spreadsheet for others to use.
In the next section, we will explore methods that you can use to share data with others who are not on your computer network.
Sharing content with those not on your network
Sharing content with those not on your network is a bit more challenging. As you have learned, maps and layouts don't actually store the GIS data that they reference. Instead, they point to the original source. The source can be a database stored within the project folder structure or it might be located someplace else entirely. It is even possible for a project, map, and layout to include multiple layers, all of which reference data from completely different sources.
This is why it is difficult to share your work with those who are not able to connect to the same resources you are using. You can't just send them a map or layer file because neither of those includes the underlying data. You could possibly zip the project folders together into a single file that you could email or put on a File Transfer Protocol (FTP) site for download, but that only works if all the data that you use within a project is stored in the project structure.
If only you could create a file that packaged all the data that you referenced in a project, map, or layer. Luckily, with ArcGIS Pro, you can do just that. It has tools that allow you to package the project, map, or layer together with its referenced data so that you can then share it with those not on your network.
Packages are also a great way to archive data. A package creates a snapshot of the data in the state that it was in when you created the package. This provides you with a backup of the data at that point, which you can reference later as needed. This also means packages are disconnected from your live data. So if you make changes to that data, you will need to recreate the package if you want it to include the changes.
In this section, you will explore the various packages that you can create and learn how to create them. You will start with the smallest type of package, the layer package, and work your way up to the largest, being the project package.
Learning about the layer package
A layer package is very similar to a layer file. It too stores all the property settings for a layer so that when it is added to a map those settings are automatically applied. In addition to saving those settings, a layer package also includes the data referenced by the layer. This means a layer package can be shared with someone who does not have access to your data. They can then add the layer package to a map and see the layer with your settings and the data in the state it was when it was packaged.
Because layer packages only include a single layer, they tend to be much smaller than other packages. This makes them more ideal for emailing to others.
Creating a layer package is similar to creating a layer file. You can select the layer in the map that you wish to package. Then select the Share tab in the ribbon. Next, you select the Layer button in the Package group. This will launch the packaging wizard.
We now move on to the next section, which includes an exercise for creating a layer package.
Exercise 13C – Creating a layer package
The Community Development Director has engaged the services of a consulting firm to help with the preparation of the city's long-range comprehensive plan. The consulting firm needs a complete copy of the city's Zoning layer, so the director has asked if you can create a file that he can send to the consultant that contains all the standard city zoning symbology and data.
In this exercise, you will create a layer package of the Zoning layer. Then you will test it to make sure it works.
Step 1 – Creating the layer package
In this step, you will create the Zoning layer package. You will work through the package wizard and you will provide all the data and input it needs to successfully create the package:
- Start ArcGIS Pro and open the Ex13.aprx project that you have been using in the other exercises in this chapter.
- Select the Official Zoning Map tab at the top of the view area to activate the map.
- Select the Zoning layer in the Contents pane.
- Next, select the Share tab in the ribbon.
- Click on the Layer button located in the Package group on the Sharing tab in the ribbon.
- Select the Save package to a file option at the top of the Package Layer pane. Notice you can automatically upload a layer package to ArcGIS Online to share with those in or outside your organization.
- Click the Browse button at the end of the cell to provide a Name and Location for the layer package file.
- Using the tree on the left side, navigate to C:StudentIntroArcProMy Projects, name the package Trippville_Zoning, and then click Save.
- Type the following in the Summary and Tags fields:
- Type Showing the zoning classifications of parcels in the City of Trippville into the Summary field.
- Add Zoning, Trippville, and Parcels tags into the Tags field.
The Package Layers pane should now look like this:

- Click the Analyze button to see whether there will be any problems while creating the package.
The analysis of the layer will either show no errors or possibly a single error. If you get a single error, it is because the layer description is missing. Since this is an error and not just a message, it must be fixed before you can proceed with creating the package.
If you get the error, proceed with the following steps. If you do not get any error, skip to step 15.
- Right-click on the error and select Change Layer Description from the presented context menu. This will open the Layer Properties window for the Zoning layer.
- Type Zoning Layer for the City of Trippville into the Layer Properties window. Feel free to update any of the other missing values as well.
- When you are done updating the Layer Properties, click OK. The error should now have a green checkmark in place of the red and white error icon.
- Click the Analyze button once again to ensure there are no issues that would cause the package creation to fail.
- If no errors are returned, click the Package button.
- When the package is successfully created, close the Package Layers pane.
Next, you need to verify that the package has indeed been created successfully.
Step 2 – Testing the package
In this step, you will create a new map in your project and add the layer package that you created to it:
- In the Catalog pane, right-click on the Maps folder and select New Map from the presented context menu. A new map should appear in your project.
- Click on the Map tab in the ribbon.
- Click on the Add Data button in the Layer group.
- In the Add Data window, navigate to the C:StudentIntroArcProMy Projects folder. Once there, you should see the Trippville_Zoning.lpkx file that you just created.
- Click on the Trippville Zoning.lpkx file and then the OK button to add the layer to your map.
The Zoning layer should now be visible on your new map. You will now verify the source of the Zoning layer.
- Click on the List by Data Source button on the top of the Contents pane.
- If needed, resize the Contents pane so that you can see the entire path to the Zoning layer's data source.
- Save your project and close ArcGIS Pro.
Congratulations! You just created and tested your first package. You now have the skills and knowledge to share your layer data and settings with others. Next, you will investigate map packages.
Understanding map packages
Just as a layer package bundles the data for a layer together with its property settings, a map package bundles all the data associated with the layers contained in a map plus the property settings for those layers. So, a map package bundles everything that you see in a map together into a single file with a .mapx extension.
Map packages provide an easy way to share an entire map with others who may not be able to connect to your data sources. One thing to consider though is size. Because a map package will contain all the layers and their referenced data within a single file, it is possible for them to get very large.
I have personally created one for a client that was over 20 GB in size. The reason for it being so large was that the client had pictures stored in the database of the features. In addition, the map included local aerial photography. So when the map package was created it included the layers, the layer properties, the attached pictures of the features, and the aerial photos that were used in the map.
Of course, that is not the norm and actually represents a worst-case scenario for size when creating a map package. However, it does illustrate just how large map packages can be. When creating a map package, it is best to first remove any unneeded layers from the map to keep the map package size to a minimum. Turning off layers' visibility will not cut it. Non-visible layers will still be included in the map package, so they must be physically removed from the map.
Creating a map package follows the same basic process as creating a layer package. You activate the two- or three-dimensional map that you wish to package and then proceed to the Share tab. You then click the Map package tool and work through the wizard.
Map package challenge
You now have the skills to create a layer package, plus the information needed to create a map package for the Official Zoning Map contained in the Ex13.aprx project. Now, save the new map package to the same location where you saved the layer package created in Exercise 13C –Creating a layer package. Then, compare the size of the layer package to the size of the map package that you created.
Learning about project packages
Project packages tend to be the biggest type of package that you can create. Project packages bundle everything that you include in a project into a single file. This includes maps, layers, data, toolboxes, tasks, attachments, geoprocessing history, and connections. Project packages will have a .ppkx file extension.
Because a project package literally includes everything that is part of a project, they tend to be large, certainly much larger than either a map or layer package. This means they are not typically well suited for sharing via email. However, it is possible to publish them to an FTP site for download, save to an external device, or even publish to ArcGIS Online. If you publish to ArcGIS Online, you will be charged credits for storing the package. The number of credits you are charged will depend on the size of the package. This is also true for layer and map packages that you may also publish to ArcGIS Online.
Project packages are a great way to archive a project once it is complete or as specific milestones are reached. They are snapshots of the project at the time the given package was created. Since it is all stored in a single file, they are much easier to manage and maintain backups for.
Again, project packages are created using the same basic method as map or layer packages. You will be required to provide certain information, including a summary, description, and tags, before the package will be created successfully.
Once created, a package can be successfully imported into ArcGIS Pro as a complete project including the maps, layers, layouts, connections, and so on that were included when the package was created. However, similar to map and layer packages, the newly imported project package will point to a copy of the original data sources and not the original data sources themselves.
Project package challenge
Using the skills and knowledge that you have gained up to now, try creating a project package for one of the projects that you have used as you worked through this book. Once created, compare the size of the project package to the size of the map and layer packages that you created.
You have now learned several ways through which you can share your GIS content with those inside and outside your network, as well as with those with or without GIS software. This ability to share data with others increases the value of your GIS by making it available to a larger audience. Next, you will learn how to take sharing your GIS with others to the next level using ArcGIS Online.
Publishing to ArcGIS Online
One of ArcGIS Pro's big strengths is its integration with ArcGIS Online and Portal for ArcGIS. This allows you to easily publish data and maps to the web that can then be accessed by others even if they do not have GIS software installed.
ArcGIS Online is Esri's cloud-based Software-as-a-Service (SaaS) solution. This allows you and others both in and outside your organization to access data, maps, and applications via the internet. This makes it much easier to share your GIS with others because they can access the content you share with them via a normal web browser.
In this section, you will learn how you can publish a map that you create in ArcGIS Pro to ArcGIS Online so that it can be accessed by others through the web browser.
Exercise 13D – Publishing a map to ArcGIS Online
The Planning Director wants to make the city of Trippville's Zoning Map accessible to others, even if they do not have ArcGIS Pro software. She wants those that access the map to have the ability to turn layers on and off, query data, view attribute tables, and even print the map. Because of the level of functionality the director desires and that users will need to be able to access the map even if they do not have GIS software, you will need to publish this as a web map to ArcGIS Online.
In this exercise, you will optimize the Official Zoning Map so it performs well when viewed through the internet. Then, you will publish the map to ArcGIS Online. Lastly, you will share the map so others can access it.
Step 1 – Optimizing your map
In this step, you will optimize the Official Zoning Map to ensure it will perform well when others view it in the browser over the internet:
- Start ArcGIS Pro and open the EX13.aprx project that you have been working on in this chapter.
- Click on the Official Zoning Map tab in the view area to make it the active map being used.
- Right-click on the Zoning layer. Then select Zoom to Layer from the menu that appears.
- Next, select the Official Zoning Map from the top of the Contents pane. Then right-click and select Properties, as illustrated in the following screenshot:

- In the Properties window, click on the Extent option located in the left panel of the Map Properties window.
- Click on Use a custom extent located at the top of the right panel in the window.
- Below where it says Get extent from, select Current visible extent. This will set how far the map will zoom out when someone presses the Zoom Full Extent button in ArcGIS Pro or the Home button in a web application.
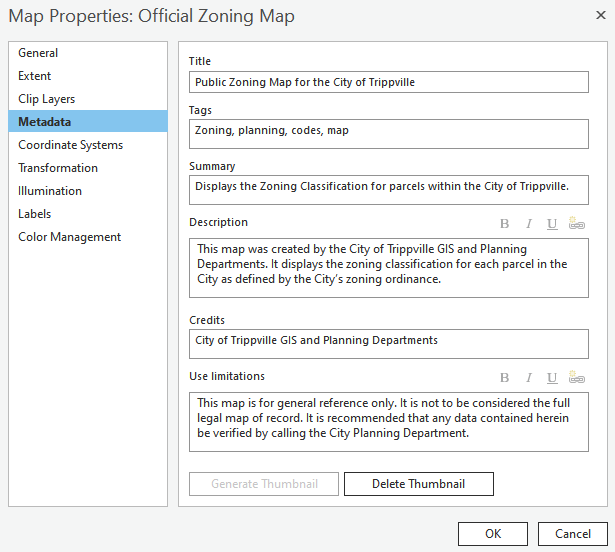
- Next, click on the Metadata option in the left panel of the Properties window. Then enter the following values:
- Type Public Zoning Map for the City of Trippville for the Title field.
- In the Tags field, add Zoning, planning, codes, and map.
- In the Summary field, it should display the Zoning Classification for parcels within the City of Trippville.
- In the Description field, type This map was created by the city of Trippville GIS and Planning Departments. It displays the zoning classification for each parcel in the City as defined by the city's zoning ordinance.
- For the Credits field, type City of Trippville GIS and Planning Departments.
- In the Use Limitationsfield, type This map is for general reference only. It is not to be considered the full legal map of record. It is recommended that any data contained herein be verified by calling the City Planning Department.
- Verify that your Map Properties window looks like the following and click the OK button when you are done:
You have just completed the first step to optimize your map before you publish it to ArcGIS Online. You have set the extents so that when users zoom to the full extent in ArcGIS Pro or use the Home button found in most web applications, they do not end up zooming out to the entire planet.
Instead, they will zoom out to the scale that allows them to see the entire Zoning layer. Then, you configured the metadata for the map. This is used by search engines and tools to locate items. Fully configuring the map's metadata is often required before ArcGIS Pro will allow you to publish to ArcGIS Online or Portal.
Next, you will work on optimizing your layers. You will start by applying scale ranges to your layers. This will control when they become visible based on the zoom scale of the map.
- Right-click on the Base_Anno layer and select Properties from the context menu that appears.
- Select the General option in the left panel of the window. Under where it says Out beyond, select 1:10,000 using the drop-down arrow. This will make it so that this layer will not become visible until someone zooms in to the scale that you selected or closer. Click OK to apply the setting and close the Properties window.
Annotation and labels do not perform well even in the desktop environment, let alone when viewing maps via the browser, so it is considered a best practice to limit the use of these as much as possible. The use of scale ranges is a good start.
- Select the Zoning layer in the Contents pane, then click on the Labeling tab in the ribbon.
- Set the Out Beyond value to 1:10,000 using the drop-down arrow. This will limit the appearance of the labels for the Zoning layer so they will not show up in the map until someone zooms to that scale or closer.
- Select the Appearance tab in the ribbon while ensuring the Zoning layer is still selected.
- In the Visibility Range group, set the Out Beyond value to 1:50,000 using the drop-down arrow.
- Do the same thing for the remaining layers, then save your project.
One of the best things you can do to optimize a map for publishing to the web is to limit how much data can be drawn at any given time. The scale ranges that you just set are a very effective method for doing that. You can also use things such as definition queries and selection layers as well.
Step 2 – Publishing a map to ArcGIS Online
Now that you have taken steps to optimize your map so that it will perform better when published to ArcGIS Online, it is now time to actually publish it.
This step will require you to have an ArcGIS Online user account that has publishing rights to your organization's ArcGIS Online portal. Publishing this map will also use some of your organization's ArcGIS Online credits if you leave it stored in ArcGIS Online for an extended period:
- Click on the Share tab in the ribbon.
- Click on the Web Map button located in the Share As group on the Share tab. This will open the Share As Web Map window.
- Notice that the Name, Summary, and Tags fields are already filled in. Those came from the metadata that you created for the map.
- Set the Select a Configuration field to Copy All Data: Exploratory. You are using this setting because the Planning Director specifically mentioned that users need to be able to perform queries on the map. The other options are not optimized to allow this or allow too much functionality such as editing data, which is not desired for this map.
- If you have a folder in your ArcGIS Online account and you want to upload this map too, you can select it using the drop-down arrow for the folder selected. Otherwise, this will just default to the root for your ArcGIS Online user account.
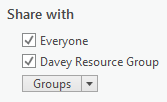
- Set the Share with option to Everyone, as illustrated in the following screenshot, because the Planning Director wants everyone including the general public to have access to view this map:
- Next, click on the Analyze button to verify your map is ready to publish.
When the analysis of your map is complete, it should return a couple of errors and several warnings. The errors must be fixed before you can publish it to ArcGIS Online. The warnings should be examined but do not have to be fixed to be published. You will now fix the errors.
- Under the Official Zoning Map, you should see one error that says 00230 Service Layerhas a different projection than the maps projection. This means the basemap and the other layers are using a different coordinate system. Right-click on this error and select Update map to use basemap's coordinate system.
It is possible that you might see a different error if your map does not have a basemap assigned. If that is the case, go to the Map tab, click on the Basemap button, and select the Topographic basemap from the options shown.
- Click on the Analyze button again. The other error should disappear now as well. Adjusting the coordinate system fixes both errors.
- Now take a moment to read the remaining warnings. You will not attempt to fix these issues in this exercise because they will not greatly impact the quality or functionality of the map. However, if this was a map for your organization, then you may want to fix them prior to publishing.
- Now that you have fixed the errors and reviewed the warnings, it is time to publish this map to ArcGIS Online. Remember that once you publish this to ArcGIS Online, it will be hosted in your organization's account and will use some credits each month for as long as it remains there.
The number of credits used should be very small, but you do need to bear this in mind before you proceed. If you are ready to publish, click the Share button located at the bottom of the Share as Web Map window.
Once you click Share, ArcGIS Pro will start to package the map and upload it to ArcGIS Online. This may take some time depending on the capabilities of your computer and the speed of your internet connection.
We will now move to the next step.
Step 3 – Viewing the new map in ArcGIS Online
In this step, you will view the map that you just published using ArcGIS Online's Web MapViewer:
- At the bottom of the Share As Web Map window, you should see an indicator showing that the process of publishing the map was successful. Below that, you should see a link that says Manage the web map – click on that link.
- Your default web browser should open, showing the properties of the new web map that you just published. Click on the Open in Map View button located at the top right of the page. This will open ArcGIS Online's Web Map Viewer application.
- If for some reason the Share As Web Map window or ArcGIS Pro was closed after the tool completed successfully, you can still get to your map. Just follow these steps:
- Open your favorite web browser, such as Chrome, Internet Explorer, Edge, Firefox, or any other.
- Go to www.arcgis.com.
- Click on the Sign In button located either in the middle of the page or the upper-right corner.
- Enter your login information for ArcGIS Online.
- Click on the Content tab at the very top of the page, then make sure My Content is selected.
- Locate the Official Zoning Map from the list of content that you have created. If this is your first time, it will be the only one listed.
- Lastly, click on the Open in Map Viewer button.
- You should now see the zoning map that you published from ArcGIS Pro. It is now available for others to see. Take a moment to review the new web map you just created.
- Click the Share button located at the top of the map. This will open the Share window. Here, you will see a link that you can send to others via email or social media so they too can access the map.
- Click Done and close your browser when you are finished exploring the map.
- Go back to ArcGIS Pro and save your project, then close the application.
Congratulations! You just published a map from your desktop to the web using the integration between ArcGIS Pro and ArcGIS Online. Now anyone with internet access will be able to access your map. This will allow them to see the zoning values for parcels within the city of Trippville. You can use this same process to share data and maps that you create for your organization with others, expanding the reach of your GIS.
Summary
In this chapter, you have learned many different methods that can be used to share your GIS content with others. You have seen how you can use project, map, and layer files to share and standardize content for those on your computer network who have access to the same data sources as you do.
You have also learned how you can export your content so that others without ArcGIS Pro can access and use your data. This chapter has provided you with the skills for exporting your GIS data to non-GIS formats so those without GIS software can use information from your GIS in documents, reports, presentations, and spreadsheets.
Lastly, you have also learned how to share data with others not on your network by using packages. Packages are not limited to just data sharing, but can also be used to archive or back up important data at specific states of existence so they can be recalled if needed.
In the next chapter, you will learn about Arcade, Esri's new expression language. You can use Arcade to create complex labels and to control symbology such that it will be compatible across the ArcGIS platform.
Further reading
If you would like to learn more about sharing your GIS content, you may want to consider the following:
- ArcGIS Pro 2.x Cookbook, by Tripp Corbin, published by Packt (Chapter12 and Chapter 13)