Once you have your server platform, the next task is to create a Rails environment.
The process for installing Ruby and Rails on a server is exactly the same as the installation on a development system described in Chapter 3: Laying the Foundations. So for example, installation on a Windows 2003 server would involve the following steps:
- Install Ruby using the one-click installer.
- Use gems to install Rails:
gem install rails --include-dependencies
It is as straightforward as that!
As a Rails application comprises a collection of text files, creating an application on a production server can be as simple as copying the application folder on a development system to the production server. There is no compiling to be done, nor registering the application with the system. As long as Ruby and Rails is installed and running correctly, just copying the application files to another location creates a copy of that application in the new location.
The copying can be done by sharing the target folder and copying over the files, transfer via FTP, or even zipping up the folder and emailing it. The options are as plentiful as there are different ways of copying files from one computer to another.
However, there is a straightforward way to transfer the application files to the server without relying on a development computer having a current production version of the application ready. That is, to transfer the files directly from the Subversion repository. This allows you to easily control which version of the application is passed to the server and provides a simple mechanism to update the production server as development continues. To achieve this, Subversion (or at least a SVN client such as TortoiseSVN) must be installed on the server (see installation details in Chapter 3: Laying the Foundations). As the server is also the obvious place to host the Subversion repository, there is a good chance it is already installed on the server.
The command to create a new copy of an application from a Subversion repository is:
$ svn checkout <source location> <destination>
A -r switch can be used to specify the revision of the application to be checked out.
$ svn checkout svn+ssh://[email protected]/repository/Intranet -r 100 intranet
This command running at the server will checkout a copy of Rory's application to a folder called "intranet". The revision 100 has been checked out.
On an intranet, where the server and network are controlled by the application owner, using checkout to create the production system is useful, in that we then have svn tools on the server that allow us to easily compare the production version of the application with the latest development version. If we were hosting the application on an externally hosted server (for example, our ISP's server on the Internet), providing easy links back into our SVN repository is not such a useful
thing to do and would present a security risk. Therefore, if the application is being hosted externally, use "svn export" to create a non-version-controlled copy of the application.
Therefore, if this command is followed by:
$ cd intranet
$ ruby script/server
...an instance of WEBrick or Mongrel will start on the server and the application will become available at http://server_name:3000/ where server_name is the network name of the server. However, this does assume the production database is available and the application is configured to use it (see below).
Once the application has been checked out on the server, it can be kept up-to date using:
$ svn update
...to update the server to the latest version, or:
$ svn update -r 101
...to update the server version of the application, to the repository version 101.
Update can also be used to roll back to a previous version. Therefore,
$ svn update -r 100
...will revert the application back to version 100, replacing files with earlier versions where changed, deleting files added as part of revision 101, and adding files deleted in revision 101.
Populating the production environment from the repository does raise an issue: there are files in the application that are specific to the current instance. For example, the log files. One thing we do not want to do is transfer a copy of the development log to the production server, especially as this file can get very big, very quickly.
Note
When I first started using Rails, I could not work out why my server lost a gigabyte of hard disk space when I updated the production version of my application. I had created an infinite loop on a development platform at one point during development. What I had not noticed was that this had resulted in a huge log file. As the log files were then included in the repository, checking out a copy of the repository resulted in me copying development.log to the server, and therefore a significant loss of disk space. When I tracked down the problem, I quickly worked out how to remove log files from the repository!
Fortunately, files such as log and temporary files are created on the fly by Rails if they do not exist. Therefore, if they are excluded from the repository, they will be automatically created in any checked out copy when the application is started.
Excluding files was discussed in Chapter 4: Working with Rails and a method was described using Eclipse. However, if we find ourselves needing to remove these files at the server, we can remove them directly using svn. The following svn commands (run in the application root) will remove log and temporary files from the repository:
$ svn remove log/*
$ svn propset svn:ignore "*.log" log/
$ svn update log/
$ svn remove tmp/*
$ svn propset svn:ignore "*" tmp/
$ svn update tmp/
$ svn commit -m "remove log and tmp files and ignore them in future"
Installation of MySQL is described in Chapter 3: Laying the Foundations. The process of installing the database on a server is the same as installing it on a development system so it is not repeated here.
In the section above, which describes transferring of the files to the production server, it was stated that the application could be started if the production database was available and the application was configured to use it. It is time to discuss the implications of that statement.
There are two places where the production database is likely to be hosted: on the Rails server itself, or on a dedicated database server accessible over the network. Having the database on the same server as the Rails application is the simplest solution and the one outlined for Rory's application. It means a simpler configuration
and less hardware to provide. However, it also means that the server's processing power has to be shared with the Rails application and the database engine, together with any other applications running on the server.
Moving the database to a dedicated server provides better performance as operation of the database engine is not impeded by other process and the full speed and processing power of a server can be dedicated to the database. These benefits usually outweigh the disadvantage of placing a network connection between the application and the database. That is, the major work in database entry and retrieval is not the passing of the initial and resultant data back and forth, but rather the processes required to search through the database and safely insert or retrieve that data within all the other data held in the database. As an analogy, for a magician performing a card trick, handing out cards is the easy part of the process. The difficult bit is shuffling and manipulating the pack to make sure the correct cards are handed out, and returning cards to the pack in a manner that they can easily be retrieved later, at the end of the trick.
For the initial stage of small application development, hosting the database on the same server as the Rails application provides acceptable performance, and this arrangement is described here. Moving the database to a separate server is a common way of improving performance as the use of an application grows. This will be discussed in Chapter 9: Advanced Deployment (which describes a number of strategies used when scaling up an application and improving performance).
I recommend not to use the same database for production and development systems. Rails already separates database schema into development, test, and production. However, it is still fairly easy to accidentally run a development system in production mode and thereby expose live data to an incomplete system. Also, it can be useful to run an application in production mode while developing an application, but we will want to do so in a safe environment away from the production server.
To clarify this point: A Rails application runs slightly differently in the production mode to how it runs in the development mode. When developing an application, you may want to run the application in the production mode to check for problems that are specific to the production mode (for example, issues with caching). If you are not to expose production data to a development system, a development system needs its own "production" environment, and therefore its own production database area.
Also, occasionally problems can manifest on a production system that were not evident on development systems. We then need to determine if there is something specific to the server that is causing the problem. To do that, it is useful to run Rails on the server in a configuration that is as close as possible to that used in development work, and therefore we would want to run the production server in development mode. Also, in trouble-shooting problems specific to the server environment, it can be useful to run unit and function tests. Therefore, the production server needs to be able to run its own test environment.
The easiest way to achieve this is to run databases locally on each development system. With an open source database such as MySQL, this is easy to achieve as MySQL can easily be installed on many systems. For a commercial database, such as Oracle, you may well want to use an alternative strategy, such as having a central development database server or instance.
However, this poses a problem. If different databases are used during development and in production, how will the application know, which database to use and how to access it when it is moved from one environment to another? There are two solutions to this problem, both of which involve the configuration of the database configuration file "database.yml":
The host name "localhost" is a generic name used across most operating systems, to describe the local computer. It is usually tied to the TCP/IP loopback address of 127.0.0.1. Therefore, if you make a connection to localhost, you are not making a connection to a specific system, but rather the local system. If you configure database.yml to use the database on localhost, the application will look for an instance of the database running on the local computer. When the application is running on a development computer, the application will use the database on that development computer. When running on the production server, it will look for a database on that server. Therefore, the same database.yml can be used in production and development. This is how the database.yml used in Rory's TestApp is configured and is evident from this excerpt:
production:
adapter: mysql
database: Test
username: root
password: password
host: localhost
Not having to have different configuration files for each environment greatly simplifies configuration and this is the technique I would recommend to use initially. However, there are some disadvantages, like the following:
- The same user name and passwords are used in both development and production server systems, which means your production database is only as secure as your development systems.
- If you host the database on a separate server, it will no longer be accessible via localhost and therefore it will be more difficult to create a single
database.ymlthat will work in both the development and production environments. Therefore, although we may start by using the localhost solution, as we scale up our application, we will probably need to move to a different system.
An alternative approach is to create different database.yml files; one for development, and another for production. The main problem then is making sure the production version is not overwritten by the development version when updating the application. Therefore, an essential step is to exclude database.yml from the Subversion repository:
$ svn remove config/database.yml
$ svn propset svn:ignore "database.yml" config/
$ svn update config/
$ svn commit -m "Removing database.yml and ignoring it in future"
That means, we will have to maintain versions of this file elsewhere. It is also a good idea to provide an example copy for the developers. The advantage is greater flexibility. The disadvantages are as follows:
- The possibility that in spite of our steps to avoid it, a development version of
database.ymlcould replace the production version, or vice versa. - It becomes difficult to test the
database.ymloutside of the production environment. If you make a typographical error in the production version, the error will only become apparent in production. Conversely, tests of the developmentdatabase.ymlare of limited relevance to the production application. It is fortunate thatdatabase.ymlis a fairly simple file. If we use this method, it is a good idea to keep this configuration file simple.
Note
Ruby heresy—I hate YAML
Ruby enthusiasts seem to always prefer YAML over other configuration file formats such as XML. Personally, YAML leaves me cold. My biggest problem with it is that white space characters have specific meaning for YAML. That means that substituting a space with a tab in a YAML file such as database.yml can break your application. Worse errors in Rails resulting from tab substitution gives very little indication of the root cause of the problem. As text editors can automatically replace pairs of spaces with tabs, the problem can easily catch out the unwary. Always be very careful when editing YAML files, that you do not replace a space or series of spaces with a tab.
There are other techniques, such as dynamically generating elements of database.yml based on environmental variables, but the two methods described above are the simplest and probably the best starting points.
The default rake migrate command creates development mode database tables. On the server, we need to create production mode database tables. Therefore, we need to alter the migration command to suit.
rake environment RAILS_ENV=production db:migrate
In the example of a test application given at the start of this chapter, the root account was used in the database set up. While this can be a convenient and expedient thing to do, it is not the best practice (as has already been discussed in Chapter 4: Working with Rails).
The alternative to using the master account is to create a dedicated account for the application. This account should then be restricted to being able to access and alter only those parts of the database that stores the application data. Using the same Rails database user name and password for development and production makes using a shared localhost database.yml simpler, and is the technique used in our Intranet application.
However, there is no reason why you cannot use a different sa or root password on the production server to that on development servers, and this is a good idea, especially if development systems are taken off-site.
Prior to the middle of 2006, setting up the web server to host the application on a production server was hard work, involving a lot of manual configuration, trial, and error. And then came, Mongrel! Mongrel is a fast HTTP library and server for Ruby. Installing it is straightforward and using this utility has greatly simplified publishing Rails applications. In fact, Mongrel is now the default Rails web server, and once installed will replace WEBrick as the local web server started via script/server.
Installing Mongrel on a server (or other Rails system) is carried out via gem:
$ gem install mongrel -include-dependencies
Once installed, we can start a mongrel instance by opening a console or command prompt in the root directory of our application and entering the following command:
$ mongrel_rails start -d
This will start a mongrel instance serving the Rails application on port 3000. To view the application's default page, browse to this URL:
http://localhost:3000/
There are a number of options that we can use to modify the configuration of Mongrel. We can list all the options by using the -h switch:
$ mongrel_rails start -h
For example, to run a Mongrel instance on the default HTTP port 80 and in production mode, start mongrel like this:
$ mongrel_rails start -d -port 80 -environment production
...or more concisely:
$ mongrel_rails start -d -p 80 e production
If using a Windows server, we can install a service based instance of Mongrel by using a gem called mongrel_service. This gem is installed with this command:
c:> gem install mongrel_service -include-dependencies
Once installed, we can create a new Mongrel service using the command mongrel_rails. For example:
c:> mongrel_rails service::install -N myapp -c c:mypath omyapp -p 4000 -e production
This will install a service called "myapp", and will serve the application whose root can be found at the path "c:mypath omyapp". The application will be available at port 4000 and will be run in production mode.
In this example, the service name is simply "myapp". I would recommend that you make the name a little more descriptive on your production server. Windows runs a lot of services and we will want to easily locate the Mongrel service in amongst them. The name specified by the -N switch is just a label, so we are not confined to simply having the application name. Quotes can also be used to enter a multiple word string as the name. Therefore, in the service creation command, we could replace:
-N myapp
...with something like:
-N "Rails app myapp on port 4000"
The service can be managed via the Services GUI (accessed via Administrators Tools in Control Panel).
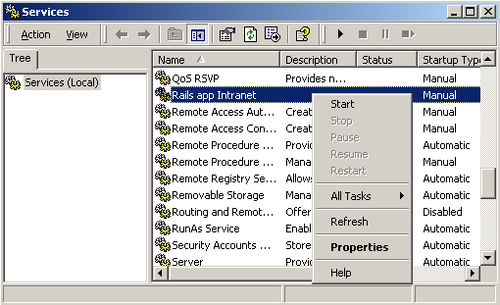
The previous screenshot shows Mongrel services highlighted in the Services GUI. The menu shown can be accessed by right-clicking on the service. The service can be started and stopped via this menu, or buttons on the toolbar.
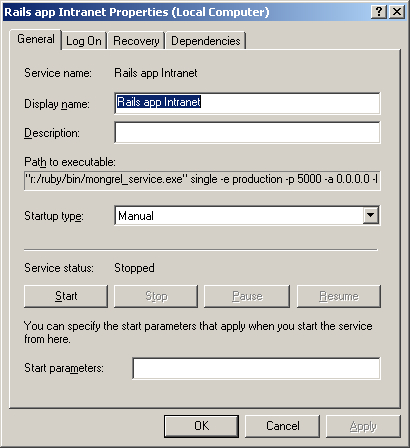
Selecting "Properties" from the menu opens the service properties GUI. If on this screen we change the "Startup type" from Manual to Automatic, the service will be started as Windows starts.
A Mongrel service can be removed from the command prompt using the service:remove option. For example:
c:> mongrel_rails service:remove -N "Rails app Intranet"
The service is initially disabled and is only completely removed on system reboot.
Although, Mongrel has greatly simplified the delivery of Rails applications, it is not without its own limitations. The main three are:
- Mongrel only serves Ruby applications (including, but not exclusively, Rails applications) and static HTML documents. If we also want to host another non-Ruby application (such as a PHP Wiki for example), we will need to run the other application on another web server, either independently or behind a proxy shared by our Rails application.
- Only one action can be carried out at a time on a single Mongrel instance. Therefore, if two actions are requested at the same time, Mongrel will only start processing the second action when it has completed processing the first. So, in an instance where two users request a new page at the same time, the users whose request arrives at the server second, will experience a delay while the first user's request is processed.
- Mongrel's performance is good enough for many small applications on its own, but it is not as fast as some other web servers. If we find the performance of our application is not as good as required we may have to use Mongrel in combination with another web server to improve performance. However, this is not the only option to boost performance. We should also consider reviewing our application and removing bottlenecks, and consider using strategies such as caching. Performance improvements gained via these actions may well be significantly better than those gained by changing the web server system.
In spite of these limitations, for many small applications, a simple Mongrel instance will provide an adequate web service. It is certainly a good starting point.
The limitations of Mongrel can be mitigated by hosting Mongrel behind Apache. Apache is the most widely used web server on the Internet. It is a very flexible and a versatile web server that can run on many operating systems including Windows XP and 2003 server, Mac OS, and all flavors of Linux. The application can be downloaded from http://www.apache.org, a website that also contains a great deal of documentation on the use of Apache.
Hosting Mongrel behind Apache means, using Apache as the main web interface for the user, and then using Apache's proxying capabilities to pass those requests to Mongrel that require dynamic processing by the Rails application. The advantages of this arrangement are:
- Apache can host other dynamic web applications such as PHP, and static web sites. This means that you are not limited to a single web development or hosting environment. Of course, on discovering the wonders of Ruby on Rails, you may well not want to develop dynamic websites using other languages and frameworks. However, you may have existing applications that you wish to continue supporting. Also, there are a lot of web applications available that you may want to take advantage of. As much as you may enjoy developing Rails applications, there is no point reinventing the wheel every time. It is likely that for some applications, the simplest and most expedient option will be to bring in a pre-existing application rather than build a solution from scratch. Therefore, it makes sense to use a system that will not greatly limit your options.
- Apache can provide a way for an application to be delivered via a cluster of Mongrel instances. That is, you can use Apache's traffic management and load balancing capabilities to spread the load across multiple instances of Mongrel. So, if two users send requests for dynamic content, Apache will direct the first request to one Mongrel instance, and the second to a different Mongrel instance. Mongrel clustering will be described in more detail in Chapter 9: Advanced Deployment.
- Apache is faster than Mongrel at delivering static content (for example, image files and style sheets). You can configure Apache to bypass Mongrel to deliver these files directly. A description of how to do this is given later in the chapter in the discussion "Configuring Apache to Act as a Proxy for a Rails Application".
Setting up Apache to support other dynamic web application systems is beyond the scope of this book. Also, to start with, we will probably not need to cluster multiple Mongrel instances, or have to squeeze out that extra bit of performance that bypassing Mongrel for static content will provide.
Therefore, at this stage of application development, it is enough to say that hosting your Mongrel instance behind Apache is a good idea. I will describe here how to configure Apache to work with a single instance of Mongrel. Information on how to use Apache to improve performance and scale up your application will be presented in Chapter 9: Advanced Deployment.
To take advantage of the simplest and most straightforward techniques for using Apache with Mongrel, it is strongly recommended that version 2.2 of Apache or later is used. The proxy modules available with earlier versions of Apache were not as easy to configure and set up to proxy Mongrel.
For detailed instructions on installing Apache, look at the documentation at http://www.apache.org. The basics are presented here and should give you enough information for a basic installation.
The following instructions describe how to install Apache on a Linux system. Note that VERSION_NO must be replaced by the version number of the application that you are installing.
Download a copy of the application:
$ lynx http://httpd.apache.org/download.cgi
Extract the source code into a new folder and move to that folder:
$ gzip -d httpd-VERSION_NO.tar.gz $ tar xvf httpd-VERSION_NO.tar $ cd httpd-VERSION_NO
You must then configure the code prior to compiling it.
$ ./configure --prefix=APPLICATION_ROOT
Replace APPLICATION_ROOT with the location where you want Apache to be installed. If the prefix option is left out, Apache is installed at /usr/local/apache2.
Then compile and install Apache.
$ make
$ make install
Some systems may require you to use sudo to install the application. So, for example, you may need to use this alternative command to install.
$ sudo make install
The configuration of Apache is controlled by the file httpd.conf, which is located in the conf folder in the root of Apache's application folders (that is at the location you specified with APPLICATION_ROOT or /usr/local/apache2). You should check through the contents of this file at this stage and update them to suit your system.
You can then test the application by making sure it starts.
$ APPLICATION_ROOT/bin/apachectl -k start
Then browse to http:/localhost, and you will see a message, which will confirm that Apache is running.
The same process can be used to install Apache on a Mac running OS X. That is, download the source code and unpack it into a suitable location. Then use this:
./configure
make
sudo make install
...to install Apache in the default application location.
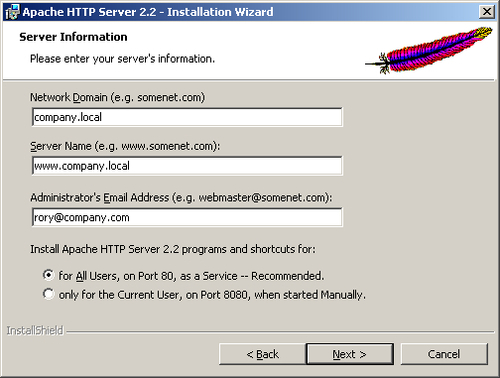
You can download the Apache source files and compile them yourself on a Windows system. However, most Windows users will find it easier to install Apache with a binary installer that uses Windows Installer to simplify the process. Installation is simply a case of downloading the binary installer (a *.msi file), double clicking on it to run the installer, and then following the wizard through. Make sure that when prompted you select the option "for All Users, on Port 80, as a Service" rather than "only for the Current User, on Port 8080, when started Manually".
Note
Using a Windows Server as a Production host is a viable option
When I started writing this chapter, I thought one of the statements I would be writing at this point would be "Windows is not a sensible platform to act as a production host for Rails". In preparing for this chapter, I read up on a number of methods people had used to achieve Mongrel clusters on Windows systems. They were all complicated and very much in the early stages of development. As clustering is the easiest way to scale-up an application, using a platform where this option was not available is extremely restrictive and therefore would not be a sensible approach, in my opinion. However, two things have changed. The latest version of Apache (2.2.3) now supports a greatly improved and simplified proxy module, and Mongrel has been developed to use mod_proxy_balancer, which is a component of the Apache proxy. These changes mean that Apache is now much easier to use with Mongrel, and this simple configuration is available on Windows as well as Linux, Mac, and other UNIX based systems. This allows you to choose the operating system that best suits your situation. I would recommend you use the one you are most familiar with. If you are a Windows user, do not feel this will restrict your ability to take advantage of the best Ruby on Rails has to offer.
This will install Apache into the folder:
C:Program FilesApache Software FoundationApache2.2
It will also install a service called Apache2, which can be started, stopped, and set to automatically start on boot from the Services GUI in the same way as described above for a Mongrel service.
Running a local DNS server provides the greatest flexibility in controlling access within our network. This will allow us to configure the names of the systems on our network and provide clear Internet style URLs.
It is common for a company to run a private network using private IP addresses (for example: 192.168.x.x or 10.x.x.x), which are separated from the Internet by a Network Address Translation (NAT) system. In such an environment it is commonly thought good practice to use a local root domain name space for our private network. So our private domain will end ".local" rather than ".com" or similar. So, instead of companyname.com, we would use companyname.local within our network. The advantages of this arrangement are that it separates the name space we use on the Internet from that used internally, and it also makes it more difficult for someone to access an internal system from the Internet, thereby helping us control access to our application.
If we use public IP addresses within our organization, we may control the name space ourselves or the DNS may be hosted by our Internet Service Provider (ISP). In this case, we may well use our Internet name space internally. However, that should not prevent us from being able to control the DNS and add new host names as required.
Adding our own host names (A records) to our DNS allows us to do the following:
- Create a host name of www and bind it to the IP address of our server. That will allow us to use
http://www.companyname.localto access our application rather thanhttp://servername.companyname.local. That is mainly a cosmetic change, though it is surprising the number of users who are confused by a web address that does not start www. - Create a host name that is specific for the application. If we create an A record that maps our application name to the IP address of our server, we will be able to use a URL of http://applicationname.companyname.local. When using Apache, we can use this application-specific URL to help route traffic to the correct destination.
To act as a proxy for Rails, Apache requires the following modules: proxy_module and proxy_http_module. These two modules rely on mod_proxy.so and mod_proxy_http.so respectively and we will require both to be present in the modules folder of our Apache application.
As stated in Chapter 3: Laying the Foundations, mod_proxy is available with the default install of Apache 2 on some Linux distributions, but not enabled. To enable it, run this command as root:
$ a2enmod proxy
and then:
$ /etc/init.d/apache2 force-reload
We will then need to modify the httpd.conf file (in Apache's conf folder) to configure Apache to proxy Mongrel. Always make a copy of httpd.conf before you start editing it, in case you need to go back to the previous configuration.
First, uncomment the two LoadModule statements for proxy_module and proxy_http_module by removing the # marks at the start of the relevant lines.
LoadModule proxy_module modules/mod_proxy.so
#LoadModule proxy_ajp_module modules/mod_proxy_ajp.so
#LoadModule proxy_balancer_module modules/mod_proxy_balancer.so
#LoadModule proxy_connect_module modules/mod_proxy_connect.so
LoadModule proxy_http_module modules/mod_proxy_http.so
#LoadModule proxy_ftp_module modules/mod_proxy_ftp.so
Then add a new section:
<VirtualHost www.companyname.local:80>
ServerName www.companyname.local
ServerAlias www.companyname.local
ProxyPass / http://www.companyname.local:4000/
ProxyPassReverse / http://www.companyname.local:4000
ProxyPreserveHost on
</VirtualHost>
Replace www.companyname.local with the full DNS name for your server. This configuration assumes that the Mongrel instance will be using port 4000.
We can also add the following lines between the ServerAlias statement and the first ProxyPass statement:
ProxyPass /images !
ProxyPass /stylesheets !
This will cause Apache not to pass requests for files in the images and stylesheet folders Mongrel. The effect of this is for static image and style sheet files to be served via Apache, rather than Mongrel. As Apache is quicker at handling static files, this provides a performance boost. If Apache's document root is set as the public folder in the Rails application, this will work as it is. However, it is more likely that we will have to tell Apache where these files are, by using an Alias entered immediately after the two new Proxy Pass lines:
Alias /images /path/to/public/images
Alias /stylesheets /path/to/public/stylesheets
Apache will need to be restarted for the change to take affect. Failure to start indicates that Apache was unable to work with the new configuration. This may be a syntax error or absence of a required file (mod_proxy.so, for example). If this happens, check the file /logs/error.log that should contain the information needed to identify the source of the problem.