In this section, we will look at a few utility features and techniques for extending views.
As discussed earlier, a helper is a method that encapsulates logic that might otherwise clutter a view template. Rails includes a multitude of built-in helpers, some of which we've already encountered (link_to, mail_to, stylesheet_link_tag), and others we'll meet shortly (see the section C*UD (Create, Update, Delete) later in this chapter). However, it is sometimes useful to create custom helpers, to centralize the view logic in an application. Examples of cases where we might want to do this are given below:
- Displaying an image wrapped inside a link tag, perhaps with
classattributes on both the<img>and<a>elements - Showing error messages with consistent styling across the whole application
- Formatting date objects into a more readable format
- Showing consistent text for empty fields (e.g. "not specified") when displaying a model instance
- Displaying a login link to users who haven't logged in yet, or showing a username if they are logged in
In all of these cases, the logic could be put directly in the template; but too much clutter makes templates hard to follow and repetitive. Helpers provide a means to keep templates clean and simple while not restricting the flexibility of views.
There is one more consideration when writing helpers: Rails provides two locations where you can put them:
- Controller-specific
In a file specific to the controller, in
app/helpers/<controller>_helper.rb, where<controller>is the name of the controller. For example, helpers specific toPeopleControllerwould go inapp/helpers/people_helper.rb; these might include methods to format a person's name or email address. - Application-level
In a file shared by all controllers, in
app/helpers/application_helper.rb. This might include generic date formatting or error message helpers.
Rails will automatically load the controller-specific helpers when a controller is invoked, and the application-level helpers for every controller invocation. We will look at an example of both types of helpers in the next two sections, each of which will take some logic out of our views.
Note
Virtual attributes and helpers (a recap)
In Chapter 4, we saw how to write virtual attributes which derive from real fields in the table but have no corresponding field of their own. Virtual attributes should be used where the output will be used in multiple contexts; helpers should be used to manipulate data to view-specific output. That distinction should be kept in mind here: the helpers we're writing produce output we're only going to use in HTML views.
When displaying individual records, the current show.rhtml template shows an ugly blank where a field has no set value. Instead, it may be better to show a default message where a record has a blank field, e.g. "not specified". We will potentially need this functionality in multiple views, so it makes sense to add the helper to app/helpers/application_helper.rb:
module ApplicationHelper
# Display a default message for empty fields.
#
# +field_value+ is the value to process.
def d(field_value=nil)
if field_value.blank?
return content_tag('em', 'not specified')
else
return field_value
end
end
end
The d method (helper) defined here is passed a field value, which is interrogated by the Rails convenience method blank?; blank? returns true if the value is empty or nil. If no argument is passed, the value nil is assigned to field_value by default (the parameter field_value=nil in the method signature specifies the default). If the field value is blank, the helper supplies a default empty field message inside an<em> element, via the content_tag helper: this takes a string representing an HTML tag as the first argument, and the content to put inside the tag as its second argument; optionally, you can pass extra :attribute => value pairs to add to the HTML element.
This method can be called wherever a field could be blank. For example, we can rewrite app/views/people/show.rhtml using it (highlighted lines below):
<h1><%= @page_title %></h1>
<p><strong>Job title:</strong> <%=d @person.job_title %></p>

<p><strong>Email address:</strong> <%= mail_to @person.email %></p>
<p><strong>Telephone:</strong> <%=d @person.telephone %></p>
<p><strong>Mobile phone:</strong> <%=d @person.mobile_phone %></p>
<p><strong>Date of birth:</strong> <%=d @person.date_of_birth %></p>

<p><strong>Gender:</strong> <%= @person.gender %></p>
<p><strong>Keywords:</strong> <%=d @person.keywords %></p>
<p><strong>Notes:</strong><br/><%=d @person.notes %></p>
However, for fields that are never empty (because we made sure they had a value when performing validation), we don't need to use the d function.
The display for a person's date of birth defaults to the international standard date notation (YYYY-MM-DD, e.g. "1968-01-08"). However, this is alien to most people: it would make more sense to show a "humanized" version of the date instead (e.g. "8th January 1968"). We could first add a generic date formatting method to the application_helper.rb file to do this:
module ApplicationHelper
...
# Display date in human-readable format, e.g. "8th January 1968".
#
# Returns +nil+ if +date_to_format+ is blank.
def human_date(date_to_format)
if date_to_format.blank?
out = nil
else
# Get the day part of the date with
# the "ordinal suffix" (th, rd, nd) appended
day = date_to_format.day.ordinalize
# strftime accepts a formatting string, which specifies
# which parts of the date to include in the output string
out = date_to_format.strftime("#{day} %B %Y")
end
out
end
end
The strftime method used in the human_date method is very useful for formatting Date and DateTime objects. It accepts a format string, much like PHP's strftime function, containing placeholders for elements of the date and/or time, marked with a preceding "%" character. Here are the placeholders you can use with the Ruby version of strftime; the examples, all use 6th December 2006 at 9:30 a.m. as the date being formatted:
|
Placeholder... |
Is replaced by... |
Example |
|---|---|---|
|
%A |
Full day name |
Wednesday |
|
%a |
Short day name |
Wed |
|
%w |
Day of the week (0...6, with Sunday being 0) |
3 |
|
%d |
Day of month, zero-padded |
06 |
|
%e |
Day of month, with a leading space if less than 10 |
6 |
|
%j |
Day of the year (001...366) |
340 |
|
%U |
Week number (00...53); the first Sunday of the year is treated as the first day of the first week |
49 |
|
%W |
Week number (00...53), the first Monday of the year is treated as the first day of the first week |
49 |
|
%B |
Full month name |
December |
|
%b |
Short month name |
Dec |
|
%m |
Month number, zero-padded |
12 |
|
%H |
Hour of day, zero-padded |
09 |
|
%Y |
Four-digit representation of the year |
2006 |
|
%y |
Two-digit representation of the year |
06 |
|
%I (capital i) |
Hour of the day, 12-hour clock (01...12) |
09 |
|
%M |
Minute of hour, zero-padded |
30 |
|
%S |
Seconds of minute, zero-padded |
00 |
|
%T |
Time (same as "%H:%M:%S") |
09:30:00 |
|
%c |
The preferred date and time representation |
Wed Dec 6 09:30:00 2006 |
|
%x |
Preferred date representation without time |
12/06/06 |
|
%X |
Preferred time representation without date |
09:30:00 |
|
%p |
The meridiem in uppercase (AM or PM) |
AM |
|
%P |
The meridiem in lowercase (am or pm) |
am |
|
%% |
Literal percentage symbol (%) |
% |
|
%F |
ISO date representation (same as "%Y-%m-%d") |
2006-12-06 |
"Zero-padded" means that a single leading zero is added to the representation of the time part if its value is less than 10.
Here are a few more examples of format strings for strftime, using some of these placeholders:
- Standard UK date format:
"%d/%m/%Y"-Example output: "06/12/2006" - Standard UK date format with short year:
"%d/%m/%y"-Example output: "06/12/06" - Standard UK date format with time:
"%d/%m/%Y %T"-Example output: "06/12/2006 09:30:00"
We can now modify app/views/people/show.rhtml to use our new human_date method:
<p><strong>Date of birth:</strong>
<%=d human_date(@person.date_of_birth) %></p>
The views we've created so far show one or more records from a single table. However, more often than not, tables in the database are related to each other. We need to be able to pull records out of the related tables and show them alongside each other.
In the Intranet application, the show.rhtml template for the PeopleController shows a person's details, as stored in the people table. As well as these details, we also need to show a person's home address. The address is stored in a separate table, addresses; the address_id field in the people table acts as a foreign key, referencing a record in this table (see Chapter 4 Working with Rails).
We can access a person's address inside the show.rhtml template through the @person instance, using its address method:
<% address = @person.address -%>
The address method is automatically available on instances of the Person class, as the Person class declares a belongs_to relationship with the Address model (see the section Associations between Models, in Chapter 4).
We can then append some more ERb code to show.rhtml to display attributes from the address (but only if the person has an address—the conditional parts are highlighted):
<p><strong>Address:</strong><br/>
<% address = @person.address -%>
<% if address -%>

<%= address.street_1 %><br/>
<%= address.street_2 + tag('br') unless address.street_2.blank? -%>
<%= address.street_3 + tag('br') unless address.street_3.blank? -%>
<%= address.city + tag('br') unless address.city.blank? -%>
<%= address.county + tag('br') unless address.county.blank? -%>
<%= address.post_code %>
<% else -%>

<%= d %>
<% end -%>

</p>
This code fragment demonstrates how to conditionally execute a block of code inside an RHTML template, using if...else...end. It also calls the d helper defined earlier, to display an error message if the person doesn't have a home address set.
There are several repeated lines in the template, which show parts of the address (plus a<br /> element), but only if they have a value, e.g:
<%= address.street_2 + tag('br') unless address.street_2.blank? -%>
This is a good case where an application-level helper can reduce the repetition in a template:
module ApplicationHelper
...
# Display +field_value+ followed by a <br> element,
# but only if +field_value+ is set; otherwise return nil.
def field_with_break(field_value)
unless field_value.blank?
return field_value + tag('br')
else
return nil
end
end
end
We can now reduce the address part of the template to:
<p><strong>Address:</strong><br/>
<% address = @person.address -%>
<% if address -%>
<%= address.street_1 %><br/>
<%= field_with_break address.street_2 -%>
<%= field_with_break address.street_3 -%>
<%= field_with_break address.county -%>
<%= field_with_break address.city -%>
<%= address.post_code %>
<% else -%>
<%=d nil %>
<% end -%>
</p>
The show.rhtml template is specific to a person: it shows their details, including their home address. However, companies can also have addresses: so we will need to include some code to render a company's address in app/views/companies/index.rhtml (we've avoided this so far).
One option would be to add a block of address-rendering code to app/views/addresses/index.rhtml, to show the address for each company; this would be similar to the code we already have in app/views/people/show.rhtml. But this would mean repeating ourselves, as we would have identical blocks of code in multiple locations.
In addition to adding repetition, we are already breaking Rails conventions by rendering addresses from inside views for PeopleController. Typically, the templates for a model are stored in a folder specific to the corresponding controller; but here, the RHTML code for rendering an Address is tied into the template for the Person model. But, at the same time, we don't want to show an address in its own full-page template: we only want to show it in conjunction with a person or company. So adding a full template for displaying an address inside a layout is unnecessary.
Rails provides a solution for this situation: partial templates (or partials for short). A partial is used to generate a page fragment (typically RHTML), which can be used inside other templates. They can be called from inside other RHTML files, or even rendered directly from inside a controller (in lieu of a full-page template), to produce a "fragment" of output.
By convention, Rails partials are included in the views directory for the controller. In our case, a partial for addresses goes in app/views/addresses. To distinguish partials from full-page templates, an underscore is prepended to the name of the partial: for example, the partial to show an address would intuitively be called _show.rhtml. Our partial should therefore go in the file app/views/addresses/_show.rhtml; the content can be cut and pasted from the show.rhtml file for people (app/views/people/show.rhtml), and looks like this:
<% if address -%>
<%= address.street_1 %><br/>
<%= field_with_break address.street_2 -%>
<%= field_with_break address.street_3 -%>
<%= field_with_break address.city -%>
<%= field_with_break address.county -%>
<%= address.post_code %>
<% else -%>
<%= d %>
<% end -%>
The main difference between the original we copied and this code is that references to the @person variable have been removed. Instead, a local variable called address is referenced. Provided this variable is passed to the partial when it is called from a controller or view, the partial can be used inside any other template.
Another difference is that paragraph tags have been removed from the partial. This means the output can be used either inside paragraphs (e.g. when showing a person) or inside table cells (e.g. in the companies list).
To render the partial inside another template, call it using the render method, e.g. in app/views/people/show.rhtml:
...
<p><strong>Notes:</strong><br/><%=d @person.notes %></p>
<p><strong>Address:</strong></p>
<p><%= render :partial => 'addresses/show',
:locals => {:address => @person.address} %></p>
Two things to note here are:
- The
rendermethod takes an option:partial, which specifies the path to the partial, relative to theviewsdirectory. Note that the underscore at the front of the partial name and the ".rhtml" suffix are excluded. - The
:localsoption can send a hash of:name => valuepairs to the partial. You can think of these as arguments being passed to a method: each pair is converted into a variable (here,address)set to the value passed in (here, the address instance associated with the person,@person.address). These variables then become available within the partial.
We can also reuse this partial inside app/views/companies/index.rhtml:
<% for company in @companies -%>
<tr>
<td>
<%= link_to company.name, { :action => 'show', :id => company.id },
{ :title => "Show details for this company" } %>
</td>
<td><%= company.telephone %></td>
<td><%= company.fax %></td>
<td><%= link_to(company.website, company.website) %></td>
<td><%= render :partial => 'addresses/show',
:locals => {:address => company.address} %></td>

</tr>
<% end -%>
The two index.rhtml templates we have written so far (one for people, the other for companies) have a repeated section of pagination code at the bottom. Rather than having this code in two places, it is better to put it in one file and pull this into the individual templates: a partial (see previous section) is an obvious solution.
However, the pagination code is not associated with any particular model; so where should it go? There is yet another Rails convention, which suggests that partials with no obvious "home" go into a directory called app/views/shared. Create this directory and add a file to it called _paginator.rhtml, which will contain the paginator code. The content of this file can be modified from the code at the bottom of app/views/people/index.rhtml:
<p><% page_num = paginator.current.number -%>
<% last_page_num = paginator.last.number -%>
<%= link_to('Previous', :page => page_num - 1) + " " unless 1 == page_num -%>
<%= pagination_links(paginator) %>
<%= link_to('Next', :page => page_num + 1) unless last_page_num == page_num -%></p>
The main change is replacing @paginator with paginator (minus the '@'). Instead of using an instance variable, we will instead pass the required variable in using the :locals option to render.
Call the new partial from app/views/people/index.rhtml and app/views/companies/index.rhtml, replacing the existing paginator code:
<%= render :partial => 'shared/paginator',
:locals => { :paginator => @paginator } %>
Note
Partial or helper?
Everything we've done with partials so far could also have been achieved with helpers: both enable the generation of chunks of content to insert inside templates, encapsulating logic, and repeated mark-up. So when should you use a partial and when a helper?
A good guideline is to look at the amount and complexity of markup (HTML or XML), you intend to generate. If you are primarily creating markup with little logic, use a partial: this is a much more natural way of laying out HTML or XML fragments. If you are doing a lot of logic in the partial, use a helper: too much logic looks ugly and awkward inside a partial, and is difficult to read when surrounded by HTML code.
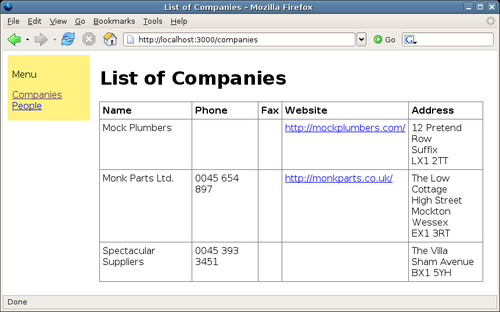
Now that we have two controllers, navigating between them is becoming a pain: each time we want to get to a controller, we have to type the right path into the address bar in the browser. We need a menu.
There are several options to consider when deciding where to locate a menu:
- When using a single layout for our whole application (as we are), the layout template (app/views/layouts/application.rhtml) is the logical location for the menu. The menu can just be added as a standard RHTML fragment.
- When using different layouts for different controllers (see the earlier section, Adding a Layout), each layout might have its own menu, too. In this case, each menu could be coded into the appropriate layout, possibly using a helper to ensure consistency of styling.
- A variant of the above is where there are different layouts for different controllers, but with a single menu common to all of them. In this case, the menu could be stored in a partial, and pulled into the appropriate place in each layout.
To keep things simple, we'll put our menu into app/views/layouts/application.rhtml. We always have the option to extract it into a partial or helper later, if we want to. This is the revised<body> element, including the menu links:
...
<body>
<div id="menu">
<p>Menu</p>
<ul>
<li><%= link_to 'Companies', :controller => 'companies' %></li>
<li><%= link_to 'People', :controller => 'people' %></li>
</ul>
</div>
<div id="content">
<%= yield %>
</div>
</body>
...
The page is separated into two separate<div> elements, one for the menu and one for the page content. The menu itself is an unordered list; each list element uses the link_to helper to generate a link to the specified controller; as no action is specified, the index action is assumed in both cases.
Without some extra styling, the menu will be at the top of the page and will be displayed as a bulleted list. This can be fixed with some simple CSS to position the two<div> elements adjacent to each other, style the colours, and turn off bullet points on the menu list items (in public/stylesheets/base.css):
#menu {
float: left;
width: 15%;
background-color: #FFF280;
padding: 1% 1% 0 1%;
}
#menu > ul > li {
list-style-type: none;
margin-left: -2.5em;
}
#content {
float: right;
margin-left: 2%;
margin-right: 2%;
width: 79%;
}
The result makes our application look more like the real thing:
While this goes some way to making navigation easier, we still have the issue that if we go to the root of the web server, we get the Rails welcome page. We will fix this later by setting a specific controller and action as the default for the application, using routes (see Chapter 7 Improving the User Experience). When we go to the root of the application, we will then get the default controller/action, instead of the welcome page.