There comes a point in the life of most applications when the people using it complain about it. Sometimes this is down to the usability of the application's front end—buttons in the wrong place, tortuous workflow, bad color choices, small fonts, etc. This is largely down to interface design, an enormous topic outside the scope of this book.
Other times, an application may have a great interface but still be unusable. Often, this is because it's just too slow. In the case of Rails, this problem might arise sooner than you expect. The Ruby interpreters available at present (mid 2007) are quite slow themselves; coupled with that, all the clever meta-programming that makes Rails such a pleasure for developers turns it into a resource-hogging nightmare for system administrators.
Slowness is something you can deal with, requiring minimal artistry and resources. This section covers how to track down particular issues with your application, and what to do about them once you've found them. We'll be looking at several aspects of this:
- Finding bottlenecks in the application
- Using caching to increase performance
- Scaling up the infrastructure to improve performance in general
If users complain that a Rails application "feels slow", they might not give you much to work with. Some may give you more useful clues, like mentioning certain screens that render slowly, but end users are often unable to provide the kind of detailed information you need to make improvements. You need to be able to home right in
on suspect lines of code. It may be that a mere handful of controllers, actions, helpers or methods are causing the problems, giving an overall impression of slowness. You need to know where those lines of code are.
The first step is to gather some solid usage data from the application logs, to use for further analysis. Rails logs are a rich seam of data waiting to be mined, including details of requests made and how long each response took. In addition, the response times are further decomposed into the time taken to run queries against the database and the time taken to render the response body (e.g. the HTML page). This is invaluable when hunting for the causes of problems.
Here is an example from Intranet's
production.log running at :info logging level; the example below was produced by the PeopleController's show action:
Processing PeopleController#show (for 127.0.0.1 at 2007-05-23 22:46:28) [GET]
Session ID: 12ea4dfe55a2ba103cdb14587b702411
Parameters: {"action"=>"show", "id"=>"4", "controller"=>"people"}
Rendering within layouts/application
Rendering people/show
Completed in 0.04771 (20 reqs/sec) | Rendering: 0.01422 (29%) | DB: 0.03226 (67%) | 200 OK [http://localhost/people/show/4]
The last line (highlighted) is the one we're interested in. There are three figures here we can use for analysis:
- The response was completed in 0.04771 seconds
- The time spent on rendering was 0.01422 seconds (29%)
- The time spent on database activities (DB) was 0.03226 seconds (67%)
While this is interesting, on its own it doesn't help identify which controller/action combinations are slowest. We need comparative data across all controller/action responses, and a decent mass of it, to produce meaningful statistics.
Note
Mocking up data for analysis
The best logs for analysis are those from a version of the application running in production, after it's been in use for (at least) several days. This will give you the most realistic data to work with.
If you don't have this sort of data, you can use a tool like Apache Bench (ab), included with the Apache web server distribution, to create some mock data instead. Apache Bench enables you to run a mass of concurrent HTTP requests against a website, emulating access by web browsers. See http://httpd.apache.org/docs/2.2/programs/ab.html for details.
Alternatively, you could write your own spidering program to randomly visit pages on your site and recursively follow links from each page. This can be used to build a reasonable mass of data very quickly. A sample Ruby script that does this, script/spider.rb, is available from the book's Subversion repository. The script starts from the path /people, visiting that page 10-100 times; parses links out of each visited page, adding any URLs found to the queue of paths to visit; then visits each of those pages 10-100 times; and so on. Note that this doesn't send any "post" requests or log in as an adminstrator; but this capability could easily be added.
As the format of Rails logs is entirely predictable, it's straightforward to write a summarizer to analyze log file data. An example is available in the book's Subversion repository as script/quick_logfile_analyzer.rb. The script parses the log file, grouping requests by controller/action; it then averages out the requests and orders them, listing the controller/action pairs visited and the associated response times; the fastest-responding ones are at the top and the slowest ones at the bottom. Here's an example of the bottom of its output for some sample log data:
...
******************************
PeopleController#show completed in an average time of 0.181 seconds (5.5 requests per second)
(times based on 659 requests)
Rendering took on average 0.131 seconds (72%)
Database queries took on average 0.012 seconds (6%)
******************************
TasksController#create completed in an average time of 0.198 seconds (5.1 requests per second)
(times based on 1 request)
Rendering took on average 0.134 seconds (67%)
Database queries took on average 0.007 seconds (3%)
******************************
CompaniesController#employees completed in an average time of 0.203 seconds (4.9 requests per second)
(times based on 10 requests)
Rendering took on average 0.058 seconds (28%)
Database queries took on average 0.024 seconds (11%)
******************************
AddressesController#index completed in an average time of 0.467 seconds (2.1 requests per second)
(times based on 8 requests)
Rendering took on average 0.136 seconds (29%)
Database queries took on average 0.011 seconds (2%)
******************************
AddressesController#show completed in an average time of 1.044 seconds (1.0 requests per second)
(times based on 2 requests)
Rendering took on average 0.365 seconds (34%)
Database queries took on average 0.005 seconds (0%)
******************************
TasksController#update completed in an average time of 3.048 seconds (0.3 requests per second)
(times based on 3 requests)
Rendering took on average 2.498 seconds (81%)
Database queries took on average 0.040 seconds (1%)
As you would expect, update and create actions are slowest: typically, SQL UPDATE and INSERT operations are slower in MySQL databases (as evidenced by the slower database query times for those actions in the log extract above). However, the slowest action that simply retrieves data is the PeopleController's show action. This is to be expected, as this action potentially involves every table in the database, pulling in a Person object, an associated Address for that person, the Company they work for, a set of Tasks associated with that person, and FileAttachment objects attached to the tasks. If any action is going to be slow, it's likely to be this one.
Note
Is it worth it?
Before you go any further, consider whether it's worth the effort to optimize your application. You now have some firm data from which to estimate the number of requests per second your application should be able to field. In our case, our slowest action has the capacity to handle approximately 25 requests per second. If your application is not likely to reach the estimated capacity, the effort of optimizing may not be worth it. Don't optimize for the sake of it; only do so if you really need to.
So, we now know which controller and action we might consider optimizing. However, we don't know why it's slow. At this point, we need to be able to see what's going on when we call the PeopleController's show action, and identify which parts of the action are slow.
To get right inside actions, you can use Ruby's profiling mechanism to get a very low-level view of what's going on inside your application. This approach is covered in the next section.
Note
If you can, cache
The biggest bottleneck in most Rails application is page rendering; as you can see from the sample data on the previous page, for our slowest retrieve action (PeopleController#show), rendering takes 76% of the total response time. Judicious use of caching can dramatically improve the performance of most Rails applications. If your application is slow, it may not even be necessary to go to the extent of profiling your actions: just use caching on the slowest controller/action pairs and you will frequently see a marked improvement. We'll take a look at caching shortly.
Ruby provides classes for profiling running code. These can be employed as a wrapper around controller actions to find out exactly what's going on when they're called. For example, you can manually run the profiler inside the Rails console (script/console) to watch method calls. Below is an example of using the console to profile the Person.find method:
$ script/console
Loading development environment.
>> require 'profile'
>> Profiler__.start_profile
>> Person.find 1
>> Profiler__.stop_profile
>> Profiler__.print_profile(STDOUT)
% cumulative self self total
time seconds seconds calls ms/call ms/call name
10.66 0.13 0.13 1 130.00 160.00 Mysql::Result#each
10.66 0.26 0.13 52 2.50 6.54 RubyLex#getc
9.02 0.37 0.11 27 4.07 6.30 Module#module_eval
5.74 0.44 0.07 1846 0.04 0.04 String#==
3.28 0.48 0.04 34 1.18 3.24 Array#include?
...
I've taken out some of the return values for brevity. The start_profile and stop_profile class methods are the key; they bracket the code to be profiled, Person.find 1, and start/stop the profiling mechanism. The profile itself is printed using the print_profile class method; in this case, it is printed to standard output (STDOUT).
To put the profiling around an individual controller action directly inside Rails (instead of manually, as above), we can apply an around_filter to the methods we want to profile. We saw examples of before_filter and after_filter in the section Using Filters in Chapter 5; around_filter can similarly be used to run some code before an action (to start the profiler) and again after the action (to stop the profiler and print its results). By creating a class and giving it a class method called filter, we can specify that class itself as the filter. The filter method should accept a controller and an action block as arguments; it should also call the action, otherwise around_filter will just block it.
Following is an example filter class that does the job—starting the profiler, calling the action, then stopping the profiler and writing the profile results into a file. Add it inside the ApplicationController class definition (in app/controllers/application.rb):
class ApplicationController < ActionController::Base
# ... other methods ...
if DEFINE_PROFILER
# A class which can be used as an around_filter for a controller,
# to profile actions on that controller; profiles get
# written into the profile directory with the
# filename '<controller>_<action>.txt'
class ProfileFilter
require 'profile'
# Extend the ProfileFilter class with methods from the
# Profiler__ class
extend Profiler__
# The filter class method must be implemented to
# employ this class as a filter
private
def self.filter(controller, &action)
start_profile
action.call
stop_profile
profile_file_name = controller.controller_name.to_s + '_'
+ controller.action_name.to_s + '.txt'
out = File.open(
File.join(RAILS_ROOT, 'profile', profile_file_name), 'w'
)
print_profile(out)
end
end
end
end
Why is this class definition wrapped in an if...end statement? It turns out that just having the class defined inside the controller slows it down the immensely. By making definition of the class conditional, we can easily switch it off when not needed by setting DEFINE_PROFILER to false, which prevents the controller from being slowed down.
So where do we set the DEFINE_PROFILER variable? We can add it to the bottom of the environment.rb file to set it in every environment:
DEFINE_PROFILER = true
If we want to have a different setting for each environment, we could instead specify this for individual environments inside their configuration files (config/environments/production.rb etc.).
Next, create a directory for storing profiles called profile; each controller/action profile gets its own file in that directory.
An around_filter can now be applied to any controller you want to profile by amending the controller's class definition. You can also apply :except and :only options, as for other types of filter, e.g.:
class PeopleController < ApplicationController
around_filter ProfileFilter, :only => [:show]
# ... other methods ...
end
Note that this makes the application considerably slower; but it can help you identify which parts of an action are absorbing the most time. Here's a sample of the output (from profile/people_show.txt):
% cumulative self self total
time seconds seconds calls ms/call ms/call name
15.08 0.84 0.84 3 280.00 400.00 ERB::Compiler::ExplicitScanner#scan
5.03 1.12 0.28 269 1.04 13.31 Array#each
5.03 1.40 0.28 7 40.00 42.86 Kernel.sleep
4.31 1.64 0.24 269 0.89 0.93 Object#method_added
3.05 1.81 0.17 73 2.33 2.74 ActiveRecord::Base#connection
2.69 1.96 0.15 9 16.67 218.89 Dependencies.new_constants_in
2.33 2.09 0.13 24 5.42 6.25 ActiveRecord::Base#define_read_method
2.15 2.21 0.12 19 6.32 18.95 ActionController::Routing:: RouteSet#generate
2.15 2.33 0.12 400 0.30 0.30 String#<<
1.97 2.44 0.11 432 0.25 0.25 Module#===
1.80 2.54 0.10 74 1.35 1.35 Array#include?
1.80 2.64 0.10 19 5.26 5.26 Mysql#query
...
Note that by far the slowest part of the action is the ERB::Compiler::ExplicitScanner#scan method, whose three calls take 15% of the total time of the action. This method is invoked during view rendering; looking back at the output from the simple log analyzer of the previous section, rendering accounts for 72% of the execution time for this action, on average; so calls to this method account for 15% of that. By contrast, database methods take 6% of the action's execution time.
To reiterate the tip from the end of the previous section: caching is likely to improve performance here, taking a bite out of that 72%. In most cases, it is more likely to improve your application's performance, and do so more simply, than any other optimization. But it's nice to have data from the profiler to back up this assertion.
Note
The example above uses the standard, slow built-in Ruby profiler, which makes testing lots of actions very time-consuming. If you need a faster profiler, take a look at ruby-prof (http://rubyforge.org/projects/ruby-prof/). It seemed a bit buggy when I used it with Rails, sometimes producing incomplete profiles, but you may have better luck with it.
If you want to profile everything, it is possible to run the whole Mongrel process, along with any actions carried out by the application, under the profiler. To do this, run the following from the command line (on *nix):
$ ruby -r profile script/server 2> profile/everything_profiled.txt
This loads the profiling library (-r profile), starts the server, and redirects any profiling output into the profile/everything_profiled.txt file. This produces a great deal of output, and is harder to decipher than the individual action profiles shown above. However, you can always search through the output for the actions you are interested in, and the extra detail may be useful on occasion.
Rails contains its own profiler script, in script/performance/profiler. It can be used to test individual methods inside your application and help you identify what they are doing. I personally don't tend to use it very often, as I think it's more useful to profile controller actions (see previous section). The Rails profiler can't do that by default. But the built-in profiler can be useful where you have inexplicably slow methods and want to find out why.
To use the profiler, pass it a code fragment and a number of times to run that fragment, e.g.:
$ script/performance/profiler "Person.find :all" 10
You get standard Ruby profiler output, which you can then use to identify the slowest parts of the method call.
As mentioned in the previous sections, using caching is the quickest and easiest way to improve the performance of a Rails application. Rails provides several types of caching, each of which provides speed benefits. However, they are not all equal in terms of speed benefit, and have different areas of application. The table below summarizes the types of caching available.
|
Type of caching |
Speed |
Description |
|---|---|---|
|
Page |
Fastest |
Caches whole views for a particular route, storing each as a full HTML page*. Can only be used for pages where every client gets the same content; e.g. a public home page, which looks the same for every visitor. As the action isn't invoked (Rails delivers the HTML file directly), filters aren't activated, so it is not suitable for pages which require authentication or other use of filters. As the whole HTML page is cached, Apache can be used to serve the cached page directly if it is available. |
|
Action |
Second fastest |
Caches individual controller actions as whole HTML pages, like page caching*. BUT the action and any filters still run, so it is possible to use authentication etc. Can only be used where an action produces the same output for all clients. |
|
Fragment |
Slowest |
Caches parts of views, e.g. a menu or a content area*. A fragment can be as small as a single paragraph, so this technique is very flexible and fine grained. Can be used to cache different content for different users. |
* See notes on how cache elements are named, in the following section
Caching stores cache elements (entire HTML pages or HTML fragments) under keys; the base key for a cached element is the path of the visited page minus the querystring. For example, these paths would each produce a different cache key:
peoplepeople/index(even though it refers to the same page aspeople)people/show/5
While the following two paths would produce the same cache key:
people/index?page=1people/index?page=2
The three different types of caching take the base cache key produced by the path and append other pieces of information to get the full location, as shown in the table below.
|
Type of caching |
Cache key prefix 1 |
Cache key suffix |
Example cache key for path /people/show/5 |
Default location when caching to file_store on localhost:4000 2 |
|---|---|---|---|---|
|
Page |
- |
.html |
people/show/5.html |
public/people/show/5.html |
|
Action |
<host:port>/ |
.cache |
localhost:4000/people/show/5.cache |
tmp/cache/localhost:4000/ people/show/5.cache |
|
Fragment |
<host:port>/ |
.cache |
localhost:4000/people/show/5.cache |
tmp/cache/localhost:4000/ people/show/5.cache |
1 Action and fragment caching uses the host name and port number as part of the cache key. This makes it possible for a single Rails application to be served under multiple domain names, while allowing each to have its own isolated cache.
The default cache store is file_store: the cache elements are kept on the local filesystem. The table shows where each type of cache element is kept when this cache store is used: page cache elements go into the public directory, while action and fragment cache elements go into tmp/cache. Other cache stores are available, as we'll see in the section Advanced Scaling, later this chapter.
If you need to change the location for cached page elements, set the following directive in config/environment.rb:
# Set page cache location to public/cached_pages
ActionController::Base.page_cache_directory = "public/cached_pages"
To change the location of the fragment (and action) cache, set this directive in config/environment.rb:
# Set fragment (and action) cache store type to :file_store
# and store cached fragments in tmp/fragments
ActionController::Base.fragment_cache_store = :file_store, "tmp/fragments"
The first step when using caching is to decide which types of caching can be used in your application. The table in the previous section gave some idea of the situations where different types of caching are applicable; let's see whether any of them apply to Intranet:
- Page caching: This can only be used where every client visiting a given path gets the same view. If there are any differences based on the client's status, you can't use page caching effectively. In the case of Intranet, each page contains a link to the login page for anonymous users, or displays the user's username once they have logged in. This means that page caching isn't feasible.
- Action caching: Like page caching, action caching stores a whole page of HTML for each path. Unlike page caching, the action is still invoked by Rails, so authentication filters can run. This makes it possible to do something like show cached pages to anonymous users, but show the same pages dynamically when the user is logged in. However, this would be a slightly complicated solution, and one that is not worth pursuing in our context.
- Fragment caching: In the case of Intranet, this is the most flexible and useful of options. It can be used at several points in our code to cache parts of the page that remain stable between requests, while enabling us to retain the flexibility to show different views to different users.
Looking at the options available, it seems clear that fragment caching is best suited to our needs. We'll briefly look at page and action caching in the following sections, but concentrate on wringing most of our performance improvements out of fragment caching.
Note
Caching vs. static HTML pages
If you have a page that changes once in a blue moon and that doesn't need to be generated by Rails, another option is available—create an HTML file and serve it direct from the web server, bypassing Rails entirely. Examples might be a terms and conditions page, an "about us" page, or contact information: all of these pages rarely change but are usually an essential part of a public web application.
If you are using Apache as a front-end for your Rails application, you can use conditional URL rewriting (available in Apache's mod_rewrite module) to serve static pages where they are available; this leaves any URLs that can't be mapped to files to be served dynamically by Rails instead. The section Using Apache to Serve Static Assets (later this chapter) covers how to use this technique to serve static files, such as JavaScripts and stylesheets, as well as cached pages and actions.
Before you can start using caching, you need to enable it for the environment you're running under. By default, the production environment has caching enabled, but the development environment does not.
Set whether caching is on or off by editing the appropriate environment file (config/environments/production.rb, config/environments/development.rb) and setting this directive:
config.action_controller.perform_caching = true
Page caching is very simple to implement. Inside a controller's class definition you simply specify the names of actions to which you want to apply page caching, e.g.
class PeopleController < ApplicationController
caches_page :index, :show
# ... other methods ...
end
With this in place, visiting /people will create an HTML file, public/people.html. If you look in the log file, you should see something like this:
Cached page: /people.html (0.00065)
This indicates that Rails has cached the page into a file called people.html; the path /people.html indicates that this file is stored inside the public directory. Note that Rails doesn't create a people directory, as there is only a forward slash at the start of the path, not anywhere within it. If we visited the path /people/index, Rails would actually create a new file in public/people/index.html, with the same content as public/people.html. Even though both paths point to the same controller and action, caching considers the two paths in isolation and creates one cached HTML file for each.
The next time the /people path is requested, Rails will deliver the public/people.html file and not run the index action at all. You won't even get an indication in the log file that this has happened as Rails isn't even invoked. Great! We're already saving time.
Similarly, if we visit the show action for a particular person (e.g. people/show/5), we'll get another HTML file in public/people/show/5.html, containing the cached HTML for that person's detail page. The next time we visit that same path, we'll see the cached page. As the person's ID is part of the path, each person's detail page gets its own element in the cache and its own HTML file in public/people/show.
However, it's not all roses. What happens if there are several pages of people to list using the index action? Recall that we created some pagination links at the bottom of the people#show view (in app/views/people/show.rhtml) to enable clicking through the list of people 10 at a time (see the section Pagination in Chapter 5). Each pagination link contains a page variable in the querystring, like this:
/people?page=2
The index action uses this to decide which page of results to show. However, if you click on these pagination links and the /people path has a cached element in public/people.html, each link just displays the first page of results that was cached. This is because caching ignores the querystring; so each page of results is treated as a request for /people and mapped onto the public/people.html cache element.
The solution is to include the page number as part of the path (which caching doesn't ignore) instead of as a querystring variable (which caching does ignore). In config/routes.rb, add a rule to do this, just above the default routing rule for controllers and actions (highlighted):
ActionController::Routing::Routes.draw do |map|
# ... other routes ...
# Enable caching of paginating index pages for PeopleController
map.connect 'people/index/:page', :controller => 'people',
:action => 'index'

# Install the default route as the lowest priority.
map.connect ':controller/:action/:id'
end
Now the pagination links have URLs like this:
people/index/2
Each page gets cached into public/people/index/X.html, where X is the page number (and value of the page parameter). This solves the problem. Anywhere where you want to cache a page that changes based on request parameters, those request parameters need to be part of the cache key; the simplest way to ensure this is to fold required parameters into the path using the routing configuration, as shown above.
While page caching is fast, once a cached element for a controller#action has been generated, Rails is no longer invoked when its path is requested. This means that even if a cached page required authentication the first time it was cached, once it exists in the cache it will be delivered to everyone, ignoring authentication. If you have pages that are the same for every logged in user that you want to cache, but still want to exclude unauthenticated users, you need to use action caching instead, as described in the next section.
Note
Keep in mind that the page caching above is for demonstration purposes only. The pages in Intranet change depending on the user, and whether they are logged in or not; page caching is not feasible in our case. If we used page caching, the first-cached version of a page might contain a logged-in user's username. This could then become the cached page that all subsequent users see, causing confusion when they apparently see themselves logged in under a different username.
Action caching caches entire HTML pages, like page caching; but cached elements are delivered via Rails, rather than directly from the cache. This means that you can still use filters for authentication (and other tasks). So if you have a page that you want only logged in users to see, and the page is the same for all of those users (e.g. a message of the day page), action caching is the answer.
There are few places in Intranet where action caching is applicable. But for the purposes of explication, here's how to cache the PeopleController's index and show actions, as hilighted in the following code:
class PeopleController < ApplicationController
helper TasksHelper
before_filter :authorize, :except => [:index, :search, :show]
before_filter :get_person, :only => [:update, :delete]
before_filter :all_addresses, :only => [:update, :create]
caches_action :index, :show

# ... other methods ...
end
The caches_action method in the class definition can be passed the names of one or more actions to cache. Note that this method should be called after any filter definitions to ensure that the filters are applied before caching is carried out.
The first visit to the path /people generates a cache file in tmp/cache/localhost:4000/people.cache (not in the public directory). (Note how the host name and port are part of the cache key.) You should see a line like this in the log:
Cached fragment: localhost:4000/people (0.00038)
Subsequent visits to the page receive the content of the cache file. However, unlike page caching, the log will record this, as Rails is invoked to retrieve the page from the cache:
Fragment read: localhost:4000/people (0.00023)
As both requests are logged, we can compare the before-caching and after-caching requests. In my case, here are the times for rendering the page on the first visit, before a cached action is available (16 requests per second):
Completed in 0.06197 (16 reqs/sec) | Rendering: 0.01825 (29%) | DB: 0.00812 (13%)
These are the times when the request is served from the cache (230 requests per second):
Completed in 0.00433 (230 reqs/sec) | DB: 0.00129 (29%)
In the second case, statistics for Rendering are absent; the templating engine isn't invoked as the HTML for the page is retrieved from the cache, not generated. Even taking into account the slight slow-down caused by writing into the cache during the first request, the request served from the cache is an order of magnitude faster.
Note
Again, action caching is not really suitable for Intranet, for the reasons described at the end of the section on page caching; each page is different for every user.
However, this raises an interesting point; if we took the username out of the HTML for the page, we could cache pages for all users (e.g. /people, /people/show/X). In cases where you need to do page or action caching, but the page content prevents you from doing so, it might be worth making pages generic so they can be cached.
Fragment caching is the most useful caching option where you have an application with no generic pages (i.e. pages that stay the same for all users). However, even in these types of application, there will still be large parts of the page that are the same for all users; for example, a menu, a header, or footer may be entirely static. But these elements may still be generated using Rails; for example, the menu may be constructed using the link_to helper, as is the case with Intranet's menu.
Caching static fragments can remove the load caused by calling helper methods continually. Rather than caching a whole page, we just cache part of a view and store the generated HTML fragment. This is done directly inside view templates, rather than inside the controller as is done for page and action caching. For example, here's how we might cache the menu in app/views/layouts/application.rhtml:
...
<body>
<% cache(:controller => 'menu') do -%>

<div id="menu">
<p>Menu</p>
<ul>
<li><%= link_to 'Companies', :controller => 'companies' %>
<ul>
<li><%= link_to 'Add a company', :controller => 'companies',
:action => 'create' %></li>
</ul>
</li>
<li><%= link_to 'People', :controller => 'people' %>
<ul>
<li><%= link_to 'Add a person', :controller => 'people',
:action => 'create' %></li>
</ul>
</li>
<li><%= link_to 'Addresses', :controller => 'addresses' %></li>
<li>
<% end -%>

...
</body>
</html>
The start of the HTML fragment to cache is marked with<% cache(<options>) do -%>, where<options> is a hash passed to Rails' url_for method.<options> is converted into a path (using the routing configuration) to generate the cache key for the fragment. Note that the path doesn't have to exist in this case; there is no menu controller, but we are still passing it as part of the path specification. The end of the fragment is marked with<% end -%>. The resulting fragment is stored in tmp/cache/localhost:4000/menu.cache.
Fragment caching can even be used to store different views for different users. For example, we could cache the login link or logged-in username by passing the username as a component of the cache key:
<%
# start caching
user = session[:user]
username = (user.nil? ? nil : user.username)
cache(:controller => 'login_panel', :username => username) do
-%>

<% if session[:logged_in] -%>
Logged in as <strong><%= session[:user].username %></strong>;
<%= link_to 'Logout', :controller => 'login', :action => 'logout' %>
<% else -%>
<%= link_to 'Login', :controller => 'login' %>
<% end -%>
</li>
</ul>
<% end # end caching -%>
Each logged in user now gets a personalised fragment in the cache store. For example, if the admin user is logged in, their menu is cached in tmp/cache/localhost:4000/login_panel.username=admin.cache. Users who aren't logged in get the version of the menu cached in tmp/cache/localhost:4000/login_panel.cache (note there's no username parameter in the filename).
The fragment cache can be used to store any generated HTML, including the entire output from the template for an action. Good candidates for this are templates for actions that display data; in our case, show and index actions on any controller.
As an example, we'll cache the output from the show action for PeopleController. To do this, edit the app/views/people/show.rhtml template, putting:
<% cache do -%>
above the first line and:
<% end -%>
as the very last line, wrapping all of the template's RHTML. As we've specified no options to the cache method call, the cache key for the fragment will be localhost:4000/people/show/X, where X is the ID of the person. Visit a person's detail page in your browser and check that the cache file is being generated (in tmp/cache/localhost:4000/people/show/X.cache). You can also check the log file for a line like this:
Cached fragment: localhost:4000/people/show/2 (0.00238)
On the next visit to the same page, the cached fragment is used instead of the HTML for the page being generated. To give a rough idea of the speed difference (in the production environment), consider the initial generation of the cached version, as follows:
Completed in 0.19671 (5 reqs/sec) | Rendering: 0.11522 (58%) | DB: 0.05368 (27%)
A subsequent request answered by reading from the cache, is recorded as follows:
Completed in 0.00615 (162 reqs/sec) | Rendering: 0.00288 (46%) | DB: 0.00255 (41%)
Much faster! However, one point to note is that, unlike page or action caching, fragment caching still runs the code inside the action. This means that for the show action, the database call to retrieve the person's record from the database still runs. This is despite the fact that we are not using the person's record to generate the HTML for the page any more, as it is being pulled from the cache. In the next section, we'll look at some techniques for avoiding these redundant database queries.
Usually, an action will retrieve one or more records to service a request; for example, the show action in the PeopleController pulls in the person's record from the database (using the get_person method, triggered as a before_filter). When you cache a fragment for a controller, the action will carry on running these database actions, even though they may have become redundant. Once a fragment has been cached, Rails no longer needs the database retrieval to generate the fragment's HTML, as it is retrieved from the cache instead.
The usual technique is to skip the retrieval of the database record if a fragment for the page exists. In our case, we can edit the show method so that it only retrieves a person's record if there is no cached fragment for it. To check for the existence of a fragment, you can use the read_fragment method:
def show
get_person unless read_fragment({})

# NB NEXT LINE DOESN'T WORK PROPERLY ANY MORE - see text!
@page_title = 'Person profile for ' + @person.full_name
end
Note that read_fragment is passed an empty hash ({}) as an argument. Here, if you do this, Rails uses the path of the current page as the key to search for in the fragment cache. read_fragment works in a similar way to the cache helper we saw in the previous section. You give it a set of options suitable for passing to url_for, and those options are used to generate the key for a cache element to read.
As we are now only calling get_person if a fragment doesn't exist, we can remove it from the PeopleController's before_filters:
before_filter :get_person, :only => [:update, :delete]
Here's what happens the first time a path like /person/show/5 is requested:
- The
showaction is invoked. - As
read_fragmentreturnsnil(no cached element forperson/show/5), get_personis called. get_personsets the@personinstance variable via a database query.
However, if the same path is requested again, the following happens:
You have a nil object when you didn't expect it!
The error occurred while evaluating nil.full_name
What's going on here? The problem is that this time round, the cache fragment does exist, so Rails doesn't perform the database query. This means that the @person instance variable is not set. Recall that the show action sets the @page_title by referencing the @person variable:
def show
get_person unless read_fragment({})
@page_title = 'Person profile for ' + @person.full_name
end
Now that there is no @person variable set, @person returns nil; so when the template tries to call @person.full_name (i.e. nil.full_name), we get the error message.
To work around this, we need to be able to cache some content for the @page_title variable when we first cache the show action, then check for a cached title when we run the show action, instead of assuming @person has been set.
We can work round this by employing the full power of the Rails caching mechanism. When the show action is invoked, we check for a page title fragment in the cache; if it's there, we retrieve it and set the @page_title instance variable; if not, we generate it from the @person object then store it in the cache. Here's the rewritten show action that implements this behavior:
def show
get_person unless read_fragment({})
title_cache_key = fragment_cache_key({}) + '.title'

@page_title = read_fragment(title_cache_key)
unless @page_title
@page_title = 'Person profile for ' + @person.full_name
write_fragment(title_cache_key, @page_title)

end
end
The highlighted lines include a couple of calls to Rails methods we've not seen before:
fragment_cache_keygenerates a key for an element in the fragment cache. In the case of the title, we use the cache key for the path plus a suffix".title". This means that the title for thepage /people/show/5will get the cache keypeople/show/5.title; and when using a filesystem cache (as we are here) will end up in the fileRAILS_ROOT/tmp/cache/people/show/5.title.cache. You can use this to generate your own custom cache keys for any type of fragment you like.write_fragment(title_cache_key, @page_title)writes the@page_titleinstance variable into the cache, under the generated key.
As we're likely to need to do this kind of custom caching in several places, it is useful to make this into a generic method available to all controllers by adding it to the ApplicationController class:
class ApplicationController < ActionController::Base
# ... other methods ...
# Store a fragment in the cache; "." + fragment_suffix is
# appended to the standard cache key for this
# controller/action; if a fragment with this key exists,
# return it; if not, call the block &generator to create
# the value, store it in the cache, and return it
private
def handle_text_fragment(fragment_suffix, &generator)
text_fragment_name = fragment_cache_key({}) + "." + fragment_suffix
value = read_fragment(text_fragment_name)
unless value
begin
value = generator.call
write_fragment(text_fragment_name, value)
rescue
value = ''
end
end
return value
end
end
To use this to set the @page_title variable in the show action:
def show
get_person unless read_fragment({})
fragment = handle_text_fragment("title") { @person.full_name }
@page_title = "Profile for " + fragment
end
What we're doing here is calling handle_text_fragment with title as the suffix for the fragment cache key; this means the method will work with a cache fragment called people/show/X.title (where X is the ID of the person to show). If the fragment exists, the fragment variable is set to its value; if not, the block { @person.full_name } is executed to generate the value instead, and that value stored in the cache. Finally, @page_title is constructed from the string"Profile for " with whatever handle_text_fragment returned appended to it.
This means that we can now remove the database query altogether, as both the person's details and the page title are cached in step with each other. This produces phenomenal speedups. Before caching:
Completed in 0.12266 (8 reqs/sec) | Rendering: 0.03310 (26%) | DB: 0.08563 (69%) | 200 OK [http://localhost/people/show/4]
When the same page is rendered from the cache:
Completed in 0.00718 (139 reqs/sec) | Rendering: 0.00537 (74%) | DB: 0.00000 (0%) | 200 OK [http://localhost/people/show/4]
From 8 requests per second to 139! Also note that there are now no database queries (DB: 0.00000 (0%) in the log entry).
The only downside to this approach is that the fragment for the page content and its title have to stay in sync. If the page title fragment is deleted but the page content fragment remains, Rails will always try to run the generator block to create the new fragment; but as the database fetch is being skipped, the generator block has no @person variable to work with, and returns the empty string (that's why the begin...rescue block is there: to capture situations where the block code causes an error). However, this is a small price to pay for the performance benefits gained.
Up until now we've happily been caching the output of what were previously dynamic pages. However, we've done nothing to ensure that the cache doesn't become stale (i.e. displaying data that is no longer correct or may not even exist any more). What if a person's record is updated? At the moment, the application knows nothing about this and the show action continues to deliver stale data from the cache.
What we need is a way of expiring elements in the cache when data changes. For example, if a person's record is updated, we will need the cached show page to expire for that person; similarly, if we cache the index page (which lists all people on the system) we need to expire it if new people are added, to keep the list up to date.
It is possible to manually expire the cache using one of the Rails built-in Rake tasks:
$ rake tmp:cache:clear
This can be useful if you have generated pages that very rarely change and don't rely on the database; in the case of Intranet, the menu may occasionally change, but any changes aren't connected to database actions and are difficult to detect. In this case, the easiest thing is to clear the cache when you make a change to the RHTML file containing the menu (app/views/layouts/application.rhtml).
But this technique is laborious where you have cached pages that should expire when data in the database changes. A better technique here is to automatically detect changes in the database and expire the cached fragments associated with those changes.
Rails provides a special ActionController::Caching::Sweeper class for exactly this purpose. Create a new file in app/controllers/people_sweeper.rb with this content:
class PeopleSweeper < ActionController::Caching::Sweeper
observe Person
def after_update(record)
clear_people_fragments(record)
end
def after_destroy(record)
clear_people_fragments(record)
end
def clear_people_fragments(record)
key = fragment_cache_key(:controller => 'people',
:action => 'show', :id => record.id)
expire_fragment(key)
expire_fragment(key + ".title")
end
end
A sweeper is a combination filter (which runs some code before or after a controller action is invoked) and observer (which watches the database for changes). Inside it, you define callback handlers that respond to actions on the observed models. In this case, observe Person specifies that the sweeper will only respond to changes to the Person model. When the sweeper responds to a database change, its callback handlers (before_*, after_*) can then be used to expire cache elements. Here, we're expiring the cached view for the show action.
A sweeper is activated by attaching it to a controller, as follows (highlighted):
class PeopleController < ApplicationController
helper TasksHelper
before_filter :authorize, :except => [:index, :search, :show]
before_filter :get_person, :only => [:show, :update, :delete]
before_filter :all_addresses, :only => [:update, :create]
cache_sweeper :people_sweeper, :only => [:update, :delete]

# ... other methods ...
end
When the update or delete actions are invoked on the PeopleController, the appropriate sweeper handler (one of its after_* methods) is called, with the modified record (Person instance) being passed in as an argument. Each of these methods in turn calls clear_people_fragments, which expires the appropriate fragments from the cache using the expire_fragment method.
Note that if we were caching the output of the people/index page, the sweeper should expire its associated cache elements when update or delete actions occur. Also note that there are additional expire_page and expire_action methods available to the sweeper if you are using page or action caching.
One other easy optimization you can perform is to reduce the load Rails puts on the database. By default, ActiveRecord is quite wasteful of resources. To demonstrate, consider the case where we have a person with associated address, company, and three tasks. If you call the PeopleController's show action for this person (with an ID of 1), the following four SQL queries are executed (along with a few others—see the logs):
- Load details from the people table:
SELECT * FROM people WHERE (people.'id' = 1) - Load the person's associated company:
SELECT * FROM companies WHERE (companies.'id' = 1)
- Load the person's associated address details:
SELECT * FROM addresses WHERE (addresses.'id' = 1) - Load the person's tasks:
SELECT * FROM tasks WHERE (tasks.person_id = 1) ORDER BY complete ASC, start DESC
This issue is sometimes termed the 1+N query problem (http://www.infoq.com/articles/Rails-Performance). When Rails retrieves an object (like a person) that has an association to other objects (like companies, addresses, and tasks), it runs one query for the person, plus another query to retrieve the data for each association (N more queries).
The reason this is wasteful is that a knowledgeable SQL programmer would be able to convert this into a single left outer join query (a.k.a. a left join), pulling the required data from the four tables in one pass. The companies, addresses, and tasks tables have associations with the people table, so our programmer could construct this single query to pull all the data out via shared keys:
SELECT * FROM people
LEFT OUTER JOIN companies ON people.company_id = companies.id
LEFT OUTER JOIN addresses ON people.address_id = addresses.id
LEFT OUTER JOIN tasks ON people.id = tasks.person_id
If you've done any PHP programming with SQL, you are probably familiar with this syntax. This statement retrieves data from all four tables, joining the rows in the different tables together using the shared keys. The downside to this approach is that it returns one row for each task, along with copies of the person, company, and address records resulting in each task carrying several fields of redundant data. In a traditional language, it would be the programmer's job to loop through the rows, ignoring the repeated data and picking out the individual tasks.
Fortunately, Rails provides functionality to avoid both the multiple queries and the pain of manually sifting the redundant data. ActiveRecord enables eager loading of associations, which, like an expert SQL programmer, performs the necessary left join operations to load all the data in one pass. As a bonus, it also manages the result set and converts it into objects without the programmer having to do any work.
It's very simple to implement, too. In our case, we can change the PeopleController to load the person plus their company, address, and tasks in one pass. We'll do this by editing the private get_person method in the PeopleController, which loads a person's record for subsequent display or editing:
class PeopleController < ApplicationController
# ... other methods ...
private
def get_person
@person = Person.find(params[:id],
:include => [:company, :address, :tasks])

end
end
The important part of this is the new :include option, which is passed to find (highlighted). This tells ActiveRecord to create an SQL statement that includes left joins to the three associated tables. Note that you can do this from either side of an association; in our case, we're joining from the person through two belongs_to associations (to address and company) and a has_many association (to tasks).
If you run the show action for the person again, you shouldn't notice any difference in the browser (though see the next section for one caveat). But if you look in the logs, you'll see that the four separate queries we saw earlier have gone, to be replaced by one looking like this:
Person Load Including Associations (0.035309) SELECT people.'id' AS t0_r0, people.'title' AS t0_r1, people.'first_name' AS t0_r2,
...
addresses.'id' AS t2_r0, addresses.'street_1' AS t2_r1,
...
tasks.'id' AS t3_r0, tasks.'title' AS t3_r1, tasks.'description' AS t3_r2,
...
FROM people LEFT OUTER JOIN companies ON companies.id = people.company_id LEFT OUTER JOIN addresses ON addresses.id = people.address_id LEFT OUTER JOIN tasks ON tasks.person_id = people.id WHERE (people.'id' = 1)
We've taken a lot of the detail out to keep things brief, but you can hopefully see that Rails has constructed a left join SQL query similar to the one we hand-crafted earlier. This single query was run instead of four separate ones. The fact that the show action (when run via a browser) still renders the page correctly also shows that Rails has intelligently dissected the data into a Person instance and its associated objects (an Address, a Company, and one or more Task instances). Bear in mind, though, that although the number of queries has been reduced, construction of objects from the SQL result sets still has to be performed.
There is one small caveat to mention for eager loading. Note that the left join statement constructed by Rails doesn't order the results in any way. But remember that we specified ordering when we associated the person model with the task model:
has_many :tasks, :order => 'complete ASC, start DESC',
:dependent => :nullify
In our original version of the show action, the tasks shown are ordered, due to the ordering specified for the association. By contrast, when using eager loading, ordering on associations is ignored, so the tasks come out in ID order. The result is that the show action using eager loading has a different task order from our original show action. If you want to retain ordering for tasks (as we do), you need to attach an :order option to the find method call, e.g.
class PeopleController < ApplicationController
# ... other methods ...
private
def get_person
@person = Person.find(params[:id],
:include => [:company, :address, :tasks],
:order => 'tasks.complete ASC, tasks.start DESC')

end
end
Tasks are now displayed in the same order as they were before we implemented eager loading.
Note
Other Optimizations
Using caching is the most important optimization you can make, and can yield instant results. Trimming the number of database queries using eager loading can also help.
However, the bottleneck may sometimes be in other parts of your application: perhaps a slow connection to a web service you are querying, a lag caused by parsing complex XML files, or a query to an enormous database table. The techniques covered earlier in this chapter should go some way to helping you find those bottlenecks. But as they can be fairly application specific, we have decided not to cover the gamut of possible solutions here.
In Chapter 6, we saw how to put a whole Rails application running on Mongrel behind Apache, so that any requests to the virtual host http://intranet.company.local/ are proxied through to the Mongrel instance on port 4000 (via mod_proxy). This made it simple to present a Rails application via a user-friendly URL and without a port number.
In the remainder of this chapter, we'll extend this basic configuration to make the application perform more efficiently by applying the following techniques:
- Setting up Apache to serve static assets: This technique reduces the load on Mongrel, leaving it to concentrate on running Rails (what it's good at), and letting Apache serve static files like images, JavaScripts, and HTML (what Apache is good at).
- Using Apache to load balance onto a Mongrel cluster: Instead of using a single Mongrel instance to run the application, we can assemble a "pack" of Mongrels to handle the load. Apache sits in front of the pack, distributing requests evenly between the Mongrel instances.
- Advanced techniques for scaling: Going beyond a single machine, we'll discuss the de facto standard techniques for scaling a Rails application across multiple physical machines.
Note
FastCGI
In the bad old days, the main approach for deploying Rails applications was FastCGI. These days, this approach is largely deprecated in fresh production environments in favor of Mongrel. However, you may still find that FastCGI is the only option offered by your shared hosting company; most hosting companies offering Rails hosting use the FastCGI approach.
If you have the option, go for Mongrel; if you are forced to use FastCGI, good luck! I have always found it flaky and resource-intensive, and won't be covering it here.
The first performance improvement we can make to our infrastructure is to enable Apache to serve static files for our application (i.e. images, JavaScripts, and cached pages). In Chapter 6, we created a basic setup for putting a Mongrel instance behind Apache running mod_proxy; in this section, we will amend this basic setup, adding some rewrite rules to serve static files through Apache, bypassing Mongrel altogether.
The resulting configuration will look like this:
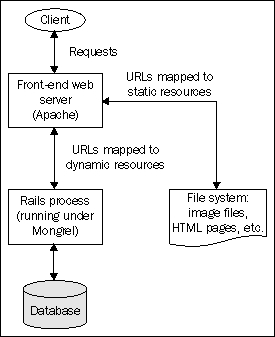
Any resources that exist on the filesystem are served directly by Apache; any remaining URLs are proxied through to the application running as a Mongrel instance.
Our basic setup in Chapter 6 didn't deal with the shared directories we're now using with Capistrano; our application is in the captain's home directory (/home/captain/apps/Intranet), but Apache's log files are still going into their default location. The first thing we can do is edit httpd.conf to log the virtual host into /home/captain/apps/Intranet/shared/log. Then we'll tell Apache that the DocumentRoot for this virtual host is in the current/public directory; that way, we can configure Apache to serve static files directly from there and bypass Rails. Here is the amended VirtualHost entry for intranet.company.local:
<VirtualHost *:80>
ServerName intranet.company.local
ServerAlias www.intranet.company.local
# Put the Apache logs in the shared Capistrano log directory
ErrorLog /home/captain/apps/Intranet/shared/log/intranet-error.log
CustomLog /home/captain/apps/Intranet/shared/log/intranet-access.log common
# Point the DocumentRoot into the current public directory
DocumentRoot /home/captain/apps/Intranet/current/public
# Proxy all requests through to Mongrel
ProxyPass / http://127.0.0.1:4000/
ProxyPassReverse / http://127.0.0.1:4000/
ProxyPreserveHost On
ProxyRequests Off
</VirtualHost>
Reload Apache to make the changes take, e.g. if you followed the Linux installation instructions in Chapter 6 you can do:
$ /etc/init.d/apache2.2 graceful
At the moment, Apache isn't doing anything other than proxying all requests, so the Intranet logs won't contain any hint that we've moved the Apache log files. In the next section, we'll get Apache to serve static files, which will add some entries to the logs.
To get Apache to serve static files, we first need to make some changes to the permissions on the directory where those files exist. We can do this using a standard<Directory> directive for the public directory of our Rails application in httpd.conf:
<Directory /home/captain/apps/Intranet/current/public>
AllowOverride none
Options FollowSymLinks
Order allow,deny
Allow from all
</Directory>
Next, we modify the<VirtualHost> entry, adding some directives which invoke the powerful features of Apache's mod_rewrite module (which we enabled while installing Apache in Chapter 6). The mod_rewrite module can be configured to change incoming request URLs into different ones, based on the conditions specified. Here's what the rewrite rules look like (highlighted):
<VirtualHost *:80>
ServerName intranet.company.local
ServerAlias www.intranet.company.local
# Put the Apache logs in the shared Capistrano log directory
ErrorLog /home/captain/apps/Intranet/shared/log/intranet-error.log
CustomLog /home/captain/apps/Intranet/shared/log/intranet-access.log common
# Point the DocumentRoot into the current public directory
DocumentRoot /home/captain/apps/Intranet/current/public
# Turn on the rewrite engine
RewriteEngine on
# Useful for debugging rewriting
RewriteLog /home/captain/apps/Intranet/shared/log/intranet-rewrite.log
RewriteLogLevel 9
# 1. If you're using page or action caching,
# this directive will serve cached files direct from Apache
RewriteRule ^([^.]+)$ $1.html [QSA]
# 2. Check whether there is a file matching the request path
RewriteCond %{DOCUMENT_ROOT}%{REQUEST_FILENAME} !-f
# 3. Only triggered if no matching file found; proxy through
# to Mongrel
RewriteRule ^/(.*)$ http://127.0.0.1:4000%{REQUEST_URI} [P,QSA,L]

</VirtualHost>
Note the use of RewriteEngine on, which makes mod_rewrite available for this virtual host; and a couple of directives to turn on verbose rewrite engine debugging, logged into a new log file (intranet-rewrite.log) alongside the Apache and Rails logs.
More complex are the RewriteCond and RewriteRule directives. Below, each of the numbered highlighted sections in the code is explained in more detail:
The first RewriteRule directive specifies that any request URLs matching the regular expression ^([^.]+)$ (i.e. any that don't contain a period character) are transformed using the substitution $1.html. In effect, this turns every request URL without a period character into a request for the same URL with .html appended. The odd-looking [QSA] flag states that any querystring attached to the original request URL should then be appended to the new .html URL too. (QSA stands for "Query String Attach".)
- For example, if the original request was for:
http://intranet.company.local/people/search?term=angela
This would get rewritten by this rule to:
http://intranet.company.local/people/search.html?term=angela
(Note the extra .html.)
The RewriteCond directive specifies that any RewriteRule directives that follow it should only be applied if there is no file at the location %{DOCUMENT_ROOT}%{REQUEST_FILENAME}. (-f is the mechanism for telling mod_rewrite to test for the existence of a file; !-f only returns true if the specified file doesn't exist).
- %{DOCUMENT_ROOT} returns the absolute path to the document root for the host: in this case, /home/captain/apps/Intranet/current/public.
%{REQUEST_FILENAME} returns the path part of the URL, minus the querystring.
When does this RewriteCond return true and trigger rewriting by the subsequent rules? As an example, take this URL: http://intranet.company.local/people/search.html?term=angela.
Here, the %{REQUEST_FILENAME} variable contains: /people/search.html.
So the RewriteCond only returns true if there is a file at the path: /home/captain/apps/Intranet/current/public/people/search.html.
The final RewriteRule, only triggered if there is no static file that can serve the request (see bullet point 2), proxies any remaining requests through to the Mongrel instance in the background. The [P, QSA, L] flags cause Apache to proxy the request (P), attach the querystring (QSA) and stop processing rewrite rules if this one is matched (L). (Note that using mod_rewrite enables us to remove the mod_proxy directives we used previously.)
- To see this in action, we'll return to the request for the URL: http://intranet.company.local/people/search?term=angela
This URL has the REQUEST_URI: /people/search and querystring: term=angela
The rewrite rule would convert this URL to: http://127.0.0.1:4000/people/search?term=angela, which would be served by the Mongrel instance running on localhost, port 4000.
Remember to reload Apache once you've edited the httpd.conf file:
$ /etc/init.d/apache2.2 graceful
Once we've set this up, how do we know it's working? That's what the rewrite log file, intranet-rewrite.log, is for.
For URLs proxied through to Mongrel you should see entries like this in the rewrite log:
192.168.13.1 - - [11/Jun/2007:17:08:16 +0100] [intranet.company.local/sid#8126278][rid#8185fe8/initial] (2) forcing proxy-throughput with http://127.0.0.1:4000/companies
192.168.13.1 - - [11/Jun/2007:17:08:16 +0100] [intranet.company.local/sid#8126278][rid#8185fe8/initial] (1) go-ahead with proxy request proxy:http://127.0.0.1:4000/companies [OK]
For static files in the public directory, served directly by Apache without rewriting, you should see entries like this in the rewrite log:
192.168.13.1 - - [11/Jun/2007:17:08:16 +0100] [intranet.company.local/sid#8126278][rid#818a668/initial] (1) pass through /stylesheets/base.css
For cached pages and actions, where the URL is rewritten to one with .html on the end, you should see log entries like this in the rewrite log:
192.168.13.1 - - [11/Jun/2007:17:15:42 +0100] [intranet.company.local/sid#8126278][rid#8185fe8/initial] (1) go-ahead with /home/captain/apps/Intranet/current/public/people.html [OK]
In the previous section, we saw how to serve static files from Apache while proxying requests for dynamic content through to a single Mongrel instance. In this section, we'll see how to scale this architecture by employing several Mongrel instances as the target for Apache to proxy dynamic requests onto.
The resulting configuration will look like this:
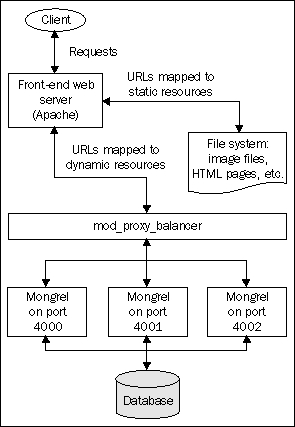
In our configuration, we'll use three Mongrel instances, running on ports 4000, 4001 and 4002, to serve dynamic requests. Three instances is a good figure to start out with when creating a Mongrel cluster, as it provides a decent amount of redundancy (you can lose two instances and the application will keep running) and performance (for example, this will help prevent the application from grinding to a halt during large file uploads).
Note
The setup we'll discuss here will still be serving data from a single database, files off a single file system, and session data from a single session store, all located on one server. Where you need to introduce multiple physical machines and possibly multiple domains, you'll need to think about using a distributed session store and/or database cluster. The section Advanced Scaling later in this chapter covers these techniques in overview.
There are two steps involved in setting up this arrangment:
- Setting up the Mongrel cluster
- Configuring Apache to proxy dynamic requests to the cluster (rather than the current arrangement, where requests go to a single Mongrel instance).
We'll cover each step in the following sections.
The mongrel_cluster gem provides commands for configuring a cluster of Mongrel instances (see the section Mongrel: a Better Way to Run Rails Applications in Chapter 3). We'll use this to set up our cluster on the production server. Run this command to create a configuration file for our cluster:
$ mongrel_rails cluster::configure -e production -p 4000 -N 3
-c /home/captain/apps/Intranet/current/ -a 127.0.0.1
-C /home/captain/apps/Intranet/shared/system/intranet_cluster.yml
-P /home/captain/apps/Intranet/shared/pids/mongrel.pid
--user captain --group captain
The flags set the following elements of the configuration:
-e= environment to run each instance under.-p= port number of the first Mongrel.-N= number of Mongrel instances to start in the cluster; the ports for the instances start from the one set using the-pflag, with the port number being incremented by 1 for each subsequent instance; in our case, we'll end up with instances on ports 4000, 4001, and 4002.-c=RAILS_ROOTdirectory of the application to serve.-a= run the instances only on the IP address specified; here we're restricting the Mongrel instances to only respond to requests originating on the same machine (localhost).-C= location of the generated configuration file.-P= where to put thepidfile for the cluster; each instance gets its ownpidat this location, with the port number inserted before the suffix; in our case, we'll get the PID filesmongrel.4000.pid, mongrel.4001.pidandmongrel.4002.pid.--user= user to run the Mongrel instances as; note we've set it to thecaptainuser.--group= group to run the Mongrel instances as.
Here's what the resulting configuration file (/home/captain/apps/Intranet/shared/system/intranet_cluster.yml) looks like:
user: captain
cwd: /home/captain/apps/Intranet/current/
port: "4000"
environment: production
group: captain
address: 127.0.0.1
pid_file: /home/captain/apps/Intranet/shared/pids/mongrel.pid
servers: 3
Next, we need to add a script to the system that will start our cluster. Before we do this, though, we'll stop our existing Mongrel instance:
$ sudo /etc/init.d/mongrel_intranet stop
We can now edit our /etc/init.d/mongrel_intranet script to start the cluster, rather than an individual Mongrel instance:
#!/bin/bash
# Ubuntu Linux init script for Rails application in cluster
# set these variables to your production environment
CONF=/home/captain/apps/Intranet/shared/system/intranet_cluster.yml
APP_NAME="Intranet"
# more variables - you shouldn't need to change this
MONGREL="/usr/bin/mongrel_rails"
# load library functions
. /lib/lsb/init-functions
case "$1" in
start)
log_begin_msg "Starting Mongrel cluster: $APP_NAME"
$MONGREL cluster::start -C $CONF
log_end_msg 0
;;
stop)
log_begin_msg "Stopping Mongrel cluster: $APP_NAME"
$MONGREL cluster::stop -C $CONF
log_end_msg 0
;;
restart)
log_begin_msg "Restarting Mongrel cluster: $APP_NAME"
$MONGREL cluster::restart -C $CONF
log_end_msg 0
;;
*)
echo "Usage: $0 {start|stop|restart}"
exit 1
;;
esac
exit 0
To start the cluster manually, do:
$ sudo /etc/init.d/mongrel_intranet start
You can also use stop and restart to control the cluster as a single entity.
Test the cluster by browsing to http://localhost:4000/, http://localhost:4001/ and http://localhost:4002/. You should see the same Rails application at each location. Note that you won't be able to see these servers from any machine other than the one they're running on (i.e. on localhost), as we specified they should only serve on the localhost IP address.
We'll also need to use this new script inside our Capistrano recipe to start/stop/restart the cluster when we deploy a new version of the application (replacing our previous versions of these tasks in config/deploy.rb):
# Cluster config file location
cluster_config = "#{shared_path}/system/intranet_cluster.yml"
desc "Override the spinner task with one which starts Mongrel"
task :spinner, :roles => :app do
run <<-CMD
sudo mongrel_rails cluster::start -C #{cluster_config}
CMD
end
desc "Alias for spinner"
task :start do
spinner
end
desc "Override the restart task with one which restarts Mongrel"
task :restart, :roles => :app do
run "sudo mongrel_rails cluster::restart -C #{cluster_config}"
end
desc "Stop Mongrel"
task :stop, :roles => :app do
run "sudo mongrel_rails cluster::stop -C #{cluster_config}"
end
The next section covers how to load-balance from Apache onto our new Mongrel cluster.
The mod_proxy_balancer module in Apache enables you to set up several workers (servers that received proxied requests from the load balancer) and distribute requests to a single virtual host across them. In our case, this means that each Mongrel is a worker, which gets a share of the requests coming into http://intranet.company.local/ dished out to it; any requests for static files are still served directly by Apache, without touching the cluster. mod_proxy_balancer does its best to ensure that the load on each of the servers is evenly balanced; you have a choice of whether load is determined using the number of requests served, or the number of bytes. We'll use the number of requests (the default) and configure Apache to evenly distribute load across the cluster.
The first step in configuring the proxying through to a cluster is to tell Apache where the workers are. This is done in the httpd.conf file as follows:
<Proxy balancer://intranet_cluster>
BalancerMember http://127.0.0.1:4000
BalancerMember http://127.0.0.1:4001
BalancerMember http://127.0.0.1:4002
</Proxy>
This can go above the VirtualHost directive for intranet.company.local. We simply specify a Proxy directive with a special balancer:// URL; then add a BalancerMember directive for each of our Mongrel instances.
Finally, you reference the balancer inside the rewrite rules for the VirtualHost, instead of http://localhost:4000 (the URL of our old, singular Mongrel instance). The necessary change is highlighted below; note that I've also removed rewrite debugging and the directive for serving cached pages and actions, which aren't used in Intranet:
<VirtualHost *:80>
ServerName intranet.company.local
ServerAlias www.intranet.company.local
# Put the Apache logs in the shared Capistrano log directory
ErrorLog /home/captain/apps/Intranet/shared/log/intranet-error.log
CustomLog /home/captain/apps/Intranet/shared/log/intranet-access.log common
# Point the DocumentRoot into the current public directory
DocumentRoot /home/captain/apps/Intranet/current/public
# Turn on the rewrite engine
RewriteEngine on
# Static files can be served straight off the filesystem
RewriteCond %{DOCUMENT_ROOT}%{REQUEST_FILENAME} !-f
RewriteRule ^/(.*)$ balancer://intranet_cluster%{REQUEST_URI} [P,QSA,L]
</VirtualHost>
Reload Apache to make the changes take effect:
$ sudo /etc/init.d/apache2.2 graceful
If you now browse to http://intranet.company.local/, you are seeing dynamic pages being delivered by the Mongrel workers in the cluster. If you are one of those people (like me) who likes to see things in writing before you believe them, you can turn on debugging for your Mongrel cluster in the intranet_cluster.yml file like this:
user: captain
cwd: /home/captain/apps/Intranet/current/
port: "4000"
environment: production
group: captain
address: 127.0.0.1
pid_file: /home/captain/apps/Intranet/shared/pids/mongrel.pid
servers: 3
debug: true
This will create a directory, shared/log/mongrel_debug, containing more information than you are likely to need about what your Mongrel cluster is doing. For proof that the cluster is working, the rails.log file should contain entries like this:
Fri Jun 15 12:13:06 BST 2007 REQUEST /people
--- !map:Mongrel::HttpParams
SERVER_NAME: 127.0.0.1
HTTP_MAX_FORWARDS: "10"
PATH_INFO: /people
HTTP_X_FORWARDED_HOST: intranet.company.local
HTTP_USER_AGENT: ApacheBench/2.0.40-dev
SCRIPT_NAME: /
SERVER_PROTOCOL: HTTP/1.1
HTTP_HOST: 127.0.0.1:4002
REMOTE_ADDR: 192.168.13.1
...
HTTP_X_FORWARDED_SERVER: intranet.company.local
REQUEST_URI: /people
SERVER_PORT: "4002"
...
Browse a few pages across the application, have a check in the logs, and make sure that each port number in the cluster appears at least once in this file. That should be enough proof.
However, if you really need visible proof right before your very eyes, here's how you can see the actual host and port of the Mongrel instance serving each page of an application. First, add a before_filter to app/controllers/application.rb:
class ApplicationController < ActionController::Base
# ... other methods ...
before_filter do |controller|
controller.instance_variable_set(:@host_and_port,
controller.request.env['HTTP_HOST'])
end
# ...
end
This sets an instance variable called @host_and_port for every action on every controller; this returns the true host and port of the Mongrel instance serving the request, rather than the one in the request URL.
Next, display that instance variable in the application layout (app/views/layouts/application.rhtml), e.g. in the page<title> element:
<!DOCTYPE html PUBLIC "-//W3C//DTD XHTML 1.0 Strict//EN" "http://www.w3.org/TR/xhtml1/DTD/xhtml1-strict.dtd">
<html xmlns="http://www.w3.org/1999/xhtml" lang="en_GB" xml:lang="en_GB">
<head>
<title><%= @page_title || 'Intranet' %> on
<%= @host_and_port %></title>
...
Now if you visit http://intranet.company.local/, you should notice that the host and port number are included in the title bar of the browser; if the cluster is working correctly, the port number should change occasionally between requests. That should satisfy even the hardest skeptic that the cluster is working and being proxied to correctly.
Throughout this chapter, we've seen how to progressively improve the performance of a Rails application; first by identifying bottlenecks, then by improving performance using caching, and finally by scaling up using Apache and Mongrel clustering. The resulting configuration is strong enough to manage significant loads. If you are building applications to service an intranet (as we've been doing throughout this book), this configuration is likely to be sufficient.
However, if your application is on the public Internet and popular, you are likely to face other issues which this arrangement isn't able to cope with. Here are a few brief tips and pointers about improving performance by further scaling out your Rails infrastructure:
- Use a faster session and cache store: We've stuck with the file system for caching both session data and cached fragments. However, input-output (IO) to a hard disk can often prove a bottleneck for large applications. You can improve the IO speed by writing temporary data to more efficient types of store, rather than to the file system. The de facto standard way of doing this for large Rails application is memcached (http://danga.com/memcached/). Rather than storing data on the disk, memcached acts like a big "lookup table" in memory where you can store session and cache data. IO to memory is far faster than IO to disk, so expensive disk operations can be entirely eliminated by utilising it. See http://wiki.rubyonrails.com/rails/pages/MemCached for some links to useful tutorials and other information. While memcached isn't necessary in our case, you can use it to make impressive performance improvements to heavily-used Rails applications. Another less-heavyweight approach would be to use the database as a session store; see the Rails documentation for
ActionController::Basefor details. - Add more hardware: In the configuration we've used here, everything is running on a single machine. Another option to scale out the infrastructure would be to add more hardware and distribute servers across it; for example, put the database server on one machine and the Mongrel instances plus Apache on another; or have a separate machine dedicated to Apache, for serving all your static assets like images, stylesheets, and JavaScripts (Rails out of the box can cope with this scenario, and has a
config.action_controller.asset_hostsetting inconfig/environments/production.rbwhere you can specify a separate "asset server" for serving all static files). - Replicate or cluster the database: If the database is the bottleneck in your application, you could split the database functionality across two machines, and replicate from the master to the slave. The slave could then be used for retrieval (e.g. for reporting or producing relatively-static parts of the website) while the master could be used to handle updates (e.g. taking customer orders). See the MySQL website for more details: http://dev.mysql.com/doc/refman/5.1/en/replication.html.
Another approach might be to cluster MySQL (or whichever database you're using), to effectively turn multiple database servers across serveral machines into one or two "super" database servers. See the MySQL website for more details: http://dev.mysql.com/doc/refman/5.1/en/mysql-cluster.html.
- Use a faster load balancer: Apache is a general-purpose web server, not specifically optimized for load balancing. If you really just want a load balancer and not a large web server, you could potentially get more performance by using a smaller, more specialized tool. The current flavor of the month in the Rails community is Nginx (http://nginx.net/), an exceedingly fast, small web server and load balancer, which is relatively easy to configure for use with a Mongrel cluster. You could also try a dedicated load balancer like Pound (http://www.apsis.ch/pound/) or Pen (http://siag.nu/pen/). For the extreme Rails enthusiast, there is also the option of using a hardware load balancer across large numbers of Mongrel instances—see http://tinyurl.com/gefp5 for a thorough round-up of the issues involved.