ActiveRecord models are very powerful: they give you a great deal of control over how data is inserted into the database. As mentioned previously, they act as wrappers around your database tables: instead of writing a SQL statement to perform operations on a table, you create instances of ActiveRecord model classes, modify their properties, and then save them. ActiveRecord handles the SQL generation and execution in the background, so you don't have to write SQL by hand (though you can if you need to). You can also manage associations between tables using convenience methods on your models which removes much of the complexity it normally entails.
In this section, we will look at these aspects of models:
- Using finders to pull information out of tables.
- How Rails maps model attributes onto fields in database tables.
- Writing validation code for models.
- Defining associations between models.
- Using unit tests to ensure models and associations behave correctly.
In this section, we'll be manipulating our models using the Rails console (command line with the Rails environment loaded). This helps enforce the separation between models and other components: by ignoring the graphical interface, we can concentrate on implementing business logic. This approach doesn't necessarily suit every type of application: for example, where work-flow is complicated and you aren't clear what the business rules are, exploring the interface using paper prototypes can help clarify what the application should do. As Rory and Jenny have a clear idea of what the Intranet application should do, a data-centric approach makes sense.
The first step is to start the console:
$ ruby script/console
Loading development environment.
>>
At the moment, we don't have any records in the database. We can use the console to add a few to the people table; at the same time, we can get an insight into how ActiveRecord operates.
If we're adding records to the people table, we need to create instances of the Person model class like this:
>> me = Person.new
=> #<Person:0xb7492134 @new_record=true, @attributes={"updated_at"=>nil, "title"=>nil, "notes"=>nil, "gender"=>nil, "address_id"=>nil, "company_id"=>nil, "date_of_birth"=>nil, "telephone"=>nil, "first_name"=>"", "last_name"=>"", "created_at"=>nil, "keywords"=>nil, "mobile_phone"=>nil, "email"=>""}>
What happened here? We created a new Person instance by calling the new method on the Person class. The console shows us the return value from each command we enter: in this case, the new method returns a Person instance, represented by #<Person:...>. The character string 0xb7492134 is just an internal identifier for the object, used by Ruby.
Note that this new instance has an instance variable called @attributes; this is simply a hash, where the keys are the names of the fields in the people table ("gender","title", "notes" etc.); and the values of the keys are the current settings for those attributes (all nil at the moment). If we saved this model instance to the database now, we'd end up with a record full of empty fields. Instead, let us set some field values then save the record:
>> me.first_name = 'Elliot'
=> "Elliot"
>> me.last_name = 'Smith'
=> "Smith"
>> me.save
=> true
Here we are calling some of the instance methods ActiveRecord added to the Person class. Each attribute in the @attributes hash has a corresponding so-called "setter" method, which can be used to set the value of an attribute. The value you pass to the setter should match the database field type: strings for VARCHAR and TEXT fields, dates for DATE fields, integers for INT fields, etc.
At the end of the sequence of commands above, the save method is called to save the record to the database. (If you are curious, you can use your MySQL client to check that the record has been inserted.)
You may be thinking that you can see what cleverness ActiveRecord is up to by looking at the Person model class. Let's open it up in Eclipse. All the model files are stored in the app/models directory; the Person model is in the file called person.rb and looks like this:
class Person < ActiveRecord::Base
end
In fact, none of the setter methods on the class are visible in the source code: they are all being added by ActiveRecord behind the scenes. A set of methods for accessing attributes of a model instance ("getters") has also been added:
>> me.first_name
=> "Elliot"
>> me.last_name
=> "Smith"
The update_attributes method added by ActiveRecord enables multiple attributes to be updated simultaneously from a hash, where the keys are the names of the fields. The update is followed by a save to the database:
>> me.update_attributes(:email => "[email protected]", :title => "Dr.")
=> true
(This is used extensively in Rails to save values from submitted forms into the database.)
Other useful methods are the find* variants ("finders"), which warrant their own section (next).
ActiveRecord includes a range of methods for retrieving records from the database, known as finder methods. Each time you create a model class, these methods become available to that class; so each of our classes already has this capability.
Finders, like the attribute setters and getters of the previous sections, insulate the developer from writing SQL. They can be used to retrieve individual records, a whole set of records, or subsets of the records in a table. While working with ActiveRecord from the console, finders can be useful for retrieving records to work with.
We're going to use the console in the next few sections (start it with ruby script/console from inside your RAILS_ROOT directory). It is also useful if you have some records to experiment with: use the instructions in the previous section to insert a few.
The simplest form of finder is the one which returns all of the records in a table:
>> results = Person.find :all
=> [#<Person:0xb7433d78 ...>, #<Person:0xb7433d3c ...>, #<Person:0xb7433d00 ...>, #<Person:0xb7433cc4 ...>, #<Person:0xb7433c88 ...>]
(Again, output is truncated for brevity.)
This finder returns an array of model instances; in this case, instances of our Person class. We can iterate through these with the standard array methods provided by Ruby, e.g.
>> results.each { |record| puts record.last_name }
Harker
Smith
Smith
Junket
Tribble
Note
The command line used above:
results.each { |record| puts record.first_name }
is a short-hand block syntax understood by Ruby. The each method effectively calls the block once for every element of the array, passing the element into the block as the record argument.
We have already seen the longer block syntax in the section Building a Model with Migrations, where it was used to define a migration.
It is also possible to limit the number of records returned, e.g. to return the first 5 records (when the people table is ordered by id):
>> Person.find :all, :limit => 5
Or to get a subset of records starting at some offset:
>> Person.find :all, :limit => 5, :offset => 5
The above gets records 6-10 from the people table (ordered by the id field).
ActiveRecord provides a default getter method for each attribute of a model class; these attributes get mapped onto fields in the database table. However, there are some situations where the default getters and setters are inadequate. For example, if you want to provide an alternative representation of a field or combine multiple real attributes into a single output attribute, you might need a custom getter.
In Rails, a pseudo-field derived from other real fields is referred to as a virtual attribute: while it is derived from and accessed in the same way as actual field values in the database table, a virtual attribute doesn't have a corresponding field of its own.
We'll write a full_name method, which will concatenate a person's title, first name, and last name into a formatted string. We also need to cope with situations where title has not been set, as it is not a required attribute:
class Person < ActiveRecord::Base
# ... other methods ...
def full_name
out = (title.blank? ? '' : title + ' ')
out + first_name + ' ' + last_name
end
end
We'll make use of this in the next few sections when displaying records we retrieve.
If we want to order the records, we can do this by passing an extra argument to the find method call:
>> results = Person.find :all, :order => 'last_name DESC'
...
>> results.each { |record| puts record.full_name }
Mrs. Jo Harker
Ms. Sarah Junket
Mr. Frank Smith
Dr. Elliot Smith
Mr. Jeff Tribble
Notice that the records are now ordered in descending order by last name (which is why Frank Smith comes before Elliot Smith); you can specify ASC to sort in ascending order (the default, if you specify neither ASC or DESC). You can pass any SQL fragment, which would ordinarily follow the ORDER BY keywords in a SQL statement, e.g.
>> results = Person.find :all, :order => 'last_name, first_name'
...
>> results.each { |record| puts record.full_name }
Mrs. Jo Harker
Ms. Sarah Junket
Dr. Elliot Smith
Mr. Frank Smith
Mr. Jeff Tribble
(Sorting by last name in ascending order, then by first name in ascending order where records have matching last names.)
We can find a single record by ID:
>> Person.find 4
=> #<Person:0xb74a91d4 ...>
Note that this doesn't return an array, but a single instance of the Person model class.
What ActiveRecord does in the background is execute the following MySQL query:
SELECT * FROM people WHERE (people.id = 4) LIMIT 1;
In some cases, you won't want to use all of the fields in the table. You can improve the efficiency of your queries by just returning the fields you need using the :select option:
>> Person.find 4, :select => 'first_name'
=> #<Person:0xb74d8604 @attributes={"first_name"=>"Sarah"}>
In this example, the query is restricted to just returning the first_name field. Note that you will need to retrieve a person's ID if you want to be able to save the model instance back to the database. Also note the :select will work with find :all, too.
We can also retrieve an array of records with specific IDs:
>> Person.find [1,3]
=> [#<Person:0xb74a3d4c ...>, #<Person:0xb74a3d10 ...>]
One method for finding records by criteria is by passing a :conditions option to find. For example, to find the first person with the last name "Junket":
>> Person.find :first, :conditions => "last_name = 'Junket'"
Or to find everyone with the surname "Smith":
>> Person.find :all, :conditions => "last_name = 'Smith'"
The :conditions option can also be passed an array, consisting of a SQL "template" as the first element, followed by the values to substitute into the template:
>> Person.find :all, :select => 'last_name, first_name',
:conditions => ["last_name = ?", 'Smith']
=> [#<Person:0xb74556ec ...>, #<Person:0xb74556b0...>]
Note what we've done here is passed an array to the :conditions find option, with a template and a substitution:
:conditions => ["last_name = ?", 'Smith']
The template should be a SQL fragment, suitable for placing after the WHERE clause in a SQL query. Any values to be substituted are represented by question marks (?) in the template. The :conditions array can be as complex as you want:
>> Person.find :all, :conditions => ["date_of_birth < ? AND last_name = ?", 20.years.ago, 'Smith']
=> [#<Person:0xb741da58...>]
This finds everyone born more than 20 years ago with the last name "Smith".
Note
By using the template plus substitutions format for conditions, we don't have to worry about correctly escaping strings in our SQL query, as ActiveRecord does it for us; we can also be assured that ActiveRecord will sanitize any values substituted into the SQL string, helping prevent SQL injection attacks.
It is also possible to use LIKE statements as :conditions to perform wild-card matches. However, note that these aren't as platform-portable as the above SQL statements. For example, to perform case-insensitive matches in PostgreSQL, you have to use the ILIKE keyword (rather than LIKE); while MySQL defaults to case-insensitive matching.
In the case of MySQL, we can do a wild-card match using LIKE with this syntax (to get everyone whose first name starts with "j" or "J"):
>> results = Person.find :all, :conditions => "first_name LIKE 'j%'"
...
>> results.each { |record| puts record.full_name }
Mr. Jeff Tribble
Mrs. Jo Harker
ActiveRecord provides one further set of conveniences for finding records: dynamic attribute-based finders. This mouthful means that you can make up finders based on field names in the table, on the fly. For example, to get all the people in the database with the first name "Elliot".
>> Person.find_by_first_name 'Elliot'
You can also specify multiple fields to filter on by joining the names of the fields with "and", e.g. to get everyone with the first name "Elliot" and last name "Smith":
>> Person.find_by_first_name_and_last_name 'Elliot', 'Smith'
By default, dynamic finders will return a single record; but they can also return an array by using find_all_by, instead of find_by:
Person.find_all_by_last_name "Smith"
Note that you can also pass standard finder options to dynamic finders, like :select and :conditions:
>> Person.find_by_first_name 'Elliot', :select => 'first_name'
>> Person.find_by_last_name 'Smith', :conditions => ['date_of_birth < ?', 20.years.ago], :select => 'first_name'
One last resort for performing queries is to pass the raw SQL to ActiveRecord yourself. Instead of using the standard find method, you create the SQL "manually" (as you would if crafting a PHP application without an ORM layer). You then execute this string using the find_by_sql method:
>> Person.find_by_sql "SELECT first_name FROM people"
Note that find_by_sql returns an array of instances.
Note
In some situations, a call to find_by_sql is far faster than the standard find method. This is because ActiveRecord doesn't need to inspect the model classes to work out which fields are in the table and then generate the SQL. Instead, you are removing a chunk of processing time by doing the dirty work yourself. This approach is worth considering where your application has database bottlenecks or where it has many large tables.
Don't forget that you can add your own finder-style methods to your class for extra convenience, too. In our Intranet application, we are very often going to want to get a list of everyone in the people table, sorted by name. We can write a wrapper round find to do this, inside the Person class:
class Person
...
def self.find_all_ordered
find :all, :order => 'last_name, first_name'
end
end
Specifying a method name starting with the keyword self creates a new class-level method. We can call it like this:
>> results = Person.find_all_ordered
...
>> results.each { |record| puts record.full_name }
Mrs. Jo Harker
Ms. Sarah Junket
Dr. Elliot Smith
Mr. Frank Smith
Mr. Jeff Tribble
(This is the same output as when we used find in the section Sorting Records.)
ActiveRecord does a lot of work in the background creating SQL statements for you. If you are curious about what ActiveRecord is doing, you can see the SQL statements in their raw form by reading the RAILS_ROOT/log/development.log file. For example, here's what Person.find :all gets translated into by Rails:
[4;36;1mPerson Load (0.002825)[0m [0;1mSELECT * FROM people [0m
The unusual characters are in the output ("[4;36;1m", "[0m" etc.), are colorization specifications, so that in editors which are capable of understanding ANSI colorization codes, you get different colors for different elements of the log. My preference is to turn off colorization by adding this line to the bottom of the config/environment.rb file:
ActiveRecord::Base.colorize_logging = false
This gives you far more sensible log output:
Person Load (0.000403) SELECT * FROM people
The important part of this, besides the SQL statement, is the number between the brackets. This shows the length of time (in seconds) that the query took to execute.
Looking at the raw SQL queries can sometimes help identify problems with badly-formatted queries, or where large inefficient queries are being generated, which could be slimmed down using find_by_sql. We'll have more to say about the logs in the section on logging in chapter 6.
Unfortunately, if you are looking at logs in Eclipse, you may find that the log file opens in an external editor. You can setup Eclipse to open them instead as follows:
- Go to the Window menu and select Preferences.
- In the Preferences dialog box, go to General | Editors | File Associations:
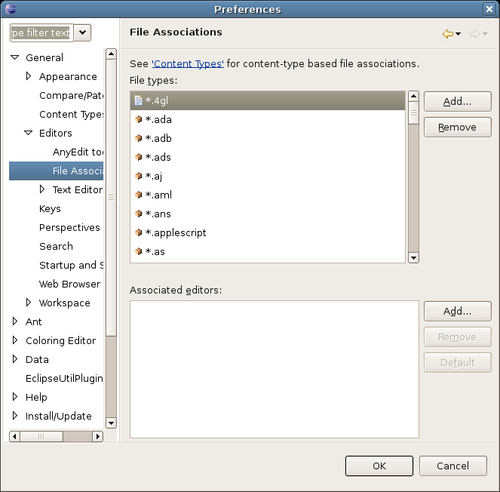
- Click the Add button to add a new file association.
- Enter
*.logfor the File type field: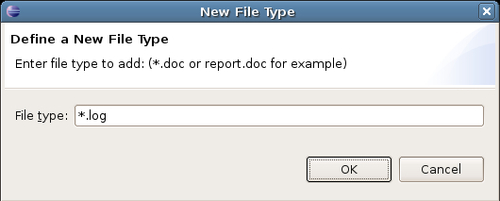
- Click OK.
- Click on Add (next to the Associated editors field) to setup an editor for this file type.
- In the Editor Selection dialog, select the SQL Text Editor option:
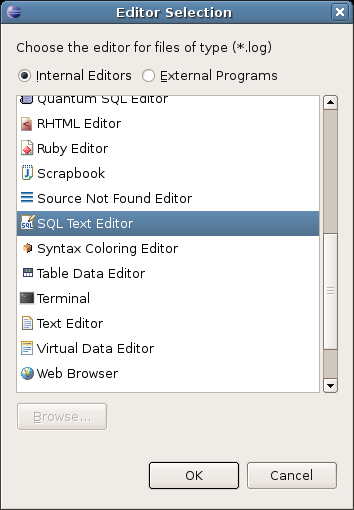
This editor does a decent job of highlighting SQL code, while leaving the rest of the logs readable. If you don't have the SQL Text Editor, choose Text Editor instead.
- Click OK.
- In the Preferences dialog, click OK.
The association should now be set up. Try opening a log file in Eclipse to check if it works.
The models we developed in the previous sections are working how we intended: we can insert new records into the database and retrieve them again. However, the current models do nothing to validate our input, making it possible to add new records where all of the fields contain empty strings. This is despite the fact that we specified that some fields in the database tables could not be set to null, as ActiveRecord automatically sets any unset string attributes to the empty string. MySQL treats an empty string differently from NULL; so a record with empty strings for the first_name, last_name, or email field is acceptable to MySQL when it is inserted. In the case of the Intranet application, this could mean many contact records without contact information.
Validation of data input is another aspect of ActiveRecord. In traditional web applications, validation can be cumbersome, to say the least. ActiveRecord provides a framework which makes validation virtually trivial. The validation framework handles validation in the model, independently of the front-end, so we can modify our models and test our validations using the console. We will also be using unit tests to verify our validation code wherever necessary (see the Testing section later in this chapter), rather than by manually testing through a front-end.
We'll take a look at validation in the context of the Intranet application, rather than in the abstract. We can set up most of the required validations using the validates_* methods in ActiveRecord, a whole family of methods for appending validation code to models. We will be using the most common and useful ones, demonstrating in detail how they can be applied to our Person model class.
We will also see how to add more complex custom validation to models, to capture situations not covered by the macro methods; then add validation to our other two models (Company and Address).
Recall that in our data structure (see Chapter 2) we specified that each person added to the people table had to meet the following validation criteria:
first_nameandlast_nameshould not be empty.emailshould be a valid email address and unique to this person.gendershould be set to "M" or "F".address_idandcompany_idshould reference records in the appropriate tables.
We can apply these validations by adding checks on the attributes of instances of the Person model, as follows:
Use the validates_presence_of method for this. The validation code is added to the class definition, inside the app/models/*.rb files. In the case of the Person class, it goes in app/models/person.rb:
class Person < ActiveRecord::Base
validates_presence_of :first_name,
:message => "Please enter a first name"
validates_presence_of :last_name,
:message => "Please enter a last name"
...
end
validates_presence_of is actually a method call on the Person class, which adds new instance methods to the class. The new instance methods are automatically called when a record is created or updated. In this case, they check that the specified attributes (first_name and last_name) contain non-blank values (i.e. not nil or the empty string).
A symbol representing the name of the attribute (e.g. :first_name, :last_name) is the first argument passed to the method. The second :message argument used in the code above is optional; if you leave it off, ActiveRecord will use a default error message. In the case of validates_presence_of, the default message is:
"<attribute> can't be blank"
You can restrict when validations are applied using an optional :on argument, e.g:
# validate when creating new records and updating existing records
# (this is the default)
validates_presence_of :first_name, :on => :save
# ONLY validate when creating new records
validates_presence_of :first_name, :on => :create
# ONLY validate when updating existing records
validates_presence_of :first_name, :on => :update
The :on option is available on all of the validates_* methods covered here. However, in the Intranet application, we can just use the default behavior, and validate on both creation of new records and updates to existing ones.
To test your validation code, use the console:
>> p = Person.new
=> #<Person:0xb7436850 ...>
>> p.save
=> false
>> p.errors
#<Person:0xb7436850 @new_record=true, @errors=#<ActiveRecord::Errors:0xb74349d8 @errors={"first_name"=>["Please enter a first name"], "last_name"=>["Please enter a last name"]} ...>
The errors method returns an object containing any current errors on the model. This method gets the content of the @errors instance variable, which contains the validation error messages, keyed by the name of the attribute. You can access errors for an individual attribute too:
>> p.errors['last_name']
=> "Please enter a last name"
>> p.errors['first_name']
=> "Please enter a first name"
Note
The default error message strings are stored in a hash in ActiveRecord. These strings are used if you don't use a :message option when calling a validation message. The default error messages hash can be accessed using: ActiveRecord::Errors.default_error_messages
You can set your own error messages by manipulating this hash. For example, to change the message for validates_presence_of errors (for example, from the default "can't be blank" to "must not be empty"), you can edit config/environment.rb and add this line:
ActiveRecord::Errors.default_error_messages[:blank] = "must not be empty"
Now any validates_presence_of failures will return an error message like "First name must not be empty".
The email attribute should comply with the standard format for email addresses. We can specify this as a regular expression. I tend to try and find a suitable expression on the web for this purpose; here's one, which works for about 99% of the cases (from, http://regular-expressions.info/email.html):
/^[A-Z0-9._%-]+@[A-Z0-9.-]+.[A-Z]{2,4}$/i
Note that it is possible that this regular expression will match some invalid email addresses, but it trades off completeness against simplicity.
We can apply this regular expression as a validation in the Person class using the validates_format_of method:
class Person < ActiveRecord::Base
EMAIL_REGEX = /^[A-Z0-9._%-]+@[A-Z0-9.-]+.[A-Z]{2,4}$/i
validates_format_of :email, :with => EMAIL_REGEX,
:message => "Please supply a valid email address"
...
end
Here we've set up a constant EMAIL_REGEX inside the Person class; this is then passed as the :with option to the validates_format_of method.
We can test this from the console:
>> p = Person.new(:first_name => 'Elliot', :last_name => 'Smith')
=> #<Person:0xb742dbec ...>
>> p.email = 'elliot at example.com'
=> "elliot at example.com"
>> p.save
=> false
>> p.errors['email']
=> "Please supply a valid email address"
>> p.email = '[email protected]'
=> "[email protected]"
>> p.save
=> true
Another constraint we need is to restrict email addresses, so that we only have a single person associated with a given email address. ActiveRecord enables us to add multiple validations to a single field simply by calling multiple validates_* methods, one after another:
class Person < ActiveRecord::Base
EMAIL_REGEX = /^[A-Z0-9._%-]+@[A-Z0-9.-]+.[A-Z]{2,4}$/i
validates_format_of :email, :with => EMAIL_REGEX,
:message => "Please supply a valid email address"
validates_uniqueness_of :email, :message => "This email address
already exists"
...
end
When you create a new record and validates_uniqueness_of is in place, ActiveRecord runs a query against the database. This checks whether any existing records have a field with a value equal to the attribute value in the new record. To demonstrate, let's add a new record using the console:
>> p = Person.new(:first_name => 'William', :last_name => 'Shakes', :email => '[email protected]')
=> #<Person:0xb790f4e0 ...>
>> p.save
=> true
That one was added OK. Now, try to add another record with the same email address:
>> p = Person.new(:first_name => 'Bill', :last_name => 'Shakes', :email => '[email protected]')
=> #<Person:0xb790f4e0 ...>
>> p.save
=> false
The save method returns false, meaning that the save failed. You can see, "This email address already exists" error message if you examine p.errors. You can also see the SQL query that ActiveRecord ran to check for uniqueness by examining the development.log log file:
SELECT * FROM people WHERE (people.email = '[email protected]') LIMIT 1
Because this query returns a record, the validation fails and the record isn't saved. It's worth bearing in mind that this type of validation runs a query on the database every time it is called: consider carefully when to use it, and whether this extra overhead is warranted for your application. In the Intranet application, accuracy of data is very important to prevent duplicate contacts, so a check is vital. In the case of signing up for a newsletter, ensuring unique email addresses may be less crucial: perhaps it's not so important if someone receives two copies of a newsletter each month, as they can always get in touch to correct the error if annoyed. In that situation, the extra overhead of validates_uniqueness_of may not be desirable.
The gender attribute should contain the value "M" or "F" ("male" or "female"). However, the people table merely constrains the gender attribute to being a one character string: it doesn't restrict that string to one of the two allowed values. We are going to enforce the constraint using validation.
The first step is to setup constant GENDERS, which stores the valid values for the gender attribute:
class Person < ActiveRecord::Base
GENDERS = {'M' => 'male', 'F' => 'female'}
...
end
We could have used a separate genders table to store this data, but decided not to (see the tip box below for the reason). The next step is to add some validation, which checks whether the gender attribute is set to one of the keys in the GENDERS hash:
class Person < ActiveRecord::Base
GENDERS = {'M' => 'male', 'F' => 'female'}
validates_inclusion_of :gender, :in => GENDERS.keys,
:message => "Please select 'M' or 'F' for gender"
...
end
The validates_inclusion_of method creates a validation which compares an attribute value against some enumerable object like an array. The enumerable object is passed using the :in option. In this case, we are using the keys of the GENDERS array as the enumerable object (referenced by GENDERS.keys). The validation is case-sensitive: so the values 'm' and 'f' will not be accepted. In the application, it is likely that we'd use radio buttons or a drop-down box to select gender in a form, in which case this validation might seem redundant. However, the rule ensures that, if our forms were maliciously manipulated to return an invalid or empty value for gender, we could catch errors before they got to the database.
Note
Why use a hash to store genders, rather than a table? This is a decision made for pragmatic reasons (to cut down on the number of database tables), but strictly speaking it goes against relational database principles: really, we should have a genders table, which stores all valid genders, and should reference the appropriate gender_id in the people table. For now, the hash solution is adequate: as we only use gender information in a single table, we are effectively folding the hypothetical genders table into the people table (the only place it is used). If we needed to use gender elsewhere, a separate table would be the proper approach.
Test the validation using the console:
>> p = Person.new
=> #<Person:0xb74ecafc ...>
>> p.gender = 'X'
=> "X"
>> p.save
=> false
>> p.errors
=> #<ActiveRecord::Errors:0xb74e83bc @errors={"gender"=>["Please select 'M' or 'F' for the genre"], ...} ...>
>> p.gender = 'M'
=> "M"
>> p.save
=> true
Validation of the related company and address for a person depends on associations with other tables. This type of validation is covered in detail in the sections Validating a Person's Address and Validating a Person's Company (after the associations, themselves have been set up).
Here is the complete validation code for the Person model:
class Person < ActiveRecord::Base
EMAIL_REGEX = /^[A-Z0-9._%-]+@[A-Z0-9.-]+.[A-Z]{2,4}$/i
validates_format_of :email, :with => EMAIL_REGEX,
:message => "Please supply a valid email address"
validates_uniqueness_of :email,
:message => "This email address already exists"
validates_presence_of :first_name,
:message => "Please enter a first name"
validates_presence_of :last_name,
:message => "Please enter a last name"
GENDERS = {'M' => 'male', 'F' => 'female'}
validates_inclusion_of :gender, :in => GENDERS.keys,
:message => "Please select 'M' or 'F' for the genre"
...
end
The validation code for the Company model in app/models/company.rb is very simple, as we only need to ensure a company has a name:
class Company < ActiveRecord::Base
validates_presence_of :name,
:message => "Please enter a company name"
end
The validation code for the Address model in app/models/address.rb is as follows:
class Address < ActiveRecord::Base
validates_presence_of :street_1,
:message => "Please enter an initial line for the address"
POSTCODE_REGEX = /^[A-Z][A-Z]?[0-9][A-Z0-9]? ?[0-9] [ABDEFGHJLNPQRSTUWXYZ]{2}$/i
validates_format_of :post_code, :with => POSTCODE_REGEX,
:message => "Please enter a valid post code"
def validate_on_create
if Address.find_by_street_1_and_post_code(street_1, post_code)
errors.add_to_base('Street address and post code already exist in the database')
end
end

end
The UK postcode regular expression is from Wikipedia (http://en.wikipedia.org/wiki/UK_postcodes). It will allow some invalid postcodes through; but like the regular expression for email addresses (see section, Checking Against a Regular Expression), it is simple to follow and will catch 95% of cases.
The first line of the address (street_1) is validated, as an initial address line and post code are required to uniquely identify a UK address.
The final validation (highlighted) is the most interesting, as it demonstrates how to perform a custom validation not available using the default Rails methods. This is done by defining a validate_on_create method, which is run to validate any records when they are created.
The validate_on_create method can check attributes on the instance using whichever criteria you like. For example, you could validate a host name against a DNS look-up service or check a country code against a web service (neither of which is possible with the macros). ActiveRecord runs any custom validate_on_create method in tandem with validations defined using the validates_* macros.
In this case, the street_1 and post_code attributes on the new instance are used to look up a record in the addresses table: if an address with matching street_1 and post_code already exists, validation fails, and a generic error message is added to the model instance (add_to_base enables adding an error message to the whole instance, rather than a particular field).
Note
An alternative approach to ensuring the uniqueness of the combination of street_1 and post_code would be to add a unique index to the database table, based on these two columns. Then, if an INSERT was performed with matching field values, it would fail due to the index constraint. However, you would then need to write some custom error catching code to trap this error and present it meaningfully through the model. The approach here is simpler and just makes use of existing features of ActiveRecord.
There is validate_on_update method, to be applied only on updates to records; and also a validate method that you can define to perform validation on both record creation and updates.
There are several more esoteric validates_*_of methods, which are summarised below (along with those with already seen), with examples of how you can use them.
validates_uniqueness_of, validates_presence_of, andvalidates_format_ofare covered above.validates_acceptance_ofUsed where a user must tick a box to agree to the terms and conditions (or similar). There doesn't have to be an attribute corresponding to the tick box in the model.
validates_confirmation_ofCompares an attribute with a submitted form field to ensure they contain the same value.
validates_exclusion_ofCompares an attribute value against an enumerable object and only returns true if the attribute value is not in that object (the inverse of
validates_inclusion_of).validates_length_ofEnsures that an attribute's value is not too long or too short. You can set a minimum length, a maximum length, or a range the length should sit within.
validates_numericality_ofEnsures that an attribute is a number. Can be constrained to be an integer, or allow both integers and floating point numbers.
validates_associatedIn the section on Associations Between Models, we'll see how to use this method.
Another method worth mentioning is validates_each, which enables you to create a custom validation for one or more attributes by running them through a block. It is used as the basis for Rails' built-in validation methods. See the documentation of ActiveRecord::Validations::ClassMethods for more details of how to use it (and for more details about the methods listed above).
Testing web applications is a laborious process. Often, it consists of developers sitting in front of web browsers and "pretending" to use the system, clicking around and filling forms with garbage. There are several draw-backs to this approach:
- Incompleteness-
It is difficult to follow every possible path through the application. Testing of some actions may be neglected or missed entirely if they only occur under unusual circumstances.
- Inconsistency-
The first time the application is tested, one set of paths through the application will be used; when forms are completed and submitted, some fields will be left empty, others filled. On subsequent tests, different paths may be followed and different form fields completed; and different again the next time; and so on. This makes it difficult to compare different test sessions, as there is no consistency in how the application is used during different sessions.
- Unrepeatability-
Because the testing process is essentially random, when bugs are encountered it is often difficult to reconstruct the actions which led to the bug occurring.
It is possible to ameliorate some of these problems by writing a test script, which human testers follow, to ensure that the same parts of the application are tested the same way in different sessions. But writing these scripts is time-consuming and tedious.
An alternative approach is to use automated testing. In environments where setting up the test harness is a cumbersome task, automated testing can in itself be time-consuming. For example, PHP has several unit testing frameworks, but they are rarely used as they are a pain (a small pain, but still a pain) to install and configure, before you even start learning how to write the tests.
By contrast, Rails makes testing easy and seductive. Each time you use the generators to create new components for your application, Rails adds test stubs for your code, depending on the type of component. The types of tests provided by Rails breaks down into:
- Unit tests-
These tests the models in the application. You can use them to check that your validation code works as expected, and to test associations between models. We'll look at these in this chapter.
- Functional tests-
These test actions on controllers. Rails provides some convenient classes for emulating an HTTP client as it interacts with your application: so you can do things like fill in a form and submit it, and check that Rails correctly adds new records to the database. Functional tests are less about testing the database and more about testing that correct data is being assigned to instance variables, routing is working correctly, the response code is correct (success/redirect), the session/cookies are being updated properly, the correct template is being rendered, etc.. This makes them less important than unit testing, but still very useful for testing large, complex applications.
- Integration tests-
These enable testing of workflows across controllers. For example, if you had a login form protecting the list of contacts, you could test that the list is correctly protected; then test that a user is able to login to access the list.
For most applications, thorough unit testing goes a long way towards improving the stability of the code: it becomes easy to trace where changes are being made to the model code, and where assumptions are coming undone (known in the testing vernacular as regressions—behavior which previously worked, but which is broken by a code modification). If models do change, unit tests provide a good prompt as to which controllers and views also need to change as a consequence. Unit testing is a pragmatic solution, which a company can easily invest in; while functional and integration testing are useful, they add yet more time to the development cycle.
Remember, also, that there is a separate testing environment baked into each Rails application (see the section, Configuring the Rails Environments): you can run tests without affecting either the development or production databases. The test stub generators remove the pain of installing and configuring the test harness; and the separate environment removes the havoc that automated testing can wreak on a real database. These two factors mean that testing in Rails is a pleasure.
For the purposes of the Intranet application, at least for now, we are going to rely on unit testing. We'll return to functional and integration testing in later chapters.
In our application, the testing framework has been automatically applied during our work with the generators. To take advantage of it, we just need to setup a test database. Follow the instructions in the section Creating a Database and System Account to add a new database; the process is summarized below:
mysql> CREATE DATABASE intranet_test;
Query OK, 1 row affected (0.18 sec)
mysql> GRANT ALL PRIVILEGES ON intranet_test.* TO intranet@localhost IDENTIFIED BY 'police73';
Query OK, 0 rows affected (0.25 sec)
mysql> FLUSH PRIVILEGES;
Query OK, 0 rows affected (0.00 sec)
We've used the same database user (intranet) for the intranet_test database as we used for the intranet database: if you prefer, you can use a separate dedicated testing user.
We also need to edit config/database.yml to configure the test database:
test:
adapter: mysql
database: intranet_test
username: intranet
password: police73
socket: /var/run/mysqld/mysqld.sock
Now, we are ready to run the tests from the command line with rake:
$ rake test:units
(in /home/rory/workspace/Intranet)
/usr/bin/ruby1.8 -Ilib:test "/usr/lib/ruby/gems/1.8/gems/rake-0.7.1/lib/
rake/rake_test_loader.rb" "test/unit/person_test.rb" "test/unit/company_test.rb" "test/unit/address_test.rb"
Loaded suite /usr/lib/ruby/gems/1.8/gems/rake-0.7.1/lib/rake/rake_test_loader
Started
...
Finished in 0.861688 seconds.
3 tests, 3 assertions, 0 failures, 0 errors
So far, so good. Running the command rake test:units initiates a Rake task, which does the following:
- Removes any existing tables and data from the
testdatabase (which is why it should be a separate database fromdevelopmentorproduction). - Clones the structure of the current
developmentdatabase into thetestdatabase. None of the data is copied into thetestdatabase, just the table structures: any test data you want to pre-populate thetestdatabase with is added using fixtures (next section). - Loads all of the
*.rbfiles inRAILS_ROOT/test/unit. These files contain test classes (aka test cases), which inherit from theTest::Unit::TestCaseclass (from Ruby's built-in unit testing library). In our case, there are three files, corresponding to our three models:test/unit/address_test.rbtest/unit/company_test.rbtest/unit/person_test.rbThe set of test cases is collectively known as a test suite.
- Any methods prefixed with
test_inside the test cases are run. In addition, if asetupmethod is defined for a test case, this method is run before each of thetest_methods; if ateardownmethod is defined, it is run after each of thetest_methods completes.Each test_ method contains assertions about the expected behavior of the models in the application. If the expectations are met, all assertions in the test return true and the test passes; if any expectation fails (i.e. any assertion returns false), the test fails. Failures are reported as they occur; if runtime exceptions occur during the tests, they are also reported and cause the test in which they occur to fail.
- When all the tests complete, a summary of the results is shown:
- tests: the number of
test_methods run - assertions: the number of assertions made during the tests
- failures: the number of tests which failed
- errors: exceptions which occurred during testing
- tests: the number of
In the next section, we'll see how a test case works, and write our own.
The default test case for the Person model (in test/unit/person_test.rb) is defined as:
require File.dirname(__FILE__) + '/../test_helper'
class PersonTest < Test::Unit::TestCase
fixtures :people
# Replace this with your real tests.
def test_truth
assert true
end
end
The first line loads the test_helper.rb code from another file inside the test directory. This file governs the general behavior of tests; we'll return to it in the next section.
The fixtures method loads some test data into the testing database, using database records defined in YAML files (see the section, Setting Up a Database Connection for more information about YAML). We'll come onto fixtures shortly.
The only default test method is test_truth. This calls the assert method with the argument true, which always returns true (it always passes). We need to replace this dummy method with our own tests.
The next question when applying unit tests to a model is "What should we test?". My answer to that is: test all validations, associations, and utility methods. This might seem excessive, as ActiveRecord already has a test suite, which checks that the validation macros work correctly. However, what we are testing is that instances of our models adhere to the behavior we expect them to have; not whether the validation code performs validation (which we know it does).
Thorough testing like this is particularly important where several people are working on a single code base. As an example, imagine that Rory writes some validation code, which says a person must have a first name. In another part of the application, he makes the assumption that any people he displays will have first names (as he's decided they aren't valid otherwise), and writes some view code, displaying people and their first names.
Meanwhile, Jenny decides that an empty first name is OK: as long as someone has a last name, their first name is unimportant. She removes Rory's validation code for first names.
The next time Rory runs his view code, he gets a regression: any people he tries to display who don't have a first name causes an error to be raised. Rory is perplexed and spends the afternoon working out what's going on.
In this situation, the tests for the validation rules on Person would be broken by Jenny's change to the code. The next time the test suite runs, the test failures will help Rory see what has changed. This makes it much easier to keep the behavior of the application stable, as it forces Jenny to rewrite any tests for the Person model if she wants to change the validation code. It also highlights to Jenny where her change will have an impact on other parts of the application: she can just see which tests fail and fix the code to make them pass again.
Now we have all agreed that testing is a good thing, the next step is to put in place some fixtures: data we can mangle during testing to see whether our expectations about a model hold up.
When you create a model, a blank fixtures file is also created (as well as the test stub discussed previously). The fixtures file is a way of creating dummy records so that each time you run your tests, you have a consistent data set to work from. Rails automatically loads fixtures when running test cases, converting them into records in the test database.
The fixtures file for a model is added to the test/fixtures directory; the name of the fixtures file is the database table name +".yml" (so we have addresses.yml, companies.yml, and person.yml). Each fixtures file is written in YAML: the top level keys are easy-to-remember names for the individual records; indented under each key are the field names and values for each record.
By default, a test case just loads the fixtures for the model under test. If you want to load other fixtures for other models, you can just append extra arguments to the fixtures method call (the first line inside the test class definition):
fixtures :people, :companies
This can be useful when testing associations (see Associations Between Models).
Following our own guidelines, we want to test the find_all_ordered method. To do this, we need at least three records in the person.yml fixture file, so we can check whether they are ordered by last name, and whether two people with the same last name are additionally ordered by first name. During the tests, we will reset attributes on these test records and try to save them back to the test database to exercise other parts of the validation code:
ginger:
id: 1
title: 'Mrs.'
first_name: 'Ginger'
last_name: 'Bloggs'
email: '[email protected]'
gender: 'F'
fred:
id: 2
first_name: 'Fred'
last_name: 'Bloggs'
email: '[email protected]'
gender: 'M'
albert:
id: 3
first_name: 'Albert'
last_name: 'Always'
email: '[email protected]'
gender: 'M'
Notice that the records are put into the YAML file in non-name order, to make sure the sorting is being done by the find_all_ordered method, and isn't just due to the ordering of the fixtures file. Also notice that all of the records are valid, having an email address, first name, last name, and gender. However, it is not necessary to setup the attributes which aren't validated and which we're not testing (like telephone, mobile_phone, etc.).
Each time Rails runs a test method, it does so inside a database transaction: any changes made during the course of running the test method are undone when the test completes (using a SQL ROLLBACK command). In other words, the fixtures are transactional, effectively being "replenished" after each test.
With MyISAM tables, we have to be careful: transactions are not supported and have no effect when running our tests. The consequence is that any changes we make during a test (e.g. deleting a record from a table) impact on later tests. Data you were expecting to be available may have disappeared, or may not have the attributes you expected. This can cause chaos: your tests become dependent on the order in which they are applied and what happened in tests previous to the current one.
The fix is simple: turn off transactional fixtures during testing if you are using MyISAM tables. Edit this line in test/test_helper.rb:
self.use_transactional_fixtures = true
And change it to:
self.use_transactional_fixtures = false
The other change you can make to the test/test_helper.rb file is to turn on instantiated fixtures. All this means is that Rails will convert any fixtures that you define into instance variables on the test case. This makes it easier to reference records added from your fixtures from inside your test cases.
Change the line:
self.use_instantiated_fixtures = false
to:
self.use_instantiated_fixtures = true
This does add a slight overhead, so you may want to leave it set to false if you have a lot of test cases or fixtures.
We are now ready to write some tests for the Person model. We have the following expectations about its behavior:
- A person should have a valid email address.
- No two people can have the same email address.
- A person without a first name is invalid.
- A person without a last name is invalid.
- A person's gender must be set to 'M' or 'F'.
- The
full_namemethod should format a person's title, first name, and last name into a correctly-formatted string. We also need to check that the output is correct where a person doesn't have a title. - The
find_all_orderedmethod should correctly sort people. The array returned should sort people by last name and then by first name in ascending order.
We can add test methods to check each of these expectations.
We need to test whether a record can be saved with an invalid email address. So, we will reset the email address for one of the fixture records and try to save it; we expect it to fail (return false):
def test_reject_invalid_email_addresses
@fred.email = 'fred @ hello.com'
assert [email protected]
@fred.email = 'fred [email protected]'
assert [email protected]
end
Some points to note:
- You can reference fixtures with the name of the record, prefixed with "@". This returns a model instance you can manipulate. If you have turned off instantiated fixtures (see the previous section), you need to reference
people(:fred)to get the model instance instead. - We want the save to fail; so our assertion states: "We're expecting the
saveto returnfalse. So, taking the logical inverse (not) of the value returned bysave, we're expecting to gettrue." - You might want to add other invalid email addresses that you are likely to encounter, to make sure that the regular expression rejects them all.
def test_email_must_be_unique
@fred.email = @albert.email
assert [email protected]
end
Here, we just set Fred's email to the same value as Albert's, then try to save Fred's record. We expect this to fail.
def test_must_have_first_name
@fred.first_name = ''
assert [email protected]
end
Here, we just set Fred's last name to the empty string and try to save his record. We expect it to fail.
def test_must_have_last_name
@fred.last_name = ''
assert [email protected]
end
def test_reject_invalid_genders
@fred.gender = 'P'
assert [email protected]
end
Here, we just set Fred's gender to something other than "M" or "F" and try to save his record. We expect this to fail.
We need to test cases where a person has a title, and cases where they don't:
def test_full_name_correctly_formatted
assert_equal 'Mrs. Ginger Bloggs', @ginger.full_name
assert_equal 'Fred Bloggs', @fred.full_name
end
This one is slightly more complicated, as we need to test that:
- All people are returned by the method.
- The records are in the ascending order of
last_name. - Where the
last_namefields of two records are the same, they should be in ascendingfirst_nameorder.
Here's the code:
def test_find_all_ordered
people_in_order = Person.find_all_ordered
assert_equal 3, people_in_order.size
assert people_in_order[0].last_name <= people_in_order[1].last_name
assert people_in_order[1].last_name <= people_in_order[2].last_name
# fred should come before ginger,
# even though they both have the same surname
assert_equal 'Fred', people_in_order[1].first_name
assert_equal 'Ginger', people_in_order[2].first_name
assert people_in_order[1].first_name <= people_in_order[2] .first_name
end
Things to note:
- We use a new type of assertion,
assert_equal(expected, actual), to compare an expected value with an actual value. - We use
<=to compare fields in pairs of records returned by thefind_all_orderedmethod. - Because we know which fixtures are loaded, we can use expectations about which record is where to do further testing, like how the people are ordered by
first_namewhen theirlast_namefield values are the same. In our fixtures, we know that Fred Bloggs should come before Ginger Bloggs in the array, and can explicitly test this.
Note
Test for positives as well as negatives
One thing which can catch you out is that fixtures don't have to be valid: for example, when first writing the fixtures for Person, I missed out gender attributes. My tests worked fine when I was checking for saves failing; but when I tried to check whether a save was successful, the tests failed, due to the lack of a valid gender attribute (not for the reason I thought they should fail).
I suggest including a test which checks whether one of your fixtures will save to the database. That way you can be sure that you are testing with what you think you are testing with, i.e. valid fixtures which will save to the database. For example:
def test_sanity
assert @fred.save
end
Several other types of assertion are possible; they are listed below, along with those we've already seen:
assert(expected)Passes ifexpectedistrue.assert_dom_equal(expected, actual)Passes if the two HTML stringsexpectedandactualare equivalent. Its inverse,assert_dom_not_equal, is also available.assert_tag(conditions)Passes if the response body meets the criteria specified in theconditionshash. For example, this assertion checks that the response body contains a<title>HTML element with text"Intranet":assert_tag :tag => 'title', :child => /^Intranet$/
The inverse, assert_no_tag, is also available. Both of these assertions make most sense in the context of functional testing: we'll see an example of how to use them in the chapter where functional and integration testing is covered.
assert_instance_of(klass, object)Passes ifobjectis an instance of the classklass.assert_kind_of(klass, object)Passes ifobjecthas the classklass, or ifklassis a superclass ofobject'sclass, or ifklassis one of the modules included inobject'sclass.assert_equal(expected, actual)Passes if expected and actual are equal (tested using the==operator).assert_not_equal(expected, actual)Passes ifexpectedandactualare not equal.assert_nil(object)Passes ifobjectis nil;assert_not_nilis also available.assert_raise(ExceptionClass) { ... }Passes if an exception of the specifiedExceptionClassis raised by the following block.assert_nothing_raised {...}Passes if the supplied block does not raise an exception.assert_match(regular_expression, string)Passes ifstringmatchesregular_expression; its inverse,assert_no_match, is also available.assert_recognizes(expected_options, path)Passes if path, when passed through routing, produces theexpected_optionshash as output. For example, the following assertion passes if routing matches the path 'companies' to thecompanies#indexcontroller/action pair:assert_recognizes({:controller => 'companies', :action => 'index'}, 'companies')
assert_generates(expected_path, options)This is like the inverse ofassert_recognizes:it passes ifoptions, when passed to routing, producesexpected_pathas output. For example, we could check that thecompanies#indexcontroller/action pair is assigned the route 'companies':assert_generates('companies', {:controller => 'companies', :action => 'index'})
assert_routing(path, options)This combinesassert_generates(path, options)andassert_recognizes(options, path)into a single assertion, checking that routing works in both directions (for generation of paths from options, and recognition of options from paths).assert_redirected_to(options)Passes if the controller action just called redirected to the same place as specified by the redirectionoptions. We'll see this in use in the section on functional testing in Chapter 5.assert_response(expected_code)Passes if the response code was of the typeexpected_code. We'll see this used in a functional test in Chapter 5.assert_template(expected_template)Passes if the response was rendered using the template expected_template. This is used in functional tests (see the section on functional tests in Chapter 5).assert_valid(object)Passes if the ActiveRecord instanceobjectvalidates.
These can be used inside test_ methods in a similar way to how we've seen assert and assert_equal being used earlier.
While some of the tests we wrote might feel like overkill, they provide a high degree of peace of mind. I always feel happier when I know my code can be run through a suite of automated tests to highlight any assumptions I've made, which may have been broken.
Another advantage is that the tests become essential for bug fixing as coding progresses. If you come across a bug, you can write a test to replicate the conditions which produce the bug. At this point, the test will fail, as you haven't fixed the bug yet. Then, you can modify the code which causes the bug until the test passes. Before you know it, you are doing test-driven development (TDD).
We haven't approached the Intranet application from a TDD perspective, as TDD is still alien to many developers, and requires a paradigm-shift in how development is approached. However, I would encourage you to at least retro-fit tests to your application, so you get a taste of the benefits; and to code a test to encapsulate each bug you encounter. Over time, you may find that it becomes natural to write tests first then write the code to make them pass. Rails makes this as painless as possible.
In Chapter 2, we used the Outlook address export as the initial basis for designing the Intranet application's database structure. Rather than have a single table, which replicated Outlook's export format directly, we decided to use three tables to prevent duplication of data: addresses, companies, and people. We then created associations between tables by putting "pseudo" foreign keys into appropriate tables. The resulting associations are:
- An address belongs to zero or more people, and each person has one or no address (we might not have home addresses for every person in the database).
- An address belongs to zero or one company, and each company has one address (a company address is mandatory).
- A person belongs to one company (required), and each company can have zero or more associated people.
The advantage of this is that if a company has multiple employees, we only record the company details once in the companies table; we then link people to the company using the company_id foreign key field in the people table. Similarly, address data is common to both people and companies: by separating it out into a single table, we can search addresses by referencing the single addresses table, rather than having to search across both the people and companies tables. We can also associate multiple people with a single address (for example, a married couple will have a joint address).
Despite our data structure, ActiveRecord remains unaware of the associations between tables. However, it only needs a small nudge to recognize them. The addition of a few simple lines of code to the model classes will enable ActiveRecord to manage the relationships for us, so we can reference a person's company from a Person instance, a company address from a Company instance, and so on. In the next three sections, we'll see how each relationship in the database can be transformed into an association between models.
The addresses and people tables have a one-to-many relationship in the database. In other words, a record in the addresses table may be related to zero or more records in the people table. The table on the "many" side of the relationship contains a foreign key to the table on the "one" side of the relationship. Ignoring fields irrelevant to the relationship, this can be represented in a standard database diagram as:
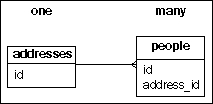
In our Rails application, this kind of database relationship is represented in ActiveRecord as an association between the Person and Address models. The association is marked in each of the participating models.
In the Person model:
class Person < ActiveRecord::Base
belongs_to :address
...
end
In the Address model:
class Address < ActiveRecord::Base
has_many :people
...
end
We can generalize the translation from a one-to-many relationship in the database to model associations, so we could use it with any pair of related tables:
- Where you have a one-to-many relationship in the database between the table
parents(on the "one" side of the relationship) and the tablechildren(on the "many" side, containing the foreign key):- In the
Parentmodel class, inserthas_many :children - In the
Childmodel class, insertbelongs_to :parent
- In the
- Which modifies instances of the classes as follows:
Parentinstances get achildrenmethod (which returns an array ofChildinstances); and achildren=method (which accepts an array ofChildinstances as an argument and sets the children collection).The parent also gets other methods, which enable new objects to be added to the collection of children, such as children << child, which appends a new instance child to the collection; children.build(attributes={}), which constructs a new Child instance using the attributes hash and links it to the parent (without saving); and children.create(attributes={}), which builds a Child instance from attributes and also saves it.
As the collection children is an array, all the standard array methods, such as empty? and size, work as expected.
Finally, it is possible to interrogate the collection using find to retrieve the subset of children matching specific criteria. For example, you could get an Address instance:
addr = Address.find 1
Then use find on its people collection to get an array of all the women living at that address:
women = addr.people.find(:all, :conditions => {:gender => 'F'})
Childinstances get aparentmethod (which returns aParentinstance); and aparent=method (which accepts a singleParentinstance as an argument).
Before we can see the effect of this, we need to create an Address:
>> addr = Address.new(:street_1 => '44 Monty Avenue', :city => 'Molltoxeter', :post_code => 'MX12 1YH') # create an address
>> addr.save
=> true
We can now assign this address to a person (assuming, you have at least one person in the database):
>> pers = Person.find :first # find a person
>> pers.address = addr # assign an address to the person
>> pers.save
=> true
This is all you need to associate the new address with the person. Once associated, you can retrieve a person's address using the address method:
>> pers = Person.find :first # find a person
=> #<Person:0xb74a4228 ...>
>> pers.address # retrieve the address for the person
=> #<Address:0xb74a2504 @attributes={"city"=>"Molltoxeter", "updated_at"=>"2006-11-03 14:33:20", "county"=>nil, "street_1"=>"44 Monty Avenue", "street_2"=>nil, "post_code"=>"MX12 1YH", "street_3"=>nil, "id"=>"5", "created_at"=>"2006-11-03 14:33:20"}>
By using the belongs_to method in the Person class, we have appended new address (a getter) and address= (a setter) methods to instances of that class:
- When
addressis called, ActiveRecord retrieves a record from theAddresstable where theaddress.idfield equals the value in the person'saddress_idattribute. - When
address=is called with anAddressinstance as an argument, theidof thatAddressinstance is set as theaddress_idattribute for the person.
If you have multiple people associated with address, you can also query in the other direction, from an address to an array of associated people:
>> a = Address.find :first # find an address
>> a.people # find the people associated with the address
=> [#<Person:0xb744a5c8 ...>, #<Person:0xb744a58c ...>]
Note
One point worth stating about associations is that they don't have to be symmetrical: if you never intend to find the people associated with an address (for example), you don't have to add has_many :people to the Address class. The belongs_to :address association in the Person class will still work without it.
Now that the relationship between the people and addresses table has been established, we are in a position to validate associations between their respective models (Person and Address). In Chapter 2, the validation rules we specified stated that a person can optionally have a home address. In cases where a person does have a home address, when we validate a person, we also need to validate that address. This is useful in situations where we are creating a new person and address simultaneously: it ensures that before we save the person into the database, any address assigned to them references a valid address.
Rails provides a convenient validates_associated method for this purpose, which we can add to the Person model:
class Person < ActiveRecord::Base
belongs_to :company
belongs_to :address
validates_associated :address
...
end
Note that this method only performs validation where an address has been assigned: where the address for a person is blank (nil), validation of the address is skipped. Validation succeeds where an address assigned to a person in turn passes all of its own validation rules (i.e. the validations on the Address class). In situations where the associated record is required (e.g. a company must have an address), you need to use validates_presence_of to check for the associated record, as well as validates_associated. See section Validating a Company's Address for an example of how to do this.
These two tables have a parent-to-child relationship in the database; this is like a one-to-many relationship, except there is at most one record at the "many" side of the relationship. In other words, a record in the addresses table is a parent of zero or one record in the companies table. The "child" in the relationship is the table containing the foreign key:
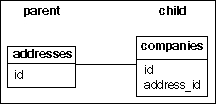
This might seem a slightly odd way of describing this relationship, but it is perfectly legitimate in ActiveRecord terms: "parent-child" doesn't necessarily denote a dependency in this context.
In the Company class, we add belongs_to:
class Company < ActiveRecord::Base
belongs_to :address
...
end
In the Address class, we add has_one:
class Address < ActiveRecord::Base
has_one :company
...
end
Again, we can generalize this translation:
- Where you have a parent-to-child relationship in the database between the table
parents(on the "parent" side of the relationship) and the tablechildren(on the "child" side, containing the foreign key):- In the
Parentmodel class, inserthas_one :child - In the
Childmodel class, insertbelongs_to :parent
- In the
- This modifies instances of the classes as follows:
Parentinstances get achildmethod (which returns aChildinstance); and achild=method (which accepts aChildinstance as an argument). They also getbuild_child(attributes={})andcreate_child(attributes={})methods. The former constructs aChildinstance and links it to the parent, but doesn't save it; the latter builds theChildinstance, links it to the parent, and saves it too.Childinstances get aparentmethod (which returns aParentinstance); and aparent=method (which accepts a singleParentinstance as an argument)
Testing the association from the console follows a similar pattern to testing the one-to-many relationship of the previous section:
>> comp = Company.find :first # find a company
=> #<Company:0xb7432888 ...>
>> addr = Address.find :first # find an address
=> #<Address:0xb7430150 ...>
>> comp.address = addr # assign the address to the company
=> #<Address:0xb7430150 ...>
>> comp.save # save the company
=> true
>> comp.address # retrieve the address for a company
=> #<Address:0xb7430150 ...>
>> addr.company # retrieve the company associated with an address
=> #<Company:0xb7427f00 ...>
One other requirement of the data structure designed in Chapter 2 is that a company must have a valid address: this is vital for the contacts database to have any value.
How can we check that the address associated with a company is valid? We need to ensure that:
- An associated address has been assigned to the company.
- The associated address is itself valid.
We can capture these requirements using validates_presence_of and validates_associated in tandem:
class Company < ActiveRecord::Base
has_many :people
belongs_to :address
validates_presence_of :name,
:message => "Please enter a company name"
validates_presence_of :address,
:message => 'Address must be supplied'
validates_associated :address,
:message => 'Address is invalid'

end
validates_presence_of ensures that an address has been assigned to the company; validates_associated ensures that the address (if assigned) is itself valid.
This relationship is very similar to the addresses to people relationship:
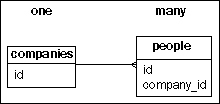
It can be marked in the Company model class with:
class Company < ActiveRecord::Base
has_many :people
...
end
And in the Person class with:
class Person < ActiveRecord::Base
belongs_to :company
# ... other methods ...
end
The code for validating the company for a person is similar to that for validating their address. A person doesn't necessarily have to be associated with a company at all; so we can dispense with validates_presence_of, and just use validates_associated:
class Person < ActiveRecord::Base
# ... other methods ...
validates_associated :company
end
Our application doesn't (yet) contain any many-to-many relationships in the database structure. But it's easy to think of situations where we might want to have this kind of relationship. For example, Ken might decide he wants to be able to categorise companies: each company will have zero or more categories, and each category will have zero or more associated companies. This would require a many-to-many relationship.
The typical way of implementing a many-to-many relationship in a database is by adding a link table between the two related tables:
- The link table stores pairs of IDs:
- One ID from the table on the "left" of the relationship (the "sinisters" table).
- One ID from the "right-hand" table (the "dexters" table).
- Each of the related tables has a one-to-many relationship with the link table.
In the case of categories and companies, we might end up with:
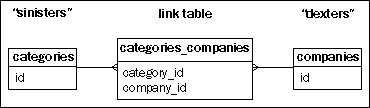
ActiveRecord makes it convenient to manage the associations between the models for these tables: use the method has_and_belongs_to_many in each model:
class Categories < ActiveRecord::Base
has_and_belongs_to_many :companies
...
end
class Companies < ActiveRecord::Base
has_and_belongs_to_many :categories
...
end
We can generalize this to the following guidelines:
- Where you have a many-to-many relationship in the database between the table
sinistersand the tabledexters:- In the
Sinistermodel class, inserthas_and_belongs_to_many :dexters - In the
Dextermodel class, inserthas_and_belongs_to_many :sinisters
- In the
- Create a link table called
dexters_sinisterswith two fields:dexter_idsinister_idThe name of the link table should be composed of the names of the two tables you are linking, arranged in alphabetical order, with an underscore in between.
- This modifies instances of the classes as follows:
Sinisterinstances get adextersmethod (which returns an array ofDexterinstances); and adexters=method (which accepts an array ofDexterinstances as an argument).Dexterinstances get asinistersmethod (which returns an array ofSinisterinstances); and asinisters=method (which accepts an array ofSinisterinstances as an argument).
In our database structure, we specified that when an address is deleted, we should remove its associated company. This makes sense, given that we don't want any companies to have invalid addresses; without the dependency, we could delete an address, but still have references to it in the company_id field of the companies table.
To specify the dependency, pass an optional :dependent => :destroy option to the has_one method call in the parent class:
class Address < ActiveRecord::Base
has_one :company, :dependent => :destroy
...
end
The effect of this is to delete a company when its associated "parent" address is deleted. If you are going to use this method for dependency tracking, you need to be clear about the consequences, and ensure that project stakeholders are in agreement: do they really want cascading deletion of companies if an address is removed?
Also note that you can specify other :dependent options with the has_one method:
has_one :company, :dependent => :nullifySets the foreign key in the related company record to null, rather than destroying it.has_one :company, :dependent => :deleteDeletes the associated company without calling its destroy method.
Similarly, you can use a :dependent option with the has_many method, as used in the Company class, e.g.
has_many :people, :dependent => :destroyDestroys all dependent records in thepeopletable when a company is destroyed.has_many :people, :dependent => :nullifySets thecompany_idfield to null for dependent records in thepeopletable when the company is destroyed.has_many :people, :dependent => :delete_allRemoves all dependent records in thepeopletable when a company is destroyed, but without calling thedestroymethod.
Note that you can't set a :dependent option when using has_and_belongs_to_many.
It's often useful to test validation of associations, as well as validation of attributes. For example, in our model, we have a custom validation which checks whether the address_id attribute references a real Address in the database. We can write a unit test for the Company model which checks this validation code, as follows.
First, create a fixture for a valid address in test/fixtures/addresses.yml:
acme_hq:
id: 1
street_1: '14 Blockfield'
street_2: 'Minsterton'
city: 'Jupiterton'
post_code: 'BX1 4FG'
Next, create a fixture for a company in test/fixtures/companies.yml:
acme:
id: 1
name: 'Acme'
address_id: 1
Note how this references the valid address_id (= 1) for the fixture we created above.
Load the addresses fixtures into the unit test for Company in test/unit/company_test.rb:
class CompanyTest < Test::Unit::TestCase
fixtures :companies, :addresses
...
end
Finally, write a test method to check that the validation code for the association behaves as expected:
class CompanyTest < Test::Unit::TestCase
fixtures :companies, :addresses
def test_must_have_real_address
# Should fail with invalid address
@acme.address = nil
assert [email protected]
# Should save when assigned a valid address
@acme.address = @acme_hq
assert @acme.save
end
end