In this section, we'll see how to set up a team server for Rails development. We'll only cover the key software for supporting Rails development and assume you can install and configure the core of the operating system yourself. If you don't have the resources to run your own server, several ways of outsourcing this function are covered at the end of the chapter.
Another assumption we make is that this is not a publicly-available server exposed to traffic from the Internet. Instead, the intranet server is sitting behind a firewall, similar to the hardware setup at Acme, described in the Supporting Rails Development section. We also assume that the only people with access to the server are internal staff: no public or anonymous access. The configuration described below is the bare minimum you can get away with in this situation, and will need tweaking on public servers or servers open to the public at large.
Space prohibits covering how to setup a server for each of the main operating systems (Linux, Windows, Mac OS X), so we'll be using Linux, a reliable and stable platform for Rails team infrastructure. Having said this, all of the software covered in this section will also run on Windows or Mac OS X, with installation being similar to installation on Linux. For example, Subversion can run on Windows, and be configured using the techniques described below. Differences between Linux and these two operating systems are highlighted where appropriate.
In the next two sections, we'll see how to configure a team server for three core functions:
- Remote access, for deploy of Rails applications to the server using Capistrano.
- Storing Rails source code using a version control system.
- Running Rails code in production using an application delivery platform (i.e. a web server and/or application server).
Note
If you have a separate servers for the code repository and web server, the instructions below should be adaptable to your circumstances.
The software covered in these sections is not specific to Rails. However, any Rails-specific issues involved in using this software are highlighted later in the book.
For reference, here's a list of the software needed on the team server:
- Rails stack, comprising:
- Ruby
- Rubygems
- Rails
- Mongrel and mongrel_cluster
- MySQL
- Ruby-MySQL
Installing these components is covered in previous sections, and it is the same for client machines. (Note that we don't need Capistrano on the server, only on the developer machines.)
- Server-only software:
- SSH
- Subversion
Installation of the server-only software is covered in the following sections.
The default behavior of gem is to include documentation for each gem you install. This slows down the installation process significantly, as gem generates the documentation from the source code.
When you are installing gems on the server, you don't really need the documentation. You can considerably speed up the installation progress by telling gem to dispense with the documentation using the --no-rdoc and --no-ri switches on the gem command. For example:
$ gem install rails -y --no-rdoc --no-ri
Secure Shell (SSH) is a vital tool for remote administration. It is included by default with practically every Linux distribution, and is very useful for Rails development, as it enables automated deployment of applications via Capistrano. We are also going to use it as the method of access to the Subversion repository.
The installation procedure on Ubuntu is simple:
$ apt-get install openssh-server
You can configure the port and various other options in /etc/ssh/sshd_config. For more information, see the SSH website at, http://www.openssh.com/.
To enable access to the team server, you will need to add user accounts for each developer on the team server. Use whichever tool you are most comfortable with. To do this on Linux, you can either use one of the GUI user management tools, or add the required users from the command line, e.g. for Rory:
$ sudo useradd --create-home --home-dir /home/rory -g users rory
$ sudo passwd rory
Enter new UNIX password:
Retype new UNIX password:

passwd: password updated successfully
Once, Rory is setup as a user on the team server (with IP address 192.168.13.129), he can try to login using the Linux command line client:
$ ssh [email protected]
The authenticity of host ''192.168.13.129 (192.168.13.129)'' can''t be established.RSA key fingerprint is 61:7a:6a:0e:5d:c5:0b:45:24:08:44:f0:06:eb:07:c0.
Are you sure you want to continue connecting (yes/no)? yes
Warning: Permanently added ''192.168.13.129'' (RSA) to the list of known hosts.
[email protected]''s password:
Linux demo-server 2.6.15-23-386 #1 PREEMPT Tue May 23 13:49:40 UTC 2006 i686 GNU/Linux
...
Note that the first time Rory logs into the server, he is prompted to accept the authenticity of the certificate presented by the server. Once he's done this, providing the server IP address doesn't change, he will not have to do it again.
If you're using Windows, you could use a tool like PuTTY (http://www.chiark.greenend.org.uk/~sgtatham/putty/) to test whether you can login to the SSH server.
Later in the chapter, we'll see how to use SSH to access a Subversion repository from Eclipse.
Most companies need some way to share electronic files between the members of staff: for example, timesheets, holiday forms, project documentation, etc. The typical approach taken is to setup what's colloquially called a shared drive. This is often as simple as a shared directory on a Windows machine in the corner of the office; or if the company has the money, they may stretch to a dedicated server or Network Attached Storage (NAS) appliance on their intranet.
Programmers working in these environments will often use the same approach, reading and writing source code files from the shared drive, resolving locks and conflicts manually (e.g. by email or verbally). In the Supporting Rails Development section, we saw how Acme staff used their server in this way. However, this brings with it a variety of problems, the most painful being accidental overwriting of other people's modifications.
The best solution in this situation is a version control system. Using this approach, developers each have their own local version of the code or working copy, checked out from a central repository. When they make changes to the code, they can save (commit) these changes back to the repository. Every other developer then has access to the changes and can update their working copy to incorporate them.
In situations where two developers working on the same file make conflicting changes, the version control system does its best to resolve the conflict and automatically merge in both sets of changes. In cases where this is not possible, the system will highlight conflicts and ask developers to manually resolve them. This makes it nearly impossible for two developers to overwrite each other's work.
The next section describes Subversion, the de facto standard open source version control system. This is a core part of a successful team infrastructure for Rails developments, as it provides:
- Control of submissions to the repository so that one person cannot accidentally overwrite another person's changes.
- A historical record of changes made to the code (it keeps a record of every modification).
- The ability to take snapshots of released versions.
- The ability to simultaneously develop multiple versions of a single application.
- And more...
Rails integrates nicely with Subversion via Capistrano (see the section Capistrano for Easier Deployment). Capistrano can radically simplify application deployment, making it easy to roll out a new version of an application, or to roll back if a new version causes problems.
This will only give a brief overview of how to install and configure Subversion, and will concentrate on showing how to integrate it with EasyEclipse. If you are interested in exploring Subversion in more depth, get hold of the free online book Version Control with Subversion from http://svnbook.red-bean.com/.
The simplest approach to installing Subversion on Ubuntu is via the command line (as root) with:
$ apt-get install subversion
That's all there is to it.
Note
If you want to install Subversion on Windows, a one-click installer is available at, http://svn1clicksetup.tigris.org/.
The command line Subversion client application is called svn. Type the following at a command line to see which version you are running and which subcommands are available:
$ svn help
usage: svn <subcommand> [options] [args]
Subversion command-line client, version 1.3.1.
Type ''svn help <subcommand>'' for help on a specific subcommand.
...
The administrative application is called svnadmin. We'll be using this in a moment to setup our source code repository. But first, we'll cover some standard practices for organizing team work around a Subversion repository.
At its simplest, a Subversion repository is a place to store multiple parallel versions of files relating to a project. These files will typically be code, but could also include images, documentation, PDF files, and directories; in fact, any type of file you like. (Unlike CVS, an older version control system which predates it, Subversion is easily able to cope with binary files.)
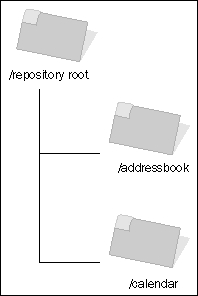
One way to think of a Subversion repository is as a tree structure, similar to a filesystem. It's not really a filesystem, and in fact it is more like a database, but this is a useful analogy for understanding its structure. At the top of the tree, you have the "root" of the repository; inside that, you have a separate "directory" for each project in the repository. Assuming a repository with two projects, addressbook and calendar, its layout can be visualized like this:
Within individual project directories, the standard Subversion layout involves three "subdirectories", representing three different aspects of a project:
- Trunk
This represents the most up-to-date, mainstream version of the project's files. If you are adding new features to the latest release of an application, you will typically do so using trunk as a base.
- Branches
This contains alternative, parallel versions of the project files. Each parallel version has its own subdirectory inside the branches directory called a branch. Each branch must have been derived from some other version of the project files at one time, whether from trunk or another branch.
The most common use of branches is as a way of storing individual versions of an application, such as version-0.2, version-0.3 etc. (the naming of branches is flexible). Another, legitimate use is to create arbitrary branches like dodgy-experimental-branch, where someone can try out new ideas without affecting trunk. Any useful changes made in that branch could then be merged back into trunk when ready.
Subversion's mechanism for creating branches is to copy some part of the repository: usually, a branch is a complete copy of the application trunk at some point of time. (You can think of this as equivalent to a literal directory copy on a standard filesystem.) Once the copy is made, the source of the branch (where the branch was copied from) and the branch itself are logically separated from each other: any changes to the branch do not affect the source unless a developer explicitly merges the changes in.
- Tags
Tags are similar to branches, in that they are created by the same method (by copying a section of the repository tree). However, they are not intended to be worked on: they are static snapshots of the project files at a specific point of time. A typical approach might be to label them release-0.2, release-0.3 etc., maintaining them as historical copies of the code base when new versions are released.
Focusing on the addressbook project, the three subdirectories can be visualized like this:
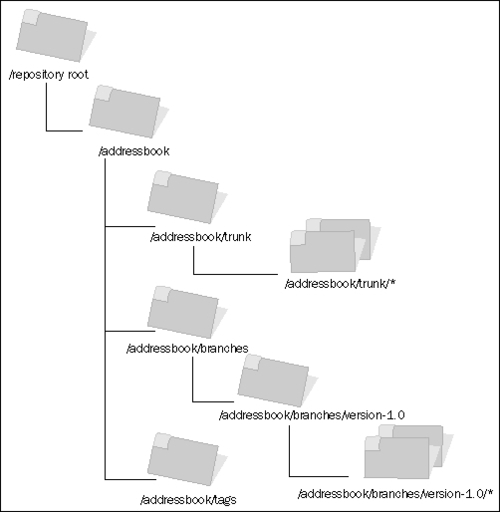
The main development of the addressbook project goes on in the trunk of the repository. There is also a single branch called version-1.0 in the branches directory, which was copied from trunk when the first version of the application was released. Development can be carried out in the version-1.0 branch without affecting the content of trunk, as the former is logically isolated from the latter.
Note that version-1.0 is logically equivalent to a subdirectory inside the branches directory and contains all the files in that version of the application. A developer could check out the whole of version 1.0 by checking out that one branch. The asterisk is used to denote the multiple files and subdirectories making up a version of the application.
Note
We'll follow this standard structure for the projects in the rest of the book, creating a "directory" for each project, with three subdirectories (trunk, branches, and tags) inside it. This isn't the only way you can structure a repository, but you will find that it is fairly standard among publicly-accessible projects.
The final complication we've hidden until now is the concept of a revision. A revision is roughly comparable to a "third dimension" of the repository: time. A revision is basically a snapshot of the state of the entire repository at a particular point in time. Each time anyone makes a change to any part of the repository (e.g. adding or deleting a file, modifying a file), they create a new revision of the whole repository. This is not a literal copy of all the files in the repository, but in some ways can be thought of as a "virtual" copy of it.
What does this mean for an individual project? When you do a "default" checkout of a project from a repository, you get the project files as they appear in the HEAD revision of the repository. The HEAD revision corresponds to the most recent revision number of the repository. So, if the HEAD revision is 10, you get the project files as they appear in revision 10. This is true even if the project files haven't changed since revision 5 (or even earlier) of the repository.
When you checkout a project, you create a working copy of some subtree of the repository. This is typically from trunk, but could also be from a branch. You then work on your working copy until you are ready to commit your changes back. At this point, Subversion compares your working copy to the part of the repository you checked out in the first place. For each file, there are four possible outcomes:
- The local file is unchanged and identical to the version in the repository. Subversion does nothing.
- The local file has not been modified, but it has been modified in the repository since it was checked out. Subversion will not commit the file. You need to modify the local copy to make sure it is up to date with the repository.
- The local file has been modified and no changes have been made in the repository since it was checked out. In this case, the local file changes are copied to the repository.
- The local file has been modified, but it has been modified in the repository since it was checked out. Subversion will not commit the file to the repository. If you run an
updateoperation, Subversion will attempt to merge changes in the repository version into your local copy of the file. Hopefully, you can subsequently commit your changes.
Armed with this knowledge of some Subversion terminology, we are now in a position to set up and start using a repository.
A Subversion repository is simply a specially-formatted directory structure on a server. Inside the root directory of the repository are a series of subdirectories and control files, which define the content of the repository and how it operates. The command line tool svnadmin can be used to initialize and maintain this structure on the team server.
As the Subversion repository is part of the filesystem, all of the developers on the project who need to write to the repository will need write permissions on the repository directory. The easiest way to do this is to create a special group (e.g. svn) to which all of the developers belong. The repository directory can be owned by this group and made writable by it.
The svn group can be added using the Linux GUI user management tools (in Ubuntu, under main menu | System | Administration | Users and Groups), or via the command line:
$ groupadd svn
In Acme's case, Rory and Jenny will both need to be members of the svn group (as will anyone else who needs to write into the repository). The easiest way to accomplish this is to use the GUI user management tools available in Linux, or via the command line with:
$ usermod -G svn -a rory
The above command adds Rory to the svn group, retaining his existing group memberships.
Next, create the directory which will become the repository. This can be located anywhere, but we'll use /repository:
$ mkdir /repository
Now that the directory is in place, initialize the repository structure inside it:
$ svnadmin create --fs-type=fsfs /repository
The --fs-type=fsfs flag tells svnadmin to use the fsfs filesystem to store the repository structure. This is the recommended filesystem, as it is faster, more stable, and more efficient.
Set the group ownership of the /repository directory to svn, make the directory writable by that group, and set the group ID on the directory. The latter step means that any new folders or files added to the repository are also owned by (and writable by) the svn group:
$ chgrp -R svn /repository
$ chmod -R g+sw /repository
For testing purposes, add a normal user account to the svn group. Then login as this user, get a command line up and try this:
$ svn mkdir file:///repository/test -m ''testing''
Committed revision 1.
The message above (Committed revision 1) shows that the Subversion repository is working correctly. The mkdir command created a directory called test inside the repository; it also associated the comment testing with the revision (via the -m flag).
Use this command to view the first revision:
$ svn list file:///repository
You should get this in return:
test/
Once you have this up and running, you can delete your test directory with:
$ svn del file:///repository/test
A Rails project can be treated just like any other project in a Subversion repository, adhering to the standard layout outlined in the Subversion Standard Practices section. For now, we'll set up a blank project, ready to be populated with a Rails application in later chapters.
The first step is to create the project directory structure. Once the directories have been created, this structure can be imported into the repository. We'll use the project name Intranet. Enter these commands at the command line:
$ mkdir tmp
$ mkdir tmp/Intranet
$ mkdir tmp/Intranet/trunk
$ mkdir tmp/Intranet/branches

$ mkdir tmp/Intranet/tags
The tmp directory is a temporary store for the project structure (it can be deleted later). The aim is for the content of the tmp directory to be copied to the root of the repository, so the Intranet application will reside at /Intranet (relative to the repository root).
Import the project structure into the repository with this command:
$ svn import tmp file:///repository/
Once this is done, the tmp directory can be removed. Check the project structure is correctly setup by running this command:
$ svn list file:///repository/Intranet/
branches/
tags/

trunk/
From this point on, we'll interact with the repository through Eclipse rather than the command line. However, in its current state, the repository is not easily available to the team. We're going to access it over SSH, which is simple and secure to setup.
EasyEclipse includes both Eclipse and the Subclipse plugin. The latter enables Eclipse to communicate with Subversion repositories over SSH. This is the approach we're going to use.
The best way to set this up is to first create a new Eclipse project based on a checkout from a repository. We've already seen how to configure the Subversion repository for the Intranet project, setting up a trunk, branches and tags for it. In this section, we will start a new project by checking out the content of the Intranet trunk.
Get EasyEclipse up and running on the developer machine, then follow these steps:
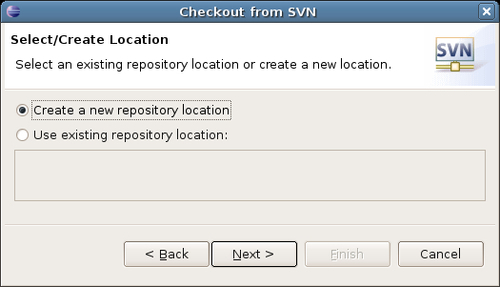
Select File | New | Project. In the dialog box, select SVN | Checkout Projects from SVN as shown below:
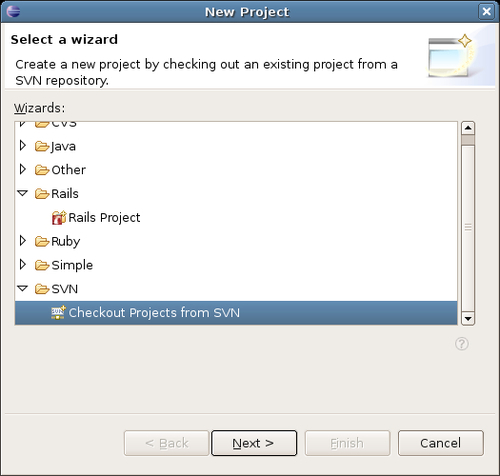
Click on Next >.
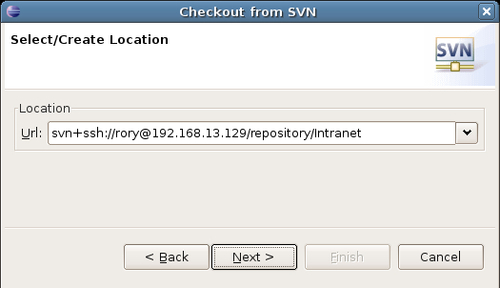
The next dialog box asks for the location of the repository:
In the Url text box of the next dialog box, enter the URL to the repository. It will look like this:
Where x.x.x.x is the IP address or hostname of the server, /repository is the path to the repository, and /path/to/project/directory is the path to the project directory in the repository, relative to the repository root. Note that we are using svn+ssh as the scheme for the URL: this makes use of SSH to connect to the server and start an svnserve process, which presents the repository to the user.
In our case, the client and server are on an internal network, and the client can reach the server at IP address 192.168.13.129. The repository is located on the path /repository on the team server; in addition, we want to work on the Intranet project, so the last part of the path should read /Intranet. Putting this all together gives the URL shown below:
EasyEclipse now contacts the server and prompts you for the username and password for accessing the repository. Use the username and password set up in section earlier in this chapter (covering how to setup SSH users on the team server):
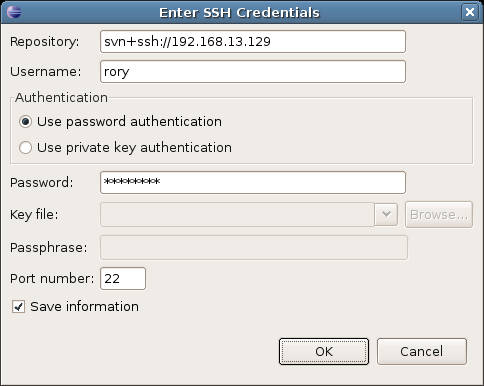
Note that the Save information checkbox: tick this so that there is no need to enter the password every time you check code back into the repository.
A list of the subdirectories for the Intranet project are now displayed. Select trunk and click on Next >.
Now , complete the final dialog box with the project details. A simple approach is to give the project a name matching the one in the repository:
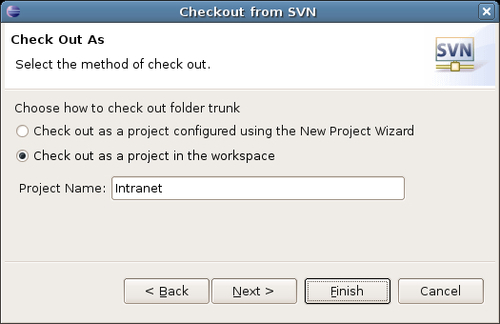
If this went smoothly, there should now be a new project in the left-hand sidebar of EasyEclipse.
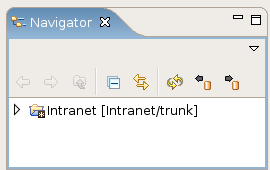
There's nothing inside the project yet, but we will be adding content over the following chapters.
If you are not convinced that EasyEclipse is the right Subversion client for you, or if you have non-programmers who need access to the repository, TortoiseSVN (http://tortoisesvn.tigris.org/) is a great alternative client tool for Windows. It integrates very cleanly with Explorer and makes it easy for non-technical users to work with version control.
If you are looking for a TortoiseSVN-style client for Linux, Meld is well worth a look (http://meld.sourceforge.net/).
If you don't have access to your own dedicated server, there is still the possibility of using external services for your development and deployment.
If you are looking for a Subversion repository, RubyForge (http://rubyforge.org/) is the main repository of Ruby and Rails related projects. Teams developing open source software can make use of their facilities to manage the project and host their code in a Subversion server. However, if you are developing proprietary code, your project will not be eligible for inclusion.
There are also commercial hosted project management solutions which may be suitable if you are not developing open source software. Try googling for hosted subversion.
If you are looking for a place to deploy your applications to, there are a variety of companies either providing Rails support as part of a larger offering, or providing dedicated Rails-only hosting. Ruby On Rails Webhosting (http://www.rubyonrailswebhost.com/) is one site which maintains a list of Rails-enabled hosting, along with user reviews.
Acme already has a Linux server, housing a shared directory, with SSH installed for remote administration. First, they install a Rails stack, mirroring Rory's Ubuntu Linux developer machine setup. Next, they install Subversion set up user accounts for each member of the team. That's all they need to do to get up and running.
Rory and Jenny setup the repository structure for the Intranet project and configure their instances of EasyEclipse to talk to the new repository over SSH. They are now ready to start development of the Intranet application.