One aspect of the application that Ken points out to Rory is that the listing of companies is very long and takes a lot of scrolling up and down to navigate. Ken asks why each company has to take up so much space within the index view. When Rory examines the layout of the list of companies, he realizes that the company addresses greatly increase the vertical height of each company entry. If he removes the addresses from the listing, there will be more companies shown in any view of the company index view.
Rory discusses with Mary whether he could remove addresses from the company index view. Mary is not keen. She states that it is sometimes useful to compare company addresses while investigating the relationship between companies or while planning a series of visits. However, she does agree that most of the time, the addresses are not needed. "What would be great," she says "would be if you choose an option to simply view an address and then hide it again." Rory thinks that the AJAX helper link_to_remote might provide him with just the tool to do this.
The AJAX helper link_to_remote, provides a modified HTML anchor on a page. The anchor is different from a standard HTML anchor in that instead of providing a link to another web page, the link_to_remote anchor provides a link to a JavaScript function. That function modifies an element on the current page. Therefore, the link_to_remote feature needs to do three main tasks:
- Provide a link on the page and a set of rules for what to do when that link is activated.
- Identify an element to be modified on the page.
- Find the correct content to display within the identified page element when activated.
link_to_remote is used within a view. The syntax is:
link_to_remote(name, options = {}, html_options = {})
...where name is the anchor text to be displayed at this point. Details of the options available can be found at:
http://api.rubyonrails.com/classes/ActionView/Helpers/PrototypeHelper.html
Here, I will describe a basic set of options, and later on when discussing Rory's requirement I will describe some more advanced options.
One of the simplest usages of link_to_remote is like this:
<%= link_to_remote "Say Hello",
:update => "output_place",
:url => {:action => 'say_hello'} -%>
This code does three things, stated as follows:
- It displays the string
"Say Hello"at this point in the page and places that text within an HTML anchor. - It defines
"output_place"as the name of the element on the page that will be modified when the anchor is activated. - The entry
:url, specifies that the action'say_hello'will provide the content used to modify"output_place".
At the moment, clicking on the created anchor link does nothing because neither output_place nor the action say_hello have been created.
XHTML and HTML pages have a hierarchical structure defined by the Document Object Model (DOM). Each page element is defined as an object and placed within the structure defined by the DOM. An early definition of this model as it related to HTML can be found here:
http://www.w3.org/TR/1998/REC-DOM-Level-1-19981001/introduction.html
More up-to-date definitions can be found via a web search for dom definition.
Therefore each element within an XHTML document can be related to every other element within the document by their relative positions within the DOM. So consider this part of an XHTML page:
<div id="fruit_list">
<ul>
<li>Apples</li>
<li>Pears</li>
<li>Oranges</li>
</ul>
</div>
Its DOM representation would be as shown below.
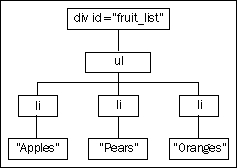
From this you can see that:
- The
ulelement is lower within the hierarchy than thedivelement. - The
ulelement is a child or descendant object of thedivparent. - The
ulelement has threelidescendant elements. - The three
lielements are at the same level and are called sibling elements. - The text within an li tags is a decedent element of that
lielement.
We can navigate up, down and across this structure using JavaScript.
Note
I will use some JavaScript here as it makes it easier to explain what the AJAX helper method is doing. While knowledge of JavaScript is helpful when using AJAX, the Rails AJAX helpers make it possible to carry out many sophisticated JavaScript driven operations without entering any JavaScript code. The AJAX libraries themselves simplify the JavaScript coding, and Rails is able to manipulate those library functions and objects via Ruby code. Therefore, do not worry at this point if you do not have any knowledge of JavaScript.
However, first we must get to a starting point. All XHTML and HTML documents have a root ancestor element called "document" and we could start from this point and navigate down to the div containing the fruit list within the DOM. However, there is an easier way in which JavaScript allows us to navigate directly to a named element. In the example above there is one named object, the div element. Its name fruit_list is defined by the id attribute. The following JavaScript code creates four objects by first accessing the named div and then navigating from that point down through the DOM to access elements at each level below:
<script language="JavaScript" type="text/javascript">
var fruit_list_div = document.getElementById("fruit_list");
var the_ul = fruit_list_div.getElementsByTagName("ul")[0];
var li_elements = the_ul.getElementsByTagName("li");
var second_li_text = li_elements[1].innerHTML;
alert(second_li_text);
</script>
The output of this script is an alert box containing the word "Pears". That is the text contained within the second li element.
The Prototype library contains a set of functions that make navigating the DOM a little simpler. The JavaScript below does the same as the script above, but uses Prototype functions to simplify the script:
<script language="JavaScript" type="text/javascript">
var fruit_list_div = $("fruit_list");
var the_ul = fruit_list_div.down("ul");
var li_elements = the_ul.immediateDescendants();
var second_li_text = li_elements[1].innerHTML;
alert(second_li_text);
</script>
The key functions to point out are:
$("fruit_list")returns the DOM element with the IDfruit_list. In our example, that is thedivelement.element.down("ul")returns the first childulbelow the current element. There is also an "up" function that allows us to navigate to parent nodes.element.immediateDescendants()returns an array of all the elements immediately below the current element.
A full description of the Prototype API can be found here: http://www.prototypejs.org/api
This example demonstrates that it is easy to access an element within the DOM using $(element_id), if we uniquely identify the element with an ID. It is also fairly straightforward to navigate and collect elements near the named element.
If we return to our link_to_remote example, we need to identify an element as"output_place" that will be modified when the link is activated. The simplest solution is to add a div element at the place in the document where we want any new content to appear:
<div id="output_place"></div>
This can be anywhere within the page displayed when the view is rendered. We can then grab this element with $("output_place"). In fact, the link_to_remote helper even puts the ID within $(), so all the helper needs is the entry:
:update => "output_place"
Lastly we need to create the code that will generate content to be placed within the output_place div when the link is activated. So in the controller we add the following code to create a new action called say_hello.
def say_hello
render :text => "Well hello there!"
end
If we now navigate to the view containing the link_to_remote, and click on the link Say Hello, Rails will render the text Well hello there! within the output_place div.
One of the best things about link_to_remote, is the number of simple-to-use advanced options. These allow us to extend and control the operation of link_to_remote very easily. A full listing of the options is available at http://api.rubyonrails.com. Rather than detail each option, I will use them here to show how Rory can achieve his objective of being able to hide and show the address entries.
When Rory starts thinking about what he requires he draws up the following list:
- An initial arrangement with the elements displayed as desired when the page is first loaded.
- A show action displaying the extra content the user will see when selecting the show link.
- A hide action that will remove the extra content created with the show action.
- A link that indicates the current state, and that can be used to switch between, show and hide states.
However, the simplest AJAX actions are to add and remove whole elements. Also, it is easier to replace a link than alter it. Therefore, the way the AJAX tools work lend themselves to a different arrangement.
- In many cases the arrangement of the initial elements and the final arrangement after the hide action, will be the same. So rather than having one action that creates the initial state, and then another that reproduces that effect, a simpler arrangement is to use a partial. Insert the partial on page load, and then reinsert it when returning to the previous state.
- If the hide element has no content, it is in effect "hide all content". We can replace the partial with a rendering of an empty element.
- Have a partial that contains the extra content. In effect the show/hide action is then switching between the partial currently being shown and its alternative.
- Have two link scripts. Hide the inactive one and make the current one visible, That is, display the hide link when the extra content is shown, and display the show link when the extra content is hidden.
To work through how to create the required show/hide effect, it is simplest to start with alternating links. Coming up is some view code that achieves a very simple show and hide effect with link_to_remote links.
<p>
<span id="show_alternative_link">
<%= link_to_remote "Show Alternative Partial",
:update => "output_place",
:url => {:action => 'show_alternative_stuff'},
:success => "$('show_alternative_link').hide()",
:complete => "$('show_initial_link').show()" %>
</span>
<span style="display: none;" id="show_initial_link">
<%= link_to_remote "Show Initial Partial",
:update => "output_place",
:url => { :action => 'show_initial_stuff' },
:success => "$('show_initial_link').hide()",
:complete => "$('show_alternative_link').show()" %>
</span>
</p>
<div id="output_place"><%= render :partial => 'initial_stuff' -%></div>
- The two links are placed together within a single pair of
ptags. - Each link is uniquely identified by an enveloping named span.
- The span containing the link that will hide the content is initially hidden using a style attribute within the span tag:
style="display: none;" - Both links update the same div element:
output_place. - The show link displays content as prescribed by the
show_alternative_stuffaction, and the hide link displays content as prescribed by theshow_initial_stuffaction. - Both links use the
:successoption. This allows us to specify an additional AJAX or JavaScript command to trigger if thelink_to_remoteprocess is successful. Both links use this option to hide themselves. The link will remain in place if thelink_to_remotefails, allowing the user to try again. - Both links use the
:completeoption to show the alternative link. The complete option triggers an AJAX or JavaScript command when thelink_to_remoteaction is completed.
Before we can use this code, the show_initial_stuff and show_alternative_stuff actions will need to be configured in the controller:
#Renders a partial called some_stuff
def show_alternative_stuff
render :partial => "alternative_stuff"
end
def show_initial_stuff
render :partial => "initial_stuff"
end
The show_stuff action renders a partial. That is the partial passed to the browser to display within the target"output_place" div. The show_initial_stuff action renders the same partial that was initially displayed within the output_place div.
So lastly we need to create two partials and place them within the controller's view folder. For this example, the content of the _initial_stuff.rhtml file is:
<h2>This is the initial partial</h2>
<p>This is the original text to be displayed.</p>
The content of the _alternative_stuff.rhtml file is:
<h2 style="color:green;">This is the replacement partial</h2>
<p style="color:red;">This is some alternative text to be displayed.</p>
Now when we click on the link "Show Alternative Partial" the contents of _alternative_stuff.rhtml replaces the initial text in the output_place div. Then clicking on the "Show Initial Partial" link returns the contents of "output_place" div to its initial state.
As I stated earlier, JavaScript can be difficult to debug. One very useful tool to help debug our AJAX actions is Firebug (http://getfirebug.com/). Firebug is a Firefox plugin. The figure below shows the response information from activating the Show Initial Partial link

Such information is often essential when tracking down AJAX related problems.
Fortunately, the company address in Rory's index view is already being rendered as a partial. So instead of creating a new partial, all Rory has to do is alter the place where the partial is rendered. That is, instead of it being loaded as the page is built, it will be rendered as a response to a link_to_remote action.
The table cell is currently created with the following code in the view app/views/companies/index.rhtml:
<td><%= render :partial => 'addresses/show', :locals => {:address => company.address} %></td>
Rory needs to replace this content with two link_to_remote entries and an output div. He also needs to move the render code to a new action within the controller.
He starts by adding new actions to the controller app/controller/companies_controller.rb:
def show_address
@address = Address.find(params[:id])
render :partial => 'addresses/show', :locals => {:address => @address}
end
def hide_address
render :text => " "
end
For the show_address action, he moves the render statement from the view to the controller's action code. Then adds a method to identify the address and pass it to the partial. The render code is altered to use @address for the local address.
The hide_address simply renders a blank entry.
The content of the company list table cell is then updated from:
<td><%= render :partial => 'addresses/show', :locals => {:address => company.address} %></td>
...to:
<td><%
show_link = "show_address_#{company.id}"
hide_link = "hide_address_#{company.id}"
output_place = "address_#{company.id}"
%>
<span id="<%= show_link -%>">
<%= link_to_remote "Show",
:update => output_place,
:url => {:action => 'show_address', :id => company.address_id},
:before => "$('#{output_place}').update('Loading ...')",
:success => "$('#{show_link}').hide()",
:complete => "$('#{hide_link}').show()"
%>
</span>
<span id="<%= hide_link -%>" style="display: none;">
<%= link_to_remote "Hide",
:update => output_place,
:url => {:action => 'hide_address'},
:success => "$('#{hide_link}').hide()",
:complete => "$('#{show_link}').show()"
%>
</span>
<div id="<%= output_place -%>"></div>
</td>
A few things to note:
- For each company, there is now a set of hide and show links, and an output
div. If Rory used the same names throughout the list, the system would be unable to determine which links to show and hide, and which outputdivto put the address content. Therefore, Rory has to uniquely identify each link and outputdiv. He does this by appending the company ID to each tag ID. So for the first company, the ID of theshow_addressspan tag becomesshow_address_1. - As having to append the company ID to a number of elements in many places is repetitive and prone to error, Rory adds a small section to the start of the new code, where the IDs of the current show link, hide link and output
divare defined. - Rory uses the
:urloption to add a parameter to theshowlink that will pass theaddressidto the controller action. This ensures that selecting eachshowlink will result in the correct address being shown. - As the address takes a little time to load, Rory adds a
:beforeoption to theshowlink. This alters the content of the outputdivas thelink_to_remoteaction starts, and Loading... is displayed. This text is overwritten when the outputdivis updated with the address, and therefore the loading message disappears on completion.
There is an AJAX helper method in_place_edit_for which is combined with a second method in_place_editor_field to create a simple way to edit a field in place. To demonstrate, try the following.
- Add this to
app/controllers/people_controller.rb(below the before_filter lines):
in_place_edit_for :person, :notes
- Then change
app/views/people/show.rhtmlso that the line:
<p><strong>Notes:</strong><br/><%=d @person.notes %></p>
- ...becomes:
<p><strong>Notes:</strong><br/><%=d in_place_editor_field :person, :notes %></p>
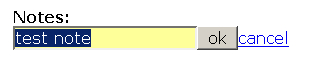
- Then browse to a person and select the show option. If you now hold your mouse cursor over a notes value, it will go yellow (you may have to go into an edit view to create some notes before this option becomes available see note below on limitations). Clicking on the value opens a simple form in which you can alter the note and save it.
While this method is very easy to implement, it is not very flexible and is difficult to extend. Some of the limitations are stated as follows:
- The form simply contains a text input field, so we have to use a different technique to update entries from selection lists or use Rails date selection tools.
- The technique relies on there being an entry to update. If nothing is entered there is no value to click on; so no way to view the form. Therefore, we cannot add information via this technique; only update existing entries.
- It is difficult to validate any entries submitted via the
in_place_editor. - The
in_place_editoris aimed at the show view. However, in line editing is most useful when it can be done from a list view and the tool is not so easy to use within a list.
In my opinion, it is easier to go to an edit view and make changes, rather than go to a view, and then reveal and submit each in_place_editor form. Using a standard edit view uses fewer clicks than using an in_place_editor enabled show view.
So rather than using the in_place_editor, return the people controller and show view to their previous state and I will demonstrate how Rory can achieve similar results via link_to_remote, and another AJAX helper method, form_remote_tag.
Mary comes to Rory with a new request. She is finding that telephone numbers are used more than anything else in the application and she wants a quick and easy way to enter and update them. Preferably she would like to change them without leaving the index view. Rory decides to extend what he has learned using link_to_remote to satisfy Mary's request.
The first step is to create a link_to_remote in the telephone cell of the company list. As it needs to appear with any existing data, he makes it very small, simply a plus sign. So in app/views/companies/index.rhtml he replaces:
<td><%= company.telephone %></td>
...with:
<td><%
tele_output = "telephone_#{company.id}"
-%>
<%= link_to_remote "+",
:update => tele_output,
:url => {:action => 'show_update_telephone', :id => company.id } -%>
<span id="<%= tele_output -%>"><%= company.telephone -%></span>
</td>
This is a simple link_to_remote.
Rory then updates app/controller/companies_controller.rb by adding two new methods:
def show_update_telephone
@company = Company.find(params[:id])
render :partial => 'update_telephone', :locals => { :company => @company}
end
def update_telephone
@company = Company.find(params[:id])
@company.telephone = params[:telephone]
@company.save
render :text => @company.telephone
end
The action show_update_telephone is used by the link_to_remote. It causes a partial _update_telephone.rhtm to be rendered and passes a company object to the partial. The partial contains an AJAX form and the method update_telephone handles the data returned by that form. Here is the content of app/views/companies/_update_telephone.rhtm:
<% tel_output = "telephone_#{company.id}"
tel_form = "telephone_form_#{company.id}" %>
<div id=<%= tel_form %>>
<%= form_remote_tag(:update => tel_output,
:url => { :action => :update_telephone },
:complete => "$('#{tel_form}').remove()" ) %>
<%= text_field_tag :telephone, company.telephone %>
<%= hidden_field_tag :id, company.id %>
<%= submit_tag "Update" %>
<%= end_form_tag %>
</div>
<div id="<%= tel_output %>"></div>
As with the previous link_to_remote tags, the company ID is appended to tag names so that each telephone entry within the list is uniquely identified.
The main new element is the form_remote_tag. This is quite like a standard form_tag, except that, it uses an AJAX XMLHttpRequest to submit the data. Therefore any data input into the form is passed to the server without refreshing the whole page. Most of the options used by link_to_remote are available to form_remote_tag, and Rory uses the :complete option to remove the form once a new entry has been submitted.
The rest of the form is generated using standard form elements. It is this that gives this technique such advantage over the in_place_editor. Any form element available to us in a standard form can be used in the form partial. While this form is used to update a single field, it would be easy to add additional fields and options (such as replacing a whole list row with an input form) become possible with only fairly small changes to the basic technique.
The AJAX functionality described so far has concentrated on tools provided by the Prototype library. Before leaving AJAX, an example is given here of some script.aculo.us functionality that could be added to Rory's application. Drag and drop is used to allow a user to grab an address and put it aside while searching through the addresses on a page.
Prototype tools mainly allow users to access data from outside and then use it within, the user interface. The script.aculo.us tools concentrate on allowing a user to manipulate the interface itself. One of the simplest functions to make available to the user, is the ability to drag one element on a web page to another location on the same page. That is, to make the element draggable.
The behavior of a draggable object is defined within the AJAX class Draggable. To make an element draggable we need to create a new instance of an object of the JavaScript class Draggable, and associate that new object with the element. This can be done by adding the following code to a view:
<%= javascript_tag "new Draggable('element_id')" -%>
Where element_id is the id of the element to be dragged. Rails provides a helper method to simplify this still further:
<%= draggable_element :element_id -%>
Unlike objects in Rails, JavaScript can be sensitive to where an object is created and used. If the code that associates an element with a Draggable object, is put before the code that defines the element within the DOM, the code will not work as we desire it to. JavaScript will not look ahead in the HTML code for an element that matches the element_id. It will only look back through the DOM elements that have already been defined. It will, therefore, fail to find the element and then associate the Draggable object with a null. This will not raise an error — it just will not make the element draggable when it is placed on the page.
Therefore, this will not work as desired:
<%= draggable_element :element_id -%>
<div id="element_id">stuff to be dragged</div>
Whereas this will work:
<div id="element_id">stuff to be dragged</div>
<%= draggable_element :element_id -%>
We wish to make the addresses in the company list draggable. These addresses are displayed in a div element whose name is defined by output_place. We, therefore, already have an ID for the element to be dragged. Adding a draggable_element statement below the output_place div and using the output_place variable to define the element will make addresses draggable:
<div id="<%= output_place -%>"></div>
<%= draggable_element output_place -%>
Once the draggable functionality is implemented, it becomes possible to show any address and then drag it to another part of the company list page, where it will stay when released. It is worth playing with this behavior as it has some unexpected results. Drag an address to another part of the page and then click on the "hide" link for this address. The address disappears as expected. However, if we then click on the "show" link, the address does not appear in its normal position, but back in the place where we dragged it. This is because not only the content of the div was moved by dragging, but also the div itself. Therefore, when the link_to_remote call behind the "show" link is triggered, it inserts the address into the div at its new position. The :revert option causes a dragged element to return to its original position when dropped. In this instance, :revert provides a more predictable behavior.
There is also the issue of whether a user would know that an element is draggable. Unless we provide clues as to the draggability of an element, there is no clue for a user that an element can be dragged; the element will look just like the static elements around it. CSS is the obvious way to overcome this. We can define a "draggable" DOM class and use that to define style elements in the page's style sheet to alter the appearance.
The modification to the output_place element shown below incorporates both a :revert option and Draggable class definition.
<div class="draggable" id="<%= output_place -%>"></div>
<%= draggable_element output_place,
:revert => true -%>
To display visual clues to the user, we also add a definition of .draggable to base.css:
.draggable {
cursor : move;
}
.draggable:hover{
background : yellow;
}
This causes the pointer (cursor) appearance to change as the mouse pointer moves over the draggable element. It also turns the background color of a draggable element to yellow while the mouse is over that element.
Dragging elements around a page may have some use, but draggability becomes much more useful if we can use the fact that an element has been dragged somewhere to drive another event. This is particularly the case if we can pass information from the dragged element to the triggered event.
The simplest way to achieve this is to use another set of AJAX objects called droppables. These are DOM elements that can receive dragged elements. Using Rails, an element can be defined as droppable like this:
<div id="drop_place_id">drop it here</div>
<%= drop_receiving_element :drop_place_id %>
To demonstrate how to use droppables, let us create a new area at the bottom of the company list page, which includes:
- An area where droppable elements can be dropped (address_drop)
- An element where new output can be created (address_drop_output)
- And the code that defines
address_dropas a droppable and an action that results from an element being drop.
<div id="address_drop">
<h2>Address drop</h2>
<p><span id="address_drop_output">Drop an address here.</span></p>
</div>
<%= drop_receiving_element :address_drop,
:update => "address_drop_output",
:url => {:action => 'show_address'},
:before => "$('address_drop_output').update('Loading ...')" -%>
Note that the drop_receiving_element method allows the same options that we have used before with link_to_remote:
:updatedefines the DOM element that will be modified when the event is triggered.:urldefines the controller method that will handle the action.:beforeallows us to give the users an indication that something is changing.
We now have somewhere to drop our addresses. However, to use the dropping process to determine a particular event we need to pass information from the dropped element to the controller. Fortunately, the method drop_receiving_element provides a mechanism to do this: the dropped element's ID is passed to the controller and can be accessed at the controller via params[:id].
In Rory's application, it should then be fairly easy to use the element id with the companies_controller's show_address method to output the dropped address. However, the design of the show_address method and the link_to_remote code that use it means that there is a small complication. The Rails object ID used to create each address droppable's ID is a Company object, whereas show_address uses Address object IDs. There are two ways to handle this—detect the type of ID being
passed to the method and alter the way the method handles the ID to suit; or change the link_to_remote code so that it also uses the company ID. The first provides better performance (because we do not always first have to find a company before we can look up an address) the second is more scalable (because more of the code is reused, that is we are not using a different set of code for each option). There is a third option which is to use an address ID to identify the droppables, but there is a possibility that this would not create unique IDs on the page as two companies could share the same address. I will use the second option as it demonstrates the important components and how they can be used together.
First we will modify the link_to_remote to use the company ID, pass the same parameter name to the controller as the default drop_receiving_element (that is, :id), pass the same information (output_place) and alter the names of the elements so that they are a little more meaningful.
<%
show_link = "show_address_for_company_#{company.id}"
hide_link = "hide_address_for_company_#{company.id}"
output_place = "address_for_company_#{company.id}"
%>
<span id="<%= show_link -%>">
<%= link_to_remote "Show",
:update => output_place,
:url => {:action => 'show_address', :id => output_place},
:before => "$('#{output_place}').update('Loading ...')",
:success => "$('#{show_link}').hide()",
:complete => "$('#{hide_link}').show()"
%>
</span>
We then need to modify the companies_controller show_address method to handle the fact that the ID being passed to it will now be a Company ID and will have the prefix"address_for_company_" to deal with:
def show_address
@address = Company.find(params[:id].delete( "address_for_company_")).address
render :partial => 'addresses/show', :locals => { :address => @address}
end
With these changes implemented, the user is now able to choose an address and drag it to the area with the heading "Address drop". When they do this, the address will appear below the heading.
This example shows how some of the techniques used with link_to_remote can also be used with drag and drop elements to provide additional functionality. In particular, it demonstrates how drag and drop can be used to trigger events, and provide information to the process controlling the event that will allow it to alter its behavior (depending on the identity of the element dropped).
I have only touched the surface of AJAX here. I hope I have demonstrated some simple techniques that achieve some effects that are particularly useful in small business application development. The AJAX helper methods I have demonstrated here are easy to use and very flexible.
However, there is a wealth of AJAX objects and functions available both through Ruby and directly via JavaScript. Some of the most exiting developments for Rails developers are coming via RJS (Ruby-generate JavaScript) which can be used to combine JavaScript functions to achieve complex tasks without the developer writing any JavaScript all coding being in Ruby. If you wish to pursue AJAX on Rails further, a good start is an Internet search on "RJS Rails". There are also a number of dedicated books on the subject starting to appear.