If you want to go it alone and install the components of a Rails stack yourself, you gain the advantage of being able to precisely tailor the pieces of software installed on your system. For example, even if you don't want MySQL to be installed, it is difficult to avoid if you use AxleGrease or InstantRails, which both bundle MySQL (Locomotive uses SQLite). A custom installation means you can remove any of the items that you don't need.
Another advantage of this approach is that you can sometimes leverage the package management provided by your operating system (if it is Linux or Mac—the Ruby packages are not a part of the mainstream Windows, and aren't covered by Windows Update). This makes it easy to keep up with bug fixes and feature enhancements. By contrast, the bundles described in the previous sections require you to manually upgrade when a new version is released (though all, except AxleGrease, provide an upgrade script to make this relatively simple).
One final benefit of a custom installation is that the package manager will track dependencies for you, ensuring that all the parts work nicely together. While the bundles do some of this work for you, you may find that adding new libraries to them (e.g. new Ruby gems) may lead to dependency issues you have to resolve yourself.
The first step is to get a working Ruby installation. In this section, We will also look at Rubygems, as it is included with Ruby on some platforms.
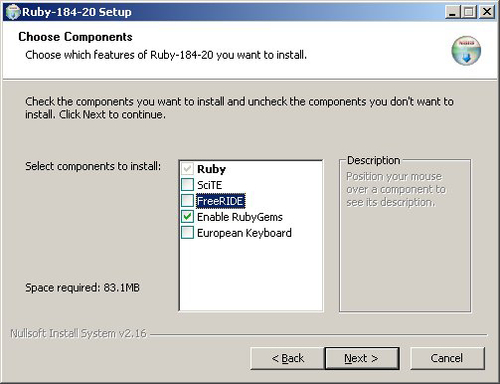
The easiest approach is to get the One-Click Ruby Installer from: http://rubyforge.org/projects/rubyinstaller/. It is a good way to install Ruby and Rubygems; ignore the text editors that it prompts you to install (FreeRIDE and SciTE) by unticking the boxes on the options screen:
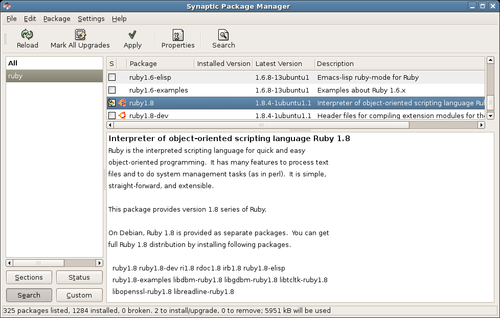
Most distributions (e.g. Ubuntu, Debian, and Fedora) provide packaged versions of Ruby and its libraries, which can be installed via package management (e.g. apt, yum, and synaptic). On Ubuntu, for example, you can use Synaptic:
Alternatively, you can install from the command line with:
$ apt-get install ruby ri rdoc irb
However, if you install Ruby on some wholly-free Linux distributions (like Debian), you may find that Rubygems is not provided through the package management system. This is because Rubygems is a package management system itself, and the gem packaging approach is at odds with the Debian Filesystem Hierarchy Standard (FHS—see: http://www.pathname.com/fhs/). The FHS specifies how files relating to a piece of software are distributed across the system—configuration files in /etc, documentation in /usr/share/doc, and so on. Rubygems, by contrast, installs software libraries into a single directory, documentation and all, which is incompatible with how Debian packages are organized and built.
Consequently, the best approach for installing Rubygems is to download the source and compile it yourself. This is easier than it sounds. First, you compile it yourself. This is easier than it sounds. First, you need to get hold of the Rubygems source from: http://rubyforge.org/projects/rubygems/ (you need the file with the .tgz suffix).
Next, you need to install the tools for compiling the source. On Ubuntu Dapper, you would do:
$ apt-get install build-essential
You are now in a position to install Rubygems from the command line. The examples below use version 0.9.0:
$ tar xzf rubygems-0.9.0.tgz
$ cd rubygems-0.9.0
$ ruby setup.rb

$ gem update
Verify that gem is working by running the gem-v command and you should see something like this:
$ gem -v

0.9.0
(The gem command is used to manage all the gems on the system: you use it to install, uninstall, and list them.)
You can install Rails from a command line:
The -y on the end of this command tells gem to install all of the Rails dependencies. If you leave this off, gem will prompt you to install them anyway: adding the switch just automatically answers yes to installing the dependencies.
If this doesn't work for you, the most likely cause is a failure to install Rubygems. If you are using the Windows One-Click Installer, try reinstalling it and make sure the Enable RubyGems option is ticked as shown in the screenshot in the earlier section Ruby on Windows. If you are using Linux, check that you have installed Rubygems correctly by following the instructions given above.
When you use gem to install Rails, you are actually installing six separate gems. If you prefer (the gem update site can be horrendously slow at times), you can download them from http://rubyforge.org/projects/rails/ and install them individually, provided you do so in this order:
- rake
- activesupport
- actionpack
- activerecord
- actionwebservice
- actionmailer
- rails
Installing from downloaded gems (rather than from the network) can be particularly useful if you have a whole load of developer machines you want to keep in sync—setup a central repository holding the Rails gem files, make it available over the network (e.g. via HTTP), and download and install the gems on the developer machines from this repository. In this way, you can ensure that you are using the same versions of the same gems. You can also extend this approach to cover other non-Rails gems. See Appendix A for more details about running your own gem server
While this book provides a thorough reference for using Rails, there are cases where you really need to dig into the Rails API documentation to get all the information you need. Fortunately, this is included with the Rails gems.
The simplest way to find the Rails documentation is to run the gem documentation server with the following command:
$ gem_server
The gem_server command runs a local web server, (on port 8808), which serves up all your Ruby gem documentation, making it accessible via a web browser. Browse to http://localhost:8808/ and you should see the front page of the installed documentation:
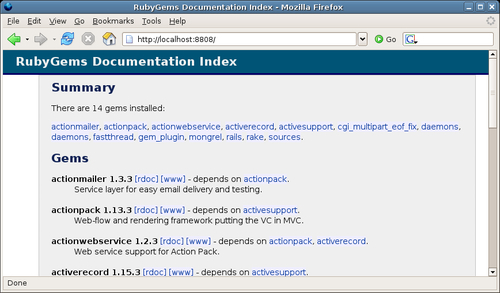
Click on the [rdoc] links to see the local documentation for your gems.
To find the Rails documentation manually (e.g. if gem_server doesn't work):
- On Windows, if you used the Ruby One-Click Installer (see the section Ruby on Windows, earlier in this chapter) and installed it into
 C:
uby
, the gem documentation is installed in:C: ubylib ubygems1.8doc - On Linux, if you installed using apt-get, the documentation is installed in:
/usr/lib/ruby/gems/1.8/doc
Within the main documentation directory, you should see a directory for each installed gem, for example:
actionmailer-1.3.3
actionpack-1.13.3
actionwebservice-1.2.3
activerecord-1.15.3
activesupport-1.4.2
rails-1.2.3
rake-0.7.2
To get to the documentation for a given gem, go to the appropriate directory (e.g. activerecord-1.14.4). Next, go to the rdoc directory. Then load the index.html file in your browser.
At this point, you may not be sure about what exactly your application is going to do, and you may not have a fully-formed idea about which libraries you'll require. However, there are a few libraries that are very useful when building practically any Rails application (particularly if you build them how we're going to build them).
Many of the libraries are available using gem and are simple to install. Others require a bit more work, but typically use the make build tool and Ruby's extconf to compile and install Ruby extension code
Note
Libraries vs. plugins
When you're developing with Ruby on Rails, there are two sources of add-ons you may need to make use of.
Libraries are extensions to Ruby itself and can be used for writing command line scripts or GUI applications in Ruby, as well as from within Rails applications. These are the add-ons I'll be describing in this chapter.
Plugins are Rails-specific extensions. They have little meaning outside of Rails, as they typically alter the behavior of classes specific to Rails. They are covered in Chapter 8.
Capistrano is a deployment tool which is tightly integrated with Rails. It allows you to do things like check out your application code from a version control system and deploy it to production servers, restart application servers, etc. It can be installed from the command line with:
$ gem install capistrano -y
We'll be covering Capistrano in some detail in Chapter 9.
Mongrel (http://mongrel.rubyforge.org/) is a great way to run Rails applications in either a development or production environment. It provides a Ruby-centric application server, specifically designed for running Ruby web frameworks (as well as Ruby on Rails, it also supports Nitro and Camping). Additionally, Mongrel can be fronted with Apache, enabling you to leverage Apache's awesome power when serving static files (images, static HTML) while farming out dynamic pages to your Rails application. You can even cluster Mongrel instances for higher performance. By starting out with Mongrel, you are kitting yourself out with all the tools you need to run applications efficiently once they get to production.
On Linux, you will need the development libraries for your version of Ruby to install Mongrel. This is because Mongrel is compiled by gem for the architecture you are using. The development library has the same name as the main library, with -dev appended to it. In the case of Ruby 1.8.x, where the Ubuntu library is called ruby1.8, the development library is ruby1.8-dev and can be installed with:
$ apt-get install ruby1.8-dev
Mongrel can now be installed via gem:
$ gem install mongrel -y
One, slight complication is that there are many versions of Mongrel, which can be confusing. Here's a fraction of the list shown when installing it on Ubuntu:
Select which gem to install for your platform (i686-linux)
1. mongrel 1.0.1 (ruby)
2. mongrel 1.0.1 (mswin32)
3. mongrel 1.0 (mswin32)
4. mongrel 1.0 (ruby)
5. mongrel 0.3.13.4 (ruby)
6. mongrel 0.3.13.3 (ruby)
7. mongrel 0.3.13.3 (mswin32)
...
Some guidelines for choosing which version to install:
- Get the one with the highest version number (and nearest to the top of the list). At the time of writing, this was version 1.0.1.
- If you are installing on Windows, choose the mswin32 gem; on any other system, use the gem marked ruby.
The Mongrel dependencies are also installed by this command: daemons, which enables you to run Ruby programs as background processes and manage them through start/stop scripts; gem_plugin, which enables loading of 3rd party Mongrel extensions; fastthread, which provides a faster threading implementation for Ruby; and maybe others, depending on the version of Mongrel you are installing. If you are prompted for a version of any of the dependent libraries you want to install, select the one nearest to the top. Choose the mswin32 version if installing on Windows, and the ruby version for other platforms.
It is also worth installing mongrel_cluster, which makes it easier to manage multiple Mongrel instances for scaling your application gracefully. We won't be using it for now, but it doesn't hurt to have it around:
$ gem install mongrel_cluster
If you are installing on Windows, it is a good idea to install the Windows services support for Mongrel. With this, you can run Mongrel as a service on a Windows server, so it starts when the machine boots. Install it with:
C:> gem install mongrel_service
Mongrel configuration is described in Chapter 6, and again in more depth in Chapter 9.
Most Rails applications depend on a database for storing their data (though, you can write a Rails application without a database, of course). Rails supports a variety of databases, including most of the main open source ones (MySQL, PostgreSQL, SQLite), as well as proprietary ones (Oracle, SQL Server).
If you work in a small development team with complete control over your environment, you could do worse than choose MySQL as your database server. You can use MySQL for internal development work with no cost whatsoever, no strings attached, on as many machines as you like. If you want to, you can also roll it out into production with little or no cost, and it will scale phenomenally well. When you do want support, you can get it from MySQL AB (the company which originated MySQL and owns the intellectual property): their support contracts are reasonably priced (cheaper than those for many proprietary databases), and scale from two-incident to 24-7 phone support. Aside from the cost angle, it is also easy to learn and administer and is very stable, too. For these reasons and others, MySQL is recommended as a database server for development work.
Another database platform you will commonly encounter is SQL Server, as it's part of Microsoft's Small Business Server, a ubiquitous piece of software in small businesses. If you are building applications for a client who controls the production platform, you may be required to use this for your database. Fortunately, Rails cleanly separates the development and production environments, so it is eminently plausible to develop on MySQL (for example), and deploy to SQL Server for production.
In fact, because of how Rails is designed, your choice of database server at this point is less important than it could be. For example, Rails lets you define your database schema in a platform-agnostic fashion (via migrations, covered in the next chapter). This means you can reproduce the same structure on a variety of database platforms with little effort.
Personally, I like SQLite for my development work, because I can move a whole application and its database between machines very easily; while I prefer MySQL for production deployments.
Throughout the book, we'll be using Rails with MySQL. However, if you need to use a different database, you can find information on configuring Rails to work with your choice of database here: http://wiki.rubyonrails.com/rails/ pages/Howtos.
MySQL is included with several of the Rails bundles mentioned earlier: for example, if you use InstantRails on Windows, you get MySQL for free. If you are installing MySQL in standalone mode, installation is still straightforward. Recommendations for the different platforms are given below.
To install MySQL on Windows, download the Current Release for Windows from the MySQL website (http://mysql.com/downloads/#downloads). Your best bet is to get the Windows Essentials package, which includes all the binaries and command line tools you need to run MySQL on Windows. (The larger Windows package adds extra support for developers who need to get further into MySQL's internals.)
MySQL comes with a full Windows installer, which takes you through the installation process step-by-step. The Typical setup installs both the server and command line utilities we need.
Configuration is also accomplished through a graphical wizard. During installation, you will be asked whether you want to configure the server immediately, and should do this.
The configuration wizard is slightly confusing (at least for me, as it uses terms like OLAP and OLTP which are kind of irrelevant), so here are some recommendations for each step of the configuration process:
- Select Detailed Configuration.
- Select Developer Machine. This prevents MySQL from hogging memory.
- Select Multifunctional Database. This gives you the option to use the InnoDB table type (if you want to), which supports transactions and foreign keys.
- Leave the InnoDB Tablespace Settings at their defaults.
- Select Decision Support as you are unlikely to be pushing hundreds of connections onto a developer's server.
- Un-tick the Enable TCP/IP Networking setting. If installing for a developer, the MySQL server doesn't need to be accessible to other machines over the network. However, if you want to remotely manage MySQL from another machine on the network (either from the command line or using the MySQL Administrator GUI tool), you need to enable TCP/IP Networking here.
- Set the default character set to the one you are most likely to work with. utf-8 is a good choice, as it is suitable for general-purpose work.
- Check Install as Windows Service (so MySQL starts and stops automatically with the machine) and Include Bin Directory in Windows PATH (so the command line tools are readily accessible).
- Set a New root password to secure the administrative user account.
- Click on the Execute button.
If everything has worked correctly, the MySQL server should start up and you should see a window like this:

See section Checking Your MySQL Installation (later in this chapter) for instructions on how to verify your installation.
Note
When you are installing MySQL on a production server, some of these settings may not be appropriate. For example, you may want to increase the number of concurrent connections allowed, or turn on TCP/IP networking (e.g. if you have multiple web servers which need to talk to a single MySQL server).
The easiest way to install MySQL on Linux is via package management, e.g. on Ubuntu:
$ apt-get install mysql-server
On Ubuntu, this installs a standard MySQL server and command-line client. The server is installed with InnoDB support and networking enabled (on the local interface only), comparable to the Windows installation outlined in the previous section. However, there is no root password set, which needs fixing. Run this command from a prompt:
$ mysqladmin password <new password>
Where<new password> is the new password you want to apply.
A binary distribution of MySQL is available for Mac OS X, from the same location as the Windows downloads (http://mysql.com/downloads/). Alternatively, you can install it via DarwinPorts (http://darwinports.opendarwin.org/). The MySQL site has some hints on installation at http://dev.mysql.com/doc/refman/5.0/en/mac-os-x.html.
To check that your MySQL installation is working, the simplest approach is to use the mysql command line program. It can be used to access every part of your MySQL installation, from creating and managing databases, to configuring user permissions and system settings. You can test whether your server is working and is available with the following command line:
$ mysql -u root -p
Enter root's password when prompted. You should see something like this if you logged in successfully:
Welcome to the MySQL monitor. Commands end with; or g.
Your MySQL connection id is 11 to server version: 5.0.22-Debian_0ubuntu6.06-log
Type ''help;'' or ''h'' for help. Type ''c'' to clear the buffer.
mysql>
If this doesn't work, it could be that you typed the wrong password, or that the password was not correctly set. Try to run the mysqladmin tool again to reset the password. Alternatively, it may be that MySQL is not running, in which case you might see this message:
$ mysql -u root -p
Enter password:

ERROR 2002 (HY000): Can''t connect to local MySQL server through socket ''/var/run/mysqld/mysqld.sock'' (2)
In this case, ensure that the MySQL server has started, e.g. on Linux:
$ /etc/init.d/mysql start
If all else fails, it could be that the machine is not accessible over the network (try pinging the machine), or it could be a configuration problem. Check the MySQL manual for more troubleshooting tips (http://mysql.com/doc/).
It is possible to control MySQL entirely from the command line. But if you prefer using GUI clients in your day-to-day work, several are available:
- MySQL Query Browser is the official MySQL AB GUI client. You can use it to manage your server and its databases. It is open source and is easy to install, either using
apt-geton Ubuntu, or by installer on Windows or Mac (from: http://www.mysql.com/products/tools/query-browser/). - MySQL Administrator is another official MySQL AB GUI client, a desktop application which runs on Windows, Linux, and Mac OS X. It provides an easy-to-follow wrapper around the MySQL configuration files.
- phpMyAdmin is a web-based (PHP) MySQL management tool. It is extremely widespread, often provided in shared hosting environments as the end-user interface to a shared database server. It can be particularly useful if you have multiple-developer teams, each of which needs different levels of access to a shared server or their own private set of databases. One gripe is that the interface is a bit clunky (like many web interfaces), but it is perfectly functional and stable.
- MySQL Workbench is a graphical database design tool, again from MySQL AB. You can use it to generate graphical database models and synchronize them to a database; or to reverse engineer the structure of an existing database (e.g. if you wanted to migrate it to a different database platform). It also supports Access, SQL Server, and Oracle database servers, so it could be useful for projects where you are working with legacy database systems.
The MySQL Ruby binding library is optional but useful. Rails will happily talk to MySQL without this library using Ruby code (see below for one caveat); but the conversation will be more efficient with it, as it uses faster C code. If you are using Mac or Linux, it is well worth installing.
Note
At the time of writing, installation of the Ruby-MySQL is essential on Ubuntu: if you do not install the bindings, Rails will fail to connect to the database correctly and throw out an error, which looks something like this:
Mysql::Error: Lost connection to MySQL server during query: ...
Follow the instructions in the next section to perform the installation.
On Windows, the installation is extremely troublesome and not worth attempting: your Rails application will still work with MySQL without the bindings.
Note
If you insist on attempting to install Ruby-MySQL on Windows, you may be able to get a pre-built binary from http://raa.ruby-lang.org/project/mysql-ruby-win/ (none was available for Ruby 1.8.4 at the time of writing).
On Linux, you can either install the MySQL Ruby bindings through package management or by compiling it from source.
If using package management (the easiest approach) you can do:
$ apt-get install libmysql-ruby
Alternatively, to install from source, first download the .tar.gz file from http://tmtm.org/downloads/mysql/ruby/. Get the highest version number compatible with your version of Ruby: in my case, this was version 2.7. Then install, (as root), using the command line:
$ tar zxvf mysql-ruby-2.7.tar.gz
$ cd mysql-ruby-2.7
$ ruby extconf.rb
$ make

$ make install
Note that if the MySQL database server is in a non-standard location, you will need to specify this when running ruby extconf.rb. For example, to install with XAMPP, you would do:
$ ruby extconf.rb --with-mysql-include=/opt/lampp/include/mysql/
,
--with-mysql-lib=/opt/lampp/lib/mysql/
The easiest approach to installing is to use one of the Ruby-MySQL ports (for the DarwinPorts package manager—see http://darwinports.opendarwin.org/). Search at http://darwinports.opendarwin.org/ports/?by=name&substr=mysql for the port appropriate for your version of MySQL.
Using a decent Integrated Development Environment (IDE) can make a big difference to your productivity as a programmer. While you can code a Rails application with nothing more than a text editor, an IDE gives you several benefits over a basic editor:
- Syntax highlighting
An IDE will color your code by highlighting different data types, control constructs (if...else...end, while...end, etc.), and variable names. This makes it easier to spot places where you have made syntax errors, like missing a closing quote character when defining a string.
- Detecting syntax errors
In cases where syntax errors occur, an IDE can help you navigate to the location of the error.
- Automatic code indentation
Good indentation is very important in making code legible. While it is possible to do this in a text editor, pressing the space bar can get tedious. An IDE will provide facilities to customize indentation (e.g. tabs or spaces, N spaces per indent), indent whole blocks of code consistently, and may also help with auto-formatting of code.
- Code templates
IDEs can help by generating boilerplate code for common tasks (e.g. a skeleton for new HTML files).
- Integration with external tools
Development is not just about coding: it's also about working with databases, build tools, running batch scripts, copying files to servers, and so on. A good IDE will provide support for common development tasks, but also enable you to customize interactions with external applications.
- Source code repository integration
Any serious coding project needs a source code repository, and your IDE should support interaction with this repository. While this is related to the previous point, your IDE should make version control easy and integrated into the fabric of coding.
A good text editor will provide some of these facilities, though not all. However, any text editor is better than the Windows default, Notepad: Notepad can be very problematic, as it doesn't handle line breaks on different operating systems that well. So, if you are looking at code written on a UNIX machine, Notepad may very well make it unintelligible.
One alternative is SciTE for Windows (http://www.scintilla.org/SciTE.html), which supports syntax highlighting for a variety of languages; it is also a part of the InstantRails bundle for Windows. However, it doesn't provide integration with source code repositories. Other good choices are TextPad (http://textpad.com/) and the Programmer's Notepad (http://www.pnotepad.org/).
One tool which provides all of the above facilities is Eclipse (http://eclipse.org/). This is rapidly becoming the de facto development environment for many programming languages, including Java and PHP, and is an excellent environment for Rails development. Here's what it looks like in action on Linux, editing some Rails code:
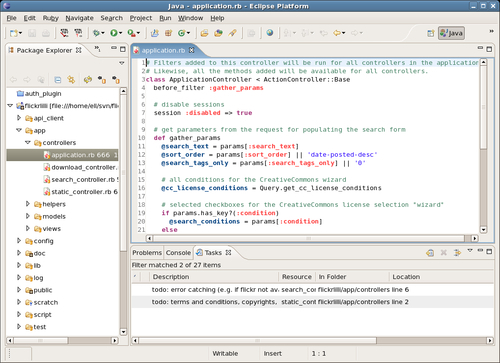
Here, you can see the Ruby syntax highlighted (right-hand pane), plus the resource view (left-hand pane) which shows the files and folders in the project. Also note the icons on the files and folders: these indicate the relationship between the local file system and a Subversion repository, enabling you to identify where you have made changes to your code which aren't yet committed to the repository. Also note the Tasks tab (bottom right) which you can use to leave yourself to dos.
Eclipse is a great development environment. However, some people see some cons with using it:
- It requires Java
This used to be an issue, as it meant you had to install Java, which had no decent open source implementations. However, it is now possible to run Eclipse using
gcj, a complete open source Java implementation. - It is a big download
Getting everything you need for your development work requires around 100Mb of download. This is big, granted, but less important as bandwidth soars into the stratosphere.
- It is overkill
Many projects are small and don't need the overhead of a massive, complicated IDE. Butyou don't have to use Eclipse for everything: you can still use vim or a graphical text editor for quick edits or for tiny projects.
- It is slow
This used to be more of an issue when RAM was expensive. However, while startup is still a bit painful at times, once Eclipse is up and running it is very responsive.
- The interface is intimidating
However, it is highly customizable, so you can turn off the bits you don't like.
- It is cross platform (Windows, Mac OS X, and Linux)
This means you can use it in a mixed OS environment, and everyone will have the same tool, which lowers training costs and makes sharing application knowledge easier.
- It is multi-purpose
While we are going to use Eclipse in the context of Rails development, you can use it to develop in many other languages (e.g. C, Java, PHP, Perl, and Python). This means that if a team develops using a variety of languages, they can use a single piece of software and a consistent interface for all their development work.
- It is extensible through plugins
Eclipse is multi-purpose because of its plugin architecture: potentially anyone can extend Eclipse's functionality by writing their own plugin. This means that a wealth of tools has emerged, using Eclipse as a base, and practically any development task you might want to perform has an Eclipse plugin available.
- It is freely available
You can use Eclipse, with no charge or restrictions, on an unlimited number of machines.
I believe the pros outweigh the cons, and that Eclipse is an ideal IDE for small teams with smaller budgets. From now on we're going to code in Eclipse throughout the rest of the book.
EasyEclipse is a nice packaging of Eclipse for Windows, Mac OS X, and Linux. It includes a Java Runtime Environment (JRE), Eclipse, plus some stable and useful plugins. The plugins included are dependent on the distribution you choose. Each distribution bundles plugins for a particular development situation: for example, there is an EasyEclipse for PHP, which includes PHP support, HTML editing tools, and Subversion integration; and an EasyEclipse for Python, which includes support for the Python language.
For our purposes, the best choice is Easy Eclipse for Ruby on Rails, which includes:
- Eclipse, itself.
- A Java Runtime Environment (in the Windows and Linux versions; Mac OS X has its own JRE). This is required to run Eclipse.
- Ruby Development Tools, for highlighting and syntax checking of Ruby files, integrated testing, code hints, source formatting, and a debugger.
- RadRails, for Rails-specific Eclipse features, such as convenient buttons to run automated tests and extra controls for activating the Rails code generators.
- QuantumDB, for interacting with database servers. You can use it to run SQL queries against databases and view tables and data graphically.
- Subclipse, for working with Subversion repositories. Code can be saved back to the repository or checked out of it (more information about Subversion is available in the Version Control section section towards the end of this chapter).
Easy Eclipse for Ruby on Rails downloads are available at:
http://www.easyeclipse.org/site/distributions/ruby-rails.html
EasyEclipse is very simple to install, as described next.
The download is an executable file which contains an installer. Double-click on the downloaded file and follow the instructions; it's OK to accept all the default settings.
Once installed, you should have a new item called EasyEclipse for Ruby on Rails in your Start menu (under Programs).
Download the EasyEclipse tarball for Linux (.tar.gz file). Unpack this file where you want to install EasyEclipse, e.g. to put it in your home directory:
$ cd ~
$ tar zxvf easyeclipse-ruby-rails-1.0.2.tar.gz
$ ln -s ruby-rails-1.0.2 easyeclipse
The last command creates a symlink from the full directory name to an easier-to-remember path.
It is easy to create a launcher for Eclipse on your Desktop. In Ubuntu, right-click on the desktop and select Create Launcher... from the context menu and fill in the options in the Create Launcher dialog box. This is what the dialog box looks like when complete:
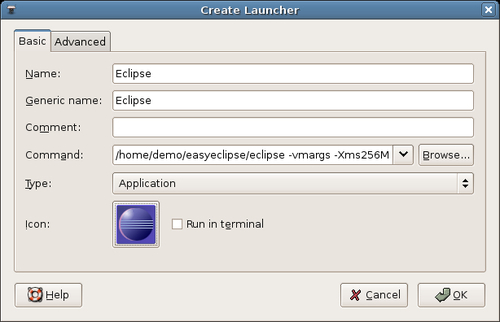
(You can browse to the icon in the EasyEclipse installation directory.)
The important part of this is the Command text box, which should reference the correct path to your Eclipse start script, e.g. for the demo user this might be something like:
/home/demo/easyeclipse/eclipse
where /home/demo/easyeclipse/ references the symlink to the EasyEclipse installation directory, and eclipse is the name of the Eclipse start script.
Note that you can pass extra arguments to Eclipse on the end of this command. Modify the command line to make sure Eclipse has enough memory by passing these arguments:
-vmargs -Xms256M -Xmx512M
What's actually happening here is that we are passing extra arguments to the Java Runtime Environment (the -vmargs flag tells Eclipse "Here come some arguments for Java"); the two arguments we're passing are: -Xms256M ("Claim a minimum of 256Mb of RAM") and -Xmx512M ("But don't claim more than 512Mb of RAM"). You can set these higher if you like, but these values should be fine.
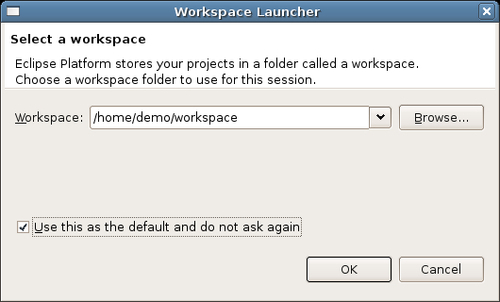
Click on the Launcher to start Eclipse. During the first startup, you are prompted to select a workspace: a default location for Eclipse to save projects to. Accept the default location or set a custom path. Also tell Eclipse to Use this as the default and do not ask again:
Once, the startup is complete, click on the Workbench icon to go to the main Eclipse interface.
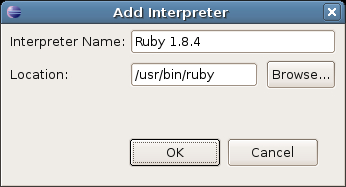
The last piece of configuration is to tell Eclipse where the Ruby binary is located (which it uses to do syntax highlighting and the like.) First, locate the Ruby binary using the command line:
$ which ruby
/usr/bin/ruby
Then, in Eclipse, set the Ruby interpreter under Window | Preferences | Ruby | Installed Interpreters. Click on the Add button and fill in the dialog box with the path to Ruby, e.g.
EasyEclipse is provided as a disk image file (.dmg suffix) for Mac OS X. Download this file, then double-click it to open up the Volume. Once inside, double-click on the Installer Package to install to the /Applications folder. Use the Finder to locate the EasyEclipse icon and double-click to run it. (You can drag and drop the icon into the Dock to make it easier to find.)
If you really enjoy making life hard for yourself, it is feasible to install every component of a Rails stack (more or less) from source code. This will really give you an insight into how Rails stack ticks, but it is not for the faint-hearted.
The definitive instructions for doing this on a Mac are available at: http://hivelogic.com/articles/2005/12/01/ruby_rails_lighttpd_mysql_tiger
Some Linux instructions are available on the Rails wiki: http://wiki.rubyonrails.com/rails/pages/RailsOnUbuntu
(This approach could be tricky on Windows, as it would require addition of large amounts of open source software before the compilation could even begin.)
As it is always the case with these sorts of how-to, they are continuously changing, so the above URLs may have vanished by the time you are reading this. The Rails wiki (http://wiki.rubyonrails.com/) is a good place to start looking for the most up-to-date instructions.
Following the recommendations from the previous sections, the developers at Acme decide on the following approach:
- They first agree on MySQL as the database for development and production deployment.
- On the Windows XP machine (Jenny's), they install MySQL Windows Essentials, Ruby (using the One-Click Installer, which includes Rubygems), Mongrel and Capistrano (via gem), and EasyEclipse for Ruby on Rails.
- On the Linux machine, Rory installs Ruby using Ubuntu's package management system, compiles Rubygems, then adds the gems for Rails, Capistrano, and Mongrel. Next, he installs MySQL using Ubuntu package management and compiles Ruby-MySQL. He installs MySQL Query Browser and MySQL Administrator to manage his MySQL server. Finally, he installs EasyEclipse for Ruby on Rails.
The Acme developers are now ready to start development. The next step is to setup the infrastructure for their project, to enable them to work collaboratively on the code and deploy live applications to their intranet.