The final feature request for Intranet is a facility for uploading files and associating them with tasks. Rails provides some simple, PHP-like wrappers around standard HTML file upload forms, which you can use in their raw form. For example, here's a simple upload form:
<h1><%= @page_title %></h1>
<% form_tag({:action => 'receive'}, {:multipart => true}) do -%>
<p>Select a file to upload:<br />
<%= file_field_tag('file_to_upload', :size => 40) %></p>
<p><%= submit_tag 'Upload' %></p>
<% end -%>
Note that this generates an HTML form with a file field for browsing to a local file. The important part is the :multipart => true option passed to form_tag: this sets the form's enctype attribute to"multipart/form-data", the encoding required when posting files over HTTP.
The next step is to write a controller, which will render this form with its index action, and handle uploads via the receive action (at which the above form points). This can be placed into app/controllers/upload_controller.rb (and the view above can go into app/views/upload/index.rhtml):
class UploadController < ApplicationController
def index
@page_title = 'Upload a file'
end
def receive
# Get the uploaded file as an object.
file_to_upload = params[:file_to_upload]
# The full path to the file on the original filesystem.
full_filename = file_to_upload.original_filename
# Get the last part of the filename.
short_filename = File.basename(full_filename)
# Retrieve the content of the file.
file_data = file_to_upload.read
# Append a timestamp to the filename to ensure it's unique
# and set the path to somewhere inside public/files.
new_filename = File.join(RAILS_ROOT, 'public/files',
Time.now.to_i.to_s + '_' + short_filename)
# Save the file into a folder inside the Rails app.
File.open(new_filename, 'w') { |f| f.write(file_data) }
# Set the flash and direct back to index.
redirect_to_index 'File uploaded successfully'
end
end
The last step is to create a files directory inside RAILS_ROOT/public, to hold the uploaded files. Now, browse to http://localhost:3000/upload, and you should be able to upload files to your heart's content.
This is a rough and ready file upload system. It doesn't handle multiple versions of the same file, or attach files to other records in the database, or display the uploaded files in any kind of list; but it does demonstrate the basic principles.
But there is a better way: by using a plugin.
Rails plugins are a mechanism to embed chunks of functionality inside your applications, extending and overlaying the basic Rails framework. Their role is similar to a Firefox add-on, or a Drupal module: they can add new views, controllers, helpers, migrations, generators, etc.; in fact, any Rails "component" can be bundled inside a plugin.
Plugins are useful as they can provide you with functionality which might take days to write, in a matter of seconds. There are dozens (hundreds?) of plugins available, with functionality ranging from UK postcode validation (validates_as_uk_postcode) to methods for easily building SQL queries (where) to integration with other systems (s3, mint). They can also be useful for packaging your own code, turning it into an easily-distributable bundle. However, for our purposes, we'll just be using other people's plugins in this chapter.
The first step in using plugins is to find them. Repositories are typically accessible via HTTP, but some use HTTPS or Subversion (svn). In most cases, the repository is actually a Subversion repository exposed over HTTP, HTTPS or the Subversion protocol; when you are installing a plugin, you are actually exporting or checking out code from a repository (see Chapter 3 Laying the Foundations for an explanation of Subversion concepts).
Note
To access svn:// URLs on Windows, you will need to install the command-line Subversion client (see Chapter 3 Laying the Foundations).
By default, Rails ships with access to the official Ruby on Rails plugins repository (http://dev.rubyonrails.com/svn/rails/plugins/). To see a full list of the repositories available, use the script/plugin script from the command line and pass the discover command:
$ ruby script/plugin discover
Add http://www.agilewebdevelopment.com/plugins/? [Y/n] y
Add svn://rubyforge.org/var/svn/expressica/plugins/? [Y/n] y
Add http://soen.ca/svn/projects/rails/plugins/? [Y/n] y
...
Answer Y (or press return) to each line, adding as many repositories as you like. The list of repositories is stored in a file called .rails_plugin_sources in your home directory (Documents and Settings on Windows, or /home/username on *nix). Each time you use the plugin script from now on, the repositories recorded in that file are accessed to build a list of plugins available for you to install.
If you want to add a single repository to your preferences, or manually add a repository not in the list returned by the discover command, you can do it with:
$ ruby script/plugin source <URL for repository>
To see a list of available plugins in the repositories you've selected:
$ ruby script/plugin list
This might take a while, as the script will interrogate all the new repositories and list the plugins they are offering (unfortunately, not alphabetically). Here's a short fragment of a full list:
account_location http://dev.rubyonrails.com/svn/rails/plugins/ account_location/
acts_as_taggable http://dev.rubyonrails.com/svn/rails/plugins/ acts_as_taggable/
browser_filters http://dev.rubyonrails.com/svn/rails/plugins/ browser_filters/
continuous_builder http://dev.rubyonrails.com/svn/rails/plugins/ continuous_builder/
deadlock_retry http://dev.rubyonrails.com/svn/rails/plugins/ deadlock_retry/
...
To install a plugin available from one of your preferred repositories:
So, to install acts_as_taggable from the list above, you would do:
$ ruby script/plugin install acts_as_taggable
+ ./acts_as_taggable/init.rb
+ ./acts_as_taggable/lib/README
+ ./acts_as_taggable/lib/acts_as_taggable.rb
+ ./acts_as_taggable/lib/tag.rb
+ ./acts_as_taggable/lib/tagging.rb
+ ./acts_as_taggable/test/acts_as_taggable_test.rb
You can see here that the plugin is downloaded a file at a time, via a svn export (i.e. a download which disassociates the files from the repository). It ends up being installed into the RAILS_ROOT/vendor/plugins directory, under a directory with the same name as the plugin: in this case, RAILS_ROOT/vendor/plugins/acts_as_taggable.
$ ruby script/plugin remove <name of plugin>
which deletes the plugin's directory from vendor/plugins.
An alternative to this approach is to svn checkout the plugin. This leaves the association between the plugin and its origin Subversion repository intact, which means that you can upgrade it easily. Install a plugin this way with:
$ ruby script/plugin install -x <name of plugin>
Passing the -x flag to the install command uses a feature of Subversion called externals, which associates the plugin with your application's Subversion repository. This means that each time someone checks out your application, they will also check out the plugin from its repository (which is external to yours). It also means that each time someone does an svn up on your application to update it, they will also update any external plugins (installed with the -x flag) from their repositories. Note that the plugin itself is not included in your repository: just a reference to its origin repository.
In cases where a project is going to be widely distributed (e.g. to a team or to the public) and is already in its own Subversion repository, using the -x flag when installing plugins is recommended.
The plugin script can run a number of other commands, such as directly installing a plugin from a URL, or listing all the plugins in a given repository. Run the plugin script without a command specification (ruby script/plugin) to see what's available.
Back to the file upload functionality we want to add to Intranet. We'll be using acts_as_attachment, a widely-used plugin with rich functionality, for our file upload management. This is provided by the techno weenie site (http://techno-weenie.net/), and is written by one of the core Rails developers (Rick Olson). Using it saves a lot of time, as the plugin provides generators and extra options for forms, which make is easier to process uploaded files. To get at it we have to add the techno weenie repository to our plugin sources:
$ ruby script/plugin source http://svn.techno-weenie.net/projects/plugins
Next, install the acts_as_attachment plugin using the -x flag:
$ ruby script/plugin install -x acts_as_attachment
This pulls the plugin into our application, as well as creating an externals definition in our Subversion repository, which links the plugin into Intranet.
With the plugin installed, we can generate a model to represent files uploaded to Intranet. acts_as_attachment provides a handy generator for this:
$ ruby script/generate attachment_model file_attachment
This creates a FileAttachment model and migration for us, and each file we upload will be represented by a record in the file_attachments table in the database.
acts_as_attachment can either store uploaded files in the database or on the file system. What's the difference?
- If you store files in the database, the data for the file is stored in a field in the specified table. This can make your database enormous, but can simplify access and backups.
- If the filesystem method is used for file storage, a physical file is written to the file system, while its location and metadata are stored in the database table. This is more economical and intuitive, so it's the approach we'll be taking.
Note
acts_as_attachment can also manage image files, producing thumbnails from them and resizing them. However, this functionality is dependent on having a Ruby graphics library available (e.g. RMagick). This is not important for Intranet, as most of the files are likely to be text or PDFs. For now, we'll just deal with the simple case, and ignore parts of the plugin only relevant to images.
Before creating the file_attachments table, take a minute to edit the migration in db/migrate/006_create_file_attachments.rb. The edited version of the file is shown below:
class CreateFileAttachments < ActiveRecord::Migration
def self.up
create_table :file_attachments do |t|
t.column "content_type", :string
t.column "filename", :string
t.column "size", :integer
t.column "task_id", :integer
t.column "parent_id", :integer

end
end
def self.down
drop_table :file_attachments
end
end
We've specified a task_id field (highlighted) to associate the uploaded file with a task. However, it is also necessary to specify a parent_id field, which mirrors the parent record ID (in this case, the ID of the parent task): this is because acts_as_attachment uses this internally to decide which records and files need to be deleted from the file system when a parent record is deleted (and a dependency has been specified). Unfortunately, in this version of acts_as_attachment, both are needed, even though this introduces duplication and confusion.
Run the migration to add the new table to the database:
$ rake db:migrate
We also need to edit the FileAttachment model to associate a file with a task, set up storage on the file system, set a maximum size for uploaded files, and tell the model where uploaded files should be stored:
class FileAttachment < ActiveRecord::Base
belongs_to :task
acts_as_attachment :storage => :file_system,
:max_size => 10.megabytes,
:file_system_path => 'public/files'
,
validates_as_attachment
end
The :filesystem_path option (highlighted) sets RAILS_ROOT/public/files as the location for uploaded files. If you haven't already created the public/files directory, do so now. On *nix, this directory must be writable by the user who owns the Rails process (in our case, by the owner of the Mongrel process, which is running the application). When a file is uploaded, it is stored in a subdirectory of the :filesystem_path; the name of the subdirectory corresponds to the parent_id of the record in the file_attachments table. For example, if a file in the file_attachments table has the filename confused.jpg and a parent_id of 12, it will end up being stored in RAILS_ROOT/public/files/12/confused.jpg.
The final step is to mark the other side of the tasks to file_attachments relationship, specifying that tasks can have many files attached:
class Task < ActiveRecord::Base
belongs_to :person
belongs_to :user
has_many :file_attachments, :dependent => :destroy,
:order => 'filename'

# ... other methods ...
end
The has_many relationship (highlighted) has the :dependent option set to :destroy, to ensure that when a task is deleted, all the associated records in the file_attachments table are also deleted. When an instance of FileAttachment is deleted, acts_as_attachment will also simultaneously remove related files from the file system. We also specify that attachments should be ordered by filename when retrieved through this association.
Each file has a task with which it is associated. The controller must therefore act in the same way as the TasksController we saw earlier in this Chapter: each time we add or delete an attachment, we need to redirect back to the task associated with the attachment when the action completes.
As with the views we wrote for the TasksController, we'll display file attachments in a separate area next to the task when editing it. When we're displaying a task, we'll just list its associated files as hyperlinks.
Unlike tasks, we won't provide a page that enables a file attachment to be uploaded and arbitrarily associated with a task. Instead, all file uploads will be explicitly associated with a task, and only listed or edited in that context. At a later date, it will still be possible to list all the files that have been uploaded in an "über file attachments list", but we'll keep things simple for now.
To sum up, here's the extra functionality we need:
- In the task edit form (app/views/tasks/edit.rhtml), show a secondary file attachment form (app/views/file_attachments/_form.rhtml), which enables file attachments to be added for the task. We'll write this first, as the other functionality is hard to add and debug without having any file attachments to experiment with.
Note that we're not going to enable file attachments on new tasks: the task must first be saved to the database and then edited again to add file attachments to it.
- Create a
FileAttachmentsControllerthat can add a single file for a specified task. As each file is associated with a task, when a file is added by theFileAttachmentsController, redirect back to theTasksControllerto update the associated task. - Amend the task partial (app/views/tasks/_task.rhtml) to list file attachments.
- Extend the attachments form and the controller to manage file attachment deletions.
- Protect the actions on the
FileAttachmentsControllerso they are only accessible to logged in users.
First, create a form that enables a new file to be uploaded and associated with a task (in app/views/file_attachments/_form.rhtml—you'll need to create the file_attachments directory in app/views first). This form is similar to the one we created at the beginning of this section, requiring the correct form encoding and a file field:
<h2>File attachments</h2>
<% form_for 'new_attachment', :url => {:controller => 'file_attachments',
:action => 'receive', :task_id => task.id},

:html => {:multipart => true} do |f| %>
<p>Upload a new attachment:<br />
<%= f.file_field(:uploaded_data, :size => 20) %></p>

<p><%= submit_tag 'Save' %></p>
<% end %>
This template expects to be handed a task parameter (first highlighted line) representing the Task instance with which newly-uploaded files should be associated.
The second highlighted line creates the file upload field, giving it the special name'uploaded_data'. If you use this name for a file field, acts_as_attachment knows that the file uploaded with it is to be saved as an instance of your file model (in our case, as an instance of FileAttachment). Although there is only a single field containing the file data, the special'uploaded_data' name means that acts_as_attachment decomposes it into content_type, size, filename, etc. The decomposed data is then used to set the corresponding attributes on the model instance.
We want to make this form available when a task is being edited, so edit app/views/tasks/edit.rhtml to look like this (the changes are highlighted):
<div id="left_panel">

<% form_for :task, @task, :url => {:action => 'update', :id => @task.id}
do |f| %>
<%= render :partial => 'form', :locals => {:f => f} %>
<% end %>
</div>

<div id="right_panel">
<%= render :partial => 'file_attachments/form',
:locals => {:task => @task} %>
</div>
Notice how the @task variable is passed as a local variable when rendering the file_attachments/form partial. We also created two<div> elements, one for the task and the other for the file attachment management panel, then reused the"left_panel" and"right_panel" IDs (used earlier to style the person view and show their tasks alongside their details) to make the two<div> elements sit next to each other.
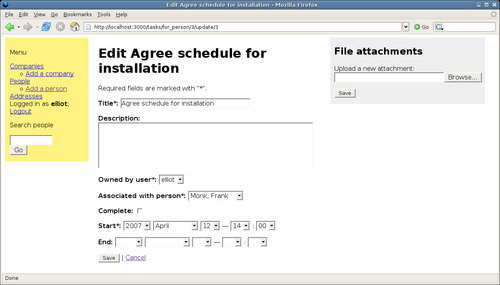
You should end up with a task update form that looks like this:

Now we can add the FileAttachments controller and receive action, which the form in the previous section posts to. First, we need a controller. From the command line, run the generator:
$ ruby script/generate controller file_attachments
Now add the receive action:
class FileAttachmentsController < ApplicationController
def receive
# Get the task the file is to be attached to.
task = Task.find(params[:task_id])
task_id = task.id
# Get the ID of the person associated with the task;
# we'll use this to redirect back to the task update view
# for the person.
person_id = task.person_id
# Create the attachment.
@new_attachment = FileAttachment.new(:task_id => task_id,
:parent_id => task_id)
@new_attachment.attributes = params[:new_attachment]
@new_attachment.save
# Set the flash and direct back to update action
# for task/person.
flash[:notice] = 'File uploaded successfully'
redirect_to :controller => 'tasks', :action => 'edit',
:id => task_id, :person_id => person_id
end
end
The action pulls the task_id from the request parameters and uses this to get a Task instance to associate this attachment with. It also gets the associated person_id from the task, so that once the action completes, the controller redirects back to the task edit page.
When creating the attachment, we first get a fresh instance of FileAttachment; setting its parent_id and task_id attributes to the the ID of the task. The remainder of the attributes are set from the :new_attachment parameters in the request: this includes a special uploaded_data field (discussed earlier, see: Adding a Form for Attaching a File to a Task), which sets attributes specific to acts_as_attachment (i.e. content_type, size, and filename).
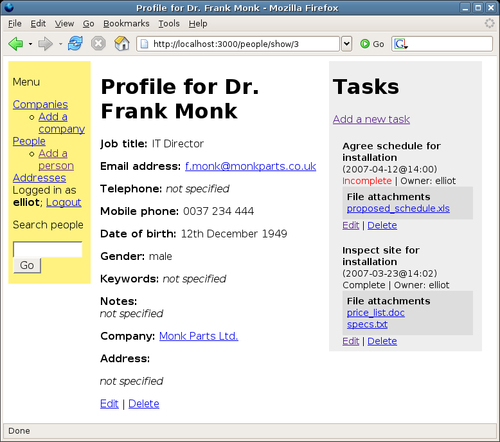
As we've specified an association between a task and its file attachments, adding a listing is simple. Edit the bottom part of app/views/tasks/_task.rhtml like this:
...
Owner: <%= task.user.username %></p>
<div class="file_attachments_for_task">
<p><strong>File attachments</strong></p>
<% unless task.file_attachments.empty? -%>
<% for attachment in task.file_attachments -%>
<p>
<%= link_to attachment.filename, attachment.public_filename %>
</p>
<% end -%>
<% else -%>
<p>None</p>
<% end -%>
</div>

...
The important part of this template is how we create the link, using two methods added to the model instances by acts_as_attachment: filename gives us the plain file name for the attachment (e.g. quotation.doc), while public_filename gives the publicly-accessible path to the file (e.g. /public/files/10/quotation.doc).
Finally, style the attachments area to make it stand out a bit more (in public/stylesheets/base.css):
.file_attachments_for_task {
background-color: #DDD;
padding: 0.5em;
}
You should now be able to add a few attachments to a task and view them, e.g.:

Now that the layouts are in place, and we are able to see the attachments for a task, we can extend the attachment management panel to handle deletions as well as additions.
First, when we display app/views/file_attachments/_form.rhtml, we'll display each existing attachment with a check box next to it: if the form is submitted and any check boxes have been selected, the associated attachments are removed. As well as deleting the record from the file_attachments table in database, the associated physical file will also be removed. Here's the new form appended to the top of the template:
<h2>File attachments</h2>
<% form_tag :controller => 'file_attachments',
:action => 'remove', :task_id => task.id do %>
<% unless task.file_attachments.empty? -%>
<p><em>Tick boxes to select attachments to delete</em></p>
<% for attachment in task.file_attachments -%>
<p>
<%= check_box_tag 'attachments_to_remove[]', attachment.id, false,
:id => 'attachments_to_remove_' + attachment.id.to_s %>
<%= link_to attachment.filename, attachment.public_filename %>
</p>
<% end -%>
<%= submit_tag 'Delete' %>
<% else -%>
<p><strong>No attachments</strong></p>
<% end -%>
<% end -%>
<p><strong>OR</strong></p>

<% form_for 'new_attachment', :url => {:controller => 'file_attachments',
:action => 'receive', :task_id => task.id},
:html => {:multipart => true} do |f| %>
...
An interesting point to note here is that we can build traditional forms with Rails, without having to resort to using form_for. We've used the check_box_tag helper here to create a series of check boxes all called attachments_to_remove[]. As the name of the form element ends with'[]', Rails will automatically gather the parameters into an array when the form is submitted (as it happens in PHP with the form elements named this way).
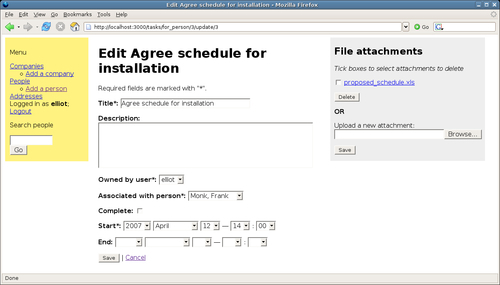
Here's what the page looks like when rendered:

Next, we add a new remove action to FileAttachmentsController to handle deletion of file attachments. This action will redirect back to the task edit form (as the receive action does). We can also take this opportunity to do a bit of refactoring: the redirection is the same for both receive and remove actions, so we can move that into a separate redirect_to_person_task method; and we need to retrieve a Task instance, task_id, and person_id to run both actions; so we can move those operations into a prepare method and use a before_filter to call it. Here's the resulting controller class definition:
class FileAttachmentsController < ApplicationController
before_filter :prepare
def receive
@new_attachment = FileAttachment.new(:task_id => @task_id,
:parent_id => @task_id)
@new_attachment.attributes = params[:new_attachment]
@new_attachment.save
# Set the flash and direct back to update action for task.
flash[:notice] = 'File uploaded successfully'
redirect_to_person_task
end
def remove
FileAttachment.destroy params[:attachments_to_remove]
flash[:notice] = 'Attachments removed'
redirect_to_person_task
end

private
def redirect_to_person_task
redirect_to :controller => 'tasks', :action => 'edit',
:id => @task_id, :person_id => @person_id
end
private
def prepare
task = Task.find(params[:task_id])
@task_id = task.id
@person_id = task.person_id
end
end
The new remove action is highlighted: it destroys an array of FileAttachment IDs retrieved from the attachments_to_remove request parameter.
The last step is to secure the FileAttachmentsController so that only logged-in users are able to manage attachments. This is as simple as adding one line to the top of the class definition, to protect every action on the controller (see the section Protecting Actions earlier in this chapter):
class FileAttachmentsController < ApplicationController
before_filter :authorize

# ... other methods ...
end
