
In the previous chapters of this book, you were introduced to the world of middleware, JEE, application servers, and of course in particular the Oracle WebLogic Server. You have learned how to install the WebLogic Server software, how to configure, and set up your WebLogic Server.
Meanwhile, when you were busy installing and configuring your WebLogic Server environment, people of the development department were already busy developing their first applications. Before FinanceFiction decided to use Oracle WebLogic as the strategic platform, all applications were built externally by software vendors. But FinanceFiction invested a lot in recruiting new people, and after getting the right people in, a development team started building new applications. These new applications introduced a lot of new functionalities. They got involved in the project at the same time as your department. One of your installed Oracle WebLogic server environments got a staging environment for developing new applications. These applications would be widely used by many departments in your company.
This morning you received a phone call from the lead developer, and he informed you that the first application was ready for the test phase and that you could start deploying it. Until this moment they used to deploy their applications through their own application development tool, but that would not be the strategy for doing deployments in your final production environment.
First of all, you have to ask yourself this question: what does the term deployment mean?
Originally the term "deployment" originated from the military world, where it means "to position troops in readiness for combat".
In fact, we do the same when we perform an application deployment. We position all components of the deployment package, in order to make them ready to perform the tasks meant for them. The only difference is that our deployment won't fight against any enemy, but will help us in getting our information in a fast, reliable, and easy way.
The term application deployment refers to the process of making an application, library, or module available for processing client requests in a WebLogic Server domain. This process is actually unpacking the application package components, putting them into directories, and preparing them to work via WebLogic Server and resources.
WebLogic uses the JEE standards of deployment. A standard API is used by deployment tools and application server providers to configure and deploy applications to an application server.
WebLogic Server implements both the JSR-88 Service Provider Interface (SPI) plug-in and model plug-in, to comply with the J2EE 1.4 deployment specification. You can use a basic J2EE 1.4 deployment API deployment tool with the WebLogic Server plug-ins (without using WebLogic Server extensions to the API) to configure, deploy, and redeploy J2EE applications and modules to WebLogic Server (from WebLogic deployment guide).
The WebLogicDeploymentManager object is an interface for the WebLogic Server deployment framework.
Before we dive deeper into the deployment process let's introduce the following terms:
- Applications: The definition of an application is not that simple. An application for an end user can be a whole chain of components from user-interface to database, although the user is not aware of all these components. So an application consists of a program or group of programs designed for end users. Application software can be divided into two general classes: systems software and applications software. Systems software consists of low-level programs that interact with the computer at a very basic level.
- Application module: It is an XML document that configures JEE resources such as JDBC, JMS, and EJBs. Application modules can be deployed as standalone modules in which their resources are bound to the global JNDI tree (definition of JNDI, see Chapter 1,Oracle WebLogic: Your First Step into a Middleware World! - Java Naming and Directory Interface).
- Application install directory: It is a WebLogic Server directory structure, designed to help organize deployment files, and generate deployment configuration artifacts for an application or module. Also referred to as an application root directory.
- Application version: A string value that identifies the version of a deployed application. It is located in the manifest file.
- Deployment configuration: The process of defining the deployment descriptor values required to deploy an application to a particular WebLogic Server domain.
- Deployment descriptor: It is an XML document used to define the J2EE behavior or WebLogic Server configuration of an application or module at deployment time.
- Deployment plan: It is an XML document that defines an application's WebLogic Server deployment configuration for a specific WebLogic Server environment. A deployment plan resides outside the application's archive file, and can apply changes to deployment properties stored in the application's existing WebLogic Server deployment descriptors.
- Distribution: It is the process by which WebLogic Server copies deployment source files to target servers for deployment.
- Production redeployment: It is the WebLogic Server redeployment strategy that deploys a new version of a production application alongside an older version, while automatically managing HTTP connections to ensure uninterrupted client access.
- Staging mode: It is the method WebLogic server uses to make deployment files available to target servers in a domain. Staging modes determine whether files are distributed to target WebLogic Managed Servers before deployment, or not.
Because JEE implements standards, the deployment should also follow these standards. JSR-88 is a standardization to define standard application programming interfaces (APIs) to enable deployment of JEE applications and standalone modules to JEE platforms.
The following diagram shows the components of a JSR-88-compliant deployment API (Application Programming Interface).
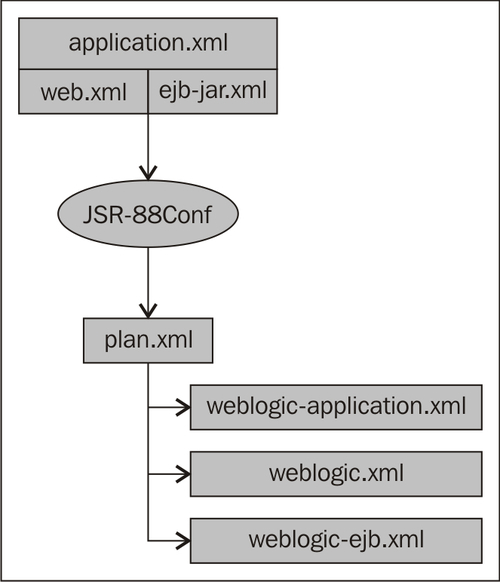
All these following XMLs are standard JEE descriptor files:
application.xml:This is the global application configuration file, which contains the common settings for all application modules contained in the EAR (Enterprise Archive).ejb-jar.xml:This is the deployment descriptor when deploying an EJB application.web.xml:This represents the core of a generic Java web application. It provides configuration and deployment information for the Web components that comprise a Web application contained in a WAR (Web Application Archive).weblogic.xml:This is the WebLogic-specific deployment descriptor file. Theweblogic.xmldeployment descriptor follows a WebLogic-specific schema that is used only by Oracle WebLogic Server. It allows you to enable and configure Web application features that are not part of the JEE specification, such as changing the default root URL path of the Web application or directing application log messages to a dedicated log file.weblogic-application.xml:This is the WebLogic server-specific deployment descriptor extension for theapplication.xml. Like all the otherweblogic-application.xml weblogic-application.xmlWebLogic-specific descriptor files, this file also enables the use of specific WebLogic features that are not a part of the JEE standards.weblogic-ejb-jar.xml:This is the WebLogic-specific descriptor for deploying an EJB application Theweblogic-ejb-jar.xmldeployment descriptor follows a schema that is used only by Oracle WebLogic Server. It allows you to enable and configure EJB features that are not part of the JEE specification, such as clustering, load balancing, and failover for remote EJBs, tuning EJB performance using pool and cache settings, and many more.plan.xml:This is an optional XML file associated with an application; it resides outside an application archive and sets or overrides the values in the JEE deployment descriptors. It allows a single application to be easily customized to multiple deployment environments.
There are two types of deployment that you can determine:
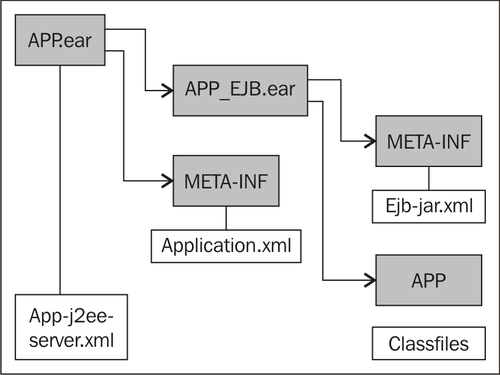
An archive file is a single file that contains all of an application's or module's classes, static files, directories, and deployment descriptor files. In most production environments, the applications that an Administrator receives for deployment are stored as archive files.
Deployment units that are packaged using a jar utility have a specific file extension depending on the type:
- EJBs and client archives are packaged as
.jarfiles. - Web applications are packaged as
.warfiles. - Resource adapters are packaged as
.rarfiles. - Enterprise applications are packaged as
.earfiles, and can contain other Java EE modules, such as EJBs, JDBC, JMS, Web applications, and Resource Adapters. - Web Services can be packaged either as
.warfiles or as.jarfiles, depending on whether they are implemented using Java classes or EJBs. Typically, the.waror.jarfiles are then packaged in an.earfile. - Java EE libraries are packaged either as an
.earfile or as a standard Java EE module. - Client applications and optional packages are packaged as
.jarfiles.
In addition to an archive file, you may also receive a deployment plan, which is a separate file that configures the application for a specific environment.
An exploded type is in fact a non-packaged deployment type. It's a set of directories that contain all the files of the application to be deployed. The directory structure for an exploded archive is very important.
An exploded archive directory contains the same files and directories as a JAR archive. If you choose to use an exploded archive directory, you may be required to manually unpack a previously archived deployment. However, the files and directories reside directly in your filesystem and are not packaged into a single archive file with the jar utility.
To choose for an exploded archive directory could be an option, if you want to perform partial updates of an application after deployment, or if an application contains static files that you will periodically update.
You can deploy your applications or libraries in several ways, WebLogic provides you several tools for this:
- weblogic.Deployer
- Admin Console and Enterprise Manager Console
- WLST
- wldeploy Ant
- Automated deploy
The quickest and easiest way to deploy (from a practical point of view) is definitely the Admin Console or Enterprise Manager console. To do a quick deployment without having too much knowledge about the deployment process is the best way to make use of these tools. When your company has lots of applications to be deployed, or when applications change frequently, such as during integration tests, it's better to use a more advanced tool to set up automated or scripted deployments.
The WebLogic Admin Console is by far the easiest way to do a quick deployment.
First of all, you should have a packaged ear or war file ready somewhere on your own computer, or you can upload it to the WebLogic Server environment (on *NIX, you could use an SCP or FTP client). With this client, you login in as the WebLogic Server software owner (usually named Oracle) and transfer the file into a directory from which you deploy the application into Oracle WebLogic.
- Prepare your WebLogic Server.
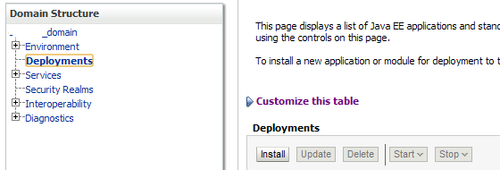
Navigate to the Domain Structure panel, and click on Deployments. A list of installed applications and libraries appear in the right pane. Click on Install (in Production Mode, first lock a session).
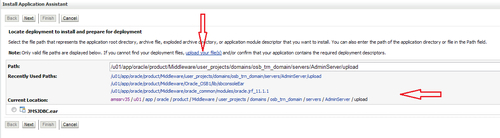
- Upload your packaged file or locate it on the WebLogic Server.
- You can upload your packaged file or locate it if it's already on the WebLogic Server. Click on Next.
- In the next screen, decide to install it as an application or a shared library that can act as a reference to other applications. All these applications can make use of one centralized library stored in the WebLogic Server configuration.

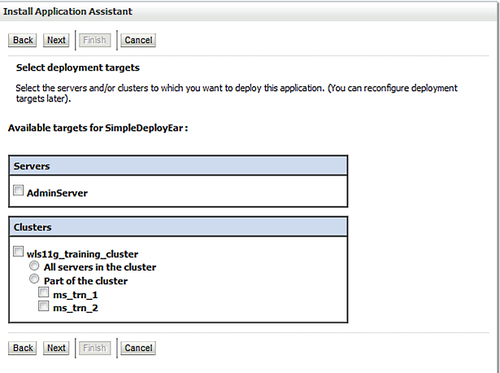
- Choose a target for your application.
Next, you should choose a target in which your application will run. In this case, the target is a Managed Server; your application will run inside the JVM of the Managed Server. It's better not to target the Admin Server; the Admin Server should be used for administrative tasks.
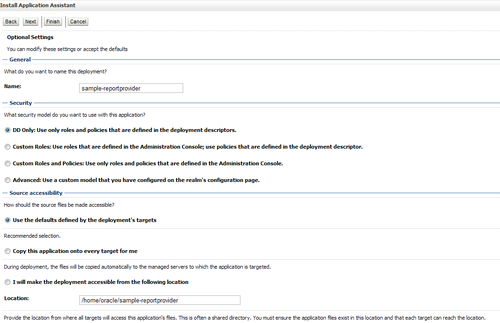
- Review and install.
A final screen appears in which you can set the application name and special options such as security, but in this simple deployment we leave these option as the default.
- After this, you can click on Finish, or Next to review. When installation is successful, and the target Managed Server is running, your application will be started and appear in the NEW state. You can start the application from the Deployments screen. In Production Mode you first have to activate your configuration before starting.
An application start failure can happen and it can have many different causes, such as flaws in the code, version difference in classes or libraries between the application and WebLogic, or configuration issues that the application depends on. For instance, if the application relies on a resource of the WebLogic server, such as a JDBC connection or connection-factory, it might fail to start, when the JDBC (or other resource needed) has not been created. In more advanced deployments, these resources can be created along with the deployment of the application, but if not, you should be aware of it, and ask your developer if there are additional resources needed, so that you can create them and configure them with the proper specifications.
You can test a deployed application using the Administration Console, by selecting and expanding the contents of the application.

This deployment can also be done through Enterprise Manager Console. The process is quite the same as in the Admin Console.
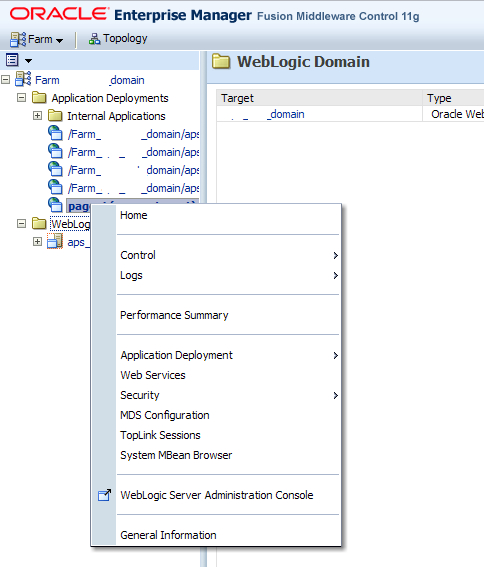
The Fusion Middleware Enterprise Manager Console is an extension on the Admin Console, but is not installed by default with a standard WebLogic domain configuration. However, if you use it, it has a very sophisticated tool to use for your deployment.
A command-line tool used within WebLogic Server is the Weblogic.Deployer command-line interface. It's a JAVA class that can be used by administrators or developers. With this tool you can create or configure your own deployment interface (by scripts, or by a tool such as Hudson or Maven).
Some examples of how to use this tool are as follows:
- Deploy application on admin server:
java weblogic.Deployer -adminurl url -username username -password password -name myapp -deploy app.ear
- Deploy individual modules in application to different targets:
java weblogic.Deployer -adminurl url -username username -password password -name myapp -targets server1 deploy app.ear
- Undeploy application from specified targets:
java weblogic.Deployer -adminurl url -username username -password password -name myapp -undeploy -targets server1,server2..
- Redeploy application on current targets:
java weblogic.Deployer -adminurl url -username username -password password -name myapp -redeploy
- Redeploy individual module in an application:
java weblogic.Deployer -adminurl url -username username -password password -name myapp -redeploy -targets moduleA@serverA,moduleA@serverB
To use Java, you should set the JAVA_HOME and include the Java executable in your PATH variable. You can do this by running the setDomainEnv script. The setDomainEnv script is located in the<DOMAIN_HOME>/bin directory.
Doing a deployment with WLST can be useful if you like to script and automate your deployment.
WLST uses two objects for the deployment process, which are:
WLSTPlan: This enables changes to be made to an application deployment plan after loading an application.
WLSTProgress: This is used to check the progress of a deployment. Commands within this object are:
- deploy
- distributeApplication
- redeploy
- startApplication
- stopApplication
- updateApplication
A sample of a simple WLST script for deployment is as follows:
# Connect to the server
print 'Connecting to server .... '
connect('weblogic','welcome1','t3://localhost:7001')
appname = "mbeanlister"
applocation = "<filelocation of app>"
# Start deploy
print 'Deploying application ' + appname
deploy(appname, applocation, targets='myserver',
planPath=<filelocation of plan>)
print 'Done Deploying the application '+ appname
exit()
By default, the autodeployment feature is enabled only if the domain is not running in production mode. When enabled, the Admin Server monitors its autodeploy folder for new, updated, or removed applications.
Auto-deployment can be useful when performing continuous integration tests. Applications get tested, changed in the code, transferred to the autodeploy directory, and the new version is already available again with the new or enhanced functionalities.
The directory<WL_HOME>/user_projects/domains/domain/autodeploy is the directory where packaged applications can be placed.
Deployment plans are part of the JSR-88 deployment standard, although not explicitly stated in this standard.
A deployment plan is an XML document that defines an application's WebLogic Server deployment configuration for a specific WebLogic environment. This was introduced since WebLogic 9. A deployment plan is not a part of an application package, but can apply changes to deployment properties stored in the application's existing WebLogic Server deployment descriptors (such as weblogic.xml). As an administrator, you can use deployment plans to change an application's configuration for a specific environment, without modifying existing J2EE or WebLogic-specific deployment descriptors. Multiple deployment plans can be used to reconfigure a single application for deployment to multiple, differing WebLogic server environments.
The deployment plan contains a set of search and replace rules that are applied to override the deployment descriptors in the archive, after unpacking and before actually deploying (or as an update to an existing application deployment).
<deployment-plan xmlns="http://www.bea.com/ns/weblogic/deployment-plan" xmlns:xsi="http://www.w3.org/2001/XMLSchema-instance" xsi:schemaLocation="http://www.bea.com/ns/weblogic/deployment-plan http://www.bea.com/ns/weblogic/deployment-plan/1.0/deployment-plan.xsd" global-variables="false">
<application-name>helloworld.ear</application-name>
<variable-definition>
<!-- add the wsdl var -->
<variable>
<name>wsdlUrl</name>
<value>http://localhost:7001/ws_helloworld/HelloWorldServicePort?WSDL</value>
</variable>
<module-descriptor external <root-element>web-app</root-element>
<uri>WEB-INF/web.xml</uri>
<!-- replace the wsdl url with the deployment url -->
<variable-assignment>
<name>wsdlUrl</name>
<xpath>/web-app/context-param/[param-name="wsdlUrl"]/param-value</xpath>
<operation>replace</operation>
</variable-assignment>
</module-descriptor>
</module-override>
<config-root>app.earplan</config-root>
</deployment-plan>
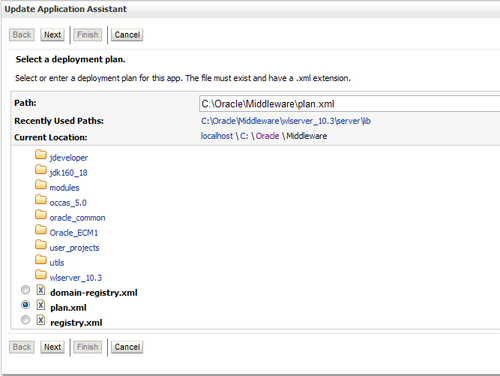
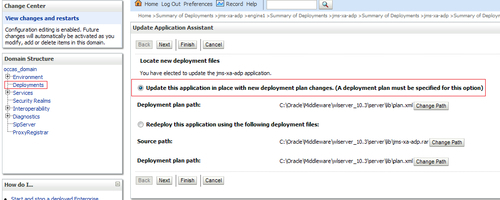
In the WebLogic Console, you can specify the deployment plan when you update your application. You also could update your plan, by updating the application in the WebLogic Admin Console.
If you yet don't have a plan for your application, library, or any other module, you can generate a plan using the weblogic.PlanGenerator command. The following are the available options:
-plan:Name of the plan-dependencies:Export all dependency properties that resolve external resource references (default)-declarations:Export all properties that declare a resource to other applications and modules-configurables:Export all editable configurables except dependencies and declarations-dynamics:Export all configurables that be changed on the fly, without needing to redeploy the application-all:Export all parameters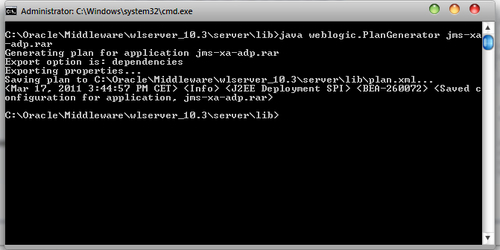
The generated plan looks similar to the following block of code:
?xml version='1.0' encoding='UTF-8'?>
<deployment-plan xmlns="http://xmlns.oracle.com/WebLogic/deployment-plan" xmlns:xsi="http://www.w3.org/2001/XMLSchema-instance" xsi:schemaLocation="http://xmlns.oracle.com/weblogic/deployment-plan http://xmlns.oracle.com/weblogic/deployment-plan/1.0/deployment-plan.xsd" global-variables="false">
<application-name>jms-xa-adp.rar</application-name>
<module-override>
<module-name>jms-xa-adp.rar</module-name>
<module-type>rar</module-type>
<module-descriptor external="false">
<root-element>weblogic-connector</root-element>
<uri>META-INF/weblogic-ra.xml</uri>
</module-descriptor>
<module-descriptor external="false">
<root-element>connector</root-element>
<uri>META-INF/ra.xml</uri>
</module-descriptor>
<module-descriptor external="true">
<root-element>wldf-resource</root-element>
<uri>META-INF/weblogic-diagnostics.xml</uri>
</module-descriptor>
</module-override>
<config-root>C:Usersmichel_sAppDataLocalTempMichel_s.configdeploymentsjms-xa-adp.rarplan</config-root>
</deployment-plan>
In this case, we only exported the main descriptors, but with the -all option, you will export all configurable items; now you can change specific properties that need to be changed. In that case an update with the new deployment plan is enough; you don't have to fully undeploy your application to make adjustments, and then do a full new deployment.
Of course, there are a whole lot more features and knowledge about deployment strategies and tools. There is unfortunately no room to handle them all, but I'd like to discuss one nice feature: parallel application versions.
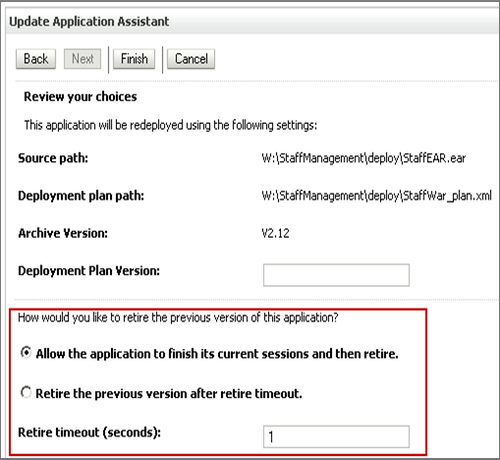
If you would like to deploy a new version of your application, but don't want to disturb the user working, you could choose to use parallel application versions.
The current version can continue to run to ensure uninterrupted application availability, either for a specified period of time, or until all existing sessions have completed. As soon as the new version is available, new sessions will be directed to this new version. At that point, different users can see different versions of the application at the same time!
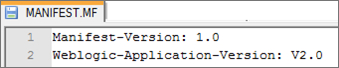
The application version is defined through a property in the application's manifest.mf file. Unversioned applications cannot run in parallel.
In the WebLogic Admin, you can specify a retirement period for the old version, based on finishing current sessions or setting a time period; the default is immediate.
In this case, no user will notice any outage of the application, no work will be lost, and no connections will be broken. This strategy can be useful only for any application code changes. If there are changes outside the application, this method is not enough to avoid outage.