
In the previous pages, you might have noticed that the Node Manager is being used for several tasks. So, what is the Node Manager and how is it being used?
- Start, shut down, and restart an Administration Server
- Start, shut down, suspend, and restart Managed Servers
- Automatically restart the Administration and Managed Servers on failure
- Monitor servers and collect log data
- Run on the same computers as the Managed Servers
- Can be run automatically in the background, as Windows services or UNIX daemons
- Are available as either Java-based, or script-based processes (for UNIX only)
In fact, the Node Manager is an O/S running process which acts like a watchdog over your WebLogic Server; the Node Manager is nothing more than an operating system process running in a JVM.
The idea is that the Node Manager process is not associated with a specific WebLogic domain but with a machine. You can use the same Node Manager process to control WebLogic Server instances in any WebLogic Server domain, as long as the server these instances reside on is the same machine as the Node Manager process. The Node Manager process must run on each server that hosts WebLogic server instances Administration or Managed Server that you want to control with Node Manager.
Some important things to know:
- Configurations are stored under the
<WL Server Home>/common/nodemanagerin thenodemanager.properties - The domains controlled by the Node Manager are stored in the
nodemanager.domains filein that same directory - Domain-specific configurations are stored in the domain directory under
servers/<name of server>/ startup.properties
Within Windows, Node Manager can run as a service. Under Linux/UNIX, there's no out-of-the-box daemon configuration available, so you will have to create that yourself. For this, there is an installation script available, which is installNodeManagerSvccmd.
There are 2 versions of the Node Manager:
- Script based
- Java based
Typically for *NIX-like systems, WebLogic provides a Node Manager script to start the Node Manager. This is less secure than the Java-based version. However, the advantage of the script-based Node Manager is that it can remotely manage servers over a network that has been configured to use SSH. No additional server installation is required.
The SSH Node Manager is a shell script, wlscontrol.sh, located in WL_HOME/common/bin/. The file must exist on each machine that hosts server instances that you want to control with Node Manager. You must also have a SSH client executable on each.
You must create a SSH public key on each machine on which you want to use the script-based version because you want to start the script remotely without having to fill in credentials.
After you've configured remote SSH and your WebLogic clustered domain, you can start the AdminServer with:
WL_HOME/common/bin/wlscontrol.sh -d clustdomain -r
DOMAIN_HOME -c -f startWebLogic.sh -s AdminServer START
Each machine that will host a Managed Server will have a duplicate domain created and configured.
From a local terminal, create a new empty directory in the home directory for the O/S user, on each of the Managed Server host machines and also on a back-up machine.
As the O/S user, use WLST to enroll the user's home directory as being the base directory to remotely run servers.
For example:
WL_HOME/common/bin/wlst.sh
connect('weblogic','weblogic','t3://,WL_SERVER>:7001')
nmEnroll('/home/<O/S user>/clustdomain','/home//<O/S user>/')
exit()
Be sure to run nmEnroll on each remote machine. This command creates a property file, /home/<O/S user>/nodemanager.domains, which maps domain names to home directories, and creates the required domain configuration and security information, so that Managed Servers can communicate with the Administration server.
The nodemanager.domains file removes the need to specify the domain home directory (with -r) when starting wlscontrol.sh. However, since you changed the Node Manager home directory, you must specify -n /home/ndmgr. The default Node Manager home directory is WL_HOME//common/nodemanager.domains; you might not want to use this directory as it is in the product installation directory and owned by another useTry to start your Managed Servers.
Local:
WL_HOME/common/bin/wlscontrol.sh -d clustdomain -n /home/<OSUser> c -f startManagedWebLogic.sh -s MS1 START
Remote:
ssh -l OSuser -o PasswordAuthentication=no -p 22 <ipadress> <WL_HOME>/common/bin/wlscontrol.sh -d clustdomain -n / home/OSUser -c -f startManagedWebLogic.sh -s MS1 START
The Java-based Node Manager runs as an O/S Java Virtual Machine process. On Windows, you can install it as a service using the installNodeMgrSvc.cmd. You should configure the port and listen address in this script.
An important configuration file is the nodemanager.properties, located in the<WL_HOME>/common/nodemanager.
An important thing to do is to set the properties StartScriptEnabled and StopScriptEnabled to true. When the Node Manager starts on a WebLogic Server, it will now use the startWebLogic script. This script calls the setDomainEnv.sh (setWLEnv.sh) script, which sets the server's classpath.
If you leave this to false, starting the WebLogic Server instance might not be successful as key components fail to start because of classpath errors.
Another interesting parameter you might want to set is CrashRecoveryEnabled. You can set this to true when you want a Managed Server to be restarted when it has crashed. Because configuring a Node Manager can be quite confusing for new WebLogic administrators, I'll explain this in a few easy steps.
- Create a Machine in the AdminConsole or during domain creation, and attach your servers to it.
- Startup the Node Manager in the foreground:
<WL_HOME>/server/bin/startNodemanager.sh
- The property file and domains file will be created in:
<WL_HOME>/common/nodemanager.
- Edit the
nodemanager.propertiesfor your needs, such asStartScriptEnabledandStopScriptEnabled, CrashRecoveryEnabled, andListenAddress.
Just as a Windows Service, on *NIX systems you can configure the Node Manager to run as an inetd or xinetd service.
Ensure that NodeManagerHome and other system properties are defined, such as CLASSPATH, LD Library Path, Java Options, and Node Manager Options.
If xinetd is configured with libwrap, you should add the NOLIBWRAP flag. Ensure that the hosts.deny and hosts.allow files are configured correctly. Please ask your O/S administrator. Depending on your network environment, additional configuration may be necessary.
The following example shows how Node Manager can be configured within xinetd:
# default: off
# description:nodemanager as a service
service nodemgrsvc
{
type = UNLISTED
disable = no
socket_type = stream
protocol = tcp
wait = yes
user = <username>
port = 5556
flags = NOLIBWRAP
log_on_success = DURATION HOST USERID
server = <path-to-java>/java
env = CLASSPATH=<cp> LD_LIBRARY_PATH=<ldpath>
server_args = -client -DNodeManagerHome=<NMHome> <java options>
<nodemanager options> weblogic.NodeManager -v
As root just run the following:
root@app1 xinetd.d]# service xinetd restart
Stopping xinetd: [ OK ]
Starting xinetd: [ OK ]
[rootapp1 xinetd.d]# /
Then, always make sure it is running:
[[root@app1 xinetd.d]# service xinetd status
xinetd (pid 1699) is running...
[root@app1 xinetd.d]# netstat -nap|grep 5556
tcp 0 0 0.0.0.0:5556 0.0.0.0:* LISTEN 1699/xinetd
[root@app1 xinetd.d]$ ps -ef|grep java
weblogic 3081 3076 2 18:29 ? 00:00:04 java -client -DNodeManagerHome=/u01/app/oracle/product/middleware/wlserver_10.3/common/nodemanager -Xverify:none
-Djava.security.policy=/usr/app/oracle/product/middleware/wlserver_10.3/server/lib/weblogic.policy
-Dweblogic.nodemanager.javaHome=/usr/app/oracle/product/ middleware/Jrockit weblogic.NodeManager -v
Because the configuring of a Node Manager can be quite a confusing issue for new WebLogic administrators, I'll explain this in a few easy steps:
On *NIX:
- Create a Machine in the AdminConsole or during domain creation, and attach your servers to it.
- Start up the Node Manager in the foreground:
<WL Server HOME>/server/bin/startNodemanager.sh
- The property file and domains file will be created in
<WL Server HOME>/common/nodemanager. Edit the nodemanager.properties for your needs, such asStartScriptEnabledandStopScriptEnabled,CrashRecoveryEnabled, andListenAddress. - Now start the Node Manager in the background:
nohup <WL_HOME>/server/bin/startNodemanager.sh &
Although during installation the Node Manager will be created as a service, here's how to do it manually.
- Configure the Node Manager Properties File.
Go to
WL_HOME/common/nodemanagerand opennodemanager.properties. Change the following properties to:CrashRecoveryEnabled=true StartScriptEnabled=true
- Install Node Manager as a Windows Service.
- Execute the following script:
WL_HOME/server/bin/installNodeMgrSvc.cmd.
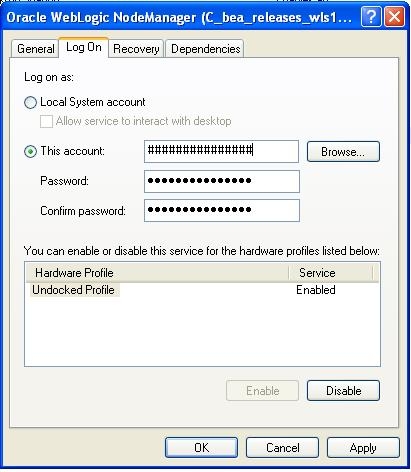
This should create a Windows Service called Oracle WebLogic Node Manager (PATH_TO_DOMAIN). Go toWindows Services and double-click on it. On the Log On tab, check the option This Account and provide the user/password you plan to use to run the WebLogic Server under Windows. Click on OKand start the service.
- Start the AdminServer.
Open a command prompt at
MW_HOME/user_projects/DOMAIN_NAME/binand run the following scriptsetDomainEnv.cmd. In the same command prompt window, type:startWebLogic.cmd. The AdminServer should start now. - Start the Managed Servers.
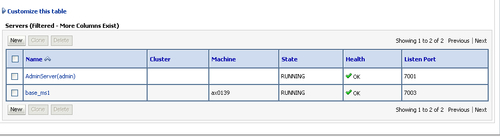
Open a browser and go to http://HOST:PORT/console. On the Domain Structure panel (upper left), click on Servers. On the Summary of Servers (middle right), go to the Control tab and select ms1 and ms2 and then click on Start. The ms1 and ms2 should start now.
- Test the work.
Let's go to the Windows Task Manager and check if our servers are there running. Open the Task Manager (right-click on the Windows clock and select the Task Manager option from the contextual menu) and sort the column Image Name. Now, let's look for our Java processes.

In the previous screenshot, you can see Java processes, one for AdminServer, one for ms1 and ms2 respectively. You can also find the Node Manager process, it's something similar to beasvc.exe. Now, let's simulate a server crash, let's kill our servers processes. Select the Java processes and click on the End Process button. In this way, the server is abruptly shut down and to the Node Manager this means a server crash. The Node Manager will then restart the processes, and they will appear again on the Task Manager just a few seconds after you've killed it. To simulate a complete OS crash, let's kill the Node Manager process first (beasvc.exe) and then kill the Java processes. Now, the Java processes won't come back because the Node Manager is not running. After rebooting Windows, we can see that the Node Manager starts automatically, and just after that the Java processes begin to show up on the Task Manager.