External user directories

So far we have learned how to get users into our Confluence installation. This is very useful but what if your company has its own LDAP server or is already using some other Atlassian products, such as JIRA or Crowd?

Within Confluence we can configure one or more external user directories. A user directory is a place where you store information about users and groups, including some other user information. This information can be the person's full name, e-mail address, or department. When an external user directory is configured, Confluence will also use the directory to authenticate a user.

Confluence has support for the following external directories:

  • Microsoft Active Directory
  • Various LDAP directory servers including OpenLDAP, Apache Directory Server, and Novell eDirectory
  • Atlassian Crowd
  • Atlassian JIRA

You can add as many external directories as you need. Note that you can change the order of the directories, determining which directory will search first.

External user directories

The effect of directory order

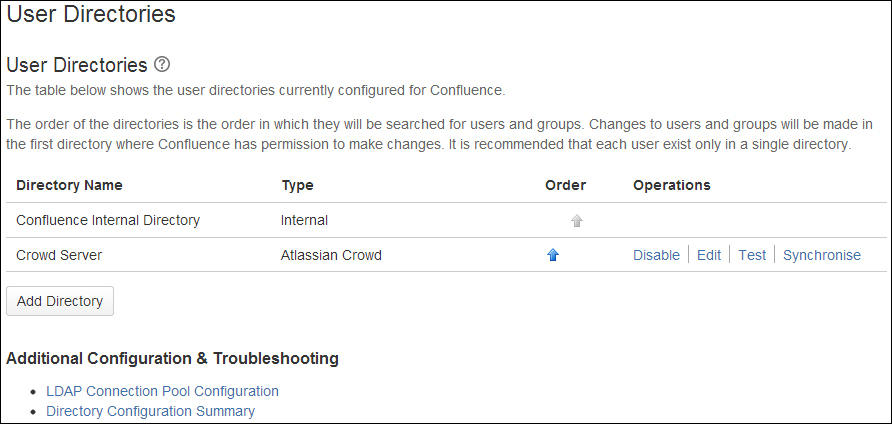
When you have more than one directory configured, the order of those directories is important and affects a couple of things within Confluence.

  • Login: The directory order is significant during the authentication of the user, especially if the user exists in multiple directories. During login, the application will search the directories in the specified order, and will use the password of the first occurrence of the user to validate the login.
  • Permissions: In the same way as the login mechanism, Confluence will look for group memberships only in the first directory where the username appears, based on the directory order.

    For example:

    • You have two directories: the employees directory and the customers directory
    • The employee directory is first in the directory order
    • A username arthur.dent exists in both directories
    • The user arthur.dent is a member of group G1 in the employees directory and group G2 in the customers directory
    • Based on directory order, the user arthur.dent only has permissions based on group G1, not G2
  • Updating users and groups: If you update a user or group via Confluence's administration screen, the update will only be made in the first directory where Confluence has write permissions.

    For example:

    • You have two user directories: a read/write LDAP directory and the internal directory
    • The LDAP directory is the first directory
    • A username arthur.dent exists in both directories
    • You update the e-mail address of the user arthur.dent via Confluence's Administration Console
    • The e-mail address will only be updated in the LDAP directory, not in the internal directory

Limitations when using external directories

When using external directories, there are a couple of limitations you should be aware of.

Build-in user management

The first limitation you should be aware of depends on the read/write configuration of your external directory. If Confluence can't write to your external directory, or you don't want it to, you have to disable the built-in user management.

To disable management of users and groups within Confluence:

  1. Browse to the Administration Console (Administration | Confluence Admin).
  2. Choose Security Configuration in the left-hand menu.
  3. Click on Edit.
  4. Check the External user management checkbox.
  5. Click on Save.

If the built-in user management is disabled, users won't be able to:

  • Signup
  • Reset their password
  • Update their profile

Also, administrators won't be able to:

  • Add new users and groups
  • Assign users to groups from Confluence

All these features are now delegated to the administration of your external user management and they have to be performed there.

Editing directories

It's not possible to edit, disable, or remove the directory your user belongs to. This precaution is to prevent administrators from locking themselves out of the Confluence, by changing the directory configuration in a way that prevents them from logging in or removing their administration permissions.

In some cases, reordering the directories will change the directory that you're currently using, if your user exists in both directories. This behavior can be used to make changes to existing directories.

Note

It's recommended to keep an administrator account in your internal directory (which can't be deleted) and use that internal user to make changes to the settings of other external directories.

Connecting to an LDAP directory

Connecting to an LDAP directory server is useful if your users and groups are stored in a corporate directory. When configuring the LDAP directory in Confluence, you can choose to make it Read Only, Read Only with Local Groups, or Read/Write. In the last case, any changes you make to your users and groups in Confluence will reflect in your LDAP directory.

Connecting to LDAP

To connect Confluence to an LDAP directory, perform the following steps:

  1. Browse to the Administration Console (Administration | Confluence Admin).
  2. Choose User Directories in the left-hand menu.
  3. Click on Add Directory. Select one of these types and click on Next:
    • Microsoft Active Directory: This option provides a quick way to add an AD directory, as it is one of the popular choices.
    • LDAP: You will be able to choose a more specific LDAP directory type on the next screen.
  4. Enter the values for the required settings as described in the following table.
  5. Save the directory settings.

Server settings

The following are the different settings required for setting up an external user directory:

Setting

Description

Name

Enter a descriptive name that will help you identify the LDAP server. For example, MyCompany Employee Directory or MyCompany Customer Directory.

Directory Type

Select the type of LDAP server you will connect to. The value you select here will determine the default values for many options on the screen.

Hostname

The hostname of your directory server.

Port

The port on which your directory server is listening. For example, 389 (default LDAP port), 10398, or 636 (LDAP over SSL).

Use SSL

Check this checkbox if the connection to your LDAP server is an SSL connection.

Username

The distinguished name of the user that the application will use when connecting to the directory server. For example:

  • cn=administrator,cn=users,dc=ad,dc=mycompany,dc=com
  • cn=user,dc=domain,dc=name
  • [email protected]

Password

The password of the user specified.

LDAP schema settings

Setting

Description

Base DN

The root distinguished name (DN) to use when running queries against the directory server. For example:

  • o=myCompany,c=com
  • cn=users,dc=ad,dc=myCompany,dc=com

Additional User DN

This value is used in addition to the base DN to limit the scope when searching and loading users. If no value is supplied, search will start from the base DN:

  • ou=Users

Additional Group DN

This value is used in addition to the base DN when searching and loading groups.

LDAP permissions

Setting

Description

Read Only

Users, groups, and memberships are retrieved from your LDAP server and cannot be modified in Confluence.

Read Only, with Local Groups

Users, groups, and memberships are retrieved from your LDAP server and cannot be modified in Confluence. However, users from LDAP can be added to groups maintained in Confluence's internal directory.

Read/Write

Modifying users, groups, and memberships in Confluence will cause the changes to be applied directly to your LDAP server. Your configured LDAP user will need to have modification permissions on your LDAP server.

Default Group Memberships

This field only appears if you select the Read Only, with Local Groups permission. If you would like to automatically add users to a group or groups, enter those names here. The first time a user logs in, their group memberships will be checked and added accordingly. On subsequent logins, memberships will not be added automatically, allowing deleting a user from one of the default groups.

Note

The Read Only, with Local Groups option is a very powerful configuration and is in many cases the best setup. Users and groups can still be managed in your company's centralized user management system. But you as an administrator still have the option to create new groups and change memberships of those groups, giving you the control you need in Confluence without cluttering your LDAP server. ines

Advanced settings

Setting

Description

Enable Nested Groups

Some directory services allow you to define a group as a member of another group, which is called Nested Groups. If you are using groups to manage permissions, check this box to enable the use of nested groups.

Use Paged results

Useful when querying large user directories, this option returns the results in specified pages instead of all the results at once.

Follow Referrals

Choose whether to allow the directory server to redirect requests to other servers. It is generally needed for Active Directory servers configured without proper DNS, to prevent a javax.naming.PartialResultException: Unprocessed Continuation Reference(s) error.

Naive DN Matching

If your directory server will always return a consistent string representation of a DN, you can enable naive DN matching. Using naive DN matching will result in a significant performance improvement, so it's recommended to use it wherever possible.

Enable Incremental Synchronization

Enabling incremental synchronization causes only changes since the last synchronization to be queried when synchronizing a directory.

Be aware that when using this option, the configured user account must have read access to:

  • The uSNChanged attribute of all users and groups that need to be synchronized
  • The objects and attributes in the Active Directory deleted objects container

If these conditions are not met, it's possible that changes in your LDAP may not be synchronized correctly to Confluence.

Synchronization Interval (minutes)

Specify the interval in minutes between directory updates. The default value is 60 minutes.

Read Timeout (seconds)

This is the time to wait for a response to be received. If there is no response within the specified time period, the read attempt will be stopped. A value of 0 means there is no limit. The default value is 120 seconds.

Search Timeout (seconds)

This is the time to wait for a response from a search operation. A value of 0 means there is no limit. The default value is 60 seconds.

Connection Timeout (seconds)

This is the time to wait when opening new server connections, or getting a connection from the connection pool. A value of 0 means wait indefinitely for a pooled connection to become available, or to wait for the default TCP timeout to take effect when creating a new connection.

User schema settings

Setting

Description

User Object Class

This is the name of the class used for the LDAP user object. For example:

  • inetorgperson
  • user

User Object Filter

The filter to use when searching for user objects. For example:

  • (objectclass=inetorgperson)
  • (&(objectCategory=Person)(sAMAccountName=*))

User Name Attribute

The attribute field to use when loading the username. For example:

  • cn
  • sAMAccountName

User Name RDN Attribute

The relative distinguished name (RDN) to use when loading the username. The RDN is the portion of your DN that is not related to the directory tree structure. For example:

  • cn

User First Name Attribute

The attribute field to use when loading the user's first name. For example:

  • givenName

User Last Name Attribute

The attribute field to use when loading the user's last name. For example:

  • sn

User Display Name Attribute

The attribute field to use when loading the user's full name. For example:

  • displayName

User Email Attribute

The attribute field to use when loading the user's e-mail address. For example:

  • mail

User Password Attribute

The attribute field to use when loading the user's password. For example:

  • userPassword

User Password Encryption

Choose the encryption algorithm used for passwords on your directory. For example:

  • SHA
  • MD5
  • PLAINTEXT

Group schema settings

Setting

Description

Group Object Class

This is the name of the class used for the LDAP group object. For example:

  • groupOfUniqueNames
  • group

Group Object Filter

The filter to use when searching group objects. For example:

  • (objectclass=groupOfUniqueNames)
  • (objectCategory=group)

Group Name Attribute

The attribute field to use when loading the group's name. For example:

  • cn

Group Description Attribute

The attribute field to use when loading the group's description. For example:

  • description

Membership schema settings

Setting

Description

Group members Attribute

The attribute field to use when loading the group's members. For example:

  • uniqueMember
  • member

User Membership Attribute

The attribute field to use when loading a user's group memberships. For example:

  • memberOf

Use the User Membership Attribute

Check this checkbox if your LDAP server supports the group membership attribute on the user.

If the checkbox is checked, Confluence will use the group membership attribute on the user when retrieving the list of groups to which a user belongs. This will result in a more efficient retrieval.

If the checkbox is not checked, Confluence will use the member attribute on the group for the search.

Note that, if you use a nested group, this option is ignored and thus Confluence will use the members attribute on the group.

Connecting to a Crowd directory

Atlassian Crowd is an application security framework that can handle the authentication and authorization for your web-based applications, which is not just restricted to Confluence or JIRA. With Crowd, it's possible to integrate multiple user directories into one directory and add support for single sign-on and centralized identity management.

Crowd is a very useful option if you have multiple web-based applications and multiple user directories you want to configure, especially if you want to add SSO to those applications as well.

Connecting to Crowd

Use the following steps to connect to Crowd:

  1. Go to your Crowd Administration Console and define Confluence as an application. More information about this step can be found at https://confluence.atlassian.com/x/rQcD.
  2. Browse to the Administration Console (Administration | Confluence Admin).
  3. Choose User Directories in the left-hand menu.
  4. Click on Add Directory and select the Atlassian Crowd option.
  5. Enter the value for the settings (explained in the following table).
  6. Save the directory settings.

Server settings

Settings

Description

Name

A descriptive name of your Crowd server. For example:

  • Crowd Server
  • MyCompany Crowd

Server URL

The web address of your Crowd console server. For example:

  • http://www.mycompany.com:8095/crowd
  • https://crowd.mycompany.com/

Application Name

The name to authenticate Confluence with Crowd. This is the application name you created when setting up Crowd for Confluence.

Application Password

The password for the configured application name. This must be the same as the password you have registered in Crowd for Confluence.

Crowd permissions

Settings

Description

Read Only

The user, group, and membership information in this directory can only be modified via Crowd. It's not possible to change any information via the Confluence Administration Console.

Read/Write

If you modify a user, group, or membership via Confluence administration screens, these changes will be applied directly to Crowd. Please note, that Confluence needs modification permissions in Crowd.

Advanced settings

Settings

Description

Enable Nested Groups

Before enabling nested groups, be sure that the directories in Crowd support this feature. When nested groups are enabled, you can define a group as a member of another group, allowing inheritance of permissions from its parent group.

Enable Incremental Synchronization

If this is checked, only changes since the last synchronization will be retrieved when synchronizing a directory.

Synchronization Interval (minutes)

Specify the interval in minutes between directory updates. The default value is 60 minutes.

Connecting to JIRA for user management

If you are also running JIRA within your organization, it is possible to use JIRA as user management for Confluence. The advantage of this approach is that your user management system is not in multiple locations, but just in JIRA.

Note

Note that if you have more then 500 users, or over five applications connecting to JIRA, this integration is not recommended. LDAP or Crowd would be a better and a more stable option in such a case.

Connecting to JIRA

The method of connecting Confluence to JIRA changed in JIRA 4.3 and later. I will assume you will be using JIRA 4.3 or later for this exercise; if you are running an older version of JIRA, you will find more information online at https://confluence.atlassian.com/x/hg6zDQ.

To connect Confluence to JIRA 4.3 or later, perform the following steps:

  1. Go to your JIRA administration screen and define the Confluence application to JIRA, using the following steps:
    1. For JIRA 4.3.x, select Other Applications from the Users, Groups & Roles section of the Administration menu.
    2. For JIRA 4.4 or later, select Users | JIRA User Server in the administration mode.
    3. Click on Add Application.
    4. Enter the application name and password that Confluence will use when accessing JIRA.
    5. Enter the IP address or addresses of your Confluence server, for example, 192.168.10.42.
    6. Save the new application.
  2. Set up Confluence to use a JIRA user directory, using the following steps:
    1. Browse to the Administration Console (Administration | Confluence Admin).
    2. Choose User Directories in the left-hand menu.
    3. Click on Add Directory and select the Atlassian JIRA option.
    4. Enter the value for the settings (explained in the following table).
    5. Save the directory settings.
  3. Make sure the Confluence groups are available in JIRA by performing the following steps:
    1. Add the confluence-users and confluence-administrators groups in JIRA.
    2. Add your own username as a member of both groups.

Server settings

Settings

Description

Name

A descriptive name of your JIRA server. For example:

  • JIRA Server
  • MyCompany JIRA

Server URL

The web address of your JIRA server. Examples:

  • http://www.mycompany.com:8080/crowd
  • https://jira.mycompany.com/

Application Name

The name to authenticate Confluence with JIRA. This is the application name you created when setting up JIRA for Confluence.

Application Password

The password for the configured application name. This must be the same as the password you have registered in JIRA for Confluence.

JIRA server permissions

Settings

Description

Read Only

The user, group, and membership information in this directory can only be modified via JIRA. It's not possible to change any information via the Confluence Administration Console.

Read/Write

If you modify a user, group, or membership via Confluence administration screens, these changes will be applied directly to JIRA.

Advanced settings

Settings

Description

Enable Nested Groups

Before enabling nested groups, be sure that nested groups are enabled on the JIRA server. When nested groups are enabled, you can define a group as a member of another group, allowing inheritance of permissions from its parent group.

Enable Incremental Synchronization

If this is checked, only changes since the last synchronization will be retrieved when synchronizing a directory.

Synchronization Interval (minutes)

Specify the interval in minutes between directory updates. The default value is 60 minutes.

..................Content has been hidden....................

You can't read the all page of ebook, please click here login for view all page.
Reset
13.59.197.213