Now that we have an understanding of the Confluence editor, we can look at using styling, layout, tables, and macros to create rich and engaging pages.
We start by creating a new page, which we call Lorem Ipsum, and use the generator located at http://www.lipsum.com/feed/html to generate some paragraphs of text for us to use. If you have another document you wish to use, you can.
Most formatting can be done using your mouse and the editor toolbar, or using a keyboard with shortcuts. The latter makes editing pages very easy, but needs some getting used to.
We use paragraph styling and character formatting to emphasize parts of content or to separate the content into logical pieces. For our Lorem Ipsum page we are going to add some headings and quotes, and emphasize a few lines.
- First we will add a header above each generated paragraph:
- Press Enter after the first two words of the paragraph.
- Select the two words, and then select Heading 1 from the Paragraph drop-down list.
- Headings can easily be changed to a different styling. Change all headings to Heading 2, except the first heading.
- The second paragraph is actually a quote from somebody else:
- Select the complete second paragraph.
- Select Quote from the Styling drop-down list.
- Last we want to emphasize some sentences by making them bold:
- Select the sentence you want to make bold.
- Click on B on the toolbar to make the sentence bold. Or press Ctrl + B on your keyboard to make the sentence bold.
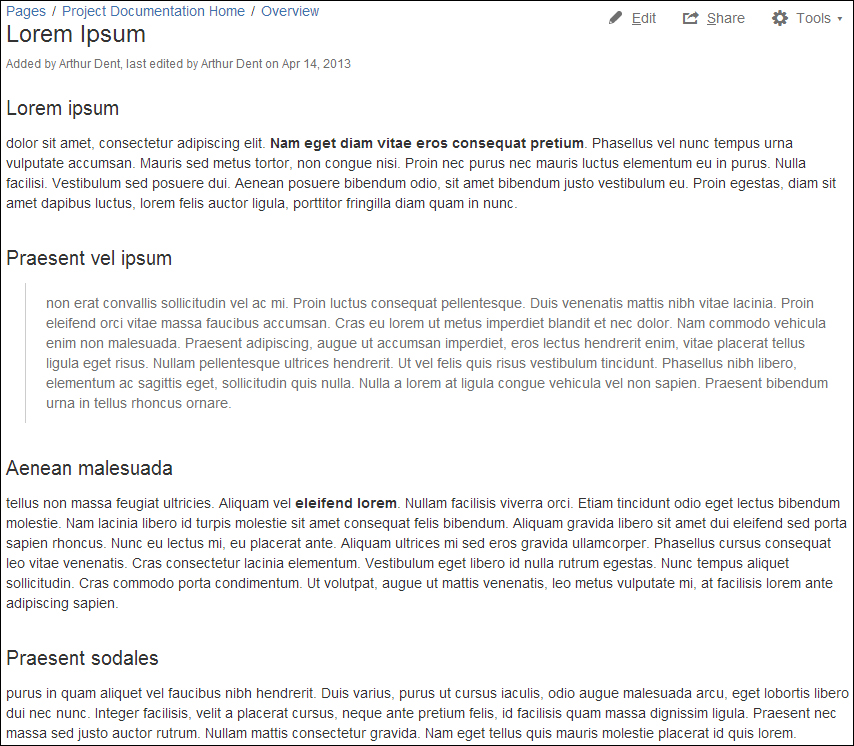
- Save the page. It should look something like this:
With macros in Confluence, you can add extra functionality or include dynamic information to a page. For example, an attachment macro can be placed on a page listing all attachments; if you add a new attachment to this page, this list is automatically updated.
Let's add the Panel macro to our page we created earlier:
- Open our Lorem Ipsum page and click on edit.
- Select the third paragraph.
- Click on Insert and choose Other Macros.
- Confluence will display the macro browser.
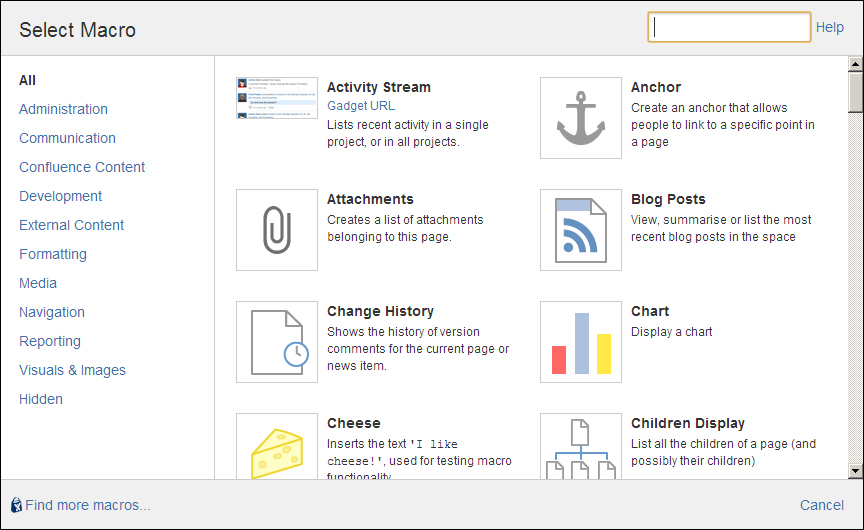
- Use the search box and search for Panel, then click on the Panel macro.
- In the next screen we can enter some details for this specific macro. Leave them empty and click on Insert located on the bottom-right corner.
- Save the page.
In the previous section, we added a Panel macro to our page, which introduced the macro browser. The macro browser is a feature you will be using a lot to create your pages, and it is a great way to explore the different macros that are available to you.
Macros are grouped into one or more categories. The left panel of the macro browser is separated into categories. When a category is clicked, related macros are displayed in the right-hand section of the panel.
The macro browser search will use your query to filter by macro title and description.
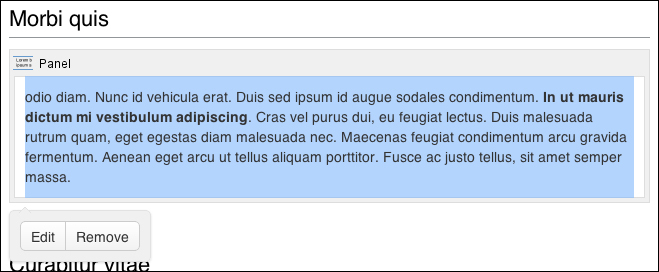
After adding a macro to your page, Confluence will display a special box around your content. This is called the macro placeholder. This placeholder can be used to edit, remove, or copy/paste macros.
Left-click once on the placeholder to display the available options. These options can differ per macro. The options for a panel are displayed in the following screenshot:
To edit a macro, select the Edit option or double-click on the placeholder. Confluence will display the Edit 'Panel' Macro screen:

The large left section displays a preview of the content. On the right you can change the macro options, if those are available for your macro.
On the Lorem Ipsum page, we want to change the styling of the panel so that it looks like the previous screenshot. This can be achieved by performing the following steps:
- Open the Edit Macro screen of the panel we just added.
- Use the paragraph title as Panel Title.
- Change the border style to Dotted.
- If you want to give this panel a bit more attention, you can change the colors too. Colors should be added in hexadecimal notation:
- Border color:
#FF0000(red) - Background color:
#FFEDED(very light red)
- Border color:
- Save the panel.
Almost every macro in Confluence can be updated using the context menu and Edit Macro dialog we just used.
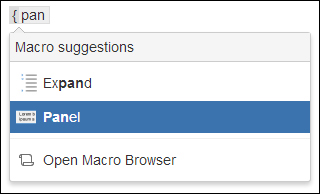
When you are more familiar with the available macros in Confluence, you can also use the keyboard shortcut to add those macros to your page.
Type { to start the macro autocompletion. Continue to type the name of the macro you are looking for, and the suggestions will be updated. Select the macro you are looking for, and it will be added to your page.
I already used the Panel macro to explain the macro browser, but it is worth mentioning again. The Panel macro is one of the macros I use the most. Panel macros are very useful for separating content, adding a bit of styling to your page, or to highlight a piece of content.
When we want to add structure to our page, it's most common to split the information into columns. An example I often use is for adding event information in Confluence. On the left side I add the event information, and on the right I add an RSVP.
Confluence offers two ways to add structure to your page:
- Page Layouts, which are predefined columns and sections.
- The Section and Column macros that allow more flexibility but are more difficult to use than Page Layouts. You can set the width of the columns, and add as many sections and columns you need on your page.
The Confluence editor comes with a predefined set of page layouts, each providing two or more columns. Some layouts also provide a horizontal header and footer to the page. The layout you select determines the position of the columns and the relative width of those columns on the page. If you use a page layout, the content of the page is confined within the border of that layout and it is not possible to add content before or after.
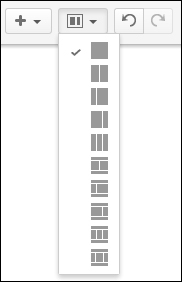
To choose a page layout, perform the following steps:
- Open a page in Edit mode.
- Click on the Page Layout icon (as shown in the following screenshot).
- A drop-down list appears with the available layouts.
- Select a layout.
If your page already has content on it, Confluence will put the existing content into the upper-left column of the new layout. If the page was already using a different layout, Confluence will put the content into the appropriate column of the new layout.
For example: You have a three-column layout and want to switch to a two-column layout. Confluence will merge the second and third column to one column by placing the content of the third column underneath the content of the second.
Keep in mind that the width of each column is set to a percentage of the total page width. Confluence will adapt the width of the columns to fit the width of the page. If a column includes a large table or object, the content may not fit, and you will see a horizontal scroll bar when viewing the page.
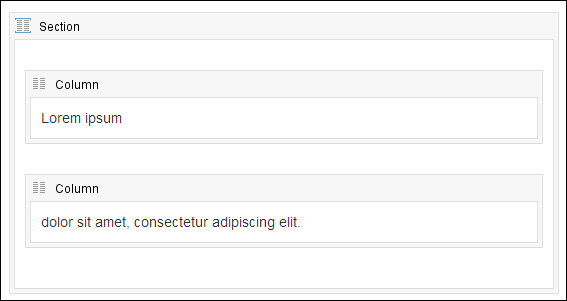
If the predefined layouts are not what you are looking for, and you want a bit more flexibility, it is also possible to use the Section and Column macros provided by Confluence. The Section macro defines the area that will contain your columns. It's different from the page layouts, in that you can have as many sections as you like, and within a section you can add as many columns as you like.
To add Section and Column macros to a page, perform the following steps:
- Open a page in Edit mode.
- Find the Section macro by navigating to Insert | Other Macros, and insert it into the page.
- Go to Insert | Other Macros again.
- Find the Column macro and insert it into the Section macro.
- Add your content to the column.
- Insert as many sections and columns as you like.
In Edit mode, you would see the sections and columns represented as macro placeholders. This makes it a bit more difficult to see how your page would look in View mode.
In addition to the capability to add as many sections and columns as you like, the macros also have parameters that you can set.
The Section macro has the parameter Show Border, which will display a border around the section and columns, if set to true.
The Column macro has the parameter Column Width. It defaults to 100 percent, divided by the numbers of columns in the section. The column width can be set in pixels or as a percentage of the available width.
Tables are very powerful; you are able to do almost everything that you would expect from tables in an editor. Tables in Confluence can highlight cells, rows, or columns, and include a sort feature in View mode.
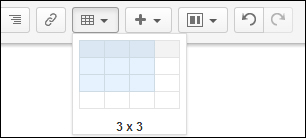
To create a table, perform the following steps:
- Open a page in Edit mode and place your cursor at the point where you want to insert the table.
- Select Table from the toolbar.
- From the drop-down list that appears, select the number of rows and columns you want your table to have.
- If you don't want a header on your table, press Shift while selecting your rows and columns.
When you select the table in the editor, an extra toolbar will appear, with all the operations you can perform on a table. Let's go over the options available, from left to right.
|
Insert an empty row above the current selected row. |
|
Insert an empty row below the current selected row. |
|
Remove the current selected row. |
|
Cut the current row and copy it to the clipboard. |
|
Copy the current row to the clipboard. |
|
Paste the row from the clipboard to the current row. |
|
Insert an empty column to the left of the current one. |
|
Insert an empty column to the right of the current one. |
|
Remove the current column. |
|
Merge the selected cells. |
|
Split the selected merge cells. |
|
Mark a row as a table header. The cells in the row will be highlighted in gray and the text will be displayed in bold. |
|
Mark a column as a table header. The cells in the column will be highlighted in gray and the text will be displayed in bold. |
|
Highlight the cells with a background color. |
|
Remove the table. |
To speed up your work with tables, Confluence has keyboard shortcuts to perform most actions.
|
Windows |
Mac OS X |
Action |
|---|---|---|
|
Ctrl + Shift + C |
Cmd + Shift + C |
Copy the current table or selected rows |
|
Ctrl + Shift + I |
Cmd + Shift + I |
Insert a new table |
|
Ctrl + Shift + V |
Cmd + Shift + V |
Paste the rows from your clipboard above the current row |
|
Ctrl + Shift + X |
Cmd + Shift + X |
Cut the current table or selected rows |
|
Alt + up arrow |
Alt + up arrow |
Add an empty row above the current row |
|
Alt + down arrow |
Alt + down arrow |
Add an empty row below the current row |

Attachments are defined as any file that is included with your page. We already discussed images as attachments before, but there are other examples too, such as screenshots, Word or PDF documents, and videos. Attachments are useful when you want to share information in a different format than plain text.
When the page you are viewing contains attachments, a small paperclip icon appears next to the page byline, just below the page name. If you click on the paperclip icon, you will be taken to the Attachments view, where you will see all the attachments.
Attachments on a page inherit the permissions of the page so that if a user doesn't have view permissions on a page, he or she can't view or download the attachment.
Attaching files to a page can be done using drag-and-drop, or by browsing for a file and uploading from your computer.
To attach a file using drag-and-drop, perform the following steps:
- Browse to the page you want to attach files to.
- Drag one, or more, files from your computer onto the page. The Attach file dialog will appear, showing you the upload progress of the file being attached to your page.
Files can also be dropped onto the Attachments or Editor view, and onto the Insert Link or Insert Image dialogs.
To attach a file via the "classic" upload approach, perform the following steps:
Confluence keeps track of the versions of an attachment uploaded to a page. By uploading an attachment with the same file name, a new version is added. Existing files will be kept with the name Version X, which is incremented with every upload.
To see all versions of an attachment, click on the arrow next to the attachment name.

Please keep in mind the following points:
- You cannot revert to a previous version of an attachment. Downloading and uploading the previous version would be a work-around.
- Confluence doesn't track changes within attachments.
- There is no limit to the number of attachments and versions, provided there is enough disk space on the server that Confluence is running on.
- Older versions of an attachment can be removed, given a user has the appropriate permissions.
Users can download all attachments in Confluence, provided the user has the permissions needed to view the page the attachment is attached to.
To download a single attachment, perform the following steps:
- Browse to the Attachment view of a page by going to Tools | Attachments.
- Right-click on the link on the attachment's name and select Select Link as, or a similar option in your browser.
- Select the location where to download the file to.
To download all the attachments from a page, perform he following steps:
- Browse to the Attachment view of a page by going to Tools | Attachments.
- Click on the Download All button located at the end of the page, to download a ZIP file containing all the attachments (this link only appears if there are two or more files attached).
Downloading an attachment doesn't prevent somebody from uploading a new version of the attachment. This could potentially mean that, by uploading the attachment again, changes are overwritten. There are plugins available to enhance Confluence with a checkout mechanism, such as Lockpoint by Arsenale.
Once you have attached a file to a page, there are different methods for embedding the content of that file into your Confluence page.
You can embed many multimedia files with the Multimedia macro. This allows the user to directly watch or listen to your multimedia file without having to download it first. In some cases the user needs a separate plugin or decoder.
Supported multimedia files:
- Adobe Flash (
.swf) - Apple QuickTime (
.mov) - Windows Media (
.wma,.wmv) - Real Media (
.rm,.ram) - MP3 and MP4 files (
.mp3,.mp4) - MPEG files (
.mpeg,.mpg) - AVI files (
.avi)
To insert the Multimedia macro, perform the following steps:
- Open a page in Edit mode and place your cursor at the location where you want to add the macro.
- Choose Insert | Other Macros, and search for the Multimedia macro.
- Fill in the macro parameters (described in the following table).
- Click on Insert.
The following table lists the macro parameters, and also provides a brief description for each:
|
Parameter |
Default |
Description |
|---|---|---|
|
Page name |
Current page |
Name of the page to which your multimedia file is attached. Use autocomplete to find your page. If this field is left empty, the current page will be used. |
|
Attachment |
- |
File name of the multimedia file. |
|
Width |
Based on the file type |
Width of the movie window. Can be specified in pixels or as a percentage of the window's width. |
|
Height |
Based on the file type |
Height of the movie window. Can be specified in pixels or as a percentage of the window's height. |
|
Autoplay |
Off |
If checked, the video or audio file will start playing as soon as the page is loaded. If this option is not checked (the default), users will have to press the play button. |
You can't embed multimedia files from remote servers, but Confluence allows this with the widget connector, which is available as a macro.
Confluence can display Office files that are attached to a page. This is useful for users who don't have Office suite installed on their desktop or don't want to download the complete file.
Supported Office files:
- Office Word (
.doc,.docx) - Office Excel (
.xls,.xlsx) - Office PowerPoint (
.ppt,.pptx)
To display an Office file in Confluence, perform the following steps:
- Open a page in Edit mode and place your cursor at the location where you want to add the macro.
- Choose Insert | Other Macros, and search for the macro. There is one for each Office file—these being the Office Word macro, Office Excel macro, Office Powerpoint macro, and the PDF macro.
- Fill in the macro parameters (described in the following table)
- Click on Insert.
|
Macro |
Parameter |
Default |
Description |
|---|---|---|---|
|
All |
Page name |
Current page |
The Confluence page containing the attached file. If not specified, the current page is assumed. |
|
File name |
None |
The name of the attached file to be displayed. | |
|
Excel |
Show Grid? |
Yes |
Select to show grid lines around each cell. Deselect to hide these grid lines. |
|
Worksheet name |
Last worksheet viewed |
The name of the worksheet you want to display. | |
|
Last row |
Last row with content |
The number of the last row you want to display, starting from 0 as the first row. | |
|
Last column |
Last column with content |
The number of the last column you want to display, starting from 0 as the first column. | |
|
Powerpoint |
Height |
The height of the display in pixels or as percentage of the window's height. | |
|
Slide Number |
None |
If specified, Confluence will display a single slide as image, instead of a slideshow. The first slide is numbered 0. | |
|
Width |
The width of the display in pixels or as an percentage of the window's width. |
Text in PDF files may appear blurred when viewed using the PDF macro. This is by design, as Confluence converts the PDF to images and reduces their size to save bandwidth. This is not possible using the macro browser, so we have to use a trick which involves Wiki markup:
- Open a page in Edit mode and place your cursor at the location where you want to add the PDF file.
- Go to Insert | Wiki Markup, and paste the following line into the text editor:
{viewfile:my.pdf|width=800|height=1000}. - Replace
my.pdfwith your file's name. - Click on Insert.
Depending on your browser, you can also use drag-and-drop to embed multimedia and Office files into your page. Confluence will try to determine the correct macro and use it to display your attachment:
- While in Edit mode, simply drag-and-drop the file from your desktop onto the editor.
Confluence will attach the file to the page and insert the macro at your cursor position.
- If needed, click on the macro and choose Edit to change the macro properties.
Images can be displayed on a Confluence page if the image meets one of the following conditions:
- The image is attached to the current page
- The image is attached to another page of the same Confluence installation; this can even be in another space
- The image is on a remote web page that your server can connect to
Once an image is displayed on your page, you can:
- Change the appearance of the image
- Move the image to a new position
- Use the image as a link to another Confluence page or URL
Once you have attached an image to a page, there are three different methods available for displaying the image:
- Using the Insert Image dialog:
- Open a page in Edit mode and place the cursor at the location where you want to display the image.
- Choose Insert | Image from the toolbar and select the Attached images tab in the dialog.
- Select the required image and click on Insert, or double-click on the image to select it.
- Using autocomplete:
- Open a page in Edit mode and place the cursor where you want to add the image.
- Type
!to trigger the autocomplete function. - Continue typing the image name and choose the image from the list that appears.
- Using drag-and-drop:
This feature uses the drag-and-drop functionality of HTML5 and is, therefore, only available in browsers that support HTML5. Depending on your browser, you can attach and display an image with just one action. While editing a page, drag-and-drop an image from your desktop on to the page. The image is uploaded, attached, and displayed at the current cursor position.
It is also possible to display an image that is attached to a different page within the same Confluence installation; the page doesn't have to be on the same space. All you need to know is the name of the image.
Tip
Displaying images from other pages can be used to manage your images easily. You could upload all your images to a single page and avoid them being uploaded more than once. Your users do need view permission to the page, so if you have images to which you want to restrict access, don't use this method.
To display an image attached to a different page, perform the following steps:
- Open a page in Edit mode and place the cursor at the location you where want to display the image.
- Go to Insert | Image, and select the Search tab.
- Type in the name of the image you are looking for.
- Choose if you want to search the current space or All Spaces, and click on Search.
- Select the required image from the search results.
You can display an image from a remote web page in your Confluence instance without needing to attach it to your page, if you know the URL of that image.
To display an image from an external web page, perform the following steps:
- Open a page in Edit mode and place the cursor where you want to display the image.
- Go to Insert | Image and select the From the web tab.
- Type or paste the URL for the image.
- Click on Preview to check that you used the correct URL.
- Click on Insert.
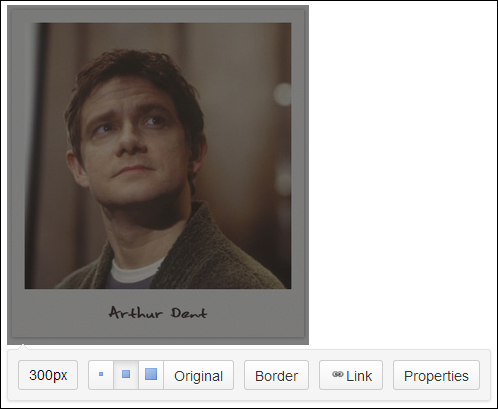
Once you have added an image into a page, you often need to edit the image. Confluence provides ways to do this using the image properties panel.

To change the size of an image, perform the following steps:
- While editing a page, click on the image to show the image properties panel, as shown in the previous screenshot.
- Change the image size manually within the text field at the left of the panel (the size can be between 16 px and 900 px). The image is resized proportionally to the original ratio. Or choose one of the size preset buttons next to the text field, to change the image size.
Images are displayed as thumbnails; clicking on the image in View mode will pop up a larger version of the image.
To add a border to the image, perform the following steps:
- While editing a page, click on the image to show the properties panel.
- Choose Border from the properties panel.
To use image effects, perform the following steps:
- While editing a page, click on the image to show the properties panel.
- Choose Properties from the properties panel.
- Select Effects in the properties dialog.
- Pick one of the five effects.
An example of an image with effects is shown in the next screenshot.
The only way to add a caption to an image is using the Instant Camera effect described earlier. Captions are very useful to add additional information about the image. Perform the following steps to add a caption to an image:
- Select Properties from the image properties panel and choose the Instant Camera effect.
- Save the page.
- Go to Tools | Attachments to view the attachments of the page. If you are displaying an image from another page, go to the attachment view of that page.
- Choose Properties located next to the image.
- Add a comment to the attachments. This comment will be used as image caption.
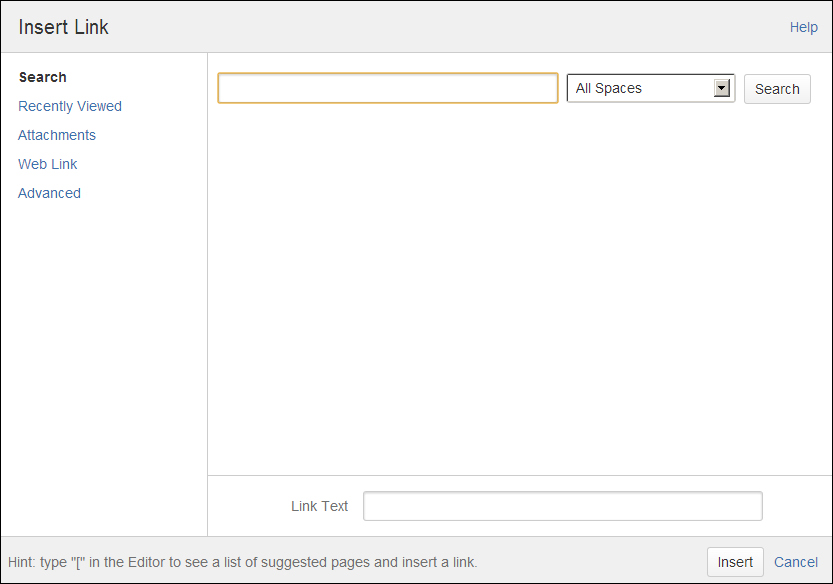
To add a link to your image, perform the following steps:
- Select Link from the image properties panel.
- Confluence will display the Insert Link dialog, which you can use to search for the page to link to.
When you have many images attached to a page, you might want to display them as a gallery. The gallery displays the page attachments as thumbnails. When a user clicks on the thumbnail, a larger version of the image is displayed.
To display the images attached to the page as a gallery, insert the Gallery macro using the steps described in the Macros section.
Features of the Gallery macro:
- The images in the gallery are taken from the attachments of that page. It is also possible to specify a different page to take the attachments from. A combination is not possible.
- Captions in the gallery are taken from the image comments.
- By default, the gallery will include all the images attached to a page. You can exclude or include images by name or label using the macro properties.
- The gallery can be sorted by name, date, and even size.
- The gallery width (columns) and title can easily be changed using the macro properties.
Links are more important than you might think. Links enable you to connect to content from anywhere within Confluence, or from other websites or applications.
It is possible to link to the following content:
- Pages, from within or outside Confluence
- Blog posts
- Pages that don't exist yet, but that you want to create at a later stage
- Attachments, such as images and documents
- User profiles or personal spaces
- A section of a page, using an anchor
Links to pages can be created using the following methods:
- Autocomplete: To link to Confluence pages
- The Insert Link dialog: To link to both Confluence and web pages
- Cutting and pasting a link into the editor: To link to both Confluence and web pages
You can use Autocomplete to create a link to any page in Confluence, if you know the name of the page you want to link to.
Start your link by typing [ to see a list of suggestions. Continue with the name of the page to search for the page you want to link to.
You can use the Insert Link dialog to create a link to a page. Perform the following steps:
- Open a page in Edit mode and place your cursor at the location where you want to insert a link. You can also highlight the text you want linked.
- Choose Link in the editor toolbar or press Ctrl + K. The Insert Link dialog will appear.
- Use the tabs on the left to find the page you want to link to:
- Search: Use this tab to link to a page or file in Confluence
- Recently Viewed: This tab displays the pages you recently viewed (and created)
- Attachments: This displays the attachments on this page
- Web Link: This tab is used to link to web pages outside Confluence
- Advanced: This tab is used for linking to anchors and as-yet non-existent pages
- Enter the link text that will be displayed on the page. If the link text is empty, the link will display either the target page name or the URL.
- Click on Insert.
To create a link to a web page, perform the following steps:
- Open a page in Edit mode and place your cursor at the location where you want to create the link.
- Click on Link in the toolbar, or press Ctrl + K to open the Insert Link dialog.
- Choose Web Link from the left tabs, and paste the web address into the Address textbox.
- Enter a link text.
- Click on Insert.
You can also paste a link directly into the Confluence editor. The link text will be the complete URL, which can be changed afterwards using the image properties panel.
It is also possible to link to a specific location within a page, by placing an Anchor macro at that location and then linking to the anchor.
To add an anchor to a page, perform the following steps:
- Open a page in Edit mode and place your cursor at the location where you want to add an anchor.
- Find the Anchor macro by:
- Going to Insert | Other Macros and finding the Anchor macro
- Typing
{anchorto use autocompletion to insert the macro
- Specify your anchor's name.
To link to an anchor, perform the following steps:
- Open a page in Edit mode and place your cursor at the location where you want to add the link.
- Choose Link in the editor toolbar, or press Ctrl + K.
- Choose Advanced and enter the anchor name into the link textbox.
- Enter the link text that will be displayed on the page.
- Click on Insert.
Use the following syntax when typing the anchor name:
|
Anchor Location |
Link Syntax |
Example |
|---|---|---|
|
Same page |
|
|
|
Different page |
|
|
|
Page in another space |
|
|
You can directly link to a heading in Confluence without the need of an anchor. However, if somebody changes the heading, the link will be broken. Using an anchor will prevent this.
To link to a heading, perform the following steps:
- Open a page in Edit mode and place your cursor at the location where you want to add the link.
- Choose Link in the editor toolbar, or press Ctrl + K.
- Choose Advanced and enter the heading into the Link textbox. The heading is case-sensitive and must be entered without spaces.
- Enter the link text that will be displayed on the page.
- Click on Insert.
In some case you want to insert a link pointing to a Confluence page that does not exist yet, but which you intend to create later. We call this type of link an undefined link.
To add an undefined link, perform the following steps:
- Open a page in Edit mode and place your cursor at the location where you want to add the link.
- Type
[to trigger the autocomplete function, and type the name of the undefined page. - From the suggestion list, choose Insert Link to create a page.
While you are working on your page, Confluence makes sure your work is saved. At regular intervals a draft is saved so that, in case of a network or server error, you can retrieve the last-saved draft and continue your work.
Drafts are created when you are adding or editing a page. By default, Confluence saves a draft every 30 seconds. A Confluence administrator can change this interval in the General Configuration setting. A draft is also created if you move to another site or page while editing a page.
When you edit the page again, Confluence will display a message stating there is an unsaved version of the page, and ask if you would like to discard it or continue with that version.
By default, Confluence saves a draft of a page that is being edited every 30 seconds. As Confluence Administrator, you can change this.
- Browse to the Administration console (Administration | Confluence Admin).
- Choose General Configuration in the left-hand menu.
- Edit the settings and change the value in Draft Save Interval.
If you want to resume editing an unsaved page or blog post, you have two options:
- Using the draft view:
- Click on your avatar in the top-right corner of the navigation bar.
- Choose Drafts from the drop-down menu.
- You will see all the drafts Confluence saved for you.
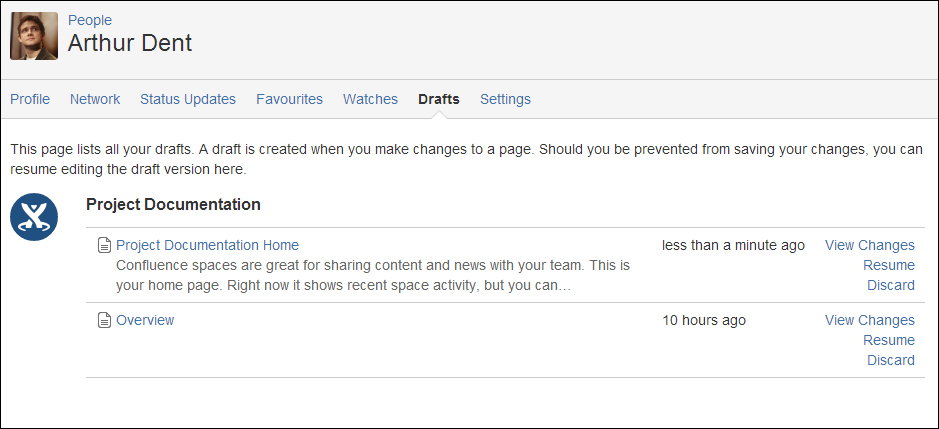
- Click on Resume, next to the relevant draft to continue editing.
- Resuming editing:
If you created a new page but didn't save it, then the next time you create a new page in the same space, Confluence will ask you if you want to resume editing your previous page. If you choose resume editing, the draft is restored, and you can resume editing it.

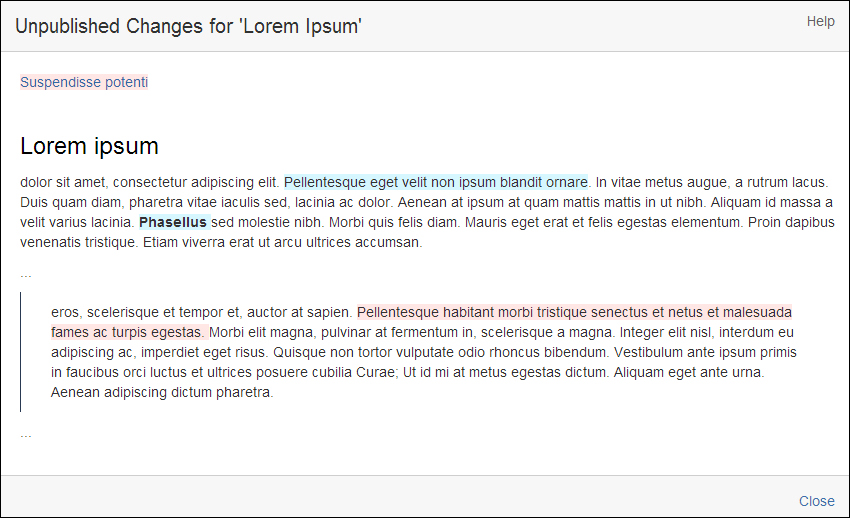
While you are editing your page or blog post, it is possible to review the changes you made, before saving them. As soon as there is a draft saved of your changes, you will see the line Draft autosaved at ... (view change) at the bottom right, just below the Save button.
If you click on view change, a dialog will appear with the changes you made during this edit.