
One of the features of the Confluence workbox is getting all your notifications in one single location. The aim of the Workbox is to alleviate time-waste by context switching between e-mail, Confluence, and other tools. The workbox displays all notifications collected from Confluence page watches, shares, mentions, and tasks. If Confluence is linked to JIRA, Atlassian's issue tracking system, you will also see JIRA notifications in your workbox. The workbox also displays personal tasks, which are explained in the next section.
From the workbox you can use the inline actions to reply to comments, or like and watch comments and pages. Follow the link in a notification to open the related content.
You can't delete notifications yourself. Notifications that you have already read are automatically deleted after two weeks and unread notifications after four weeks.
To manage your notifications, perform the following steps:
- Select the workbox icon in the Confluence navigation bar.
- You can also use the keyboard shortcut: Type
gthenn. - The icon will also show the number of unread notifications.
- You can also use the keyboard shortcut: Type
- Choose the notifications icon.
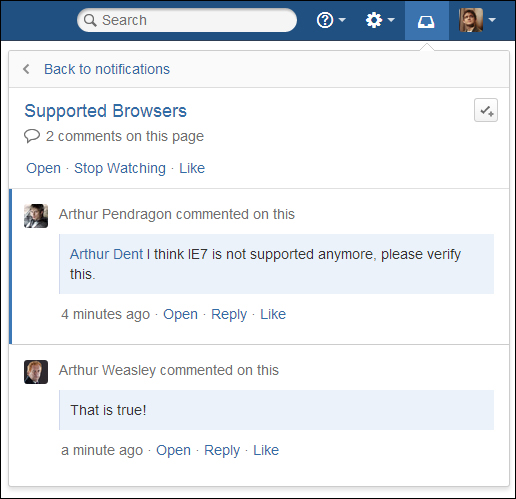
- Select a notification from the list to see the notification details. Within the details you can do the following:
- Open the related page, blog post, or comment. The page will open in a new tab in your browser.
- Like or Unlike the content or comment.
- Watch or Stop Watching the relevant content to receive, or stop receiving notifications.
- Comment or Reply to respond to a comment directly from the workbox.
- Choose the add task icon to create a task based upon the notification.
The workbox displays a notification when somebody performs one of the following actions in Confluence:
- Shares a page or blog post with you
- Comments on a page or blog post you are watching
- Mentions you in a page, blog post, or comment
- Likes a page or blog post that you are watching or created
- Assigns you a task by mentioning you in a tasklist
Notifications triggered, because you are watching a space, will not be shown in the workbox.
If your Confluence installation is linked to JIRA, you will also see the following notifications from JIRA in your workbox:
The Confluence workbox is enabled by default; as a Confluence administrator you can disable it or change the configuration. A couple of configuration scenarios are possible:
- Your Confluence installation provides in-app notifications and displays them in its own workbox. There are two possibilities in this scenario:
- This Confluence installation is the only installation involved.
- Or, this Confluence installation displays its own notifications and also displays notifications from JIRA and/or another Confluence installation.
- Your Confluence installation sends in-app notifications to another Confluence installation.
- In-app notifications are completely disabled and unavailable.
The Confluence workbox includes both notifications and tasks, and when workbox notifications are enabled so are personal tasks. If you disable the notifications, personal tasks won't be available either.
To use notifications and tasks, the Confluence workbox has to be enabled.
To enable the Confluence workbox, perform the following steps:
- Browse to the Administration Console (Administration | Confluence Admin).
- Select In-app Notifications from the left-hand side menu.
- Select displays in-app notifications and click on Save to save the form. The workbox icon will now appear at the top-right of the navigation bar.
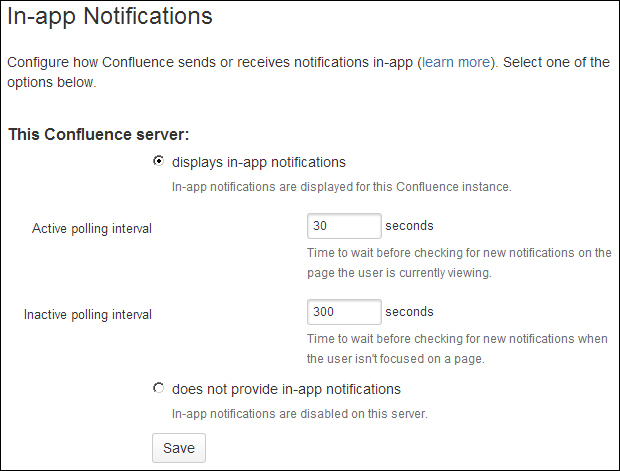
- Active polling interval: This is the number of seconds that Confluence will wait before checking for new notifications relevant to the page that the user is currently viewing.
- Inactive polling interval: This is the number of seconds that Confluence will wait before checking for new notifications relevant to all pages currently not in focus. This can also be on other servers if configured.
The Confluence workbox can include notifications from your JIRA issue tracker but this requires some extra setup.
To include notifications from JIRA, perform the following steps:
- Make sure JIRA and Confluence are connected via application links.
- Browse to the Administration Console (Administration | Confluence Admin).
- Select Application Links from the left-hand side menu.
- Select Add Application Link and follow the wizard to create a new application link. (There is more about application links in Chapter 8, Advanced Confluence.)
- If your JIRA server is linked to multiple Confluence servers, make sure the primary application link is to the Confluence server that will display the in-app notifications.
- Select In-app Notifications from the left-hand side menu from the Administration Console.
- Select display in-app notifications from other servers.
- Your JIRA server will appear in the list of linked applications.
- Your users will see JIRA notifications in the Confluence workbox.
Note that this feature is only available for JIRA 5.2 or later. JIRA will send its notifications only to the Confluence server that is configured as the primary application link.
Confluence can send and receive notifications to or from another Confluence server. To demonstrate how to set this up, let's assume we have two Confluence servers ConfSend and ConfReceive, where ConfSend will send its notifications to ConfRecieve.
To send notifications to another Confluence server, perform the following steps:
- Connect both Confluence installations via applications links. In
ConfReceive:- Browse to the Administration Console (Administration | Confluence Admin).
- Select Application links from the left-hand side menu.
- Set up an Application link as described in the Including notifications from JIRA section.
- Configure
ConfReceiveto display in-app notifications.- Select In-app Notifications from the left-hand side menu of the Administration Console.
- Select displays in-app notifications from other servers.
- Configure the notification settings in
ConfSend.