Accessing the content
So far, all content we have created can be viewed and edited by anyone who has access to Confluence, and even without logging in if you're enabled an anonymous login. When your company's information and documentation is in Confluence, allowing anyone to view or edit them might not be the best security setting.
Confluence gives you all the tools to make your installation as open or as closed as you would like it to be. While we go over the options and how to enable them, please keep the following points in mind:
- Confluence is a tool for communication and collaboration; allowing your users to view and edit as much content as possible. This will help you getting the most out of the transparent knowledge exchange in your organization.
So, restrict a space or page only if you have a good reason for doing so.
- Confluence keeps track of every change made to a page or blog post. This makes it easy to see who changed what and, if required, revert the content to a previously saved state.
In a situation where everybody works on documents on their own desktop, people aren't used to getting feedback and input. This can be a cultural shift that a company has to go through while starting to work with Confluence. Before restricting access to a space, page, or blog post, ask yourself, "Why should this document be private and what is the harm in making it more visible within my organization?"
Global permissions are site-wide permissions and can be assigned only by system administrators and Confluence administrators. Global permissions can be assigned to groups, individual users, and anonymous users.
Before we go into how to change the different global permissions, it's good to know the different administrator roles:
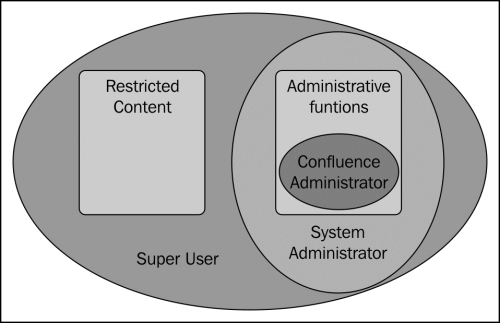
- Super user: Any user that belongs to the confluence-administrators group has full administrative access to Confluence. A super user can also view and edit all content even if it is restricted by permissions.
- System Administrator: Users with the System Administrator global permission have full administrative access to Confluence but cannot view or edit the content they don't have permissions to.
- Confluence Administrator: Users with the Confluence Administrator global permission have restricted access to the Confluence administrative functions. Confluence administrators cannot, for example, install new add-ons. More detail on which functions are restricted are in the Comparing the administration roles section.
How the different roles are related to each other is illustrated in the following diagram:
Note
As a user within the confluence-administrators group is allowed to view and edit all content, it is recommended to use a different user account for day-to-day work. With the System Administrator permission, all administrative functions can be performed but your administrators aren't allowed to view all content.
A super user account would only be needed if restricted content can't be accessed by anyone anymore. The super user can still access the content and restore the restrictions.
If you are a Confluence administrator, you can add users and groups to the global permissions to determine their permissions.
To view the global permissions:
- Browse to the Administration Console (Administration | Confluence Admin).
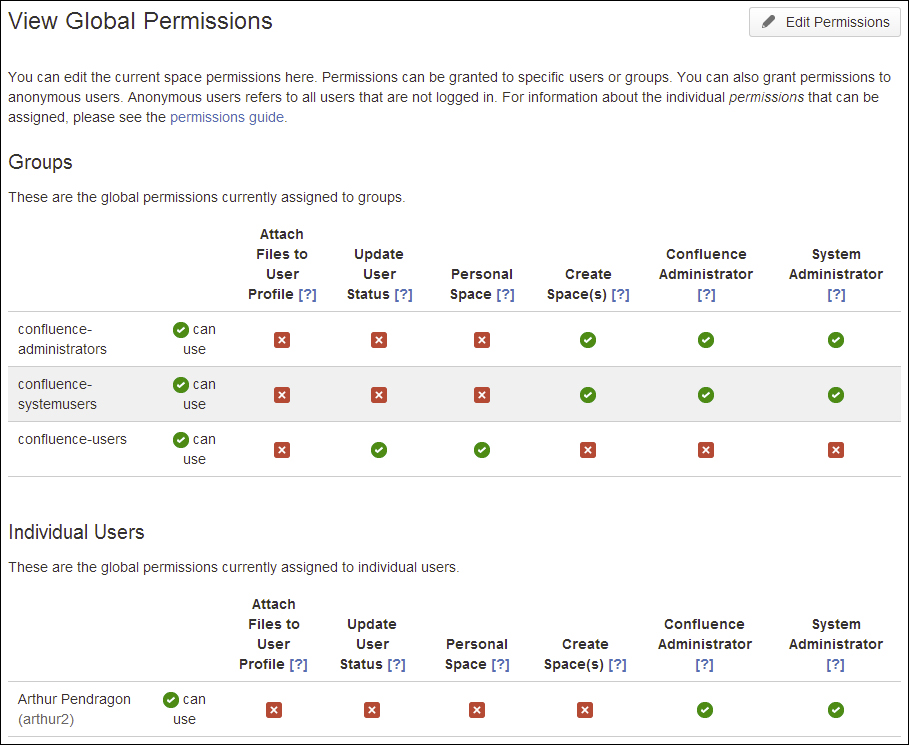
- Choose Global Permissions in the left-hand side menu. The next screen would be as shown in the following screenshot:
To add permissions for a group, perform the following steps:
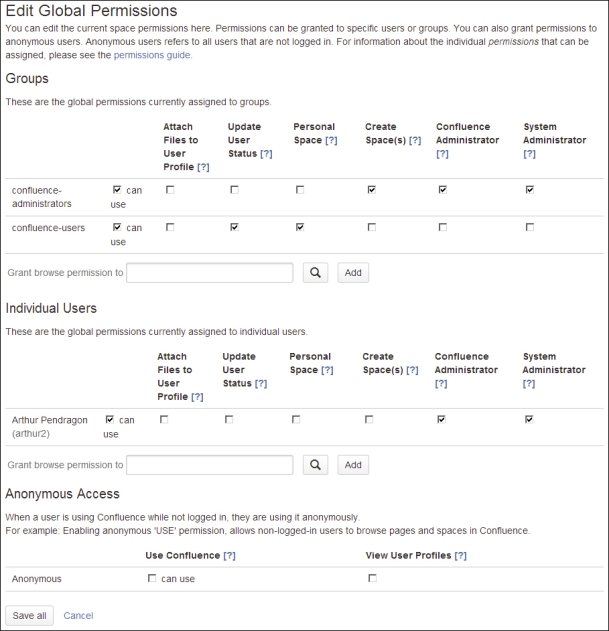
- Select Edit Permissions; this will show the Edit Global Permissions screen.
- Type the group name in the Grant browse permission to box in the groups section. You can also search for the group name.
- Click on Add.
- The group will be added to the list and you can edit the permissions.
- When all the relevant checkboxes are checked, click on the Save All button at the bottom of the page.
To add permissions for a user, perform the following steps:
To add or edit the permissions of groups and users, perform the following steps:
- Select or clear the checkbox under the relevant permissions for the relevant user or group. A selected box indicates that the permission is granted.
- To allow anonymous access to your Confluence installation, select the Use Confluence option in the Anonymous Access section.
- Choose Save All to save your changes.
In the previous steps we learned how to manage the different global permissions. In the following table those different global permissions are explained. These permissions are also displayed in the previous screenshot.
We have already learned that a user with System Administrator permission is allowed to perform all administrative functions within Confluence. A user with Confluence Administrator permission is only allowed to administrate just a subset of those functions.
You can give the Confluence Administrator permission to users who should be able to perform most administrative functions, but should not be able to perform functions that can compromise the security of the Confluence system.
The following functions are granted to the System Administrator permission but excluded from the Confluence Administrator permission to ensure your Confluence instance integrity and security.
- General configuration – only the following options are excluded:
- Change the server base URL
- Enable/disable remote API
- Enable/disable compress HTTP response
- Change connection timeouts
- Backup administration
- External gadgets
- Mail servers
- User macros
- In-App notifications
- Attachment storage
- PDF export
- Office connector
- Add-ons – only the following options are excluded:
- Upgrade add-ons
- Install new add-ons
- Confluence upgrade check
- Security configuration – only the following options are excluded:
- External user management
- Append wildcards to user and group searches.
- Enable custom stylesheets for spaces.
- Show system information on the 500 page.
- Maximum RSS items
- RSS timeout
- XSRF protection
- Anti XSS mode
- Change the global stylesheet
- Add custom HTML
- Backup and restore
- Mail queue
- Cache statistics
- Scheduled jobs
- Logging and profiling
- Atlassian support tools
Some things to keep in mind while working with global permissions are that users with:
- The Confluence Administrators permission are able to access the global permissions page and change the permissions, excluding permissions for the confluence-administrators group
- The Confluence Administrators permission cannot grant themselves the System Administrator permission
- The Confluence Administrators permission cannot add themselves to the confluence-administrators group and become super users
- The System Administrators permission can change the permissions of the confluence-administrators group on the global permissions page
- The System Administrators permission are able to add themselves to the confluence-administrators group and become super users
Every space has its own set of permissions. These permissions determine the access to the space for specific users and groups. In order to assign these permissions, a user must be space administrator, that is, they should have the Admin permissions for that space.
The following is the list of different permissions you can set on a space level:
|
Permission |
Description |
|---|---|
|
The user can view this space's content. This includes pages and blog posts. Without this permission the user cannot access the space at all. | |
|
The user can add and edit pages in this space. | |
|
The user is allowed to remove pages in this space. | |
|
The user is allowed to create and edit blog posts. | |
|
The user is allowed to remove blog posts in this space. | |
|
The user is allowed to make comments in this space. | |
|
The user is allowed to remove any comments in this space. | |
|
The user is allowed to add attachments to this space. | |
|
The user is allowed to remove any attachments in this space. | |
|
The user is allowed to delete mail items. | |
|
The user is allowed to export content from this space. | |
|
The user has administrative permissions over this space. |
Note
If, by mistake, all administrative access to a space is removed, nobody has access to administer the space anymore. This could, for example, happen if somebody who was a space administrator leaves the company or a group with Space Administrator permissions is removed from Confluence. In such a case, somebody from the confluence-administrators group needs to help you to fix the permissions.
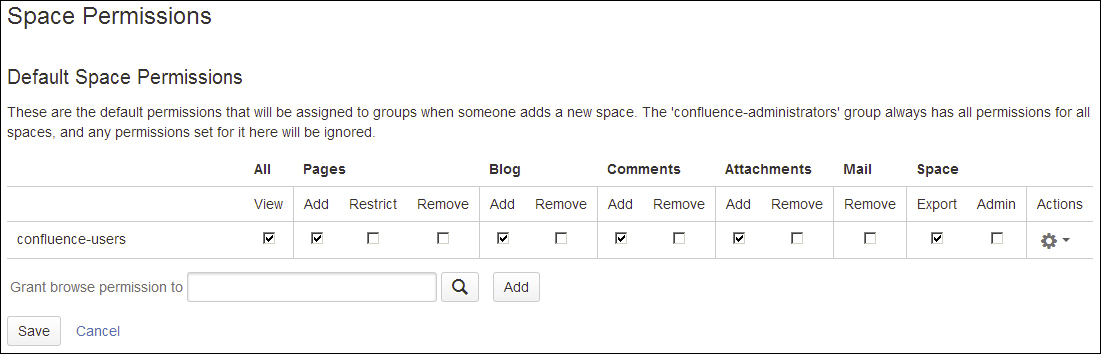
Permissions can be granted to groups or to individual users. You need to be a space administrator to assign space permissions. A Confluence administrator can also set the default permissions that will be applied when a space is created; this is explained in the following section.
To access the space permissions, you will need to perform the following steps:
- Go to the space and choose Space tools on the left sidebar.
- Select Permissions followed by Permissions.
On the space permission screen you will notice the following three sections:
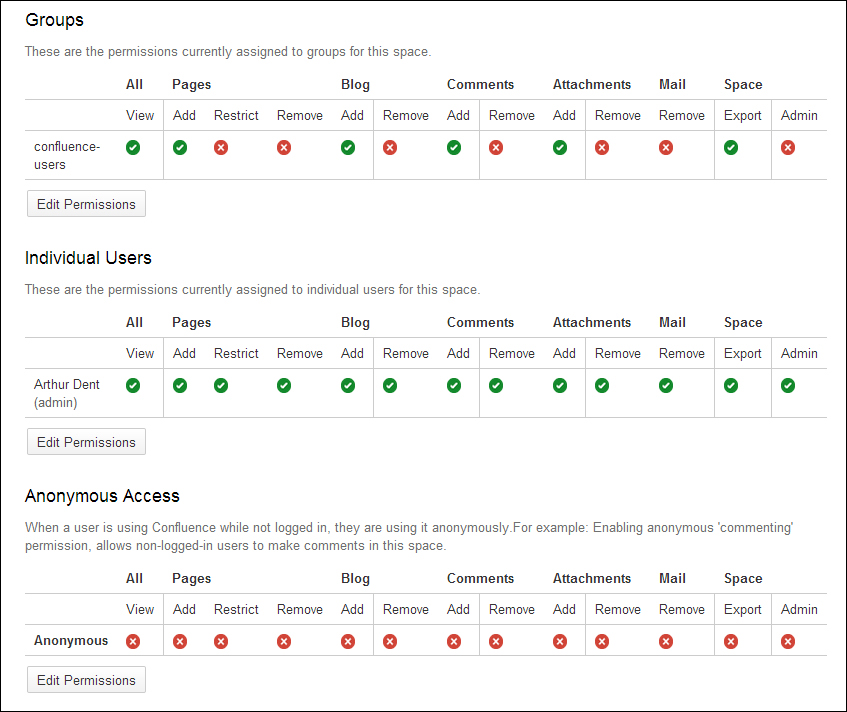
To assign permissions to groups, perform the following steps:
- Click on the Edit Permissions button below the group section.
- To assign a permission, check the relevant checkbox.
- To remove a permission, uncheck the checkbox below the relevant permission.
- To add a new group to the list, type the group name in the textbox in the group section and click on Add. You can also search for groups using the magnify icon next to the textbox.
- Click on Save All to apply the changes.
To assign permissions to users:
- Click on the Edit Permissions button below the Individual User section.
- To assign a permission, check the relevant checkbox.
- To remove a permission, uncheck the checkbox below the relevant permission.
- To add a new user to the list, type the username in the textbox in the Individual User section and click on Add. You can also search for users by using the magnify icon next to the textbox.
- Click on Save All to apply the changes.
To assign permissions to anonymous users:
- Click on the Edit Permissions button below the Anonymous User section.
- To assign a permission, check the relevant checkbox.
- To remove a permission, uncheck the checkbox below the relevant permission.
- Click on Save all to apply the changes.
Anonymous users can't be granted space administration rights or the permission to restrict pages.
Page restrictions are the lowest tier where you are able to control access to your content. With page restrictions you can control who can view or edit individual pages.
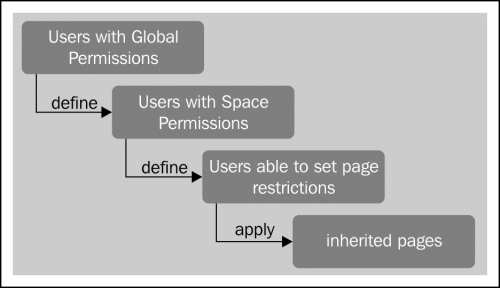
Before we get to how to set and manage page restrictions, it good to know how Confluence handles permissions and restrictions. Permissions and page restrictions work in a hierarchical manner. This means that a user who can access and modify global permissions can define which users can access and modify space permissions. Space administrators can then define which users have access to create and modify pages. These users can then apply viewing and editing restrictions to a page. Child pages inherit the viewing and editing restrictions from their parent.
If you translate this into a diagram, it will look something like this:
I already mentioned that child pages inherit the view restrictions set on the parent page. This is also true for child pages of those child pages and so on. If a view restriction is set to a page that already has inherited restrictions from its parent, users must satisfy both restrictions in order to see that page.
Edit restrictions are not inherited from the parent page, only from the space. Edit restrictions have to be reapplied to child pages.
We will first talk about viewing page restrictions.
When you are viewing a page with page restrictions applied to it, you will notice a small padlock icon in the byline of the page, directly below the page title. If you click on that icon, the page restrictions dialog will appear, displaying the full details on the page restrictions.
When you are editing a page, you will notice a restrictions button at the bottom of the screen. Clicking on this button will also display the page restrictions dialog.
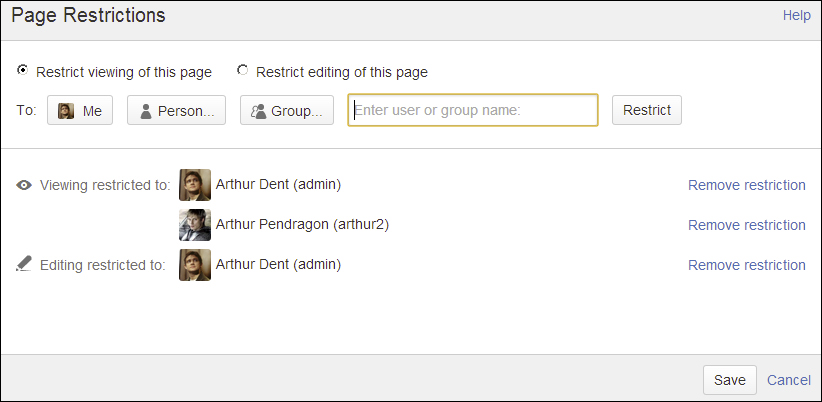
Next we will take a look at setting page restrictions. In order to set page restrictions, perform the following steps:
- Browse to the relevant page.
- Choose Tools | Restrictions to open the Page Restrictions dialog.
- Select the restriction option you want to set (view or edit).
- Choose the users and groups you want to be able to view or edit the page.
- To include yourself, click on Me.
- To select a particular user or group, type the user's username or the group name into the textbox. Click on Restrict to allow that user or group to view or edit the page.
- To search for a user or group click on the Person… or Group… button.
- Click on Save to apply the new restrictions, as shown in the following screenshot:
To remove page restrictions, perform the following steps:
- Open the Page Restrictions dialog by using the padlock icon or select Tools | Restrictions.
- Click on the Remove restriction link next to a user or group to remove them from the restriction. Hereby, you will disallow them to view or edit the page, unless there are no restrictions.
- Click on Save.
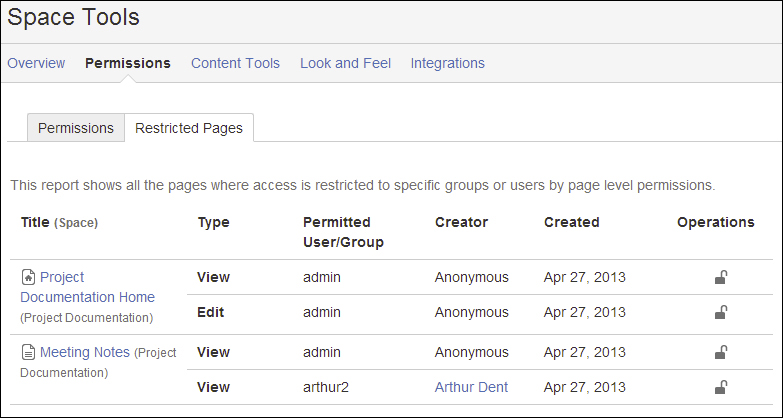
Next we will look at viewing restricted pages. As a space administrator you can view all pages that are restricted. From within this view, it is also possible to remove page restrictions. For example, you may need to do this when there is nobody who can access a certain page anymore.