
Working with add-ons
Throughout the book we have been using a plain vanilla Confluence installation without any added features or functionalities. Add-ons are separately installed components that supplement or enhance functionality in Confluence. This can vary from a single feature such as a macro to something that could be a product on its own, such as the add-on "Team Calendars".
There are over 500 add-ons for Confluence available via the Atlassian Marketplace and more are being added. These add-ons can be downloaded, evaluated, and purchased via the Marketplace. The Marketplace can be access directly via the Internet or by making use of the Universal Plugin Manager, from within the Confluence Administration Console.
Note
The term "add-on" and "plugin" are both being used to indicate extra functionality. While both terms are sometimes used interchangeably, they are not the same. A plugin is a type of add-on that can be added to Confluence and is developed using the Atlassian Plugin SDK. Not all add-ons are plugins. A native app for you mobile device would be considered an add-on, while the "content formatting macros" are plugins.
The Atlassian Marketplace, located at https://marketplace.atlassian.com, is the resource for finding, evaluating, and purchasing add-ons for Confluence.
Finding add-ons using the normal search functionality of the Marketplace is usually very easy and will find you the right add-on. Sometimes you want to narrow down the search parameters and search for an add-on specific to a certain version. This can be done via the advanced search.
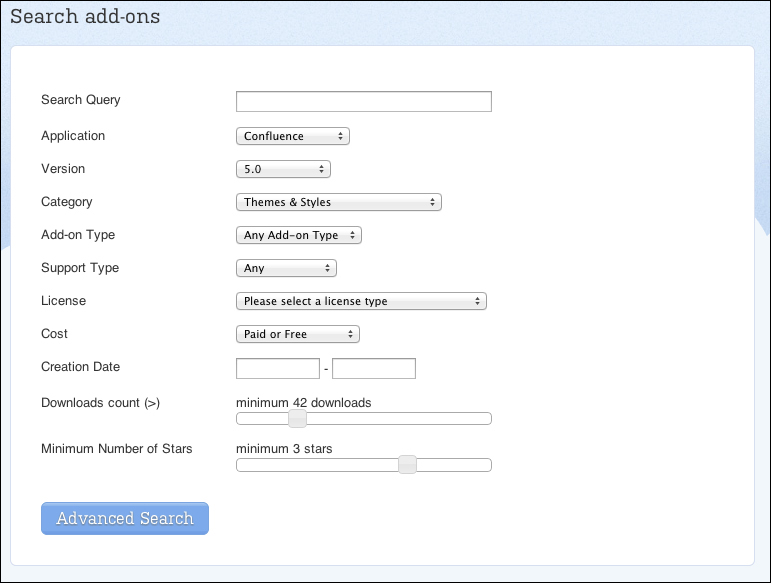
To find an add-on using Advanced Search, perform the following steps:
- Browse to https://marketplace.atlassian.com.
- Select Advanced Search from the top navigation to browse to the advanced search as displayed in the next image.
- Select Confluence as Application and choose your version from the values of the Version field.
- Fill in other options to specify the add-on you're looking for.
- Click on Advanced Search.
When you have found a plugin that you like, there are two possibilities:
- The add-on is free, and can be used without a license.
- The add-on is one that you have to pay for; then you have to buy a license if you want to use the add-on. The add-on can be evaluated for 30 days, which can be extended to 90 days.
In either case, you have to download the add-on and install it in your Confluence installation. The Marketplace offers a download link, but there is an easier way to install new add-ons to your application, the Universal Plugin Manager.
The Universal Plugin Manager (UPM), which is an add-on itself, can be used to administer add-ons from within Confluence. The UPM is called universal, because it works across other Atlassian products.
With the more recent versions of Confluence, the Universal Plugin Manager comes preinstalled, so you don't have to install it yourself. However, as the UPM is a plugin, it gets updated regularly, so you'll need to update it from time to time.
The Universal Plugin Manages relies on an available Internet connection to perform the following tasks:
- Searching and installing new add-ons
- Checking for and installing updates for the add-ons
- Performing application upgrade checks
If your Confluence server is not connected to the Internet, it is possible to switch the UPM to offline mode. In offline mode, the UPM does not connect to the Internet, and the features using Internet are disabled. In offline mode, you will still be able to use the UPM for:
- Managing installed add-ons
- Uploading a new add-on from a local server
- Checking the UPM audit log
Another option is to protect your server with a firewall, and allow the UPM to connect only to the required services. To allow the UPM to perform online functions from behind a firewall, make sure Confluence can connect to port 443 (https) on the following servers:
- *.atlassian.com: The UPM connects to several servers in the
atlassian.comdomain. These include marketplace.atlassian.com and id.atlassian.com. - dq1dnt4af4eyy.cloudfront.net: The Marketplace uses Amazon CloudFront as the CDN. This is where your add-ons are downloaded from.
Note
These links are subject to change, check https://confluence.atlassian.com/x/Y4tCEg if the previously mentioned settings don't work for you.
If the Universal Plugin Manager is in online mode (default), information is transmitted every time a Confluence administrator visits the "manage add-ons" page in the Administration Console. In addition, a background task will send the same information every 24 hours to the Marketplace to check for new versions.
The information transmitted to Atlassian includes:
- The type and version of the application (for example, Confluence 5.1.2)
- The add-on key and version of the installed add-ons (for example,
com.atlassian.calendar1.2) - The current UPM version
When analytic information collection is enabled, the following information is also transmitted to Atlassian:
If you want to disable transmitting license information to Atlassian, you can disable this function by setting a Java system property. The property is atlassian.upm.server.data.disable=true.
To set a Java system property:
- Open the
setenv.batfile that is located atCONF_INSTALL/bin. - Find the
set JAVA_OPTS=_VA_OPTS%section. - Add
-Datlassian.upm.server.data.disable=trueto the section; the list is space separated.Note
If you are running Confluence as a Windows Service, the system property has to be set elsewhere; refer to https://confluence.atlassian.com/x/JoUDCg for more information.
If you want to set the Universal Plugin Manager in offline mode, no data will be transmitted to Atlassian. You cannot download any add-ons directly via the UPM though.
To turn on offline mode:
- Browse to the Administration Console (Administration | Confluence Admin).
- Choose Manage Add-ons in the left-hand menu.
- Click on the Settings link at the bottom of the page; a dialog will appear as shown in the following screenshot:
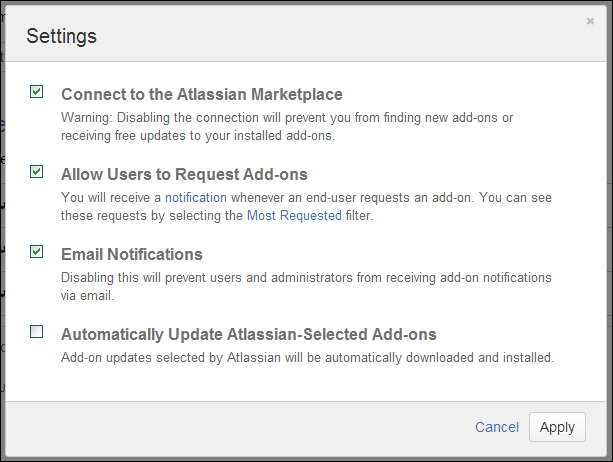
- Uncheck the checkbox in front of Connect to the Atlassian Marketplace. This is enabled by default.
- Click on Apply for the settings to take effect.
Features that are disabled in offline mode, such as Find new add-ons are hidden from the user interface.
Any user, administrator or nonadministrator, can browse the Atlassian Marketplace from within Confluence. System administrators can use this page to install add-ons, while other users can use this to request add-ons for installation (more about requests in the User request for add-ons section).
To find an add-on, perform the following steps:
- Click on your avatar in the top-left corner.
- Select Atlassian Marketplace from the drop-down menu. The in-product view of the Marketplace appears as shown in the following screenshot:
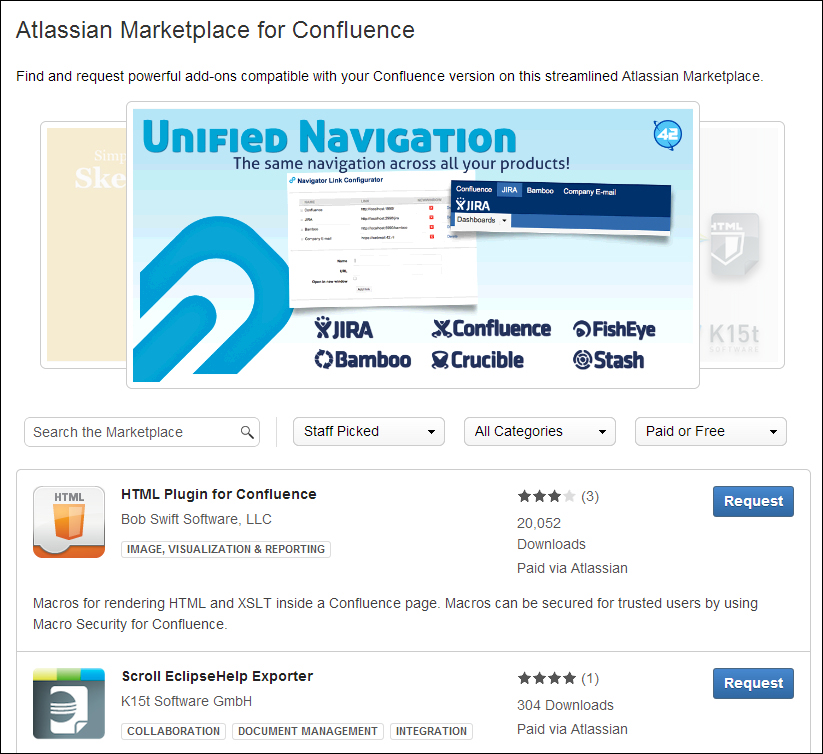
- Search for add-ons by browsing the suggestions or by:
- Typing a search string in the Search the Marketplace box. This will filter the results based upon add-on names.
- Use the pull-down menus to filter the add-ons based on:
- Attributes such as Recently Added or Staff Picked
- Category, such as Themes & Styles or Blueprints
- Based on pricing such as Free, Paid via Atlassian, or All Paid
Note
There is a difference between Paid via Atlassian and All Paid. Add-on vendors may choose to let Atlassian handle all the purchases for their add-on. This is a great advantage for users, who can now purchase add-ons via Atlassian, making use of their standardized process and my.atlassian.com. The All Paid option also displays add-ons by vendors who choose their own purchasing system.
The Universal Plugin Manager makes it very easy to install new add-ons in your Confluence installation. With a few clicks, you can browse through all add-ons and install the ones you like.
Alternatively, you can use the file upload to install an add-on manually by uploading a JAR or OBR file to Confluence. The archive file should contain plugin code and resources. You can use this method if other operations will not work because you're behind a firewall.
If you are a system administrator and the UPM is connected to the Internet, you can install add-ons by clicking on the Install button from the Find New Add-ons page. This single-click installation is the quickest way to install add-ons.
To install a plugin directly:
- Click on your avatar in the top-left corner.
- Select Atlassian Marketplace from the drop-down menu. The in-product view of the Marketplace appears.
- Find the relevant add-on.
- Click on the Install button to install the add-on.
If the add-on is a paid add-on, there will be buttons Buy Now and Free Trail. Clicking on either one of these buttons will download and install the add-on, and ask you to get a valid license via https://my.atlassian.com.
When the single-click installation method is not available to you, you can use the manual file upload to install your add-ons. Add-ons are normally distributed as JAR or OBR files, containing the add-on code and resources. These are the only two file types that the UPM accepts for installation.
Before uploading your add-on manually, be sure to have the distribution file on your desktop or a local server, for example, downloaded from the Marketplace to your desktop.
- Browse to the Administration Console (Administration | Confluence Admin).
- Choose Manage Add-ons in the left-hand menu.
- Click on the Upload Add-on link at the top-right side of the page. The following upload dialog appears:
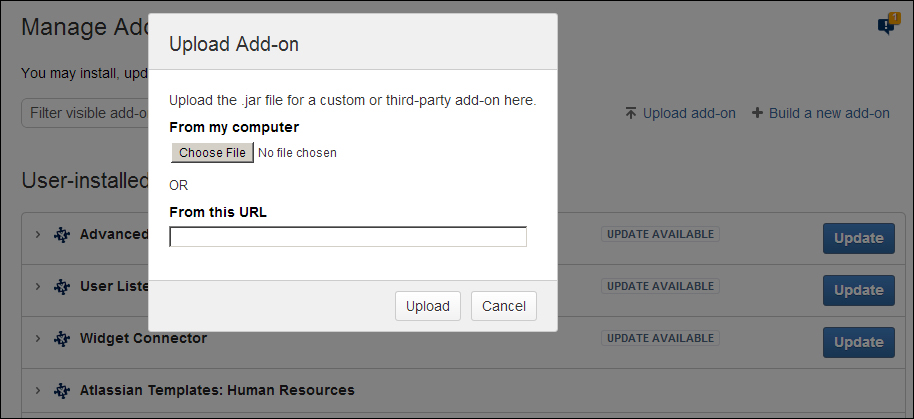
- Choose a JAR or OBR file from your computer, or enter a URL that the server can access.
- Click on the Upload button. A confirmation message will appear when the add-on is installed successfully.
Add-on providers periodically release new versions of their add-ons to incorporate bug fixes and new features. These updates can be release at any moment, independent of the releases of Confluence. It is generally recommended to keep add-ons up-to-date, but do validate an update before applying it to your production environment.
If the Universal Plugin Manager is connected to the Marketplace, the Manage Add-ons page will help you to keep your installed add-ons up-to-date. If the UPM is not connected, keeping the add-ons up-to-date needs a manual check via https://marketplace.atlassian.com.
To update an add-on, perform the following steps:
- Browse to the Administration Console (Administration | Confluence Admin).
- Choose Manage Add-ons in the left-hand menu.
- Add-ons that have an update available will be displayed in the Add-ons Requiring Action list, as shown in the following screenshot:
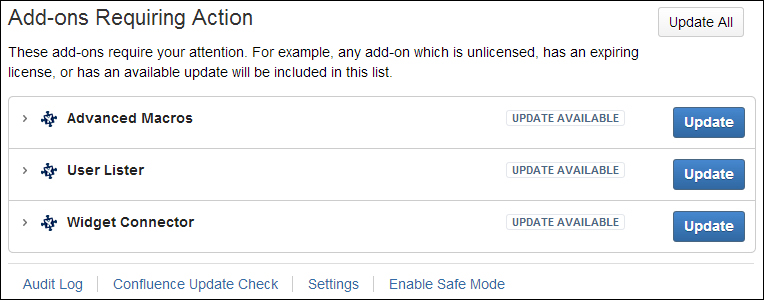
- Click on the Update button next to the add-on. The UPM will then download and install the latest available version. A success message will appear when it is finished.
Alternatively, the updated add-on can be manually uploaded. The update procedure is identical to the single-click option. Generally, it is not needed to remove the "old" add-on before updating it, provided the add-on developer incremented the version number.
Note
Updating add-ons can fail in some cases, for example, when a plugin developer did not anticipate a new version of the UPM such that updating the add-on on a newer version of the UPM fails. Other reasons exist too. It is then helpful to stop the Confluence instance, remove the cache folders (https://confluence.atlassian.com/x/TgG_EQ), restart the instance, and re-try updating or uploading the previous add-on version.
You can remove an installed add-on from Confluence in the Manage Add-ons page. Uninstalling an add-on permanently removes it from Confluence and the file is removed from the home directory. If you only want to temporarily remove it, you may choose to disable your add-on instead.
To uninstall an add-on, perform the following steps:
- Browse to the Administration Console (Administration | Confluence Admin).
- Choose Manage Add-ons in the left-hand menu.
- Find the add-on you want to uninstall in the add-on list.
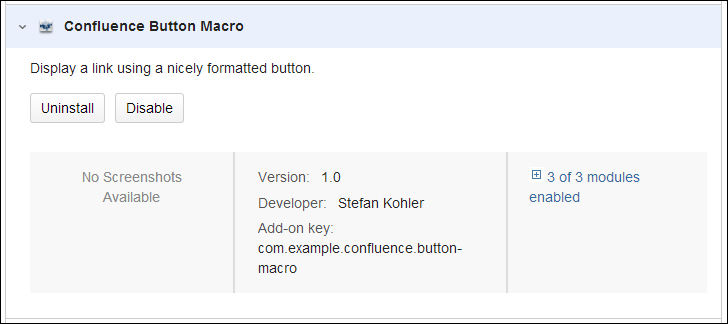
- Click on the add-on to open the details view.
- Click on the Uninstall button.
- Confirm by clicking on the Continue button in the dialog.
- When finished, a notice appears in the add-on details view.
If you want to have the add-on features temporarily removed, you can also disable the add-on. Disabling an add-on will make its features unavailable.
To disable an add-on, perform the following steps:
When enabled, all users in Confluence can view the in-product Marketplace to search for add-ons. Instead of installing or trying add-ons, they can choose to request the add-on.
When the Request button is clicked on, a pop up appears where an additional message for the system administrator can be given, as in the following screenshot:
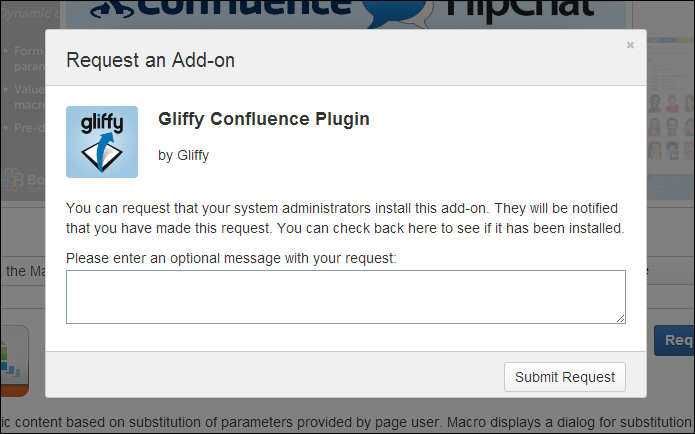
If a user requests an add-on, the system administrators will receive an e-mail notification.
Via the Find New Add-ons page, administrators can easily see the most requested add-ons and by whom were they requested.
To watch the most requested add-ons:
- Browse to the Administration Console (Administration | Confluence Admin).
- Choose Manage Add-ons in the left-hand menu.
- From the add-on filters, choose Most Requested as displayed in the following screenshot:
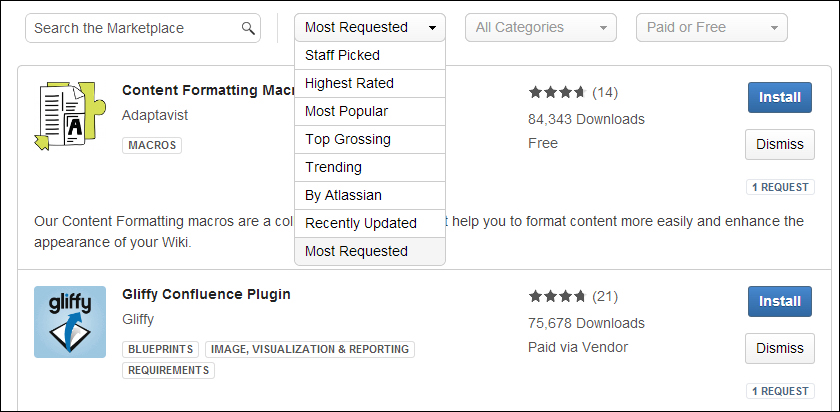
The requested add-ons will appear, with the most requested at the top.
- Click on an add-on to view more details about the request. The users, dates of request, and additional messages are displayed here.
- From this view, you can install, buy, or dismiss the request, removing the request count from the add-on.
The user add-on request feature is enabled by default, but can be disabled by a system administrator. This will remove the in-product Marketplace link for users and the Most Requested add-on filter.
Disabling user requests will not remove request counts. If the feature is enabled again, previously requested add-ons would appear.
To disable user add-on requests: