Confluence can be integrated with other Atlassian tools using application links . An application link is a trusted relation between two applications. These applications are allowed to share information and work with each other.
To explain the possibilities, we will be connecting our Confluence installation to a JIRA installation. Using the same technique, Confluence can be connected to Bamboo, FishEye, Crucible, Stash, or another Confluence installation.
Integration of Confluence with JIRA allows you to, among others, display a list of JIRA issues in your Confluence page as shown in the following screenshot:

Make sure that the base URL is set correctly (in General Configuration) for both applications before adding an application link.
To connect Confluence to JIRA, perform the following steps:
- Browse to the Administration Console (Administration | Confluence Admin).
- Choose Application Links in the left-hand side menu.
- Click on Add Application Link. Step 1 of the link wizard will appear.
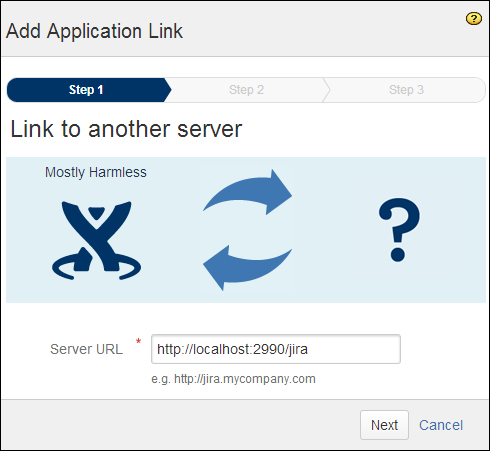
- Enter the server URL of JIRA and click on Next.
- In Step 2 of the wizard, enter the following information:
- Also create a link from 'Your Company JIRA' back to this server: Select this option if you want to create a two-way link between Confluence and JIRA. If so, provide an administrator account for JIRA to create the link.
- The provided credentials are not stored.
- The credentials need to be a user account with administration access.
- Reciprocal link URL: This URL will override the base URL. Application links will use this URL to connect to JIRA.
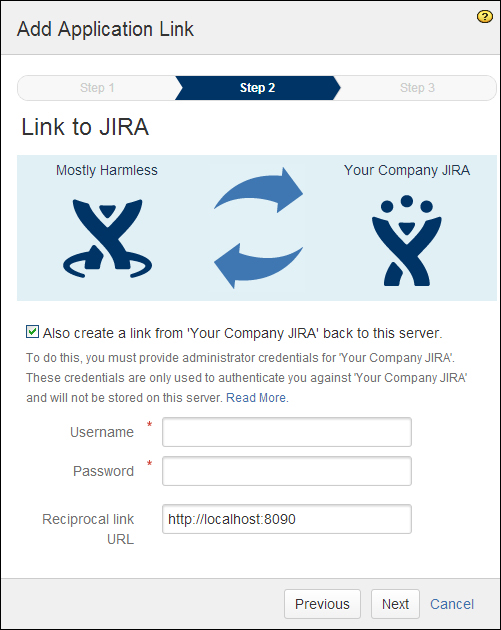
- Click on the Next button; Step 3 will appear.
- Enter the information required to configure the authentication:
- The servers have the same set of users and usernames or The servers have different sets of users or usernames: Select either one of these options, depending on how the users are managed in Confluence and JIRA.
- These servers fully trust each other: Selecting this option will allow to Confluence and JIRA connect to each other as any user. This is the most useful connection.
A Confluence system administrator can change the application name and display URL for any existing application link.
To edit an application link, perform the following steps:
- Browse to the Administration Console (Administration | Confluence Admin).
- Choose Application Links in the left-hand menu.
- Click on the Configure link, next to the application link you want to edit.
- The application link details will be displayed:
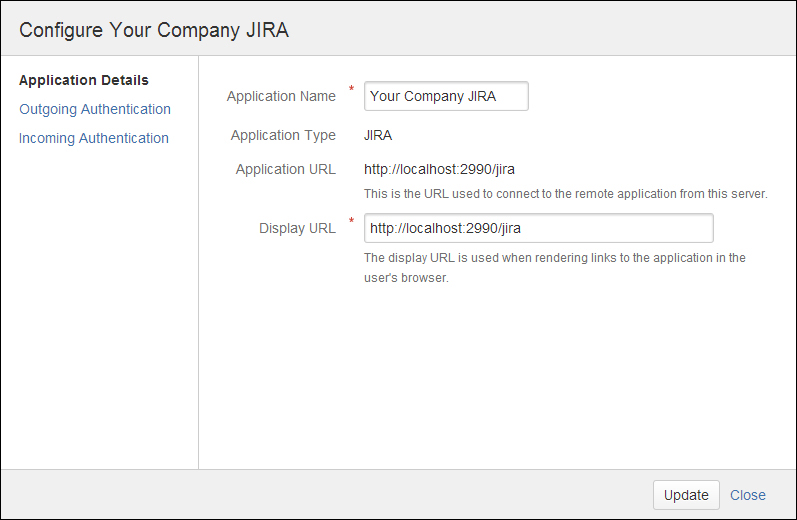
- Update the details as you like; the Application Type and Application URL fields cannot be changed after creating the link.
- The Display URL field is used when displaying links to the application. When you created the application link, you may have used an internal URL or IP, which your users can't access. This URL overrides that URL when displaying a link.
- Click on Update to save your changes.
Application links are, as the name suggests, application-wide. Once an application link is set up between applications, it is possible to create a more specific links, called project links. With project links, you can connect a specific Confluence space to a specific JIRA project, Bamboo project, or FishEye repository. Doing this makes it easier to gather your information in one place.
To link a space to a JIRA project:
- Go to the space you want to connect to JIRA.
- Select Space Tools in the sidebar. (If you are not using the default theme, select Browse | Space Admin.)
- Select the Integrations tab.
- Click on the Add Link link. A drop-down with the configured application links appears; select the application you want to link to.
- Select one of the options on the Authorization Required screen.
- Authorize: Select this option if you want to grant your space access to the target project. You will be prompted for JIRA credentials.
- Skip – Your access is anonymous: Select this option if you want anonymous access to JIRA.
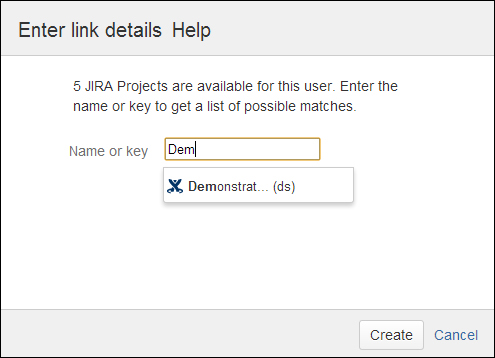
- In the Name or Key field, enter the name/key of the JIRA project you want to connect to.
- Select Yes or No, to create a link in JIRA back to the Confluence space too.
- Click on the Create button to create the project link.
On every application link, you can configure which authentication method should be used for incoming and outgoing connections. Incoming authentication is used for all requests from JIRA to Confluence and outgoing authentication goes the other way around.
The authentication for an application link is basically defining the level of trust between Confluence and the other application. The level of authentication that you should configure depends on a number of factors:
- Do both applications trust each other?: In case of an Atlassian application, it would be safe to answer "yes". If you are connecting Confluence to another application, make sure that application is secure.
- Do both applications share the same user base?
- Do you have administrative access to the other application?
Common scenarios are as follows:
- Both Confluence and JIRA are internal and use the same user base. In this case, trusted applications is the best authentication for both incoming and outgoing authentications.
- If Confluence and JIRA don't share the same user base, use OAuth (explained in the next section) for authentication (both ways). This could be your internal Confluence and external (customer-facing) JIRA instance.
- In the case where you don't have administrative rights on the JIRA server, you can configure a one-way outgoing authentication using basic HTTP authentication.
Trusted applications authentication allows one application to access functions on another application on behalf of any user, without the user having to log in to the other application. So in our situation, every Confluence user will see the exact same list of JIRA issues when they use the "JIRA Issues" macro as they would when they use the JIRA issue navigator.
To configure trusted applications authentication:
- Browse to the Administration Console (Administration | Confluence Admin).
- Choose Application Links in the left-hand menu.
- Click on the Configure link, next to the application link you want to edit.
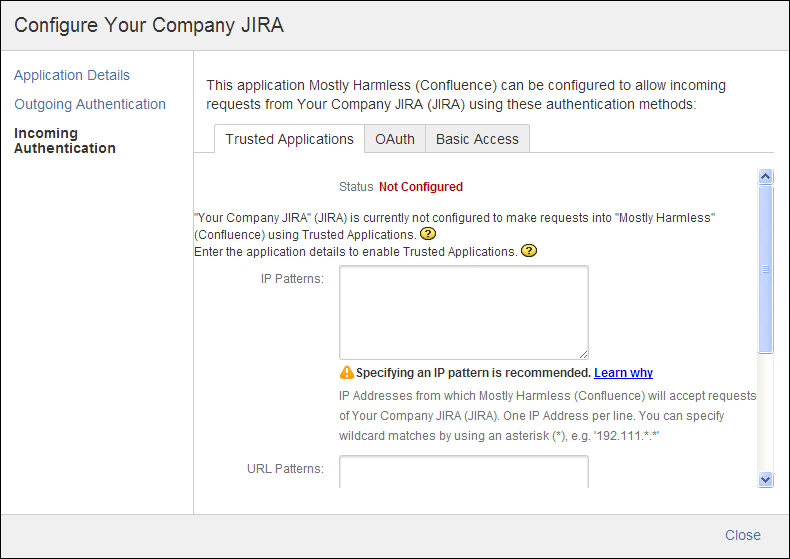
- Select the Incoming Authentication tab; all incoming authentications will be displayed with the Trusted Applications tab selected.
- The tab will display if the authentication is currently enabled or not. The trusted applications configuration has the following properties:
- IP Patterns: Enter the IP addresses (IPv4) from which Confluence should accept requests. You can specify a wildcard by using an asterisk, for example,
192.168.2.*. - URL Patterns: Enter the URLs that JIRA is allowed to access. For Confluence this should at least be the following:
/plugins/servlet/streams/plugins/servlet/applinks/whoami - Certificate Timeout (ms): Enter the certificate timeout. The default time is 10 seconds. The timeout is used to prevent replay attacks. If the second request is 10 seconds after the initial (authorization) request, it will be rejected. Note that the timeout relies on the clocks on both servers being synced.
- IP Patterns: Enter the IP addresses (IPv4) from which Confluence should accept requests. You can specify a wildcard by using an asterisk, for example,
- Click on Apply to save your changes.
The settings for outgoing authentication have the same properties. The outgoing authentication can also be set up from Confluence, but you might be prompted for the JIRA credentials.
OAuth is a protocol that allows web applications to share data with other external applications. This could be another web application (such as JIRA) or a desktop or mobile application.
OAuth is typically used when two applications trust each other, but don't share the same set of users and do have the option to connect via application links.
To configure OAuth Authentication, perform the following steps:
- Browse to the Administration Console (Administration | Confluence Admin).
- Choose Application Links in the left-hand menu.
- Click on the Configure link, next to the application link you want to edit.
- Select Incoming Authentication and select the OAuth tab.
- Click on the Enable button to enable OAuth authentication for the incoming link. The remote application will be automatically set up to be the "consumer" and your local application a "service provider".
For outgoing authentication a login dialog will display if you are not currently logged in to the remote application. Log in with your credentials for the other (JIRA) server. Selecting the Enable button will set up OAuth for outgoing authentication.
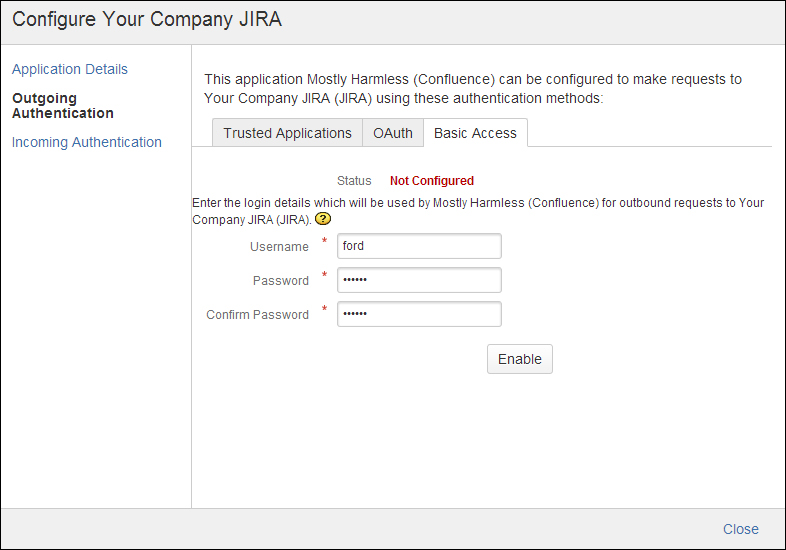
Using basic HTTP authentication relies on the connection between Confluence and JIRA being secure. It is recommend to use a different authentication method, provided you are able to do so.
Basic HTTP authentication allows you to provide Confluence with user credentials for JIRA, and visa versa. Once authenticated, Confluence can access JIRA functions and resources on behalf of that user. This also means that if you provide user credentials of a user with administrative functions, your application link would be able to access those functions as well.
To configure basic HTTP authentication:
- Browse to the Administration Console (Administration | Confluence Admin).
- Choose Application Links in the left-hand menu.
- Click on the Configure link, next to the application link you want to edit.
- Select Incoming Authentication and select the Basic Access tab.
- Enter the User Credentials.
- Click on Enable to store the credentials and enable basic HTTP authentication.