
Visual Studio 2012 provides multiple options to run the tests and collect the results. One is through the command-line utilities, and the other is through the IDE features such as the Test Explorer, Test Runs, and Test Results windows. The Test Explorer window lists the available tests and helps in running the tests, as well as getting the summary result of a recent test. The Test Runs window connects to the controller, and then collects the summary of all Test Runs. The Test Runs window displays all the tests based on the results availability at the location. To get the detailed result information, the Test Run result should be connected, and on double-click of the Test Run, the results are displayed in the Test Results window. Opening the Test Run from the results window provides detailed information of the test.
The Test Result can be added as part of the Team Foundation Server (TFS) 2012 automated build, so that the automated build after the new code check-in can be verified against the existing functionality. The build process takes care of compiling the latest checked-in code, and creating the project output files and deployment files. If the tests are included as part of the build, the build service will run the tests after building the code, and then produce the Test Results in a similar fashion to the Test Run and Test Explorer. The Test Results are stored separately in trace files under the test results folder.
The Test Results window helps in creating defects based on the test output, and then adds to the TFS as a work item of type defect. The overall Test Result can also be published directly to the TFS, and associated to the code builds available in the Team Foundation Server. Following are the main topics that would be covered in this chapter:
- Testing as part of Team Foundation Server build
- Building reports and Test Result
- Creating work item from Test Result
- Publishing Test Results
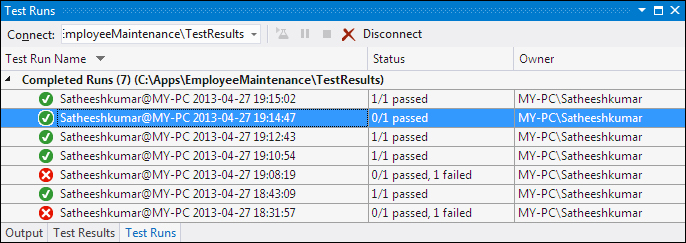
All tests with Test Results stored in the trace files are displayed in the Test Runs window. The following screenshot shows the Test Runs window, which shows the status of the test, and the link to Test Result details. The test name is same as the Test Result, .trx filename created during the Test Run.
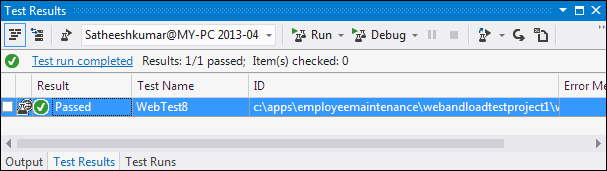
From the Test Runs window, individual tests can be opened in the Test Results window to see a summary and details of the results. Double-click on any of the tests from the Test Runs window to open the results. The summary is shown initially, but double-clicking on the summary opens the details of the Test Result. The following screenshot shows the sample Test Run result summary of the test.
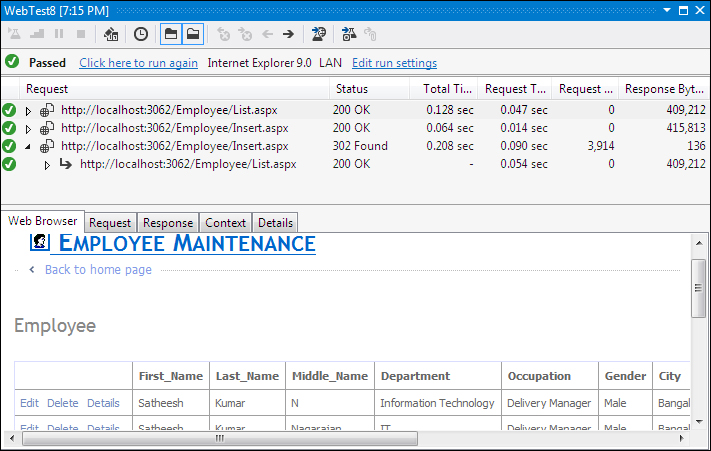
On double-clicking the Test Result in the Test Results window, another window will be opened, which provides Test Run details such as Web Browser, Request, Response, Context, and other details, as shown in the following screenshot:
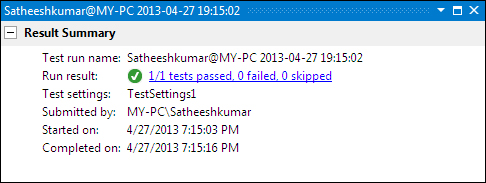
The Test Results window not only displays the summary of the Test Result, but also features other options such as running the test again, debugging the Test Run, and showing the run details. The following screenshot shows the test Result Summary window, which shows the start time and end time of the test, test settings file used, run result, and who initiated the test.
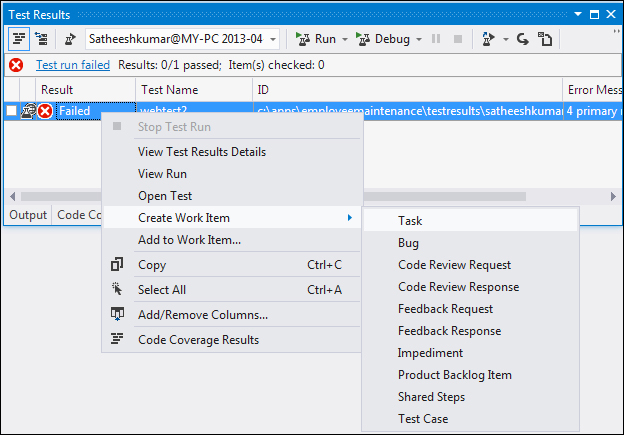
There could be multiple actions planned based on the Test Result. In case if the test fails, a defect should be raised to resolve the issue with the test failure; a task should be created for the developer who is going to work on fixing it; a code review task should be created to make sure the fix is correct and that standards are followed, this should also go as part of the backlog items; and a test case should be created to retest the fix and make sure the test will not fail again. All of these can be done right from the Test Results window, without going away, and then opening a new tool. Right-click on the Test Result, choose the Create Work Item option, and then select the type of work item.
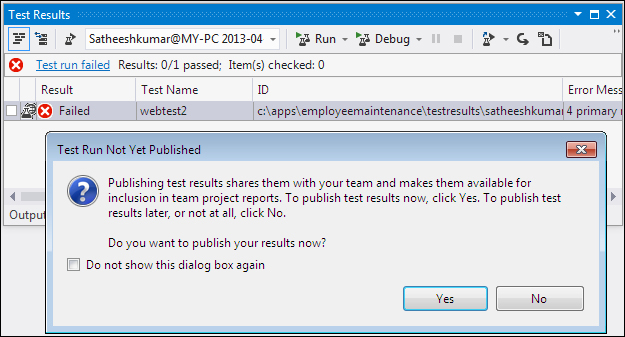
Selecting the option to create a task will prompt for publishing the Test Result, if it is not published already. Publishing the Test Result to the build would help the team to understand which build has the issue and the error details as well.
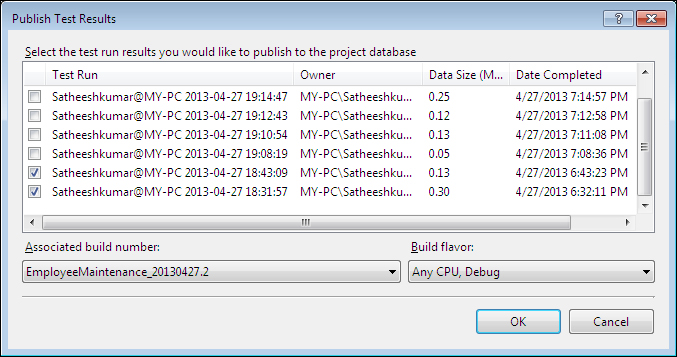
The Publish Test Results window lists all the Test Runs which were not published to the Team Project. Choose the Rest Run which needs to be published, and then select the build number from the list of all available builds to associate the Test Run result with the build.
The following section explains the process of creating the build definition for the project, and then configuring the test along with the build.
The Team Foundation Server is the place to maintain the source code for projects, Test Projects included. Let's say there is a class library project and a Unit Test Project for the class library, and both are checked into the Team Foundation Server. Whenever there is a change or fix in the code and if the code is checked in to TFS, the build service within TFS should start the project and solution with the newly checked-in code; and after completion of the build, the Test Project has to run to verify that the fix is producing the expected result. The whole process after the check-in can be automated using Visual Studio.
The Team Foundation Server provides explicit build service to build the Team Projects. The build service should be configured so that the service makes use of the controller and the agents for the build process.
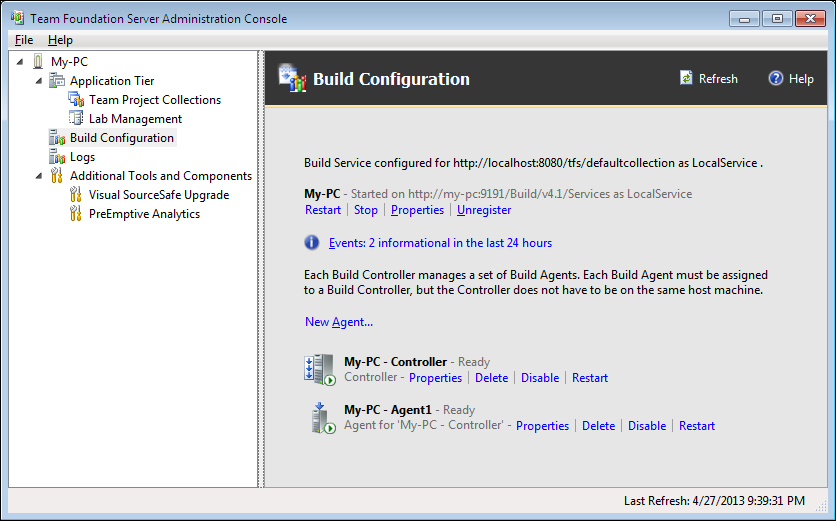
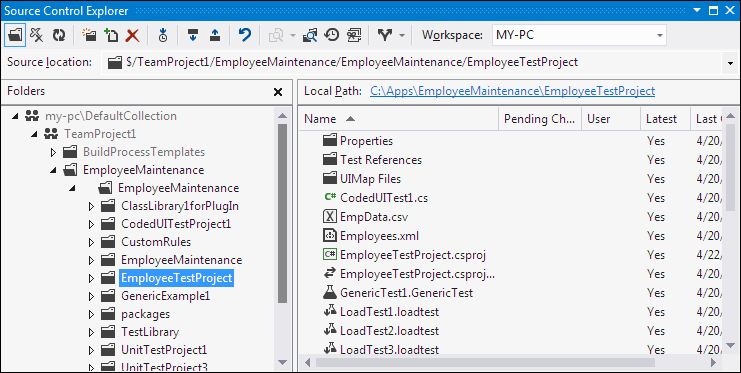
Once the build service is configured and ready for creating the build definitions, we can use the Team Explorer window to create build definition for projects. Build definition is the configuration, and creation of build with required details such as the solution or project name, location, and references. It also includes the configuration of build agents, if multiple machines are used. The following screenshot shows the build project, which contains the class library project and the Test Project for the class library.
The build project automates the process of collecting the latest code from source control and compiling the project files, and then building the project. If the build succeeds, the same service can also start running the Test Project after compiling. Creating the build definition involves multiple steps, namely selecting the project, trigger timings, controller name, and a few other process parameters and retention policies for the output. Navigate to Team Explorer | Home | Builds | New Build Definition in order to create a new build definition for projects.
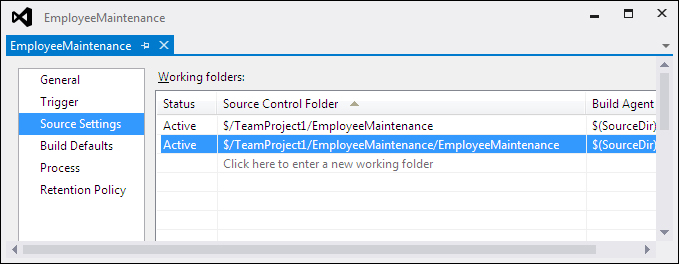
The option shown in the previous screenshot is one of the steps involved in creating the build definition: selecting the solution files to build. It can be multiple or a single solution. During the build process, all the latest code files under this solution folder will be compiled and built.
The next major configuration section is the Process section, through which the projects and tests to include as part of the build can be configured. There are three different parts of configuration such as Required, Basic, and Advanced.
- Required: This section is used to include the projects or items to be built as part of the build process.
- Basic: This section is used for selecting the automated tests, and then set the arguments and priority for testing.
- Advanced: This section is used to select a particular agent for building the projects, set the option to create work items on test failure, arguments, and platform, and then drop the location to place the output files.
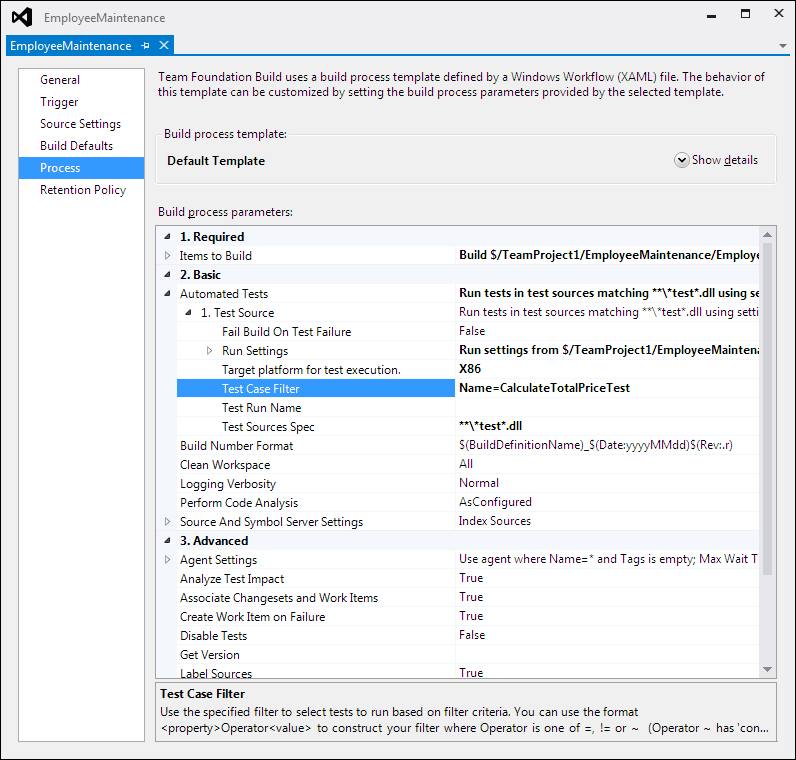
The Test Case Filter option is used for filtering a test or set of tests from all the available tests. The other filter option available is the Test Run Name to get the exact test to run. The Run Settings file is used to choose the custom settings file for the run.
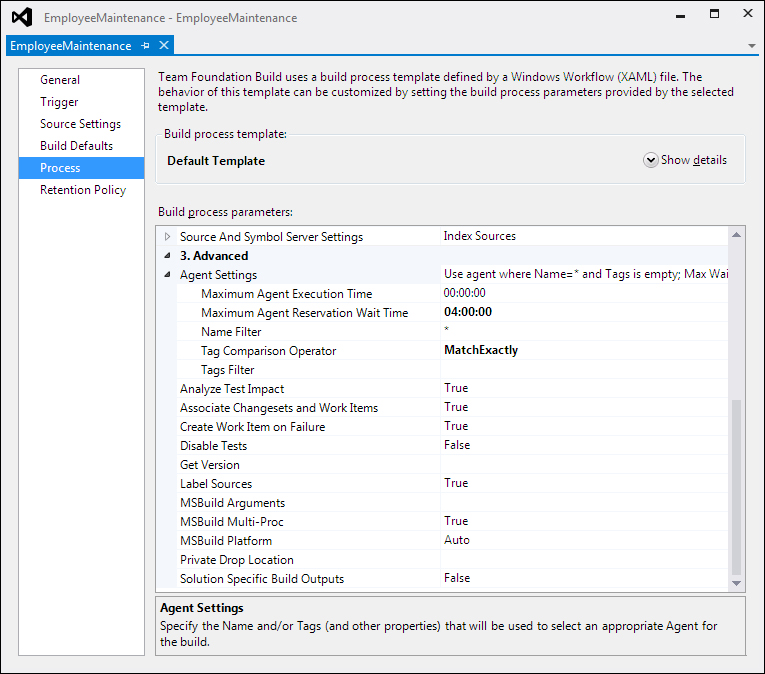
The next section is the Advanced section, which is used for setting the Maximum Agent Execution Time and Maximum Agent Reservation Wait Time options, and then choosing the agent by agent name and tag. The other configurations that can be set include Analyze Test Impact, Associate Changesets and Work Items, Create Work Item on failure, Get Version of code, and lastly specifying the Private Drop Location option.
Once we set the process-related configuration, the next thing is to set the Retention Policy option for the Test Results. There is another section Trigger, which is used for configuring the build schedule to start the build process. It can also be set to run manually, so that the check-ins does not trigger the build. The continuous integration build (happens on every check-in), rolling builds (which accumulates the files until the previous build completes), and gated check-in (if the files submitted merge and build successfully), schedule the build to run at a particular time daily, weekly, or every day.
Once all these configurations are set, the build definition is ready to be scheduled.
The build process helps the team to determine that the check-in from the developers has broken the build or failed the test. The check-in policies and the gated check-in help to guard the code base.
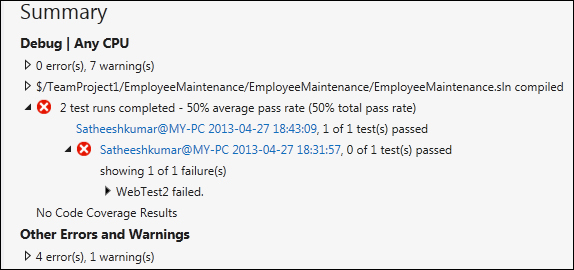
Select the build definition from the Team Explorer, and then queue new build for the selected build definition. Visual Studio takes the source code for the solution from TFS, builds the projects and reports on them immediately. The report is also saved in TFS for future reference. Each and every step is reported in the build report. It consists of getting the source for the project, compiling the projects, compiling the Test Project, and running the Test Project (if it is set to run after the build). The report also includes the overall build status. When the tests are run directly from Visual Studio, the Test Run status is also reported and the Test Results are stored in a similar way. The following screenshot is the sample of the build Summary report.
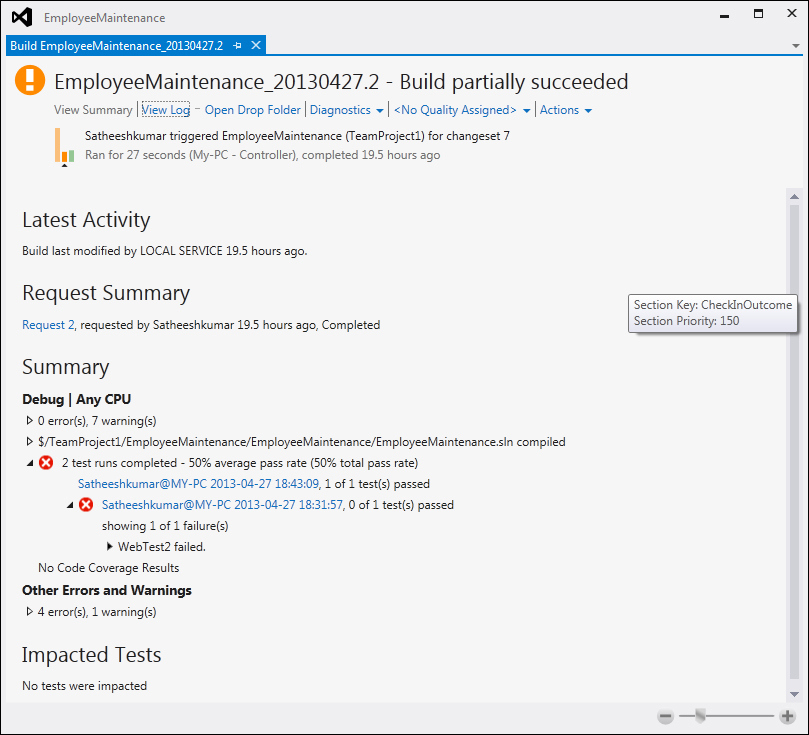
The preceding screenshot shows that the build has failed with a few warnings and errors in running the tests. There are seven warnings in building the solution files, and then there are four errors and one warning in running the test as part of the build. The Summary section of the report shows that the two Test Runs are completed, which is the same result published from the Test Results window as explained in the previous section.
The build Summary report also has URL link to View Log, Open Drop Folder, and Delete Build. The detailed log information provides the detailed steps involved in building the project and the test execution as part of build. The Test Result also has the URL link, which opens the result in the Test Results window.
A work item in the Team Foundation Server refers to a unit of work with definite start and end. It could be just an item, which is a task; or a defect, which is a work item of type Bug, or it could be an issue or a requirement item.
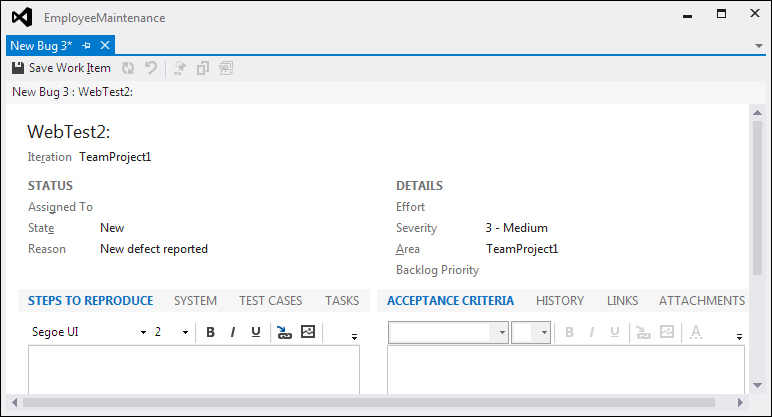
The work item of type Bug is used to raise defect against test failure or error while running the test. Right-click and choose the work item of type Bug from the Context menu. This opens the window to create the new defect with some default values such as the test name, iteration, severity, state, and reason. All these details can be modified, and other details can be added to provide additional information about the test failure.
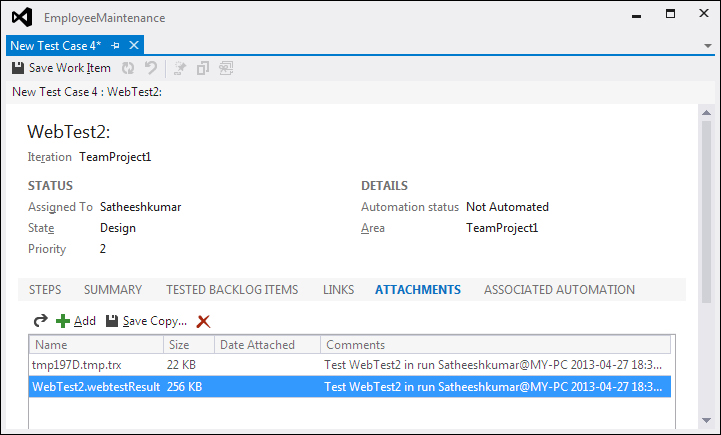
The defect gets added to the Team Project under the TFS. It is very good that Visual Studio provides the option to create test case from here too. Selecting the Context menu option to create the test case, opens a new Test Case window with a few default values. Interestingly, the test case also contains the Test Result and Test Run details as attachment. This would really help the team to analyze the issue quickly, and then fix it. The following screenshot shows the test case with attachment of results.
There are other options such as Code Review Request, Code Review Response, Feedback Request, Feedback Response, Impediment, Product Backlog Item, Shared steps, and Test Case. All these are work items of different type.