
The Plan tab in Testing Center is used for creating the test cases, setting the environments, and for grouping and linking the Test Cases, whereas the Test tab in Testing Center is mainly used for running the test and capturing the results.
The test cases that are created under the Plan tab can be executed under Test or run through the manual Test Runner. Running these tests is not only used for verifying the functionality as per the requirement; a lot of other Test Result information can be captured during the test as well. Information such as defects, connectivity issues, security issues, test outcomes, screenshot images, and other comments can be captured, along with the Test Run.
Open the Microsoft Test Manager and then the Testing Center window.
Select Plan from the main menu bar in Testing Center, for creating or verifying all the test cases.
To execute/run the test cases created, select Test from the main menu bar in Testing Center to open the Run Tests window. This window shows the list of all Test Suites and test cases that we created. We can select all tests under the Test Suite or select an individual test from the Test Suite and run that separately.
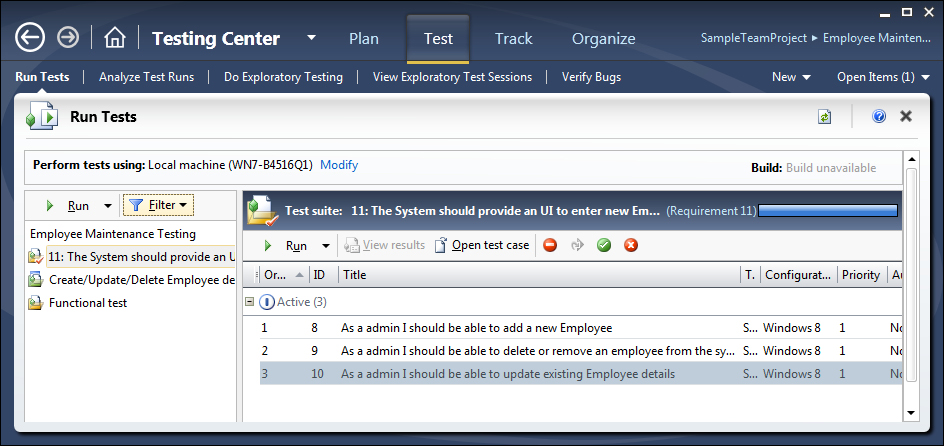
The filter option on the left is used for filtering the Tests Suites based on tester or other configurations for testing (based on the current environment). Select the Test Suite or a particular test and run it. Running the Test Suite opens the tests in Test Runner and lists the test case steps for the first test in the list.
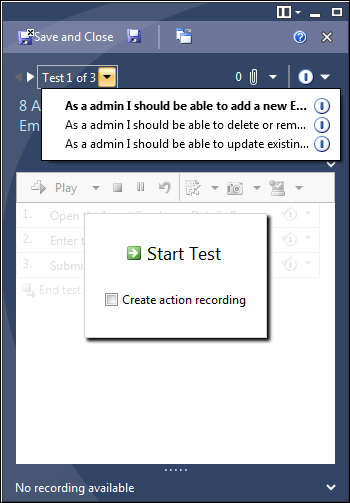
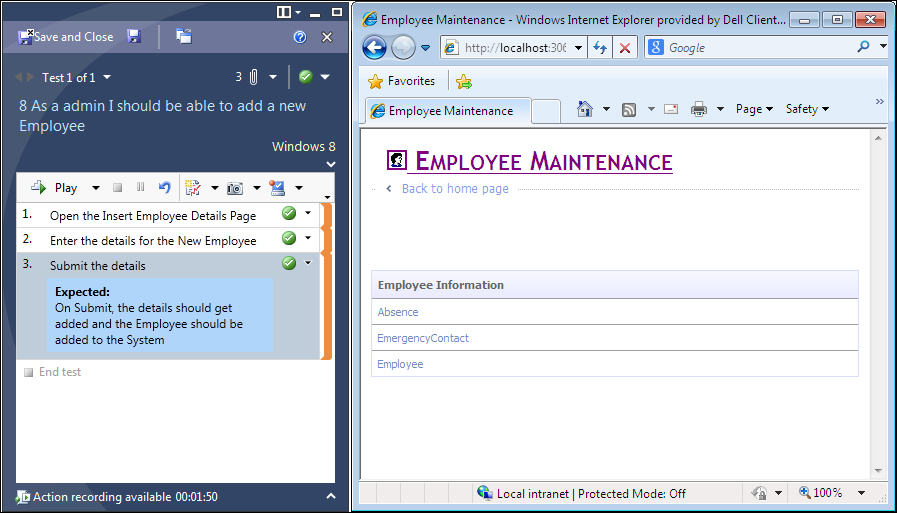
The selected Test Suite in Test Runner shows three tests in total, as three tests were added to the selected Test Suite, and the first in the list is for testing the Add new Employee details screen. The window also displays the test steps in the first test. You will see another small window, which has the option to start the Test Run and to create action recording. If you choose to enable the action recording, the testing actions will be captured and recorded, and can be replayed at any point in time to verify the functionality. This action recording is also used for generating automated testing code, and may be re-used in other tests if needed. This can be very useful in case of multiple similar tests or common test steps, also called shared test steps.
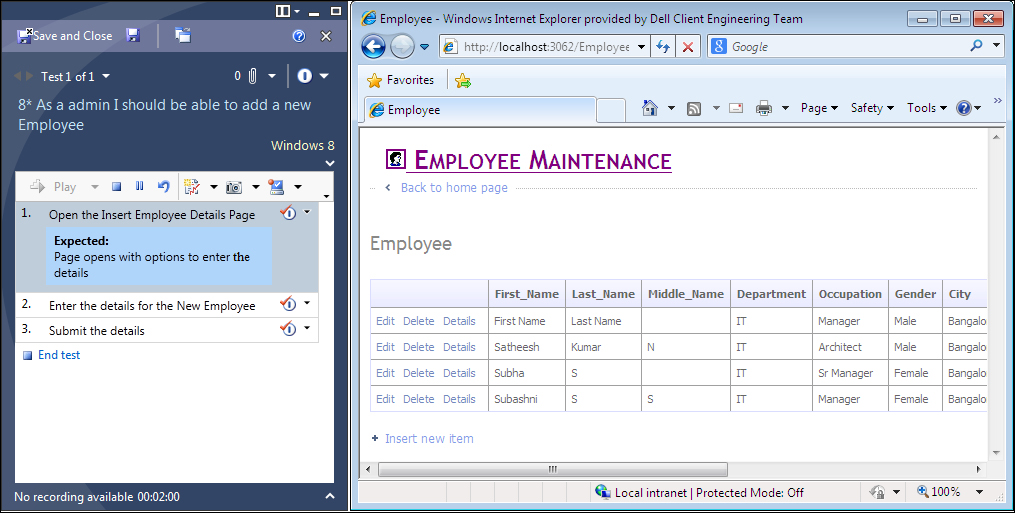
Click on Start Test and follow the steps to start testing the application manually. The following screenshot shows Test Runner with the test open, as well as the application for which the test case is written. The first step in Test Runner shows what to test in the application and what the expected result from the application is. The tester should follow the steps and verify the expected result with the actual output.
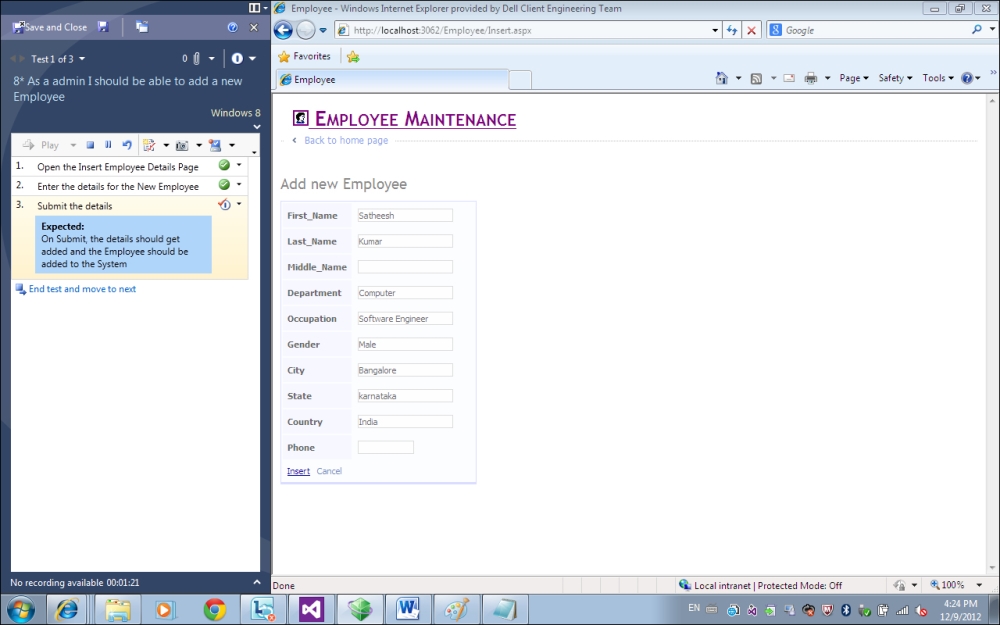
After verifying the result, the tester can mark the step as either Pass or Fail, based on the output. This option is on the right of each test step. The following screenshot shows two steps passed successfully while the third step is in progress:
Once all the steps are tested and completed, you can end the current test and move to the next test using the option below Test Runner. After completing all the tests, click on the Save and close option to close Test Runner and go back to Test Manager, which will show the final status of the Test Run.
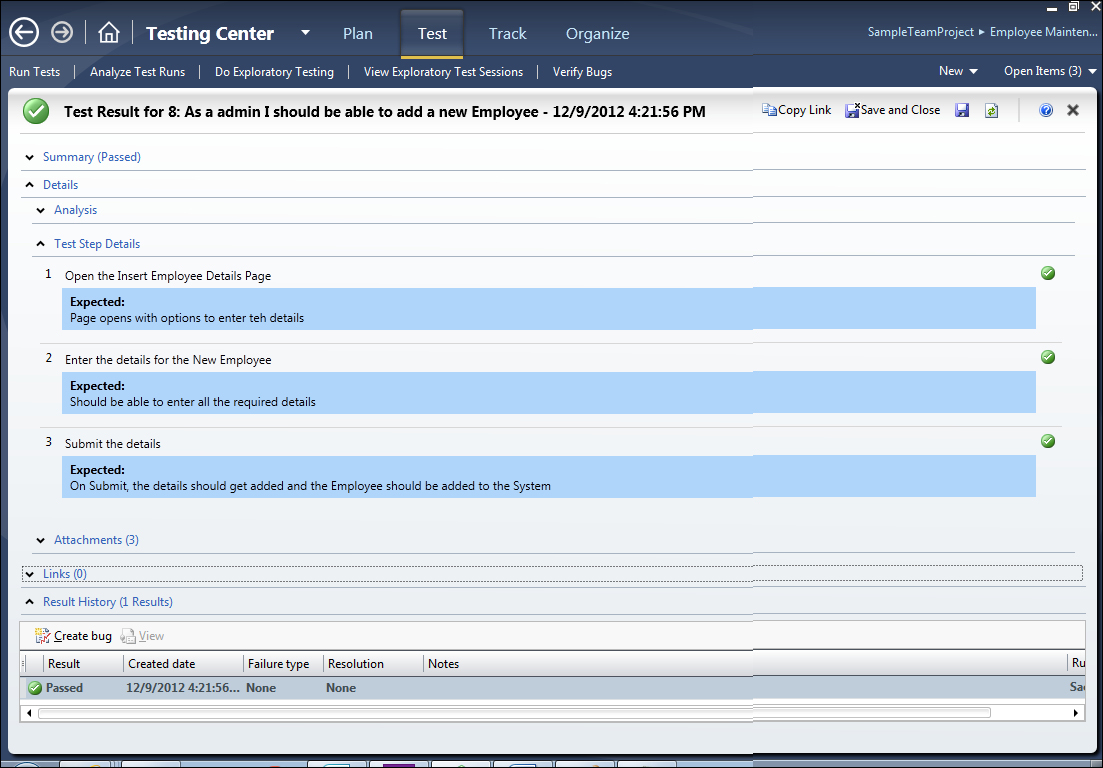
To see the details of each Test Run, select the test case from the right pane of the Testing Center window, and open the Test Result window using the menu option View Results. The result window shows the details for the selected test case, such as test summary, analysis details, steps' status, attachments, and result history.
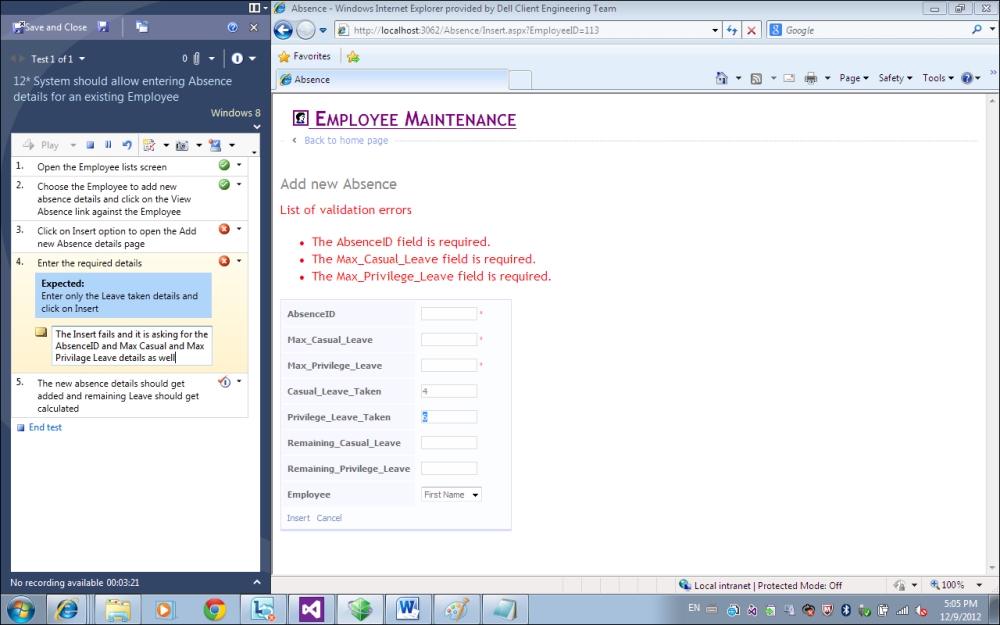
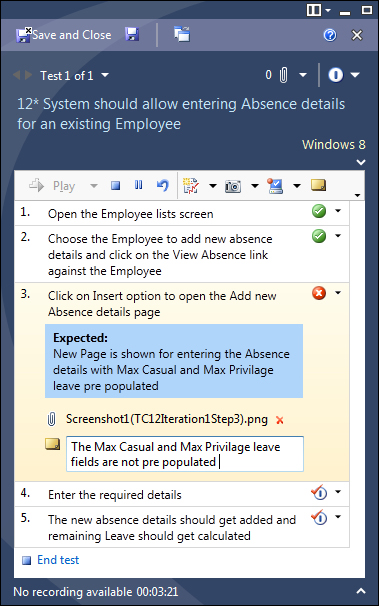
Going back to the Test Suite, select the test case for adding the absence details for an employee from the list and run the test. Let us see the behavior in case of test failure. To understand the concept of test failure, we look at a few mandatory fields in this absence screen that are not properly configured to have the test fail:
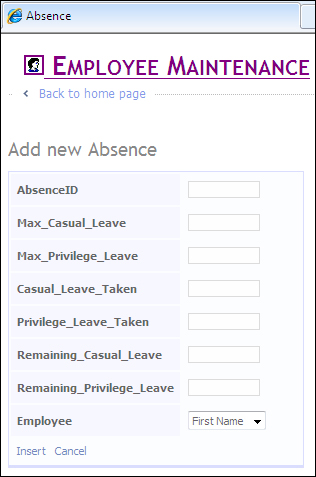
Every employee needs to have their absence details entered into the system and the balance of absence or leave should automatically get calculated by the system. The current application has the provision to add absence details for the selected employee, as shown in the previous screenshot. The employee absence screen, as shown in the previous screenshot, accepts values for all the fields from the user, but there are few fields such as AbsenceID, Max_Casual_Leave, and Max_Privilege_Leave, which should be read-only. These should not accept any value from the user as the system should automatically assign values to these fields. But as per the Test Result, the read-only fields are accepting values from the user, which is a potential defect; this needs to be logged as a defect by the tester to be fixed by the developer later.
Test Runner includes an option to create a test defect record immediately after the test step. Click on the Create bug option from the toolbar in Test Runner, which opens the New Bug* screen, complete with the status of each step and the linked work items such as requirements. You can also enter the other details such as Assigned to, Area, Iteration, Priority, and Severity.
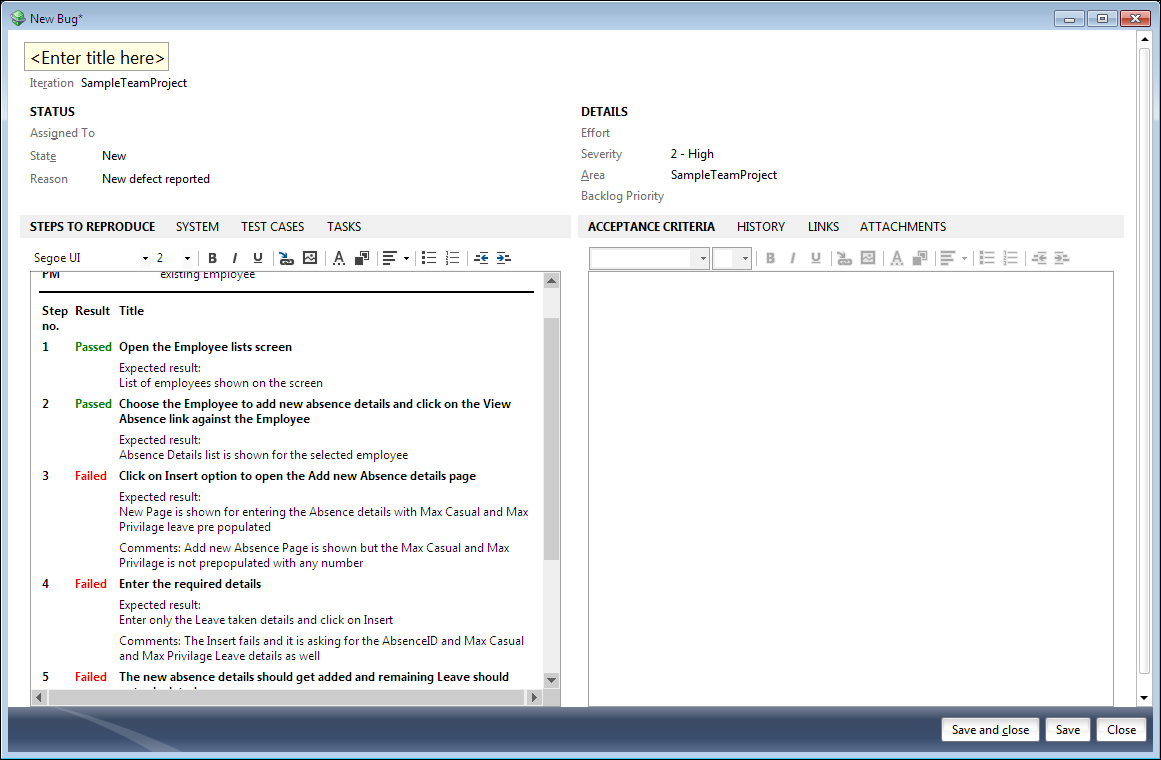
Save and close the New Bug* window so that the defect is created. The defect is automatically linked to the test case, and the user actions and any attachments captured during the test are also saved and linked to the test case. If you click on View Results for the test case, the Test Result window shows the summary of test, test steps, attachments, defects raised during the test, and the result's history.
Test Runner has the option to record the steps taken during manual testing, so that they can be played back later whenever a re-test is required; this saves time and effort by not working through a manual test every time. The action recording can be activated during the course of manual testing. Later on, can playback the recording to run through those test steps automatically.
Select the option Create action recording before starting the Test Run in the Test Runner window. Then choose the option Mark test case result, as shown in the following screenshot. Follow the steps and mark the Test Results and then end the result. The following screenshot shows the test with all the steps having action recording already. This is denoted by the orange color coding at the right end of each test step and the message at the bottom of the Test Runner window that says a recording is already available. The recording can be overridden by choosing the recording option again while running the test in the future.
Next time while running the test, select the Play option in the Test Runner toolbar to run the test step automatically (that is, using the actions from the recorded Test Run). The details entered during last run will be re-used as well as the actions.
The Play option in the toolbar will play only the action for the current step in the test case. But the Play all option (located below the Play option) will play all recorded actions for the current test case. To run a group of test steps, select multiple test steps and click on the Play option. The Preview option shows the text form of recording for the selected test case.
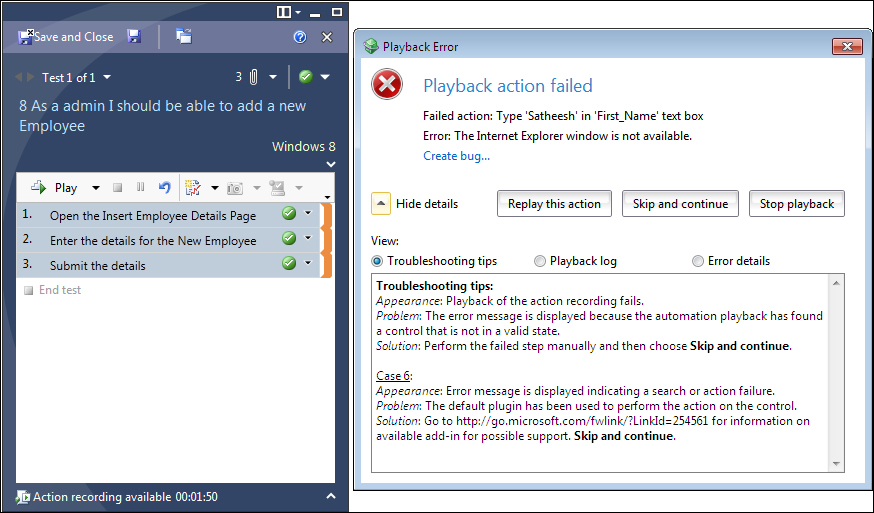
If there is any error during playback of the test, due to unavailability of the application or any other error, Test Runner will throw an error message similar to the one shown in the following screenshot. It has an option to create a bug as well.
Along with the Test Result capture, the screenshot of the current screen area, or the error message, you can add additional documents (or files) as attachments to the test step. Take the current environment's snapshot in case of only virtual environment and add comments to the test to provide additional information. All these options are available under the Test Runner toolbar. The following screenshot shows the attachment, image, and a comment added to the test step:
Another option to capture the environment details is also available, but is only enabled if the tests are run in a SCVMM environment.