
In Visual Studio, the solution uses the default environment and common configuration for all the tests under the solution. The configuration is used for controlling the test execution based on multiple factors. All the time, it is less likely that the test would be executed based on a single configuration file. For example, automated tests running in a different machine may have to use data adapters to collect different data. The network configuration varies based on system configuration and network speed. During these times, the settings can be customized and configured using a file with the extension as testsettings in Visual Studio 2012.
The testsettings file is used to define the roles to be used for a Test Run, configure to collect diagnostic data during Test Run, and to control Test Runs on multiple machines.
In Visual Studio 2012, the testsettings file is no longer used for unit tests; rather, runsettings is used for custom configurations. runsettings is used for Test Runs to configure settings such as deployment directory and code-coverage analysis.
The testsettings file must be used for web performance tests, load tests, and coded UI tests. Use runsettings for unit tests to configure deployment and code coverage. This chapter covers the following sections under test settings file for different test types:
- General
- Roles
- Data and Diagnostics
- Deployment
- Setup and Cleanup Scripts
- Hosts
- Test Timeouts
- Unit Tests
- Web Tests
The last section explains about configuring unit test using the runsettings file and editing the sections of a configuration file.
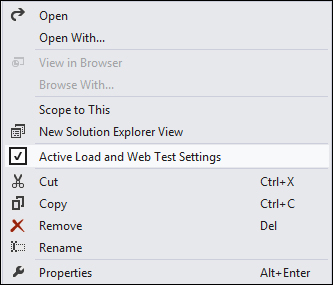
Configuring a test requires the testsettings file to be added to the solution as a prerequisite. More than one testsettings file can be added, but only one can be active at any time. To add a testsettings file, select the solution and right-click and choose Add and then New Item from the context menu. Select Test Settings from the Add New Item window. After adding the settings, right-click on the settings and choose Active Load and Web Test Settings to enable the settings for load and web performance tests.
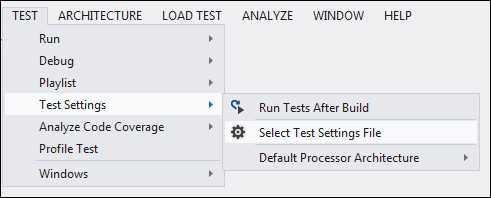
Use the TEST menu and select Test Settings and then the Select Test Settings File option to select the file that is already created.
There are multiple tabs or sections within the settings file for different types of configurations, based on the test types.
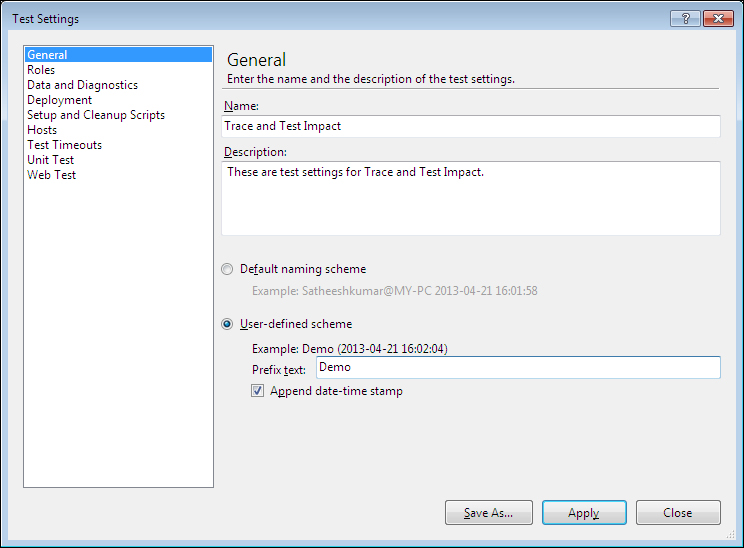
This is the general page to specify the Name and provide a Description for the settings. It also provides a feature to change the naming scheme of the Test Results files. By default, it takes the current user name and the name of the machine with the run date and time added to the file name. User-defined custom schemes can also be set for the Test Result name. Current date timestamp can be added to the file name by choosing the option to append the value as shown in the following screenshot.
This is to check whether the test has to be run on the local machine or on a remote machine. It is set to run on the local machine by default. To run on a remote machine, provide the names of the controller and the agents along with the roles for the test. The remote machine could be a controller or an agent, but a single controller controls and collects data from multiple agents. The Roles page is used to configure the controller and the agents to collect the data and to run the tests. The details of configuring controllers and agents are explained in Chapter 7, Load Testing which talks about load testing. Select the Test Execution Method as Remote execution and then select the Controller name field from the Controller drop-down list, which will control the agents and collect the test data.
Click on Roles to add different roles to run tests and to collect data. The role can be Web Server or SQL Server. Each role uses a Test Agent that is managed by the controller. You can keep adding roles. To select the role that you want to run the test with, click on Set as role to run tests. The other roles will not run the test, but will be used for data collection.
To limit the number of agents used for tests, we can set attributes and filter. Click on Add in the Agent attributes for selected role section and then enter the attribute name and value for the selected role.
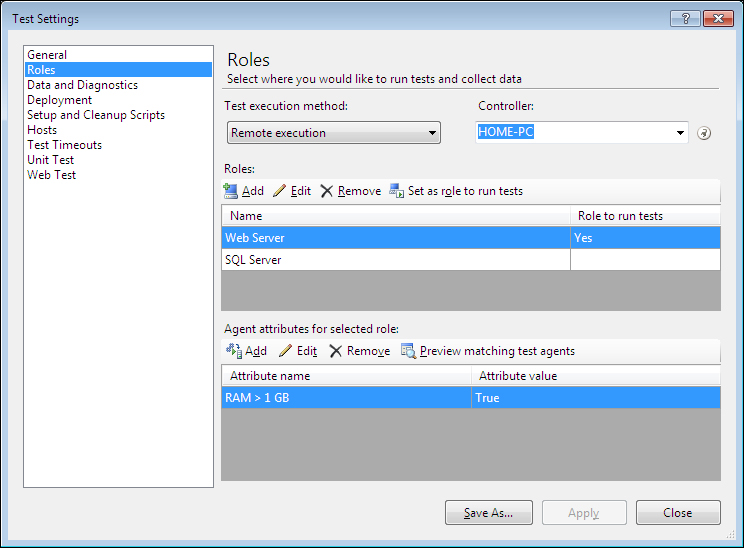
The names and values for the attributes of roles decide which agent should be used for testing.
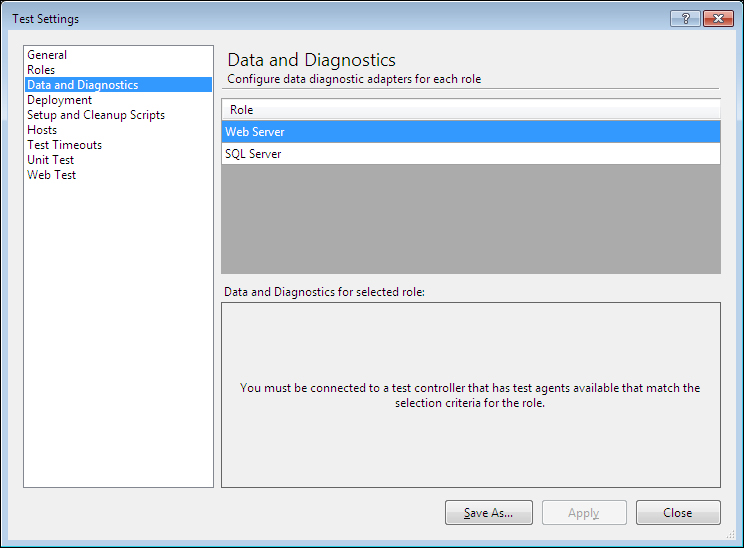
From the Data and Diagnostics page, we can define the diagnostic data adapter that the role uses to collect data. If there are multiple data and diagnostics selected for the role, and if there are available agents, the controller will make use of the available agents to collect data. To configure each data and diagnostic, select the diagnostic and click on Configure to open the dialog and configure the selected diagnostics.
The roles defined as a part of the Roles section are displayed for the selection of diagnostics. Select each role from the list and then choose the diagnostics for the selected role. The diagnostics list is displayed only if the controller has any agents with the matching role. For example, the following screenshot shows that the Web Server role does not have an agent that matches the selection criteria defined by the attributes:
But in case of a second role, which is SQL Server, the data and diagnostics is enabled as the controller has a matching agent, as shown in the following screenshot:
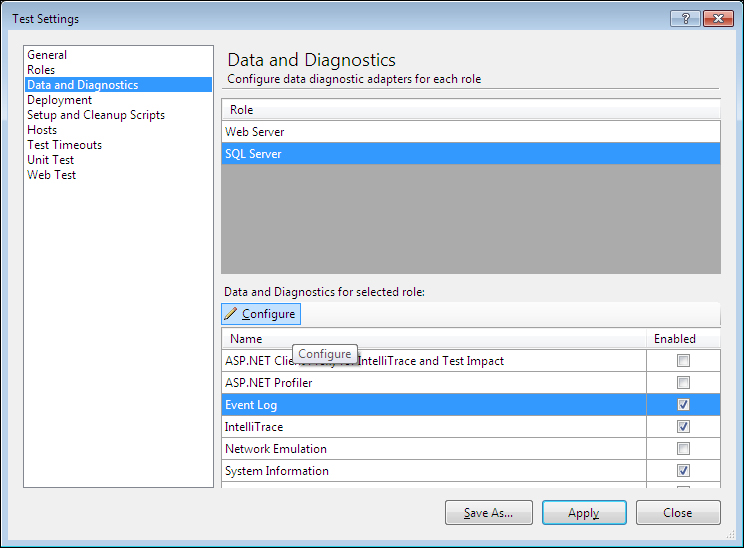
To go into the advanced configuration for the selected diagnostic, choose the Configure option from the Data and Diagnostics section to open the dialog and configure the details. The following sample shows the configuration for the selected Event Log Detail:
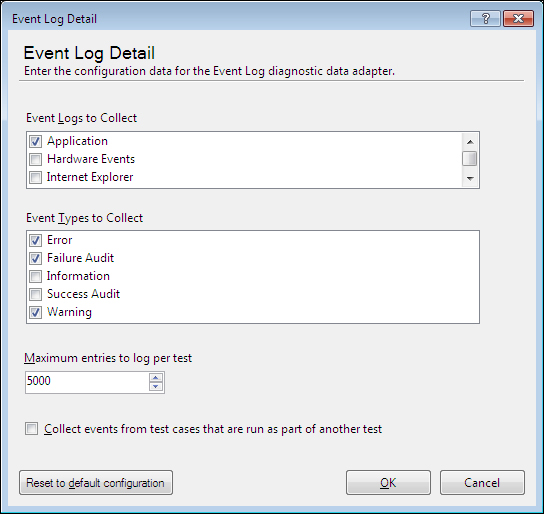
The configuration screen provides the option to choose the event logs to collect event types and the maximum entries to log per test. Similarly, other diagnostic can be configured as well.
Use this section to configure the files and folders to be deployed along with the application. Whatever is specified here are considered as additional files that are deployed along with the application files.
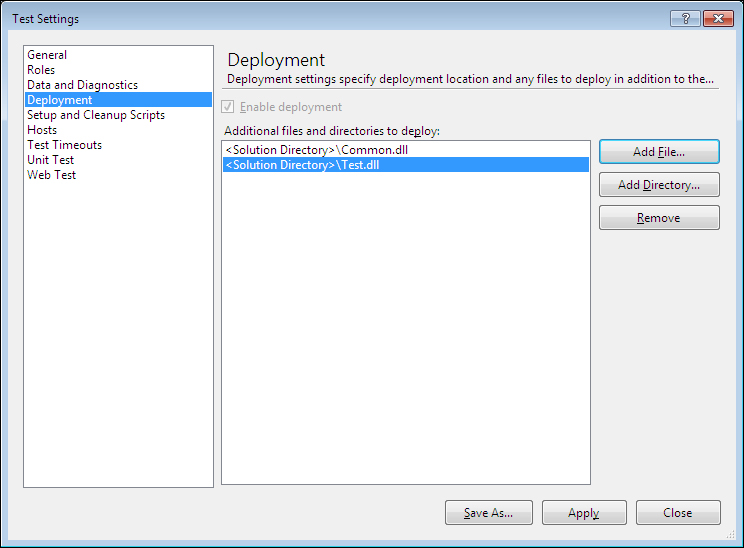
There is a checkbox option as Enable deployment, used to enable or disable the deployment. By default, it is checked.
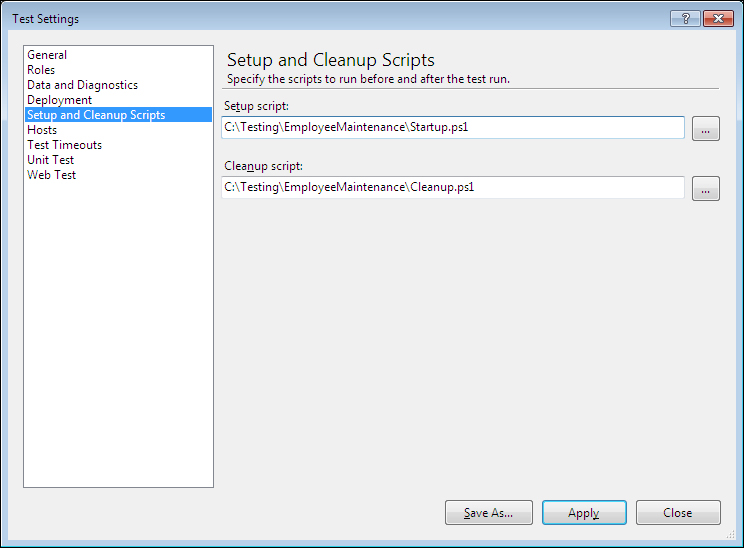
In this section, script files are specified to run before and after running the test. This is useful in setting the environment for running the test and also in cleaning up the files or other objects used during testing. These scripts for all the tests under the solution. So, we should take extra care while writing them—it should be written in such a way that it should work with all types of tests.
There are two options here. One is to select the default host and the other is not to run. This page is for specifying the default host for the tests to run. To run tests in the same process as ASP.NET, select ASP.NET from the host types. Notice that the other required detail section is enabled upon selecting ASP.NET. Provide details such as the URL of to the test, which would point to the application URL. The next step is to configure if the test has to run with the use of ASP.NET development server or using local IIS. If you choose the option to run using a local development server, you need to provide the website path and the web application root. In case of IIS, we don't have to provide the detail as it would be picked from the system itself.
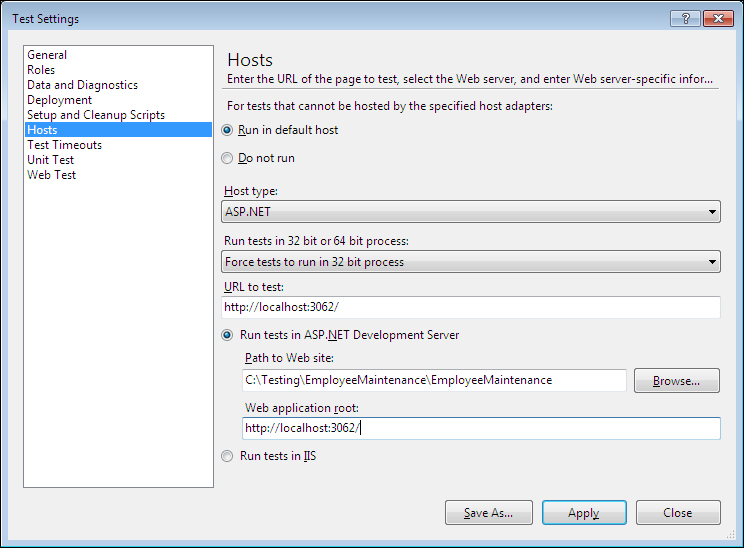
All these details are set as attribute values for test methods while creating the Test Project and generating the test methods.
These values are specified to set the time limit for the Test Run. The test may take more time than usual because of various factors in the system. We cannot wait to complete the test. There are situations where some tests might take more time than expected because of many other factors such as environmental issues. In that case, set the maximum time limit after which the test would stop and the testing completes. If it exceeds the limit, the run will be aborted. There are two options for setting the time limit:
- Abort a Test Run if its total execution time exceeds: This is to set the total test runtime limit irrespective of the number of tests and their types. The entire test will abort after exceeding the limit.
- Mark an individual test as failed if its execution time exceeds: This is to specify the time limit for an individual test. This applies to all types of tests in the run. On exceeding the time of an individual test, the test will be marked as failed and the subsequent tests in the list will continue to run. The timeout property set for the test using test properties will override the default timeout set here.

The time limit can be specified in hours, minutes, and seconds, or all three. The time limit includes the Setup and Cleanups Scripts used in the Test Run. These are the tests with the attributes AssemblyInitializeAttribute, ClassInitializeAttribute, AssemblyCleanUpAttribute, and ClassCleanUpAttribute specified for the assembly or a class within the assembly.
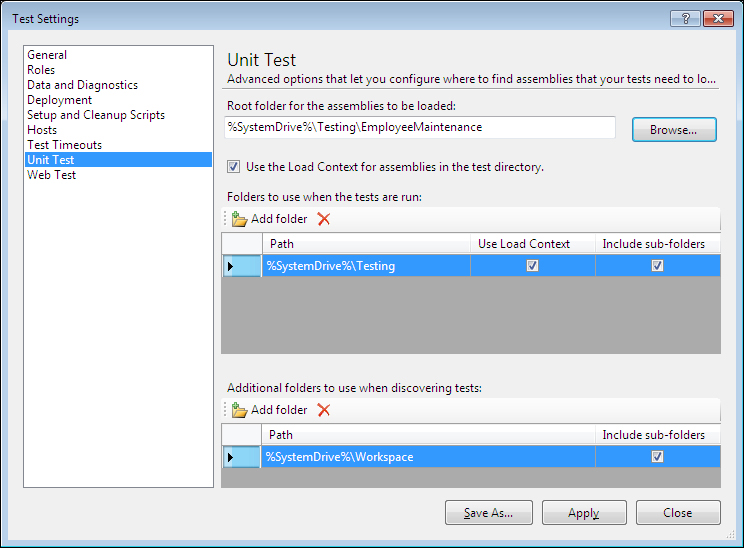
This is where you configure the folders where the assemblies reside for the unit test and the folder to use when the Test Runs. There is another option to configure the additional folders for tests.
In the Root folder for the assemblies to be loaded section, select the folder where the environment variables and other additional assemblies that are required for the unit test are present. This is the base folder where the unit test will look for any additional information required for the testing.
The Use the Load Context for assemblies in the test directory. option is checked by default, which is used to load all assemblies in load context. This option can be unchecked in case there are many assemblies and it is not required to load all assemblies with load context and the test is also not dependent on loading them with load context.
The Folders to use when the tests are run option is used to specify additional folders to look for any assemblies during the execution of tests. There are two additional options along with the folder path. Use Load Context is the first option, which is a checkbox to specify if the directory should use load context for the assemblies. The second option is to include subfolders to find the assemblies during test execution. The following screenshot shows the sample unit test configuration:
The Additional folders to use when discovering tests: option is used to provide a folder path when executing the tests remotely. Remote execution of test happens if it is an automated test by Test Manager or Team Build. These paths are used for discovering assemblies during test execution, either by MSTest or by the Test Controller.
The test configuration file stores all configuration information that was set in the previous sections. The editor or the window that we used in the previous section takes care of writing the information to a file. It is a normal XML file that can be edited manually if sufficient information about the change required is available. Additional care should be taken about the formatting and syntax of the text while updating.
To open the test configuration file using the XML editor, select the test configurations file from the solution explorer, and right-click and select the option Open with. Then, choose any XML file editor or notepad from the list. The XML file contains all the information that was set using the editor. The following code block shows the sample test settings XML file:
<?xml version="1.0" encoding="UTF-8"?>
<TestSettings name="TestSettingforLoadTest" id="6d1a7bad-a7a9-4c88-920e-fe97c2567242" xmlns="http://microsoft.com/schemas/VisualStudio/TeamTest/2010">
<Description>These are default test settings for a local test run.</Description>
<Deployment>
<DeploymentItem filename="Common.dll" />
<DeploymentItem filename="Test.dll" />
</Deployment>
<RemoteController name="HOME-PC" />
<Execution location="Remote">
<Hosts type="ASP.NET">
<AspNet name="ASP.NET" executionType="WebDev" urlToTest="http://localhost:3062/">
<DevelopmentServer pathToWebSite="C:TestingEmployeeMaintenanceEmployeeMaintenance" webApplicationRoot="http://localhost:3062/" />
</AspNet>
</Hosts>
<TestTypeSpecific>
<UnitTestRunConfigtestTypeId="13cdc9d9-ddb5-4fa4-a97d-d965ccfc6d4b">
<AssemblyResolution applicationBaseDirectory="%SystemDrive%TestingEmployeeMaintenance">
<TestDirectoryuseLoadContext="true" />
<RuntimeResolution>
<Directory path="%SystemDrive%Testing" includeSubDirectories="true" />
</RuntimeResolution>
<DiscoveryResolution>
<Directory path="%SystemDrive%Workspace" includeSubDirectories="true" />
</DiscoveryResolution>
</AssemblyResolution>
</UnitTestRunConfig>
.
.
.

</TestSettings>
Start editing the XML file in the editor if you are familiar with the syntax; sections and the required information is available.
The following code section identifies the additional files to be deployed along with the application:
<Deployment>
<DeploymentItem filename="Test.dll" />
<DeploymentItem filename="Common.dll" />
</Deployment>
To include additional files, simply edit them and add the file with the correct attribute. The following code snippet shows an additional file added to the section:
<Deployment>
<DeploymentItem filename="Test.dll" />
<DeploymentItem filename="Common.dll" />
<DeploymentItem filename="Readme.txt" />
</Deployment>
Readme.txt is the additional file added to the deployment item section. Edit the XML only if there is no IDE and you are familiar with XML syntax and formatting.
Web tests require some specific settings in order to run. The web test can be run in different browsers and with different sets of data. This page has the option to specify the required settings.
Using the first option Fixed run count, specify the number of run iterations. It would be a fixed run based on the count specified, or it can be One run per data source row. If the number of run iterations is fixed, the test will run for the specified number of times. If it is mentioned as one row per data source row, the test will run for each row in the data source attached to the test.
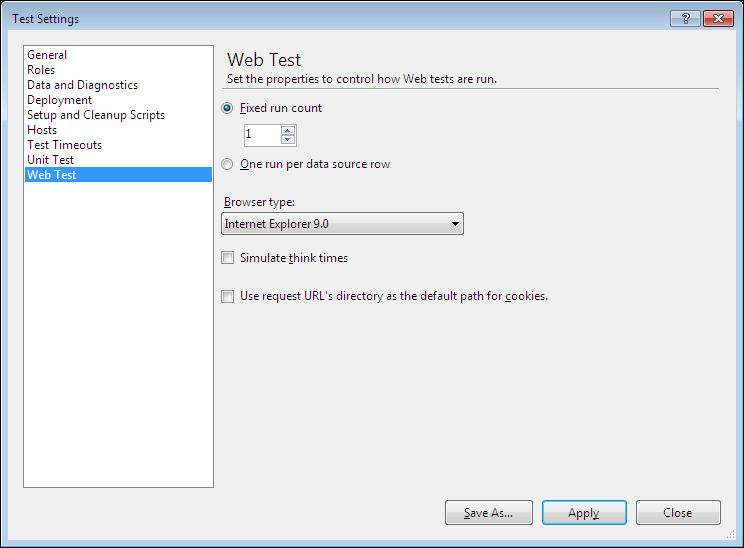
The second option is for selecting the Browser type used for testing. The page also has the option to simulate think times. Think times are the time spent in between any two test actions. There is another new option Use request URL's directory as the default path for cookies to store the cookies in the same path as the URL.
Visual Studio 2012 has a new configuration file with the extension runsettings, which is mainly used for unit tests. The testsettings file can still be used for unit tests, if the test is run using MSTest adapters created using previous versions of Visual Studio. The runsettings file can be used with any of the adapters for extensibility, using Visual Studio 2012, such as .NUnit and xUnit are few of the extensible unit test frameworks used in Visual Studio 2012. The testsettings file in Visual Studio 2012 is mainly used for load and web performance tests and any tests deployed to lab environments. Using runsettings for unit test is much faster than using the testsettings file.
There is no IDE to create the runsettings file, but it is just an XML file with configurations similar to testsettings. Just add an XML file to the solution and then rename it runsettings. Open the XML file and add the configurations manually. The XML content would look similar to what is shown in the following screenshot:
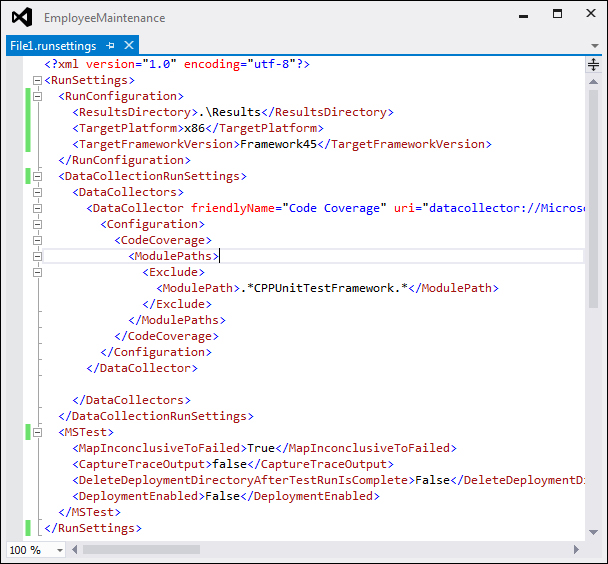
There are different sections within the runsettings file:
ResultsDirectoryis used to specify the directory where the Test Results would be placed.- The
TargetFrameworkVersionsection is used to specify the version of the framework that is used for executing the tests. TargetPlatformis used to specify if it is a x86 or a x64 platform.TreatTestAdapterErrorsAsWarningsis a Boolean value that is set to true or false, to show any errors as warnings.- The
DataCollectorssection is used to specify the settings for diagnostic data adapters. Diagnostic data adapters are used to collect additional information about the system, environment, and the application under test. - The
Codecoveragedata collector is used to create a log with information on application code covered by test. This is the only adapter that can be customized usingrunsettings.