
Now that you have a mobile robot, you want to coordinate all of its different abilities. Let's start with the simplest approach using a single control program that can call other programs and enable all the capabilities.
You've already done this once in Chapter 3, Providing Speech Input and Output, where you edited the continuous.c code to allow it to call other programs to execute functionality. The following is a screenshot of the code that we used from the /home/ubuntu/pocketsphinx-0.8/programs/src/ directory:
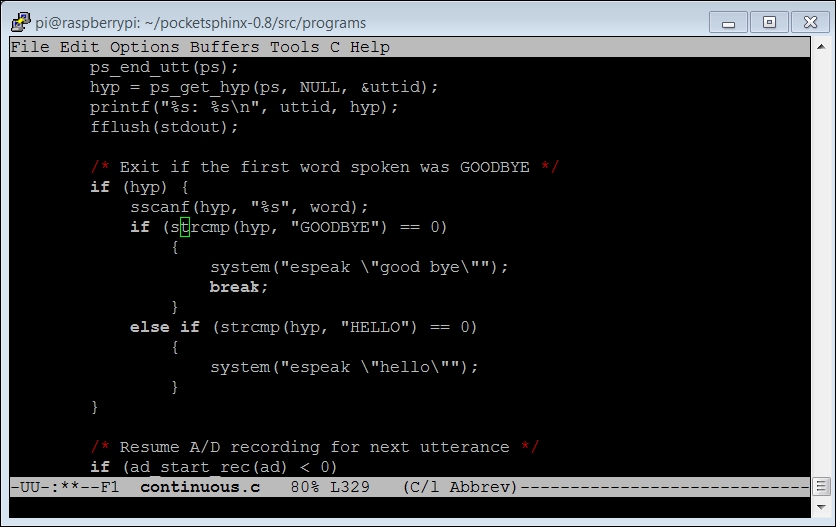
The functionality that is important to us is the system("espeak "good bye"""); line of code. When you use the
system function call, the program actually calls a different program, in this case the espeak program, and passes to it the "good bye" parameter so that the words good and bye come out of the speaker.
The following screenshot is another example from Chapter 5, Creating Mobile Robots on Wheels, where you wanted to command your robot to move:
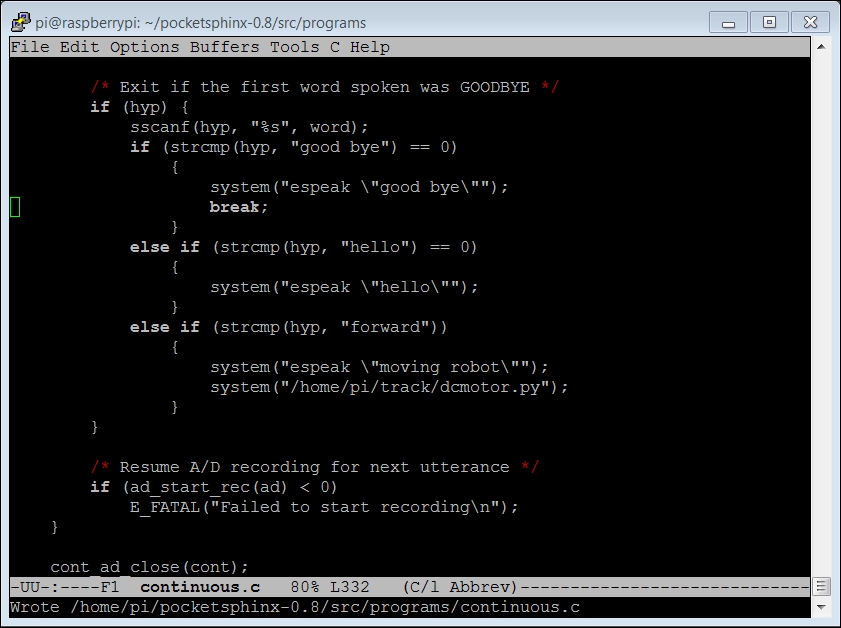
In this case, if you say forward to your robot, it will execute two programs. The first program you call is the espeak program with the parameter "moving robot". These words should then come out from the speaker on the robot. The second program is the dcmotor.py program, which should include the commands to move the robot forward.
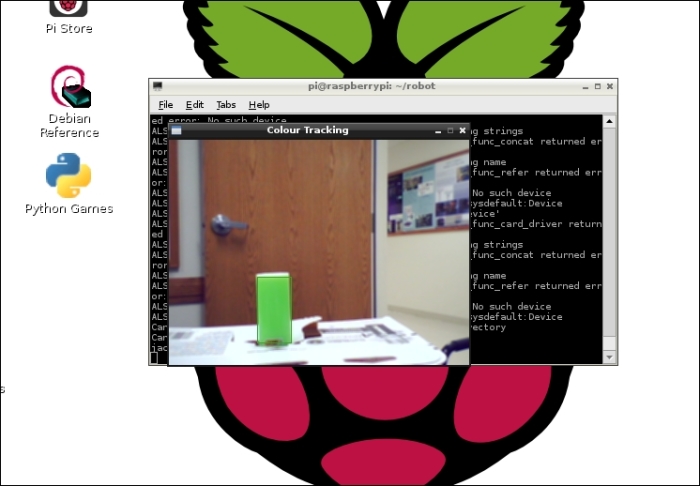
I am now going to include an example in Python; it is my preferred language. I am going to use my tracked robot, which is shown in the following image:

This robot has a camera and is also able to communicate via a speaker. You can also control it via a wireless keyboard. You will now add the functionality to follow a colored ball, turn as the ball goes right or left, and tell you when it is turning.
You also need to make sure all of your devices are available to your programs. For this, you'll need to make sure your USB camera as well as the two DC motor controllers are connected. To connect the camera, follow the steps in Chapter 4, Adding Vision to Raspberry Pi, in the Connecting the USB camera to Raspberry Pi and viewing the images section. It works best to connect the USB camera first before connecting any other USB devices.
When the camera is up and running, you'll want to connect and check the DC motor controllers as described in Chapter 5, Creating Mobile Robots on Wheels. You may want to run the dcmotor.py program just to make sure you are connected and both the motors work.
In this project, you are going to involve three different programs. First, you are going to create a program that will find out whether the ball is on the right-hand side or the left-hand side. This is going to be your main control program. You are also going to create a program that moves your robot approximately 45 degrees to the right and another program that moves it 45 degrees to the left. You are going to keep these programs very simple, and you may just want to put them all in the same source file. But as the complexity of each of these programs grows, it will make more sense for them to be separate, so this is a good starting point for your robotic code. Also, if you want to use the code in another project, or want to share it, this sort of separation helps.
You are going to create three programs for this project. In order to keep this situation organized, I created a new directory in my home directory by typing mkdir robot in my home directory. I will now put all my files in this directory.
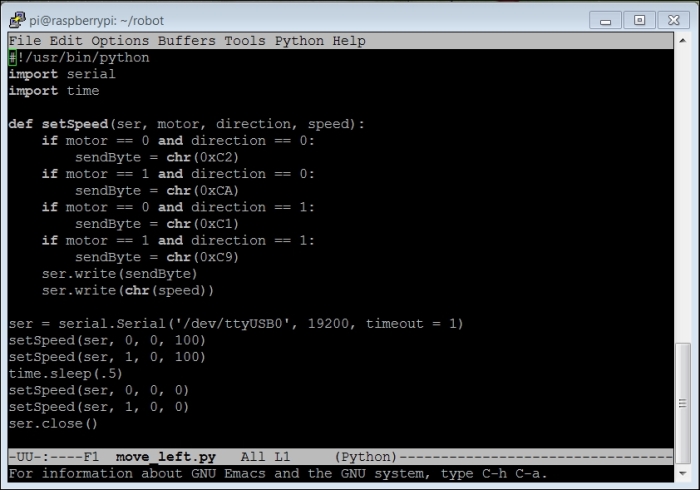
The next step is to create two files that can move your robot: one to the left-hand side and the other to the right-hand side. For this, you will have to create two copies of the dcmotor.py code as you did in Chapter 5, Creating Mobile Robots on Wheels, in your robot directory. If you have created that file in your home directory, type cp dcmotor.py ./robot/move_left.py cp dcmotor.py ./robot/move_right.py. Now you'll edit the files, changing two numbers in the program. Edit the code, shown in the following screenshot, in the move_left.py file:
The following are the details for this code:
#!/usr/bin/python—This statement sets the program so it can be run directly from the program lineimport serial—This statement imports theseriallibrary so you can talk to the motor controllerimport time—This statement imports thetimelibrary so you can use thetime.sleep()function to add a fixed delaydef setSpeed(ser, motor, direction, speed):– This statement has thesetSpeedfunction you will call in your program that sets the speed and direction for a given motorif motor == 0 and direction == 0:– This statement sets Motor 1 in the forward directionsendByte = chr(0xC2)—This statement is the actualbytecommand to the motor controllerif motor == 1 and direction == 0:– This statement sets Motor 2 to go in the backward directionsendByte = chr(0xCA)—This statement is the actualbytecommand to the motor controllerif motor == 0 and direction == 1:– This statement sets Motor 1 to go in the backward directionsendByte = chr(0xC1)—This statement is the actualbytecommand for the motor controllerif motor == 1 and direction == 1:– This statement sets Motor 2 to go in the forward directionsendByte = chr(0xC9)—This statement is the actualbytecommand for the motor controllerser.write(sendByte)—This statement sends thebytecommand out of theserialportser.write(chr(speed))—This statement sends thespeedbyte out of theserialportser = serial.Serial('/dev/ttyUSB0', 19200, timeout = 1)—This statement initializes and opens theserialportsetSpeed(ser, 0, 0, 100)—This statement sends theforwardcommand to Motor 1 at a speed of 100 unitssetSpeed(ser, 1, 0, 100)—This statement sends thereversecommand to Motor 2 at a speed of 100 unitstime.sleep(.5)—This statement causes the motor to wait for 0.5 secondssetSpeed(ser, 0, 0, 0)—This statement sets the speed of Motor 1 to 0 unitssetSpeed(ser, 1, 0, 0)—This statement sets the speed of Motor 2 to 0 unitsser.close()—This statement closes theserialport
Similarly, you will also need to edit moveright.py, as shown in the following screenshot:
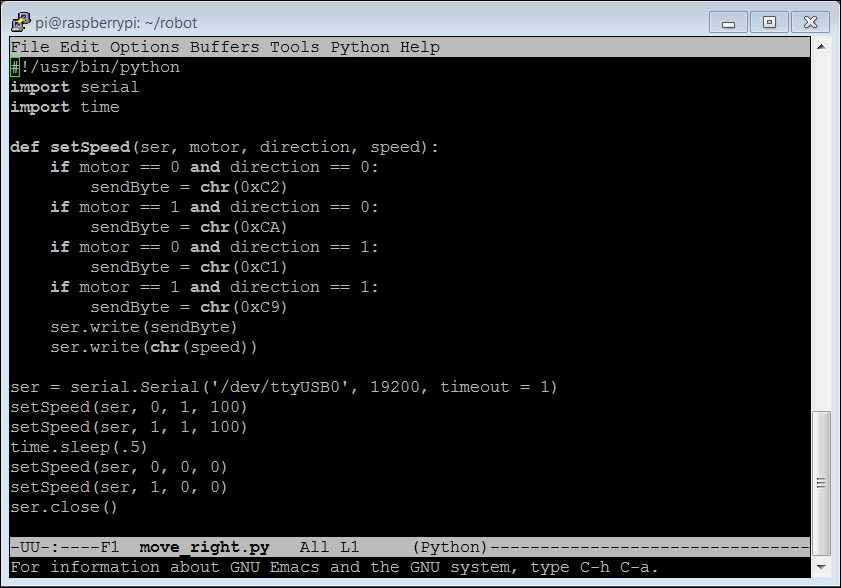
This time, the setSpeed numbers are changed to run the motors in the opposite direction, turning the robot to the right-hand side.
The final step is to create the main control program. You're going to start with the camera.py program you edited in Chapter 4, Adding Vision to Raspberry Pi. Execute this by typing cp /home/pi/example/python/camera.py ./follow.py while you are in your robot directory. Open this file with your editor; if you are using emacs, type emacs follow.py and then edit the code as shown in the following screenshot:
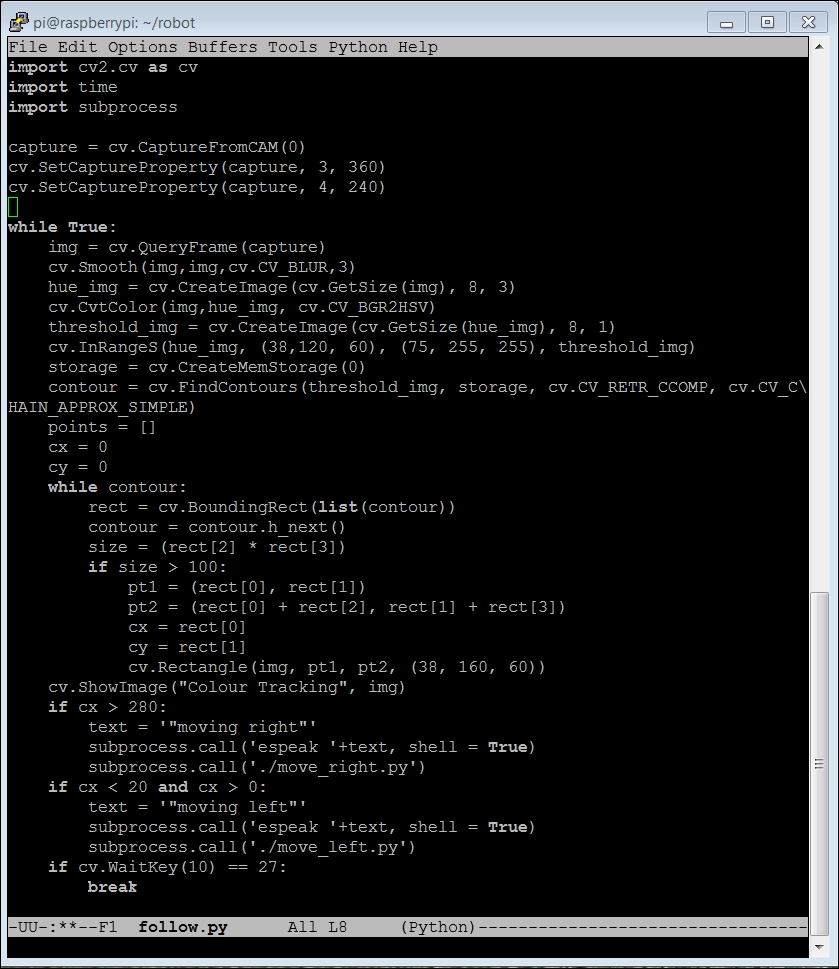
Let's look at the following code statements along with their functions:
import cv2.cv as cv—This statement imports theCVlibrary.import time—This statement imports thetimelibrary.import subprocess—This statement imports thesubprocesslibrary; this will allow you to call other programs within your Python program.capture = cv.CaptureFromCAM(0)—This statement sets up the program to capture your images from the webcam.cv.SetCaptureProperty(capture, 3, 360)—This statement sets thexresolution on the image to 360.cv.SetCaptureProperty(capture, 4, 240)—This statement sets theyresolution of the image to 240.while True:—This statement executes the loop over and over until the Esc key is pressed.img = cv.QueryFrame(capture)—This statement brings in the image.cv.Smooth(img,img,cv.CV_BLUR,3)—This statement smoothens the image.hue_img = cv.CreateImage(cv.GetSize(img), 8, 3)—This statement creates a new image that will hold the hue-based image.cv.CvtColor(img,hue_img, cv.CV_BGR2HSV)—This statement moves a copy of the image using thehuevalues inhue_img.threshold_img = cv.CreateImage(cv.GetSize(hue_img), 8, 1)—This statement creates a new image that will hold all the blobs of colors.cv.InRangeS(hue_img, (38,120, 60), (75, 255, 255), threshold_img)—This statement now fills inhue_imgfromthreshold_img.storage = cv.CreateMemStorage(0)—This line creates some memory for you to manipulate the images.contour = cv.FindContours(threshold_img, storage, cv.CV_RETR_CCOMP, cv.CV_CHAIN_APPROX_SIMPLE)—This statement finds all the areas on your image that are within the threshold. There may be more than one so you want to capture them all.points = []—This statement creates an array to hold all the different possible points of color.cx = 0—This statement gives a variable to hold thexlocation ofcolor.cy = 0—This statement gives a variable to hold theylocation ofcolor.while contour:—This statement now adds awhileloop that will let you step through all the possible contours. By the way, it is important to note that if there is another larger green blob in the background, you will find that location. Just to keep this simple, we'll assume that your green ball is unique.rect = cv.BoundingRect(list(contour))—This statement gets a bounding rectangle for each area ofcolor. The rectangle is defined by its corners around the blob ofcolor.contour = contour.h_next()—This statement will prepare you for the nextcontourstatement (if one exists).size = (rect[2] * rect[3])—This statement calculates the diagonal length of the rectangle you are evaluating.if size > 100:—This checks to see whether the area is big enough for our purpose.pt1 = (rect[0], rect[1])—This statement defines aptvariable at thexandycoordinates on the left-hand side of the blob's rectangular location.pt2 = (rect[0] + rect[2], rect[1] + rect[3])—This statement defines aptvariable at thexandycoordinates on the right-hand side of the blob's rectangular location.cx = rect[0]—This statement sets the value ofcxto thexlocation ofcolor.cy = rect[1]—This statement sets the value ofcyto theylocation of the color.cv.Rectangle(img, pt1, pt2, (38, 160, 60))—Here, you add a rectangle to your original image, identifying where you think it is located.cv.ShowImage("Colour Tracking", img)—This statement displays the image on the screen.if cx > 280:—This statement checks to see whether the object is too far to the right.text = '"moving right"'—This statement gets you ready to call the user.subprocess.call('espeak '+text, shell = True)—This statement callsespeakwith a message.subprocess.call('./move_right.py')—This statement calls the Python program, which will move the unit to the right-hand side.if cx < 20 and cx > 0:—This statement checks to see whether the object is too far to the left. Make sure you exclude0, which will be the case initially if there is no object.text = '"moving left"'—This statement gets you ready to call the user.subprocess.call('espeak '+text, shell = True)—This statement callsespeakwith a message.subprocess.call('./move_left.py')—This statement calls the Python program, which will move the unit to the left-hand side.if cv.WaitKey(10) == 27:—This statement kills the program if you press the Esc key.break—This statement stops the program.
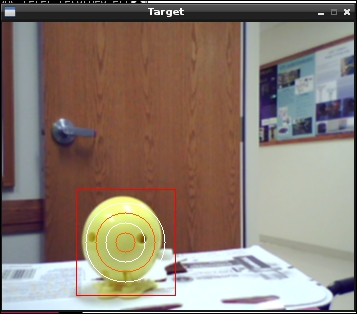
Now, you can run the program by typing python ./follow.py. You can also type chmod +x follow.py and then run the program by typing ./follow.py. The window should be displayed as shown in the following screenshot:
The green rectangle indicates that the program is following the color green. As the green color is moved towards the edge on the left-hand side, the robot should rotate slightly to the left-hand side. As the green color is moved towards the edge on the right-hand side, the robot should rotate slightly towards the right-hand side.
With OpenCV, it is also possible to perform motion detection. There are a couple of good tutorials on how to do this with OpenCV. One simple example is at http://www.steinm.com/blog/motion-detection-webcam-python-opencv-differential-images/. Another example, a bit more complex but more elegant, can be found at http://stackoverflow.com/questions/3374828/how-do-i-track-motion-using-opencv-in-python.
While using motion detection, if you put your wind-up walker toy in front of the camera, you will see the output on the webcam (using the code from the second tutorial) as follows:
You can then use it to move the robot to follow the motion.