Chapter 2. First steps with Ajax
This chapter covers
- Introducing the technologies behind Ajax
- Using Cascading Style Sheets to define look and feel
- Using the Document Object Model to define the user interface structure
- Using XMLHttpRequest to asynchronously contact the server
- Putting the pieces together
In chapter 1 we focused on users and how Ajax can assist them in their daily activities. Most of us are developers, and so, having convinced ourselves that Ajax is a Good Thing, we need to know how to work with it. The good news is that, as with many brand-new, shiny technologies, most of this process will be reasonably familiar already, particularly if you’ve worked with the Internet.
In this chapter, we’ll explain the Ajax technology. We’ll discuss the four technological cornerstones of Ajax and how they relate to one another, using code examples to demonstrate how each technology works and how everything fits together.
You might like to think of this chapter as the “hello world” section of the book, in which we introduce the core technologies using some simple examples. We’re more interested here in just getting things to work; we’ll start to look at the bigger picture in chapter 3. If you’re already familiar with some or all of the Ajax technologies, you may want to skim these sections. If you’re new to Ajax and to web client programming, these introductions should be sufficient to orient you for the rest of the book.
2.1. The key elements of Ajax
Ajax isn’t a single technology. Rather, it’s a collection of four technologies that complement one another. Table 2.1 summarizes these technologies and the role that each has to play.
Table 2.1. The key elements of Ajax
| JavaScript | JavaScript is a general-purpose scripting language designed to be embedded inside applications. The JavaScript interpreter in a web browser allows programmatic interaction with many of the browser’s inbuilt capabilities. Ajax applications are written in JavaScript. |
| Cascading Style Sheets (CSS) | CSS offers a way of defining reusable visual styles for web page elements. It offers a simple and powerful way of defining and applying visual styling consistently. In an Ajax application, the styling of a user interface may be modified interactively through CSS. |
| Document Object Model (DOM) | The DOM presents the structure of web pages as a set of programmable objects that can be manipulated with JavaScript. Scripting the DOM allows an Ajax application to modify the user interface on the fly, effectively redrawing parts of the page. |
| XMLHttpRequest object | The (misnamed) XMLHttpRequest object allows web programmers to retrieve data from the web server as a background activity. The data format is typically XML, but it works well with any text-based data. While XMLHttpRequest is the most flexible general-purpose tool for this job, there are other ways of retrieving data from the server, too, and we’ll cover them all in this chapter. |
We saw in chapter 1 how an Ajax application delivers a complex, functioning application up front to users, with which they then interact. JavaScript is the glue that is used to hold this application together, defining the user workflow and business logic of the application. The user interface is manipulated and refreshed by using JavaScript to manipulate the Document Object Model (DOM), continually redrawing and reorganizing the data presented to the users and processing their mouse- and keyboard-based interactions. Cascading Style Sheets (CSS) provide a consistent look and feel to the application and a powerful shorthand for the programmatic DOM manipulation. The XMLHttpRequest object (or a range of similar mechanisms) is used to talk to the server asynchronously, committing user requests and fetching up-to-date data while the user works. Figure 2.1 shows how the technologies fit together in Ajax.
Figure 2.1. The four main components of Ajax: JavaScript defines business rules and program flow. The Document Object Model and Cascading Style Sheets allow the application to reorganize its appearance in response to data fetched in the background from the server by the XMLHttpRequest object or its close cousins.

Three of the four technologies—CSS, DOM, and JavaScript—have been collectively referred to as Dynamic HTML, or DHTML for short. DHTML was the Next Big Thing around 1997, but not surprisingly in this industry, it never quite lived up to its initial promise. DHTML offered the ability to create funky, interactive interfaces for web pages, yet it never overcame the issue of the full-page refresh. Without going back to talk to the server, there was only so much that we could do. Ajax makes considerable use of DHTML, but by adding the asynchronous request, it can extend the longevity of a web page considerably. By going back to the server while the interface is doing its stuff, without interruption, Ajax makes a great difference to the end result.
Rather conveniently, all of these technologies are already preinstalled in most modern web browsers, including Microsoft’s Internet Explorer; the Mozilla/Gecko family of browsers, including Firefox, Mozilla Suite, Netscape Navigator, and Camino; the Opera browser; Apple’s Safari; and its close cousin Konqueror, from the UNIX KDE desktop. Inconveniently, the implementations of these technologies are frustratingly different in some of the fine details and will vary from version to version, but this situation has been improving over the last five years, and we have ways of coping cleanly with cross-browser incompatibilities.
Every modern operating system comes with a modern browser preinstalled. So the vast majority of desktop and laptop computers on the planet are already primed to run Ajax applications, a situation that most Java or .NET developers can only dream about. (The browsers present in PDAs and Smartphones generally offer a greatly cut-down feature list and won’t support the full range of Ajax technologies, but differences in screen size and input methods would probably be an issue even if they did. For now, Ajax is principally a technology for desktop and laptop machines.)
We’ll begin by reviewing these technologies in isolation and then look at how they interoperate. If you’re a seasoned web developer, you’ll probably know a lot of this already, in which case you might like to skip ahead to chapter 3, where we begin to look at managing the technologies by using design patterns.
Let’s start off our investigations by looking at JavaScript.
2.2. Orchestrating the user experience with JavaScript
The central player in the Ajax toolkit is undoubtedly JavaScript. An Ajax application downloads a complete client into memory, combining data and presentation and program logic, and JavaScript is the tool used to implement that logic. JavaScript is a general-purpose programming language of mixed descent, with a superficial similarity to the C family of languages.
JavaScript can be briefly characterized as a loosely typed, interpreted, general-purpose scripting language. Loosely typed means that variables are not declared specifically as strings, integers, or objects, and the same variable may be assigned values of different types. For example, the following is valid code:
var x=3.1415926;
x='pi';
The variable x is defined first as a numeric value and reassigned a string value later.
Interpreted means that it is not compiled into executable code, but the source code is executed directly. When deploying a JavaScript application, you place the source code on the web server, and the source code is transmitted directly across the Internet to the web browser. It’s even possible to evaluate snippets of code on the fly:
var x=eval('7*5'),
Here we have defined our calculation as a piece of text, rather than two numbers and an arithmetic operator. Calling eval() on this text interprets the JavaScript it contains, and returns the value of the expression. In most cases, this simply slows the program execution down, but at times the extra flexibility that it brings can be useful.
General purpose means that the language is suitable for use with most algorithms and programming tasks. The core JavaScript language contains support for numbers, strings, dates and times, arrays, regular expressions for text processing, and mathematical functions such as trigonometry and random number generation. It is possible to define structured objects using JavaScript, bringing design principles and order to more complex code.
Within the web browser environment, parts of the browser’s native functionality, including CSS, the DOM, and the XMLHttpRequest objects, are exposed to the JavaScript engine, allowing page authors to programmatically control the page to a greater or lesser degree. Although the JavaScript environment that we encounter in the browser is heavily populated with browser-specific objects, the underlying language is just that, a programming language.
This isn’t the time or place for a detailed tutorial on JavaScript basics. In appendix B we take a closer look at the language and outline the fundamental differences between JavaScript and the C family of languages, including its namesake, Java. JavaScript examples are sprinkled liberally throughout this book, and several other books already exist that cover the language basics (see our Resources section at the end of this chapter).
Within the Ajax technology stack, JavaScript is the glue that binds all the other components together. Having a basic familiarity with JavaScript is a prerequisite for writing Ajax applications. Being fluent in JavaScript and understanding its strengths will allow you to take full advantage of Ajax.
We’ll move on now to Cascading Style Sheets, which control the visual style of elements on a web page.
2.3. Defining look and feel using CSS
Cascading Style Sheets are a well-established part of web design, and they find frequent use in classic web applications as well as in Ajax. A stylesheet offers a centralized way of defining categories of visual styles, which can then be applied to individual elements on a page very concisely. In addition to the obvious styling elements such as color, borders, background images, transparency, and size, stylesheets can define the way that elements are laid out relative to one another and simple user interactivity, allowing quite powerful visual effects to be achieved through stylesheets alone.
In a classic web application, stylesheets provide a useful way of defining a style in a single place that can be reused across many web pages. With Ajax, we don’t think in terms of a rapid succession of pages anymore, but stylesheets still provide a helpful repository of predefined looks that can be applied to elements dynamically with a minimum of code. We’ll work through a few basic CSS examples in this section, but first, let’s look at how CSS rules are defined.
CSS styles a document by defining rules, usually in a separate file that is referred to by the web page being styled. Style rules can also be defined inside a web page, but this is generally considered bad practice.
A style rule consists of two parts: the selector and the style declaration. The selector specifies which elements are going to be styled, and the style declaration declares which style properties are going to be applied. Let’s say that we want to make all our level-1 headings in a document (that is, the <H1> tags) appear red. We can declare a CSS rule to do this:
h1 { color: red }
The selector here is very simple, applying to all <H1> tags in the document. The style declaration is also very simple, modifying a single style property. In practice, both the selector and the style declaration can be considerably more complex. Let’s look at the variations in each, starting with the selector.
2.3.1. CSS selectors
In addition to defining a type of HTML tag to apply a style to, we can limit the rule to those within a specific context. There are several ways of specifying the context: by HTML tag type, by a declared class type, or by an element’s unique ID.
Let’s look at tag-type selectors first. For example, to apply the above rule only to <H1> tags that are contained within a <DIV> tag, we would modify our rule like this:
div h1 { color: red; }
These are also referred to as element-based selectors, because they decide whether or not a DOM element is styled based on its element type. We can also define classes for styling that have nothing to do with the HTML tag type. For example, if we define a style class called callout, which is to appear in a colored box, we could write
.callout { border: solid blue 1px; background-color: cyan }
To assign a style class to an element, we simply declare a class attribute in the HTML tag, such as
<div>I'll appear as a normal bit of text</div>
<div class='callout'>And I'll appear as a callout!</div>
Elements can be assigned more than one class. Suppose that we define an additional style class loud as
.loud { color: orange }
and apply both the styles in a document like so:
<div class='loud'>I'll be bright orange</div>
<div class='callout'>I'll appear as a callout</div>
<div class='callout loud'>
And I'll appear as an unappealing mixture of both!
</div>
The third <div> element will appear with orange text in a cyan box with a blue border. It is also possible to combine CSS styles to create a pleasing and harmonious design!
We can combine classes with element-based rules, to define a class that operates only on particular tag types. For example:
span.highlight { background-color: yellow }
will be applied only to <span> tags with a declared class attribute of highlight. Other <span> tags, or other types of tag with class='highlight', will be unaffected.
We can also use these in conjunction with the parent-child selectors to create very specific rules:
div.prose span.highlight { background-color: yellow }
This rule will be applied only to <span> tags of class highlight that are nested within <div> tags of class prose.
We can specify rules that apply only to an element with a given unique ID, as specified by the id attribute in the HTML. No more than one element in an HTML document should have a given ID assigned to it, so these selectors are typically used to select a single element on a page. To draw attention to a close button on a page, for example, we might define a style:
#close { color: red }
CSS also allows us to define styles based on pseudo-selectors. A web browser defines a limited number of pseudo-selectors. We’ll present a few of the more useful ones here. For example:
*:first-letter {
  font-size: 500%;
  color: red;
  float: left;
}
will draw the first letter of any element in a large bold red font. We can tighten up this rule a little, like this:
 p.illuminated:first-letter {
  font-size: 500%;
  color: red;
  float: left;
}
The red border effect will now apply only to <p> elements with a declared class of illuminated. Other useful pseudo-selectors include first-line, and hover, which modifies the appearance of hyperlinks when the mouse pointer passes over them. For example, to make a link appear in yellow when under the mouse pointer, we could write the following rule:
a:hover{ color:yellow; }
That covers the bases for CSS selectors. We’ve already introduced several style declarations informally in these examples. Let’s have a closer look at them now.
2.3.2. CSS style properties
Every element in an HTML page can be styled in a number of ways. The most generic elements, such as the <DIV> tag, can have dozens of stylings applied to them. Let’s look briefly at a few of these.
The text of an element can be styled in terms of the color, the font size, the heaviness of the font, and the typeface to use. Multiple options can be specified for fonts, to allow graceful degradation in situations where a desired font is not installed on a client machine. To style a paragraph in gray, terminal-style text, we could define a styling:
.robotic{
  font-size: 14pt;
  font-family: courier new, courier, monospace;
  font-weight: bold;
  color: gray;
}
Or, more concisely, we could amalgamate the font elements:
.robotic{
  font: bold 14pt courier new, courier, monospace;
  color: gray;
}
In either case, the multiple styling properties are written in a key-value pair notation, separated by semicolons.
CSS can define the layout and size (often referred to as the box-model) of an element, by specifying margins and padding elements, either for all four sides or for each side individually:
.padded{ padding: 4px; }
.eccentricPadded {
  padding-bottom: 8px;
  padding-top: 2px;
  padding-left: 2px;
  padding-right: 16px;
  margin: 1px;
}
The dimensions of an element can be specified by the width and height properties. The position of an element can be specified as either absolute or relative. Absolutely positioned elements can be positioned on the page by setting the top and left properties, whereas relatively positioned elements will flow with the rest of the page.
Background colors can be set to elements using the background-color property. In addition, a background image can be set, using the background-image property:
.titlebar{ background-image: url(images/topbar.png); }
Elements can be hidden from view by setting either visibility:hidden or display:none. In the former case, the item will still occupy space on the page, if relatively positioned, whereas in the latter case, it won’t.
This covers the basic styling properties required to construct user interfaces for Ajax applications using CSS. In the following section, we’ll look at an example of putting CSS into practice.
2.3.3. A simple CSS example
We’ve raced through the core concepts of Cascading Style Sheets. Let’s try putting them into practice now. CSS can be used to create elegant graphic design, but in an Ajax application, we’re often more concerned with creating user interfaces that mimic desktop widgets. As a simple example of this type of CSS use, figure 2.2 shows a folder widget styled using CSS.
Figure 2.2. Using CSS to style a user interface widget. Both screenshots were generated from identical HTML, with only the stylesheets altered. The stylesheet used on the left retains only the positioning elements, whereas the stylesheet used to render the right adds in the decorative elements, such as colors and images.

CSS performs two roles in creating the widget that we see on the right in figure 2.2. Let’s look at each of them in turn.
Using CSS for layout
The first job is the positioning of the elements. The outermost element, representing the window as a whole, is assigned an absolute position:
div.window{
  position: absolute;
  overflow: auto;
  margin: 8px;
  padding: 0px;
  width: 420px;
  height: 280px;
}
Within the content area, the icons are styled using the float property so as to flow within the confines of their parent element, wrapping around to a new line where necessary:
div.item{
  position: relative;
  height: 64px;
  width: 56px;
  float: left;
  padding: 0px;
  margin: 8px;
}
The itemName element, which is nested inside the item element, has the text positioned below the icon by setting an upper margin as large as the icon graphic:
div.item div.itemName{
  margin-top: 48px;
  font: 10px verdana, arial, helvetica;
  text-align: center;
}
Using CSS for styling
The second job performed by CSS is the visual styling of the elements. The graphics used by the items in the folder are assigned by class name, for example:
div.folder{
  background:
    transparent url(images/folder.png)
    top left no-repeat;
}
div.file{
  background:
    transparent url(images/file.png)
    top left no-repeat;
}
div.special{
  background:
    transparent url(images/folder_important.png)
    top left no-repeat;
}
The background property of the icon styles is set to not repeat itself and be positioned at the top left of the element, with transparency enabled. (Figure 2.2 is rendered using Firefox. Transparency of .png images under Internet Explorer is buggy, with a number of imperfect proposed workarounds available. The forthcoming Internet Explorer 7 fixes these bugs, apparently. If you need cross-browser transparent images, we suggest the use of .gif images at present.)
Individual items declare two style classes: The generic item defines their layout in the container, and a second, more specific one defines the icon to be used. For example:
<div class='item folder'>
<div class='itemName'>stuff</div>
</div>
<div class='item file'>
<div class='itemName'>shopping list</div>
</div>
All the images in the styling are applied as background images using CSS. The titlebar is styled using an image as tall as the bar and only 1 pixel wide, repeating itself horizontally:
div.titlebar{
  background-color: #0066aa;
  background-image: url(images/titlebar_bg.png);
  background-repeat: repeat-x;
  ...
}
The full HTML for this widget is presented in listing 2.1.
Listing 2.1. window.html
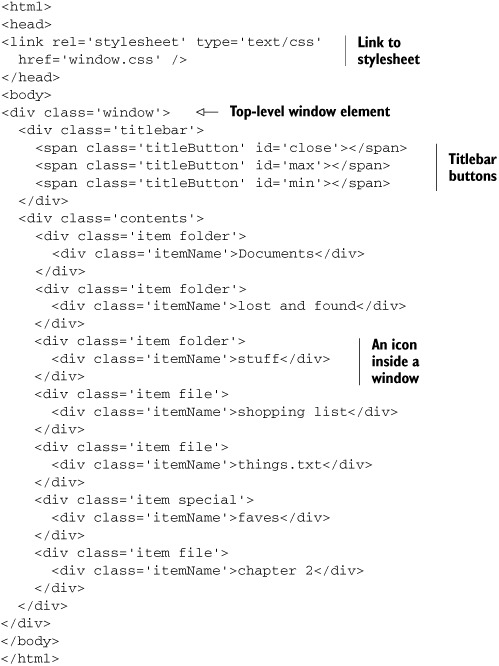
The HTML markup defines the structure of the document, not the look. It also defines points in the document through which the look can be applied, such as class names, unique IDs, and even the tag types themselves. Reading the HTML, we can see how each element relates to the other in terms of containment but not the eventual visual style. Editing the stylesheet can change the look of this document considerably while retaining the structure, as figure 2.2 has demonstrated. The complete stylesheet for the widget is shown in listing 2.2.
Listing 2.2. window.css
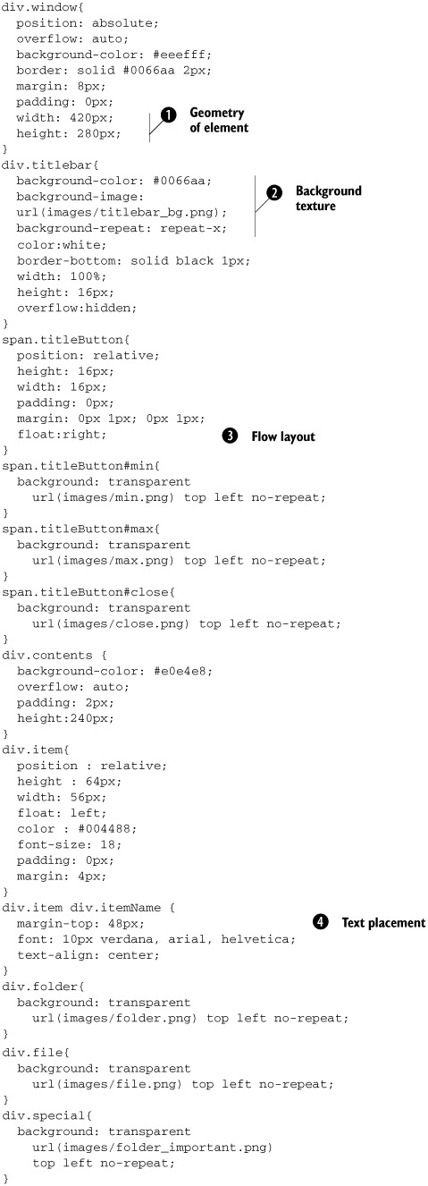
We’ve already looked at a number of the tricks that we’ve employed in this stylesheet to tune the look and feel of individual
elements. We’ve highlighted a few more here, to demonstrate the breadth of concerns to which CSS can be applied: on-screen
placement ![]() , texturing elements
, texturing elements ![]() , assisting in layout of elements
, assisting in layout of elements ![]() , and placing text relative to accompanying graphics
, and placing text relative to accompanying graphics ![]() .
.
CSS is an important part of the web developer’s basic toolkit. As we’ve demonstrated here, it can be applied just as easily to the types of interfaces that an Ajax application requires as to the more design-oriented approach of a static brochure-style site.
2.4. Organizing the view using the DOM
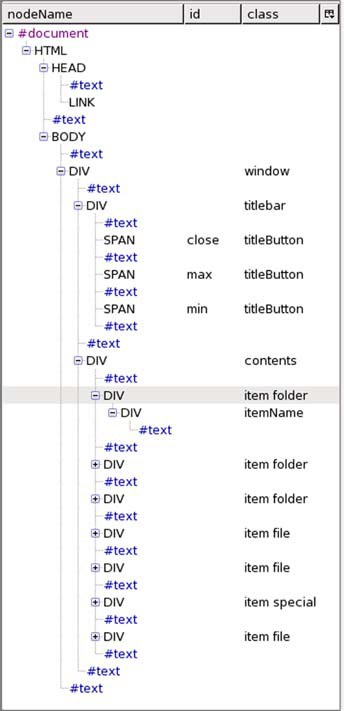
The Document Object Model (DOM) exposes a document (a web page) to the JavaScript engine. Using the DOM, the document structure, as seen in figure 2.3, can be manipulated programmatically. This is a particularly useful ability to have at our disposal when writing an Ajax application. In a classic web application, we are regularly refreshing the entire page with new streams of HTML from the server, and we can redefine the interface largely through serving up new HTML. In an Ajax application, the majority of changes to the user interface will be made using the DOM. HTML tags in a web page are organized in a tree structure. The root of the tree is the <HTML> tag, which represents the document. Within this, the <BODY> tag, which represents the document body, is the root of the visible document structure. Inside the body, we find table, paragraph, list, and other tag types, possibly with other tags inside them.
Figure 2.3. The DOM presents an HTML document as a tree structure, with each element representing a tag in the HTML markup.
A DOM representation of a web page is also structured as a tree, composed of elements or nodes, which may contain child nodes within them, and so on recursively. The JavaScript engine exposes the root node of the current web page through the global variable document, which serves as the starting point for all our DOM manipulations. The DOM element is well defined by the W3C specification.
It has a single parent element, zero or more child elements, and any number of attributes, which are stored as an associative array (that is, by a textual key such as width or style rather than a numerical index). Figure 2.3 illustrates the abstract structure of the document shown in listing 2.2, as seen using the Mozilla DOM Inspector tool (see appendix A for more details).
The relationship between the elements in the DOM can be seen to mirror that of the HTML listing. The relationship is two-way. Modifying the DOM will alter the HTML markup and hence the presentation of the page.
This provides a top-level view of what the DOM looks like. In the following section, we’ll see how the DOM is exposed to the JavaScript interpreter and how to work with it.
2.4.1. Working with the DOM using JavaScript
In any application, we want to modify the user interface as users work, to provide feedback on their actions and progress. This could range from altering the label or color of a single element, through popping up a temporary dialog, to replacing large parts of the application screen with an entirely new set of widgets. By far the most usual is to construct a DOM tree by feeding the browser with declarative HTML (in other words, writing an HTML web page).
The document that we showed in listing 2.2 and figure 2.3 is rather large and complex. Let’s start our DOM manipulating career with a small step. Suppose that we want to show a friendly greeting to the user. When the page first loads, we don’t know his name, so we want to be able to modify the structure of the page to add his name in later, possibly to manipulate the DOM nodes programmatically. Listing 2.3 shows the initial HTML markup of this simple page.
Listing 2.3. Ajax “hello” page
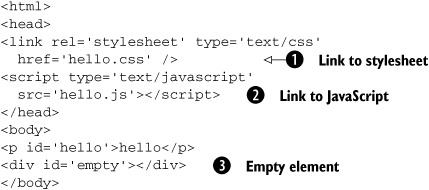
We have added references to two external resources: a Cascading Style Sheet ![]() and a file containing some JavaScript code
and a file containing some JavaScript code ![]() . We have also declared an empty <div> element with an ID
. We have also declared an empty <div> element with an ID ![]() , into which we can programmatically add further elements.
, into which we can programmatically add further elements.
Let’s look at the resources that we’ve linked to. The stylesheet defines some simple stylings for differentiating between different categories of item in our list by modifying the font and color (listing 2.4).
Listing 2.4. hello.css
.declared{
  color: red;
  font-family: arial;
  font-weight: normal;
  font-size: 16px;
}
.programmed{
  color: blue;
  font-family: helvetica;
  font-weight: bold;
  font-size: 10px;
}
We define two styles, which describe the origin of our DOM nodes. (The names of the styles are arbitrary. We called them that to keep the example easy to understand, but we could have just as easily called them fred and jim.) Neither of these style classes is used in the HTML, but we will apply them to elements programmatically. Listing 2.5 shows the JavaScript to accompany the web page in listing 2.4. When the document is loaded, we will programmatically style an existing node and create some more DOM elements programmatically.
Listing 2.5. hello.js
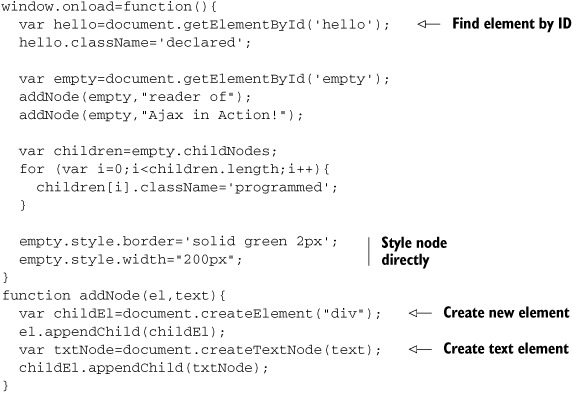
The JavaScript code is a bit more involved than the HTML or the stylesheet. The entry point for the code is the window.onload() function, which will be called programmatically once the entire page has been loaded. At this point, the DOM tree has been built, and we can begin to work with it. Listing 2.5 makes use of several DOM manipulation methods, to alter attributes of the DOM nodes, show and hide nodes, and even create completely new nodes on the fly. We won’t cover every DOM manipulation method here—have a look at our resources section for that—but we’ll walk through some of the more useful ones in the next few sections.
2.4.2. Finding a DOM node
The first thing that we need to do in order to work on a DOM with JavaScript is to find the elements that we want to change. As mentioned earlier, all that we are given to start with is a reference to the root node, in the global variable document. Every node in the DOM is a child, (or grandchild, great-grandchild, and so on) of document, but crawling down the tree, step by step, could be an arduous process in a big complicated document. Fortunately, there are some shortcuts. The most commonly used of these is to tag an element with a unique ID. In the onload() function in listing 2.5 we want to find two elements: the paragraph element, in order to style it, and the empty <div> tag, in order to add contents to it. Knowing, this, we attached unique ID attributes to each in the HTML, thus:
<p id='hello'>
and
<div id='empty'></div>
Any DOM node can have an ID assigned to it, and the ID can then be used to get a programmatic reference to that node in one function call, wherever it is in the document:
var hello=document.getElementById('hello'),
Note that this is a method of a Document object. In a simple case like this (and even in many complicated cases), you can reference the current Document object as document. If you end up using IFrames, which we’ll discuss shortly, then you have multiple Document objects to keep track of, and you’ll need to be certain which one you’re querying.
In some situations, we do want to walk the DOM tree step by step. Since the DOM nodes are arranged in a tree structure, every DOM node will have no more than one parent but any number of children. These can be accessed by the parentNode and childNodes properties. parentNode returns another DOM node object, whereas childNodes returns a JavaScript array of nodes that can be iterated over; thus:
var children=empty.childNodes;
for (var i=0;i<children.length;i++){
  ...
}
A third method worth mentioning allows us to take a shortcut through documents that we haven’t tagged with unique IDs. DOM nodes can also be searched for based on their HTML tag type, using getElementsByTagName(). For example, document.getElementsByTagName("UL") will return an array of all <UL> tags in the document.
These methods are useful for working with documents over which we have relatively little control. As a general rule, it is safer to use getElementById() than getElementsByTagName(), as it makes fewer assumptions about the structure and ordering of the document, which may change independently of the code.
2.4.3. Creating a DOM node
In addition to reorganizing existing DOM nodes, there are cases where we want to create completely new nodes and add them to the document (say, if we’re creating a message box on the fly). The JavaScript implementations of the DOM give us methods for doing that, too.
Let’s look at our example code (listing 2.5) again. The DOM node with ID 'empty' does indeed start off empty. When the page loads, we created some content for it dynamically. Our addNode() function uses the standard document.createElement() and document.createTextNode() methods. createElement() can be used to create any HTML element, taking the tag type as an argument, such as
var childEl=document.createElement("div");
createTextNode() creates a DOM node representing a piece of text, commonly found nested inside heading, div, paragraph, and list item tags.
var txtNode=document.createTextNode("some text");
The DOM standard treats text nodes as separate from those representing HTML elements. They can’t have styles applied to them directly and hence take up much less memory. The text represented by a text node may, however, be styled by the DOM element containing it.
Once the node, of whatever type, has been created, it must be attached to the document before it is visible in the browser window. The DOM node method appendChild() is used to accomplish this:
el.appendChild(childEl);
These three methods—createElement(), createTextNode(), and appendChild()—give us everything that we need to add new structure to a document. Having done so, however, we will generally want to style it in a suitable way, too. Let’s look at how we can do this.
2.4.4. Adding styles to your document
So far, we’ve looked at using the DOM to manipulate the structure of a document—how one element is contained by another and so on. In effect, it allows us to reshape the structures declared in the static HTML. The DOM also provides methods for programmatically modifying the style of elements and reshaping the structures defined in the stylesheets.
Each element in a web page can have a variety of visual elements applied to it through DOM manipulation, such as position, height and width, colors, margins and borders. Modifying each attribute individually allows for very fine control, but it can be tedious. Fortunately, the web browser provides us with JavaScript bindings that allow us to exercise precision where needed through a low-level interface and to apply styling consistently and easily using CSS classes. Let’s look at each of these in turn.
The className property
CSS offers a concise way of applying predefined, reusable styles to documents. When we are styling elements that we have created in code, we can also take advantage of CSS, by using a DOM node’s className property. The following line, for example, applies the presentation rules defined by the declared class to a node:
hello.className='declared';
where hello is the reference to the DOM node. This provides an easy and compact way to assign many CSS rules at once to a node and to manage complex stylings through stylesheets.
The style property
In other situations, we may want to make a finer-grained change to a particular element’s style, possibly supplementing styles already applied through CSS.
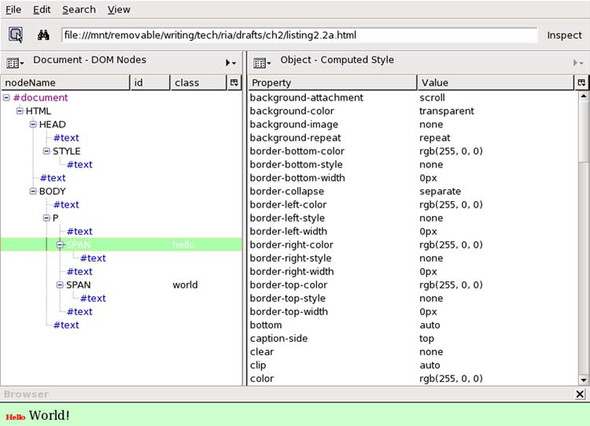
DOM nodes also contain an associative array called style, containing all the fine details of the node’s style. As figure 2.4 illustrates, DOM node styles typically contain a large number of entries. Under the hood, assigning a className to the node will modify values in the style array.
Figure 2.4. Inspecting the style attribute of a DOM node in the DOM Inspector. Most values will not be set explicitly by the user but will be assigned by the rendering engine itself. Note the scrollbar: we’re seeing only roughly one-quarter of the full list of computed styles.
The style array can be manipulated directly. After styling the items in the empty node, we draw a box around them; thus:
empty.style.border="solid green 2px";
empty.style.width="200px";
We could just as easily have declared a box class and applied it via the className property, but this approach can be quicker and simpler in certain circumstances, and it allows for the programmatic construction of strings. If we want to freely resize elements to pixel accuracy, for example, doing so by predefining styles for every width from 1 to 800 pixels would clearly be inefficient and cumbersome.
Using the above methods, then, we can create new DOM elements and style them. There’s one more useful tool in our toolbox of content-manipulation techniques that takes a slightly different approach to programmatically writing a web page. We close this section with a look at the innerHTML property.
2.4.5. A shortcut: Using the innerHTML property
The methods described so far provide low-level control over the DOM API. However, createElement() and appendChild() provide a verbose API for building a document and are best suited for situations in which the document being created follows a regular structure that can be encoded as an algorithm. All popular web browsers’ DOM elements also support a property named innerHTML, which allows arbitrary content to be assigned to an element in a very simple way. innerHTML is a string, representing a node’s children as HTML markup. For example, we can rewrite our addNode() function to use innerHTML like this:
function addListItemUsingInnerHTML(el,text){
  el.innerHTML+="<div class='programmed'>"+text+"</div>";
}
The <DIV> element and the nested text node can be added in a single statement. Note also that it is appending to the property using the += operator, not assigning it directly. Deleting a node using innerHTML would require us to extract and parse the string. innerHTML is less verbose and suited to relatively simple applications such as this. If a node is going to be heavily modified by an application, the DOM nodes presented earlier provide a superior mechanism.
We’ve now covered JavaScript, CSS, and the DOM. Together, they went under the name Dynamic HTML when first released. As we mentioned in the introduction to this chapter, Ajax uses many of the Dynamic HTML techniques, but it is new and exciting because it throws an added ingredient into the mix. In the next section, we’ll look at what sets Ajax apart from DHTML—the ability to talk to the server while the user works.
2.5. Loading data asynchronously using XML technologies
While working at an application—especially a sovereign one—users will be interacting continuously with the app, as part of the workflow. In chapter 1, we discussed the importance of keeping the application responsive. If everything locks up while a lengthy background task executes, the user is interrupted. We discussed the advantages of asynchronous method calls as a way of improving UI responsiveness when executing such lengthy tasks, and we noted that, because of network latency, all calls to the server should be considered as lengthy. We also noted that under the basic HTTP request-response model, this was a bit of a non-starter. Classical web applications rely on full-page reloads with every call to the server leading to frequent interruptions for the user.
Although we have to accept that a document request is blocked until the server returns its response, we have a number of ways of making a server request look asynchronous to users so that they can continue working. The earliest attempts at providing this background communication used IFrames. More recently, the XMLHttpRequest object has provided a cleaner and more powerful solution. We’ll look at both technologies here.
2.5.1. IFrames
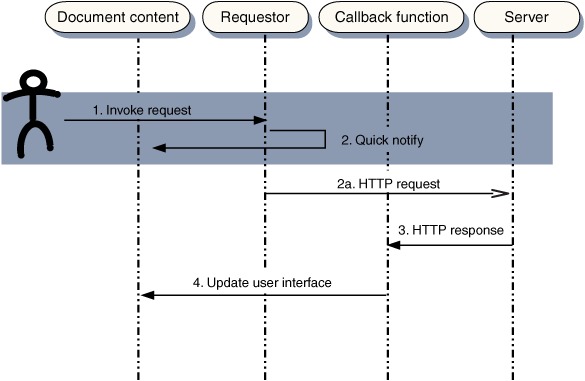
When DHTML arrived with versions 4 of Netscape Navigator and Microsoft Internet Explorer, it introduced flexible, programmable layout to the web page. A natural extension of the old HTML Frameset was the IFrame. The I stands for inline, meaning that it is part of the layout of another document, rather than sitting side by side as in a frameset. An IFrame is represented as an element in the DOM tree, meaning that we can move it about, resize it, and even hide it altogether, while the page is visible. The key breakthrough came when people started to realize that an IFrame could be styled so as to be completely invisible. This allowed it to fetch data in the background, while the visible user experience was undisturbed. Suddenly, there was a mechanism to contact the server asynchronously, albeit rather a hacky one. Figure 2.5 illustrates the sequence of events behind this approach.
Figure 2.5. Sequence of events in an asynchronous communication in a web page. User action invokes a request from a hidden requester object (an IFrame or XMLHttpRequest object), which initiates a call to the server asynchronously. The method returns very quickly, blocking the user interface for only a short period of time, represented by the height of the shaded area. The response is parsed by a callback function, which then updates the user interface accordingly.
Like other DOM elements, an IFrame can be declared in the HTML for a page or it can be programmatically generated using document.createElement(). In a simple case, in which we want only a single nonvisible IFrame for loading data into, we can declare it as part of the document and get a programmatic handle on it using document.getElementById(), as in listing 2.6.
Listing 2.6. Using an IFrame
<html>
<head>
<script type='text/javascript'>
window.onload=function(){
  var iframe=document.getElementById('dataFeed'),
  var src='datafeeds/mydata.xml';
  loadDataAsynchronously(iframe,src);
}
function loadDataAsynchronously(iframe,src){
  //...do something amazing!!
}
</script>
</head>
<body>
<!--
...some visible content here...
-->
<iframe
  id='dataFeed'
  style='height:0px;width:0px;'
>
</iframe>
</body>
</html>
The IFrame has been styled as being invisible by setting its width and height to zero pixels. We could use a styling of display:none, but certain browsers will optimize based on this and not bother to load the document! Note also that we need to wait for the document to load before looking for the IFrame, by calling getElementById() in the window.onload handler function. Another approach is to programmatically generate the IFrames on demand, as in listing 2.7. This has the added advantage of keeping all the code related to requesting the data in one place, rather than needing to keep unique DOM node IDs in sync between the script and the HTML.
Listing 2.7. Creating an IFrame
function fetchData(){
  var iframe=document.createElement('iframe'),
  iframe.className='hiddenDataFeed';
  document.body.appendChild(iframe);
  var src='datafeeds/mydata.xml';
  loadDataAsynchronously(iframe,src);
}
The use of createElement() and appendChild() to modify the DOM should be familiar from earlier examples. If we follow this approach rigidly, we will eventually create a large number of IFrames as the application continues to run. We need to either destroy the IFrames when we’ve finished with them or implement a pooling mechanism of some sort.
Design patterns, which we introduce in chapter 3, can help us to implement robust pools, queues, and other mechanisms that make a larger-scale application run smoothly, so we’ll return to this topic in more depth later. In the meantime, let’s turn our attention to the next set of technologies for making behind-the-scenes requests to the server.
2.5.2. XmlDocument and XMLHttpRequest objects
IFrames can be used to request data behind the scenes, as we just saw, but it is essentially a hack, repurposing something that was originally introduced to display visible content within a page. Later versions of popular web browsers introduced purpose-built objects for asynchronous data transfer, which, as we will see, offer some convenient advantages over IFrames.
The XmlDocument and XMLHttpRequest objects are nonstandard extensions to the web browser DOM that happen to be supported by the majority of browsers. They streamline the business of making asynchronous calls considerably, because they are explicitly designed for fetching data in the background. Both objects originated as Microsoft-specific ActiveX components that were available as JavaScript objects in the Internet Explorer browser. Other browsers have since implemented native objects with similar functionality and API calls. Both perform similar functions, but the XMLHttpRequest provides more fine-grained control over the request. We will use that throughout most of this book, but mention XmlDocument briefly here in case you come across it and wonder how it differs from XMLHttpRequest. Listing 2.8 shows a simple function body that creates an XmlDocument object.
Listing 2.8. getXmlDocument() function
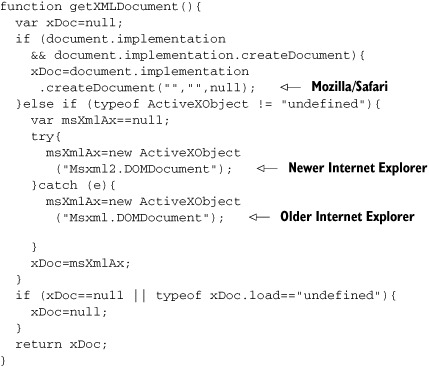
The function will return an XmlDocument object with an identical API under most modern browsers. The ways of creating the document differ considerably, though.
The code checks whether the document object supports the implementation property needed to create a native XmlDocument object (which it will find in recent Mozilla and Safari browsers). If it fails to find one, it will fall back on ActiveX objects, testing to see if they are supported or unsupported (which is true only in Microsoft browsers) and, if so, trying to locate an appropriate object. The script shows a preference for the more recent MSXML version 2 libraries.
Note
It is possible to ask the browser for vendor and version number information, and it is common practice to use this information to branch the code based on browser type. Such practice is, in our opinion, prone to error, as it cannot anticipate future versions or makes of browser and can exclude browsers that are capable of executing a script. In our getXmlDocument() function, we don’t try to guess the version of the browser but ask directly whether certain objects are available. This approach, known as object detection, stands a better chance of working in future versions of browsers, or in unusual browsers that we haven’t explicitly tested, and is generally more robust.
Listing 2.9 follows a similar but slightly simpler route for the XMLHttpRequest object.
Listing 2.9. getXmlHttpRequest() function

Again, we use object detection to test for support of the native XMLHttpRequest object and, failing that, for support for ActiveX. In a browser that supports neither, we will simply return null for the moment. We’ll look at gracefully handling failure conditions in more detail in chapter 6.
So, we can create an object that will send requests to the server for us. What do we do now that we have it?
2.5.3. Sending a request to the server
Sending a request to the server from an XMLHttpRequest object is pretty straightforward. All we need to do is pass it the URL of the server page that will generate the data for us. Here’s how it’s done:
function sendRequest(url,params,HttpMethod){
  if (!HttpMethod){
    HttpMethod="POST";
  }
  var req=getXMLHTTPRequest();
  if (req){
    req.open(HttpMethod,url,true);
    req.setRequestHeader
         ("Content-Type",
          "application/x-www-form-urlencoded");
    req.send(params);
  }
}
XMLHttpRequest supports a broad range of HTTP calling semantics, including optional querystring parameters for dynamically generated pages. (You may know these as CGI parameters, Forms arguments, or ServletRequest parameters, depending on your server development background.) Let’s quickly review the basics of HTTP before seeing how our request object supports it.
HTTP—A quick primer
HTTP is such a ubiquitous feature of the Internet that we commonly ignore it. When writing classic web applications, the closest that we generally get to the HTTP protocol is to define a hyperlink and possibly set the method attribute on a form. Ajax, in contrast, opens up the low-level details of the protocol for us to play with, allowing us to do a few surprising things.
An HTTP transaction between a browser and a web server consists of a request by the browser, followed by a response from the server (with some exceptionally clever, mind-blowingly cool code written by us web developers happening in between, of course). Both request and response are essentially streams of text, which the client and server interpret as a series of headers followed by a body. Think of the headers as lines of an address written on an envelope and the body as the letter inside. The headers simply instruct the receiving party what to do with the letter contents.
An HTTP request is mostly composed of headers, with the body possibly containing some data or parameters. The response typically contains the HTML markup for the returning page. A useful utility for Mozilla browsers called LiveHTTPHeaders (see the Resources section at the end of this chapter and appendix A) lets us watch the headers from requests and responses as the browser works. Let’s fetch the Google home page and see what happens under the hood.
The first request that we send contains the following headers:
GET / HTTP/1.1
Host: www.google.com
User-Agent: Mozilla/5.0
  (Windows; U; Windows NT 5.0; en-US; rv:1.7)
  Gecko/20040803 Firefox/0.9.3
Accept: text/xml,application/xml,
  application/xhtml+xml,text/html;q=0.9,
  text/plain;q=0.8,image/png,*/*;q=0.5
Accept-Language: en-us,en;q=0.5
Accept-Encoding: gzip,deflate
Accept-Charset: ISO-8859-1,utf-8;q=0.7,*;q=0.7
Keep-Alive: 300
Connection: keep-alive
Cookie: PREF=ID=cabd38877dc0b6a1:TM=1116601572
  :LM=1116601572:S=GD3SsQk3v0adtSBP
The first line tells us which HTTP method we are using. Most web developers are familiar with GET, which is used to fetch documents, and POST, used to submit HTML forms. The World Wide Web Consortium (W3C) spec includes a few other common methods, including HEAD, which fetches the headers only for a file; PUT, for uploading documents to the server; and DELETE, for removing documents. Subsequent headers do a lot of negotiation, with the client telling the server what content types, character sets, and so on it can understand. Because I’ve visited Google before, it also sends a cookie, a short message telling Google who I am.
The response headers, shown here, also contain quite a lot of information:
HTTP/1.x 302 Found
Location: http://www.google.co.uk/cxfer?c=PREF%3D:
  TM%3D1116601572:S%3DzFxPsBpXhZzknVMF&prev=/
Set-Cookie: PREF=ID=cabd38877dc0b6a1:CR=1:TM=1116601572:
  LM=1116943140:S=fRfhD-u49xp9UE18;
  expires=Sun, 17-Jan-2038 19:14:07 GMT;
  path=/; domain=.google.com
Content-Type: text/html
Server: GWS/2.1
Transfer-Encoding: chunked
Content-Encoding: gzip
Date: Tue, 24 May 2005 17:59:00 GMT
Cache-Control: private, x-gzip-ok=""
The first line indicates the status of the response. A 302 response indicates a redirection to a different page. In addition, another cookie is passed back for this session. The content type of the response (aka MIME type) is also declared. A further request is made on the strength of the redirect instruction, resulting in a second response with the following headers:
HTTP/1.x 200 OK
Cache-Control: private
Content-Type: text/html
Content-Encoding: gzip
Server: GWS/2.1
Content-Length: 1196
Date: Tue, 24 May 2005 17:59:00 GMT
Status code 200 indicates success, and the Google home page will be attached to the body of this response for display. The content-type header tells the browser that it is html.
Our sendRequest() method is constructed so that the second and third parameters, which we probably won’t need most of the time, are optional, defaulting to using POST to retrieve the resource with no parameters passed in the request body.
The code in this listing sets the request in motion and will return control to us immediately, while the network and the server take their own sweet time.
This is good for responsiveness, but how do we find out when the request has completed?
2.5.4. Using callback functions to monitor the request
The second part of the equation for handling asynchronous communications is setting up a reentry point in your code for picking up the results of the call once it has finished. This is generally implemented by assigning a callback function, that is, a piece of code that will be invoked when the results are ready, at some unspecified point in the future. The window.onload function that we saw in listing 2.9 is a callback function.
Callback functions fit the event-driven programming approach used in most modern UI toolkits—keyboard presses, mouse clicks, and so on will occur at unpredictable points in the future, too, and the programmer anticipates them by writing a function to handle them when they do occur. When coding UI events in JavaScript, we assign functions to the onkeypress, onmouseover, and similarly named properties of an object. When coding server request callbacks, we encounter similar properties called onload and onreadystatechange.
Both Internet Explorer and Mozilla support the onreadystatechange callback, so we’ll use that. (Mozilla also supports onload, which is a bit more straightforward, but it doesn’t give us any information that onreadystatechange doesn’t.) A simple callback handler is demonstrated in listing 2.10.
Listing 2.10. Using a callback handler
var READY_STATE_UNINITIALIZED=0;
var READY_STATE_LOADING=1;
var READY_STATE_LOADED=2;
var READY_STATE_INTERACTIVE=3;
var READY_STATE_COMPLETE=4;
var req;
function sendRequest(url,params,HttpMethod){
  if (!HttpMethod){
    HttpMethod="GET";
  }
  req=getXMLHTTPRequest();
  if (req){
    req.onreadystatechange=onReadyStateChange;
    req.open(HttpMethod,url,true);
    req.setRequestHeader
         ("Content-Type", "application/x-www-form-urlencoded");
    req.send(params);
  }
}
function onReadyStateChange(){
  var ready=req.readyState;
  var data=null;
  if (ready==READY_STATE_COMPLETE){
    data=req.responseText;
  }else{
    data="loading...["+ready+"]";
  }
  //... do something with the data...
}
First, we alter our sendRequest() function to tell the request object what its callback handler is, before we send it off. Second, we define the handler function, which we have rather unimaginatively called onReadyStateChange().
readyState can take a range of numerical values. We’ve assigned descriptively named variables to each here, to make our code easier to read. At the moment, the code is only interested in checking for the value 4, corresponding to completion of the request.
Note that we declare the request object as a global variable. Right now, this keeps things simple while we address the mechanics of the XMLHttpRequest object, but it could get us into trouble if we were trying to fire off several requests simultaneously. We’ll show you how to get around this issue in section 3.1. Let’s put the pieces together now, to see how to handle a request end to end.
2.5.5. The full lifecycle
We now have enough information to bring together the complete lifecycle of loading a document, as illustrated in listing 2.11. We instantiate the XMLHttpRequest object, tell it to load a document, and then monitor that load process asynchronously using callback handlers. In the simple example, we define a DOM node called console, to which we can output status information, in order to get a written record of the download process.
Listing 2.11. Full end-to-end example of document loading using XMLHttpRequest
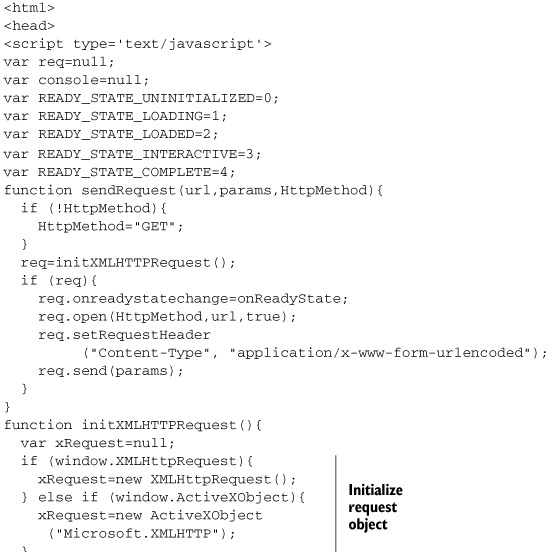
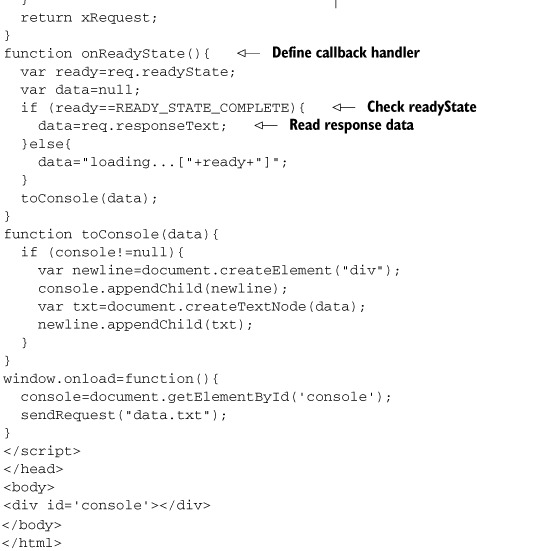
Let’s look at the output of this program in Microsoft Internet Explorer and Mozilla Firefox, respectively. Note that the sequence of readyStates is different, but the end result is the same. The important point is that the fine details of the readyState shouldn’t be relied on in a cross-browser program (or indeed, one that is expected to support multiple versions of the same browser). Here is the output in Microsoft Internet Explorer:
loading...[1]
loading...[1]
loading...[3]
Here is some text from the server!
Each line of output represents a separate invocation of our callback handler. It is called twice during the loading state, as each chunk of data is loaded up, and then again in the interactive state, at which point control would be returned to the UI under a synchronous request. The final callback is in the completed state, and the text from the response can be displayed.
Now let’s look at the output in Mozilla Firefox version 1.0:
loading...[1]
loading...[1]
loading...[2]
loading...[3]
Here is some text from the server!
The sequence of callbacks is similar to Internet Explorer, with an additional callback in the loaded readyState, with value of 2.
In this example, we used the responseText property of the XMLHttpRequest object to retrieve the response as a text string. This is useful for simple data, but if we require a larger structured collection of data to be returned to us, then we can use the responseXML property. If the response has been allocated the correct MIME type of text/xml, then this will return a DOM document that we can interrogate using the DOM properties and functions such as getElementById() and childNodes that we encountered in section 2.4.1.
These, then, are the building blocks of Ajax. Each brings something useful to the party, but a lot of the power of Ajax comes from the way in which the parts combine into a whole. In the following section, we’ll round out our introduction to the technologies with a look at this bigger picture.
2.6. What sets Ajax apart
While CSS, DOM, asynchronous requests, and JavaScript are all necessary components of Ajax, it is quite possible to use all of them without doing Ajax, at least in the sense that we are describing it in this book.
We already discussed the differences between the classic web application and its Ajax counterpart in chapter 1; let’s recap briefly here. In a classic web application, the user workflow is defined by code on the server, and the user moves from one page to another, punctuated by the reloading of the entire page. During these reloads, the user cannot continue with his work. In an Ajax application, the workflow is at least partly defined by the client application, and contact is made with the server in the background while the user gets on with his work.
In between these extremes are many shades of gray. A web application may deliver a series of discrete pages following the classic approach, in which each page cleverly uses CSS, DOM, JavaScript, and asynchronous request objects to smooth out the user’s interaction with the page, followed by an abrupt halt in productivity while the next page loads. A JavaScript application may present the user with page-like pop-up windows that behave like classic web pages at certain points in the flow. The web browser is a flexible and forgiving environment, and Ajax and non-Ajax functionality can be intermingled in the same application.
What sets Ajax apart is not the technologies that it employs but the interaction model that it enables through the use of those technologies. The web-based interaction model to which we are accustomed is not suited to sovereign applications, and new possibilities begin to emerge as we break away from that interaction model.
There are at least two levels at which Ajax can be used—and several positions between these as we let go of the classic page-based approach. The simplest strategy is to develop Ajax-based widgets that are largely self-contained and that can be added to a web page with a few imports and script statements. Stock tickers, interactive calendars, and chat windows might be typical of this sort of widget. Islands of application-like functionality are embedded into a document-like web page (figure 2.6). Most of Google’s current forays into Ajax (see section 1.3) fit this model. The drop-down box of Google Suggest and the map widget in Google Maps are both interactive elements embedded into a page.
Figure 2.6. A simple Ajax application will still work like a web page, with islands of interactive functionality embedded in the page.

If we want to adopt Ajax more adventurously, we can turn this model inside out, developing a host application in which application-like and document-like fragments can reside (figure 2.7). This approach is more analogous to a desktop application, or even a window manager or desktop environment. Google’s GMail fits this model, with individual messages rendering as documents within an interactive, application-like superstructure.
Figure 2.7. In a more complex Ajax application, the entire application is an interactive system, into which islands of document-like content may be loaded or programmatically declared.

In some ways, learning the technologies is the easy part. The interesting challenge in developing with Ajax is in learning how to use them together. We are accustomed to thinking of web applications as storyboards, and we shunt the user from one page to another following a predetermined script. With application-like functionality in our web application, we can provide the user with a more fine-grained handle on the business domain, which can enable a more free-form problem-solving approach to his work.
In order to gain the benefits of this greater flexibility, we have to question a lot of our coding habits. Is an HTML form the only way for a user to input information? Should we declare all our user interfaces as HTML? Can we contact the server in response to user interactions such as key presses and mouse movements, as well as the conventional mouse click? In the fast-paced world of information technology, we place a large emphasis on learning new skills, but unlearning old habits can be at least as important.
2.7. Summary
In this chapter, we’ve introduced the four technical pillars of Ajax.
JavaScript is a powerful general-purpose programming language with a bad reputation for generating pop-up windows, back-button hacks, and image rollovers. Appendix B contains a more detailed description of some of the features of the language, but from the examples here, you should be able to get a feel for how it can be used to genuinely enhance usability.
CSS and the DOM complement one another in providing a clear programmatic view of the user interface that we’re working with, while keeping the structure separate from the visual styling. A clean document structure makes programmatic manipulation of a document much simpler, and maintaining a separation of responsibilities is important in developing larger Ajax applications, as we’ll see in chapters 3 and 4.
We’ve shown how to work with the XMLHttpRequest object and with the older XmlDocument and IFrame. A lot of the current hype around Ajax praises XMLHttpRequest as the fashionable way to talk to the server, but the IFrame offers a different set of functionality that can be exactly what we need at times. Knowing about both enriches your toolkit. In this chapter, we introduced these techniques and provided some examples. In chapter 5, we will discuss client/server communications in more detail.
Finally, we looked at the way the technological pillars of Ajax can be combined to create something greater than the sum of its parts. While Ajax can be used in small doses to add compelling widgets to otherwise static web pages, it can also be applied more boldly to create a complete user interface within which islands of static content can be contained. Making this leap from the sidelines to center stage will require a lot of JavaScript code, however, and that code will be required to run without fail for longer periods, too. This will require us to approach our code differently and look at such issues as reliability, maintainability, and flexibility. In the next chapter, we look at ways of introducing order into a large-scale Ajax codebase.
2.8. Resources
For a deeper understanding of Cascading Style Sheets, we recommend the CSS Zen Garden (www.csszengarden.com/), a site that restyles itself in a myriad of ways using nothing but CSS.
Eric Meyer has also written extensively on CSS; visit his website at www.meyerweb.com/eric/css/. Blooberry (www.blooberry.com) is another excellent website for CSS information.
Early Ajax solutions using IFrames are described at http://developer.apple.com/internet/webcontent/iframe.html.
The LiveHttpHeaders extension for Mozilla can be found at http://livehttpheaders.mozdev.org/
Danny Goodman’s books on JavaScript are an essential reference for DOM programming, and cover the browser environments in great detail: Dynamic HTML: The Definitive Reference (O’Reilly 2002) and JavaScript Bible (John Wiley 2004).
The W3Schools website contains some interactive tutorials on JavaScript, for those who like to learn by doing (www.w3schools.com/js/js_examples_3.asp).
