Chapter 7. Testing applications
- Migrating tests to OSGi for in-container testing
- Mocking OSGi APIs for bundle testing
- Performing unit, integration, and management testing
You’re now just about halfway through this book: congratulations! At this point, you should have confidence in applying OSGi to new and existing projects. Migrating applications to OSGi should be especially fresh in your mind from the last chapter. But what can you do to make sure you’re on the right track to modularity and not turning your applications into tangled spaghetti? As is true for any piece of software, the best way to track quality is with regular testing. Testing can confirm that your modularized code meets the same requirements as your original application. Testing can verify that your code will continue to work when deployed inside the target container. It can even help you practice different deployment scenarios in the safety of your friendly neighborhood test server. Even a simple nonfunctional test, such as checking the number of shared packages between bundles, can avoid tangles forming early on in development.
Why wait until the end of a project to discover if your code works in the strict environment of an OSGi framework or how well your chosen bundles fit together? Migrate and modularize your tests along with your code! This chapter will help put this advice into practice by taking you through three different approaches:
- Running existing tests on OSGi
- Mocking out calls to OSGi APIs
- Advanced OSGi testing
The last section in particular takes a closer look at how unit and integration test concepts relate to modular applications and introduces the idea of management testing. If you’re eager to learn more about testing modularity and you’re already familiar with in-container tests and object mocking, feel free to skip ahead to section 7.3.
By the end of this chapter, you should be comfortable with testing OSGi applications, which will lead to better quality bundles for everyone. Let’s start by continuing the theme from chapter 6 and get some existing tests running on an OSGi framework.
7.1. Migrating tests to OSGi
Imagine you have an application that you want to modularize and move to OSGi. You almost certainly have existing tests that check requirements and expected behavior. You can use these tests to verify and validate the modularization process, either by manually running them at key stages or by using an automated build system that runs tests on a regular schedule—say, whenever people check in code. These tests give you confidence that your modularized application is to some extent equivalent to the original, at least when run with the test framework. But what they don’t tell you is whether your code behaves the same inside an OSGi container.
To find out, you need to run your tests twice: inside the target container as well as outside. Running these tests outside the container is a matter of using your favorite test framework, like JUnit (http://junit.sourceforge.net/) or TestNG (http://testng.org/). There are many good books on testing standard Java applications, so we assume you already know how to write unit tests and run them using Ant, Maven, or your IDE. But what about testing inside an OSGi container; how does it work in practice, and is it worth the effort?
7.1.1. In-container testing
Would you develop and deploy a web application without ever testing it inside an application server? Would you ship a product without testing its installer? Of course not! It’s important to test code in the right environment. If you expect to use a class with OSGi, you should test it inside an OSGi framework—how else will you discover potential class-loading or visibility issues? But before you can run your existing JUnit or TestNG tests inside the container, you first need to deploy them.
As you saw in chapter 6, whenever you want to deploy something into an OSGi framework, you must consider packaging and placement. If the test classes are (accidentally) exposed from the external class path, the tests will effectively be running outside of the container. Does this mean you should bundle tests along with the application code? It depends on how you expect the code to be used in OSGi. Internal classes can only be tested from inside the same bundle, but public-facing code can and should be tested from another bundle to mimic real-world conditions. Testing code inside the same bundle typically means the caller and callee share the same class loader, but many OSGi-related issues only appear when different class loaders are involved. So, wherever possible, test from another bundle.
Figure 7.1 summarizes the four possible test-deployment options:
Figure 7.1. Test deployment options
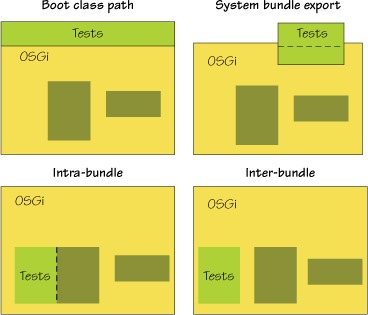
- Boot class path
- System bundle export
- Intra-bundle
- Inter-bundle
We’ll concentrate on the last two options (intra-bundle and inter-bundle tests) because it’s much more realistic to have the test code running inside the container along with the code being tested. Bundle testing means deploying tests in bundles just like any other piece of code, but how much effort is involved in getting tests up and running in an OSGi framework? Let’s find out right now by converting an existing open source library and its test suite into separate bundles.
7.1.2. Bundling tests
The Apache Commons Pool project (http://commons.apache.org/pool/) provides a small library for managing object pools. You’ll use the source distribution for Commons Pool 1.5.3, which contains the code for both the library and its test suite:
chapter07/migration-example/commons-pool-1.5.3-src.zip
Begin the example by splitting the Commons Pool library and tests into two bundles. The main subproject extracts the library source, compiles it, and creates a simple bundle that exports the main package, but hides the implementation (.impl) package. The test subproject does exactly the same thing for the test source, but it appends -test to the bundle symbolic name to make sure the bundles are unique.
The Commons Pool tests are JUnit tests, so you also need access to the JUnit library. Should it be deployed as a bundle or placed on the external class path? Exposing the packages from the external class path means you don’t have to turn JUnit into a bundle, but it also means JUnit can’t see test classes unless they’re on the same class path or explicitly passed in via a method call. You’d have to write your own code to scan bundles for tests and feed the class instances to JUnit, instead of relying on the standard test runner. We’ll look at a tool that does this in section 7.3. Let’s try the other approach here: bundling JUnit.
You can use the bndwrap Ant task from the bnd tool (http://aqute.biz/Code/Bnd) to quickly wrap the JAR file. The bndwrap task analyzes the JAR and creates a bundle that exports all packages contained inside it. It also adds optional imports for any packages that are needed but not contained in the JAR file. Unfortunately, this import list doesn’t contain your test packages, because JUnit doesn’t know about them yet. To avoid having to explicitly list your test packages at build time, you can instead use DynamicImport-Package: * (discussed in section 5.2.2). This dynamic import means JUnit will be able to see any future test class, as long as some bundle exports them.
Also add the following Main-Class header:
Main-Class: junit.textui.TestRunner
This tells your example launcher to start the JUnit test runner after deploying all the bundles. The TestRunner class expects to receive the name of the primary test class, so add org.apache.commons.pool.TestAll to the OSGi launcher command line in build.xml. (Your launcher will automatically pass any arguments after the initial bundle directory setting on to the Main-Class.)
Figure 7.2 shows the test deployment, which is the inter-bundle option from figure 7.1.
Figure 7.2. Testing Commons Pool inside an OSGi framework

Let’s try it for real:
$ cd chapter07/migration-example

$ ant clean test.osgi
...
[junit.osgi] Class not found "org.apache.commons.pool.TestAll"
[junit.osgi] Java Result: 1
Hmm...the JUnit bundle couldn’t see the TestAll class even though the test bundle clearly exports it. If you look closely at the package involved and cast your mind back to the visibility discussion from section 2.5.3, you should understand why. This is the same package that’s exported by the main Commons Pool bundle! Remember that packages can’t be split across bundles unless you use bundle dependencies (section 5.3), and you’re using package dependencies. You could use Require-Bundle to merge the packages together and re-export them (see section 5.3.1 for more about re-exporting packages), but you’d then need to use mandatory attributes to make sure JUnit and other related test bundles were correctly wired to the merged package. This would lead to a fragile test structure and cause problems with package-private members (to find out why, see the discussion near the start of section 5.4.1).
A better solution is to use fragments (section 5.4) to augment the original bundle with the extra test classes. To do this, you need to add one line to test/build.properties:
Fragment-Host: ${module}
The module property refers to the org.apache.commons.pool package, which you also use as the symbolic name of the main bundle. This is all you need to declare your test bundle as a fragment of the main library bundle. With this change in place, you can rebuild and repeat the test. You should see JUnit run through the complete Commons Pool test suite, which takes around two minutes:
$ ant clean test.osgi
...
[junit.osgi] .........................................
[junit.osgi] .........................................
[junit.osgi] .........................................
[junit.osgi] .........................................
[junit.osgi] .........................................
[junit.osgi] .....................................
[junit.osgi] Time: 118.127
[junit.osgi]
[junit.osgi] OK (242 tests)
You’re now running all your tests inside the combined library bundle (the intra-bundle option from figure 7.1) because your test fragment contains both internal and public-facing tests. You could go one step further and use a plain bundle for public tests and a fragment for internal tests, but you’d need some way to give JUnit access to your internal tests. At the moment the public org.apache.commons.pool.TestAll class loads internal tests from inside the same fragment, but this won’t work when you separate them. You don’t want to export any internal packages from the fragment because that would also expose internals from the main bundle, potentially affecting the test results.
The least disruptive solution is to keep a single public test class in the fragment that can be used to load the internal tests. You can move the remaining public-facing tests to a new package that doesn’t conflict with the library API (such as .test) and deploy them in a separate bundle. The result is a combination of both inter-bundle and intra-bundle testing. Figure 7.3 shows an example of such a structure for testing Commons Pool.
Figure 7.3. Recommended test structure for OSGi bundle tests

You can also run the test example outside of the container by invoking JUnit with the various bundles on the standard Java class path. In this case, you don’t need to start the OSGi framework. To try this, use the test build target instead of test.osgi. You should see the same results as before:
$ ant clean test
...
[junit] .........................................
[junit] .........................................
[junit] .........................................
[junit] .........................................
[junit] .........................................
[junit] .....................................
[junit] Time: 117.77
[junit]
[junit] OK (242 tests)
You’ve seen how easy it is to run tests both inside and outside of a container, but how do you know if you’re testing all possible scenarios and edge cases? Most projects use coverage to measure test effectiveness, although this doesn’t guarantee you have well-written tests! Given the importance of test coverage, let’s continue with the example and find out how you can record coverage statistics inside an OSGi container.
7.1.3. Covering all the bases
It’s always good to know how much of your code is being tested. Like test results, coverage can vary depending on whether you’re testing inside or outside a container. This makes in-container tests just as important as out-of-container tests when determining overall test coverage.
We can break the coverage-gathering process into three stages:
- Instrument the classes
- Execute the tests
- Analyze the results
The first and third stages can be done outside of the OSGi container. This leaves you with the second stage: testing the instrumented classes inside the chosen container. You already know you can run the original tests in OSGi, so what difference does instrumentation make? It obviously introduces some sort of package dependency to the coverage library, but it also introduces a configuration dependency. The instrumented code needs to know where to find the coverage database so it can record results. You can deal with the package dependency in three ways: wrap the coverage JAR file up as a bundle, export its packages from the system bundle using org.osgi.framework.system.packages.extra, or expose them from the boot class path with org.osgi.framework.bootdelegation. When using boot delegation, you must make sure coverage packages are excluded from the generated Import-Package in the library bundle or at least made optional. (Not doing this would lead to a missing constraint during resolution, because no bundle exports these packages.)
The simplest approach is to add the coverage JAR file and its dependencies to the launcher’s class path and update the system packages. Next simplest is boot delegation: here you have the extra step of removing coverage packages from the Import-Package of your instrumented bundle. Let’s take the interesting route and turn the coverage JAR file into a bundle. Our chosen coverage tool for this example is Cobertura 1.9.3 (http://cobertura.sourceforge.net/), but all the techniques mentioned should work for other tools as well.
The first step is to create a new JAR file which contains the original Cobertura JAR file and all of its execution-time dependencies. You embed these dependencies because you want this to be a standalone bundle. Remember, this bundle will only be used during testing, so you have more leeway than if you were creating a production-quality bundle. You then use the bnd tool to wrap the JAR file in the same way you wrapped JUnit, making sure you set Bundle-ClassPath so the bundle can see its embedded dependencies. You can find the complete bundling process in cobertura.osgi/build.xml.
All you need to do now is instrument the classes and run the tests:
$ ant clean test.osgi -Dinstrument=true
You use the instrument property to enable the various instrumentation targets. Before launching the tests, the build also sets the net.sourceforge.cobertura.data-file system property so that instrumented tests know where to find the coverage database. As soon as the tests complete, the build runs the Cobertura report task to process the results. Point your browser at reports/index.html to see the results, which should look like figure 7.4.
Figure 7.4. Cobertura coverage report for Commons Pool

In this section, you saw how to take existing tests (and test tools) and run them inside an OSGi container. You may have noticed that this process is similar to the JAR-to-bundle process described in the first half of chapter 6. Deciding how to bundle tests is no different than deciding how to bundle an application. Visibility and modularity are just as important when it comes to testing. But what about going the other way? Can you take OSGi-related code and test it outside the container?
When you first begin to modularize and migrate an application over to OSGi, you probably won’t have a direct dependency on the OSGi API. This means your code can still be tested both inside and outside the container. But at some point you’ll want to use the OSGi API. It may start with one or two bundle activators, and then maybe use the bundle context to look up a service. Dependency injection, component models (discussed in chapters 11 and 12), and other similar abstractions can all help reduce the need to deal directly with the container. But what if you have code that uses the OSGi API? Such code can’t be tested outside the container—or can it?
Imagine if you could mimic the container without having to implement a complete OSGi framework. There’s a technique for doing this, and it goes by the name of mocking.
7.2. Mocking OSGi
OSGi is just a load of fancy class loaders! Oh, wait, we didn’t mean that sort of mocking. (Besides, we all know by now that there’s a lot more to OSGi than enhanced class loading.) We’re talking about using mock objects to test portions of code without requiring a complete system. A mock object is basically a simulation, not a real implementation. It provides the same API, but its methods are scripted and usually return expected values or additional mocked objects. Object mocking is a powerful technique because it lets you test code right from the start of a project, even before your application is complete. You can also use it to test situations that are hard to recreate with the real object, such as external hardware failures.
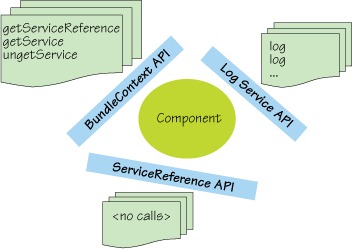
Figure 7.5 represents the dynamic log client from chapter 4. Let’s take this example and test it outside OSGi by mocking the API: verifying calls made to the API and scripting the desired responses. We’ll show you how easy it is to script scenarios that may be hard to reproduce in a real container, look at mocking in a multithreaded environment, and wrap things up by reliably demonstrating the race condition mentioned in section 4.3.1.
Figure 7.5. Mocking in action
7.2.1. Testing expected behavior
How might you use mocking to test an OSGi application? Let’s look at code from earlier in this book: the LogService lookup example from chapter 4 that contained a potential race condition. Here’s a quick reminder of the problematic code.
Listing 7.1. Broken service lookup containing a race condition
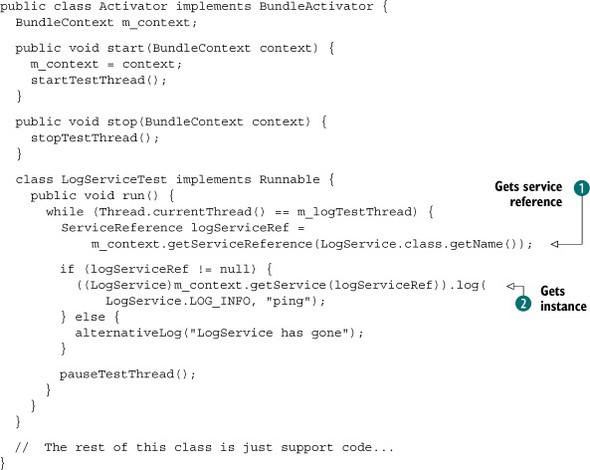
Notice how this code interacts with the OSGi container. It receives a context object in the activator start method, uses this context to get a service reference ![]() , and uses this reference to get the actual instance
, and uses this reference to get the actual instance ![]() . Each of these objects has a well-defined interface you can mock out, and the example code uses only a few methods from each
API. This is good news because when mocking objects you only need to simulate the methods that are used, not the complete
API.
. Each of these objects has a well-defined interface you can mock out, and the example code uses only a few methods from each
API. This is good news because when mocking objects you only need to simulate the methods that are used, not the complete
API.
You already know that this code compiles against the OSGi API, and back in chapter 4 you even tried it on an actual framework. But does it use the service API correctly? This is the sort of test that’s hard to write without mocking. Sure, you can run tests on the container by invoking your code and checking the results as you did back in section 7.1, but this doesn’t tell you if the code is using the container the right way. For example, the container won’t complain if you forget to unget a service after you’re done with it, but forgetting to do this skews service accounting and makes it look like your bundle is still using the service when it isn’t. The container also doesn’t know if you use the result of getService() without checking for null. In this example, you may get a NullPointerException if the service disappears in the short time between checking the reference and using it. Writing a test that’s guaranteed to expose this race condition on a live framework is hard, but trivial with mock objects.
How exactly does mocking help? Because mock objects are scripted, you can verify that the right methods are called in the appropriate order. You can throw exceptions or return null values at any point in the sequence to see how the client handles it. Enough talk, let’s try mocking ourselves.
7.2.2. Mocking in action
Typically, five steps are involved in mocking out an API:
- Mock— Create prototype mock objects
- Expect— Script the expected behavior
- Replay— Prepare the mock objects
- Test— Run the code using the mock objects
- Verify— Check that the behavior matches
You’ll use EasyMock (http://easymock.org/) in this example, but any mocking library will do. You can find the initial setup under chapter07/mocking-example in the book’s companion code. It contains the log client code from listing 7.1 and a skeleton test class that you’ll expand on in this section: mock_test/src/org/foo/mock/ LogClientTests.java. You can also find a completed version of the unit test in the solution directory if you don’t feel like typing all this code. Let’s go through each of the five steps in detail and mock out the OSGi API:
- Create prototype objects for parts of the API that you want to mock out: BundleContext, ServiceReference, and LogService. You can do this by adding the following lines to the empty test case:
BundleContext context = createStrictMock(BundleContext.class);
ServiceReference serviceRef = createMock(ServiceReference.class);
LogService logService = createMock(LogService.class); You use a strict mock for the context, because you want to check the call sequence. - Script the expected behavior of the log client as it finds and calls the Log-Service:
expect(context.getServiceReference(LogService.class.getName()))
.andReturn(serviceRef);
expect(context.getService(serviceRef))
.andReturn(logService);
logService.log(
and(geq(LogService.LOG_ERROR), leq(LogService.LOG_DEBUG)),
isA(String.class)); Using your knowledge of the service API from chapter 4, you expect that the client will call your mock context to find a reference to the LogService, to which you respond by returning a mock service reference. You expect the client to pass this reference back your mock context in order to get your mock Log-Service. Finally, you expect the client to call your mock LogService with a valid log level and some sort of message string. - Replay the expected behavior to initialize your mock objects:
replay(context, serviceRef, logService); - Use your mock objects, and pretend to be the OSGi container:
BundleActivator logClientActivator = new Activator();
logClientActivator.start(context);
try {
Thread.sleep(1000);
} catch (InterruptedException e) {}
logClientActivator.stop(context); Consider the active lifecycle of an OSGi bundle: first it’s started, and some time later it’s stopped. You don’t worry about mimicking the resolution stage in this test because you want to test service usage, not class loading. You know the client will spawn some sort of thread to use the LogService, so you wait one second to give that thread time to make the call and pause. (Using sleep here isn’t ideal; later, you’ll see how you can replace it with proper handshaking.) Then, when the one second is up, you stop the client bundle. - The last step is to make sure you saw the expected behavior during the test:
verify(context, serviceRef, logService); This method throws an exception if the observed behavior doesn’t match.
At this point, you should have a complete test that compiles and runs successfully:
$ cd chapter07/mocking-example

$ ant test
...
test:
[junit] Running org.foo.mock.LogClientTests
[junit] Tests run: 1, Failures: 0, Errors: 0, Time elapsed: 1.157 sec
Excellent: you’ve confirmed that your client uses the OSGi API correctly when a Log-Service is available. But what happens when a LogService isn’t available; does it handle that too?
7.2.3. Mocking unexpected situations
As we mentioned back at the start of this section, mocking is a powerful testing technique because it lets you script situations that are hard to re-create inside a test environment. Although it’s easy to arrange a test in an OSGi container without a LogService, it would be difficult to arrange for this service to appear and disappear at exactly the right time to trigger the race condition you know exists in your client code. With mocking, it’s easy.
First, let’s test what happens when no LogService is available by adding the following expectation between your last expect and the call to replay:
expect(context.getServiceReference(LogService.class.getName()))
    .andReturn(null);
This states that you expect the client to begin another call to look up the LogService, but this time you return a null reference to indicate no available service. If you try to run the test now, it will fail because you don’t give the client enough time to make a second call before stopping the bundle. Your log client pauses five seconds between each call, so you need to add five seconds to the existing sleep:
try {
  Thread.sleep(6000);
} catch (InterruptedException e) {}
The client now gets enough time to begin a second log call, but the test still fails:
$ ant test
...
[junit] Running org.foo.mock.LogClientTests
[junit] Exception in thread "LogService Tester" java.lang.AssertionError:
[junit]   Unexpected method call getBundle():
It appears that your client is using another method (getBundle()) on the Bundle-Context to find the owning bundle when no LogService is available. If you look at the rest of the client code under chapter07, you’ll see that it uses this to get the bundle identifier when logging directly to the console. You don’t mind how many times your client calls getBundle(), if at all, so let’s use a wildcard expectation:
Bundle bundle = createNiceMock(Bundle.class);

expect(context.getServiceReference(LogService.class.getName()))
    .andReturn(null);

expect(context.getBundle())
    .andReturn(bundle).anyTimes();
You need to provide a new mock to represent your Bundle object. This time, instead of simulating each method the client uses, you take a shortcut and use a nice mock on the first line. Nice mocks automatically provide empty implementations and default return values. You expect your log client to request this mock bundle from your mock bundle context after you return the null service reference, but it may ask for it zero or more times. One last thing you must remember to do is add your mock bundle to the replay list. (If you happen to forget to replay a mock before it’s used, you’ll get an IllegalStateException from EasyMock about missing behavior definitions.)
replay(context, serviceRef, logService, bundle);
With the new expectation in place and everything replayed, the test passes once more:
$ ant test
...
[junit] Running org.foo.mock.LogClientTests
[junit] <--> thread="LogService Tester", bundle=0 : LogService has gone
[junit] Tests run: 1, Failures: 0, Errors: 0, Time elapsed: 6.125 sec
Having sleep in your unit test is annoying, though. Every time you want to test additional log calls, you need to extend the sleep, which makes your tests run longer and longer. You should try to replace it with some form of handshaking. But even with handshaking, your log client will still pause for five seconds between each call. If only you could replace the pause method while keeping the rest of the code intact.
7.2.4. Coping with multithreaded tests
You’re currently testing a simple log client that spawns a separate thread to make log calls. Knowing how to test multithreaded bundles is useful, because people often use threads to limit the amount of work done in the activator’s start method. As we mentioned at the end of the last section, the main difficulty is synchronizing the test thread with the threads being tested. Up to now you relied on sleep, but this is a fragile solution. Some form of barrier or handshake procedure (see figure 7.6) is needed to hold client threads back until the test is ready to proceed and vice versa.
Figure 7.6. Synchronizing tests with multithreaded code

Thankfully, the log client has an obvious place where you can add such a barrier: the protected pauseTestThread method, which currently puts the client thread to sleep for five seconds. You could consider using aspect-orientated programming (AOP) to add a barrier to this method, but let’s avoid pulling in extra test dependencies and use an anonymous class to override it instead:
final CountDownLatch latch = new CountDownLatch(2);

BundleActivator logClientActivator = new Activator() {
  @Override protected void pauseTestThread() {
    latch.countDown();

    if (latch.getCount() == 0) {
      LockSupport.park();
    }
  }
};
The anonymous class replaces the original pauseTestThread method with one that uses a countdown latch, initialized with the number of expected log calls. Each time the client makes a log call, it calls pauseTestThread and counts down the latch. When no more log calls are expected, the client thread suspends itself and waits for the rest of the test to shut down. The test code only needs to wait for the latch to reach zero before it stops the client bundle:
logClientActivator.start(context);
if (!latch.await(5, TimeUnit.SECONDS)) {
  fail("Still expecting" + latch.getCount() + " calls");
}
logClientActivator.stop(context);
The test includes a timeout in case the client thread aborts and can’t complete the countdown; but if everything goes as expected, the updated test finishes in under a second:
$ ant test
...
[junit] Running org.foo.mock.LogClientTests
[junit] <--> thread="LogService Tester", bundle=0 : LogService has gone
[junit] Tests run: 1, Failures: 0, Errors: 0, Time elapsed: 0.14 sec
So far so good: all you have to do to test additional log calls is increment the latch count. But what should you do if your client thread doesn’t contain a pause method or this method can’t be replaced or extended? Another solution is to add barriers to the mocked-out objects themselves by using so-called answer objects. Answers let you perform basic AOP by intercepting method calls, which you can use to add synchronization points. Here’s an example:
expect(context.getServiceReference(isA(String.class)).andAnswer(
    new IAnswer<ServiceReference>() {
      public ServiceReference answer() {
        LockSupport.park();
        return null;
      }
    });
In this (incomplete) example, you script an answer that always returns a null service reference and use it to suspend the client thread whenever it makes this call. This works as long as the client thread initiates the expected call at the right time and there are no problems with suspending the client in the middle of this call. But it also leaves the client code untouched, which in this case means a five-second pause between log calls. You’ll test another log call in the next section, so let’s stick with the original latch solution.
7.2.5. Exposing race conditions
OSGi is dynamic: bundles and services may come and go at any time. The key to developing a robust application is being able to cope with and react to these events. This same dynamism makes testing robustness difficult. You could deploy your bundles into a real framework and attempt to script events to cover all possibilities (we’ll look at this in more detail in section 7.3), but some scenarios require microsecond timing. Remember the race condition we mentioned at the start of this section? This will be exposed only if you can arrange for the LogService to disappear between two method invocations—a narrow window. Many factors can cause you to miss this window, such as unexpected garbage collection and differences in thread scheduling. With mocking, you can easily script the exact sequence of events you want:
expect(context.getServiceReference(LogService.class.getName()))
    .andReturn(serviceRef);

expect(context.getService(serviceRef))
    .andReturn(null);

expect(context.getBundle())
    .andReturn(bundle).anyTimes();
You begin by expecting another log call, so remember to bump the latch count up to three calls. The LogService is still available at this point, so you return the mock reference. The client is expected to dereference this by calling getService(), and at this point you pretend the LogService has vanished and return null. You follow this by expecting another wildcard call to get the bundle, just as you did in section 7.2.3, because the log client may need it to do some alternative logging to the console.
Your test is now complete. You may want to compare it with the class in the solution subdirectory. It covers normal and missing service conditions and the edge case where the service is there to begin with but quickly disappears. Running it should expose the problem that you know is there but couldn’t re-create reliably on a real framework:
$ ant test
...
[junit] Running org.foo.mock.LogClientTests
[junit] <--> thread="LogService Tester", bundle=0 : LogService has gone
[junit] Exception in thread "LogService Tester"
          java.lang.NullPointerException
[junit]     at org.foo.log.Activator$LogServiceTest.run(Activator.java:66)
[junit]     at java.lang.Thread.run(Thread.java:619)
[junit] Tests run: 1, Failures: 0, Errors: 0, Time elapsed: 5.205 sec
At this point, adventurous readers may want to copy the working service-lookup example from chapter 4 (chapter04/dynamics/correct_lookup) and try testing it. One tip: you’ll need to extend the test to expect calls to ungetService(), because the working example attempts to release the service reference after each successful call to get-Service(). Whether you mandate calls to ungetService() or make them optional by appending times(0, 1) to the expectation is completely up to you.
In this section, you learned how to mock out the OSGi API and script different scenarios when testing bundle-specific code that uses OSGi. Mocking helps you test situations that are next to impossible to recreate in a real container. It also provides a counterpoint to the first section where you were running existing tests inside a real container on code that often had no dependency on OSGi at all. The last section will attempt to harmonize both approaches, by explaining how to script modular tests and run them on a variety of frameworks.
7.3. Advanced OSGi testing
In the previous section, you successfully mocked out the OSGi API and ran your tests without requiring a framework. Of course, the less you depend directly on an API, the easier it is to mock. It’s even easier if you use one of the component models from chapters 11 and 12, because your dependencies will be indirectly injected by the component framework. Such components rarely need to use the OSGi API themselves, so testing becomes a matter of reconfiguring bindings to inject mocked-out dependencies in place of the original instances. But as we discussed in section 7.1.1, eventually you’ll want to run tests on a real OSGi framework. These container tests typically don’t increase your code coverage—any unit and mocked-out tests should have already tested the critical paths. Instead, these tests verify that your code conforms to the container: is it packaged correctly, does it follow the container programming model, does it use standard APIs?
You should run your tests on as many containers as possible to guard against container-specific behavior. But keeping all these containers up to date and managing their different settings and configurations soon becomes tiresome. The newly standardized OSGi embedding and launching API (discussed in chapter 13) helps, but it lacks features that would make testing on OSGi much easier: automatic test wrapping, dynamic bundle creation, and common deployment profiles. Luckily, several recently released OSGi test tools provide all these features and more.
OSGi-enabled test tools bring other benefits because they embrace OSGi, such as improved test modularity and management. You can use them to run a complete range of tests from basic unit tests, through various combinations of integration tests, all the way up to advanced management tests. You’ll see a real-world example of this later that uses one of the more popular OSGi test tools called Pax Exam to test a service bundle in isolation, combined with client bundles, and finally with older versions of the same service to try out a proposed upgrade scenario.
Let’s begin with a brief review of the various OSGi test tools available today.
7.3.1. OSGi test tools
At the time of writing this book, three major test tools are available for OSGi:
- Open Participation Software for Java’s (OPS4J) Pax Exam (http://wiki.ops4j.org/display/paxexam)
- Spring DM’s test support (http://static.springsource.org/osgi/docs/1.2.1/reference/html/testing.html)
- Dynamic Java’s DA-Testing (www.dynamicjava.org/posts/da-testing-introduction)
All follow the same basic approach to building and deploying tests:
- Prepare the OSGi container.
- Deploy the selected bundles.
- Create a test bundle on the fly.
- Deploy and execute the tests.
- Shut down the container.
Each tool has its own advantages and disadvantages. The Spring DM test support obviously works best with Spring-based applications. Although you can also use it to test non-Spring applications, doing so requires several Spring dependencies that make it appear rather heavy. Spring DM testing also only supports JUnit 3, which means no annotated tests. DA-Testing, on the other hand, provides its own test API, optimized for testing service dynamics such as the race condition you saw in section 7.2.5. This makes it hard to move existing JUnit or TestNG tests over to DA-Testing, because developers have to learn another test API, but it does make dynamic testing much easier. Pax Exam goes to the other extreme and supports both JUnit 3 and 4, with TestNG support in the works. Table 7.1 summarizes the differences between the tools.
Table 7.1. OSGi test tool features
|
JUnit 3 |
JUnit 4 |
TestNG |
OSGi mocks |
OSGi frameworks |
OSGi profiles |
|
|---|---|---|---|---|---|---|
| Pax Exam | Future | Felix / Equinox / Knopflerfish (multiple versions) | over 50 | |||
| Spring DM | Future | Felix / Equinox / Knopflerfish (single version only) | ||||
| DA-Testing | Equinox (others planned) |
In this chapter, you’ll use Pax Exam from the OPS4J community, because we believe it’s a good general-purpose solution; but many of the techniques covered in this section can be adapted for use with the other tools. One of Pax Exam’s strengths is its support for a wide range of different OSGi frameworks, which is important if you want to produce robust portable bundles. But why is this?
7.3.2. Running tests on multiple frameworks
OSGi is a standard, with a detailed specification and a set of framework-compliance tests. Even with all this, there can be subtle differences between implementations. Perhaps part of the specification is unclear or is open to interpretation. On the other hand, maybe your code relies on behavior that isn’t part of the specification and is left open to framework implementers, such as the default Thread Context Class Loader (TCCL) setting. The only way to make sure your code is truly portable is to run the same tests on different frameworks. This is like the practice of running tests on different operating systems—even though the JDK is supposed to be portable and standardized, differences can exist, and it’s better to catch them during development than to fix problems in the field.
Unfortunately, many OSGi developers only test against a single framework. This may be because they only expect to deploy their bundles on that particular implementation, but it’s more likely that they believe the cost of setting up and managing multiple frameworks far outweighs the perceived benefits. This is where Pax Exam helps—testing on an extra OSGi framework is as simple as adding a single line of Java code.
Let’s see how easy it to use Pax Exam. You’ll continue to use Ant to run these tests, although Pax Exam is primarily Maven-based. This means you need to explicitly list execution-time dependencies in build.xml, instead of letting Maven manage this for you. You can find your initial setup under chapter07/testing-example.
Look at the fw subproject; it contains a simple test class that prints out various framework properties. The contents of this test class are shown next.
Listing 7.2. Simple container test

You begin by annotating your test class with @RunWith. This tells JUnit to use the named test runner instead of the standard JUnit one. The Pax Exam JUnit4TestRunner class is responsible for starting the relevant framework, deploying bundles, and running the tests. The @Configuration annotation identifies the method that provides the Pax Exam configuration. Right now, you ask it to deploy the standard OSGi
compendium bundle ![]() from Maven central in to the default framework. The actual test method is annotated with the usual JUnit 4 annotation, @Test. It accepts a BundleContext argument that’s supplied by Pax Exam at execution time. You use this bundle context to print out various properties, including
the symbolic name of the test bundle
from Maven central in to the default framework. The actual test method is annotated with the usual JUnit 4 annotation, @Test. It accepts a BundleContext argument that’s supplied by Pax Exam at execution time. You use this bundle context to print out various properties, including
the symbolic name of the test bundle ![]() .
.
To run this test, type the following:
$ cd chapter07/testing-example

$ ant test.container
You should see something like the following, but with properties that match your system.
Listing 7.3. Using Pax Exam to run tests on an OSGi framework
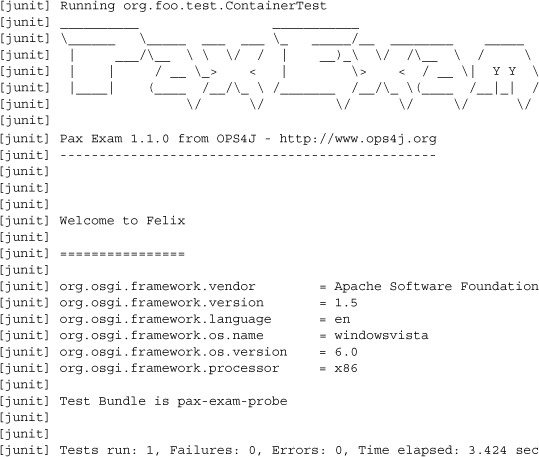
You may have noticed that the symbolic name of the test bundle is pax-exam-probe. This bundle is generated at execution time by Pax Exam and contains your test classes. The default container is Apache Felix, but you can easily ask Pax Exam to run the same test on other frameworks as well. All you need to do is add a few lines to the configuration method in your test class fw/container/src/org/foo/test/ContainerTest.java:
  @Configuration
  public static Option[] configure() {
    return options(
      frameworks(
        felix(), equinox(), knopflerfish()
      ),
      mavenBundle("org.osgi", "org.osgi.compendium", "4.2.0")
    );
  }
Pax Exam does the hard work of downloading the necessary JAR files and setting up any framework-specific configuration files. You just need to sit back and rerun your test:
$ ant test.container
This time you should see three distinct sets of output, as shown here.
Listing 7.4. Using Pax Exam to run tests on multiple frameworks

Notice how some of the properties vary slightly between frameworks, in particular the OS name. This is a reminder of why it’s a good idea to test on a variety of frameworks: to make sure you aren’t depending on unspecified or undocumented behavior.
You just saw how easy it is to run a test on many different frameworks using Pax Exam. But how well does it work with existing unit tests and existing test tools?
7.3.3. Unit testing
At the start of this section, we mentioned how OSGi test tools can help you modularize and manage tests. Because Pax Exam integrates with JUnit as a custom runner, you can use it in any system that can run JUnit tests. This means you can mix non-OSGi unit and integration tests with Pax Exam–based tests and have the results collected in one place. A good example of this mixture can be found in the Configuration Admin Service implementation from the Apache Felix project (http://felix.apache.org/site/apache-felix-config-admin.html). The Configuration Admin Service is a compendium service that provides and persists configuration data for bundles.
The Felix Configuration Admin Service build uses Maven and has a single test directory. This test directory contains mocked-out unit tests to test internal details along with Pax Exam integration tests to test the expected Configuration Admin Service behavior. We’ve taken these tests and separated them into unit and integration tests so you can see the difference. The unit tests are in the ut subproject, and you can run them with this command from the chapter07/testing-example/ directory:
$ ant test.unit
...
[junit] Running
    org.apache.felix.cm.file.FilePersistenceManagerConstructorTest
[junit] Tests run: 2, Failures: 0, Errors: 0, Time elapsed: 0.027 sec
[junit] Running org.apache.felix.cm.file.FilePersistenceManagerTest
[junit] Tests run: 8, Failures: 0, Errors: 0, Time elapsed: 0.255 sec
[junit] Running org.apache.felix.cm.impl.CaseInsensitiveDictionaryTest
[junit] Tests run: 10, Failures: 0, Errors: 0, Time elapsed: 0.012 sec
[junit] Running org.apache.felix.cm.impl.ConfigurationAdapterTest
[junit] Tests run: 3, Failures: 0, Errors: 0, Time elapsed: 0.013 sec
[junit] Running org.apache.felix.cm.impl.ConfigurationManagerTest
[junit] Tests run: 3, Failures: 0, Errors: 0, Time elapsed: 0.037 sec
[junit] Running org.apache.felix.cm.impl.DynamicBindingsTest
[junit] Tests run: 4, Failures: 0, Errors: 0, Time elapsed: 0.055 sec
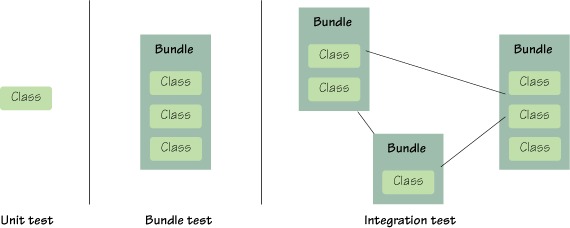
These are still considered unit tests because they don’t run inside an OSGi container. You could bundle them into a fragment as you did in section 7.1 and deploy them using Pax Exam, in which case they would be called bundle tests. Bundle tests are somewhere between unit and full-blown integration tests. They test more than a single class or feature but don’t involve more than one bundle. Figure 7.7 shows the difference.
Figure 7.7. Unit, bundle, and integration testing
After you’ve tested your core functionality both inside and outside the OSGi container, you can move on to integration testing. Integration testing is where Pax Exam shines.
7.3.4. Integration testing
Integration tests are where you start to piece together your application and test interactions between individual components. To test combinations of components, you need some way to compose them. For standard Java applications, it can be tricky deciding which JAR files you need to load; but with OSGi applications, all the dependency information is available in the metadata. Deployment becomes a simple matter of picking a set of bundles.
Let’s look at a concrete example. You can find the Apache Felix Configuration Admin Service integration tests under the it subproject. To run all these tests in sequence, type the following in the chapter07/testing-example/ directory:
$ ant test.integration
...
[junit] Tests run: 2, Failures: 0, Errors: 0, Time elapsed: 26.523 sec
...
[junit] Tests run: 7, Failures: 0, Errors: 0, Time elapsed: 24.664 sec
...
[junit] Tests run: 15, Failures: 0, Errors: 0, Time elapsed: 55.839 sec
...
[junit] Tests run: 4, Failures: 0, Errors: 0, Time elapsed: 14.45 sec
...
[junit] Tests run: 4, Failures: 0, Errors: 0, Time elapsed: 13.809 sec
...
[junit] Tests run: 2, Failures: 0, Errors: 0, Time elapsed: 5.723 sec
You may wonder why there isn’t much output during the tests. This is because you’ve set the local logging threshold to WARN. To see more details about what Pax Exam is running, edit the local log4j.properties file, and change the threshold from WARN to INFO.
Let’s take a closer look at one of the integration tests from ConfigurationBaseTest.
Listing 7.5. Basic configure-then-start integration test

This integration test checks that the Configuration Admin Service implementation successfully records configuration data that
is registered before the managed bundle starts. The managed bundle is the bundle being configured. The test method has the
standard JUnit 4 annotation and extends a base class called ConfigurationTestBase that provides general helper methods. One such method is used to set configuration data using the current Configuration Admin
Service ![]() . The test creates and installs a managed bundle on the fly and waits for the configuration to be delivered to this managed
bundle. It makes sure the delivered configuration is correct
. The test creates and installs a managed bundle on the fly and waits for the configuration to be delivered to this managed
bundle. It makes sure the delivered configuration is correct ![]() before removing the configuration. The test waits for the managed bundle to be notified about this removal and verifies it
was correctly notified
before removing the configuration. The test waits for the managed bundle to be notified about this removal and verifies it
was correctly notified ![]() .
.
This is a clear test. It almost looks like a unit test, except calls are being made between components instead of inside a single component or class. The other tests under the it subproject follow the same basic pattern, which may be repeated several times:
- Check the initial system state.
- Disrupt the state (by calling services, or adding or removing bundles).
- Check the resulting system state.
As you just saw, the Configuration Admin Service integration tests all extend a single base class called ConfigurationTestBase that defines helper methods to deal with configurations, synchronize tests, and create additional bundles at execution time. These additional bundles consume and validate the configuration data. Right now, the tests are only configured to run on Apache Felix, but let’s see if they also pass on other frameworks.
Add the following lines to the Pax Exam options inside the configuration() method in ConfigurationTestBase, just as you did with the container test back in section 7.3.2, like this:
@Configuration
public static Option[] configuration() {
  return options(
    frameworks(felix(), equinox(), knopflerfish()),
    provision(
      bundle(new File("bundles/configadmin.jar").toURI().toString()),
      mavenBundle(
        "org.ops4j.pax.swissbox", "pax-swissbox-tinybundles", "1.0.0"))
  );
}
Pax Exam now runs each test three times—once per framework. You can see this by typing the following command in the chapter07/testing-example/ directory:
$ ant test.integration
...
[junit] Tests run: 6, Failures: 0, Errors: 0, Time elapsed: 84.585 sec
...
[junit] Tests run: 21, Failures: 0, Errors: 0, Time elapsed: 99.05 sec
...
[junit] Tests run: 45, Failures: 0, Errors: 0, Time elapsed: 220.184 sec
...
[junit] Tests run: 12, Failures: 0, Errors: 0, Time elapsed: 55.269 sec
...
[junit] Tests run: 12, Failures: 0, Errors: 0, Time elapsed: 54.686 sec
...
[junit] Tests run: 6, Failures: 0, Errors: 0, Time elapsed: 26.417 sec
No failures or errors! The Apache Felix Configuration Admin Service implementation works the same on all three frameworks. This shouldn’t be unexpected, because one of the goals driving OSGi is reusable modules. Many framework bundles can be reused on other frameworks. When you find you need a particular compendium service, and your current framework doesn’t provide it, look around in case you can reuse a bundle from another site. You can even use Pax Exam to try different combinations of compendium bundles.
Pax Exam makes integration testing as simple as unit testing, but like any good tool you have to be careful not to overuse it. Each integration test has the overhead of starting and stopping an OSGi container, so the overall test time can build up as you add more and more tests. People are looking into reusing containers during testing, but for some tests you need complete isolation. Although work is being done to reduce the cost of each test, this cost will never be zero. In practice, this means you should look carefully at your tests and try to get the most from each one.
Integration testing is normally considered the last phase of testing before starting system or acceptance tests. You’ve tested each piece of functionality separately and tested that the pieces work together. There’s nothing else to test before verifying that your application meets the customers’ requirements—or is there?
7.3.5. Management testing
This book contains an entire chapter (chapter 10) about how to manage OSGi applications, so it’s clear that management is an important aspect. You should reflect that by testing applications to make sure they can be successfully managed, upgraded, and restarted before releasing them into production. Too often, we see bundles that work perfectly until they’re restarted or bundles that can’t be upgraded without causing ripples that affect the whole application.
What might management testing cover? Table 7.2 has some suggestions.
Table 7.2. Management testing ideas
|
Task |
Involves |
|---|---|
| Install | Installing new bundles (or features) alongside existing used implementations |
| Uninstall | Uninstalling old bundles (or features) that may or may not have replacements |
| Upgrade | Upgrading one or more bundles with new functionality or bug fixes |
| Downgrade | Downgrading one or more bundles because of an unexpected regression |
| Graceful degradation | Seeing how long the application functions as elements are stopped or uninstalled |
We’ll show you how OSGi and Pax Exam can help with management testing. The current test example exercises the latest Configuration Admin Service implementation from Apache Felix. But what if you have an application that uses an earlier version? Can you upgrade to the latest version without losing any configuration data? Why not write a quick test to find out?
You can find the example upgrade test under mt/upgrade_configadmin_bundle. It’s based on the listConfiguration test from the existing Apache Felix integration test suite. Listing 7.6 shows the custom configuration for the upgrade test. You want to reuse the helper classes from the earlier tests, so you explicitly deploy the integration test bundle alongside your management test. You also deploy the old Configuration Admin Service bundle and store the location of the new bundle in a system property so you can use it later to upgrade Configuration Admin Service during the management test. You use a system property because the configuration and test methods are executed by different processes, and system properties are a cheap way to communicate between processes.
Listing 7.6. Configuring the upgrade management test
private static String toFileURI(String path) {
  return new File(path).toURI().toString();
}

@org.ops4j.pax.exam.junit.Configuration
public static Option[] configuration() {
  return options(
    provision(
      bundle(toFileURI("bundles/integration_tests-1.0.jar")),
      bundle(toFileURI("bundles/old.configadmin.jar")),
      mavenBundle("org.osgi", "org.osgi.compendium", "4.2.0"),
      mavenBundle("org.ops4j.pax.swissbox", "pax-swissbox-tinybundles",
                  "1.0.0")
    ),
    systemProperty("new.configadmin.uri").
      value(toFileURI("bundles/configadmin.jar"))
  );
}
The rest of the test follows the same script as the original listConfiguration test with three key differences. First, you make sure the installed Configuration Admin Service bundle is indeed the older 1.0.0 release, by checking the OSGi metadata:
Dictionary headers = getCmBundle().getHeaders();
TestCase.assertEquals("org.apache.felix.configadmin",
    headers.get(Constants.BUNDLE_SYMBOLICNAME));
TestCase.assertEquals("1.0.0",
    headers.get(Constants.BUNDLE_VERSION));
Second, you do an in-place update of the Configuration Admin Service bundle to the new edition:
cmBundle.update(new URL(
    System.getProperty("new.configadmin.uri")).openStream());
You perform an in-place update to preserve the existing configuration data in the bundle’s persistent data area (see section 3.3.4). This works only when you’re upgrading bundles to a new version. If you wanted to switch to a Configuration Admin Service implementation from another vendor, you’d need both bundles installed while you copied the configuration data between them.
Third, you make sure the Configuration Admin Service bundle was successfully updated to the new version before finally checking that the configuration data still exists:
headers = cmBundle.getHeaders();
TestCase.assertEquals("org.apache.felix.configadmin",
    headers.get(Constants.BUNDLE_SYMBOLICNAME));
TestCase.assertEquals("1.2.7.SNAPSHOT",
    headers.get(Constants.BUNDLE_VERSION));
You can run this management test with a single command from the chapter07/ testing- example/ directory:
$ ant test.management

[junit] Running org.apache.felix.cm.integration.mgmt.ConfigAdminUpgradeTest
...
[junit] Tests run: 1, Failures: 0, Errors: 0, Time elapsed: 5.344 sec
You can even extend the upgrade test to make sure it works on other OSGi frameworks, as you did with the original Apache Felix Configuration Admin Service integration tests. You’ll see that the test passes on all three frameworks, which is more proof that this service implementation is truly independent of the underlying OSGi framework.
This was only a small test; but if you look at the management examples from chapters 3 and 10, we hope you can see that you can easily script larger, more complex scenarios in Java (or any other JVM language) by using the standard OSGi lifecycle and deployment APIs. Imagine building up a modular library of management actions (install, start, stop, upgrade, and downgrade) that you can quickly tie together to test a particular task. Such management testing can help squash potential problems well in advance, minimizing real-world downtime.
Earlier in this chapter, we showed you how to test an application all the way up from individual classes to single bundles and combinations of bundles. Just now, we looked at testing different management strategies, such as upgrading and downgrading components, to make sure the application as a whole (and not just this release) continues to behave over its lifetime. At this point, you should be ready to move on to system and acceptance tests. These tests don’t need special treatment regarding OSGi, because OSGi is just an implementation detail. As long as the application can be launched, it can be tested.
7.4. Summary
This chapter covered three different approaches to testing OSGi applications:
- Bundling existing non-OSGi tests to run inside OSGi
- Mocking existing OSGi tests to run outside of OSGi
- Using OSGi test tools to automate test deployment
In an ideal world, you’d use a combination of these three approaches to test all your code, both inside and outside one or more OSGi containers. In the real world, projects have deadlines and developers need their sleep, so we suggest using tools such as Pax Exam to automate as much of the test-bundling and -deployment work as possible. These tests should grow along with your application, giving you confidence that you do indeed have a robust, modular application. But what should you do if one of your tests fails inside OSGi? What tools and techniques can you apply to find the solution? Help is available in chapter 8.