
15
WINDOWS XP
Contents
- Introduction
- Features of Windows XP
- The desktop—The task bar, the icons and shortcuts
- Structure of Windows—Title bar, menu bar, tool bar, scroll bar, status bar
- Windows XP explorer
- The start
- The window-Title bar, menu bar, standard bar, address bar, status bar
- The view-Filmstrip, thumbnails, tiles, icons, list, details
- Selecting files
- Working with folders-Creating, deleting, copying, moving, changing
- Files and folders properties-Showing, organizing, modifying
- The search
- The recycle bin-Open, restoring and deleting files or folders, emptying
- Configuring screen-Desktop, screen saver, appearance, themes, settings
- Configuring the mouse, adding or removing programs
- Adding new hardware-Not plug & play, basic information about computer
- System tools-Backup, character map, disk cleanup, system restore etc.
- The scandisk
- Windows XP media player, Windows XP help
- Windows vista-Updated GUI, Windows instant search, Windows DVD maker, embedded start menu, the taskbar preview, Windows contacts
- Windows 7-Desktop, Windows explorer, taskbar, devices, virtual hard disk, Windows action center, Windows biometric framework, wordpad
Why this chapter
Create, open, copy, hide, search, or delete a file or folder; view a folder’s information, configure the appearance and theme of the screen, and, add new hardware and software are some of the tasks you perform quite often while working with the computer machine. For performing these tasks, you interact with the operating system. Windows XP is a most widely used and popular operating system. The purpose of this chapter is to introduce you to “Windows XP”.
15.1 INTRODUCTION
There exist a number of operating systems, such as DOS, Windows 98, Windows NT, Windows XP, Windows Vista, Unix, Linux, DOS, Mac OS X Snow Leopard etc. Each Operating System (OS) has its own unique features. Windows XP belongs to the Windows family of OS. Windows XP represents an important change from the previous versions of Windows OS. Before Windows XP, Microsoft had two different operating systems, Windows 98 for personal use and Windows NT/2000 for business and professional environment. Windows XP is a convergence among both versions; the center of operating system Windows 2000 was divided to create Windows XP, and some adjustments were done to differentiate Windows XP Home Edition and Windows XP Professional.
The main benefits of Windows XP are:
- For domestic users, it has acquired the stability of Windows NT/2000. Thus, Windows XP is very stable and rarely crashes.
- For professional users, it provides greater compatibility with the hardware than Windows NT/2000.
In this chapter, the environment of Windows XP OS is discussed in detail. A brief description of Windows Vista and Windows 7 OS is also provided.
15.2 FEATURES OF WINDOWS XP
Windows XP has a new user system completely different from Windows 98. Some new features ofWindows XP are:
- Multiple users with independent profiles can be defined. Each user can have different permissions that will allow the user to carry out certain tasks. Each user will have a different Start menu and My Documents folder that can be protected by password. Multiple users can also share folders. The system handles the different active users without interferences.
- It is better integrated to Internet Explorer.
- CDs can be burned by dragging and dropping to the recording unit. It is no longer necessary to install an additional program to record CDs.
- It has a useful way for showing pictures called Filmstrip.
- It s easier to configure a domestic network.
- It recovers better from errors. When a fatal error occurs Windows XP creates a register with all the information concerning the error and gives user the option of sending it to Microsoft, to be analyzed.
- Windows XP initializes faster than Windows 98.
- The Start menu and the Task bar have changed.
- Windows Movie Maker is a new component used for editing films.
15.3 THE DESKTOP
The entire screen on which all windows are displayed is termed as Windows Desktop. It is the first screen that appears when the operating system has initialized (Figure 15.1). All your work opens as individual windows on the Windows Desktop.
The Desktop has two parts—the portion where icons are displayed, and the Taskbar at the bottom of the Desktop window. The icons are small images located on the Desktop. For example, ![]() for Internet Explorer and
for Internet Explorer and ![]() for Recycle Bin. The Task Bar contains Start button and other parts.
for Recycle Bin. The Task Bar contains Start button and other parts.
In this chapter, we use the following terminology while working with the mouse:
- Pointer—a mouse pointer
- Click—press left button of mouse once
- Double Click—press left button of mouse twice
- Right Click—press right button of mouse once
- Select—move the pointer of mouse and keep the left button of the mouse pressed over the area that you want to select. The selected area will appear in a dark background.
We enclose the command in braces <Command> to represent the command to be clicked.

Figure 15.1 The desktop screen
15.3.1 The Task Bar
On the Desktop, Task Bar appears at the bottom of the screen. The task bar has four parts: (1) Start button, (2) Area for shortcuts, (3) The running programs, and, (4) The Notification Area.
- Start Button: It
 provides access to the entire range of options that Windows XP offers. If you click it, a menu as shown in Figure 15.2 is displayed.
- It displays the list of programs that are permanently available and that are most frequently used. Like, Set Program Access and Defaults, Connect To, Printers and Faxes etc.
- All Programs is used to view all the programs that are installed on the computer.
- Documents provide access to the different parts of Windows XP that are most often used like— My documents, My Recent Documents, My Pictures.
- Control Panel allows configuring and customizing of appearance of the computer.
- Search is used to find files or folders.
- Help and Support provides help and support to work on Windows.
- Run allows directly executing certain commands, for example to execute a specific program, etc.
- Log Off allows closing the current session.
- Turn Off Computer allows restarting or turning off the computer.
- The area for shortcuts contains icons that are used to access a particular program
 quickly. To place an icon here, simply drag it from the Desktop. To execute, simply click on the icon.

Figure 15.2 The start button
- Running Programs It shows the buttons of the application programs that are currently open. If the button is slightly darker, it is the button of the application program that you are currently working with. When there are several instances of the same program open at the same time they are grouped under a button. For example, if you have six windows of Internet Explorer opened at the same time, clicking on the button will display all windows of the Internet Explorer.

- The Notification Area contains icons that represent the programs that start up automatically when the computer is turned on. If a round button appears,
 this allows you to expand or shrink the area that contains the icons of these programs. The time also appears here.
  Double-click on an icon to open it.
15.3.2 The Icons and Shortcuts
The user can double-click the icon on the desktop to open it, for example, clicking on the icon ![]() will open up Internet Explorer.
will open up Internet Explorer.
- Organizing Icons on Desktop using the following steps:
- Right click on Desktop. <Arrange Icons By> (Figure 15.3)

Figure 15.3 Arrange icons by
- Choose to organize by Name, Type, Size, or Modified (date).
- You can activate Auto Arrange, which arranges the icons one below the other.
- To customize the way the icons are organized, simply drag them with the mouse to where you want them. For this, Auto Arrange must be deactivated.
- Right click on Desktop. <Arrange Icons By> (Figure 15.3)
- Create Shortcuts as follows:
- Right click on Desktop. <New> <Shortcut> (Figure 15.4)
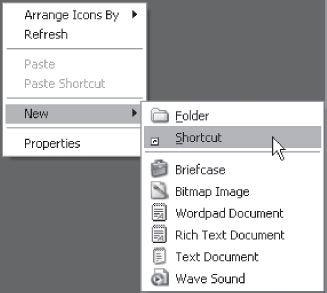
Figure 15.4 New shortcut
- A dialog box will appear. Indicate the program for which you want to create the shortcut. You can use Browse button, to find the program.
- Select the file or folder. <Ok> <Next>
- Type a name for the Shortcut. <Finish>
- Once you have the shortcut on the desktop, you can leave it there or drag it to the quick access bar on the task bar.
- Right click on Desktop. <New> <Shortcut> (Figure 15.4)
- Change Date and Time—The computer has a clock located on the right side of the task bar.
 To change the Date follow these steps:
- Double-click on the clock on the Task bar to open the dialog box (Figure 15.5).
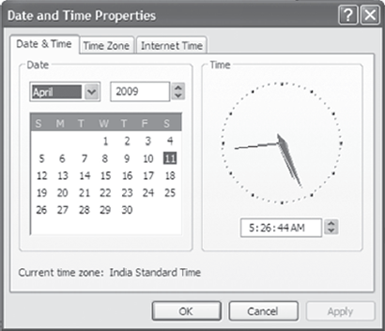
Figure 15.5 The clock
- Change the date by selecting the required month, year and day. Change the time by selecting the time digits.
- Click Apply if you want the change to take effect and remain in dialog box. Click OK if you want the changes to be permanent and the dialog box to close.
- Selecting <Time Zones> allows changing the meridian.
- Double-click on the clock on the Task bar to open the dialog box (Figure 15.5).
- Visualize the Tool Bars as follows:
- Right Click on Task Bar. <Toolbars> (Figure 15.6)
- Select the toolbars that you wish to see. If next to the option a check mark appears it means that the tool is already visible.
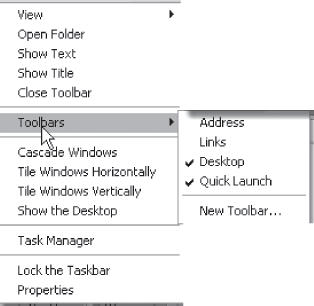
Figure 15.6 The toolbar
15.4 STRUCTURE OF WINDOWS
All the windows in Windows XP have the same structure. Figure 15.7 shows the contents of directory D:ASHIMA GOEL. The structure of this window is very similar to the others.
- Title Bar—It contains name of the program you are working with and name of the opened document. The windows can be moved around the window desktop using this title bar. The top right corner has three buttons to minimize, maximize/restore, and close the window.
- Menu Bar—It is located under the Title bar and contains the related Pull-down menus for the currently active windows; for example—File, Edit, View, Favorites, Tools, and Help. Clicking on a menu name will activate a pull-down menu with various options to select. If you find an option that is grey or lighter colored, it means that it is not possible to select it at that moment.
- Tool Bar—It contains icons of the most often used commands that can be executed immediately. These commands can also be executed from the menu bar.
- Scroll Bar—The scroll bars allow us to move throughout the page in a quick and simple manner. Simply drag the bar with the mouse or click on the arrows. There are bars to move along the width of the page and bars to move along the height of the page. The little square with dots on the right is used to change the size of the window.
- Status Bar—It gives information to the user, depending on the window that is opened at the time. This bar is not shown by default in Windows XP. You can activate or de-activate it from the <View> <Status Bar>.
- Borders for Resizing—A thin border appears around the windows, which can be used to resize the current window. To resize the current windows, just place the pointer on the border of the windows (it will become two-headed arrow), click the mouse button, and then hold and drag to the desired location. The windows will change its size.
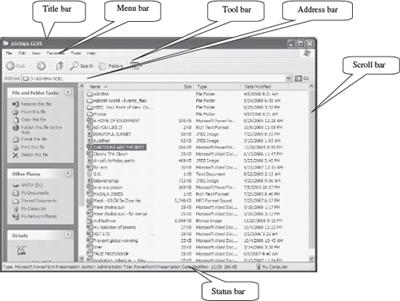
Figure 15.7 A window
15.5 WINDOWS XP EXPLORER
Windows Explorer lets the user explore the contents of computer and do file management. It organizes and controls the files and folders of the different storage devices such as the hard drive, disk drive, etc. The Windows Explorer is also known as the File Manager. Windows Explorer is especially useful for copying and moving files. Windows Explorer allows to delete, see, copy, or move files and folders.
15.5.1 The Start
To start Windows Explorer
- Click on the icon
 on the task bar or desktop, or,
 - <Start> <Programs> <Accessories> <Windows Explorer> (Figure 15.8)
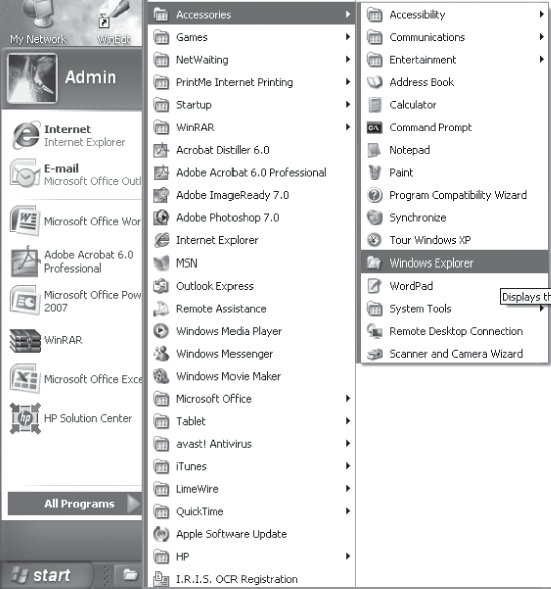
Figure 15.8 The start button
15.5.2 The Window
The window that opens when you start Windows Explorer has the same structure as discussed in the previous section. The explorer consists of two sections. On the left side there is the directory tree (in a hierarchical order) which shows the list of units and folders on the computer. On the right side there is a section, which shows all the files and folders that the user has selected on the left hand side. Windows Explorer has different bars that make up the window. These are as follows:
- Title Bar that shows the name of the folder you are in.
- Menu Bar contains the menus that allow access to all the operations that can be done with a file or folder. Clicking on the menu will display the options.
- Standard Bar contains the buttons for the most used operations. If this bar is not visible, select from the menu View, the option Toolbars, next select the option Standard buttons.
- Back button
 —to go to the last page that you have seen.
 - Forward button—to move one page forward.
- Up button
 —to go up one level from the current folder.
 - Search button
 —displays a window where you can search for the file
 - Folders button
 —shows the folder’s structure on the left side of the screen.
 - Last button
 —to change the views on the folders (details, Thumbnails)
- Back button
- Address Bar shows the name of the folder you are working with.

- Status Bar shows additional information of the selected file or folder. It shows the number of files the folder contains and its total size. If a file is selected, status bar displays the information of selected objects and their total size.
15.5.3 The View
Windows explorer allows the user to see the folder’s information in different views to facilitate specific searching. On clicking of the button ![]() a menu shows the different options (Figure 15.9) that can be selected to view a unit or a folder. The options are - (1) Filmstrip, (2) Thumbnails, (3) Tiles, (4) Icons, (5) List, and (6) Details.
a menu shows the different options (Figure 15.9) that can be selected to view a unit or a folder. The options are - (1) Filmstrip, (2) Thumbnails, (3) Tiles, (4) Icons, (5) List, and (6) Details.
- Thumbnails—A small representation of the content appears with the format of the image.
- Filmstrip—It is used to view the images only. On the bottom part a strip appears with the images in thumbnail format and on the top a larger representation of the image selected on the bottom is seen.
- Tiles—The files and folders are shown with large images with the name, file type, and size in KB
- Icons—The files are shown with an icon and the name of file.
- List—Shows small icons, one below the other, so it is easier to search by name. It shows only the name of file or folder.
- Details—Icons are shown one below the other, with some of their properties like size, file type, date of modification, etc.

Figure 15.9 The view options
15.5.4 Selecting Files
The files on folders can be selected in three different ways depending on what files and folders you wish to select. Windows Explorer allows you to select a single file or folder, or several files or folders at the same time.
- To select a single file or folder—Click on the file or folder you want to select. Any operation you perform will only apply to the selected file or folder.
- To select several files and folders that are consecutive—
- Click on the first element and then click on the last element while keeping <Shift> key on the keyboard pressed.
- This can also be done with the mouse. Click on the left of the first file or folder (but not on it) and, without letting go, drag it. A frame appears that shows the area that the frame encompasses. Continue dragging until all the files and folders you wish to select are within the frame, then let go of the left mouse button
- To select several files and folders that are not consecutive—Click the first file or folder and while keeping the <Ctrl> key on the keyboard pressed, continue to click the other files and folders that you wish to select.
15.5.5 Working with Folders
Windows Explorer allows you to perform several operations on the files and folders stored in a directory. You can create a folder, delete a file or folder, copy a file or folder, move a file or folder, and change the name of a file or folder.
- Creating Folders
- Open the folders that you have by clicking on the “+” located to the left of the folders. It will show all of the folders contained in it and the plus sign will become a minus sign “-” ; If you click on the minus sign, it will again hide the content of the folder selected.
- Open the folder in which you want to create a new folder by double clicking on it.
- <File> <New> <Folder>. A new folder appears with the name New Folder. This is the name that Windows gives to new folders by default. Type a name for the new folder, and then press Enter key on the keyboard.
- Deleting Files or Folders
- Select the files or folders you want to delete.
- Once selected, you can delete the file or folder using—<File> <Delete>, or, Press delete button on the keyboard, or, Click on
 . The deleted folder moves to the Recycle Bin.
- Copying Files or Folders
- Select the files or folders you want to copy.
- Once selected, you can copy the file or folder using any one of the following ways:
- <Edit> <Copy>. Open the folder or disk drive where you want to copy the file to. <Edit> <Paste>, or,
- Click on Copy Q. A dialog box is displayed. Search for the folder where you want to copy the selected file or folder. If you click on the “+” that appears on the left, the contents of the folder will be displayed. Select and open the folder where you want to copy the file or folder. <Paste>.
- Moving Files or Folders
- Select the files or folders you want to move.
- Once selected, you can move the file or folder using any one of the following ways: <Edit> <Move to Folder>. A dialog box is displayed. Search for the folder where you want to move the selected file or folder. If you click on the “+” that appears on the left, the contents of the folder will be displayed. Select and open the folder where you want to move the file or folder. <Move>.
- Changing the Name of a File or Folder
- Select the file or folder whose name you want to change.
- Once selected, you can change the name of file or folder using any one of the following ways:
- Right click. <Rename>. Write the new name, or,
- <File> <Rename>. Write the new name.
- Click Enter key or click outside the file or folder so that the changes take place.
15.5.6 Files and Folders Properties
Both files and folders have their own characteristics, for example size, location, date of creation, attributes, etc. In Windows Explorer, to know the characteristics of a file or folder, do either of the following:
- <File> <Properties>, or,
- Right click on a file or folder. Select <Properties> from the displayed menu.

Figure 15.10 The file properties
A window with several tabs will appear (Figure 15.10). Depending on whether it is a folder or a particular file, the tabs that appear will vary. In case of a folder, the tabs that appear are General, Sharing, and Customize. General shows the Type of folder, Location, size, number of files it contains, and the date when the folder was created. Sharing contains information on the permission that is given to the other users of the network on our folders. Customize allows changing the properties of the folder.
In case of a file, the tabs that appear are General, Custom, and Summary. General (Figure 15.11) shows the characteristics of the files, modified saves the date the file was last modified and last accessed, the last time the file was opened regardless of whether changes were made or not, Attributes shows the attributes assigned to the file (read only, hidden, or archive).
- Showing Hidden Files and Folders
- <Tools> <Folder options> <View> (Figure 15.12)
- In Hidden files and Folders-Check <Show hidden files and folders>. <OK>

Figure 15.11 The file properties general tab
- Knowing Types of Files—To know the types of files registered in the computer and the program with which they open.
- <Tools> <Folder Options…> <File Types>
- On the window that appears, you can see all of the types of files that the computer can open. If you select any of them, the details of the program with which it opens will appear.
- Organizing Folders
- Place cursor on the folder you wish to arrange.

Figure 15.12 The folder options
- <View> <Arrange icons by> (Figure 15.13)
- Select the way (Name, Size, Type, Modified) you want to arrange the files in the folder.
- Place cursor on the folder you wish to arrange.
- Modifying Windows Behavior
- <Tools> <Folder Options> <General> (Figure 15.14)
You can modify the behavior, like—open a window in same window or new window, open using single click and double click, etc.
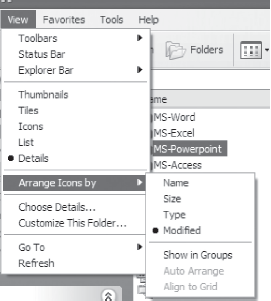
Figure 15.13 Organizing folders
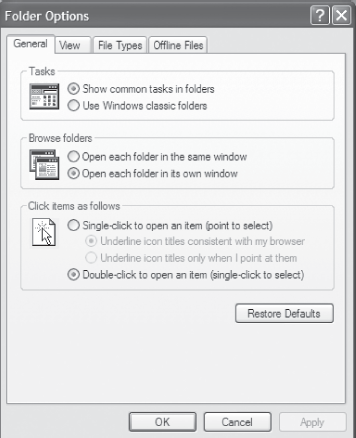
Figure 15.14 To modify window behaviour
15.6 THE SEARCH
With so many files and folders, sometimes it becomes difficult to locate a file or a folder in the directory. Windows XP provides Search option to search for hardware, a network, people in the directory, Internet pages, etc. To search click <Start> <Search>.
It allows you to search for files and folders, people, hardware, and on the Internet. The search pop-up screen will be displayed (Figure 15.15).
15.7 THE RECYCLE BIN
The Recycle Bin is a space on the hard disk reserved to store information that is deleted. In the event of deleting a file or folder by mistake, it is possible to retrieve it from the Recycle Bin. If a deleted file needs to be restored, the Recycle Bin restores files or folders to the place from where they were deleted. For example, if a file is deleted from D:My Documents, when it is restored, it will go back to this folder. Recycle Bin stores and maintains the deleted documents until the bin is emptied.

Figure 15.15 The search pop-up screen
- Open Recycle Bin—To open the Recycle Bin, place the cursor on Desktop and double-click on the Recycle Bin icon
 . The Recycle Bin window (Figure 15.16) is similar to the Windows Explorer window, and has similar options. In the Recycle Bin shows the names of the deleted files and folders, their original location before it was deleted and the date and time when it was deleted.
 - Restoring Files or Folders
- Select the elements to be restored by clicking on them.
- Click on the green arrow on the left side with <Restore the selected Items> or <Restore this Item> depending on whether you have selected more than one item or one item, or, Click on <File> <Restore>
- The selected files will return to where they were located before deletion.
- Deleting Files or Folders—Once files and folders in the Recycle Bin are deleted, they are deleted permanently. To delete any file or folder from the Recycle Bin follow these steps:
- Select the files to be deleted.
- <File> <Delete>, or, press the Delete button on the keyboard.
- A window appears asking if you are sure that you want to delete the selected file or folder. Click Yes if you are sure you want it deleted.
- The selected files will disappear and cannot be restored.
- Emptying the Recycle Bin—There are three ways to empty the Recycle Bin as follows—
- Open Recycle Bin Window. Click on <Empty the Recycle Bin>. A window will appear asking “Are you sure you want to delete these x items”, where x is the number of elements currently in the Recycle Bin. Click Yes to empty it.
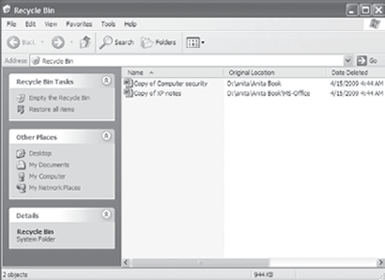
Figure 15.16 The recycle bin
- Open Recycle Bin window. <File> <Empty Recycle Bin>. A window will appear asking “Are you sure you want to delete these x items”, where x is the number of elements currently in the Recycle Bin. Click Yes to empty it.
- Right click on the Recycle Bin icon on the desktop. <Empty Recycle Bin>
- Open Recycle Bin Window. Click on <Empty the Recycle Bin>. A window will appear asking “Are you sure you want to delete these x items”, where x is the number of elements currently in the Recycle Bin. Click Yes to empty it.
15.8 CONFIGURING THE SCREEN
A user spends long hours in front of the computer. Configuration of the screen is required to make the screen of the desktop comfortable for use. The user can configure the desktop screen as follows:
- On the Desktop, Right click on the screen where there are no icons on the screen.
- Select <Properties>. It will display the properties of the screen. It contains tabs like the Desktop, Screen saver, Appearance, Themes, and Settings.
- Configure the Desktop from here.
The different tabs are used to configure for different properties, as follows:
- Desktop—It is used to choose a new background or wallpaper from the list (Figure 15.17). The position of the wall paper on the screen can be centered, tiled or stretched. Centered displays the image in real size in the center of the screen, Tile displays the image with as many images as necessary to fill the screen, and Stretch displays the image once taking up the entire screen. The option Browse… allows the user to have another image that does not appear on the list as background. Once settings are made, click OK.

Figure 15.17 The desktop settings
- Screen Saver—Sometimes the computer remains inactive for a few minutes. A still image on the screen for too long and too often can damage the monitor. It is recommended to have a screen saver. Screen saver screen allows the user to make settings for the screen saver. Preview shows how the screen saver will look once it gets activated. Wait is the time it takes for the screensaver to appear. A setting is used to customize the image that is used as the screen saver. Password protect is a password protection to keep someone else from working on your account, on resume. It will allow you back to the normal screen only after you have entered the correct user password.
- Appearance—It is used to change the appearance of the Desktop screen like, the style you want, a color scheme and a font size (Figure 15.18). Once settings are made, click OK.
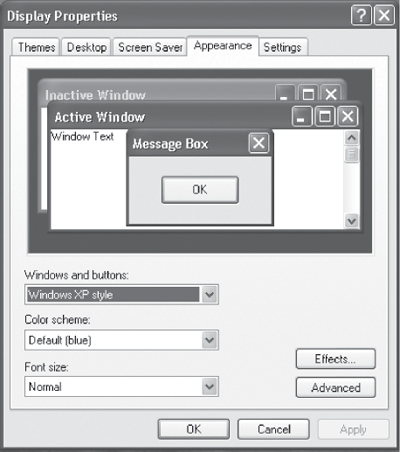
Figure 15.18 The desktop appearance settings
- Themes•A Theme groups the different characteristics that affect the appearance of Desktop by giving it a name. You can select a theme you prefer and on the bottom part you can see how it will look. If you wish to save the changes, click Save as, then name it and click OK.
- Settings—It allows you to select the monitor and graphics card, and choose the resolution and the color scheme (Figure 15.19). The resolution affects the size of the images. Selecting a color scheme decides the amount of colors with which the monitor will work with.
15.9 CONFIGURING THE MOUSE
The mouse is a tool that is used constantly and it is recommended to set it as per your convenience and needs. To configure the mouse, open the mouse properties window as follows:
<Start> <Settings> <Control Panel> <Printers and Other Hardware> <Mouse> (Figure 15.20) You can do all settings for the mouse from here.
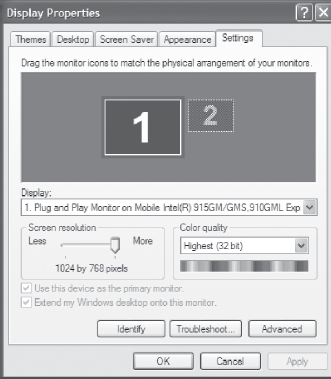
Figure 15.19 The desktop color settings
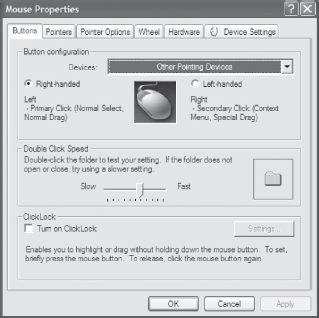
Figure 15.20 The mouse settings
15.10 ADDING OR REMOVING PROGRAMS
The Adding and Removing tool is used to add a program and to uninstall a program that is no longer needed. When a new program is installed, Windows creates notes on a file called Windows Register. The Windows Register stores the current configuration of the system, hardware, software, and different user configurations. A program that needs to be uninstalled cannot be done by simply deleting the files manually. If we delete, only the files linked to a program, the records that Windows created on the Register are not removed, so an inconsistency can occur.
To add or remove programs, open the Add or Remove Programs window as follows:
- <Start> <Settings> <Control Panel> <Add or Remove Programs> (Figure 15.21)
The window allows the user to change or remove programs, add new programs, add or remove Window components, and setting of program access and defaults.

Figure 15.21 Setting to add or remove programs
15.11 ADDING NEW HARDWARE
When we want to add new hardware to a computer, two things can happen: either the component is Plug & Play or it is not. If the hardware to be installed is Plug & Play, simply connect the hardware and Windows will recognize and install it automatically. Conversely, if you connect the hardware and the Window recognizes it, then the hardware is Plug & Play. If the Windows does not recognize it, then the element is not Plug & Play and needs to be installed manually. For installing it, an Add new Hardware assistant is provided. When new hardware is installed, the computer needs driver for that hardware. The driver contains the files that describe the hardware and allows the computer to communicate with it.
- To add a hardware that is not plug & play, open the window as follows—
- <Start> <Settings> <Control Panel> <Printers and Other Hardware> <Add hardware> (on the left of window) (Figure 15.22)
- The Add Window Hardware Wizard appears. Follow the instructions of the wizard for installation.
- To see the basic information about your computer like the hardware of your system and their properties, do the following:
- <Start> <Control Panel> <Performance and maintenance> <See basic information about your computer>
- A window named System Properties will appear. It has various tabs. For example, the General tab shows generic information about your system, such as which processor is installed, etc. Select <Hardware> <Device manager>. It shows a list of all the hardware installed on your computer (Figure 15.23).
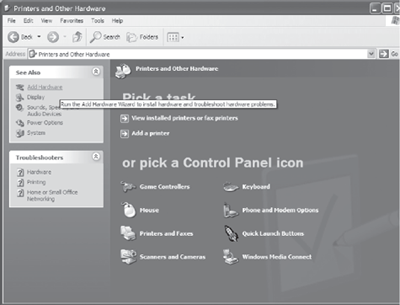
Figure 15.22 The window and other hardware screen

Figure 15.23 The device manager
15.12 SYSTEM TOOLS
Windows incorporates certain tools such as the Disk Defragmenter, the Disk Cleanup – the tool to free disk space, the Scheduled Tasks, etc. Almost all of these tools are designed to optimize the behavior of the computer. To select any of these tools, do the following:
<Start> <Programs> <Accessories> <System Tools> (Figure 15.24)
The window shows the different system tools like Backup, Character Map, Disk cleanup, Disk DeFragmenter, Files and Settings Transfer wizard, Scheduled Tasks, System Information, and System Restore.
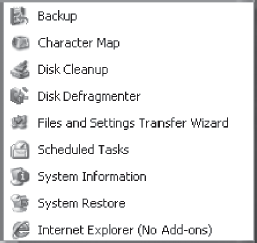
Figure 15.24 The system tools screen
- Disk Defragmenter reorganizes the information that is stored on the disk so that the free spaces between the information disappear, and the performance of the disk improves.
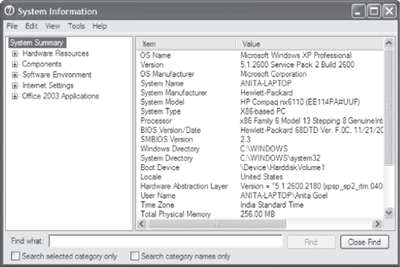
Figure 15.25 The system information screen
- System Information shows information regarding the system, such as the installed applications, the drivers, the processor, etc (Figure 15.25). It gives detailed information about the Hardware Resources, Components, Software environment, Internet Settings and MS–Office applications.
- Disk Clean Up allows you to empty the disk of information that you do not use, like temporary files, Internet files, or even files in the Recycle Bin.
- Character Map is useful to insert symbols that are not on the keyboard.
- System Restore restores the Windows registry, which is the place where all the information about changes to the configuration is kept (Figure 15.26). The system itself makes a copy of the registry every once in a while. With this tool, you can restore some of these copies or generate a new copy of the current registry when you are going to make important changes to the configuration of the system. If the new configuration does not work properly, you can go back and restore the system.
- Scheduled Tasks is used to schedule any program to run at specific times. For example, you can schedule the use of the Disk Cleanup for once a week, which will run automatically, once a week.
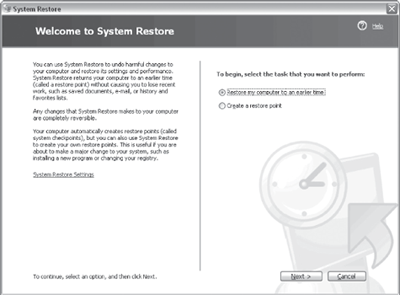
Figure 15.26 The system restore screen
15.13 THE SCANDISK
It is a tool used to search errors in the system’s units and to repair those errors. When the computer is turned off in an abrupt manner it is possible that some files may get damaged. Normally when the computer is turned on, after being turned off abruptly (without using the option shut down from the Start menu), the Scandisk executes to check the system and repair any error that it may find. By using this tool we can fix the possible errors and therefore retrieve the information that it contains, although, it is not always possible to retrieve the information.
To use Scandisk, do as follows:
- Click on My Computer on desktop,
- Select the unit (drive) that you want to perform the scandisk on, for example unit (D:).
- Right click. <Properties> <Tools> <Check Now…> (Figure 15.27)
Once the scan has finalized a confirmation window will appear.

Figure 15.27 The scandisk

Figure 15.28 The windows media player
15.14 WINDOWS XP MEDIA PLAYER
Windows XP includes the Windows Media Player (Figure 15.28) which allows you to listen to music from a CD. To open the Windows Media Player double click on ![]() . It allows playing of songs from a CD or from the hard disk drive. There are commands to handle the player, like play as well as to pause, stop the song or video being played, skip back to the previous song on the list, skip to the next song or video on the playlist, move forward or move backward in a song, control the volume and you can do many more things.
. It allows playing of songs from a CD or from the hard disk drive. There are commands to handle the player, like play as well as to pause, stop the song or video being played, skip back to the previous song on the list, skip to the next song or video on the playlist, move forward or move backward in a song, control the volume and you can do many more things.
15.15 WINDOWS XP HELP
The Windows XP provides help to questions regarding the use of a Windows XP component or tool. The help is composed of a series of pages that are similar in navigation, as the pages on a web site. Options are also available to search information about a particular theme from key words and key phrases.
The most common help provided by Windows XP is in the form of tooltips that appear by placing the pointer for a few seconds over the majority of the icons on Windows. This help is useful when you do not remember what an icon is for; the tooltip gives you a hint.
The main way to obtain help is facilitated by the help center and technical support. To open the Help and Support Center and use the help services click on ![]() Help and technical support from the <Start> <Settings> <Control Panel> menu.
Help and technical support from the <Start> <Settings> <Control Panel> menu.
15.16 WINDOWS VISTA
Windows Vista contains many changes and new features over its predecessor (Windows XP).
Microsoft’s Windows Vista operating system is designed to give better results in less time. Its improved graphics look helps in multitasking, and its increased security system makes your data more secure but it needs very high systems specifications to run. The minimum specification of the computer on which Windows Vista can be installed is Pentium 4 or higher, 512 MB RAM, 32 MB video card and 40 GB hard disk. But, Windows Vista installed on the computer having the above specification makes the computer very slow. To have a reasonable speed of working with Windows Vista installed, you should have at least 2.0 GHz Pentium 4 or higher, 1 GB of RAM, 60 GB hard disk and 64 MB video RAM. The high system requirements are one of the key reasons for Windows Vista criticism.
Here, we highlight some of the key features of Windows Vista:
- Updated GUI and Visual Style Dubbed Windows—Aero is Microsoft’s name for the GUI theme (Luna—Windows XP’s interface). Aero allows for transparent windows edges, window fades and 3D task switcher. If your video card supports the Aero Glass interface, you get translucent title bars and animations. Aero interface enables you to quickly switch between windows and tasks.
- Sidebar (Figure 15.29) is the collection of items on the right side of the screen. It is a customizable window that makes it easy to access frequently used information. It contains a set of devices you can choose from. Some choices are:
- Calculator, analog clock, notepad, recycle bin, games, puzzles, and currency converter.
- CPU and memory meters to view the amount of system resources in use.
- Feed viewer for tracking items, news, sports etc. via RSS, and Feed watcher for monitoring the selected RSS feeds.
- Slide show that displays a continuous slide show of the photos in the Pictures folder.
- The search facility in Windows Vista has been improved. You can use Windows Instant Search to search for anything on your computer.
- Multimedia tools like Windows DVD Maker have been included. It redesigns networking, audio, print, and displays sub-systems. It makes it easy to burn your movies to disc, and you can create chapters and menus that let you jump to specific scenes. You also have more control over the quality and size of your video files.
- Windows Vista has improved the Security of the User’s Data.
- New security systems like drive encryption, file system encryption and scheduled backups improve security of your data.
- The new IE7 browser keeps malicious software or Web sites from changing configuration settings.
- Windows Service Hardening keeps OS services from making changes to the registry, file system, etc., without your permission.
- Windows Firewall settings can be controlled both for the outbound traffic as well as inbound traffic.
- Network Access Protection agent prevents Vista clients from connecting to your network if they don’t have the proper security updates.
- Embedded Start Menu (Figure 15.30) includes Windows Mail (instead of Outlook Express), Windows Contacts (new address book), and Windows Calendar, in addition to the features of the Start menu of Windows XP.
- The Taskbar Preview provides a preview of the open application icon. If there are multiple instances of that application, you will see all preview pages.
- Windows Contacts replaces the Windows Address Book in XP. In addition to the features supported by Windows Address book, you can add photos to your contacts and import Windows Address Book files from another computer, and do much more.

Figure 15.29 The Windows vista sidebar
- Vista includes the Windows Calendar which provides good, basic appointment and event scheduling that you can view in a daily, weekly, or monthly layout. It includes a Task list and allows you to set reminders and recurring appointments. You can share your calendar with others on the local computer or the Internet. You can export your calendar to a website and allow others to subscribe to it, and you can subscribe to the calendars of others and view them side by side. You can also easily invite participants to meetings.
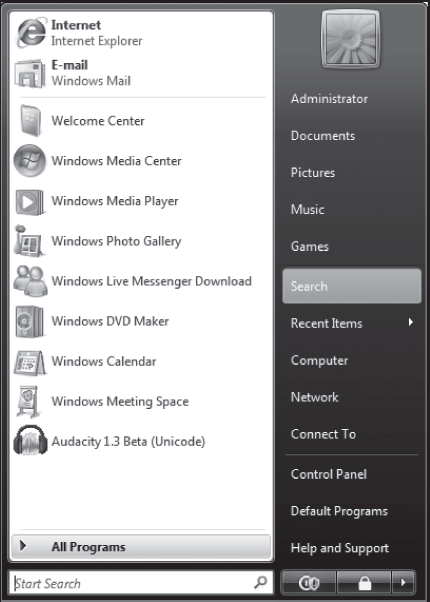
Figure 15.30 The Windows Vista start menu
- Vista includes the Windows Photo Gallery which replaces the Windows Picture and Fax Viewer in XP. The photo gallery helps you organize and view your digital photos and videos easily. You can do simple photo editing and print them.
- Vista includes several New Games, such as Ink ball and Chess Titans.
- File Navigation is easy in Windows Vista. For example, as you vertically scroll the folder tree, the window automatically scrolls horizontally to keep them in view. You can go directly to any folder in the hierarchy above the one you’re in simply by clicking its name there.
Microsoft’s Windows Vista operating system has a new look and incorporates lots of added functionality over its predecessor. Increased security system that makes your data more secure is one of its key features. However, running Windows Vista on a machine requires very high systems specifications.
15.17 WINDOWS 7
Windows 7 makes the most of powerful 64-bit PCs, the new desktop standard. It includes several feature advancements in touch, speech, handwriting recognition, support for virtual hard disk, and support for additional file formats, improved performance on multicore processors, improved boot performance, and kernel improvements. It includes performance improvements like sleep and resume quickly, and spot USB devices faster. It retains Windows Aero user interface and visual style introduced with Windows Vista.
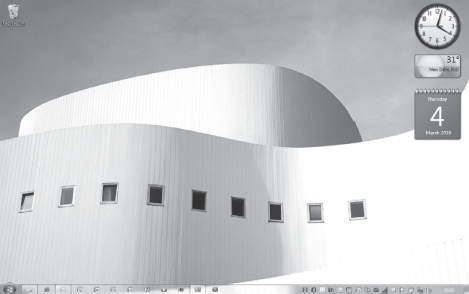
Figure 15.31 Desktop in Windows 7
Here, we highlight some of the key features of Windows 7—
- Desktop (Figure 15.31) allows you to have new themes, slide shows, or gadgets on the desktop.
- A desktop Slideshow changes the desktop background in a designated amount of time with a smooth fading transition.
- Themes include desktop slideshow settings. A new control panel interface, accessible through Personalize context menu item on the desktop provides the ability to customize and switch between themes.
- The sidebar of Windows Vista has been removed, but Gadgets can be placed on desktop. The Windows Media Center has been added to Windows 7, which adds playback of media in MP4, MOV, and many more multimedia containers with native codecs for H.264, MPEG4-SP etc.
- Windows Explorer
- Libraries—Windows Explorer (Figure 15.32) in Windows 7 supports Libraries, virtual folders that aggregates content from various locations—including shared folders on networked systems if the shared folder has been indexed by the host system—and present them in a unified view. By default, a new user account in Windows 7 contains four libraries, for different file types: Documents, Music, Pictures, and Videos.
- Federated search—Windows Explorer also supports federating search to external data sources, such as custom databases or web services that are exposed over the web.

Figure 15.32 Windows explorer in Windows 7
- Start menu—Windows 7’s Start Menu has a fade-in highlight effect when the user moves the mouse over it.
- A Devices and Printers option has been added that displays a new device manager.
- Taskbar Jump Lists are presented in the Start Menu via a guillemet; when the user moves the mouse over the guillemet, or presses the right-arrow key, the right-hand side of the Start menu is widened and replaced with the application’s Jump List. Jump Lists provide speedy access to your favorite pictures, songs, websites, and documents.
- Windows 7 Taskbar provides better thumbnail previews, easier-to-see icons, and more ways to customize.
- It is 10 pixels taller than in Windows Vista to accommodate touch screen input and a new larger default icon size. The glass taskbar is more transparent.
- It is more application-oriented than window-oriented, and therefore doesn’t show window titles. Applications can be pinned to the taskbar allowing the user instant access to the applications they commonly use.
- It shows a preview of the window. In a thumbnail preview, the name of the window is also shown. Aero Peek button when clicked or hovered over with the mouse, displays the desktop and gadgets by turning all windows transparent. Aero Shake allows users to clear up any clutter on their screen by shaking (dragging back and forth) a window of their choice with the mouse. Snap is a quick and new way to resize and compare windows on the desktop.
- Devices—There are two major new user interface components for device management in Windows 7, “Devices and Printers” and “Device Stage”. Both of these are integrated with Windows Explorer, and together provide a simplified view of what devices are connected to the computer, and what capabilities they support. When a device such as a portable music player is connected to the system, the device appears as an icon on the task bar, as well as in Windows Explorer.
- The improvements and additions made to Windows 7 Core Operating System components include AVCHD camera support and Universal Video Class 1.1, fewer hardware locks and greater parallelism.
- The Enterprise, Ultimate, and Professional editions of Windows 7 incorporate support for the Virtual Hard Disk (VHD) file format. VHD files can be mounted as drives, created, and booted from.
- The Windows Security Center has been renamed to Windows Action Center which encompasses both security and maintenance of the computer.
- Windows 7 includes new Windows Biometric Framework which consists of a set of components that standardizes the use of fingerprint biometric devices. A new Biometric Device Control Panel is included which provides an interface for deleting stored biometrics information, troubleshooting, and enabling or disabling the types of logins that are allowed using biometrics.
- Windows 7 adds support for Multiple Firewall profiles. When your computer is connected to two or more networks at the same time Windows 7 applies a separate firewall profile to each network connection.

Figure 15.33 Control panel in Windows 7
- WordPad in Windows 7
- Windows 7’s start-up screen consists of an animation featuring four colored light balls (red, yellow, green, and blue).
- Calculator has been rewritten, with multiline capabilities including Programmer and Statistics modes along with unit conversion and date calculation.
- Many new items have been added to Control Panel (Figure 15.33) including: ClearType Text Tuner, Desktop Gadgets, Recovery, Troubleshooting, Location and Other Sensors, Credential Manager, Biometric Devices, System Icons, Action Center, and Display.
- Paint and WordPad both have the new ribbon user interface.
- Resource Monitor includes numerous new features, including an improved RAM usage display, display of TCP/IP ports being listened to, filtering processes using networking, filtering processes with disk activity etc.
- For developers, Windows 7 includes a new networking API with support for building SOAP based web services in native code.
- Windows 7 includes power-saving features, such as adaptive display brightness, which dims a laptop’s display when the laptop has not been used for a while.
- The windows borders and taskbar remain translucent when a window is maximized with Windows Aero applied.
- HomeGroup allows easy sharing of files and printers on a home network.
- Windows Live Essentials has programs like Mail, Movie Maker, Photo Gallery, and more.
- Windows Search allows you to search for virtually anything on your PC, instantly. It works like search folders i.e. allow pivoting views, and allow you to show content from various locations in one spot.
- Windows 7 supports remote media streaming which allows you to enjoy music and video on your home PC—even when you’re not at home.
- It allows you to pair Windows 7 with a touchscreen, replacing a keyboard or mouse.
- Windows Complete PC Backup allows users to completely restore their PC environment including the operating system, installed programs, user settings, and data files.
QUESTIONS
- What is the benefit of Windows XP over its predecessors?
- List any five new features of Windows XP.
- What is Windows Desktop?
- Discuss about the different parts of Windows desktop screen.
- Name the different parts of the Task Bar.
- In which area does the date and time appear on the Windows screen.
- List the different ways in which you can organize icons on desktop (Arrange icons by).
- Describe the structure of Window in Windows XP.
- Write steps to do the following —(1) Organizing icons on Desktop, (2) Create Shortcuts, and (3) Change Date and Time.
- What is the purpose of the title bar, menu bar, tool bar, scroll bar and status bar in a Window of Windows XP.
- What is the purpose of Windows XP Explorer?
- List the different views in which you can see the folder information.
- Explain in one or two lines, how the folder information is viewed in (1) Filmstrip, (2) Thumbnails, (3) Tiles, (4) Icons, (5) List, and (6) Details.
- List the different ways of selecting a file or a folder.
- Write steps to do the following—(1) Create a Folder, (2) Delete a File, (3) Copy a File, (4) Move a File, and (5) Change the name of a File.
- What information is provided by the <Properties> of the folder.
- Write steps to do the following—(1) Show Hidden Files and Folders, (2) Know the Types of Files, and (3) Organize Folders.
- What is the purpose of Recycle Bin?
- List the steps to restore a file from Recycle Bin.
- List the steps to configure Desktop, Screen saver, and Screen appearance.
- What is the purpose of Windows Register?
- List the steps to add a non-plug & play hardware.
- Name any three System tools.
Exercises
Instructions: For all the questions take the screen snapshots before you perform the exercise, and, after you perform the exercise.
To take a snapshot of the screen, do the following:
Step 1. <shift key> <function key (fn)> <print screen key (prt sc)>
Step 2. Open a new word document and <Paste> on it.
- Create shortcuts for any two programs.
- Change the date and time of your computer.
- View the folder in Thumbnail format.
- Create a new folder ‘F’. Copy folder ‘F’ to a new directory. Move the folder from this new directory to another directory, and name it ‘H’. Delete the original folder ‘F’.
- Search the location where a folder “X” is in your computer.
- Empty the Recycle Bin.
- Restore the deleted files in Recycle Bin.
- Configure your screen. (Change its Appearance, Theme, Screen saver etc.)
- Change the icon of your mouse, when it comes on a tooltip.
- Use the Disk Defragmenter.
- Use Disk Clean up.
- Use the Character Map.
- Find the system information.
- Create a new System Restore point.
- Schedule the disk cleanup task to run now, tomorrow, and day after at the same time.
- While doing any of the above, enjoy the music. Play a song from the playlist using Windows Media Player.