
20
NETWORK AND INTERNET CONNECTIONS
Contents
- Introduction
- Start network connections
- Create a new connection—
- Connect to dial-up modem, cable or DSL modem, LAN connection, private network, existing home or small office network, DCC between two computers
- Select network connection type— Internet option, network at my workplace, home or small office network, advanced connection option
- Getting ready—Choose ISP, set up connection manually, use the CD I got from an ISP
- Manage a network connection—Disable, enable and repair a network connection, configure IP settings
- Network setup
- Windows firewall
- Sharing of files
- Wireless network setup—Create wireless network, add a computer to an existing wireless network
- Connect using virtual private network
- Set up a wired network
- Automatic wireless network connections—Configure wireless network settings, available networks, automatically connect to non-preferred networks
- Set up Internet properties—Internet options
- Choose an Internet connection—Dial-up access, ISDN, DSL, cable modem, wireless Internet connections, T-1 lines, Internet over satellite
Why this chapter
Internet and networking is an important part of using the computer. To connect the computer to a network or the Internet, using wired or wireless connection, you need to set up a connection and also be able to manage it. In Windows XP, the Network and Internet Connections option allows you to do that. The purpose of this chapter is to introduce you to the Network and Internet connections of Windows XP.
20.1 INTRODUCTION
Windows XP provides many ways using which to network or link computers at home, at office or to the Internet. Windows XP provides easy-to-follow wizards to help create, manage, and secure your network. You can setup five types of network connections i.e., dial-up connections, local area connections, virtual private network connections, direct connections using serial or parallel cables, and, call in to a remote access server from your home or office. It is also possible to set up wired connections or wireless connections to connect to other computers or the Internet. Windows XP also allows setting up a Firewall that blocks access to the computer from the Internet or a network program and service that is not trusted.
In this chapter, we describe the Network and Internet Connections of Windows XP. The chapter describes creating and managing the network connections, setting up a wired and wireless connection, setting up the Firewall, and making Internet settings using the Internet options.
20.2 START NETWORK CONNECTIONS
The network connections setting in Windows XP specifies how to connect the computer to a network. It might also be needed to change the network settings if the Internet Service Provider (ISP) is changed.
The steps to start the network connections is as follows:
- <Start> <Control Panel> <Pick a Category> <Network and Internet Connections> <or pick a Control Panel icon> <Network Connections> (Figure 20.1)
- Windows XP displays the Network Connections window.
All the network connections (Figure 20.2) of the computer can be seen
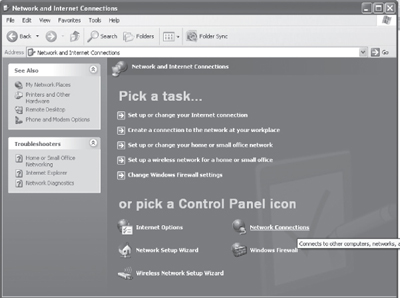
Figure 20.1 Network and internet connections
In this chapter, the following terminology is used for working with the mouse
- Pointer—a mouse pointer
- Click—press left button of mouse once
- Right Click—press right button of mouse once
- Double Click—press left button of mouse twice
- Select—move the pointer of mouse and keep the left button of the mouse pressed over the area that you want to select. The selected area will appear in a dark background.
The commands are enclosed in braces <Command> to represent the command to be clicked.
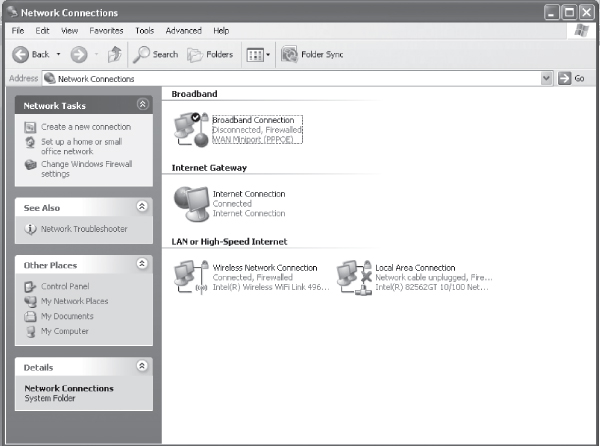
Figure 20.2 Network connections
20.3 CREATE A NEW CONNECTION
To create a new connection, the New Connection Wizard has to be started. The new connection wizard helps to create a connection to the Internet, to another computer, or to the workplace network. The New Connection Wizard supports setting up the different types of network connections like broadband, Virtual Private Network (VPN), modem dialup, serial port, parallel port and infrared. The New Connection Wizard allows the following:
- Set up a computer to connect to the Internet using a dial-up modem, a cable or DSL modem, or LAN connection. The Internet Service Provider (ISP) would have provided the settings to be included on the computer.
- Connect the computer to a private network, such as the company network, using dial-up or VPN connection to work from home or another location. Your company/organization must give the access right for the VPN.
- Connect the computer to an existing home or small office network or set up a new one. Assign a unique name for your computer and type in the workgroup name correctly.
- Set up a Direct Cable Connection (DCC) between two computers using serial, parallel, or infrared port.
- Set up your computer for incoming connection that allows other computers on the local network or on the Internet to connect to it.
To start the New Connection Wizard, do the following steps:
- <Start> <Control Panel> <Network and Internet Connections> <Network Connections>. A window opens.
- On the left side of window, on the tab Network Tasks, click <Create a new connection> (Figure 20.3)
- A New Connection Wizard opens. Click Next to continue.
- Select Network connection type. The Network Connection Type (Figure 20.4) presents three choices for Internet and private network setup:
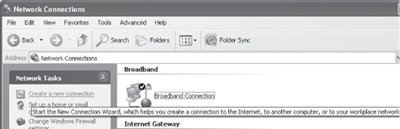
Figure 20.3 Create a new connection option
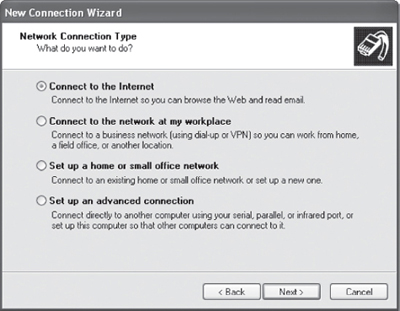
Figure 20.4 Network connection type
- Connect to the Internet option allows the user to choose from a list of ISPs, use a setup CD provided by the ISP, or set up a connection manually.
- Connect to the network at my workplace allows client-side setup of both dialup remote access and VPN services.
- Set up a home or small office network allows sharing an Internet connection, share files, folders and printers.
- Set up an advanced connection option supports serial, parallel and infrared port networking setups.
Select an option. To connect to the Internet, select the Connect to the Internet option. Click Next to continue.
- The Getting Ready page (Figure 20.5) presents three choices as shown below:

Figure 20.5 Getting ready for Internet connection
- Choose from a list of Internet Service Providers option gives instructions for setting up an account with an ISP, then making the Internet connection through that new account.
- Set up my connection manually option sets up connections for accounts that have already been opened with an ISP (username and password are ready for use).
- Connect using a dial-up modem option works for phone line Internet services.
- Connect using a broadband connection that requires a user name and password (DSL or cable modem Internet services).
- Connect using a broadband connection that is always on (for “always on” DSL or cable modem services)
- Use the CD I got from an ISP option is used when an installation CD-ROM has been given to you by the ISP.
- Select Choose from a list of Internet Service Providers
- Click Finish.
The Windows XP network connection wizard closes and a new window (Figure 20.6) opens.
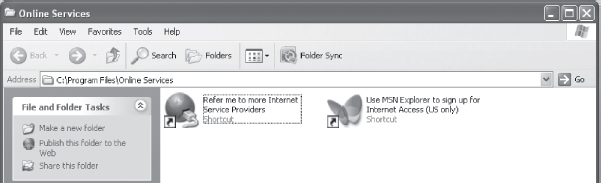
Figure 20.6 Online services
The Refer me to more Internet Service Providers launches a new Internet Connection Wizard.
The Use MSN Explorer to sign upfor InternetAccess (US only) launches the MSN window.
20.4 MANAGE A NETWORK CONNECTION
Several network management tasks can be performed on a network connection. To manage a network connection, do as follows:
- Click on the connection you want to manage. Network management task can be performed on this connection in two ways:
- On the left side, Network Tasks shows the list of possible tasks you can perform for this connection, or
- Right-click on the network connection you want to manage. A pop-up window appears (Figure 20.7). Select the task to be performed.
Some of the network management tasks you can perform on the selected network connection are as follows:
- Disable a network connection—Right-click. <Disable>.
- Enable a network connection—Right-click. <Enable>.
- Repair a network connection—Right-click. <Repair>.
- Configure your Internet Protocol (IP) settings—Use this option to specify the IP address and Domain Name System (DNS) servers. Right-click a network connection. <Properties>. General tab. In This connection uses the following items click <Internet Protocol (TCP/IP)>. Click <Properties>. In the Internet Protocol (TCP/IP) Properties dialog box (Figure 20.8), configure the network settings. Click OK. Click close to return to the Network Connections window.
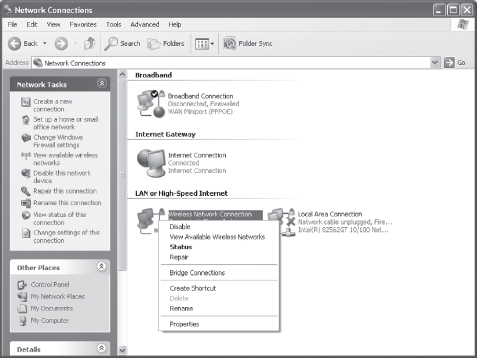
Figure 20.7 Network management tasks
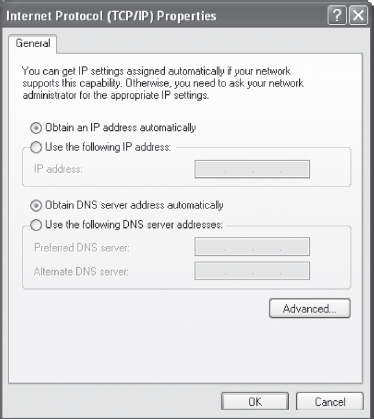
Figure 20.8 TCP/IP properties
20.5 NETWORK SETUP
The Network Setup wizard is used after physically connecting all computers in the network with the necessary hardware. The Network Setup Wizard helps do the following:
- Configure all computers in the network to share one Internet connection through a hub, gateway etc.
- Set up Windows Firewall to protect the computer or network when it is connected to the Internet.
- Enable file and printer sharing so that certain files, folders, or printers can be accessed by all computers in the network.
Network Setup Wizard can be used as follows:
- <Start> <Control Panel> <Network and Internet Connections> <Network Setup Wizard> (Figure 20.9).
- Click Next. On each window that opens follow the instructions and then click on Next. Finally you will reach the window showing Finish. Click on Finish to complete the setup.
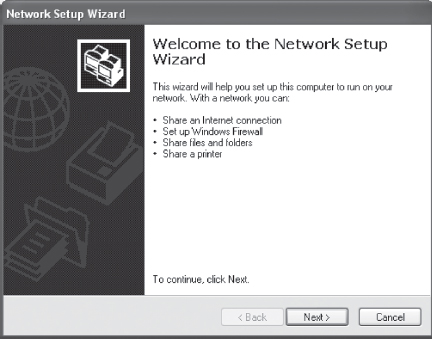
Figure 20.9 Network setup wizard
20.6 WINDOWS FIREWALL
Windows firewall is a protective boundary that monitors the incoming traffic from the network and Internet. Using the firewall, guards against the intruders and unauthorized persons over the network and the Internet. When connected to the Internet or a network, it blocks unauthorized access to the computer. However, the programs and services that you trust can access your computer. Windows Firewall does not provide the options to filter outgoing connections.
The Windows Firewall is turned on by default. In Windows XP, Windows Firewall is part of the Windows Security Center. Windows Security Center manages security setting of Internet Options, Windows Automatic Updates and Windows Firewall. It constantly checks whether Windows Firewall is on, and displays an alert message if it is turned off. Windows Security Center also monitors the antivirus software to ensure that it is updated.
The Windows Firewall ![]() window can be opened in either of the following ways:
window can be opened in either of the following ways:
- <Start> <Control Panel> <Network and Internet Connections> <Windows Firewall>, or
- <Start> <Control Panel> <Network and Internet Connections> <Change Windows Firewall settings>, or
- <Start> <Control Panel> <Security Center> <Windows Firewall>, or
- <Start> <Control Panel> <Windows Firewall>, or
- <Start> <Connect To> <Show all connections> <Network Tasks> <Change Windows Firewall settings>, or
- <Start> <All Programs> <Accessories> <Communications> <Network Connections> <Network Tasks> <Change Windows Firewall settings>, or
- <My Network Places> <View network connections> <Network Tasks> <Change Windows Firewall settings>.
The Windows Firewall is opened as follows:
- <Start> <Control Panel> <Network and Internet Connections> <Windows Firewall>.
- Windows Firewall window opens (Figure 20.10). It has three tabs—General, Exceptions and Advanced. You can make the Firewall settings from here.

Figure 20.10 Windows firewall
20.7 SHARING OF FILES
Windows XP allows the local sharing and network sharing of the files and folders. To share a file or folder with other users, perform the following steps:
- Right-click on the folder name you want to share.
- Click <Properties>.
- Click <Sharing>.
- Click on Shared Documents for the local sharing (Figure 20.11). Click on Network Setup Wizard for the network sharing of the file or folder.
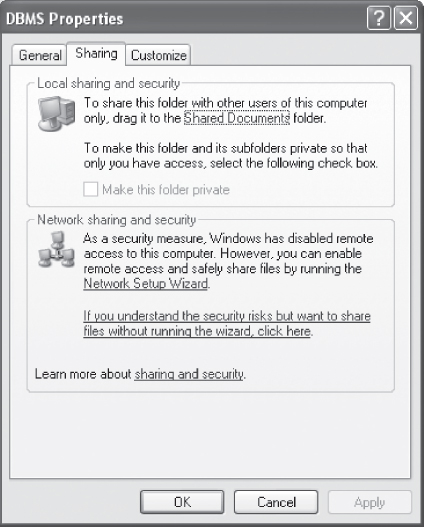
Figure 20.11 Sharing of files and folders
Sharing rights for the users can also be set. Permissions can be allowed or denied to specific users or groups for the sharing of the folder. To share the individual files, put the files in the same shared folder. All the files and folders in the parent shared folder will be automatically shared.
20.8 WIRELESS NETWORK SETUP
The Wireless Network Setup Wizard enables creation of a secure wireless network. Choose the security scheme to be Wired Equivalent Privacy (WEP) or Wi-Fi Protected Access (WPA). WPA gives stronger security to your network, but make sure that the hardware (network adapter and access point) supports WPA.
The Wireless Network Setup Wizard can be started as follows:
<Start> <Control Panel> <Network and Internet Connections> <Wireless Network Setup Wizard> The Wireless Network Setup Wizard (Figure 20.12) helps to:

Figure 20.12 Wireless network setup wizard
- Create a wireless network in which a wireless access point connects all computers together. It is necessary to assign a network name—Service Set Identifier (SSID) and a secure key with either WEP or WPA encryption (Figure 20.13). An SSID is the name of a wireless local area network (WLAN). All wireless devices on a WLAN must use the same SSID to communicate with each other. The SSID on wireless clients can be set either manually, by entering the SSID into the client network settings, or automatically by leaving the SSID blank. You can save your network settings to a Universal Serial Bus (USB) flash drive and use it for configuring the wireless access point and other computers. The USB flash drive can only be used for setting up wireless LAN devices (e.g. access point, camera and phone) that support Windows Connect Now technology (WCN). There is an option to print the network settings and set up the network manually.
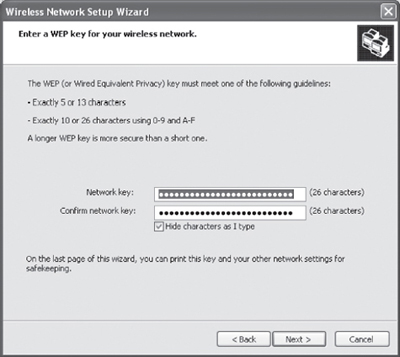
Figure 20.13 To enter a WEP key for wireless network
- Add a computer to an existing wireless network. You can use the USB flash drive to which settings were saved during your wireless network creation, or you can set up the network manually. To use the flash drive, just plug in the USB flash drive to each computer that you want to add to the existing wireless network and confirm that the computer will be added to the existing wireless network when prompted by the wizard. Then the computer will be configured automatically for joining the existing wireless network.
20.9 CONNECT USING VIRTUAL PRIVATE NETWORK (VPN)
A VPN provides remote users with secure access to the organization’s network via public infrastructure such as Internet. To connect to the VPN, first make the settings required to make the connection, as follows:
- <Start> <Control Panel> <Network and Internet Connections> <Network connection> <Create a new connection>. The New Connection Wizard appears. Click Next.
- Select Connect to the network at my workplace. Click Next.
- Select Virtual Private Network connection. Click Next.
- In the Company Name text box, type the name given by your company for the connection. Click Next.
- In the Host name or IP address text box, type the host name of our company’s computer to which you want to connect to. Click Next.
- Select My use on. Click Next.
- Check the checkbox for Add a shortcut to this connection to my desktop. Click Finish
- Click Cancel to exit.
To connect to the VPN, do as follows:
- From the Desktop, double click your VPN connection shortcut.
- A dialog box appears. Enter your user name and password.
- Click Connect.
20.10 SET UP A WIRED NETWORK
Wired networks offer good performance, reliability and security. Wired networks are used to connect your desktop computer to the Internet and to other computers in your home. If you have a single computer, connecting to the Internet requires plugging a network cable into the computer and the modem. If there is more than one computer, connect a router between your modem and your computers. If the computer is in a different room from that of the router, a network extender can be used to connect the computer.
The steps to connect the computer to the Internet connection using a wired network are as follows:
- Use the services of an Internet service provider (ISP) to have them configure an Internet connection to your home. Preferably, place the modem in the room with your computer.
- Your computer must have a Network adapter.
- Shut down your computer. <Start> <Turn off Computer> <Turn Off>.
- Connect the network cable given to you by your ISP to your network adapter. Connect the other end of the network cable to your modem.
- Start your computer and log on to Microsoft Windows.
- Windows automatically detects that you are connected to the Internet.
Your wired connection to the Internet is now ready for use.
20.11 AUTOMATIC WIRELESS NETWORK CONNECTIONS
Windows XP allows establishing a wireless network connection to Wi-Fi network routers and access points automatically. This feature helps to make wireless Internet or Wi-Fi network connections easily with laptop computers. The steps to be followed to establish a wireless network connection automatically are as follows:
- Check whether the Windows XP computer supports automatic wireless configuration. For this do as follows:
- <Start> <Control Panel> <Network and Internet Connections> <Network Connections>
- Right-click <Wireless Network Connection> <Properties>
In the Wireless Network Connection properties window, if you see a Wireless Networks tab, then you can automatically connect to wireless network connections. Click it.
- To enable automatic configuration, Use Windows to configure my wireless network settings checkbox must be checked on the Wireless Networks tab of the Wireless Network Connection properties window (Figure 20.14). Automatic wireless network configuration will be disabled if this checkbox is unchecked.
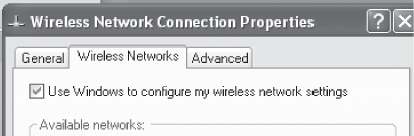
Figure 20.14 Use Windows to configure wireless network
- The Wireless Networks tab allows access to the set of Available networks (Figure 20.15). Available networks represent the active networks currently detected by Windows XP. To view the available networks, click the View Wireless Networks button on that page.
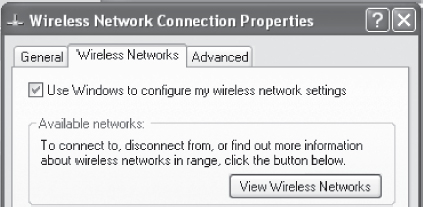
Figure 20.15 View wireless networks
- You can also build a set of “Preferred networks” (Figure 20.16) when automatic wireless configuration is active. This list represents a set of known Wi-Fi routers or access points you wish to automatically connect to in future. The order Preferred networks are listed here determines the order that Windows XP will automatically attempt when seeking to make a wireless connection. You can set this order to your preference.
- By default, Windows XP enables automatic wireless configuration support. Also, by default, Windows XP only auto-connects to Preferred networks.
- The Advanced button on the Wireless Networks tab of Wireless Network Connection properties controls the default behavior of Windows XP automatic connections. The Automatically connect to non-preferred networks, allows Windows XP to auto-connect to any network on the Available list, not just Preferred ones. This option is disabled by default.
- When the View Wireless Networks button on the Wireless Network tab is clicked, all the available wireless networks in range (Figure 20.17) are seen. Choose the network that you wish to connect to and click the Connect button.
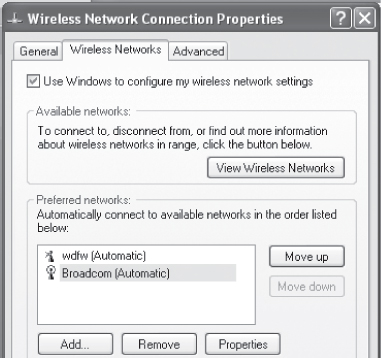
Figure 20.16 Preferred networks
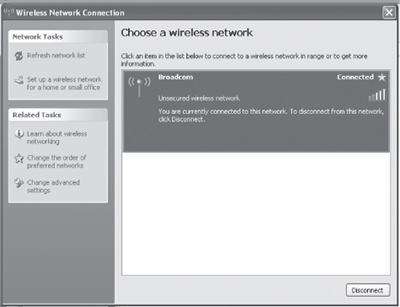
Figure 20.17 Choose a wireless network
- If the wireless network is protected, click Change advanced settings. A Wireless Network Properties window opens. Click on the Wireless Networks tab. In the Preferred network, select the network you want to connect to. Click <Properties>. A window opens. It has three tabs—Association, Authentication and Connection. Make the required entries in these tabs. Click <OK>.
- You should now be connected to the wireless network.
20.12 SET UP INTERNET PROPERTIES—INTERNET OPTIONS
Once you are connected to the Internet, you need to use the Web Browser to access the World Wide Web (WWW). The Internet Explorer is a Web browser software that comes bundled with the Windows software. Internet can be accessed by clicking on the Internet Explorer icon jjA. The Internet Explorer settings can be modified using the Internet Options. Internet Options allows you to change the settings of Internet Explorer, but it cannot be used to change the settings of other Web browsers.
To Open Internet Options, do as follows:
- <Start> <Control Panel> <Network and Internet Connections> <Internet Options>.
- An Internet Properties window opens.
The Internet Properties window (Figure 20.18) has seven tabs—General, Security, Privacy, Content, Connections, Programs and Advanced. Specify the first Web page you see on starting the browser, delete temporary Internet files stored on the computer, use Content Advisor to block access to objectionable material, and specify how colors and fonts are displayed on Web pages. You can also set the security level and specify which programs to use for e-mail. In short, you can make all the settings for the Internet browser from here.
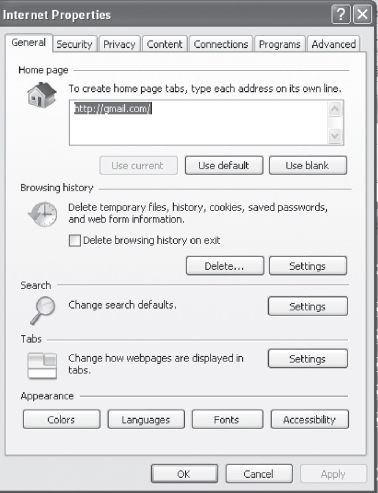
Figure 20.18 Internet properties
20.13 CHOOSE AN INTERNET CONNECTION
With the growth of technology, the content on the Web has also changed. Now web applications include content like animations, online gaming, database-driven Web sites and e-commerce. Thus, the need for speed as to how fast we can connect to the Internet has changed.
The overall connection speeds of the different types of Internet connections are given below. There can be variations amongst different Internet Service Providers (ISP).
- Dial-up access is economical but slow. Dial-up access uses normal telephone lines so the quality of the connection is not always good. Speed is 2400 bps to 56 Kbps.
- Integrated Services Digital Network (ISDN) is an international communications standard for sending voice, video, and data over telephone lines. Speed is 64 Kbps to 128 Kbps.
- DSL is an always on connection. ADSL is the most commonly deployed type ofDSL. Speed is 128 Kbps to 8 Mbps.
- Cable modem gives you a broadband Internet connection that is designed to operate over cable TV lines. Speed 512 Kbps to 20 Mbps.
- Wireless Internet Connections uses radio frequency bands. Wireless Internet provides an always-on connection which can be accessed from anywhere geographically within a network coverage area. Their speed varies.
- T-1 Lines are a leased line option for businesses connecting. T-1 Lines support speeds of 1.544 Mbps.
- Internet over Satellite (IoS) allows a user to access the Internet via a satellite that orbits the earth. Speed: 492 Kbps to 512 Kbps.
For home users, the ADSL connection is the best suited. It is a broadband connection, always on, not very expensive and can be used with the telephone line. It has a fairly good speed also. You can also connect your broadband connection to a wireless modem internally in the home, to access the Internet connection from any room of the house wirelessly.