
Chapter 14
Importing Data into Excel
Understanding External Data
External data is data that resides outside of Excel in a file, database, server, or website. You can import external data into an Excel worksheet for additional types of data analysis. A vast amount of data exists in the world, and most of it resides in some kind of non-workbook format. Some data exists in simple text files, perhaps as comma-separated lists of items. Other data resides in tables, either in Word documents or, more likely, in Access databases. There is also an increasing amount of data that resides in web pages and in XML files.
By definition, all this data is not directly available to you via Excel. However, Excel offers a number of tools that enable you to import external data into the program. Depending on your needs and on the type of data, you can either import the data into a worksheet or you can import the data directly into a PivotTable. In most cases, Excel also enables you to refresh the data so that you are always working with the most up-to-date version of the data.
External Data Types
Excel can access a wide variety of external data types. Some of the common external data types are data source files, Access tables, Word tables, text files, web pages, and XML files.
Data Source File
Open Database Connectivity (ODBC) data sources give you access to data residing in databases such as Access and dBase or on servers such as SQL Server and Oracle. However, there are many other data-source types, including data connection files (which connect to specific objects in a data source, such as an Access table), web queries, OLAP (Online Analytical Processing) cubes, query files (saved via Microsoft Query), web-based data retrieval services, and XML files.
Access Table
Microsoft Access is the Office suite’s relational database management system. It is often used to store and manage the bulk of the data used by a person, team, department, or company. You can connect to Access tables either via Microsoft Query or by importing table data directly into Excel.
Word Table
Simple collections of nonrelational data are often stored in a table embedded in a Word document. You can only perform so much analysis on that data within Word, and so it is often useful to import the data from the Word table into an Excel worksheet.
Text File
Text files often contain useful data. If that data is formatted properly — for example, where each line has the same number of items, all separated by spaces, commas, or tabs — then it is possible to import that data into Excel for further analysis.
Web Page
People and companies often store useful data on web pages that reside either on the Internet or on company intranets. This data is often a combination of text and tables, but you cannot analyze web-based data in any meaningful way in your web browser. Fortunately, Excel enables you to create a web query that lets you import text and tables from a web page.
XML
XML (Extensible Markup Language) is redefining how data is stored. This is reflected in the large number of tools that Excel now has for dealing with XML data, particularly tools for importing XML data into Excel.
Access to External Data
To use external data, you must have access to it. This usually means knowing at least one of the following: the location of the data or the login information required to authorize your use of the data.
Location
By definition, external data resides somewhere other than in an Excel worksheet on your system. Therefore, to access this external data, you must at least know where it is located. Here are some of the possibilities:
• On your computer. The data may reside in a file on your hard drive, on a CD or DVD, or on a memory card or other removable storage medium.
• On your network. The data may reside in a folder on a computer that is part of your local or wide area network. If that folder has been shared with the network, and if you have the appropriate permissions to view files in that folder, then you can access the data within the files.
• On a server. The data may be part of a large, server-based database management system, such as SQL Server or Oracle. In this case, you need to know the name or network address of the server.
• On a web page. The data may reside on a web page, either as text or as a table, in which case you need to know the address of the web page.
• On a web server. The data may reside on a special web server that runs data retrieval services such as Windows SharePoint Services. In this case, you need to know the address of the server and the location of the data on that server.
Login
Knowing where the data is located is probably all that you require if you are dealing with a local file or database or, usually, a web page. However, after you start accessing data remotely — on a network, database server, or web server — you also require authorization to secure that access. You need to see the administrator of the resource to obtain a username or login ID as well as a password.
Import Data
After you have access to the data, your next step is to import it into Excel for analysis and manipulation. You have two choices: importing to a worksheet or to a PivotTable.
Import to Worksheet
In all cases, you can import the data directly into an Excel worksheet. Depending on the amount of data, this can make your worksheet quite large. However, having direct access to the data gives you maximum flexibility when it comes to analyzing the data. Not only can you create a PivotTable from the worksheet data, but you can also use Excel with other data-analysis tools: lists, database functions, scenarios, and what-if analysis.
Import to PivotTable
If you are building a PivotTable using the external data as the source, then in most cases Excel enables you to import the data directly into the PivotTable. The advantage here is that Excel does not have to store two copies of the data, one on a worksheet and another in the pivot cache. The disadvantage is that you can only analyze the data using the PivotTable report. Other types of data analysis that require direct access to worksheet data are not possible.
Import Data from a Data Source
You can quickly import data into just about any format by importing the data from a defined data source file. A data connection file is a data source that connects you to a wide variety of data, including ODBC, SQL Server, SQL Server OLAP Services, Oracle, and web-based data retrieval services.
You can also create data connection files that point to specific objects in a database, such as an Access table. Excel also considers file types such as Access databases and projects, web pages, and text files to be data sources.
Import Data from a Data Source

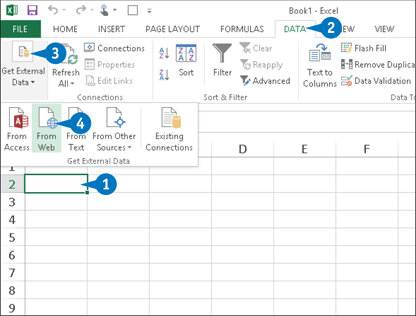
![]() Click the Data tab.
Click the Data tab.
![]() Click Get External Data.
Click Get External Data.
![]() Click Existing Connections.
Click Existing Connections.

The Existing Connections dialog box appears.
![]() Click the data source you want to import.
Click the data source you want to import.
![]() Click Open.
Click Open.
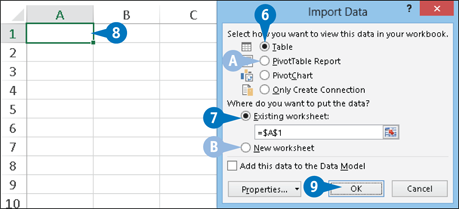
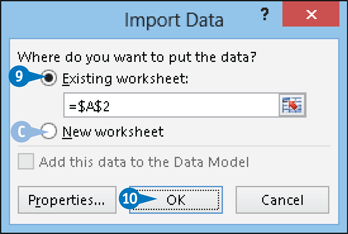
The Import Data dialog box appears.
![]() Click the Table option (
Click the Table option (![]() changes to
changes to ![]() ).
).
A To import the data directly into a PivotTable, click the PivotTable Report option (![]() changes to
changes to ![]() ).
).
![]() Click the Existing Worksheet option (
Click the Existing Worksheet option (![]() changes to
changes to ![]() ).
).
![]() Click the cell where you want the imported data to appear.
Click the cell where you want the imported data to appear.
B To import the data into a new sheet, click the New Worksheet option (![]() changes to
changes to ![]() ).
).
![]() Click OK.
Click OK.

Excel imports the data into the worksheet.
Import Data from an Access Table
If you want to use Excel to analyze data from a table within an Access database, you can import the table into an Excel worksheet. You can use Microsoft Query to perform this task. However, Excel gives you an easier way to do this: You can import the table directly from the Access database. To make this technique even easier, Excel automatically creates a data connection file for the database and table that you import. Therefore, you can import the same table in the future simply by opening the data connection file. Note, too, that you can also use the steps in this section to import data from any query that is already defined in the Access database.
Import Data from an Access Table
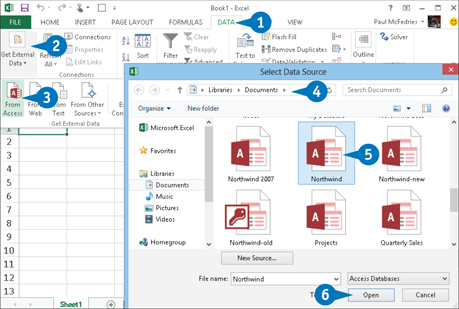
![]() Click the Data tab.
Click the Data tab.
![]() Click Get External Data.
Click Get External Data.
![]() Click From Access.
Click From Access.
The Select Data Source dialog box appears.
![]() Open the folder that contains the database.
Open the folder that contains the database.
![]() Click the file.
Click the file.
![]() Click Open.
Click Open.
Note: If the Data Link Properties dialog box appears, make sure the login information is correct and then click Test Connection until you can connect; then click OK.
The Select Table dialog box appears.
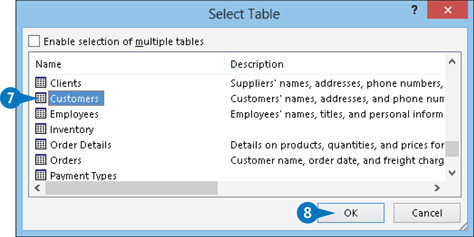
![]() Click the table or query you want to import.
Click the table or query you want to import.
![]() Click OK.
Click OK.

The Import Data dialog box appears.
![]() Click the Table option (
Click the Table option (![]() changes to
changes to ![]() ).
).
A To import the data directly into a PivotTable, click the PivotTable Report option (![]() changes to
changes to ![]() ).
).
![]() Click the Existing Worksheet option (
Click the Existing Worksheet option (![]() changes to
changes to ![]() ).
).
![]() Click the cell where you want the imported data to appear.
Click the cell where you want the imported data to appear.
B To import the data into a new sheet, click the New Worksheet option (![]() changes to
changes to ![]() ).
).
![]() Click OK.
Click OK.

Excel imports the data into the worksheet.
EXTRA
If the Access database requires a login password, you may need to type the password again when you refresh the imported data. To avoid this extra step, tell Excel to save the database password along with the external data. If you have the Import Data dialog box onscreen, click the Properties button; if you have already imported the data, click the Data tab, click the Refresh All down arrow, and then select Connection Properties from the drop-down list. In the Connection Properties dialog box, click the Definition tab, click the Save Password check box (![]() changes to
changes to ![]() ), click Yes, and then click OK.
), click Yes, and then click OK.
Import Data from a Word Table
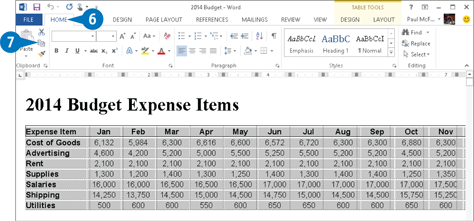
Word tables are collections of rows, columns, and cells, which means they look something like Excel ranges. Moreover, you can insert fields into Word table cells to perform calculations. These fields support cell references, built-in functions, and operators. Cell references refer to specific cells, such as B1, which refers to the cell in the second column and first row of a table. You can use cell references with built-in functions such as SUM and AVERAGE, and operators such as addition (+), multiplication (*), and greater than (>), to build formulas that calculate results based on the table data. However, Excel still offers far more sophisticated data-analysis tools. Therefore, to analyze your Word table data properly, you should import the table into an Excel worksheet.
Import Data from a Word Table
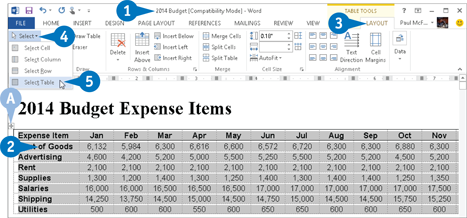
![]() Launch Microsoft Word and open the document that contains the table.
Launch Microsoft Word and open the document that contains the table.
![]() Click a cell inside the table you want to import.
Click a cell inside the table you want to import.
![]() Click the Layout tab.
Click the Layout tab.
![]() Click Select.
Click Select.
![]() Click Select Table.
Click Select Table.
A You can also select the table by clicking the table selection handle.
![]() Click the Home tab.
Click the Home tab.
![]() Click Copy.
Click Copy.
You can also press Ctrl+C.
Word copies the table to the Clipboard.

![]() Switch to the Excel workbook into which you want to import the table.
Switch to the Excel workbook into which you want to import the table.
![]() Click the cell where you want the table to appear.
Click the cell where you want the table to appear.
![]() Click the Home tab.
Click the Home tab.
![]() Click Paste.
Click Paste.
You can also press Ctrl+V.
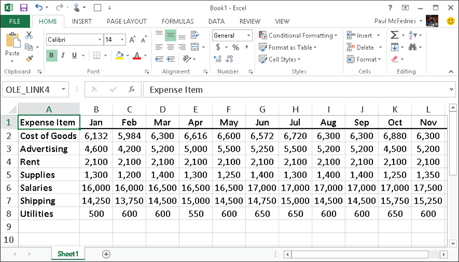
Excel pastes the Word table data.
EXTRA
If you make changes to the Word data, those changes are not automatically reflected in the Excel data. If this is a concern, shift the data’s container application from Word to Excel. After you paste the table data into Excel, copy the Excel range, switch to Word, click the Home tab, click the Paste down arrow, and then click Paste Special. In the Paste Special dialog box, click HTML Format in the As list, click the Paste Link option (![]() changes to
changes to ![]() ), and then click OK. The resulting table is linked to the Excel data, which means that any changes you make to the data in Excel automatically appear in the Word table. However, if you change the data in Word, you cannot update the data in Excel.
), and then click OK. The resulting table is linked to the Excel data, which means that any changes you make to the data in Excel automatically appear in the Word table. However, if you change the data in Word, you cannot update the data in Excel.
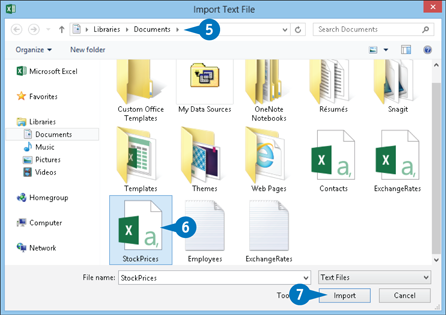
Import Data from a Text File
Nowadays, most data resides in some kind of special format: Excel workbook, Access database, web page, and so on. However, it is still relatively common to find data stored in simple text files because text is a universal format that users can work with on any system and in a wide variety of programs. You can analyze the data contained in certain text files by importing the data into an Excel worksheet. Note, however, that you cannot import just any text file into Excel; it needs to be in the form of delimited or fixed-width text files.
Import Data from a Text File
Start the Text Import Wizard
![]() Click the cell where you want the imported data to appear.
Click the cell where you want the imported data to appear.
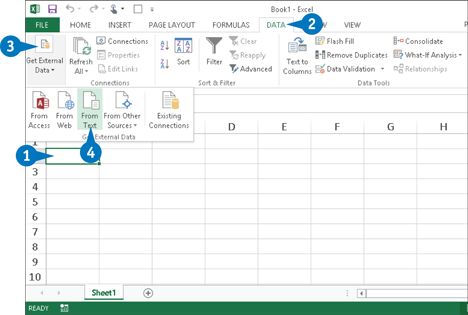
![]() Click the Data tab.
Click the Data tab.
![]() Click Get External Data.
Click Get External Data.
![]() Click From Text.
Click From Text.

The Import Text File dialog box appears.
![]() Open the folder that contains the text file.
Open the folder that contains the text file.
![]() Click the text file.
Click the text file.
![]() Click Import.
Click Import.
The Text Import Wizard – Step 1 of 3 dialog box appears.
Note: For delimited text, continue to the steps under “Import Delimited Data”; for fixed-width text, skip to “Import Fixed-Width Data.”
Import Delimited Data
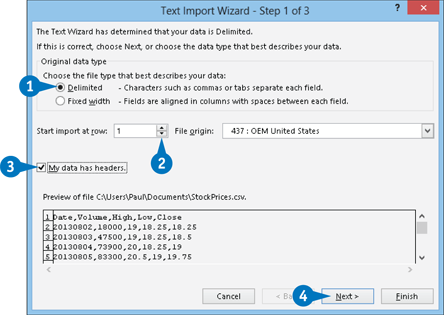
![]() Click the Delimited option (
Click the Delimited option (![]() changes to
changes to ![]() ).
).
![]() Click the Start Import at Row spin box arrows to set the first row you want to import.
Click the Start Import at Row spin box arrows to set the first row you want to import.
![]() If the first import row consists of column headers, click the My Data Has Headers check box (
If the first import row consists of column headers, click the My Data Has Headers check box (![]() changes to
changes to ![]() ).
).
![]() Click Next.
Click Next.
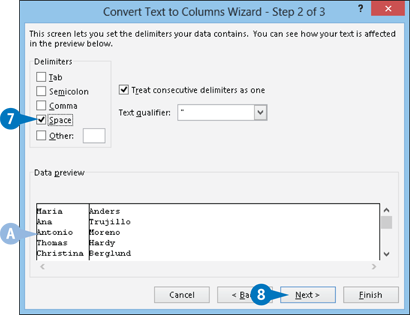
The Text Import Wizard – Step 2 of 3 dialog box appears.
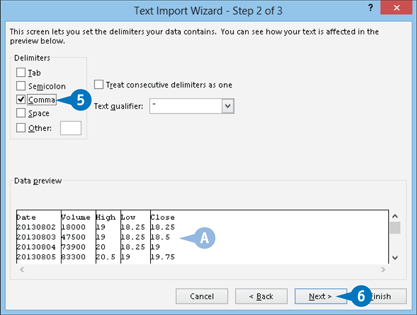
![]() Click the check box beside the delimiter character that your text data uses (
Click the check box beside the delimiter character that your text data uses (![]() changes to
changes to ![]() ).
).
A If you choose the correct delimiter, the data appears in separate columns.
![]() Click Next.
Click Next.
The Text Import Wizard – Step 3 of 3 dialog box appears.
Note: To complete this section, follow the steps under the subsection, Finish the Text Import Wizard.
If you are importing data that uses the fixed-width structure, then you need to tell Excel where the separation between each field occurs. In a fixed-width text file, each column of data is a constant width. The Text Import Wizard is usually quite good at determining the width of each column of data, and in most cases the wizard automatically sets up column break lines, which are vertical lines that separate one field from the next. However, titles or introductory text at the beginning of the file can impair the wizard’s calculations, so you should check carefully that the proposed break lines are accurate.
Import Data from a Text File
Import Fixed-Width Data

Note: You need to have completed the steps under Start the Text Import Wizard before continuing with this section.
![]() Click the Fixed Width option (
Click the Fixed Width option (![]() changes to
changes to ![]() ).
).
![]() Use the Start Import at Row spin box to set the first row you want to import.
Use the Start Import at Row spin box to set the first row you want to import.
![]() If the first import row consists of column headers, click the My Data Has Headers check box (
If the first import row consists of column headers, click the My Data Has Headers check box (![]() changes to
changes to ![]() ).
).
![]() Click Next.
Click Next.
The Text Import Wizard – Step 2 of 3 dialog box appears.
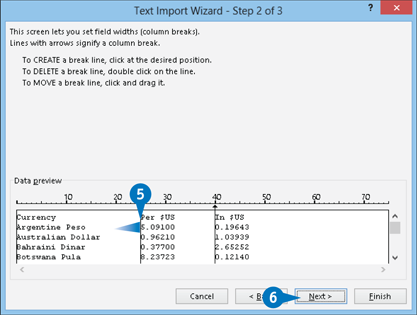
![]() Click and drag a break line to set the width of each column.
Click and drag a break line to set the width of each column.
To create a break line, you can click the ruler at the point where you want the break to appear.
To delete a break line, you can double-click it.
![]() Click Next.
Click Next.
The Text Import Wizard – Step 3 of 3 dialog box appears.
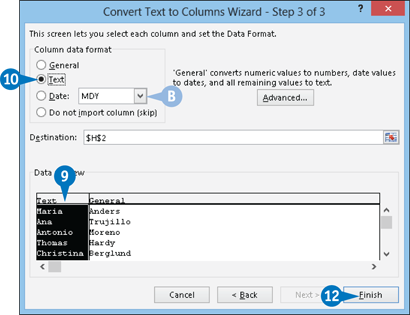
Finish the Text Import Wizard
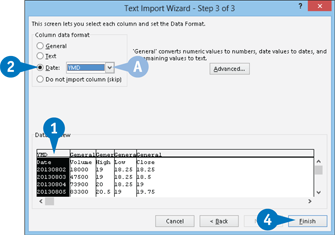
![]() Click a column.
Click a column.
![]() Click the Column data format option that you want Excel to apply to the column (
Click the Column data format option that you want Excel to apply to the column (![]() changes to
changes to ![]() ).
).
A If you select the Date option, click the down arrow and select the date format your data uses from the drop-down list.
![]() Repeat steps 1 and 2 to set the data format for all of the columns.
Repeat steps 1 and 2 to set the data format for all of the columns.
![]() Click Finish.
Click Finish.
The Import Data dialog box appears.
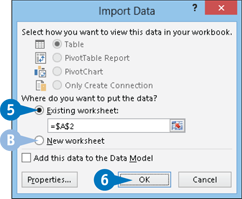
![]() Click the Existing Worksheet option (
Click the Existing Worksheet option (![]() changes to
changes to ![]() ).
).
B If you want the data to appear in a new sheet, you can click the New Worksheet option instead (![]() changes to
changes to ![]() ).
).
![]() Click OK.
Click OK.
Excel imports the data to the worksheet.
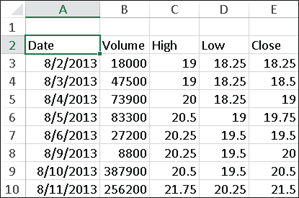
Import Data from a Web Page
To make data more readily available to a wide variety of users, many people are placing data on web pages that are accessible through the Internet or a corporate network. Although this data is often text, most web page data comes in one of two formats: a table or preformatted text. A table is a rectangular array of rows and columns, with data values in the cells created by the intersection of the rows and columns. Preformatted text is text that has been structured with predefined spacing. In many cases, you can use this spacing to organize data into columns with fixed widths. Both types of data are suitable for import into Excel, which enables you to perform more extensive data analysis using the Excel tools.
Import Data from a Web Page
![]() Click the cell where you want the imported data to appear.
Click the cell where you want the imported data to appear.
![]() Click the Data tab.
Click the Data tab.
![]() Click Get External Data.
Click Get External Data.
![]() Click From Web.
Click From Web.

The New Web Query dialog box appears.
![]() Type the address of the web page.
Type the address of the web page.
![]() Click Go.
Click Go.
A Excel loads the page into the dialog box.
![]() Click the Select Table icon beside the table that you want to import.
Click the Select Table icon beside the table that you want to import.
B Excel selects the table.
![]() Click Import.
Click Import.
The Import Data dialog box appears.
![]() Click the Existing Worksheet option (
Click the Existing Worksheet option (![]() changes to
changes to ![]() ).
).
C If you want the data to appear in a new sheet, you can click the New Worksheet option instead (![]() changes to
changes to ![]() ).
).
![]() Click OK.
Click OK.

Excel imports the data to the worksheet.
APPLY IT
Excel gives you two other methods for creating web queries:
• Right-click the page and then click Export to Microsoft Excel.
• Copy the web page text, switch to Excel, and then paste the text. When the Paste Options smart tag appears, click the smart tag down arrow and then click Refreshable Web Query.
Each of these methods opens the New Web Query dialog box and automatically loads the web page. If you want to save the web query for future use in other workbooks, click Save Query (![]() ) in the New Web Query dialog box and then use the Save Workspace dialog box to save the query file.
) in the New Web Query dialog box and then use the Save Workspace dialog box to save the query file.
Import Data from an XML File
You can analyze data that currently resides in XML format by importing that data into Excel and then manipulating and analyzing the resulting table. XML (Extensible Markup Language) is a standard that enables the management and sharing of structured data using simple text files. These XML files organize data using tags, among other elements, that specify the equivalent of a table name and field names. Because XML is just text, if you want to perform data analysis on the XML file, you must import the file into an Excel worksheet. Excel usually stores imported XML data in an XML table, a range that looks and operates much like a regular Excel table, except that it has a few XML-specific features.
Import Data from an XML File
![]() Click the cell where you want the imported data to appear.
Click the cell where you want the imported data to appear.
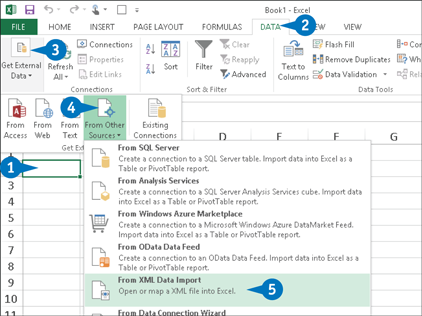
![]() Click the Data tab.
Click the Data tab.
![]() Click Get External Data.
Click Get External Data.
![]() Click From Other Sources.
Click From Other Sources.
![]() Click From XML Data Import.
Click From XML Data Import.

The Select Data Source dialog box appears.
![]() Select the folder that contains the XML file you want to import.
Select the folder that contains the XML file you want to import.
![]() Click the XML file.
Click the XML file.
![]() Click Open.
Click Open.
Note: If you see a dialog box telling you there is a problem with the data, click OK.
The Import Data dialog box appears.
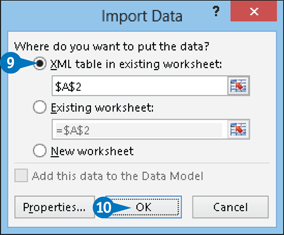
![]() Click the XML Table in Existing Worksheet option (
Click the XML Table in Existing Worksheet option (![]() changes to
changes to ![]() ).
).
![]() Click OK.
Click OK.
Excel imports the data into the worksheet as an XML table.
Refresh Imported Data
External data often changes; you can ensure that you are working with the most up-to-date version of the information by refreshing the imported data. Refreshing the imported data means retrieving the most current version of the source data. This is usually a straightforward operation. However, it is possible to construct a query that accesses confidential information or destroys some or all of the external data. Therefore, when you refresh imported data, Excel always lets you know the potential risks and asks if you are sure the query is safe. Remember that most external data resides on servers or in remote network locations. Therefore, the refresh may take some time, depending on the amount of data, the load on the server, and the amount of traffic on the network.
Refresh Imported Data
Refresh Non-text Data

![]() Click any cell inside the imported data.
Click any cell inside the imported data.
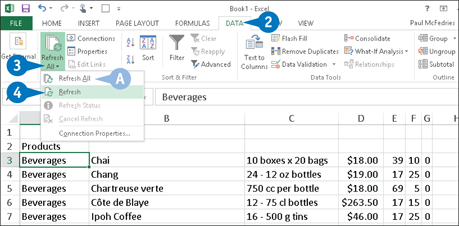
![]() Click the Data tab.
Click the Data tab.
![]() Click the Refresh All down arrow.
Click the Refresh All down arrow.
![]() Click Refresh.
Click Refresh.
Note: You can also refresh the current data by pressing Alt+F5.
A To refresh all the imported data in the current workbook, you can click Refresh All, or press Ctrl+Alt+F5.
Excel refreshes the imported data.
Refresh Text Data
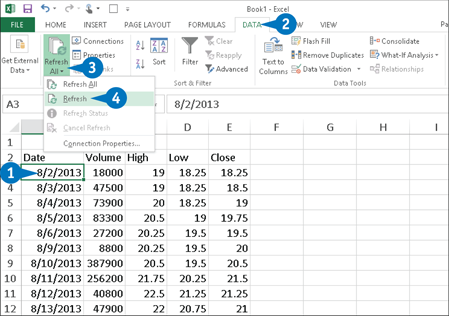
![]() Click any cell inside the imported text data.
Click any cell inside the imported text data.
![]() Click the Data tab.
Click the Data tab.
![]() Click the Refresh All down arrow.
Click the Refresh All down arrow.
![]() Click Refresh.
Click Refresh.
Note: You can also refresh the current data by pressing Alt+F5.
The Import Text File dialog box appears.
![]() Open the folder that contains the text file.
Open the folder that contains the text file.
![]() Click the text file.
Click the text file.
![]() Click Import.
Click Import.
Excel refreshes the imported text data.
EXTRA
In most cases, you can set up a schedule that automatically refreshes the data at a specified interval. Follow steps 1 to 3 under “Refresh Non-text Data,” and then click Connection Properties. Click the Refresh Every check box (![]() changes to
changes to ![]() ) and then use the spin box to specify the refresh interval, in minutes. Note that not every type of imported data supports this feature.
) and then use the spin box to specify the refresh interval, in minutes. Note that not every type of imported data supports this feature.
If the refresh is taking a long time, check the refresh status by following steps 1 to 3 under “Refresh Non-text Data” and then clicking Refresh Status to display the External Data Refresh Status dialog box; click Close to continue the refresh. If the refresh is taking too long, follow steps 1 to 3 again, and then click Cancel Refresh to stop it.
Separate Cell Text into Columns
You can make imported data easier to analyze by separating the text in each cell into two or more columns of data. An imported data column may contain multiple items of data. In imported contact data, for example, a column might contain each person’s first and last name, separated by a space. This is problematic if you want to sort the contacts by last name, so you need some way of separating the names into their own columns. Excel makes this easy by offering the Text to Columns feature, which examines a column of data and then separates it into two or more columns.
Separate Cell Text into Columns

![]() Insert a column to the right of the column you want to separate.
Insert a column to the right of the column you want to separate.
Note: If the data will separate into three or more columns, you can insert as many new columns as you need to hold the separated data.
![]() Select the data you want to separate.
Select the data you want to separate.
![]() Click the Data tab.
Click the Data tab.
![]() Click Text to Columns.
Click Text to Columns.

The Convert Text to Columns Wizard – Step 1 of 3 dialog box appears.
![]() Click the Delimited option (
Click the Delimited option (![]() changes to
changes to ![]() ).
).
![]() Click Next.
Click Next.
![]() Click the check box beside the delimiter character that your text data uses (
Click the check box beside the delimiter character that your text data uses (![]() changes to
changes to ![]() ).
).
A If you choose the correct delimiter, the data appears in separate columns.
![]() Click Next.
Click Next.
![]() Click a column.
Click a column.
![]() Click to select the data format you want Excel to apply to the column.
Click to select the data format you want Excel to apply to the column.
B If you click the Date option, you can use this list to click the date format your data uses.
![]() Repeat steps 9 and 10 to set the data format for all the columns.
Repeat steps 9 and 10 to set the data format for all the columns.
![]() Click Finish.
Click Finish.
Excel asks if you want to replace the contents of the destination cells.
![]() Click OK (not shown).
Click OK (not shown).
Excel separates the data.
EXTRA
If your column contains fixed-width text, follow steps 1 to 4 to start the Convert Text to Columns Wizard. Click the Fixed Width option (![]() changes to
changes to ![]() ), and then click Next. Click and drag a break line to set the width of each column, and then click Next. Follow steps 9 to 13 to complete the wizard.
), and then click Next. Click and drag a break line to set the width of each column, and then click Next. Follow steps 9 to 13 to complete the wizard.
Excel does not always create just one extra column from the data. For example, in a column of contact names, if any of those names use three words, Excel assumes that you want to create two extra columns for the data. Unfortunately, this may cause Excel to overwrite some of your existing data. Therefore, before separating data into columns, check the data to see how many columns Excel will create.