
CHAPTER 3
Exploring Embedded Linux Systems
This chapter exposes you to the core concepts, commands, and tools required to effectively manage the Beagle-based embedded Linux system. The first part of the chapter is descriptive; it explains the basics of embedded Linux and the Linux boot process. After that, you learn step-by-step how to manage Linux systems. For this exercise, you are strongly encouraged to open a terminal connection to your board and follow along. Next, the chapter describes the Git source code management system. This topic is an important one because the source code examples in this book are distributed via GitHub. Desktop virtualization is also described; it is useful for cross-platform development in later chapters. The chapter finishes by describing how you can download the source code examples for this book.
EQUIPMENT REQUIRED FOR THIS CHAPTER:
- Any Beagle board with a terminal connection, preferably running Debian
Further details on this chapter are available at www.exploringbeaglebone.com/chapter3/.
Introducing Embedded Linux
First things first: even though the term embedded Linux is used in this chapter's title, there is no such thing as embedded Linux! There is no special version of the Linux kernel for embedded systems; it is just the mainline Linux kernel running on an embedded system. That said, the term embedded Linux has broad and common use; therefore, it is used here instead of “Linux on an embedded system,” which is the more accurate phrasing.
The word embedded in the term embedded Linux is used to convey the presence of an embedded system, a concept that can be loosely explained as some type of computing hardware with integrated software that was designed to be used for a specific application. This concept is in contrast to the personal computer (PC), which is a general-purpose computing device designed to be used for many applications, such as web browsing, word processing, and game play. The line is blurring between embedded systems and general-purpose computing devices. For example, the BeagleBone Black (BBB) or BeagleBoard can be both, and many users will deploy them solely as a capable general-purpose computing device. However, embedded systems have some distinctive characteristics.
- They tend to have specific and dedicated applications.
- They often have limited processing power, memory availability, and storage capabilities.
- They are generally part of a larger system that may be linked to external sensors or actuators.
- They often have a role for which reliability is critical (e.g., controls in cars, airplanes, and medical equipment).
- They often work in real time, where their outputs are directly related to present inputs (e.g., control systems).
- In recent times, connectedness has become a core feature of embedded systems, allowing these to be the building blocks of the Internet of Things (IoT).
Embedded systems are present everywhere in everyday life. Examples include vending machines, household appliances, phones/smartphones, manufacturing/assembly lines, TVs, games consoles, cars (e.g., power steering and reversing sensors), network switches, routers, wireless access points, sound systems, medical monitoring equipment, printers, building access controls, parking meters, smart energy/water meters, watches, building tools, digital cameras, monitors, tablets, e-readers, anything robotic, smart card payment/access systems, and more.
The huge proliferation of embedded Linux devices is thanks in part to the rapid evolution of smartphone technology, which has helped drive down the unit price of ARM-based processors. ARM Holdings PLC is a UK company that licenses the intellectual property of its ARM processors to Texas Instruments (the manufacturer of the processors on the Beagle boards) for up-front fees and a small royalty fee, which is based on the sale price of the processor.
Advantages and Disadvantages of Embedded Linux
There are many embedded platform types, each with its own advantages and disadvantages. There are low-cost embedded platforms, with volume prices of less than $1, such as the Microchip AVR or PIC or Texas Instruments MSP43x processors, and there are high-cost specialized platforms that can cost more than $150, such as multicore digital signal processors (DSPs). These platforms are typically programmed in C and/or assembly language, requiring that you have knowledge of the underlying systems architecture before you can develop useful applications. Embedded Linux offers an alternative to these platforms, in that significant knowledge of the underlying architecture is not required to start building applications. However, if you want to interface with electronic modules or components, some such knowledge is required.
Here are some of the reasons why embedded Linux has seen such growth:
- Linux is an efficient and scalable operating system (OS), running on everything from low-cost consumer-oriented devices to expensive large-scale servers. It has evolved over many years, from when computers were much less powerful than today, but it has retained many of the efficiencies.
- A huge number of open source programs and tools have already been developed that can be readily deployed in an embedded application. If you need a web server for your embedded application, you can install the same one that you might use on a Linux server.
- There is excellent open-source support for many different peripherals and devices, from network adapters to displays.
- It is open source and does not require a fee for its use.
- The kernel and application code is running worldwide on so many devices that bugs are infrequent and are detected quickly.
One downside of embedded Linux is that it is not ideal for real-time applications because of the OS overhead. Therefore, for high-precision, fast-response applications, such as analog signal processing, embedded Linux may not be the perfect solution. However, even in real-time applications, it is often used as the “central intelligence” and control interface for a networked array of dedicated real-time sensors (see Chapter 10). In addition, there are constant developments underway in real-time operating systems (RTOS) Linux that aim to use Linux in a preemptive way, interrupting the OS whenever required to maintain a real-time process.
Is Linux Open Source and Free?
Linux is released under the GNU General Public License (GPL), which grants users the freedom to use and modify its code in any way; so, free generally refers to “freedom” rather than to “without cost.” In fact, some of the most expensive Linux distributions are those for embedded architectures. You can find a quick guide to the GPLv3 at www.gnu.org that lists the four freedoms that every user should have (Smith, 2013).
The freedom to use the software for any purpose
The freedom to change the software to suit your needs
The freedom to share the software with your friends and neighbors
And, the freedom to share the changes you make
Even if you are using a distribution that you downloaded “for free,” it can cost you significant effort to tailor libraries and device drivers to suit the particular components and modules that you want to use in your product development.
Booting the Beagle Boards
The first thing you should see when you boot a desktop computer is the Unified Extensible Firmware Interface (UEFI), which provides legacy support for Basic Input/Output System (BIOS) services. The boot screen displays system information and invites you to press a key to alter these settings. UEFI tests the hardware components, such as the memory, and then loads the OS, typically from the solid-state drive (SSD)/hard drive. Therefore, when a desktop computer is powered on, the UEFI/BIOS performs the following steps:
- Takes control of the computer's processor
- Initializes and tests the hardware components
- Loads the OS off the SSD/hard drive
The UEFI/BIOS provides an abstraction layer for the OS to interact with the display and other input/output peripherals, such as the mouse/keyboard and storage devices. Its settings are stored in NAND flash and battery-backed memory—you can see a small coin battery on the PC motherboard that supports the real-time system clock.
Bootloaders
Like most embedded Linux devices, the Beagle boards do not have a UEFI/BIOS or battery-backed memory by default (a battery-backed real-time clock is added to a board in Chapter 8). Instead, it uses a combination of bootloaders. Bootloaders are typically small programs that perform the critical function of linking the specific hardware of your board to the Linux OS. Bootloaders perform the following:
- Initialize the controllers (memory, graphics, I/O)
- Prepare and allocate the system memory for the OS
- Locate the OS and provide the facility for loading it
- Load the OS and pass control to it
The Beagle boards use an open source Linux bootloader, called Das U-Boot (“The” Universal Bootloader). It is custom built for each Beagle board using detailed knowledge of the hardware description, which is provided in board-specific software patches.
The /boot directory contains the Linux kernel and the other files required to boot the board. For example, on the PocketBeagle (with two different kernel versions), you will see the directory listing, as shown here:
debian@beaglebone:/boot$ ls -l-rw-r--r-- 1 root root 159786 Apr 22 07:17 config-4.14.35-ti-rt-r44-rw-r--r-- 1 root root 163837 Apr 22 11:44 config-4.9.88-ti-rt-r111drwxr-xr-x 6 root root 4096 Apr 25 01:14 dtbs-rw-r--r-- 1 root root 4468991 Apr 24 01:01 initrd.img-4.14.35-ti-rt-r44-rw-r--r-- 1 root root 6523044 Apr 25 01:34 initrd.img-4.9.88-ti-rt-r111-rw-r--r-- 1 root root 492 Mar 5 13:11 SOC.sh-rw-r--r-- 1 root root 3634267 Apr 22 07:17 System.map-4.14.35-ti-rt-r44-rw-r--r-- 1 root root 3939313 Apr 22 11:44 System.map-4.9.88-ti-rt-r111drwxr-xr-x 2 root root 4096 Mar 5 07:14 uboot-rw-r--r-- 1 root root 1882 Apr 25 01:26 uEnv.txt-rwxr-xr-x 1 root root 10379776 Apr 22 07:17 vmlinuz-4.14.35-ti-rt-r44-rwxr-xr-x 1 root root 10070592 Apr 22 11:44 vmlinuz-4.9.88-ti-rt-r111
These files have the following functions:
- The Linux kernel is in the compressed
vmlinuz*files. - The initial RAM disk (file system in memory) is in the
initrd*files, which creates a temporary root file system (called an early user space) that is used to identify hardware and load the kernel modules that are required to boot the “real” file system. - The
uEnv.txtfile sets the boot parameters for your board. You can edit this file to set custom boot properties (e.g., set up a flasher image as described in Chapter 2). - The
System.map*files provide a debug mapping from kernel-specific build codes to human-readable symbols so that any crash dump files can be analyzed. This file is not required for boot. - The
config*files list the options that were chosen when the kernel was built. It is human readable and not required for boot. You can typemore /boot/config-4.xxxto see the build configuration. SOC.shis a script that contains bootloader information that is required when the bootloader is to be upgraded. It is human readable and not required for boot.- The
/boot/dtbs/directory contains subdirectories with the device tree binaries that are required to boot a board. Each subdirectory provides binaries for a specific kernel build.
Figure 3-1 illustrates the boot process on the Beagle boards, where each bootloader stage is loaded and invoked by the preceding stage bootloader. The primary program loader in the AM335x executes when the reset vector is invoked. It loads the first stage bootloader (aka the second stage program loader) file called MLO from the eMMC/SD card. This loader initializes clocks and memory and loads the second stage bootloader u-boot.img from the eMMC/SD card. The MLO (~92 KB) and u-boot.img (~420 KB) files exists in a raw area of the SD card that precedes the Linux ext4 partition.1 For example, when you call lsblk, you see that the ext4 partition begins at sector 8,192 (4,194,304 bytes), as shown here:
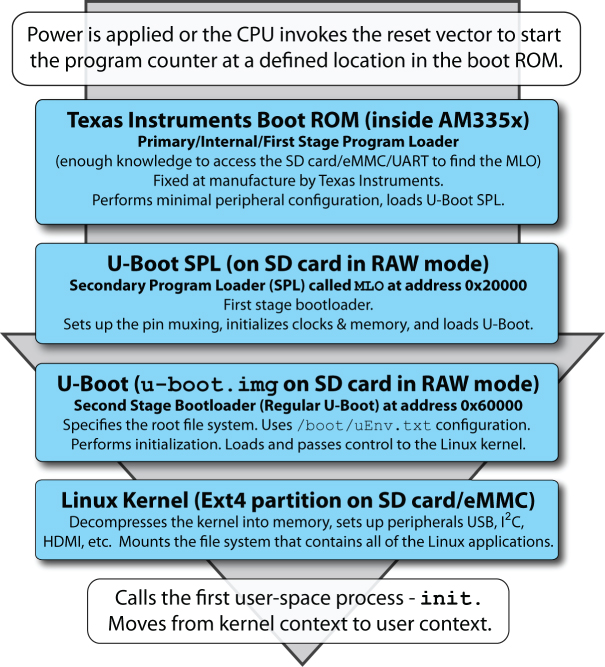
Figure 3-1: The full boot sequence on the Beagle boards
debian@beaglebone:/boot$ sudo fdisk -lDisk /dev/mmcblk0: 29.8 GiB, 32010928128 bytes, 62521344 sectorsUnits: sectors of 1 * 512 = 512 bytesSector size (logical/physical): 512 bytes / 512 bytesI/O size (minimum/optimal): 512 bytes / 512 bytesDisklabel type: dosDisk identifier: 0xaf2e67c6Device Boot Start End Sectors Size Id Type/dev/mmcblk0p1 * 8192 62521343 62513152 29.8G 83 Linux
which gives sufficient space for storing these files.
This file system design has the advantage of making accidental deletion of these critical files unlikely. Importantly, the u-boot.img and MLO files were built using a patched version of the standard U-Boot distribution that was built with full knowledge of the hardware description of the Beagle boards. The second-stage bootloader (U-Boot) performs additional initialization and then loads and passes control to the Linux kernel, which it finds in the /boot/ directory of the ext4 partition.
The output that follows is a typical boot sequence that was captured using the USB to UART TTL 3V3 serial cable that is introduced in Chapter 1. The cable was attached the BeagleBone header, as illustrated in Figure 1-11(a), and the data was captured at a baud rate of 115,200. The following is an extract of the console output as a BBB is booting. It displays important system information, such as memory mappings.
U-Boot SPL 2018.01-00002-ge9ff418fb8 (Feb 20 2018 - 20:14:57)Trying to boot from MMC2U-Boot 2018.01-00002-ge9ff418fb8 (Feb 20 2018 - 20:14:57 -0600),Build: jenkins-github_Bootloader-Builder-38CPU : AM335X-GP rev 2.1I2C: readyDRAM: 512 MiBReset Source: Power-on reset has occurred.MMC: OMAP SD/MMC: 0, OMAP SD/MMC: 1Using default environmentBoard: BeagleBone Black<ethaddr> not set. Validating first E-fuse MACBeagleBone Black:BeagleBone: cape eeprom: i2c_probe: 0x54:BeagleBone: cape eeprom: i2c_probe: 0x55:BeagleBone: cape eeprom: i2c_probe: 0x56:BeagleBone: cape eeprom: i2c_probe: 0x57:Net: eth0: MII MODEcpsw, usb_etherPress SPACE to abort autoboot in 2 secondsboard_name=[A335BNLT] …board_rev=[00C0] …Card did not respond to voltage select!mmc_init: -95, time 13gpio: pin 56 (gpio 56) value is 0gpio: pin 55 (gpio 55) value is 0gpio: pin 54 (gpio 54) value is 0gpio: pin 53 (gpio 53) value is 1Card did not respond to voltage select!mmc_init: -95, time 13switch to partitions #0, OKmmc1(part 0) is current deviceScanning mmc 1:1…gpio: pin 56 (gpio 56) value is 0gpio: pin 55 (gpio 55) value is 0gpio: pin 54 (gpio 54) value is 0gpio: pin 53 (gpio 53) value is 1switch to partitions #0, OKmmc1(part 0) is current devicegpio: pin 54 (gpio 54) value is 1Checking for: /uEnv.txt …Checking for: /boot.scr …Checking for: /boot/boot.scr …Checking for: /boot/uEnv.txt …gpio: pin 55 (gpio 55) value is 11879 bytes read in 22 ms (83 KiB/s)Loaded environment from /boot/uEnv.txtChecking if uname_r is set in /boot/uEnv.txt…gpio: pin 56 (gpio 56) value is 1Running uname_boot …loading /boot/vmlinuz-4.9.82-ti-r102 …9970640 bytes read in 655 ms (14.5 MiB/s)uboot_overlays: [uboot_base_dtb=am335x-boneblack-uboot.dtb] …uboot_overlays: Switching too: dtb=am335x-boneblack-uboot.dtb …loading /boot/dtbs/4.9.82-ti-r102/am335x-boneblack-uboot.dtb …61622 bytes read in 56 ms (1 MiB/s)uboot_overlays: [fdt_buffer=0x60000] …uboot_overlays: loading /lib/firmware/BB-BONE-eMMC1-01-00A0.dtbo …1440 bytes read in 605 ms (2 KiB/s)uboot_overlays: loading /lib/firmware/BB-HDMI-TDA998x-00A0.dtbo …5127 bytes read in 80 ms (62.5 KiB/s)uboot_overlays: loading /lib/firmware/BB-ADC-00A0.dtbo …711 bytes read in 397 ms (1000 Bytes/s)uboot_overlays: loading /lib/firmware/univ-bbb-EVA-00A0.dtbo …62008 bytes read in 470 ms (127.9 KiB/s)loading /boot/initrd.img-4.9.82-ti-r102 …6510886 bytes read in 435 ms (14.3 MiB/s)debug: [console=ttyO0,115200n8 bone_capemgr.uboot_capemgr_enabled=1root=/dev/mmcblk1p1 ro rootfstype=ext4 rootwait coherent_pool=1Mnet.ifnames=0 quiet] …debug: [bootz 0x82000000 0x88080000:635926 88000000] …## Flattened Device Tree blob at 88000000Booting using the fdt blob at 0x88000000Loading Ramdisk to 8f9ca000, end 8ffff926 … OKreserving fdt memory region: addr=88000000 size=7e000Loading Device Tree to 8f949000, end 8f9c9fff … OKStarting kernel …[ 0.001915] clocksource_probe: no matching clocksources found[ 1.459462] wkup_m3_ipc 44e11324.wkup_m3_ipc: could not get rproc handle[ 1.751983] omap_voltage_late_init: Voltage driver support not added[ 1.759505] PM: Cannot get wkup_m3_ipc handlerootfs: clean, 82338/239520 files, 481317/957440 blocksDebian GNU/Linux 9 beaglebone ttyS0BeagleBoard.org Debian Image 2018-03-05Support/FAQ: http://elinux.org/Beagleboard:BeagleBoneBlack_Debiandefault username:password is [debian:temppwd]beaglebone login:
You can see that the initial hardware state is set, but most entries will seem quite mysterious for the moment. These are some important points to note (as highlighted in the preceding output segment):
- The U-Boot SPL first-stage bootloader is loaded first.
- The U-Boot second-stage bootloader is loaded next, and a full hardware description is then available.
- The GPIOs are checked to determine whether to boot from the eMMC or the SD card (e.g., check whether the Boot button is pressed).
- The configuration file
/boot/uEnv.txtis loaded and parsed. - The Linux kernel version is loaded (e.g.,
4.9.82-ti-r102). - U-Boot loads the U-Boot overlays to configure hardware (e.g., HDMI, analog-to-digital converters).
- The kernel begins executing.
The primary configuration file for the Beagle boards is /boot/uEnv.txt. You can manually edit this file (e.g., sudo nano /boot/uEnv.txt) to enable/disable hardware, to provide Linux command-line arguments, and to use the eMMC flasher script by commenting and uncommenting lines. For example, here is a cut-down configuration file:
debian@ebb:/boot$ more uEnv.txt#Docs: http://elinux.org/Beagleboard:U-boot_partitioning_layout_2.0###Master Enableenable_uboot_overlays=1###Custom Cape#dtb_overlay=/lib/firmware/<file8>.dtbo######Disable auto loading of virtual capes (emmc/video/wireless/adc)#disable_uboot_overlay_emmc=1#disable_uboot_overlay_video=1#disable_uboot_overlay_audio=1#disable_uboot_overlay_wireless=1#disable_uboot_overlay_adc=1###Cape Universal Enableenable_uboot_cape_universal=1cmdline=coherent_pool=1M net.ifnames=0 quiet##enable Generic eMMC Flasher:##make sure, these tools are installed: dosfstools rsync#cmdline=init=/opt/scripts/tools/eMMC/init-eMMC-flasher-v3.sh
Remove the comment in front of the last line in the file to call a script that overwrites the BeagleBone eMMC with the Linux image that is on the SD card.
Das U-Boot uses a board configuration file called a device tree (also called a device tree binary) containing the board-specific information that the kernel requires to boot the board. This file contains all the information needed to describe the memory size, clock speeds, on-board devices, and so on. This device tree binary (DTB), or the binary, is created from a DTS (the source) file using the device tree compiler (dtc). This topic is described in detail in Chapter 6, when examining how to interface to the Beagle board GPIOs.
debian@ebb:/boot/dtbs/4.9.82-ti-r102$ ls -l *.dtb…-rw-r--r-- 1 root root 64035 Feb 22 01:26 am335x-boneblack.dtb-rw-r--r-- 1 root root 66633 Feb 22 01:26 am335x-boneblack-wireless.dtb-rw-r--r-- 1 root root 137415 Feb 22 01:26 am335x-boneblue.dtb-rw-r--r-- 1 root root 61710 Feb 22 01:26 am335x-bonegreen.dtb…-rw-r--r-- 1 root root 132769 Feb 22 01:26 am335x-pocketbeagle.dtb…
The DTS has the same syntax as the following extract, which details the four user LED pins and one of the two I2C buses on the BBB:
am33xx_pinmux: pinmux@44e10800 {pinctrl-names = "default";pinctrl-0 = <&userled_pins>;userled_pins: pinmux_userled_pins {pinctrl-single,pins = <0x54 0x07 /* gpmc_a5.gpio1_21, OUTPUT | MODE7 */0x58 0x17 /* gpmc_a6.gpio1_22, OUTPUT_PULLUP | MODE7 */0x5c 0x07 /* gpmc_a7.gpio1_23, OUTPUT | MODE7 */0x60 0x17 /* gpmc_a8.gpio1_24, OUTPUT_PULLUP | MODE7 */>;};i2c0_pins: pinmux_i2c0_pins {pinctrl-single,pins = <0x188 0x70 /* i2c0_sda, SLEWCTRL_SLOW | INPUT_PULLUP */0x18c 0x70 /* i2c0_scl, SLEWCTRL_SLOW | INPUT_PULLUP */>;}; …};
The full description for the device tree source for Linux 4.x.x is available with the source code distribution of this book in the Chapter 3 directory. You will see how to download this code at the end of the chapter. This tree structure is discussed in detail in Chapter 6, when custom circuits are interfaced to the Beagle boards.
Kernel Space and User Space
The Linux kernel runs in an area of system memory called the kernel space, and regular user applications run in an area of system memory called user space. A hard boundary between these two spaces prevents user applications from accessing memory and resources required by the Linux kernel. This helps prevent the Linux kernel from crashing because of badly written user code; because it prevents applications that belong to one user from interfering with applications and resources that belong to another user, it also provides a degree of security.
The Linux kernel “owns” and has full access to all the physical memory and resources on the Beagle boards. Therefore, you have to be careful that only the most stable and trusted code is permitted to run in kernel space. You can see the architectures and interfaces illustrated in Figure 3-2, where user applications use the GNU C Library (glibc) to make calls to the kernel's system call interface. The kernel services are then made available to the user space in a controlled way through the use of system calls.
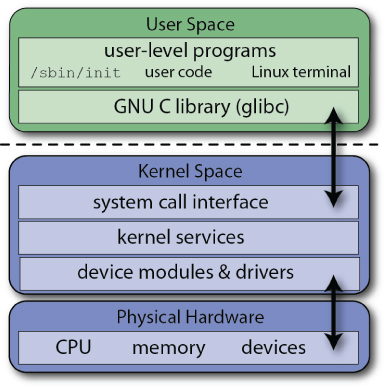
Figure 3-2: The Linux user space and kernel space architectures
A kernel module is an object file that contains binary code, which can be loaded and unloaded from the kernel on demand. In many cases, the kernel can even load and unload modules while it is executing, without needing to reboot the board. For example, if you plug a USB Wi-Fi adapter into your board, it is possible for the kernel to use a loadable kernel module (LKM) to utilize the adapter. Without this modular capability, the Linux kernel would be extremely large, as it would have to support every driver that would ever be needed on any Beagle board. You would also have to rebuild the kernel every time you wanted to add new hardware. One downside of LKMs is that driver files have to be maintained for each device. (Interaction with LKMs is described throughout the book, and you will see how you can write your own LKMs in Chapter 16.)
As described in Figure 3-1, the bootloader stages pass control to the kernel after it has been decompressed into memory. The kernel then mounts the root file system. The kernel's last step in the boot process is to call systemd init (/sbin/init on the Beagle boards with the Debian Stretch image), which is the first user-space process that is started and the next topic that is discussed.
The systemd System and Service Manager
A system and service manager starts and stops services (e.g., web servers, Secure Shell [SSH] server) depending on the current state of the board (e.g., starting up, shutting down). The systemd system and service manager is a recent and somewhat controversial addition to Linux that aims to replace and remain backward compatible with System V (SysV) init. One major drawback of SysV init is that it starts tasks in series, waiting for one task to complete before beginning the next, which can lead to lengthy boot times. The systemd system is enabled by default in Debian 9 (Stretch). It starts up system services in parallel, helping to keep boot times short, particularly on multicore processors such as the BeagleBoard X15. In fact, you can display the boot time using the following (you may be able to log in some time before the user-space processes have completed):
debian@beaglebone:~$ systemctl --versionsystemd 232 +PAM +AUDIT +SELINUX +IMA +APPARMOR +SMACK +SYSVINIT+UTMP +LIBCRYPTSETUP +GCRYPT +GNUTLS +ACL +XZ +LZ4 +SECCOMP +BLKID+ELFUTILS +KMOD +IDNdebian@beaglebone:~$ systemd-analyze timeStartup finished in 15.638s (kernel) + 45.405s (userspace) = 1min 1.044s
As well as being a system and service manager, systemd consists of a software bundle for login management, journal logging, device management, time synchronization, and more. Critics of systemd claim that its development project has suffered from “mission creep” and that it has taken on development work that is outside of its core mission. To some extent, this change in mission has resulted in systemd becoming core to the future of Linux itself, possibly even removing choice from users; however, it is clear that systemd is being widely adopted by many Linux distributions and here to stay.
You can use the systemctl command to inspect and control the state of systemd. If called with no arguments, it provides a full list of the services that are running on your board (there can be 100+ services running on a typical board). Use the Spacebar to page, and use Q to quit.
debian@beaglebone:~$ systemctlUNIT LOAD ACTIVE SUB DESCRIPTION-.mount loaded active mounted Root Mountapache2.service loaded active running The Apache HTTP Serverbonescript-autorun.service loaded active running Bonescript autorunconnman.service loaded active running Connection servicecron.service loaded active running Regular background …[email protected] loaded active running Getty on tty1[email protected] loaded active running Serial Getty on ttyGS0[email protected] loaded active running Serial Getty on ttyS0ssh.service loaded active running OpenBSD Secure Shell…
systemd uses service files, which have a .service extension to configure how the different services should behave on startup, shutdown, reload, and so on; see the /lib/systemd/system directory.
The Apache service runs by default upon installation. The systemd system can be used to manage such services on your board. For example, you can identify the exact service name and get its status using the following steps:
debian@beaglebone:~$ systemctl list-units -t service | grep apacheapache2.service loaded active running The Apache HTTP Serverdebian@beaglebone:~$ systemctl status apache2.service• apache2.service - The Apache HTTP ServerLoaded: loaded (/lib/systemd/system/apache2.service; enabled; …Active: active (running) since Wed 2018-05-02 16:04:32 IST; 1h 41min agoProcess: 1029 ExecStart=/usr/sbin/apachectl startMain PID: 1117 (apache2)Tasks: 55 (limit: 4915)CGroup: /system.slice/apache2.service└_1117 /usr/sbin/apache2 -k start└_1120 /usr/sbin/apache2 -k start└_1122 /usr/sbin/apache2 -k startMay 02 16:04:28 beaglebone systemd[1]: Starting The Apache HTTP Server…May 02 16:04:32 beaglebone systemd[1]: Started The Apache HTTP Server.
At this point you can connect to the board on port 8080 using your web browser to verify that the Apache server is running as a service on the board, as illustrated in Figure 3-3.
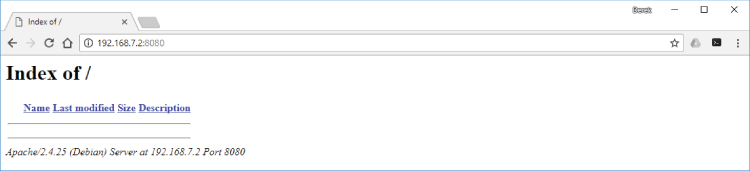
Figure 3-3: The Apache Server running on the Beagle board
You can stop the apache2 service using the systemctl command, whereupon the browser will issue a “connection refused” message.
debian@beaglebone:~$ sudo systemctl stop apache2[sudo] password for debian:debian@beaglebone:~$ systemctl status apache2• apache2.service - The Apache HTTP ServerLoaded: loaded (/lib/systemd/system/apache2.service; enabled; …Active: inactive (dead) since Wed 2018-05-02 17:51:12 IST; 17s agoProcess: 1969 ExecStop=/usr/sbin/apachectl stopProcess: 1029 ExecStart=/usr/sbin/apachectl startMain PID: 1117 (code=exited, status=0/SUCCESS)
The service can then be restarted as follows:
debian@beaglebone:~$ sudo systemctl start apache2 Table 3-1 provides a summary of systemd commands, using the apache2 service as a syntax example. Many of these commands require elevation to superuser permissions by use of the sudo tool, as described in the next section.
Table 3-1: Common systemd Commands
| COMMAND | DESCRIPTION |
systemctl
|
List all running services. |
systemctl start apache2
|
Start a service. Does not persist after reboot. |
systemctl stop apache2
|
Stop a service. Does not persist after reboot. |
systemctl status apache2
|
Display the service status. |
systemctl enable apache2
|
Enable a service to start on boot. |
systemctl disable apache2
|
Disable a service from starting on boot. |
systemctl is-enabled apache2
|
Display if a system service starts on boot. |
systemctl restart apache2
|
Restart a service (stop and then start). |
systemctl condrestart apache2
|
Restart a service only if it is running. |
systemctl reload apache2
|
Reload configuration files for a service without halting it. |
journalctl –f
|
Follow the systemd log file. Press Ctrl+C to quit. |
sudo hostnamectl --static set-hostname ebb
|
Change the hostname. |
hostname
|
Display the hostname. |
timedatectl
|
Display the time and time zone information. |
systemd-analyze time
|
Display the boot time. |
The runlevel describes the current state of your board and can be used to control which processes or services are started by the init system. Under SysV, there are different runlevels, identified as 0 (halt), 1 (single-user mode), 2 through 5 (multiuser modes), 6 (reboot), and S (startup). When the init process begins, the runlevel starts at N (none). It then enters runlevel S to initialize the system in single-user mode and finally enters one of the multiuser runlevels (2 through 5). To determine the current runlevel, type the following:
debian@beaglebone:~$ who -rrun-level 5 2018-05-02 16:05
In this case, the board is running at runlevel 5. You can change the runlevel by typing init followed by the level number. For example, you can reboot your board by typing the following:
debian@beaglebone:~$ sudo hostnamectl --static set-hostname ebbdebian@beaglebone:~$ hostnameebb
Also, edit the /etc/hosts file to have an entry for ebb, or you will receive “unable to resolve host” messages when you use the sudo command.
debian@beaglebone:~$ more /etc/hosts127.0.0.1 localhost127.0.1.1 beaglebone.localdomain beaglebone ebb…debian@beaglebone:~$ sudo init 6
As demonstrated, systemd retains some backward compatibility with the SysV runlevels and their numbers, as the previous SysV commands work correctly under systemd. However, the use of runlevels in systemd is considered to be a dated practice. Instead, systemd uses named target units, some of which are listed in Table 3-2, which includes an indicative alignment with SysV runlevels. You can identify the current default target on the board.
debian@ebb:~$ systemctl get-defaultgraphical.target
Table 3-2: systemd Targets Aligned with SysV Runlevels
| TARGET NAMES | SYSV | DESCRIPTION AND EXAMPLE USE |
poweroff.target
|
0 | Halt the system: shutdown state for all services |
rescue.target
|
1,S | Single-user mode: for administrative functions such as checking the file system |
multi-user.target
|
2-4 | Regular multiuser modes with no windowing display |
graphical.target
|
5 | Regular multiuser mode with windowing display |
reboot.target
|
6 | Reboot the system: reboot state for all services |
emergency.target
|
— | Emergency shell only on the main console |
This indicates that the current configuration is for the board to have a headful windowing display. You can also see the list of units that the target loads using the following:
debian@ebb:~$ systemctl list-units --type=targetUNIT LOAD ACTIVE SUB DESCRIPTIONbasic.target loaded active active Basic Systemcryptsetup.target loaded active active Encrypted Volumesgetty.target loaded active active Login Promptsgraphical.target loaded active active Graphical Interfacelocal-fs-pre.target loaded active active Local File Systems (Pre)local-fs.target loaded active active Local File Systemsmulti-user.target loaded active active Multi-User System…
If you are using your board as a network-attached device that does not have a display attached (i.e., headless), it is wasteful of CPU/memory resources to have the windowing services running.2 You can switch to a headless target using the following call, whereupon the LXQt windowing interface will no longer be present, and the graphical.target entry will no longer appear in the list of units.
debian@ebb:~$ sudo systemctl isolate multi-user.targetdebian@ebb:~$ who -rrun-level 3 2018-05-02 16:18 last=5
And, you can re-enable the headful graphical display using the following:
debian@ebb:~$ sudo systemctl isolate graphical.targetdebian@ebb:~$ who -rrun-level 5 2018-05-02 16:20 last=3
Finally, to set up the board so that it uses a different default runlevel on boot (e.g., for a headless display), you can use the following:
debian@ebb:~$ sudo systemctl set-default multi-user.targetCreated symlink /etc/systemd/system/default.target →/lib/systemd/system/multi-user.target.debian@ebb:~$ systemctl get-defaultmulti-user.target
After reboot, the windowing services (if they are present) do not start, and the notional equivalent SysV runlevel is displayed as runlevel 3.
Managing Linux Systems
In this section, you examine the Linux file system in more detail, building on the commands and tools described in Chapter 2, to ensure that you have full administrative control of your board.
The Superuser
On Linux systems, the system administrator account has the highest level of security access to all commands and files. Typically, this account is referred to as the root account or superuser. Under Debian, this user account has the username root, but it is typically disabled by default; however, you can enable it by typing sudo passwd root from a shell that is logged in with the debian user account (username: debian, password: temppwd).
debian@ebb:~$ sudo passwd rootEnter new UNIX password: myrootpasswordRetype new UNIX password: myrootpasswordpasswd: password updated successfully
It is recommended when performing general operations on a Linux system that you try to avoid being logged in as the superuser; however, it is important to also remember that when using an embedded Linux system you are typically not running a server with thousands of user accounts! In many applications, a single root user account, with a nondefault password, is likely sufficient. However, using a nonsuperuser account for your development work could protect you from yourself—for example, from accidentally deleting the file system. The debian user account in Debian has been carefully configured to simplify the interaction with hardware, enabling it to be used for the majority of tasks that are described in this book. However, it is important to understand how this custom user account is configured and how it works so well.
Under many Linux distributions, including Debian, a special tool called sudo (superuser do) is used whenever you want to perform system administration commands. Typically, the tool prompts you for the administrator password and then authorizes you to perform administrator operations for a short time period, also warning you that “with great power comes great responsibility.” The debian user account in Debian has been configured so that it requires you to enter a password for superuser elevation.
The next section discusses user accounts management, but if you create a new user account and want to enable it to use the sudo tool, the account name must be added to the sudoers file, /etc/sudoers, by using the visudo tool (type visudo while logged in as root, or type sudo visudo if logged in as debian). The last lines of the /etc/sudoers file provide the configuration for the debian user account (lines are commented out using the # symbol). It does this by setting the properties for a group, called sudo, of which the user debian is a member:
debian@ebb:~$ sudo more /etc/sudoers# User privilege specificationroot ALL=(ALL:ALL) ALL# Allow members of group sudo to execute any command%sudo ALL=(ALL:ALL) ALL …
In this configuration, any user in the sudo group is granted privileges on all (first ALL) hostnames to execute commands as any user (second ALL) and to execute all commands (third ALL). The sudo tool works well; however, it can make the redirection of the output of a command more complex, which is apparent later in this chapter. You can add a user to the sudo group as follows:
debian@ebb:~$ sudo adduser debian sudoAdding user 'debian' to group 'sudo' …Adding user debian to group sudoDone.
There is another command in Linux that enables you to run a shell with a substitute user: su. Typing su - (same as su - root) opens a new shell with full superuser access, and it can be used as follows, after you have enabled root login:
debian@ebb:~$ su -Password: mySuperSecretPasswordroot@ebb:~# whoamirootroot@ebb:~# exitlogoutdebian@ebb:~$ whoamidebian
Instead of doing this, you can create an interactive shell (-i) through the sudo command, as shown here:
debian@ebb:~$ sudo -iroot@ebb:~# whoamiroot
which means that the login-specific resources (e.g., .profile) are read by the shell. The # prompt indicates that you are logged in to the superuser account. To re-disable root login to the board, you can type sudo passwd -l root.
System Administration
The Linux file system is a hierarchy of directories used to organize files on a Linux system. This section examines the ownership of files, the use of symbolic links, and the concept of file system permissions.
The Linux File System
Linux uses data structures, called inodes, to represent file system objects such as files and directories. When a Linux extended file system (e.g., ext3/ext4) is created on a physical disk, an inode table is created. This table links to an inode data structure for each file and directory on that physical disk. The inode data structure for each file and directory stores information such as permission attributes, pointers to raw physical disk block locations, time stamps, and link counts. You can see this with an example by performing a listing ls -ail of the root directory, where -i causes ls to display the inode indexes. You will see the following for the /tmp directory entry:
debian@ebb:~$ cd /debian@ebb:/$ ls -ail | grep tmp41337 drwxrwxrwt 10 root root 4096 May 2 18:17 tmp
Therefore, 41337 is the
/tmp
directory's inode index. If you enter the /tmp directory by using cd, create a temporary file (a.txt), and perform ls -ail, you will see that the current (.) directory has the same inode index.
debian@ebb:/$ cd tmpdebian@ebb:/tmp$ touch a.txtdebian@ebb:/tmp$ ls -ailtotal 4041337 drwxrwxrwt 10 root root 4096 May 2 18:36 .2 drwxr-xr-x 21 root root 4096 Apr 23 01:47 ..1893 -rw-r--r-- 1 debian debian 0 May 2 18:36 a.txt
You can also see that the root directory (
.
.) has the inode index of 2 and that a text file (
a.txt
) also has an inode index, 1893. Therefore, you cannot
cd
directly to an inode index because the inode index might not refer to a directory.
Figure 3-4 illustrates the Linux directory listing and file permissions that relate to working with files under Linux. The first letter indicates the file type—for example, whether the listing is a (d) directory, (l) link, or (-) regular file. There are also some more obscure file types: (c) character special, (b) block special, (p) fifo, and (s) socket. Directories and regular files do not need further explanation, but links need special attention, as described next.
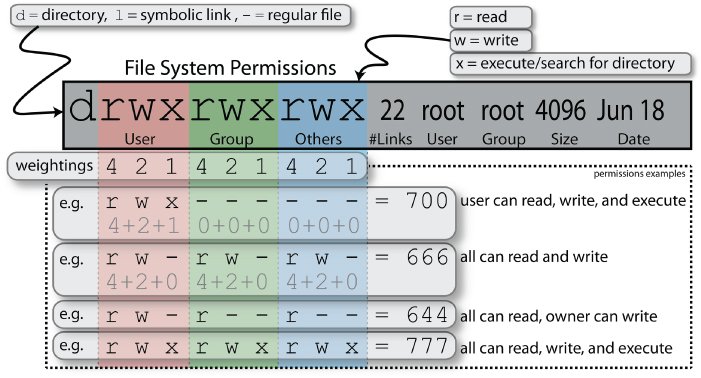
Figure 3-4: Linux directory listing and file permissions
Links to Files and Directories
There are two types of links in Linux: soft links and hard links. A soft link (or symbolic link) is a file that refers to the location of another file or directory. Hard links, conversely, link directly to the inode index, but they cannot be linked to a directory. You create a link using ln /path/to/file.txt linkname. You create a symbolic link by adding -s to the call. To illustrate the usage, the following example creates a soft link and a hard link to a file /tmp/test.txt:
debian@ebb:~$ cd /tmpdebian@ebb:/tmp$ touch test.txtdebian@ebb:/tmp$ ln -s /tmp/test.txt softlinkdebian@ebb:/tmp$ ln /tmp/test.txt hardlinkdebian@ebb:/tmp$ ls -ailtotal 4041337 drwxrwxrwt 10 root root 4096 May 2 18:40 .2 drwxr-xr-x 21 root root 4096 Apr 23 01:47 ..2172 -rw-r--r-- 2 debian debian 0 May 2 18:40 hardlink2268 lrwxrwxrwx 1 debian debian 13 May 2 18:40 softlink -> /tmp/test.txt2172 -rw-r--r-- 2 debian debian 0 May 2 18:40 test.txt
The hard link has the same inode index as the test.txt file, and you can also see there is a number 2 in front of the file test.txt and hardlink entry (after the file permissions). This is the number of hard links that are associated with the file. This is a count value that was incremented by 1 when the hard link, called hardlink, was created. If you were to delete the hard link (e.g., using rm hardlink), this counter would decrement back to 1. To illustrate the difference between soft links and hard links, some text is added to the test.txt file.
debian@ebb:/tmp$ echo "testing links on the BB" >> test.txtdebian@ebb:/tmp$ more hardlinktesting links on the BBdebian@ebb:/tmp$ more softlinktesting links on the BBdebian@ebb:/tmp$ mkdir subdebian@ebb:/tmp$ mv test.txt sub/debian@ebb:/tmp$ more hardlinktesting links on the BBdebian@ebb:/tmp$ more softlinkmore: stat of softlink failed: No such file or directory
You can see that when the test.txt file is moved to the subdirectory, the soft link breaks, but the hard link still works perfectly. Therefore, symbolic links are not updated when the linked file is moved, but hard links always refer to the source, even if moved or removed. To illustrate the last point, the file test.txt can be removed using the following:
debian@ebb:/tmp$ rm sub/test.txtdebian@ebb:/tmp$ more hardlinktesting links on the BBdebian@ebb:/tmp$ ls -ail hardlink2172 -rw-r--r-- 1 debian debian 24 May 2 18:59 hardlink
Yet, the file still exists! And it will not be deleted until you delete the hard link called hardlink, thus decrementing the link count to zero. You can see that the count is currently 1 by examining the hardlink entry. Therefore, if a file has a hard link count of zero and it is not being used by a process, it will be deleted. In effect, the filename itself, test.txt, was just a hard link. Note that you cannot hard link across different file systems, because each file system will have its own inode index table that starts at 1. Therefore, inode 269, which is the inode index of the /tmp directory, is likely describing something quite different on another file system. Type the command man ln to see a particularly useful guide on linking.
Users and Groups
Linux is a multiuser OS, which uses the following three distinct classes to manage access permissions:
- User: You can create different user accounts on your board. This is useful if you want to limit access to processes and areas of the file system. The
rootuser account is the superuser for Debian and has access to every file; so, for example, it may not be safe to run a public web server from this account or the debian user account if the server supports local scripting. - Group: User accounts may be flagged as belonging to one or more groups, whereby each group has different levels of access to different resources (e.g., gpios, I2C buses).
- Others: This includes all users of the system besides the file's owner, or a member of the group listed in the permissions.
You can create users at the Linux terminal. The full list of groups is available by typing more /etc/group. The following example demonstrates how you can create a new user account on the board and modify the properties of that account to suit your needs. You can list the groups that a user belongs to by typing groups at the shell prompt.
debian@ebb:~$ groupsdebian adm kmem dialout cdrom floppy audio dip video plugdevusers systemd-journal i2c bluetooth netdev cloud9ide xenomaiweston-launch tisdk spi admin eqep pwm gpio
To practice with the topics that were introduced earlier in this chapter, the following examples are performed using the molloyd user account. The first example demonstrates how to change the ownership of a file using the change ownership chown command and to change the group ownership of the file using the change group chgrp command.
For the sudo tool to be invoked correctly in the example, the user molloyd must be present in the sudo group, which is the case for the user debian and the user molloyd (from the previous example).
Alternatively, you can edit the sudoers file, which is achieved by the debian user account executing the visudo command. The file can be modified to include a molloyd entry, such as the following:
debian@ebb:~$ sudo visudodebian@ebb:~$ sudo tail -n 1 /etc/sudoersmolloyd ALL=(ALL) ALL
The molloyd user account can now execute the sudo command and must enter their user password to do so.
File System Permissions
The file system permissions state what levels of access each of the permissions classes have to a file or directory. The change mode command chmod enables a user to change the access permissions for file system objects. You can specify the permissions in a relative way. For example, chmod a+w test.txt gives all users write access to a file test.txt but leaves all other permissions the same. You can also apply the permissions in an absolute way. For example, chmod a=r test.txt sets all users to only have read access to the file test.txt. The next example demonstrates how to modify the file system permissions of a file using the chmod command.
Table 3-3 provides examples of the command structure for chown and chgrp. It also lists some example commands for working with users, groups, and permissions.
Table 3-3: Commands for Working with Users, Groups, and Permissions
| COMMAND | DESCRIPTION |
chown molloyd a.txt
chown molloyd:users a.txt
chown - Rh molloyd /tmp/test |
Change file owner. Change owner and group at the same time. Recursively change ownership of /tmp/test.-h affects symbolic links instead of referenced files.
|
chgrp users a.txt
chgrp -Rh users /tmp/test |
Change group ownership of the file. Recursively change with same -h as chown.
|
chmod 600 a.txt
chmod ugo+rw a.txt
chmod a-w a.txt |
Change permissions (as in Figure 3-4) so that the user has read/write access to the file; group or others have no access. Give users, group, and others read/write access to a.txt.Remove write access for all users using a, which describes all (the set of users, group, and others).
|
chmod ugo=rw a.txt
|
Set the permissions for all to be read/write. |
umask
umask -S |
List the default permissions settings. Using -S displays the umask in a more readable form. |
umask 022
umask u=rwx,g=rx,o=rx |
Change the default permissions on all newly created files and directories. The two umask commands here are equivalent. If you set this mask value and create a file or directory, it will be drwxr-xr-x for the directory and -rw-r--r-- for the file. You can set a user-specific umask in the account's .login file. |
chmod u+s myexe
chmod g+s myexe |
Set a special bit called the setuid bit (set user ID on execute) and setgid bit (set group ID on execute), s, that allows a program to be executed as if by another logged-in user but with the permissions of the file's owner or group. For example, you could use this to allow a particular program to execute as if the root user account executed it. If the file is not executable, a capital S appears, instead of a lowercase s. |
chmod 6750 myexe
chmod u=rwxs,g=rxs,o=myexe |
Set the setuid bit in an absolute way. Both examples will give myexe the permissions -rwsr-s---, where both the setuid and setgid bits are set (note the space before myexe).For security reasons, the setuid bit cannot be applied to shell scripts. |
stat /tmp/test.txt
|
Provides useful file system status information for a file or directory, such as its physical device and inode information, last access, and modify/change times. |
Here is an example of the last entry in Table 3-3, the stat command:
molloyd@ebb:/tmp$ stat /tmp/test.txtFile: /tmp/test.txtSize: 0 Blocks: 0 IO Block: 4096 regular empty fileDevice: b301h/45825d Inode: 2305 Links: 1Access: (0644/-rw-r--r--) Uid: (0/ root) Gid: ( 0/ root)Access: 2018-05-02 20:03:01.164235706 +0100Modify: 2018-05-02 20:03:01.164235706 +0100Change: 2018-05-02 20:03:35.020235710 +0100Birth: -
Note that each file in Linux retains an access, modify, and change time. You can update the access and modify times artificially using touch -a text.txt and touch -m test.txt, respectively (the change time is affected in both cases). The change time is also affected by system operations such as chmod; the modify time is affected by a write to the file; and, the access time is in theory affected by a file read. However, such operational behavior means that reading a file causes a write! This feature of Linux causes significant wear on the BeagleBone eMMC or SD card and results in I/O performance deficiencies. Therefore, the file access time feature is typically disabled on the boot eMMC/SD card using the mount option noatime within the /etc/fstab configuration file (covered in the next section). Note that there is also a similar nodiratime option that can be used to disable access time updates for directories only; however, the noatime option disables access time updates for both files and directories. You can see the noatime setting being set on the boot partition in /etc/fstab as follows:
molloyd@ebb:~$ more /etc/fstab | grep mmcblk/dev/mmcblk0p1 / ext4 noatime,errors=remount-ro 0 1
Just to finish the discussion of Figure 3-4: The example in the figure has 22 hard links to the file. For a directory this represents the number of subdirectories, the parent directory (..) and itself (.). The entry is owned by root, and it is in the root group. The next entry of 4096 is the size required to store the metadata about files contained in that directory (the minimum size is one sector, typically 4,096 bytes).
One final point: if you perform a directory listing ls -ld in the root directory, you will see a t bit in the permissions of the /tmp directory. This is called the sticky bit, meaning that write permission is not sufficient to delete files. Therefore, in the /tmp directory any user can create files, but no user can delete another user's files.
molloyd@ebb:~$ cd /molloyd@ebb:/$ ls -dhl tmpdrwxrwxrwt 11 root root 4.0K May 2 20:32 tmp
The ls -dhl command lists (d) directory names (not their contents), with (h) human-readable file sizes, in (l) long format.
The Linux Root Directory
Exploring the Linux file system can be daunting for new Linux users. If you go to the top-level directory using cd / on the board and type ls, you will get the top-level directory structure, of the following form:
molloyd@ebb:/$ lsbbb-uEnv.txt boot etc ID.txt lost+found mnt opt rootsbin sys usr bin dev home lib medianfs-uEnv.txt proc run srv tmp var
What does it all mean? Well, each of these directories has a role, and if you understand the roles, you can start to get an idea of where to search for configuration files or the binary files that you need. Table 3-4 briefly describes the content of each top-level Linux subdirectory.
Table 3-4: The Linux Top-Level Directory
| DIRECTORY | DESCRIPTION |
bin
|
Contains the binary executables used by all of the users and is present in the PATH environment variable by default. Another directory, /usr/bin, contains executables that are not core to booting or repairing the system. |
boot
|
Contains the files for booting the board. |
dev
|
Contains the device nodes (linked to device drivers). |
etc
|
Configuration files for the local system. |
home
|
Contains the user's home directories (e.g., /home/debian). |
lib
|
Contains the standard system libraries. |
lost+found
|
After running fsck (file system check and repair) unlinked files display here. The mklost+found command re-creates the lost+found directory if it is deleted. |
media
|
Used for mounting removable media, such as micro-SD cards. |
mnt
|
Used typically for mounting temporary file systems. |
opt
|
A good place for installing third-party (non-core Linux) optional software. |
proc
|
A virtual file representation of processes running on the board. (For example, if you cd /proc and type cat iomem, you can see some memory mapping addresses.) |
root
|
The home directory of root account under Debian Linux distributions. (This is /home/root on several other distributions.) |
run
|
Provides information about the running system since the last boot. |
sbin
|
Contains executables for root user (superuser) system management. |
srv
|
Stores data related to FTP, web servers, rsync, etc. |
sys
|
Contains a virtual file system that describes the system. |
tmp
|
Contains temporary files. |
usr
|
Contains programs for all of the users, and many subdirectories such as /usr/include (C/C++ header files), /usr/lib (C/C++ library files), /usr/src (Linux kernel source), /usr/bin (user executables), /usr/local (similar to /usr but for local users), and /usr/share (shared files and media between users). |
var
|
Contains variable files such as system logs. |
Commands for File Systems
In addition to commands for working with files and directories on file systems, there are commands for working with the file system itself. The first commands you should examine are df (remember as disk free) and mount. The df command provides an overview of the file systems on the board. Adding -T lists the file system types.
molloyd@ebb:~$ df -TFilesystem Type 1K-blocks Used Available Use% Mounted onudev devtmpfs 219200 0 219200 0% /devtmpfs tmpfs 49496 5604 43892 12% /run/dev/mmcblk0p1 ext4 30707172 2066088 27342152 8% /tmpfs tmpfs 247476 0 247476 0% /sys/fs/cgroup…
The df command is useful for determining whether you are running short on disk space; you can see that the root file system (/) is 8% used in this case, with 27.3 GB (of a 32 GB SD card) available for additional software installations. Also listed are several temporary file system (tmpfs) entries that actually refer to virtual file systems, which are mapped to the board's DDR RAM. (The /sys/fs/* entries are discussed in detail in Chapter 8.)
The list block devices command lsblk provides you with a concise tree-structure list of the block devices, such as SD cards, USB memory keys, and USB card readers (if any), that are attached to the board. As shown in the following output, you can see that mmcblk0 (a boot SD card on a BeagleBone) has a single partition, p1, which is attached to the root of the file system: /. The eMMC on the BeagleBone is present as mmcblk1 in this case, even though the board is booted using the SD card:
molloyd@ebb:~$ lsblkNAME MAJ:MIN RM SIZE RO TYPE MOUNTPOINTmmcblk0 179:0 0 29.8G 0 disk└_mmcblk0p1 179:1 0 29.8G 0 part /mmcblk1 179:8 0 3.7G 0 disk└_mmcblk1p1 179:9 0 3.7G 0 partmmcblk1boot0 179:24 0 1M 1 diskmmcblk1boot1 179:32 0 1M 1 disk
USB ports (or the SD card on a BeagleBone) can be used for additional storage, which is useful if you are capturing video data and there is insufficient capacity on the eMMC/system SD card. You can test the performance of SD cards to ensure that they meet the needs of your applications using the example that follows.
Using the mount command with no arguments provides you with further information about the file system on the board.
molloyd@ebb:~$ mount/dev/mmcblk0p1 on / type ext4 (rw,noatime,errors=remount-ro,data=ordered)sysfs on /sys type sysfs (rw,nosuid,nodev,noexec,relatime)proc on /proc type proc (rw,nosuid,nodev,noexec,relatime) …
As previously discussed, the file system is organized as a single tree that is rooted at the root: /. Typing cd / brings you to the root point. The mount command can be used to attach a file system on a physical disk to this tree. File systems on separate physical devices can all be attached to named points at arbitrary locations on the single tree. Table 3-5 describes some file system commands that you can use to manage your file system and thereafter follows two examples that demonstrate how to utilize the mount command for important Linux system administration tasks.
Table 3-5: Useful Commands for File Systems
| COMMAND | DESCRIPTION |
du -h /opt
du -hs /opt/*du -hc *.jpg |
Disk usage: Find out how much space a directory tree uses. Options: (-h) human-readable form, (-s) summary, (-c) total. The last command finds the total size of the JPG format files in the current directory. |
df -h
|
Display system disk space in (-h) human-readable form. |
lsblk
|
List block devices. |
dd if=test.img of=/dev/sdX
dd if=/dev/sdX of=test.img |
Write the image to the drive. dd converts and copies a file, where if is the input file and of is the output file. Use this command under Linux to write an image to an SD card.Create an image of the drive. This is typically used under desktop Linux with the following form: sudo dd if=./BB*.img of=/dev/sdX
where /dev/sdX is the SD card reader/writer device.
|
cat /proc/partitions
|
List all registered partitions. |
mkfs /dev/sdX
|
Make a Linux file system. Also mkfs.ext4, mkfs.vfat. This destroys data on the device. Use this command very carefully! |
fdisk -l
|
Note that fdisk can be used to manage disks, create partitions, delete partitions, etc. fdisk -l displays all existing partitions. |
badblocks /dev/mmcblkX
|
Check for bad blocks on the SD card. SD cards have wear leveling controller circuitry. If you get errors, get a new card; don't record them using fsck. Run this with root permissions and be aware that it takes some time to run. |
mount /media/store
|
Mount a partition if it is listed in /etc/fstab. |
umount /media/store
|
Unmount a partition. You will be informed if a file is open on this partition. |
sudo apt install tree
tree ~/ |
Install the tree command and use it to display the directory structure of the user account. |
find and whereis
The find command is useful for searching a directory structure for a particular file. It is incredibly comprehensive; type man find for a full list of options. For example, use the following call to find the C++ header file iostream somewhere on the file system (using sudo avoids access permission problems):
molloyd@ebb:/$ sudo find . -name iostream*./usr/include/c++/6/iostream./usr/share/ti/cgt-pru/include/iostream./usr/share/ti/cgt-pru/lib/src/iostream./usr/share/ti/cgt-pru/lib/src/iostream.cpp …
Using -iname instead of -name ignores upper/lowercase letters in the search name.
The following example finds files in /home/ that were modified in the last 24 hours and prior to the last 24 hours, respectively:
molloyd@ebb:~$ echo "Test file" >> new.txtmolloyd@ebb:~$ sudo find /home -mtime -1/home/molloyd/home/molloyd/.bash_history/home/molloyd/new.txtmolloyd@ebb:~$ sudo find /home -mtime +1/home/debian/home/debian/.xsessionrc/home/debian/.bash_logout …
Alternatively, you can use access time (-atime), size (-size), owner (-user), group (-group), and permission (-perm).
The whereis command is different in that it can be used to search for the binary executable, source code, and manual page for a program.
molloyd@ebb:~$ whereis findfind: /usr/bin/find /usr/share/man/man1/find.1.gz /usr/share/info/find.info.gz
In this case, the binary command is in /usr/bin/, and the man page is in /usr/share/man/man1 (stored in gzip form to save space).
more or less
The more command has been used several times already, and you have likely gleaned its use. It enables you to view a large file or output stream, one page at a time. Therefore, to view a long file, you can type more filename. For example, the log file /var/log/messages contains kernel output messages. You can view this file page by page by typing more /var/log/messages. However, if you want to keep the display concise, use -5 to set the page length to be five rows.
molloyd@ebb:~$ more -5 /var/log/messagesApr 30 06:25:05 beaglebone liblogging-stdlog: …Apr 30 03:37:41 beaglebone kernel: [ 0.000000] Booting Linux …Apr 30 03:37:41 beaglebone kernel: [ 0.000000] Linux version …--More--(0%)
You can use the Spacebar to page through the content and the Q key to quit. There is an even more powerful command called less that you can access.
molloyd@ebb:~$ less /var/log/messages
The less command gives you a fully interactive view using the keyboard. There are too many options to list here. For example, you can use the arrow keys to move up and down. Or, you can page down using the Spacebar, search for a string by typing / (e.g., type /usb to find messages related to USB devices), and then press the N key to go to the next match (or Shift+N key to go to the previous match).
Finally, there is a command specifically for displaying the kernel ring buffer that formats the output with colored markup, which can be called simply using the following:
molloyd@ebb:~$ dmesg The Reliability of SD Card/eMMC File Systems
One of the most likely points of failure of a single-board computer (SBC) is its SD card, which is more generally known as a multimedia card (MMC) or an embedded MMC (eMMC) when it is built onto the SBC (as is the case for the BeagleBone). NAND-based flash memory, such as that in MMCs, has a large capacity and a low cost, but it is prone to wear, which can result in file system errors.
The high capacity of MMCs is largely because of the development of multilevel cell (MLC) memory. Unlike single-level cell (SLC) memory, more than 1 bit can be stored in a single memory cell. The high voltage levels required in the process of deleting a memory cell disturbs adjacent cells, so NAND flash memory is erased in blocks of 1 KB to 4 KB. Over time, the process of writing to the NAND flash memory causes electrons to become trapped, reducing the conductivity difference between the set and erased states. (For a discussion on SLC versus MLC for high-reliability applications, see tiny.cc/beagle301.) MLCs use different charge levels and higher voltages to store more states in a single cell. (Commercial MLC products typically offer 4 to 16 states per cell.) Because SLCs store only a single state, they have a reliability advantage (typically 60,000–100,000 erase/write cycles) versus MLC (typically 10,000 cycles). MMCs are perfectly suitable for daily use in applications such as digital photography or security camera recording; 10,000 cycles should last more than 27 years at one entire card write per day.
However, embedded Linux devices constantly write to their MMCs for tasks such as logging system events in /var/log/. If your board writes to a log file 20 times per day, the lifespan of the SD card could be as low as 8 months. These are conservative figures, and thanks to wear leveling algorithms, the lifespan may be much longer. Wear leveling is employed by MMCs during data writes to ensure that rewrites are evenly distributed over the entire MMC media, thus avoiding system failure of Linux devices because of concentrated modifications, such as changes to log files.
For your Beagle board, ensure that you purchase a high-quality branded SD card. In addition, the more unused space you have on the SD card, the better, because it further enhances the wear leveling performance. The BeagleBone uses an eMMC storage—essentially an MMC on a chip that has the same order of reliability as SD cards. However, one important advantage of eMMCs is that the board manufacturer has control over the quality and specification of the storage device used. Finally, most consumer SSDs are also MLC based, with the more expensive SLC-based SSDs typically reserved for enterprise-class servers.
For Beagle applications that require extended reliability, a RAM file system (tmpfs) could be used for the /tmp directory, for the /var/cache directory, and for log files (particularly /var/log/apt). You can achieve this by editing the /etc/fstab file to mount the desired directories in memory. For example, if you have processes that require file data to be shared between them for the purpose of data interchange, you could use the /tmp directory as a RAM file system (tmpfs) by editing the /etc/fstab file as follows:
molloyd@ebb:/etc$ sudo nano fstabmolloyd@ebb:/etc$ more fstab/dev/mmcblk0p1 / ext4 noatime,errors=remount-ro 0 1debugfs /sys/kernel/debug debugfs defaults 0 0tempfs /tmp tempfs size=100M 0 0molloyd@ebb:/etc$ mkdir /tmp/swapYou can then apply these settings using the mount command:molloyd@ebb:/etc$ sudo mount -aAnd then check that the settings have been applied:molloyd@ebb:/etc$ mount…tmpfs on /tmp/swap type tmpfs (rw,relatime,size=102400k)
The root directory (/) is mounted by default with the noatime attribute set, which dramatically reduces the number of writes and increases I/O performance (as described earlier in the chapter). You should apply this attribute when possible to all solid-state storage devices (e.g., USB memory keys), but it is not necessary for RAM-based storage.
Remember that any data written to a tmpfs will be lost on reboot. Therefore, if you use a tmpfs for /var/log, any system errors that caused your board to crash will not be visible on reboot. You can test this fact by creating a file in the /tmp/swap/ directory as configured earlier and rebooting.
The actual RAM allocation grows and shrinks depending on the file usage on the tmpfs disk; therefore, you can be reasonably generous with the memory allocation. Here's an example with the 100 MB /tmp/swap/ tmpfs mounted:
molloyd@ebb:/tmp/swap$ cat /proc/meminfo | grep MemFree:MemFree: 213404 kBmolloyd@ebb:/tmp/swap$ fallocate -l 50000000 test.txtmolloyd@ebb:/tmp/swap$ ls -l test.txt-rw-r--r-- 1 molloyd molloyd 50000000 May 4 12:30 test.txtmolloyd@ebb:/tmp/swap$ cat /proc/meminfo | grep MemFree:MemFree: 164548 kBmolloyd@ebb:/tmp/swap$ rm test.txtmolloyd@ebb:/tmp/swap$ cat /proc/meminfo | grep MemFree:MemFree: 213296 kB
It is possible to use a read-only file system to improve the life span of the SD card and the stability of the file system (e.g., SquashFS compressed file system), but this requires significant effort and is not suitable for the type of prototype development that takes place in this book. However, keep it in mind for a final project or product deployment where system stability is crucial.
Linux Commands
When you are working at the Linux terminal and you type commands such as date, the output of these commands is sent to the standard output. As a result, the output is displayed in your terminal window.
Output and Input Redirection (>, >>, and <)
It is possible to redirect the output to a file using redirection symbols > and >>. The >> symbol was used previously in this chapter to add text to temporary files. The > symbol can be used to send the output to a new file. Here's an example:
molloyd@ebb:/tmp$ date > a.txtmolloyd@ebb:/tmp$ more a.txtFri May 4 12:33:32 IST 2018molloyd@ebb:/tmp$ date > a.txtmolloyd@ebb:/tmp$ more a.txtFri May 4 12:33:45 IST 2018
The >> symbol indicates that you want to append to the file. The following example illustrates the use of >> with the new file a.txt:
molloyd@ebb:/tmp$ date >> a.txtmolloyd@ebb:/tmp$ more a.txtFri May 4 12:33:45 IST 2018Fri May 4 12:34:23 IST 2018
Standard input using the < symbol works in much the same way. The inclusion of -e enables parsing of escape characters, such as the return (
) characters, which places each animal type on a new line.
molloyd@ebb:/tmp$ echo -e "dog cat yak cow" > animals.txtmolloyd@ebb:/tmp$ sort < animals.txtcatcowdogyak
You can combine input and output redirection operations. Using the same animals.txt file, you can perform operations such as the following:
molloyd@ebb:/tmp$ sort < animals.txt > sorted.txtmolloyd@ebb:/tmp$ more sorted.txtcatcowdogyak
Pipes (| and tee)
Simply put, pipes (|) enable you to connect Linux commands. Just as you redirected the output to a file, you can redirect the output of one command into the input of another command. For example, to list the root directory (from anywhere on the system) and send (or pipe) the output into the sort command, where it is listed in reverse (-r) order, use the following:
molloyd@ebb:~$ ls / | sort -rvarusr…bin
You can identify which user installations in the /opt directory occupy the most disk space: du gives you the disk used. Passing the argument -d1 means only list the sizes of 1 level below the current directory level, and -h means list the values in human-readable form. You can pipe this output into the sort filter command to do a numeric sort in reverse order (largest at the top). Therefore, the command is as follows:
molloyd@ebb:~$ du -d1 -h /opt | sort -nr500K /opt/backup198M /opt98M /opt/source75M /opt/cloud925M /opt/scripts
Another useful tool, tee, enables you to both redirect an output to a file and pass it on to the next command in the pipe (e.g., store and view). Using the previous example, if you want to send the unsorted output of du to a file but display a sorted output, you could enter the following:
molloyd@ebb:~$ du -d1 -h /opt | tee unsorted.txt | sort -nr500K /opt/backup198M /opt98M /opt/source75M /opt/cloud925M /opt/scriptsmolloyd@ebb:~$ more unsorted.txt500K /opt/backup25M /opt/scripts98M /opt/source75M /opt/cloud9198M /opt
You can also use tee to write the output to several files simultaneously:
molloyd@ebb:~$ du -d1 -h /opt | tee 1.txt 2.txt 3.txt500K /opt/backup…molloyd@ebb:~$ ls1.txt 2.txt 3.txt unsorted.txt
Filter Commands (from sort to xargs)
Each of the filtering commands provides a useful function:
sort: This command has several options:-rsorts in reverse,-fignores case,-duses dictionary sorting and ignores punctuation,-ndoes a numeric sort,-bignores blank space,-iignores control characters,-udisplays duplicate lines only once, and-mmerges multiple inputs into a single output.wc(word count): Calculates the number of words, lines, or characters in a stream. Here's an example:molloyd@ebb:/tmp$ more animals.txtdogcatyakcowmolloyd@ebb:/tmp$ wc < animals.txt4 4 16
This command returns that there are 4 lines, 4 words, and 16 characters (including hidden characters, e.g., carriage returns). You can select the values independently by using line count (-l), word count (-w), and character count (-m), and -c prints out the byte count (which would also be 16 in this case).
head: This command displays the first lines of the input, which is useful if you have a long file or stream of information and want to examine only the first few lines. By default, it displays the first 10 lines. You can specify the number of lines using the-noption. For example, to get the first two lines of output of thedmesgcommand (display message or driver message), which displays the message buffer of the kernel, use the following:
molloyd@ebb:~$ dmesg | head -n2[ 0.000000] Booting Linux on physical CPU 0x0[ 0.000000] Linux version 4.9.88-ti-rt-r111 …
tail: This command works likeheadexcept that it displays the last lines of a file or stream. Using it in combination withdmesgprovides useful output, as shown here:
molloyd@ebb:~$ dmesg | tail -n2[ 178.194805] pvrsrvkm: loading out-of-tree module taints kernel.[ 178.556171] [drm] Initialized pvr 1.14.3699939 20110701 on minor 0
grep: This command parses lines using text and regular expressions. You can use this command to filter output with options, including ignore case (-i), stop after five matches (-m 5), silent (-q), will exit with return status of 0 if any matches are found, specify a pattern (-e), print a count of matches (-c), print only the matching text (-o), and list the filename of the file containing the match (-l). For example, the following examines thedmesgoutput for the first three occurrences of the stringusb, using-ito ignore case:
molloyd@ebb:~$ dmesg | grep -i -m3 usb[ 0.809529] usbcore: registered new interface driver usbfs[ 0.809622] usbcore: registered new interface driver hub[ 0.809795] usbcore: registered new device driver usb
You can combine pipes. For example, you get the same output by using head and displaying only the first two lines of the grep output.
molloyd@ebb:~$ dmesg | grep -i -m3 usb | head -n2[ 0.809529] usbcore: registered new interface driver usbfs[ 0.809622] usbcore: registered new interface driver hub
xargs: This command enables you to construct an argument list that you use to call another command or tool. In the following example, a text fileargs.txtthat contains three strings is used to create three new files. The output ofcatis piped toxargs, where it passes the three strings as arguments to thetouchcommand, creating three new files:a.txt,b.txt, andc.txt.molloyd@ebb:~$ echo "a.txt b.txt c.txt" > args.txtmolloyd@ebb:~$ cat args.txt | xargs touchmolloyd@ebb:~$ lsargs.txt a.txt b.txt c.txt
Other useful filter commands include awk (to program any type of filter), fmt (to format text), uniq (to find unique lines), and sed (to manipulate a stream). These commands are beyond the scope of this text; for example, awk is a full programming language! Table 3-6 describes useful piped commands to give you some ideas of how to use them.
Table 3-6: Useful Pipe Examples
| COMMAND | DESCRIPTION |
apt list --installed | grep camera
|
List the installed packages and search for one that contains the search string camera. Each command in this table is entered on a single line. |
ls -lt | head
|
Display the files in the current directory in order of age. |
cat urls.txt | xargs wget
|
Download the files, listed in URLs within a text file urls.txt. |
dmesg | grep -c usb
|
Count the number of times usb is found in the output of dmesg. |
find . -name "*.mp3" | grep -vi "effects" > /tmp/playlist.txt
|
Search your board (e.g., run from/with sudo) for .mp3 files, ignoring any sound effects files, to create a playlist file in /tmp. |
echo and cat
The echo command simply echoes a string, output of a command, or a value to the standard output. Here are a few examples:
molloyd@ebb:~$ echo 'hello'hellomolloyd@ebb:~$ echo "Today's date is $(date)"Today's date is Fri May 4 13:45:36 IST 2018molloyd@ebb:~$ echo $PATH/usr/local/bin:/usr/bin:/bin:/usr/local/games:/usr/games
In the first case, a simple string is echoed. In the second case, the " " are present as a command is issued within the echo call, and in the final case the PATH environment variable is echoed.
The echo command also enables you to see the exit status of a command using $?. Here's an example:
molloyd@ebb:~$ lsargs.txt a.txt b.txt c.txtmolloyd@ebb:~$ echo $?0molloyd@ebb:~$ ls /nosuchdirectoryls: cannot access '/nosuchdirectory': No such file or directorymolloyd@ebb:~$ echo $?2
Clearly, the exit status for ls is 0 for a successful call and 2 for an invalid argument. This can be useful when you are writing scripts and your own programs that return a value from the main() function.
The cat command (concatenation) facilitates you in joining two files together at the command line. The following example uses echo to create two files: a.txt and b.txt; cat concatenates the files to create a new file c.txt. You need to use -e if you want to enable the interpretation of escape characters in the string that is passed to echo.
molloyd@ebb:~$ echo "Hello" > a.txtmolloyd@ebb:~$ echo -e "from the PocketBeagle" > b.txtmolloyd@ebb:~$ cat a.txt b.txt > c.txtmolloyd@ebb:~$ more c.txtHellofromthePocketBeagle
diff
The diff command facilitates you in finding the differences between two files. It provides basic output.
molloyd@ebb:~$ echo -e "dog cat bird" > list1.txtmolloyd@ebb:~$ echo -e "dog cow bird" > list2.txtmolloyd@ebb:~$ diff list1.txt list2.txt2c2< cat---> cow
The value 2c2 in the output indicates that line 2 in the first file changed to line 2 in the second file, and the change is that cat changed to cow. The character a means appended, and d means deleted. For a side-by-side comparison, you can use the following:
molloyd@ebb:~$ diff -y -W30 list1.txt list2.txtdog dogcat | cowbird bird
where -y enables the side-by-side view and -W30 sets the width of the display to 30-character columns.
If you want a more intuitive (but challenging) difference display between two files, you can use the vimdiff command (installed using sudo apt install vim), which displays a side-by-side comparison of the files using the vim (Vi IMproved) text editor (type vimdiff list1.txt list2.txt and use the VI key sequence: Escape : q ! twice to quit or Escape : w q to save the changes and quit). Vim requires practice to master the key sequences.
tar
The tar command is an archiving utility that enables you to combine files and directories into a single file (like an uncompressed zip file). This file can then be compressed to save space. To archive and compress a directory of files, such as /tmp, use the following:
molloyd@ebb:~$ tar cvfz backup.tar.gz /tmpmolloyd@ebb:~$ ls -l backup.tar.gz-rw-r--r-- 1 molloyd molloyd 416 May 4 13:54 backup.tar.gz
where c means new archive, v means verbosely list files, z means compress with gzip, and f means archive name follows. You might also see .tar.gz represented as .tgz. See Table 3-7 for more examples.
Table 3-7: Useful tar Commands
| COMMAND | DESCRIPTION |
tar cvfz name.tar.gz /tmp
|
Compress with gzip form. |
tar cvfj name.tar.bz2 /tmp
|
Compress with bzip2 compression (typically a longer delay, but smaller, file). Enter all commands in this table on a single line. |
tar cvfJ name.tar.xz /tmp
|
Compress with xz file format (used in .deb package files). |
tar xvf name.tar.*
|
Decompress compressed file (x indicates extract). It will autodetect the compression type (e.g., gzip, bz2). |
tar xvf name.tar.* /dir/file
|
Extract a single file from an archive. Works for a single directory too. |
tar rvf name.tar filename
|
Add another file to the archive. |
tar cfz name-$(date +%m%d%y).tar.gz /dir/filename
|
Create an archive with the current day's date; useful for scripts and cron job backups. Note that there must be a space between date and +%m%d%y. |
md5sum
The md5sum command enables you to check the hash code to verify that the files have not been corrupted maliciously or accidentally in transit. In the following example, the wavemon tool is downloaded as a .deb package but not installed. The md5sum command can be used to generate the md5 checksum.
molloyd@ebb:~$ sudo apt download wavemonGet:1 http://deb.debian.org/debian stretch/main armhf wavemon armhf0.8.1-1 [49.3 kB] Fetched 49.3 kB in 0s (247 kB/s)molloyd@ebb:~$ ls -l *.deb-rw-r--r-- 1 root root 49286 Jan 2 2017 wavemon_0.8.1-1_armhf.debmolloyd@ebb:~$ md5sum wavemon_0.8.1-1_armhf.deb557728e1da32bb7f68b09099755c9ca3 wavemon_0.8.1-1_armhf.deb
You can now check this checksum against the official checksum to ensure you have a valid file. Unfortunately, it can be difficult to find the checksums for individual packages online. If wavemon is installed, the checksums are in /var/lib/dpkg/info/wavemon.md5sums. You can install a utility under Debian called debsums to check the integrity of the file and its constituent parts.
molloyd@ebb:~$ sudo apt install debsums wavemonmolloyd@ebb:~$ debsums wavemon_0.8.1-1_armhf.deb/usr/bin/wavemon OK…/usr/share/man/man5/wavemonrc.5.gz OK/usr/share/menu/wavemon OK
If you are building your own packages that you want to distribute, it would be useful to also distribute a checksum file against which users can verify their downloaded repository. An alternative to md5sum is sha256sum, which can be used in the same way.
molloyd@ebb:~$ sha256sum wavemon_0.8.1-1_armhf.deb6536009848b1063e831d7d9aae70f6505e46e8ecc88e161f6bd7034ba11ae1dc
Linux Processes
A process is an instance of a program that is running on the OS. You need to be able to manage the processes that are running on your board, understand foreground and background processes, and kill a process that becomes locked.
How to Control Linux Processes
The ps command lists the processes currently running on the board. Typing ps shows that the following PocketBeagle is running two user processes, the bash shell with process ID (PID) 1953 and the ps command itself, which is running with PID 1968. The ps PID is different every time you run it because it runs to completion each time.
molloyd@ebb:~$ psPID TTY TIME CMD1953 pts/0 00:00:00 bash1968 pts/0 00:00:00 ps
To see all running processes, use ps ax. In the following example, it is filtered to search for the string “apache” to discover information about the apache2 processes that are running on the board:
molloyd@ebb:~$ ps ax | grep apache1107 ? Ss 0:00 /usr/sbin/apache2 -k start1110 ? Sl 0:00 /usr/sbin/apache2 -k start1111 ? Sl 0:00 /usr/sbin/apache2 -k start1970 pts/0 S+ 0:00 grep apache
It is clear that three different processes are running for the service, enabling it to handle multiple simultaneous connections. In this example, all threads are currently waiting for an event to complete (S), PID 1107 is the session leader (Ss), 1110 and 1111 are its multithreaded clones (Sl), and the 1970 grep process is in the foreground group (S+). As described earlier, a call to systemctl status apache2 provides information about the services running on the PocketBeagle—if you execute the call, you will see that the process PIDs match those displayed by a call to ps.
Foreground and Background Processes
Linux is a multitasking OS that enables you to run processes in the background while using a program that is running in the foreground. This concept is similar to the behavior of a windowing system (e.g., Windows, macOS). For example, the desktop clock continues to update the time while you use a web browser.
The same is true of applications that run in a terminal window. To demonstrate that, here is a small segment of C code to display “Hello World!” every five seconds in a Linux terminal. Exactly how this works is covered in Chapter 5, but for the moment, you can enter the code verbatim into a file called HelloBeagle.c using the nano file editor within the molloyd user home directory, as follows:
molloyd@ebb:~$ nano HelloBeagle.cmolloyd@ebb:~$ more HelloBeagle.c#include<unistd.h>#include<stdio.h>int main(){int x=0;do{printf("Hello Beagle! ");sleep(5);}while(x++<50);return 0;}
The program has 50 iterations, displaying a message and sleeping for five seconds on each iteration. After saving the file as HelloBeagle.c, it can be compiled to an executable by typing the following (-o specifies the executable filename):
molloyd@ebb:~$ gcc HelloBeagle.c -o hellomolloyd@ebb:~$ ls -l hello-rwxr-xr-x 1 molloyd molloyd 8384 May 4 16:26 hello
If this works correctly, you will now have the source file and the executable program called hello (note that the executable x flag is set). It can then be executed.
molloyd@ebb:~$ ./helloHello Beagle!Hello Beagle!^C
It will continue to output this message every five seconds; it can be killed using Ctrl+C. However, if you would like to run this in the background, you have two options.
The first way is that, instead of using Ctrl+C to kill the process, use Ctrl+Z, and then at the prompt type the bg (background) command.
molloyd@ebb:~$ ./helloHello Beagle!^Z[1]+ Stopped ./hellomolloyd@ebb:~$ bg[1]+ ./hello &molloyd@ebb:~$ Hello Beagle!Hello Beagle!Hello Beagle!
When you press Ctrl+Z, the ^Z displays in the output. When bg is entered, the process is placed in the background and continues to execute. In fact, you can continue to use the terminal, but it will be frustrating, because “Hello Beagle!” displays every five seconds. You can bring this process back into the foreground using the fg command.
molloyd@ebb:~$ fg./helloHello Beagle!^Cmolloyd@ebb:~$
The application is killed when Ctrl+C is typed (displays as ^C).
The second way to place this application in the background is to execute the application with an & symbol after the application name.
molloyd@ebb:~$ ./hello &[1] 1992molloyd@ebb:~$ Hello Beagle!Hello Beagle!Hello Beagle!
The process has been placed in the background with PID 1992 in this case. To stop the process, use ps with this PID or find the PID using the ps command.
molloyd@ebb:~$ ps |grep hello1992 pts/0 00:00:00 hellomolloyd@ebb:~$ Hello Beagle!
To kill the process, use the kill command.
molloyd@ebb:~$ kill 1992[1]+ Terminated ./hello
You can confirm that a process is dead by using ps again. If a process doesn't die, you can use a -9 argument to ensure death! (e.g., kill -9 1992). A separate command, pkill, will kill a process based on its name, so in this case you can kill the process as follows:
molloyd@ebb:~$ pkill hello One more command worth mentioning is watch, which executes a command at a regular interval and shows the outcome full screen on the terminal. For example, to watch the kernel message log, use the following:
molloyd@ebb:~$ watch dmesg You can specify the time interval between each execution using -n followed by the number of seconds. A good way to understand watch is to execute it as follows:
molloyd@ebb:~$ watch -n 1 ps aEvery 1.0s: ps a ebb: Fri May 4 16:34:52 2018PID TTY STAT TIME COMMAND1033 tty1 Ss+ 0:00 /sbin/agetty --noclear tty1 linux…2018 pts/0 S+ 0:00 watch -n 1 ps a2046 pts/0 S+ 0:00 watch -n 1 ps a2047 pts/0 S+ 0:00 sh -c ps a2048 pts/0 R+ 0:00 ps a
You will see the PID of ps, sh, and watch changing every one (1) second, making it clear that watch is actually executing the command (ps) by passing it to a new shell using sh -c. The reason why watch appears twice in the list is that it spawns itself temporarily at the exact moment that it executes ps a.
Other Linux Topics
At this point of the book, I have covered the core commands for working with Linux on the Beagle boards; however, there is much more to cover on the topic of managing Linux systems. For example, how do you configure a Wi-Fi adapter? How do you use cron to schedule jobs? These topics and many others are detailed as you work through the book. For example, cron jobs are covered in Chapter 11, in the context of the Internet of Things.
Using Git for Version Control
Simply put, Git is a system that enables you to track changes to the content of a software project as it develops. Git, designed by Linus Torvalds, is used today for mainline Linux kernel development. Git is an incredibly useful system to understand for two main reasons: you can use Git when developing your own software, and you can gain an appreciation of how to work with Linux kernel source distributions. In developing your own software, Git is particularly useful for backing up your code and redeploying it to multiple Beagle boards.
Git is a distributed version control system (DVCS) for source control management. A version control system (VCS) tracks and manages changes to documents of any type. Typically, documents that have been changed are marked with revision numbers and time stamps. It is possible to compare revisions and even revert to older versions of the documents. There are two types of VCSs.
- Centralized: These systems, such as Apache Subversion (SVN), work on the basis that there is a single “master” copy of the project. The workflow is straightforward: you pull down changes from a central server, make your changes, and commit them back to the master copy.
- Distributed: Using these systems, such as Git and Selenic Mercurial, you do not pull down changes; instead, you clone the entire repository, including its entire history. The clone of the repository is just as complete as the master copy and can even become the master copy if required. Thankfully, by today's standards, text documents and programming source code do not occupy much disk space. Importantly, the DVCS model does not prevent you from having a central master repository that everybody uses; take a look at
git.kernel.org.
The main advantage of a DVCS over a CVCS is that you can quickly commit and test changes locally, on your own system, without ever having to push them to a master copy; however, changes can be pushed when they reach an appropriate level of quality. The only significant disadvantage is the amount of disk space required to store the project and its entire history, which grows over time.
Git is a DVCS that is focused on programming source control and management. It enables you to create parallel developments that do not affect the original. You can even revert to an older version of one of the source code files or an older version of the entire project. The project, with its associated files and history, is called a repository. This capability is particularly useful in large-scale programming projects for which you may go down a development pathway with the project that is ultimately unsuccessful. The facility for parallel development is also important if you have several people working on the same project.
Git is written in C, and although it originated from the need for version control tools in the development of Linux kernel code, it is used by many other open source developments such as Eclipse and Android.
The easiest way to understand Git is to go through the steps of actually using it. Therefore, the next section is structured as a step-by-step guide. If it is not already, Git is easily installed using sudo apt install git, so you should be able to follow the steps, directly at the terminal. GitHub is used in this book as the remote repository for providing the source code examples. Except for pushing the source code to the server, you can do everything in this guide without a GitHub account. GitHub provides free public repository accounts but charges a fee for private repositories, such as those that would be required for retaining intellectual property rights.
A Practice-Based Introduction
In this guide, I create a repository called test on GitHub. Initially, it contains only a README.md file with a short description of the “test” project.
As shown in Figure 3-5, nearly all operations are local operations. A checksum is performed on every file in Git before it is stored. The checksum ensures that Git will be aware if a modification is made outside of Git itself, including file system corruption. Git uses 40-character hash codes for the checksums. This helps Git keep track of changes between the local repository and remote repository, which enables the range of local operations.
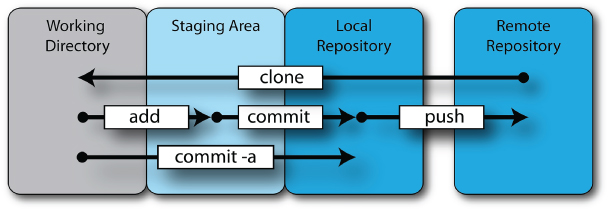
Figure 3-5: The basic Git workflow
Cloning a Repository (git clone)
Cloning a repository means making a copy of all the files in the repository on your local file system, as well as the history of changes to that project. You do this operation only once. To clone the repository, issue the command git clone followed by the fully formed repository name:
molloyd@ebb:~$ cd ~/molloyd@ebb:~$ git clone https://github.com/derekmolloy/test.gitCloning into 'test'…remote: Counting objects: 20, done.remote: Total 20 (delta 0), reused 0 (delta 0), pack-reused 20Unpacking objects: 100% (20/20), done.
You now have a full copy of the test repository in the /test/ directory. Your repository is just as complete as the version on the GitHub server; if you were to deploy it over a network, file system, other Git server, or even a different GitHub account, it could assume the role as the main version of this repository. Although there is no need for a central server, it is usually the case, because it enables multiple users to “check in” source code to a known master repository. The repository is created in the /test/ directory, and it currently contains the following:
molloyd@ebb:~/test$ ls -altotal 20drwxr-xr-x 3 molloyd molloyd 4096 May 4 23:18 .drwxr-xr-x 4 molloyd molloyd 4096 May 4 23:16 ..drwxr-xr-x 8 molloyd molloyd 4096 May 4 23:16 .git-rw-r--r-- 1 molloyd molloyd 4 May 4 23:16 .gitignore-rw-r--r-- 1 molloyd molloyd 59 May 4 23:16 README.md
You can see the README.md file that was created when the project was initialized on GitHub; you can use more to view the contents of this file. The directory also contains a hidden .git subdirectory, which contains the following files and directories:
molloyd@ebb:~/test$ cd .gitmolloyd@ebb:~/test/.git$ lsbranches config description HEAD hooks index infologs objects packed-refs refs
The hidden .git folder contains all the information about the repository, such as commit messages, logs, and the data objects. For example, the remote repository location is maintained in the config file.
molloyd@ebb:~/test/.git$ more config | grep urlurl = https://github.com/derekmolloy/test.git
The “Further Reading” section at the end of this chapter directs you to an excellent book on Git, which is freely available online, that describes the nature of the .git directory structure in detail. Thankfully, in the following discussion, you do not have to make changes in the .git directory structure because you have Git commands to do that for you.
Getting the Status (git status)
Now that the repository exists, the next step is to add a new text file to the working directory, where it will be in an untracked state. When you call the command git status, you can see a message stating that “untracked files” are present.
molloyd@ebb:~/test$ echo "Just some text" > newfile.txtmolloyd@ebb:~/test$ git statusOn branch masterYour branch is up-to-date with 'origin/master'.Untracked files:(use "git add <file>…" to include in what will be committed)newfile.txtnothing added to commit but untracked files present (use "git add" to track)
The next step is to add any untracked files to the staging area. However, if you did not want to add a set of files, you could also create a .gitignore file to ignore those files. For example, this could be useful if you are building C/C++ projects and you decide that you do not want to add intermediate .o files. Here is an example of creating a .gitignore file in order to ignore C/C++ .o files:
molloyd@ebb:~/test$ echo "*.o" > .gitignoremolloyd@ebb:~/test$ more .gitignore*.omolloyd@ebb:~/test$ touch testobject.omolloyd@ebb:~/test$ git statusOn branch masterYour branch is up-to-date with 'origin/master'.Untracked files:(use "git add <file>…" to include in what will be committed)newfile.txtnothing added to commit but untracked files present (use "git add" to track)
In this case, two files are untracked, but there is no mention of the testobject.o file, as it is being correctly ignored. Note that the .gitignore file is itself part of the repository and so will persist when the repository is cloned, along with its revision history and so on.
Adding to the Staging Area (git add)
The files in the working directory can now be added to the staging area by typing git add .
This command adds all the files in the working directory, with the exception of the ignored files. In this example, two files are added from the working directory to the staging area, and the status of the repository can then be displayed using the following:
molloyd@ebb:~/test$ git add .molloyd@ebb:~/test$ git statusOn branch masterYour branch is up-to-date with 'origin/master'.Changes to be committed:(use "git reset HEAD <file>…" to unstage)new file: .gitignorenew file: newfile.txt
To delete (remove) a file from the staging area, use git rm somefile.ext.
Committing to the Local Repository (git commit)
After you add files to the staging area, you can commit the changes from the staging area to the local Git repository. First, you may want to add your name and e-mail address variables to identify who is committing the changes.
molloyd@ebb:~/test$ git config --global user.name "Derek Molloy"molloyd@ebb:~/test$ git config --global user.email " [email protected]"
These values are set against your Linux user account, so they will persist when you next log in. You can see them by typing more ~/.gitconfig.
To permanently commit the file additions to the local Git repository, use the git commit command.
molloyd@ebb:~/test$ git commit -m "Testing repository for BeagleBone"[master b2137ee] Testing repository for BeagleBone2 files changed, 2 insertions(+)create mode 100644 newfile.txtcreate mode 100644 .gitignore
The changes are flagged with the username, and a message is also required. If you want to detail the message inline, use -m to set the commit message.
Pushing to the Remote Repository (git push)
To perform this step, you must have your own GitHub account. The git push command pushes any code updates to the remote repository. You must be registered to make changes to the remote repository for the changes to be applied. In Git 2.0, a new more conservative approach, called simple, has been taken to push to remote repositories. It is chosen by default, but a warning message can be squelched, and the push can be performed as follows (replace the user details and repository name with your own account details):
molloyd@ebb:~/test$ git config --global push.default simplemolloyd@ebb:~/test$ git pushUsername for 'https://github.com': derekmolloyPassword for 'https://[email protected]': mySuperSecretPasswordCounting objects: 4, done.Compressing objects: 100% (2/2), done.Writing objects: 100% (4/4), 350 bytes | 0 bytes/s, done.Total 4 (delta 0), reused 0 (delta 0)To https://github.com/derekmolloy/test.git61b6ee4..b2137ee master -> master
After the code has been pushed to the remote repository, you can pull changes back to a local repository on any machine by issuing a git pull command from within the local repository directory.
molloyd@ebb:~/test$ git pullAlready up-to-date.
In this case, everything is already up-to-date.
Git Branching
Git supports the concept of branching, which enables you to work on multiple different versions of the set of files within your project. For example, to develop a new feature in your project (version 2) but maintain the code in the current version (version 1), you could create a new branch (version 2). New features and changes that are made to version 2 will not affect the code in version 1. You can then easily switch between branches.
Creating a Branch (git branch)
Suppose, for example, you want to create a new branch called mybranch; you can do so using the command git branch mybranch, and then you can switch to that branch using git checkout mybranch, as shown here:
molloyd@ebb:~/test$ git branch mybranchmolloyd@ebb:~/test$ git checkout mybranchSwitched to branch 'mybranch'
Now, to demonstrate how this works, suppose that a temporary file called testmybranch.txt is added to the repository. This could be a new code file for your project. You can see that the status of the branch makes it clear that the working directory contains an untracked file.
molloyd@ebb:~/test$ touch testmybranch.txtmolloyd@ebb:~/test$ lsnewfile.txt README.md testmybranch.txt testobject.omolloyd@ebb:~/test$ git statusOn branch mybranchUntracked files:(use "git add <file>…" to include in what will be committed)testmybranch.txtnothing added to commit but untracked files present (use "git add" to track)
You can then add this new file to the staging area of the branch using the same commands.
molloyd@ebb:~/test$ git add .molloyd@ebb:~/test$ git statusOn branch mybranchChanges to be committed:(use "git reset HEAD <file>…" to unstage)new file: testmybranch.txt
You can commit this change to the mybranch branch of the local repository. This change will affect the mybranch branch but have no impact on the master branch.
molloyd@ebb:~/test$ git commit -m "Test commit to mybranch"[mybranch 63cae5f] Test commit to mybranch1 file changed, 0 insertions(+), 0 deletions(-)create mode 100644 testmybranch.txtmolloyd@ebb:~/test$ git statusOn branch mybranchnothing to commit, working tree cleanmolloyd@ebb:~/test$ lsnewfile.txt README.md testmybranch.txt testobject.o
You can see from the preceding output that the file testmybranch.txt is committed to the local repository and you can see the file in the directory.
If you now switch from the branch mybranch to the master branch using the call git checkout master, you will see that something interesting happens when you request the directory listing.
molloyd@ebb:~/test$ git checkout masterSwitched to branch 'master'Your branch is up-to-date with 'origin/master'.molloyd@ebb:~/test$ lsnewfile.txt README.md testobject.o
Yes, the file testmybranch.txt has disappeared from the directory! It still exists, but it is in a blob form inside the .git/objects/ directory. If you return to the branch and list the directory, you will see the following:
molloyd@ebb:~/test$ git checkout mybranchSwitched to branch 'mybranch'molloyd@ebb:~/test$ lsnewfile.txt README.md testmybranch.txt testobject.o
The file now reappears. Therefore, you can see just how well integrated the branching system is. At this point, you can go back to the master branch and make changes to the original code without the changes in the mybranch branch having any impact on the master code. Even if you change the code in the same file, it has no effect on the original code in the master branch.
Merging a Branch (git merge)
What if you want to apply the changes that you made in the mybranch branch to the master project? You can do this by using git merge.
molloyd@ebb:~/test$ git checkout masterSwitched to branch 'master'Your branch is up-to-date with 'origin/master'.molloyd@ebb:~/test$ git merge mybranchUpdating b2137ee..63cae5fFast-forwardtestmybranch.txt | 01 file changed, 0 insertions(+), 0 deletions(-)create mode 100644 testmybranch.txtmolloyd@ebb:~/test$ git statusOn branch masterYour branch is ahead of 'origin/master' by 1 commit.(use "git push" to publish your local commits)nothing to commit, working tree cleanmolloyd@ebb:~/test$ lsnewfile.txt README.md testmybranch.txt testobject.o
Now the testmybranch.txt file is in the master branch, and any changes that were made to other documents in the master have been applied. The local repository is now one commit ahead of the remote repository, and you can use git push to update the remote repository.
Deleting a Branch (git branch -d)
If you want to delete a branch, use the git branch -d mybranch command.
molloyd@ebb:~/test$ git branch -d mybranchDeleted branch mybranch (was 63cae5f).molloyd@ebb:~/test$ lsnewfile.txt README.md testmybranch.txt testobject.o
In this case, the file testmybranch.txt is still present in the master project—and it should be because the branch was merged with the master project. If the branch had been deleted before the merge was performed, the file would have been lost.
Common Git Commands
Table 3-8 summarizes the main Git commands. At this point, you have seen the core use of Git. If you are developing code directly on the Beagle board, Git can be highly useful because you can easily push your developments to a remote repository. That capability can be useful in backing up your code and redeploying the code to multiple boards.
Table 3-8: Summary of the Main Git Commands
| OPERATION | DESCRIPTION | OPERATION | DESCRIPTION |
git clone
|
Clone from the remote repository. |
git rm
|
Delete a file or directory from the staging area. |
git init
|
Create a wholly new repository. |
git mv
|
Move or rename a file or folder in the staging area. |
git pull
|
Merge changes from a master repository. |
git log
|
Display a log of commits. The project history. |
git fetch
|
Find what has changed in a master repository without merging. |
git tag
|
Give a commit a name (e.g., version 2). |
git status
|
Show the project's status. |
git merge [name]
|
Merge the branch. |
git add
|
Add a new file or edit an existing file. |
git show
|
Get details about the current or other commit. |
git diff
|
Show the differences that are to be committed. |
git branch [name]
|
Create a new branch. (Use -d to delete.) |
git commit
|
Commit to the repository. |
git checkout [name]
|
Switch to a different branch. |
git push
|
Push changes from the local repository to a remote repository. |
Desktop Virtualization
The BeagleBone and BeagleBoard are capable general-purpose computing platforms, but if you are planning to build a Linux kernel or perform cross-platform development (see Chapter 7), a PC-based Linux installation is highly recommended. You can use a single/dual-boot Linux PC, or if you are a Windows/Mac native, you should investigate desktop virtualization.
Desktop virtualization enables a single desktop computer to run multiple OS instances simultaneously. It uses technology called hypervisors, which consist of hardware, firmware, and software elements, to create and run software-emulated machines, known as virtual machines (VMs). If you want to run multiple OS instances on a single computer, VMs provide an alternative to creating a multiboot configuration.
In virtualization, there are usually two or more distinct OS instances. The host OS is the one that was first installed on the physical machine. The hypervisor software is then used to create a guest OS within a VM. Figure 3-6 captures a host Windows desktop computer running a guest Debian 64-bit Linux Stretch VM within a window. The Debian installation has the Cairo-Dock desktop interface installed.
Figure 3-6: VirtualBox running Debian 9.4 as a guest OS on a Windows host machine with an SSH session to the PocketBeagle board
Many virtualization products are available, but most have significant costs and proprietary licenses and are limited in the type of guest and host OSs that they support. Two of the most popular Linux desktop virtualization products are VMware Player and VirtualBox. VMware Player (www.vmware.com/products/player/) is free for personal use. VirtualBox (www.virtualbox.org) is available under a GNU GPLv2 license (some features are available free under a proprietary license).
Both products use hosted hypervisors (Type 2) for virtualization, meaning that they run within a regular OS, enabling you to use both machines simultaneously. VirtualBox is available to run on Windows, macOS, and Linux machines, and it can be used to host guest OSs such as Linux, Windows, and macOS. Currently, VMware Player is not available for macOS host installations; instead, you must purchase a product called VMware Fusion.
Both products are powerful, and it is difficult to distinguish between them; however, VirtualBox is released under a GPL, and it supports a useful feature called snapshots. A user interface makes it possible to take a snapshot of the guest OS that can be saved for later use. For example, you could take a snapshot before you make a significant configuration change to your guest OS, enabling you to roll back to that configuration should problems arise. The snapshot stores the VM settings, changes in the contents of the virtual disks, and the memory state of the machine at that point in time. Therefore, when a snapshot is restored, the VM continues running at the same point as when the snapshot was taken.
If you install the VirtualBox Guest Additions, you are able to copy and paste text between your guest and host OSs, share directories, and even resize the window dynamically. This chapter's web page (www.exploringbeaglebone.com/chapter3/) provides advice on installing a Linux guest OS under a Windows host OS.
Code for This Book
Now that you have your Desktop Linux installation up and running under VirtualBox or you are running a regular Linux desktop installation, you can download all the source code, scripts, and documentation discussed in this book by opening a Linux terminal session/window and typing the following (on the desktop machine and Beagle board):
molloyd@ebb:~$ sudo apt install gitmolloyd@ebb:~$ git clone https://github.com/derekmolloy/exploringBB.gitCloning into 'exploringBB' …molloyd@ebb:~$ cd exploringBB/molloyd@ebb:~/exploringBB$ lschp02 chp05 chp08 chp10 chp12 chp14 extras License.txtchp03 chp06 chp09 chp11 chp13 chp15 library README.md
If you want to download the code from within Windows or macOS, a graphical user interface for working with GitHub repositories is available from windows.github.com and mac.github.com.
Summary
After completing this chapter, you should be able to do the following:
- Describe the basic concept of an embedded Linux system
- Describe how embedded Linux devices, such as the Beagle boards, boot the Linux OS
- Describe important Linux concepts, such as kernel space, user space, and system initialization using systemd
- Perform Linux system administration tasks on the Beagle boards
- Use the Linux file system effectively
- Use a range of Linux commands for file and process management
- Manage your own software development projects using Git
- Install a Linux distribution on your desktop computer host OS using desktop virtualization tools, such as VirtualBox
- Download the source code for this book using Git
Further Reading
The following texts can help you learn more about embedded Linux, Linux administration, Git, and virtualization:
- Christopher Hallinan's Embedded Linux Primer: A Practical Real-World Approach, Second Edition (Upper Saddle River, NJ: Prentice Hall, 2011).
- The Debian Policy Manual:
www.debian.org/doc/debian-policy/. - To learn more about Git, start with a call to
man gittutorial, and then if you need detailed information, see Scott Chacon's excellent reference Pro Git, atwww.git-scm.com/book/en/v2; also available in paperback (New York: Apress Media, 2009).
Bibliography
- Git FAQ. (2013, 3 9). Retrieved 2 22, 2014, from Git Wiki: https://git.wiki.kernel.org/index.php/GitFaq#Why_the_.27Git.27_name.3F
- Smith, B. (2013, 7 29). A Quick Guide to GPLv3. Retrieved June 14, 2015, from
www.gnu.org/licenses/quick-guide-gplv3.html