Not too long ago, if you wanted drums in your music, you would have to pay someone to play the part, and then it would take hours of cutting actual recording tape to get the sound right when the drummer wasn’t as on tempo as you wanted. Solo artists were usually nothing more than a guy with a guitar. When armed with FL Studio, though, a guy with a guitar and FL Studio becomes an entire band with post-production abilities. The bass, drums, synths, violins, pianos, and a ton of other instruments can be emulated or “faked” to give your music that complete sound. Even guitar strumming can be mimicked, and full chords can be played.
This chapter takes a look at the incredible world of software instruments and generators and how they can be used. We will take a look at each instrument and generator that comes included with FL Studio and look at some examples of using them. By the end of this chapter, you will have nearly all the information you need to make music in FL Studio and, most importantly, where to find that sound you are looking for. To begin this chapter, we take a look at the plug-ins you can install into FL Studio and how to install plug-ins that are not native to the program.
There are a decent number of formats that plug-ins can run as, and FL Studio will accept most of the ones you will find. To begin, VST/VST2, or Virtual Studio Technology, was a standard developed by Steinberg (creators of Cubase) so that third-party plug-ins can be recognized in recording software. Most of the plug-ins you will find either support or run in this format, and FL Studio will recognize most, if not all, of these. Remember that developers make mistakes, too, so if something doesn’t run properly, it is not likely FL Studio causing the trouble. FL Studio’s plug-ins conform strictly to the VST specification, and there are times when third-party plug-ins don’t stick to the standard, which can cause a wide range of issues.
DirectX plug-ins are a standard developed by Windows that will work in FL Studio, provided that you have installed DirectX Media. This download can be found on the Microsoft website. DirectX 2 plug-ins require DirectX Media as well, but these will use the Fruity Wrapper plug-in to run. Buzz effects are also supported, but they use FL’s Buzz Effects adapter plug-in in order to work properly.
This section is for helping you install that plug-in that you love, but FL Studio hasn’t seen yet. In this example I will be installing iZotope’s Ozone 4, which is an amazing mastering suite and has tons of features, such as EQs, multi-band compressors, limiters, and many others, along with a great selection of presets.
First, you will have to install the program, and there are too many plug-ins available to go through that part. It is good to know that it is best to keep the third-party plug-ins out of the FL Studio installation directory. Assuming you have installed the program, we will start by pointing FL Studio to where you keep your plug-ins. Many times, when they are VST plug-ins, they will be stored in C:Program FilesSteinbergVST Plug-Ins. My computer is running a dual-boot system, and the directory happens to be Program Files (x86)VstPlugins. As you can see in Figure 6.1, I have selected the VstPlugins folder to be my extra VST search folder in the Options menu (F10), under the File tab. All the FL plug-ins will be in FL Studio’s own folder, but for the other plug-ins residing in a different folder, this is where you tell FL Studio to look for them.

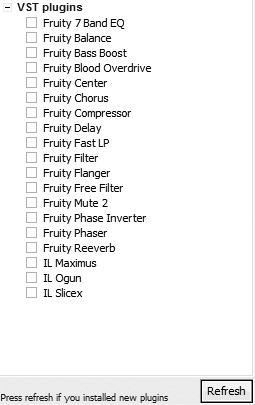
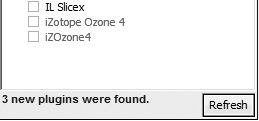
Now navigate to Channels > More, and upon selecting More, a list of all your plug-ins will show up. If you have recently installed your plug-ins or changed the extra search directory, then you will want to select Refresh at the bottom of the list. As you can see in Figure 6.2, Ozone 4 still isn’t showing up, but after clicking Refresh and choosing Fast Scan, Ozone 4 will show up with the rest of the plug-ins (see Figure 6.3). After selecting the box next to Ozone 4, it shows up in the main plug-in list and opens upon selection (see Figure 6.4).

Now that we have had a chance to look at installing plug-ins that FL Studio didn’t come with, it’s time to dig deep into the included plug-ins of FL Studio. These are the bread and butter of your digital sound-making. Many can affect sound that you record into FL as well, but most will be generators that produce sound for you to add to your projects. There is really no way to discuss all of the presets in these plug-ins, because as you will find with plug-ins such as Auto-gun, there are more than four billion presets to choose from, and your exploration will end up being key in finding sounds that you like or that would fit in your project.
3xOsc, shown in Figure 6.5, is a great oscillator tool for creating tons of different sounds that you can use as a quiet pad (a layer of sound in the background) or a stabbing arpeggiator that puts more rhythm in your music. The settings for the oscillators are the same, and the first set of boxes allows you to choose the shape of the oscillation.
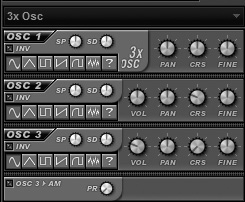
Changing up these shapes alone will give you a plethora of options to work with. The Invert Toggle switch will flip the phase of that particular oscillator, so if you are looking at a digital drawing of the waveform, it will be turned upside down, which can help with creating a stereo effect if the sound is giving off too much of a mono feeling.
The SP (Stereo Phase) knob will basically allow you to move the oscillating wave forward or backward in time. This feature is great for widening the sound of your 3x Osc instrument and giving it more depth. The SD (Stereo Detune) knob can essentially do the same thing, but you will notice that the tones between the left and right channels become out of tune the more you adjust them. Feel free to experiment with this, but I have found more success in changing the stereo phase when looking for an interesting sound.
The CRS (Course) and Fine tuning knobs will tune the entire oscillator rather than cause the left and right to become out of tune with each other, and I have found this useful when working with remixes that are slightly out of tune. Adjusting this will allow you to hit those in-between tones without affecting the entire channel. Just remember that you made changes so you don’t wonder why your instrument is out of tune when you try to play it.
The last two selections include a toggle switch (OSC 3 > AM) that allows you to cause the third oscillator to be amplitude modulation for the first two oscillators, as well as a Stereo Phase Randomness (PR) knob that will allow you to add varying degrees of randomness to the stereo phase of all oscillators. This plug-in will be reminiscent of early synths and will have a very classic sound to it. Many of us may have noticed that these types of sounds are really starting to creep back into modern music. The easiest way to find the presets is to go to your Browser—at the top is the Channel Presets menu. Open this, and directly underneath will be all of the presets for the 3xOsc to peruse. I highly suggest trolling these sounds, because although many of them seem simple, it is these simple sounds that combine with many others to create awesome arrangements in your projects.
There are a few complicated concepts inside this plug-in, but its relative simplicity is a good introduction to synthesis and hearing how it works. It is very difficult to explain different oscillator shapes without actually hearing them.
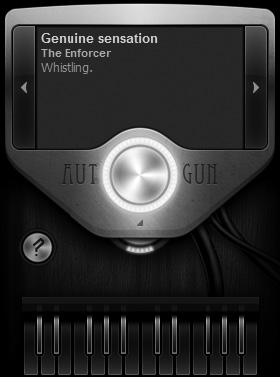
Autogun, shown in Figure 6.6, is simply amazing due to the quality of sound and the mind-boggling number of presets. This plug-in allows for maximum creativity because of the variance in sounds available, which are based on the Ogun synthesis engine. The number crunchers at Image-Line did the math, and for you to sit down and go through each preset, at one preset per second, 24 hours a day, every single day, it would take more than 136 years. So in this case, you really don’t have to worry too much about someone using the same sound as you with this instrument. The interface is very simple and easy to use because it is just left and right buttons to scroll through presets. Or, you can roll the dice with a random number entry by choosing Enter Preset Number from the Options menu. The large dial in the middle will control the plug-in volume, and the yellow lights located beneath it are known as the “magic” level. This control will add a fullness with stereo enhancement to your sound.
BeepMap, shown in Figure 6.7, is an interesting plug-in that basically uses images to create sound. The sound that is created is based on colors in the picture, where red color in the image will control the wave playback on the left side, green will be on the right, and yellow will be a mixture of left and right.

This can be a little daunting to wrap your head around when first explained, but just know that the different colors you see are all responsible for affecting the sound you hear. The vertical height of the colors will represent the frequency of the produced sound (sine wave), and two factors affect the frequency range (how high or low the note will play). The first is the Frequency knob, which will affect the range of the entire image height, and the second is the Use Blue option, which will determine the frequency range of each pixel in the image.
The Length knob will allow you to change how long a note plays based on each pixel in the image, while the Open option will bring up a list of literal pictures to import. Remember that these pictures act like presets for the sound, so loading a picture into this plug-in will determine the sound that you hear when playing notes.
Grainy will give your sound a grittier feel to it, and the Loop button will cause your sound to play until you release the key that you are using to trigger the sound. Widen will create a larger left/right separation for your sound, but keep in mind that this will not be noticeable with all sounds.
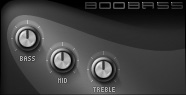
The BooBass plug-in, shown in Figure 6.8, is a very basic plug-in that gives you a nice emulated bass sound. The idea of this plug-in is to sound like a real bass, and the controls that come with it are relatively simple. The different knobs affect the frequency based on which one you move. The Bass knob will adjust the frequency in the lower end, which you will find very useful for softening up bass lines that are playing a little too heavy in the lower region. The Mid and Treble knobs will affect mid and high frequency ranges, respectively. Getting your bass to sound right here will help you avoid too much EQ work on it later. This plug-in is very user friendly, and getting the sound you want is as simple as turning the knobs.
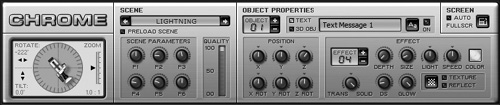
Chrome, shown in Figure 6.9, is a fun way to trigger visualization effects for your project. There are many ways to use this, but making music is not one of them. Think of this as an image generator that “plays” different images from notes on the Piano roll or a MIDI keyboard.
The first thing to note is that in most cases, you will need to run the Graphics Tester. This is very quick to do and prevents systems that shouldn’t run Chrome from actually using the plug-in by testing the capabilities of your graphics card. To locate the Graphics Tester, navigate to Start > Programs > Image-Line > FL Studio > Advanced > Graphics Tester and double-click the Graphics Tester icon. If you are unable to find the Graphics Tester, you can run a quick search using your Start menu (see Figure 6.10).

Chrome can be treated like an instrument that plays a spectrum of color rather than a range of frequency. As you go up and down the Piano roll, the colors will change like a spectrum (violet, blue, green, yellow, orange, red). You can see that in Figure 6.11, I have written in some notes on the Piano roll of Chrome to trigger fireworks, and each key as you go up or down will be a different color. Left to right in the Piano roll will still operate as a function of time, and the grid will be based on your Snap settings.

When first looking at Chrome, the dial on the left will control the rotation, tilt, and zoom of the image, and these controls can be mapped to your MIDI keyboard for controlling the image by hand. (Right-click, choose Link to Controller, and then move a MIDI keyboard fader or knob.) The Scene button will allow you to open a different scene (the adjustable image), or you can click the left and right arrows to toggle through the different options.
Each scene will vary slightly in how the Scene Parameter knobs will affect the image, but when you mouse over the knob, the description will be displayed in the hint bar. If your computer is suffering (or worse, freezing up on you) when using Chrome, try lowering the Quality bar, because this will increase the performance of the plug-in by lowering the demand on the graphics card.
The Object Properties section (see Figure 6.12) will allow you to place an object or text over the scene and control the look and movement. To select a 3D object from FL Studio’s files, highlight the 3D Object box and click the button to the right of where it says No Object. If you want text as the object that sits on top of the image, then highlight Text, and you can type in any text you wish and change the font by clicking the button to the right of the text entry area.
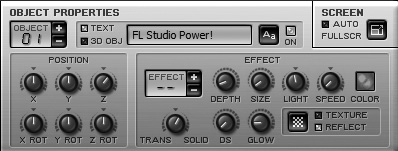
To the left, the Auto FullScr (full screen) button will cause the Chrome plug-in to take up the entire screen of your monitor when you press Play in the transport. The knobs and selections below the object and text selections will allow you to manipulate the size, depth, transparency, glow effect, shadowing, and rate that it moves. The upper Position knobs will move the object on the selected axis (X,Y,Z), and the lower Position knobs will move the rotation of each axis.
To add texture to your object, you can highlight Texture and then use the button next to the toggle switch to open a list of choices. This is a great tool to send visualization out, especially in a live performance setting, where you are using your MIDI keyboard to change effects and trigger colors. While you are playing your live set, you could have your performance name flashing randomly or even exactly when you need it to, using your MIDI keyboard (see Figure 6.13).

Looking for a great piano sound? Look no further than FL Keys (see Figure 6.14), and the best part is that this is not a demo! There is software out there that will cost you more than FL Studio itself, and you won’t be able to hear the difference when a little reverb is applied.
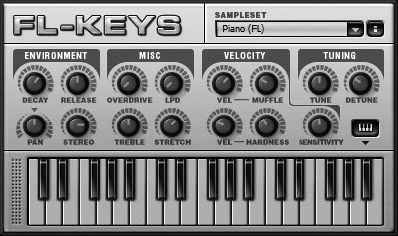
There are three initial settings by default: Piano, Rhodes, and Roto-Organ. Many of the knobs will be familiar to you by now, but it is important to take note of a few to fully understand this plug-in’s abilities. Under the Misc section, the Stretch knob will determine how much the sound is pitched based on the note pressed above C#5. You can adjust the high notes by –50 to +50 cents so that those higher notes will bend down or up slightly. (One hundred cents represents a semitone.)
The Hardness knob will affect the level of overall brightness of your notes, and the Sensitivity knob will control how FL Keys reacts to different note velocities. So if you want the keys to play at a constant velocity, then turn this knob completely to the left, and no matter how firmly or softly you press a key with your MIDI keyboard, the notes will stay at the same volume.
The Detune knob will allow you to add a random detuning to your piano keys, and this can add a realistic sound to your performances, because many pianos played might have a few notes slightly out of tune here and there. The more detuning that you add, though, the more that your notes will be all over the place in pitch.
FL Slayer is a great guitar emulator and will allow you to create full chords of clean or distorted guitar for your projects (see Figure 6.15). This is great for soloing with a keyboard or plugging in chords to play for that gritty effect. This effect is designed to re-create a guitar with effects and will not affect incoming signal, so it can’t be used as an effects board for your real guitar.
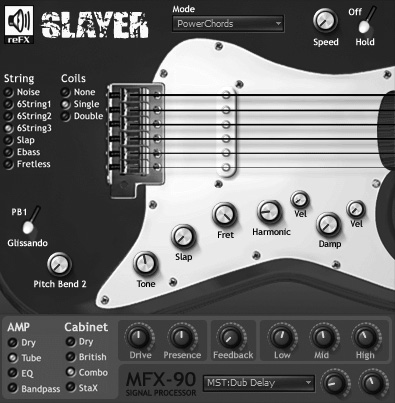
The Mode drop-down list will affect how FL Slayer responds to MIDI notes in the Piano roll or notes played on your MIDI keyboard. None will cause Slayer to play like a normal synth, and AutoChords will create guitar-style chords based on the notes that are played. PowerChords is a setting that will produce a familiar three-string playback that is usually used with heavily distorted guitar. It is great for getting that rock sound. Strumming will play chords strummed out and is great for clean chord playing. Solo Fixed will allow you to add a slide sound so that as you change notes, they will slide up and down to each other, and Solo Dynamic will essentially do the same thing, but the amount of glide will be dependent upon the distance between the notes played. For example, two notes next to each other will quickly slide, while notes an entire octave apart will take longer to slide between.
The Speed wheel will control the speed that the virtual guitar is strummed and will give the playback a real sound to it, rather than six notes played on top of each other. The Hold switch next to this, when turned on, will allow the notes to continue playing (like the strings of a guitar continuously vibrating), but beware, because this can get irritating if you want the note to stop and it just keeps playing.
The String and Coils selections will allow you to choose what the guitar should sound like based on the strings it is using and the pickups. The Pitch Bend option will allow you to choose between a fine and a coarse pitch bend by toggling the Glissando button. Linking the Pitch Bend knob to a fader on your MIDI keyboard allows you to get that wicked bending sound that real guitarists achieve, and you can even create an automation clip to get the bend perfected!
The extra knobs on the guitar picture itself will all affect the different noises that a guitar would naturally make. Experiment with adding and subtracting these to create your ideal guitar sound.
The Amp and Cabinet selections will allow you to add an amplifier sound to your guitar and mimic that sound playing through a stack of speakers. So rather than set up a complicated chain of effects, speakers, and a mic to record the sound, everything you need is right here!
Drive will determine the amount of distortion for the guitar, Presence will affect the brightness of the guitar, and Feedback will simulate literal feedback from an amp.
The MFX-90 is like a built-in effects board that you can set to respond either prior to the amp or after. Effects beginning with AMP will affect the sound before going to the amp, while MST effects will affect the sound coming out of the amp.
There is a great collection of guitar effects that you will find with many guitar effects processors, and it will be well worth your time to familiarize yourself with how each effect will affect your sound. Place some notes in the Piano roll and scroll through these settings so that the next time you are looking for a stereo sweeping sound (DubDelay) or tremolo, you will know where it is and how to use it.
The Parameter knobs will control different aspects of the effect that you select. This plug-in is very versatile and great for those of us who have great guitar parts in our heads, but who have never picked up a guitar. I have played the guitar for roughly two decades now, and using this plug-in is still an option to me for ripping solos that I still can’t play.
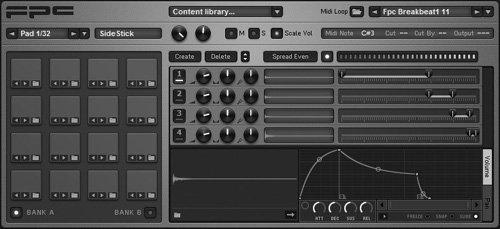
This is the plug-in to create beats with (see Figure 6.16)! Any sample can be used, so you can use it to trigger sound effects or even play entire songs, but pretty much everyone using the FPC will be using it to make the backbone of their projects. If you are only planning on triggering sounds that are perfectly on beat and that are not played live, then I suggest using the Stepsequencer to make your beats, because it will prove to be much easier.
One way to place the sounds your hear in the FPC into the Stepsequencer is to middle-click (center mouse button/scroll wheel) the sound in the FPC, and an instance of Edison will open. Then use the Drag tool to place it in the Stepsequencer (see Figures 6.17 and 6.18).
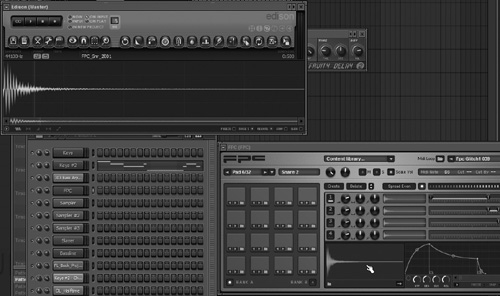

Now you have the samples placed in the Channel window and can start sequencing a beat using the step entry (see Figure 6.19).

The important thing to remember is that Edison will be sitting on your master track, and this will limit you with respect to editing specific tracks. To get around this, after linking the channels in the Channel window (F6) to individual tracks in the Mixer (F9), simply remove the instance of Edison in the master track, and the samples will still play based on the step sequencing.
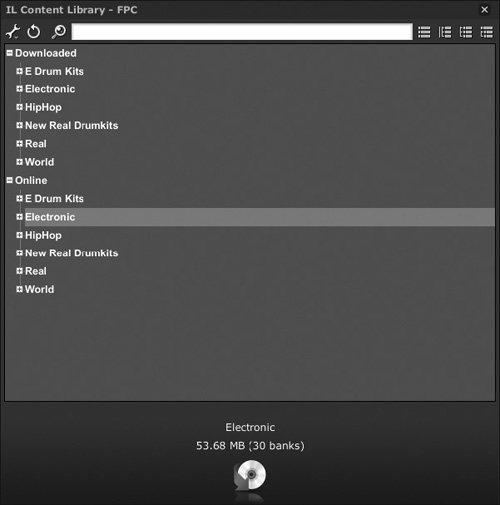
Now that we have looked at a way to use the sounds in FPC, let’s take a look at the FPC itself and triggering the sounds inside the plug-in. The first drop-down menu that you will see is the Content Library. This allows you to download more drum sounds from Image-Line. They will be a mix of free sounds and sounds you can purchase. For this example, we will look at installing one of the free drum kits, so that you can learn how to add sounds using this online feature. Remember that you need to be connected to the Internet to use this feature.
Begin by clicking the Content Library button, and the Image-Line Content Library window will open with options for downloading (see Figure 6.20). Under the Online section, navigate to the HipHop section and select the HipScratch 2 (Free) option (see Figure 6.21) and then click the Download button at the bottom of the Content Library window.

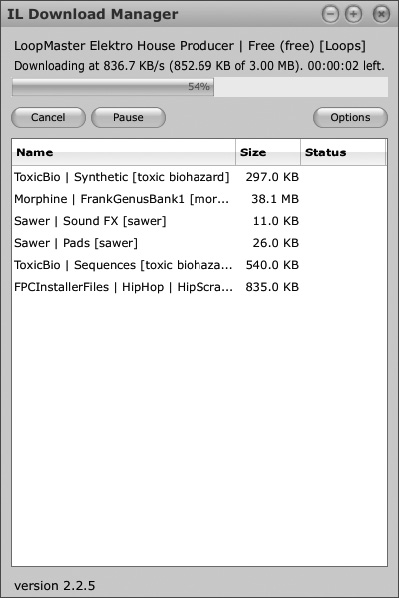
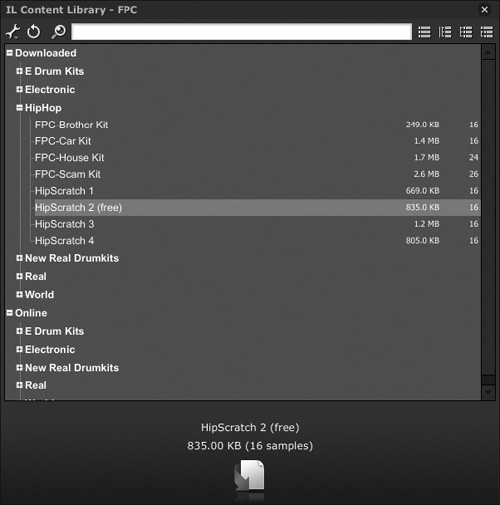
The Download Manager will open and detail the progress of your download (see Figure 6.22). When it is finished, navigate to the sample you just downloaded in the Content Library under Downloaded > HipHop > HipScratch 2 and select the Download button again (see Figure 6.23). When you choose the Download button after making a selection from your downloaded section, as opposed to the online section, it actually loads the samples into the FPC rather than downloading again. Now when you click the pads of the FPC, the loaded samples will be from the HipScratch kit that you downloaded.
The buttons to the left of the Content Library will allow you to enter in preset patterns that are placed in the Piano roll. This is great for getting you started with making a beat, and you can easily adjust any note or the timing of any note like you would with any information that is in the Piano roll. Remember that this will not change the sounds that are played; it will only affect the pattern. (Remember our discussion on MIDI?)
These presets tell the FPC when to play the notes rather than the content (the note sound that plays). There is a multitude of presets available, and you can access them through the MIDI File button or by scrolling through the presets using the left and right arrows. If you are not fantastic at making beats, you are out of ideas, or you really just need a filler beat for having a more natural metronome, this is where you select a pattern to play.
In Figure 6.24, you can see that I selected Hiphop 08 from the preset list and how it automatically placed MIDI notes on the Piano roll. The best part is that because you are using MIDI, the sounds will conform to the tempo that you already have set for your song regardless of the pattern. I recommend using a pattern with no other information on it, because if you have another channel that goes longer than the set pattern length, the beat will stop and not play again until the pattern has finished playing (see Figure 6.25).

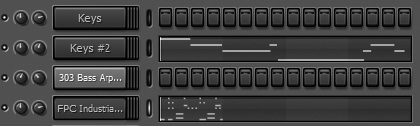
Figure 6.25. MIDI inserted into the Piano roll when another channel plays longer than the pattern length setting.
At this point we have looked at using the pads and adjusting the MIDI notes in our recording MIDI chapter, but we didn’t look at the FPC’s ability to edit the actual sound. This is great for quickly tweaking parts of your sample to get the sound just right. The important thing to understand about Figure 6.26 is that this menu will look the same when clicking on different pads, but each one will be unique to each sound.
The volume, solo, and mute controls will be familiar to you and will individually control each pad as it is selected. The note settings were discussed in the “Setting Up a Drum Pad Controller” section in Chapter 5, but it is important to know that the Cut and Cut By settings are used like sampler channel settings. So if you need one pad to stop the sound of another, this is where you would set it. A great example is when you have an open hi-hat and a closed hi-hat sound. When the closed hi-hat strikes, if the open hi-hat continues playing, it will sound wrong. You want the closed sound to “cut” the open hi-hat and stop it from playing so it sounds like a drummer actually playing live.
To do this, you would set the open hi-hat to be cut by (for example) 3 and then have the closed hi-hat cut 3. This can be used for any sample, and any sound can stop any other sound from playing.
The last option is an Output setting that allows you to route individual sounds to different outputs on the Mixer. The number output that you choose will be relative to the FPC placement, so if you have the FPC on Mixer Track 4, and the output for a particular pad is set to 3, the sound will play on Mixer Track 7.
The FPC has a Layer section (see Figure 6.27) that allows you to create variances in your sounds based on velocity, or how hard you play a note. To better explain this, we will take a single sample and turn it into a panned sample that, when played softly, will play on the left, and when played hard, will play on the right.
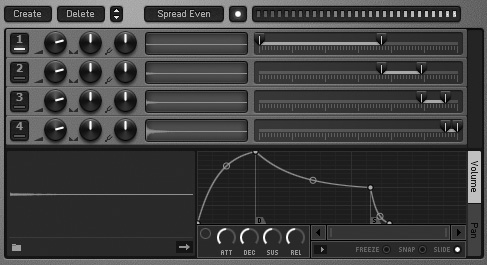
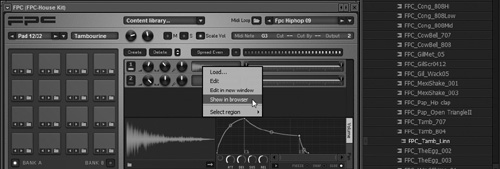
Start by selecting any pad on the FPC so that it plays a sound, and make sure that there is only one layer visible after playing it (see Figure 6.28). Now select Create, and another layer will be added. This will be an empty layer, so nothing will play at first. We need to bring in the same sample (in this example), and the quickest way to locate it is to right-click the sample in the first layer and choose Show in Browser (see Figure 6.29).

Now drag the sample from the Browser into the empty layer (see Figure 6.30). For this example we will select Spread Even, so that the first layer is notes that are played softly and the second layer is notes that are played loudly. Keep in mind that you can change the range on either sample, and Spread Even will evenly divide the velocity response among any number of layers that are added.

Now pan the first layer to the left and pan the second layer to the right. What you have done is told FL Studio that when this note is pressed, if it is pressed softly, then Layer 1 will play, but if it is pressed firmly, then Layer 2 will play. Because we adjusted the panning, if you play softly, the sample will play in your left ear, and when played firmly, it will play in your right ear.
Below this section is a typical ADSR envelope to adjust your layers individually. It will react in the same way based on the layer that is active.
This is a good amount to take in, so when beginning with layers, know that each layer will only play based on the velocity range that you set, and volume can be controlled by the layer settings, but velocity will not always be volume. For example, if you set Layer 1 to respond to low velocity but raise the volume, and Layer 2 responds to high velocity but the layer volume is dropped, when you play firmly, the sample will play quietly. Most would never use it this way, but it is just to illustrate how unrestrained your abilities are when using layers.
Rather than point out each feature in the Layer section, I wanted to take you through an example of using it so that you can see it in action rather than just reading about what buttons do, because this plug-in is one of the most powerful digital drum controllers available today. The flexibility of adding layers adds to the already powerful feature set that allows quick adjustments and velocity-based sound tweaking. With the layers, you can even add different samples so that the same key plays different sounds, depending upon how hard that key is pressed!
Practice with this plug-in, and so you don’t fear affecting a project you may already be working on, open a new project and just play with the FPC for a bit. Add layers and different sounds to different pads while trying to adjust each one in a different way. Trust me; once you create a drum beat and it sounds exactly like it did in your head, you’ll be glad you took the time to experiment.
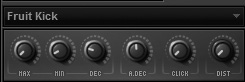
Although the FPC is a hard act to follow, the Fruit Kick (see Figure 6.31) is outstanding for creating a custom kick sound. This plug-in works best when used with the Stepsequencer, in my opinion, because you can still link the channel to its own Mixer track for effects, but the sound will be one shot when the Stepsequencer is used.
This is the simple method, but also know that you can find the pitch of your kick drum and match it to the song using the Piano roll. The drum will still be the same general sound based on the changes that you make to the available knobs, but as you move up and down the Piano roll, the pitch will change. The knobs are fairly simple, and there are presets in the Browser (Plugin Presets > Generators > Fruit Kick), but this is one of the easier plug-ins to experiment with, because there is no loading involved if you don’t use a preset.
Max and Min will both act like frequency filters, but Max will determine the lowest frequency, while Min will determine the highest frequency that is played. Dec will tell the kick sound how fast to play through the frequency range set by your Max and Min knobs, while A. Dec will determine how long the kick sound will linger.
Click and Distortion (Dist) will both add to the kick sound’s character by adding a click to the start (through phase offset) or distorting the sound by forcing the waveform to clip. Try the extremes of each, and you will be surprised by how many familiar kick drum sounds can be replicated with this simple little interface.
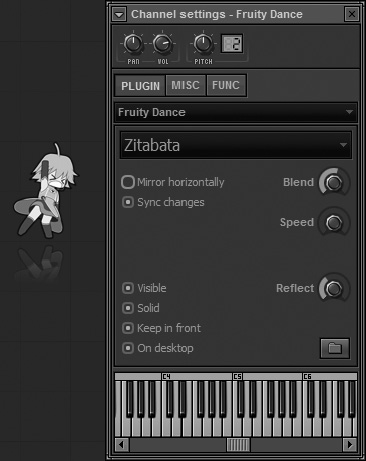
The Fruity Dance plug-in (see Figure 6.32) allows you to control an animated character that will dance based on notes played in the Piano roll or live on your MIDI keyboard. This generator is fairly straightforward, and opening the Piano roll will allow you determine when the character will perform certain dance moves.
The Show and Hide Piano roll notes allow you to display and hide the character based on when the MIDI notes play in the Show and Hide rows. In Figure 6.33, I have drawn in a back-and-forth pattern where the character will appear and disappear every beat using the Show/Hide rows, but you can see that the dance move MIDI note still plays. Even if the animated character is hidden, she is still performing dance moves in the background.
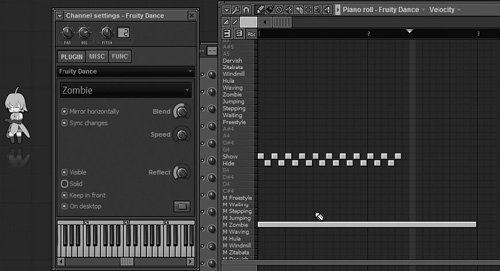
Figure 6.33. The character is set to flash between visible and invisible based on the notes in the Piano roll.
The big drop-down is a menu that displays all of the available dance moves, but this is for sticking with one dance move for the entirety of your project. If you want to change it up even a little bit, I suggest using the Piano roll.
Mirror Horizontally will flip the character’s dance movements on the vertical axis. This is great for adding two instances of the Fruity Dance and having a mirror image dancing to the same moves as your original.
Sync Changes means that the dance move that the character is performing will complete before switching to the next move that you have designated in the Piano roll. Turn this off if you are looking for immediate, on-point changes, though keep in mind that they might seem a little jerky when jumping from one move to another.
Visible toggles whether or not you can see the character, but remember that the Piano roll will have priority for this control, so if you deselect Visible, and the Piano roll has a show note that plays, the character will appear when the show note is triggered.
Keep in Front will place your character on top of all open windows. On Desktop will keep the character on your screen even after minimizing FL Studio.
Blend will smooth the transition between dance moves, and Speed will increase or decrease the character movement by a multiple of the tempo that you have set for your project. You are able to create your own animations using PNG or GIF files, but this lies outside the scope of teaching you how to successfully create music within FL Studio, so I will just mention that FL Studio recommends using image editors with layering and transparency abilities when creating your image sheets. To get a better idea of what the files look like, you can navigate to FL Studio > Plugins > Fruity > Generators > FruityDance > Artwork or simply open the help file (F1), navigate to Fruity Dance, and check out Making Your Own Animation.
Fruity DrumSynth Live (see Figure 6.34) is a great plug-in for making beats and is extremely flexible with adjusting your sounds. The compact style of the plug-in allows you to keep it in view most of the time for easy editing. A standout feature of this plug-in is the ability to morph two sounds into one another, which I find useful for creating your own drum sounds or when you just need to add a little extra to your sample.
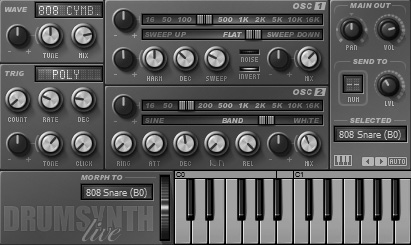
The DrumSynth is based on the manipulation of sound waves and will literally combine the two selected sounds and then allow you to mix them using the mod wheel to the left of the virtual keyboard. The Wave section, located in the upper left of the plug-in, allows you to mix between sample sounds and the built-in noise generator that is directly to the right of these settings.
All of the darker knobs that have – and + as values are velocity controllers. Remember that this doesn’t always refer to volume, but typically that is what it will affect. The Tune knob will adjust the tuning (pitch) of the sample, and the Mix knob will control the blend of sample sound and noise generator.
The first oscillator allows you to select a frequency for generating a tone, and the slider beneath it will cause the note to sweep down when pulled left and sweep up when pulled right if the Noise button is deactivated. The Harmonics wheel allows you to distort the waveform by adding odd harmonics when turned left and even harmonics when turned right. The Decay knob will be familiar, but remember to use it! If that bass drum kick sound is lingering too long when played, lower the decay for a tighter punch—just know that this only applies to the first oscillator.
When Noise is not selected, the Sweep knob will determine how quickly the tone created sweeps across the frequency range set by the Frequency slider above. Invert will invert the phase of the two oscillators, so if you are getting that flat, lifeless sound from two waves cancelling each other out, select this switch to prevent phasing problems between them.
The second oscillator will have similar settings, and it has the ability using the first knob to ring modulate Oscillator 1 with Oscillator 2.
The Trig area in the bottom-left corner is similar to the Cut by Cut Itself options that we have seen in the Channel settings. When Mono is selected for a sound, the sound will cut any previous sounds that were playing. When Poly is selected, the sound will play without cutting, and the Group settings will allow you to group sounds into four available groups so that only the sounds in the same group will cut each other. This is important for hi-hat sounds, so if you have a closed hi-hat sound and an open one, usually grouping them is a good idea. When you place both in, say, Group Two, then whenever you play the open hi-hat, the closed hi-hat will stop the open hi-hat from playing and will give your music a more natural sound.
My favorite feature of this plug-in, as mentioned earlier in this section, is the sound-morphing ability. The Morph To drop-down displays a list of sounds that can be set to morph with the selected sound on the keyboard, and the mod wheel will control the mix between the two sounds.
One key thing to keep in mind when using this plug-in is that every note selection you make will give you a different setting for every section of the plug-in. When you play notes using your MIDI keyboard, DrumSynth Live will not automatically highlight a played note in the plug-in visually. This means that notes played on a MIDI keyboard will not change the settings display for the individual notes. Use the mouse to highlight the note for which you want to adjust parameters (which is indicated by the orange mark above it). If you can’t see the note that is selected, click the Auto button in the lower-right corner, and the virtual keyboard will navigate to the highlighted note.
Use this plug-in to make your beats, but also use it for perfecting the sounds within your beats. Shorten, distort, re-create, and polish the sounds that make up the foundation of your song.
The DX10 (see Figure 6.35) is a synth that makes use of frequency modulation to create sounds similar to real instruments. By modulating the pitch of one oscillator to the pitch of another and then increasing the speed of these modulations, the once-simple tones take on a whole new life!
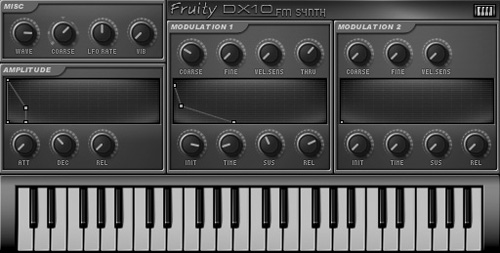
There is a small set of presets to get you going, and if you are going for that ’80s synth sound, there is plenty of flexibility within this plug-in for finding just the right tone. While you will see typical settings that we have dealt with in this book for the modulation settings, unfamiliar settings will lie in the first set of knobs in the Miscellaneous section.
The Wave knob acts like a tone brightness control and can be analogous to someone opening and closing his mouth while singing the same note. Turning left would be like someone closing his mouth, while turning right will open it. The Coarse knob adjusts the pitch of the sound by octaves, while the LFO Rate knob determines the speed of the vibrato, and the Vib knob controls the strength of the vibrato. This is a fun plug-in to explore and can generate some interesting bass sounds, background pads, and retro noises.
The Fruity SoundFont Player (see Figure 6.36) is a great way to put your samples to work. The first time I opened up the SoundFont Player and loaded a string sample into it, I was impressed by the quality that came out. Although the quality is not guaranteed, there are tons of online sites that offer free .sf2 files—just always be careful when downloading anything off the Internet. You can load your .sf2 files by clicking on the folder icon and navigating to them, and once they are open, you will be able to choose the patch and bank of the selected SoundFont file. If you click on the name, you will see the full list of available instruments.
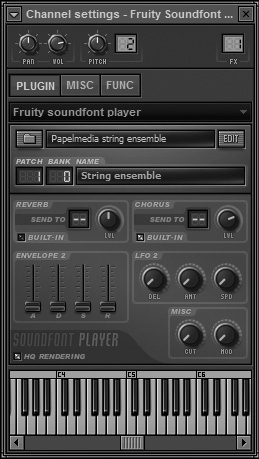
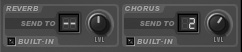
The Reverb and Chorus switches allow you to use the built-in reverb and chorus of the plug-in. The Send To selectors (see Figure 6.37) will allow you to route the output of the plug-in to any of the four send tracks. You will still need to insert an effect on the send track if you want the sound to be processed, so I suggest leaving this section alone unless you want to use the built-in effects. For creating sends, just use the Mixer so that you develop a pattern in your workflow, rather than varying your methods of routing.
The lower settings only need to be used if you want to change the envelope, LFO, or cutoff settings of the sound. Raising the attack adjusts the instrument so that it produces a smooth, swelling string sound, while adjusting the Mod knob applies modulation to the currently loaded instrument.
This is a very simple and powerful generator that has great quality, so definitely take the time to experiment with some of the sounds available and try routing the audio to a reverb send or chorus send to see how much easier this setup makes it.
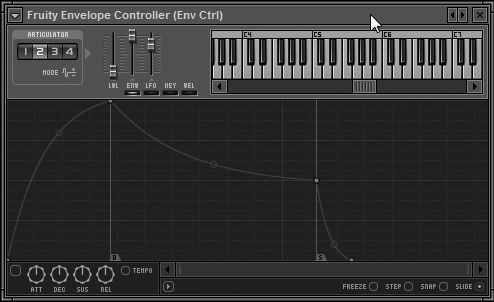
This is an ADSR envelope that generates automation, makes no sound by itself, and can be linked to nearly anything in FL Studio. Remember, automation is nothing more than something automatically happening, such as a channel panning from left to right. This plug-in is great for softening the attack of a punchy snare or helping a note to sustain longer where needed. We have seen the controls for this type of envelope and do not need to go over what each parameter does, but it is worth mentioning that each envelope can be added to a certain part of the MIDI keyboard. (Don’t worry; it doesn’t affect your actual MIDI keyboard, it just tells the sounds how to play for certain note ranges.) Each articulator (which is a fancy way of saying “the different envelopes”) can be assigned to a finite range on the mini-keyboard (see Figure 6.38). Use the mouse to select your range so that only those particular notes will respond to the envelope that is created.
The Fruity Granulizer plug-in, shown in Figure 6.39, will load like a sampler channel but without the actual sample. You can put any sound that you want into this plug-in, and the sample will be “granulized.” Typically, it is difficult to describe sound changes when those changes do not affect pitch and are envelope based, but the Fruity Granulizer is reminiscent of sounds used by the movie The Matrix. When phone calls are made and the voices have a choppy effect on them, that is similar to what you can do with the sample you load.
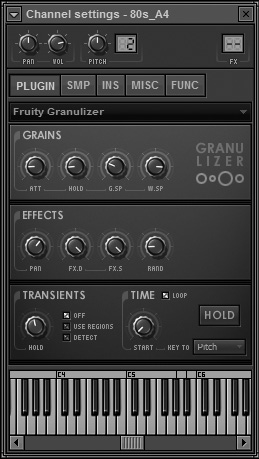
For this short example, I dragged a random choir sample to the Granulizer’s sample window from the project Browser (see Figure 6.40). A great use for this plug-in is linking an external MIDI fader or knob to the Pan, FX.D (effects depth), and FX.S (effects speed). This will allow you to adjust stereo separation, the rate of choppiness, and the intensity of the effect, all at your fingertips. You can move the knobs live by clicking and dragging the mouse, but I have found that I am able to locate that perfect sound within seconds when using linked controllers.

This effect essentially splits up the sound into a bunch of tiny pieces and plays them at rates you determine. Although you know what the Effects section does, it is good to understand that the Grains section will only affect how the grains themselves play back.
The Attack wheel will create a fade-in to and a fade-out of the sample. The Hold will determine the length of each piece of audio. G.SP, or grain spacing, will determine how long it takes between playback of each grain. Turn it to the left, and the sample will play more quickly than when it is turned all the way right, because this will place a good deal of space between grains, thereby slowing down the overall sample.
Transients show up in digital recording and are basically little spikes of sound that can cause the overall sound to clip and be distorted during recording or playback. This is one of the many reasons for leaving plenty of headroom when recording, because when a drummer hits a cymbal, the initial transient in the waveform could cause the signal to clip if the volume or amplifier gain is turned up too much. They seem to jump off of the waveform, and when they occur, the Granulizer detects them and assigns grains to them.
The big Hold knob will determine the length of those specific transient grains. When off, the switches will ignore transients. When Use Regions is highlighted, they will load sliced samples if they were pre-sliced, and when Detect is selected, they will cause the Granulizer to find the transients automatically and assign grains. Keep in mind that we are talking about small differences that are hard to notice without adjusting the knobs yourself. The difference is there, but it is not night and day, so it helps to really listen for that perfect sound.
The Time section will allow you to loop your sample, but if the sample has a fade-in, ending, and silence at the end of the sample, this will be noticeable. The Hold switch creates a freezing effect on the sound, and when you press it, it actually sounds like your soundcard has locked up.
The Key To drop-down menu will cause your keys to map to a certain behavior based on your selection. The default mapping is Pitch, so as you climb up the keyboard, the sample gets higher in pitch. Key To Percent means that C5 to C7 represents where the sample starts, so if you play C5 it will play normally, but C7 will start from a later portion of the sample.
When Loop is engaged, this can be difficult to hear. Key To Step will cause every key after C5 to progressively offset the sample by steps, and Key To Transient will cause the start time to be based on slices as you go up the keyboard from C5.
The Start wheel is just when the sample should start playing from. Turning this knob to the right will cause the sample to play past the absolute beginning. It will not delay when the sound starts, it will cause the sample to actually play from a later position but still in time. For example, if the statement “I drove my red car down the street” was recorded, as you slide that Start knob to the right, the talking would begin at the same time but would start with different words, such as “ove my red car down the street,” “car down the street,” and so on.
The Fruity Keyboard Controller plug-in (see Figure 6.41) can be thought of as an internal controller. This plug-in, much like MIDI, will only send information and doesn’t make any sound on its own.
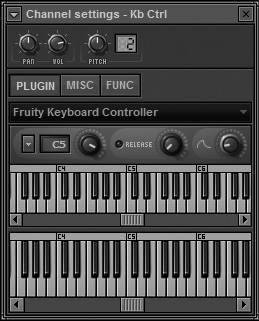
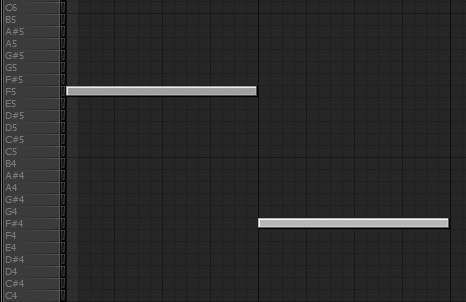
The possibilities with this plug-in are nearly limitless, because anything that can be linked can be controlled. To better understand this, we will map the keyboard controller to the bass and midrange controls of the BooBass plug-in that we already discussed. When both plug-ins are inserted on the Channel window, open BooBass, right-click the Bass knob, choose Link to Controller, and then select Kb Ctrl (Kb Ctrl) - Note from the Internal Controller drop-down menu (see Figure 6.42). This tells the Bass knob to react to anything the Keyboard Controller tells it to do based on where the Keyboard Controller’s Piano roll notes are placed.

Next, right-click the Mid knob, select Link to Controller, and choose Kb Ctrl (Kb Ctrl) - Velocity from the Internal Controller drop-down menu. Now you have set the Midrange knob to react to the note velocity of the Keyboard Controller’s Piano roll.
Now that everything is linked, how do you get the Bass knob to move by using the Keyboard Controller? I’m glad you asked, because the rest is easy and only dependent upon your creativity and needs.
In this example, let’s say that we want to have the bass play with power for one bar and then cut down the bass and boost the midrange for the second. Start by selecting the Keyboard Controller in the Channel window and opening the Piano roll for the Keyboard Controller. (Right-click the Keyboard Controller channel and choose Send to Piano Roll.) The range on the graphic of the Keyboard Controller will determine what keys will affect the linked Bass knob, and as you can see in Figure 6.43, the range that is being used is C4–C6. This means that if we put notes on the Piano roll higher or lower than this range, the Bass knob will not be affected. C4 is the lowest value of the Bass knob (with this knob, it means the bass will be lowered to zero), while C6 will be the highest (the bass will be turned all the way up).

Figure 6.43. The range of the keyboard graphic (the highlighted area between C4 and C6) determines what notes will be in use by the Keyboard Controller.
Because we are working with the bass first, let’s place a note on the Piano roll near the upper part of the range for one bar and then a second note in the lower part of the range for the next bar (see Figure 6.44). The notes will determine the knob position, because the Keyboard Controller only tells the knob what to do, rather than making any sound. When you play the project, you will see the knob move between the two different positions.
Now let’s do the same thing with the Midrange control. The difference here is that the Piano roll note velocity will control the Midrange knob rather than what note is in the Piano roll, so when you change the velocity of the note, the Midrange knob will move with those changes. We want the midrange to be stronger in the second bar, so lower the velocity of the first note and raise the velocity of the second note.
At this point there are still no notes in the Piano roll of BooBass, and you have only entered in notes on the Keyboard Controller Piano roll. Now that you have this set up (see Figure 6.45), try pressing Play in Pattern mode. You will see the Bass knob turn up for the first bar and turn down for the second bar, while the Midrange knob does the opposite. Select the BooBass channel so that it is active and try playing a few notes on your MIDI keyboard. Or, press Ctrl+T and play a few notes on your typing keyboard. Now you can hear the changes and see that the Keyboard Controller basically tells the controls what to do.
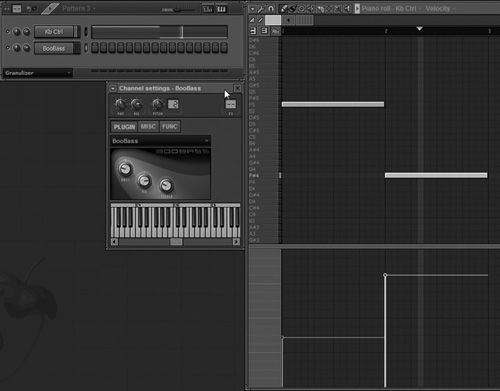
Figure 6.45. An example of using the Keyboard Controller to change the Bass (notes in the Piano roll) and Midrange (velocity of the notes in the Piano roll) knob positions.
The controls available in the Keyboard Controller include an ability to cause the Keyboard Controller to auto-map your keys or auto-map your keys while only using the white keys. Next to the auto-mapping drop-down is the current note selected on the keyboard graphic, and the knob next to that will allow you to adjust individual values of each note by selecting any note on the graphic and turning the knob.
To keep it simple, I would leave this alone and use the auto-mapping, because changing different notes’ values will mean that the control (the Bass knob, for example) will not react based on a descending or ascending range. What I mean here is that if you change C5 to be a value of 1 (the available range of all notes is between 0 and 1) when your selected range is C4–C6, then C5 will move the knob the same amount as C6. When you play notes going upward on the Piano roll of the Keyboard Controller, as you pass C5, the note will spike to the extreme (Bass knob will turn all the way up) and then go back to the normal progression when you press C#5, D5, and so on. The Release toggle switch will cause the note value (0–1) to jump back to the position of the Value for Auto Release knob (located to the right of the toggle switch) when a note is released (when a note on the Piano roll ends). The smoothing option will determine how quickly changes happen between notes (in our example, how quickly the bass drops out).
I wanted to use a basic example to illustrate how this plug-in can work for you and make changes (especially in third-party plug-ins) to any parameter that you need altered. The Piano roll makes it easy to map out tempo-perfect changes to your filters, volume, panning, and anything else you can come up with. Don’t be afraid to experiment with this one, because if you don’t like what it is doing, you can simply remove or mute the Keyboard Controller, and it will stop controlling knobs and parameters without you having to go back to find what was controlling which specific knob.
The Fruity Slicer is a simplified version of the plug-in Slicex and is a great way to turn your audio into playable slices. You can load any audio sample into the Fruity Slicer by selecting a sample from the Browser, right-clicking the sample, and sending it to the Fruity Slicer or dragging the sample itself over to the Fruity Slicer sample window. Fruity Slicer will attempt to slice the audio itself unless there is preexisting slice information, in which case the sample will be sliced according to that data.
In Figure 6.46, you can see that the sliced pieces are placed on the Piano roll as MIDI notes. This means that as the song plays, the notes will trigger that part of the sample (the sliced piece). After loading a sample, press Play on the main transport to see the Fruity Slicer in action.
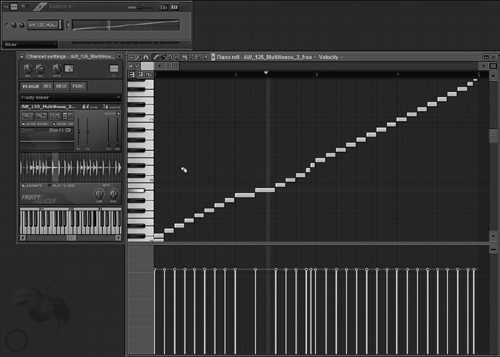
The basic interface is fairly simple to use, especially when the beat is sliced properly, and creating interesting sounds or rhythms using the different slices can add real depth to your music.
This is a great place to create multiple layers in your music, such as vocal stutters or extra drum hits, using clips that are already in your project.
At the top of this generator is the BPM and Beats display. It is important to know that these are linked to each other, so if you lower the BPM, the beats will drop as well. The first option in the Fruity Slicer is the Open Sliced Beat Groove, which lets you import a groove file (.zgr) that tells the plug-in where the cuts in a sample should be made. It is important to know that there is no audio data in this file, and it only imports the slice information (basically draws the notes on the Piano roll), but it will try to find the original sample to import.
The Open and Slice a Sample button will allow you to load a wide array of audio (MP3, WAV, REX, and so on). Save the Original Sample will save the audio with no sample slicing information, and Save Processed will save the audio with the slice points. To avoid navigating the project Browser, use Load Sample to bring in your audio when opening the Fruity Slicer if no sample has been loaded or you want to change the audio currently loaded.
In the event that the slicing seems off or poorly timed, you can press the Beat Slicer button (third in the row of four) to open a list of options for setting slice points in your audio (see Figure 6.47). Use Sample Built-In Slicing will place the slice points back where they belong, using the slice markers that were saved with the sample from a program such as Edison or ACID. The Dull, Medium, and Sharp Auto-Slicing options place slice points in the audio, where Dull is a lower number of slices, Medium will have more slices, and Sharp will have the greatest number of slices.
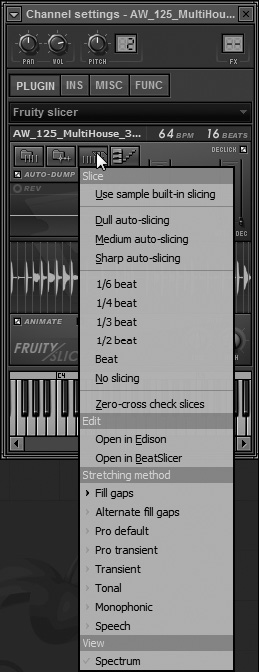
The beat selections change the slice points (MIDI notes on the Piano roll) of your audio based on the project tempo. So if the original slice points had a faster part that, for example, hit twice consecutively on the 1/4 note, and you select 1/2 beat, then that particular section will have the two 1/4-note hits in one slice (MIDI note).
As a visual example, compare Figure 6.46 to Figure 6.48, where in Figure 6.46 I selected 1/2 beat from the Slicing menu. You can see that the two quick little 1/4 notes that were near the third bar are now one 1/2-beat note.
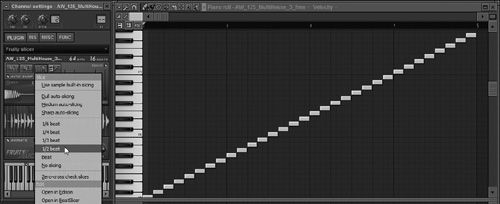
The No Slicing option will remove all slices, and the audio will be mapped to one note on the Piano roll. Zero-Cross Check Slices will nudge the start and end points of the slices to the closest zero-crossing (where the waveform of the audio is not making any sound). Use this if there are pops and clicks in your audio, but keep in mind that if the slice points are way off, you might still hear distortion between slices.
The Edit portion of this menu gives you options to export individual slices. Choose Open in Edison to send your selected slice to an instance of Edison. Choose Open in BeatSlicer to send the slice into an instance of BeatSlicer.
The Stretching Method options are presets that will determine positioning of slices and stretching of the audio. Each can be adjusted by moving the PS (pitch shift) and TS (time-shift, or length of the slices) sliders. Pro Transient is great for drum samples, because the initial waveform spike from a drum hit is taken into account when the plug-in makes slice points.
The View option will allow you to toggle between spectrum and waveform views, which is nice for those who prefer spectrum-style editing.
The Dump Beat to Piano Roll button (see Figure 6.49) will place MIDI notes on the Piano roll that will determine when slices are played. Reverse will reverse the position of the MIDI notes on a vertical axis, so the slices will play in reverse order, but the sound of each slice will still play normally and not reversed. Random will move the MIDI notes to random positions on the Piano roll. Because this is random, it is worth trying it out a few times, because a new rhythm can be created, even with vocals!
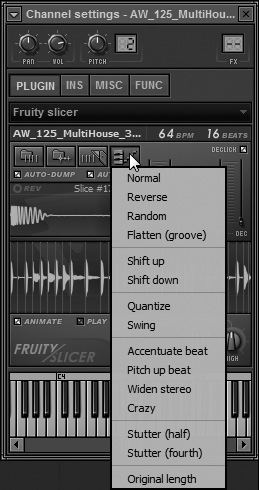
The Flatten option will dump the notes into the Piano roll in a straight line, so that the slice points are preserved, but will only play the first slice. This can be great if the slice points you have make up a rhythm that you want, because you can use the Flatten option and the slice points remain, but now only the first slice plays, creating a rhythmic stutter.
Shift Up and Shift Down will move the slices to their next slice point. The easiest place to see this change is in the Piano roll. Quantize will snap your slices to the grid that is chosen in the Piano roll, and Swing will add a swing to the slice positions. Remember that this doesn’t add swing to the audio, but rather to the rhythm of when the notes are triggered, although in many cases I have liked the Swing setting more than the imported slice data.
Accentuate Beat will cause the notes that lie on each first beat to play at a higher velocity, while Pitch Up Beat will raise the pitch of every other beat starting with the first one. Widen Stereo will alternate left to right panning of each slice (MIDI note), while Crazy will change a little bit of everything (of the note in the Piano roll) and is a new setting each time it is selected.
The Stutter effect options will break each slice into two pieces (Half) or four pieces (Fourth) and are great for giving your audio a choppy sound. Original Length will place notes on the Piano roll that match the original sample speed if it was different from the project tempo.
The Attack and Decay sliders act like a respective fade-in and fade-out for each slice of the sample, but these are global controls, so all slices will be affected. The Auto-Dump is, by default, highlighted and will drop the note slice selections into the Piano roll. Turn this off when you just want to play the slices using your MIDI keyboard or typing keyboard.
Auto-Fit Switch will cause the sample to fit to the current project tempo when you load it in but will not change a current sample if turned on after a sample has been loaded. Animate will provide a visual representation of the slice being played in the Fruity Slicer, and Play to End will cause the slices to play to the end of the loop.
The Low and High knobs affect where samples are sliced by altering the sensitivity to low notes and high notes. This is nice when you are getting slices from a low note that should not be a slice. By moving the Low knob, you can cause Fruity Slicer to ignore that low note and remove the slice point.
The individual slice editing can be accessed by right-clicking in the Slice Preview window, which is located above the Sample Preview window (see Figure 6.50). Here you can remove the slice (which takes away the slice point at the start of the audio), split the slice (which adds a slice point to where your cursor is in the Slice Preview window), and copy to audio clipboard for use with pasting into the Playlist or anywhere that can accept the audio slice.
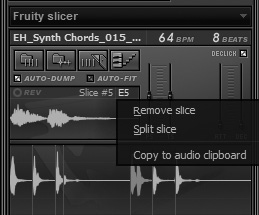
The Reverse button will reverse the audio of the selected slice. Keep in mind that accuracy can be difficult to achieve, and if you are having trouble getting the precision you need, I suggest using Slicex, which we’ll look at later in this chapter.
The Fruity Vibrator plug-in (see Figure 6.51) allows you to alter your sound using a force-feedback device. The force-feedback effects are in the form of .ffe files, and the Vibrator takes these effects and maps them to the Piano roll (or MIDI keyboard if you are using one), and they respond based on notation and velocity.
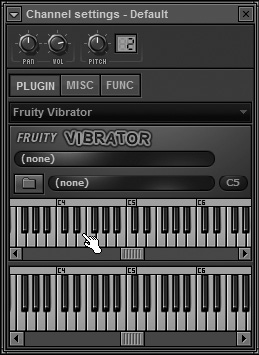
Microsoft has a force editor tool that allows you to create these effect files for placement on the Piano roll. This editor, along with help using it, can be found on the Microsoft website in the latest DirectX software developer kit. Creating these files lies outside of the scope of this book, and while using .ffe effect files can add interesting texture to your music, learning the coding is not necessary when you are able to create effects and adjust them in real time using other FL Studio tools.
The Layer Channel is a plug-in that produces no sound; rather, it helps control multiple sounds in different ways. The concept is simple, yet powerful: Use a channel to control multiple channels. The easiest way to see this in action is to add two different instrument channels and a Layer Channel. Now make sure that the Layer Channel settings are in view and highlight the two channels that the instruments are on (see Figure 6.52). Now select Set Children in the Layer Channel settings, and those two instruments will be controlled by the Layer Channel. Remember that you can still control them individually if you click on the specific instrument channel, but now when the Layer Channel is selected and you play notes, both instruments will react.
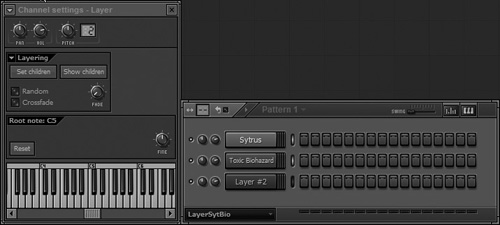
The Show Children option next to Set Children will highlight linked channels (children) in the Stepsequencer and de-select all other channels, allowing you to double-check which channels you linked to a Layer Channel.
Figure 6.52 demonstrates the ability of the plug-in to layer multiple instruments, but there are many uses for a Layer Channel. Let’s explore another example where we use layering to give our samples a more variable feel, such as replicating the dynamic playing of a live drummer. Add three Fruity Kick plug-ins followed by a Layer Channel and then link the three kick channels by again highlighting the three kick channels and then selecting Set Children (see Figure 6.53) in the Layer Channel settings.
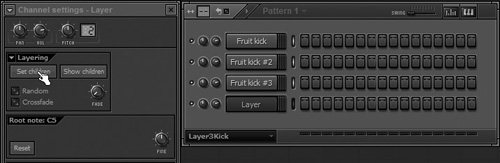
After you set the children, open up each kick plug-in and make small adjustments to the kicks so that each sample sounds unique. Now select Random in the Layer Channel settings and press one key a few times on your keyboard. As you probably hear, the Layer Channel is randomly playing the children, which in this case are the three kick sounds. When you only have slight adjustments, this can produce a more realistic sound for percussion, but experiment with all types, because you might find an interesting combo of random sounds.
The Crossfade toggle switch will cause the Fade knob to control which linked channels (children) play. When the Fade knob is turned all the way left, you will hear the first linked channel (child), and as you turn the knob to the right, the Layer Channel will run through the linked channels until reaching the linked last channel when the knob is all the way to the right. This is a fun plug-in to experiment with and can make a great tool in your creative arsenal.
Recalling our discussion on MIDI, you will remember that MIDI doesn’t make any sound on its own; rather, it tells MIDI instruments when to play, and the MIDI Out plug-in is no different. As you can see in Figure 6.54, I have Harpsichord selected, but when I press the keys on my MIDI keyboard, there is no sound. This is because nothing is set to receive the MIDI data coming from the MIDI Out plug-in. When an instance of LSD is loaded into the Mixer track that the channel containing the MIDI Out plug-in is linked to, then you will hear sound. We will discuss the LSD in greater detail in Chapter 7, “Effects Plug-Ins,” but for now understand that the only thing coming out of the MIDI Out plug-in is MIDI information.

When sending MIDI to an external device, it is important that the device port number (in the Options menu, F10) matches the MIDI interface port number (set in the MIDI options, F10) so that they communicate with each other. The channel and bank output can be selected at the top of the plug-in, so if your external device has a great sound on Channel 3, Bank 54, you can drag the mouse over these boxes to match that number, and the MIDI Out plug-in will send MIDI information to that channel and specific bank. This plug-in is great when you need MIDI to be sent to an external device—just make sure that you have researched how to set up that device so that the sound you are looking for is played.
The Plucked! generator, shown in Figure 6.55, is an example of physical modeling synthesis and creates a plucked string sound that is common in many electronic styles of music. With the right effects and EQ, the Plucked! synth can add a haunting melody to nearly any track. The sound played can be adjusted using the controls, where Normalize will make the decay (length of each sound) the same for all notes, and Gate will remove the decay, causing the audio of each note to suddenly stop near the end of the sound.
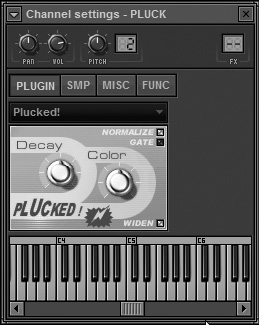
The Decay knob will adjust how long the audio of the triggered note plays after being released, and the Color knob will change the tone from muffled (left) to bright (right). The Widen option, when selected, will create a wider stereo sound for the instrument. This instrument is simple, but I think that is its strong point, because you know the sound that you have to work with and how to easily adjust it to your taste.
SimSynth Live is a synthesizer that brings us back to the ’80s by using oscillating waves to create sounds. This plug-in has three oscillators (see Figure 6.56), allowing you to really tweak your sound and achieve perfect results. The Oscillator sections have knobs allowing you to adjust sounds they make by changing the oscillation type, the speed, the frequency, and the volume. The last three switches are a little less familiar, but the 1 and 2 switches just add a wave to the oscillator one or two octaves above the original, and the Warm button lightens the intensity of the oscillator. All the oscillators feed into the Amp section, which has the familiar ADSR envelope to adjust, and then the sound moves into the SVF (State Variable Filter) section.
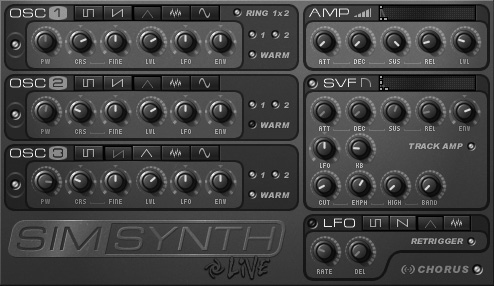
The first set of ADSR controls will control the envelope of the filter that is placed on the sound, so if you raise the attack of the SVF section and keep the Amp section set to have a quick attack, the sound will still play fast, but the filter will take longer to activate. The LFO knob will determine the amount of LFO effect you place on the sound, but this is based on the settings you make in the lower LFO section, so without enabling this, you won’t hear anything. The Track Switch button just means that the filter sound will be made using the Amp ADSR envelope instead of the one in the SVF section.
The Cutoff, High-, and Low-Pass knobs are types that we have seen, but the EMPH knob will cause the frequencies near the set cutoff to have emphasis, so with many sounds, it will create a sharper, brighter sound when turned right.
The LFO section allows you to place an LFO on your sound before it plays through the final output, and there is also a Chorus toggle switch, allowing you to widen the sound. The only unfamiliar portion in that section is the Retrigger button, which will cause the LFO to start every time there is a note played, rather than continuously running. Try adjusting this to see whether you get better rhythmic results. SimSynth Live is great for creating original sounds when you are looking for a retro synth, and it is especially useful for creating automation clips with filter sweeps.
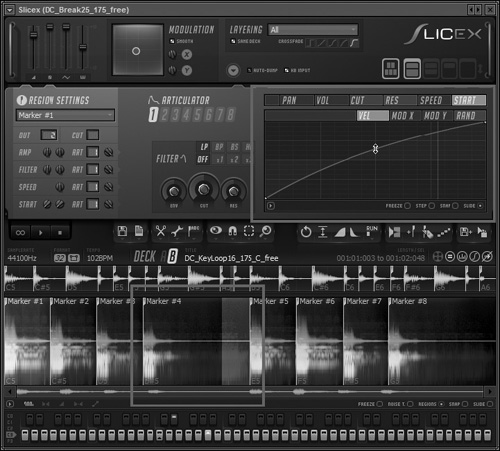
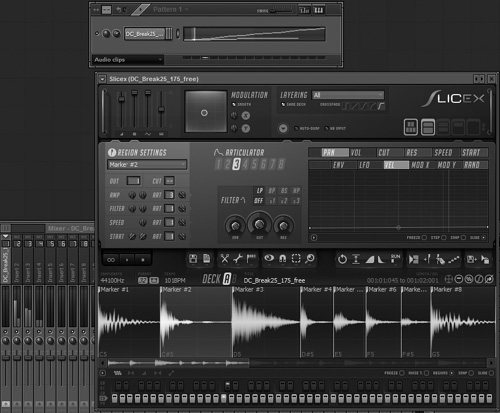
Slicex (see Figure 6.57) is the big brother to the Fruity Slicer and allows for a much wider range of editing abilities. The concept behind this plug-in is to take one or two audio samples and create new rhythms from the sliced samples by mapping each sample to MIDI notes on the Piano roll. You can also use the Slicex to simply play slices with your MIDI keyboard as well, but many big advantages over the Fruity Slicer include multiple articulators, multiple audio sources, and Edison-style editing capabilities.

I will say that my preference in audio slicing is this plug-in, mainly due to the ability to turn any audio loop into an instance of the FPC while being able to edit the sound itself. If you have a clean drum loop and you like the instruments, but the loop is stale, load it into Slicex! Slicex will determine the points where each part of the drum beat starts and break them up into slices. Now you can create a new drum beat using those same sounds with notes placed in the Piano roll, or you can play the new beat live and record using your MIDI or typing keyboard. Slicex even allows you to drag regions or slices of samples into the other deck by using the Drag Sample option, and then you can replace a region in the other deck. You can totally rebuild a beat using this drag-and-drop feature. We will start with a look at the main features of the interface and then dig into using multiple samples and layering sounds.
We’ll begin our tour of Slicex with a look at the master panel (see Figure 6.58). The first four sliders are global to everything in Slicex, so use caution when adjusting these values, because they will affect all slices. The first slider is a master volume control, followed by a randomness amount, a master LFO, and a master pitch. Again, these sliders will affect all sound, so don’t try to use these to change the pitch of one slice.

Next to the sliders is a graph that will control X-Y modulation based on where you move the point inside the graph. This will be discussed further as we run into cases where it can be used, but for now, know that the values can be responsible for controlling different parameters in Slicex. The Layering drop-down menu allows you to determine how different layers will react to each other (see Figure 6.59), but it is important to note that two slices must share the same trigger key to use layering.
All means that all regions or slices assigned to the same note will play as is. All (Gain-Compensated) is great for drums or sounds that are boosting the audio too much, because it will pull down the volume when two regions or slices are playing so that they don’t go above the original volume of one region playing alone.
Velocity-Mapped means that the velocity of the notes will determine which region will play, so if you want to make a certain region play instead of another region that is linked to the same MIDI note, you can use the velocity of the note in the Piano roll to determine which region will play.
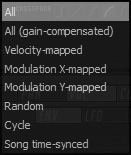
Modulation X-Mapped and Modulation Y-Mapped will cause the Modulation control at the top of the screen to act as a crossfade between layered regions (where left to right is X and top to bottom is Y on the graph). Random will cause layered regions to crossfade between each other at random. Cycle will alternate between layered regions on playback, and Song Time-Synced will select the closest region to the tempo of your project.
When the same deck option is not selected, both layers from each deck will play when they are triggered at the same time. However, when same deck is selected, Deck A is triggered by odd-numbered MIDI channel notes, and Deck B is triggered by even-numbered MIDI channel notes. In Figure 6.60, the usual Piano roll dump from Deck A is present (using by default the green MIDI channel notes), but when I select Same Deck and have linked layers, the notes that I have drawn in pink (MIDI Channel 8 or any even number) will trigger regions (slices) from Deck B based on their selection. It’s important to know that when using this, unlinked notes will not play anything from Deck B. The last note (in pink, MIDI Channel 8) in this example has no name, is not linked, and will not trigger anything from Deck B, so placing a note in the Piano roll does nothing.
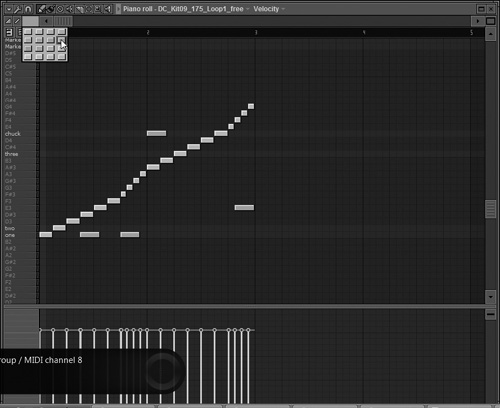
Figure 6.60. Layers in Deck B are triggered by the notes on the Piano roll set to trigger on MIDI Channel 8.
The Crossfade Curve option will allow you to choose from five different available crossfades when the layers between Deck A and B are set to crossfade between each other. The down arrow beneath Same Deck will open a drop-down menu with a list of deck options and general settings (see Figure 6.61).

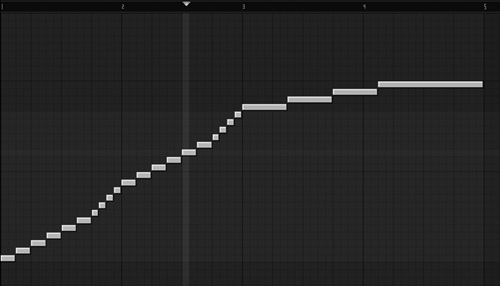
The Macros portion of this menu begins by allowing you to determine how the slices relate to the keyboard notes. Assign Both Decks to Whole Keyboard means that as you go up the keyboard, Deck A slices will be mapped to each note consecutively, so that when the last slice from Deck A plays, Deck B will be the next series of keyboard notes. You can see a visual example of this in Figure 6.62, where Deck A is the short, choppy notes and Deck B is the longer notes. Assign Both Decks to Black & White Notes will place Deck A slices on the white keys and Deck B slices on the black keys.
Layer Both Decks will cause corresponding regions (Region 1 in Deck A with Region 1 in Deck B, Region 2 in Deck A with Region 2 in Deck B, and so on) to layer with each other so that they are parallel on the keyboard. Layer Selections in Both Decks will link the two slices you have selected (one in Deck A and one in Deck B) to the same MIDI note in the Piano roll. So when you play the note to which both slices are linked, you will hear both slices play at the same time.
Layer Homonymous Regions is an ultra-fancy way of saying link regions with the same name. For example, rename a marker in Deck A Kick and then rename a marker in Deck B Kick as well. Then select Layer Homonymous Regions. You can see that both regions trigger at the same time.
One thing to remember is that this is not a toggle switch (on/off), so if you rename new regions after selecting the option, they will not automatically link. You will have to select Layer Homonymous Regions every time you want regions with the same name to link to each other.
Assign Deck A Regions to Articulator 1 and Assign Deck B Regions to Articulator 2 will cause the regions (slices) in each deck to be affected by their respective articulators, while Normalize Layered Region Levels will normalize the audio in each slice.
The Settings section contains a variety of toggle switches that will affect different parts of Slicex. When turned on, Sample Start Covers Whole Length means that when adjusting an envelope for the sample start section, that envelope will affect the entire slice of audio. When this is turned off, however, the envelope will only affect roughly the first 100ms of the sample.
In Figure 6.63 I have Sample Start Covers Whole Length turned on, and you can see in the upper highlighted area where I have a velocity curve on the sample start. It gradually fades in over the sample start, but when the sample start covers the length of the entire region, the velocity fade-in is applied to the whole slice.
In the lower highlighted area of Figure 6.63, you can see that Marker 4 (as well as all the other regions) has a long fade-in, and the only audio that really plays is highlighted within Marker 4.
When selected, Link Velocity to Volume will cause your slices to play as loud as the velocity of the note played. This means that when you play your MIDI keyboard softly, the slices will play quietly, and playing hard will cause the slices to play loudly.
Loop Half of Regions will cause your loop points to only encompass the latter half of a region. HQ Envelopes allows you to set envelope points, curves, and lines with more precision. Lock Audio Data will freeze all editing so that you can clearly see any envelopes that you have drawn by removing the control points, and it protects you from accidentally changing something you don’t want to.
The Auto-Dump toggle switch will place notes on your Piano roll that correspond to the slice points in audio when a sample is loaded into Deck A. Deck B behaves differently, and the MIDI notes corresponding to the slices can only be inserted by choosing Dump to Piano Roll from the wave editor menu bar.
The KB Input button will turn on the keyboard shortcuts for use in Slicex. It is worth taking the time to learn some of these to speed up your audio editing, but keep in mind that this will make Slicex play instead of the main transport when you’re pressing the spacebar and Slicex is focused. This is one reason to leave it off, but the main reason is for the capability to use the Typing Keyboard to Piano Keyboard feature.
To the right of these settings are five toggle switches that allow you to change what portions of Slicex to view. You can have the entire plug-in open or go down to just the master panel, which only affects how the plug-in looks and the space it takes up on your computer screen. All envelopes, effects, and audio slices are still active regardless of the window appearance selection made here.
This section of Slicex, shown in Figure 6.64, will control filters, envelopes, and any modulation effects that are linked to a marker or region. The first drop-down menu on the left of the articulation panel will determine which region will be affected by the settings. For example, if you select Marker #2, then the region between Marker #2 and Marker #3 will highlight, and the envelopes that you set will only affect that region. So if you pan the audio to the left with Marker #2 selected, only the selected region will pan to the left when it is triggered from the keyboard or Piano roll. A cool feature of the marker names is that if you rename them, those names will show up in the Piano roll when Text Display is selected, making finding the right notes associated with your slices much easier.
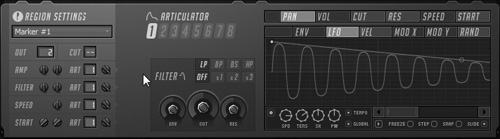
In Figure 6.65, I have done this to Marker #2 using Articulator #3 so you can see the resulting playback on Insert 2, where the audio is panned over to the left. When you select an out, the marker will play out of the Mixer track that is the selected number of positions to the right. In Figure 6.65, the output of Marker #2 is set to one, so it is one output right of the Mixer track that is linked to Slicex in the Channel window.
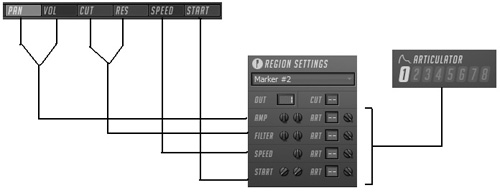
The Cut option will prevent other regions with the same cut number from overlapping. To better understand this section, keep it running through your head that the knobs below the Region (marker) selection drop-down only affect the selected region (marker). The Amp knobs will control panning and volume of the selected articulator, and Filter will adjust the cutoff frequency and resonance of the selected articulator. In Figure 6.66, I switched the positions of the envelope controls to give you a better visual of what the knobs in Slicex control.
The Articulator selection allows you to specify the articulator to which you want to add an envelope or filter. Think of the articulators as individual placeholders for settings, and the articulator numbers chosen in the region settings will determine the amount of those settings placed on the region. The Filter controls beneath the Articulator selector will allow you to place frequency filters on articulators, which in turn will affect the linked region. So to put a low-pass filter on a single region, select it from the Region Settings drop-down list and adjust your filter.
Then turn on the articulator to which that filter is linked by selecting the articulator number to the right of Filter in the Region Settings menu.
The envelopes have been discussed in many different parts of this book, and the Start Sample section was discussed earlier in this chapter, but it important to note that in order for an envelope to work, there must be two points on the graph of the Envelope section. Many that you will open will not have the straight line to edit, in which case you must draw new points on the graph by right-clicking to add a point.
Most of the options in the wave editor (see Figure 6.67) are identical to those discussed in Edison, so I will just highlight the differences, but feel free to go back to Edison in Chapter 4 to review what each button does. The only real differences in this window are two selections. One is the toggle switch between Deck A and Deck B, and the other is a toggle switch to display either both decks or only one at a time. To save room, flipping this into Single mode allows you to only have one deck in view at a time, but you can still use the Deck A/B selector to choose which one you want to look at. The envelope displays will also allow you to put an envelope (post-articulation) to the entire sample that is loaded into Slicex.
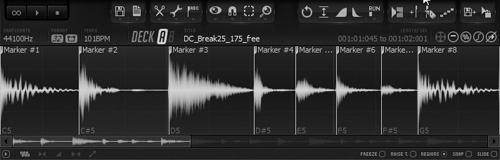
Here we will look at adding two decks and adjusting a few parameters so you get a basic step-by-step example of using Slicex. Begin by adding Slicex to an empty channel and linking it to a track in the Mixer. Now insert a drum loop into Deck A and a music loop into Deck B. In this example I am using the free loops downloaded from the Image-Line online section (Loops > Loopmaster David Carbone DandB Masterclass > Free > DC_Kit09_175_Loop1_free for the drums in Deck A and DC_KeyLoop16_175_C_free for the music loop in Deck B).
Go up to the arrow drop-down menu and select Assign Both Decks to Black & White Notes so that Deck A uses the white notes and Deck B uses the black notes. The first thing you will notice is that the slices from Deck A are assigned MIDI notes and dropped onto the Piano roll (see Figure 6.68). The reason why I used this example is because, as you can see, the Piano roll hits the ceiling, and the notes overlap each other. This can happen when there are too many slices for the Piano roll range.
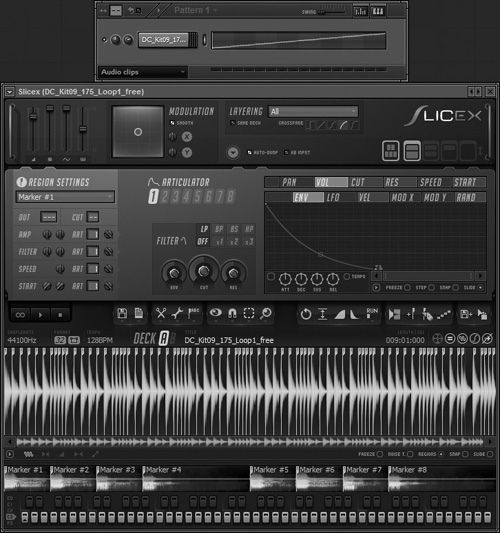
In our example, the loop actually is the same loop running a few times, so you can remove unnecessary notes. Do this by selecting the area after two bars in the Piano roll (see Figure 6.69) and deleting the selected area. This will leave you with a clean two-bar loop. If you’d like, you can select the unused audio in the sample and delete that, too, leaving you only with a clean loop in Deck A.
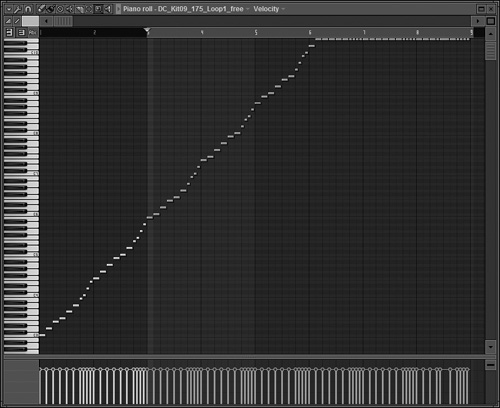
Before adding effects, let’s get Deck B playing with Deck A by linking selections. Let’s link Marker #1 in Deck A with Marker #1 in Deck B. Do this by right-clicking anywhere in Marker #1 in Deck A and then right-clicking anywhere in Marker #1 in Deck B so that they are both highlighted (see Figure 6.70). Now go to the down arrow drop-down menu and select Layer Selections in Both Decks (see Figure 6.71). When you play the pattern, both Marker #1s will play from Deck A and B at the same time.
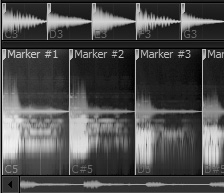
Figure 6.70. Highlighting markers from different decks for linking. The top deck is in wave view, while the bottom deck is in dual view mode.
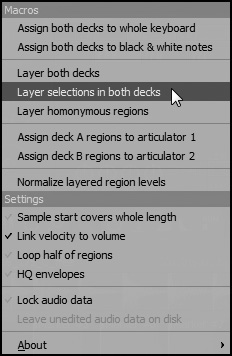
Now link Marker #13 in Deck A with Marker #4 in Deck B. This is where we will stop with linking selections and move on to adjusting parameters of different selections.
For this example, we will put a pan on the two triggered slices in Deck A that follow the triggered Deck B slices to create a widening effect, and we will want the different slices to play in individual Mixer tracks. Start by right-clicking on Marker #2 in Deck A to select it and go up to the Region Settings. Make sure that Marker #2 is selected and change the output (Out) number to 1. Choose 2 for the Articulator Number selector box (next to Amp) and then highlight Pan and Vel.
At this point you will see a red line in the envelope graphic display (see Figure 6.72). Drag this line down to the bottom on both sides and then select Marker #14 from the Region Settings drop-down menu and select Articulator 2 in the box located to the right of the Amp knobs. The same pan will be applied to this marker.

To give one of the slices a cutoff filter, we will start by selecting Marker #6 from the drop-down list, choosing Articulator 3 next to the Filter knobs, and making the output (Out) 2. Feel free to experiment with the different settings, but for this example we will choose LP (low-pass filter) and x1 (single-filter mode). In the graphic display, choose Cut and LFO, then have the line go from high to low (remember that if there is no line, right-click in the graph to create a point) and turn up the Speed knob until the oscillations are abundant (see Figure 6.73). Now you will hear a definite difference in the way that the sliced audio plays, and your different pieces of affected audio are now playing out of different Mixer tracks.

Figure 6.73. Speed knob turned up to create multiple oscillations in the graph display, which in turn affects the audio of the selected marker.
Slicex is a monster in the world of plug-ins, and although it can seem complicated at first, don’t be afraid to load samples and mess with them as much as you like, because you can always load the same sample in a different instance of Slicex or turn off the articulation controls. Similar to FL Studio’s general use of linking, a good understanding of how Slicex links these different parameters is key to being able to utilize all of the tools available. However, keeping it simple and playing live slices that are recorded into Edison for later editing is perfectly acceptable.
If adding filters using plug-ins is more your speed, a final option could be to send each region or marker to a different output, then individually mix each slice in its own track, and then record the final audio into Edison. This way you get all of your effects on each slice, but after rendering it to one file, you will save a ton of space and memory because no plug-ins for the slices will need to be loaded.
Unfortunately, the Synthmaker plug-in lies outside the scope of this book. Synthmaker (see Figure 6.74) is a program within a program, and the documentation and available tutorials could fill an entire book by themselves. Start with the basic tutorials to get into building your own synths, and trust me, I know it looks like an unreachable task at first look, but even learning the basics gives you the foundation of knowledge for how many of the synths you have actually work. As you start adding parts and throwing filters and effects on your plug-in, you can start to see the signal flow and how things work (or don’t work) with each other.

This is not a program to be mastered in five minutes, so be patient and take your time when something doesn’t work right away. Once you begin gaining confidence in Synthmaker, the plug-in becomes a playground of creativity, and this time you can tell people that not only did you write the music, but you made the synth that’s making the sound!
The TS404, shown in Figure 6.75, is a bass synthesizer that can resemble classic synth sounds and has the ability to create its own original sounds. The layout of this plug-in is simple, and the audio can be controlled by the two oscillators; their settings; the mix between them (Osc 1 and 2); the envelope control similar to many discussed previously; a cutoff/filter with low-pass, high-pass, and band-pass controls and LFO; and finally, some general distortion. Although these controls are seemingly simple, the number of combinations and settings is nearly limitless.
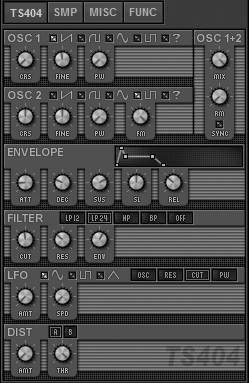
When you open the TS404, it will load the default sound, but there is no accessible preset list inside of the TS404 plug-in. To get to your presets, open the Browser and navigate to Channel Presets > TS404. This immense list will get you started creating bass synthesizer sounds and give you an idea of the variety of sounds available with this plug-in. When I am thinking of a certain sound, what I will do is pick out the closest preset to what I have in mind and then adjust settings where they are needed. Understanding what each knob does helps in finding the right sound, but the best way to understand the different controls is simply to listen and tweak knobs to see how the different parameters affect the sound.
Even the defaults of WASP (see Figure 6.76) and WASP XT (see Figure 6.77) sound identical, so we will be discussing the updated and more refined WASP XT. This synth pulls from the influence of ’80s synths but steps into the more modern style of synths. You will hear familiar saw sounds, but the deep ambient noises that can be created in WASP XT are spectacular.
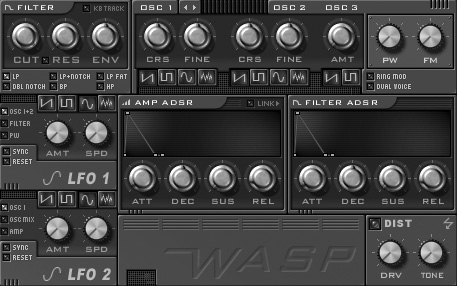

Built into this plug-in is a filter, three oscillators, a ring modulator, a frequency modulator, two ADSR envelopes, and even a distortion setting. The KB Track knob in the Filter section allows you to spread the cutoff range, and the remaining options are all ones that we have seen plenty of times now.
The slider beneath OSC 1 and OSC 2 acts like a crossfader between the two oscillators for the final output, and to enter in a third oscillator, just turn the Amount knob under OSC 3. The PW knob is the pulse width, which only works on square-shaped oscillators (the symbol that looks like a sideways, squared-off S). It will alter the shape of the oscillation, and the result will depend on the other settings and oscillations. In some cases, I was able to get a softer sound that was less scratchy by turning this to the right.
You know how to operate the LFO settings and remember that the amp envelope feeds into the filter envelope, and a quick way to make the filter envelope identical to the Amp section is to click the Link button, and it will basically duplicate the settings. The Modulation section will control modulation of a chosen destination where your choices are modulating the pulse width, LFO modulation amount, OSC 1 volume, or frequency response of OSC 2.
The Amp and Filter knobs in the Velocity section control the modulation velocity of each specific envelope, so you can boost the specific modulation of an envelope. The Output section has an old-school Tone knob that will brighten or darken the sound, while the Amt knob will control the distortion amount when Drive is turned on.
Dual will double the oscillators and detune one so that you get a richer sound, which comes in handy for quickly beefing up your synth. Analog will add randomness in an effort to more accurately mimic hardware, where the oscillators are not perfectly linked. W. Noise uses actual random white noise in the oscillators instead of the sound generated from the plug-in.
Most of this plug-in will come down to taste and experimentation, so it is worth the effort of at least going through the presets to hear the available sounds. After this, lock on to a preset you like and try trashing the sound a bit to see whether you get an even more desirable result. You will find that, through training your ears to hear what the knobs do to sound, you will be able to quickly create the sounds you want anytime you need them.
The Wave Traveller (see Figure 6.78) is great for altering sample playback, but most will use this plug-in specifically for the vinyl scratch simulation. This plug-in allows you to create those scratched vocals that sound like you pressed them to record and scratched it yourself live. The quality when scratching is superb, allowing playback adjustments to be extremely broad.

Get as creative as you want with the samples (try synth sounds, live instrument recordings, and so on), but for reference, I will assume that a vocal is loaded into the Wave Traveller. To load a sample, click the folder icon and navigate to an audio file. Underneath this is the preview window that displays the sample, how much of it will be played, and the spline (the red line affecting the playback direction and speed of the sample).
Every key on your MIDI keyboard can cause the sample to play through the Wave Traveller, and the best part is that each key can have its own individual settings, allowing you to make multiple scratches of the same sample and play them using a MIDI keyboard or trigger them in the Piano roll.
The Patch area will let you select a note from C0 to B9 to create a spline setting, or you can click the virtual keyboard of Wave Traveller. The knobs on either side of the Patch Selection drop-down determine the start and end points of your sample. This is great for taking a vocal phrase and assigning different words out of that phrase to different notes. The Speed knob will determine generally how fast or slow a sample will play back based on tempo when the T-A switch to the right is flipped up, whereas playback will be based on absolute value (as a percentage of the original sample speed) when T-A is flipped down.
The Path Definition panel on the far right of the plug-in is where you draw the spline that affects your audio. The spline that is created here is represented by time on the horizontal axis and sample position on the vertical axis. A good way to wrap your head around it is to just think that the steeper you draw the slope of a section of the spline as the plug-in moves from left to right, the faster your sample will play in either direction. As you make the spline more of a gradual slope, the playback (again, forward or reverse) will slow down as it passes across that adjusted section of the spline.
It’s important to know that the speed at which the sample plays back is also affected by the Speed knob and the T-A switch. The key is adding in sample position, where the height of the spline represents the playback position of the sample. So if you start your spline at the top on the left side of the graph (Path Definition panel) and make a straight line that gradually goes to the bottom right of the graph, then the sample will play in reverse (see Figure 6.79). This is because you are starting the spline (period of playback) at the end of the sample and gradually bringing it back to the beginning while keeping the direction constant.
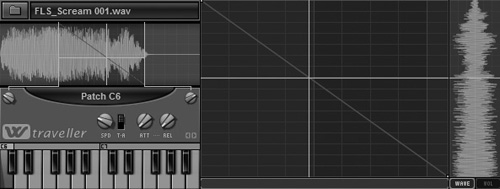
The Wave Traveller can take a little practice to get the hang of, but the effort is well worth the reward of being able to quickly add scratch effects to your samples. From vocals to kick drums, your imagination is the only limit.
We have taken a deep look into the available instruments and generators included with FL Studio. Where possible, I omitted repetitive information so that you don’t have to read about attack and decay in 20 parts of the book. Remember that key to getting the right sound out of your instruments is experimentation with everything. Save your project as a new file, play with settings of a generator, and try to get a desired sound using your own detective work. You get quite an exhilarated feeling when you create a sound all on your own and you are not using a preset. The sound becomes yours, and while the settings may have been used in the past, it is not incredibly likely with most plug-ins because of the range of choices.
In the next chapter, we will look at more plug-ins, but we will focus in on the effects plug-ins included with FL Studio. These plug-ins are what make your final product have echo, reverb, distortion, and a wide array of other sonic changes. I will demonstrate how you can even use effects channels to put live effects on inputs, such as a voice or a guitar, and explain the routing process of the effects channels that can be loaded into each individual Mixer track.