Upon hearing the word MIDI, many people think of cheesy sounds from a synthesizer or simply don’t know what it is. MIDI stands for musical instrument digital interface, and although it comes out of the early ’80s, it is widely used today even in places you might not consider. Many cell phones that are in use today have some sort of MIDI sequencer built into them to play ringtones. In this chapter we will explore the history of MIDI and look at a few examples of using it in FL Studio. We will also look at how MIDI information can control different parameters of nearly every knob in FL Studio. And I’ll explain Live mode and its use with a MIDI controller to play different parts of your music. This will allow you to come up with entirely new creations live and on the fly!
MIDI was created in an effort to simplify the massive amounts of incompatible synthesizers that were available in the ’70s. If you wanted to play multiple instruments, you needed multiple keyboards because you would be unable to run signal through all of your music emulators. Keyboards would trigger the sound of one synthesizer, but then that device might not work if connected to a different synth. Your home studio was a mess of keyboards and tangled wires that you constantly had to change.
MIDI fixed this by creating a protocol, or common language, that all of these synths could read, allowing you to interconnect devices and trigger them at different times using one keyboard. Musicians were able to bring more virtual instruments into their music, which ended up running rampant in ’80s songs. Virtual instruments have greatly increased in quality, and many that are used today are indistinguishable from the real thing. The virtual pianos available today have replaced the need for a real piano, and they even have different controls that imitate how hard keys are played based on the MIDI information received by your computer.
It is important to know first and foremost that MIDI is not sound, and MIDI alone will make no sound. This is why a MIDI controller or keyboard will not have an audio output—because there is no sound to play! There are piano keyboards that have built-in sounds and only have audio output, but we will focus on MIDI keyboards (including keyboards with built-in sounds that send MIDI) in this chapter. A great way to think of MIDI is to compare it to your computer typing keyboard. If you turn on the Typing Keyboard to Piano Keyboard feature, you can play instruments inside FL Studio using the bottom two rows of letters, but you can’t plug that keyboard into a speaker and expect it to make sound. Both keyboards in this example send data only, and MIDI is just a form of data, so rest assured that neither will make sound if plugged directly into a speaker.
Another way of thinking of MIDI is to compare your MIDI keyboard to a symphony conductor. The conductor plays no instruments directly but guides the performance of the musicians in the orchestra. The musicians playing their instruments are like the software instruments in FL Studio because they can play sounds, but they need to know when to play. MIDI information tells these sounds when and how to play rather than making the sound itself. In most cases MIDI is used in conjunction with a piano-style keyboard that will usually have a pitch bend and modulation wheel on it, but devices that use MIDI are nearly limitless and are constantly being reinvented. I once helped an engineer set up a MIDI laser harp that sent MIDI signals based on whether the laser lights were blocked by the fingers. Aside from playing like a harp, it was a little overkill as far as inventions are concerned, but it was very interesting to see in use. There are even entire MIDI controllers premapped to control all the parameters of DJ software, but for FL Studio I will focus on two MIDI controller types—the piano-style keyboard and the MPC-style beat pads.
Piano-style controllers will suit almost every music style when the keys are pressure sensitive. This means that the harder you play, the louder the instrument will be. There are variations where notes that are firmly pressed will cause the sound to change, but usually the volume is affected. Keep in mind that the keyboard only sends information and not actual sound, but the software responds to the way the MIDI keyboard is played. Those that make beats will miss out on the touch-sensitive pads that seem to have become a staple in beat making unless their keyboard comes with them (see Figure 5.1).

The keyboard can vary from a basic range of keys with no additional controls to ones like you see in Figure 5.1. They will sometimes have even more knobs available. The knobs and faders on your keyboard can be mapped to almost anything in FL Studio. You can create your own virtual mixing board using the faders on your keyboard alone!
The size of the keyboard only matters if you actually play the piano—then you might want a larger one for playing live. But the smaller ones will work for every musician because the keyboard can send different octaves of notes. For example, you could play the lower part of a piano riff and then come back, raise the octaves on your keyboard, and play the higher part, creating a full keyboard sound.
I find that having a larger keyboard does help when auditioning sounds so that you can hear a few different octaves, because the sound you are looking for may not sound right a few octaves up, but when cycling through hundreds of presets, it can be missed when only a couple of octaves are available for immediate playback. You can always press Up Octave on the keyboard, but trust me, once you start searching deep into your instruments, you will move quickly through different sounds looking for the right one. The MIDI keyboard is the utility instrument and can represent almost any virtual instrument you can throw at it.
The drum pad controllers like the Trigger Finger (see Figure 5.2) can be found among many artists out there who fancy themselves as beatmakers. They are specifically desirable to these types of musicians because the touch-sensitive pads are larger than keys on a keyboard and give you plenty of room to strike the pads.

A great advantage to these pads is also that they are durable, so hitting them with moderate force over and over won’t wear them out. I know that keyboards are supposed to be designed the same way, but I have seen many MIDI keyboards come in for repair because the piece that reacts to the keys being pressed breaks, and then the entire range of keys needs to be replaced. Although it does happen, I have never seen pads that came in for repair due to overuse.
The Trigger Finger is a MIDI controller, so there are no internal sounds, and it is only sending MIDI signal, much like the keyboard. The knobs and faders can be mapped to most parameters in FL Studio, similar to the keyboard as well. The big difference is that it is designed for making beats, and even the FPC (a drum instrument plug-in) has 16 pads that are similarly mapped like the Trigger Finger.
So which should you purchase? If you can afford it, I would say both, but remember that the Axiom (refer to Figure 5.1) has both keys and touch-sensitive pads, so buying another device is not necessary. If you can find a combo like this, make that your purchase.
If price is an issue, you have not yet purchased any gear, and you are just beginning in the music field, I would stick with a piano-style keyboard that is velocity sensitive (the keys register how hard you play them). You can make drum beats on a keyboard, and you get the same velocity-sensitive touch when playing a beat, but it will take some getting used to when playing on the slim keys.
Another reason is flexibility with different instruments. You can use the Trigger Finger to play chords of a piano, but they have to be mapped, and this can be a pain even when you know what you’re doing. The same holds true when using any synth, and you will find the drums pads limiting. Regardless of the instrument you choose (or find a great deal on), in the next section I will show you how to specifically set up each type and get it to work in FL Studio.
We will begin by looking at two different setups for MIDI controllers, starting with the Axiom keyboard and then moving to the Trigger Finger. Both setups will be very similar, but we will open an instance of two different instruments to display where they are effective. If you are only using one or the other, then you can skip to that section or read both for a complete understanding of setting up the devices, because you might add gear as your studio builds.
The first thing to be aware of when using a MIDI controller is whether your device requires a driver to properly be recognized by your computer. Many MIDI keyboards will need a manufacturer driver on any system aside from Vista 64-bit and any Mac operating system. The drivers for your MIDI keyboard can usually be found at manufacturer’s website unless none are required. In my case, I am running Vista 64-bit, so MIDI controllers are for the most part plug and play, meaning that when I plug it in, Windows will assign drivers for it, and everything will work.
So, you take out the Axiom and connect it to the computer through USB, which will give the keyboard its power and send MIDI signal to and from the computer. The Axiom is powered by the USB, so no additional power supply is needed, but keep in mind that some USB ports do not supply enough power for some devices, and an external power supply must be used.
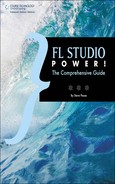
Windows will install the driver automatically on a Vista 64 operating system, and then you are ready to open FL Studio. Press F10 to open to your MIDI options, and under the Input section, you will see your keyboard. Highlight it and make sure Enable is selected (see Figure 5.3). For the Controller Type drop-down menu, Generic Controller is fine. This option will work for almost every controller, but if you see the name of your device in this drop-down menu, go ahead and select it.
Now you can close the menu and press F6 to display your Channel window. Go up to Channels from the main menu bar of FL Studio and choose Channels > Add One > FL Keys. The output of FL Keys is routed to the main output in the Mixer, so upon opening FL Keys, you will be able to play and hear piano. If you are not hearing any sound, you may need to reset the keyboard or contact technical support for assistance. At this point you can play and hear piano sounds and play with the settings in FL Keys to hear different sounds triggered from your MIDI keyboard.
For this example, we will be plugging a Trigger Finger into the computer and using the FPC to create drums. Much like the keyboard, certain operating systems may require a driver in order to run the Trigger Finger properly, so any needed drivers should be downloaded and installed prior to opening FL Studio. In my case, Vista 64 allows the Trigger Finger to be plugged in and start working immediately. For complete assurance that your device will work, you can browse the list of supported devices in the Controller Type drop-down menu and base your purchase off of that. This means that your device will be premapped to FL Studio and ready to work immediately!
With drum pads, it is easy to forget that you were messing around with settings to make different notes or trigger different instruments, so I recommend doing a factory reset on your keyboard to begin. This causes all of the information sent by the Trigger Finger to be its default values.
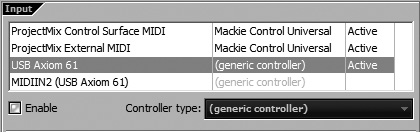
Plug in the controller and open FL Studio. Go to the Options menu (F10), make sure you are on the MIDI tab, then highlight the Trigger Finger. Make sure Enable is selected and the Controller Type drop-down menu says Generic Controller, as shown in Figure 5.4. If you are using a device that shows up by name in the list, then select that, but Generic Controller will work for most MIDI controllers.
In this example, I will use a different method to get to the instrument. Start by making sure that the Channel window (F6) is visible, then press Ctrl+F8. This will open the Plugin Picker, allowing you to choose your instrument from a graphical list. At the bottom of the graphics are categories that will narrow your search. Hover over the Drum option, and only a few will remain, with the first being the FPC. Click and drag (keep holding the mouse button down until you get the instrument to the Channel window) the FPC over to the Channel window and insert it into an empty channel. The FPC will pop up, and at first glance it bears a striking resemblance to the Trigger Finger itself.
The reason why I had you do a reset on the Trigger Finger is because the pads will not line up perfectly with the drum pad pattern of the FPC. This way, when you run into this problem, you will know what to do. Start by using the mouse and selecting the lower-left pad (Pad 1) of the FPC. The sound will play once, and the hint bar at the top of the screen will tell you the pad number and the note that is playing. After pressing the note with the mouse, the actual note will display in the top-left portion of the FPC (see Figure 5.5).
Select the note itself—in this case, C3—and a menu will open (see Figure 5.6) with a long list of available note options. Choose Learn and press the lower-left drum pad (Pad 1) on the Trigger Finger. Now the first pads on both are mapped to each other, so when you press that pad on the Trigger Finger, the linked pad on the FPC will light up and play the sound that is loaded. To map the rest, follow the same order of mouse-clicking the pad on the FPC, choosing Learn, and then pressing the corresponding pad on the Trigger Finger.

Keep in mind that switching drum kits can change the settings you have linked with the FPC. A better option would be to change the notes that the pads of the Trigger Finger are sending into the program so that the pads are always matched to the FPC. To do this, you need to individually change the notes on your Trigger Finger.
Although this is not a tutorial on the Trigger Finger, sometimes companies can leave you lacking proper documentation and feeling slightly in the dark. Every controller will be different, but for the Trigger Finger, press the pad that you want to adjust and then press the Save & Exit and Exit buttons together to enter Edit mode. The lights above the buttons will flash; now turn the C1/Note/Min knob until you reach the note that is needed to play the correct pad in the FPC. Press the Save & Exit button twice, and the note is stored.
Keep in mind that sometimes the notes do not read correctly or are slightly off, so you will have to do a little reasoning when properly mapping. For example, if the Trigger Finger says it is sending C#3 (which looks like C.3 on the LED display), FL Studio may read it as a C#5. If this is the case and you need FL to read a C#3, then drop the Trigger Finger note down two octaves to C#1 so that FL Studio reads it as C#3 (the note you wanted).
Again, remember that this example of mapping is specific to the Trigger Finger and will not always apply to every controller. For specific note mapping, you will want to read the manual of your device regarding how to do this. If the documentation is not there, then checking forums and searching online tutorials will usually guide you to an answer.
We have learned about the features of the Piano roll and the different tools that we have for manipulating sound, but we haven’t looked at any real examples. Throughout this section, we will look at building a few riffs and some examples of how to change notes and their properties. Producer and songwriter Josquin de Pres once told me “Sure you know what everything does, but can you use it?” At first, this seemed like a redundant question, but the more I thought about it, I realized that his point was, “Can you use all this stuff properly and efficiently?”
The more I worked with artists and other engineers, the more I saw that knowing how to perform tasks in recording software prevents you from getting stuck when creating. I’m not talking about writer’s block, because that is when you are just at a loss for ideas. The problem is when you have the ideas and you can’t make them happen due to fumbling around through menus. Trust me; losing an idea to ignorance when you know exactly how you want it to sound is very frustrating. Preventing this is solved by acquiring the knowledge, and in the next few sections we will look at actually using the Piano roll with a few instruments.
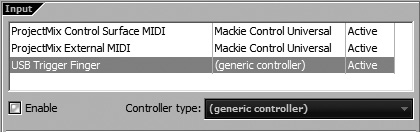
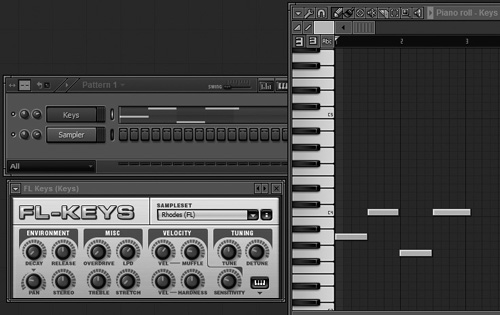
The Piano roll is the grid that houses MIDI notes and triggers the instrument you have selected, so first off, let’s choose that instrument! Open up FL Keys and then right-click the channel and choose Piano Roll (see Figure 5.7). This will open the Piano roll option, allowing you to play, record, and draw notes on the grid. Remember that even without a MIDI keyboard, you can still follow along using your typing keyboard (when Typing Keyboard to Piano Keyboard is selected, or press Crtl+T to toggle it on and off). The typing keyboard will be basically the same as a MIDI keyboard, but it will not have velocity control (usually volume), so the notes will all play at the same volume.
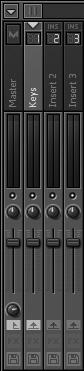
Before getting into recording and editing of MIDI, take a moment to link your instrument channels to Mixer tracks, so that you don’t have to do it later. You can always delete unused channels or mute any that you don’t want playing, but setting it up beforehand gives you the ability to quickly silence a single instrument. With the FL Keys channel selected in the Channel window, press F9 to bring up the Mixer. Right-click on an empty Mixer track and choose Link Selected Channels > To This Track (or use the quick key Ctrl+L). After selecting this option (see Figure 5.8), you will see the Mixer track change to Keys because of FL Studio’s auto-naming feature (see Figure 5.9), and now the volume and muting can be controlled with the single track. Without doing this, all the channels will run through the main Mixer channel, and it will be frustrating trying to solo individual sounds when mixing unless you use the Mute and Solo switches located on each channel. Now we are ready to start making some sound using MIDI!

Let’s start by making a recording that plays for two bars using our FL Keys channel. Before doing anything, make sure that you are in Pattern mode, not Song mode. For this example, you don’t need a complicated piece; just play a few notes over the two bars.
Begin by toggling the metronome on or pressing Ctrl+M so that you are able to keep your recording on beat. We also want Countdown before Recording turned on (Ctrl+P), and by default it will give you a one-bar lead-in. This gets you prepared to stay with the beat, because most of the time it can be difficult to stay on beat when starting immediate recording with the music.
When you go to record, you will hear four clicks, and then recording will begin. For this example, lower the tempo to 110 by clicking on the tempo indicator in the main transport (see Figure 5.10) and dragging downward until you get to 110. Make sure that you click the big numbers, because the small number will lower and raise the tempo in small increments.
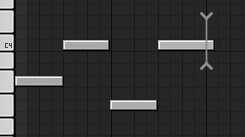
These different actions may have made the Piano roll disappear; just reopen it by pressing F7. Now right-click the Record button in the main transport and make sure that Automation and Score are selected. Pressing the Record button will cause it to turn orange, and pressing the spacebar will start the count-in metronome. If the Recording Options dialog box pops up, select Automation and Score and then press the spacebar. See if you can get four notes to sound decent over these two bars. After playing these, if you find that you have played a little past the two bars (see Figure 5.11), you will see that the pattern goes to the next bar before repeating. Because you only need two bars of piano, use the Slice tool (C) to cut off the end of the last note (see Figure 5.12) and then delete it by right-clicking the end piece.
Remember that for right-clicking to delete the note, you need to use the Draw (P), Paint (B), or Slip tool (S), and remember that Typing Keyboard to Piano Keyboard must be disabled for these shortcuts to work. I’m going to take a guess and assume that there are a few of you out there who don’t want to play notes, but who still want to create them. For those of you to whom this applies, just use the Pencil tool (P) to draw four lines on the Piano roll that sound good over the two bars. Or, if you are feeling a quick burst of creativity, try turning on the Typing Keyboard to Piano Keyboard function with step editing (Ctrl+E) turned on.
Now, whether recorded or played, we have MIDI notes on the Piano roll that are triggering sound from FL Keys, and that sound is routed to its own track in the Mixer. At this point, if you wish, you can turn off the metronome so that you are only hearing the piano.
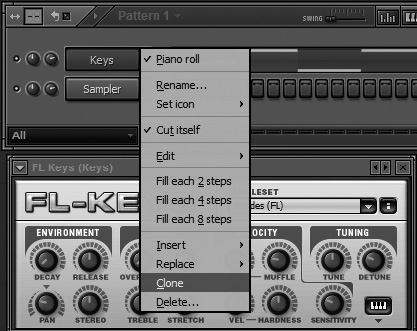
First, we’ll make a new channel with the same instrument so we can play a different part on top of the first recording. The fastest way to do this is to right-click the FL Keys channel in the Channel window and choose Clone (see Figure 5.13). This will create another FL Keys channel with the same settings as the previous one, but it will not contain the Piano roll information.
First, change the pattern number to 2 by making sure the Channel window is highlighted (F6) and then pressing the right arrow on your keyboard. Again, get in the habit of quickly linking everything first! In this case, you can link the second channel of FL Keys to the same Mixer track, because you will probably want the same effects on the keys so that they sound like one person playing one part.
Now you have the same instrument on two different channels, so you can tweak different parameters and they don’t affect each other, but both still go to the Mixer where the same effects will be applied. In this mode, though, the first pattern that you made will not automatically play because now you are listening to the second pattern, which has no Piano roll notes. To fix this, select the first pattern by highlighting the Channel window (F6) and then press the left arrow key to go back to Pattern 1.
Now you can see the original piano recording notes in the Channel window. With the Channel window (F6) focused, press the up arrow to make sure that the first FL Keys channel is highlighted, then press Ctrl+C. Now press the right arrow so you are on the second pattern and press Ctrl+V to paste the notes into the new Piano roll. You can also change patterns by clicking the pattern indicator in the main transport (see Figure 5.14) and dragging the mouse up or down. You can also select specific notes in a Piano roll by Ctrl-clicking and dragging (see Figure 5.15) over the ones you want and then pressing Ctrl+C to copy them. Then you can paste the notes into different channels and patterns. Remember to keep the Channel window in focus; otherwise, your copy and paste quick keys could be working elsewhere in your project.
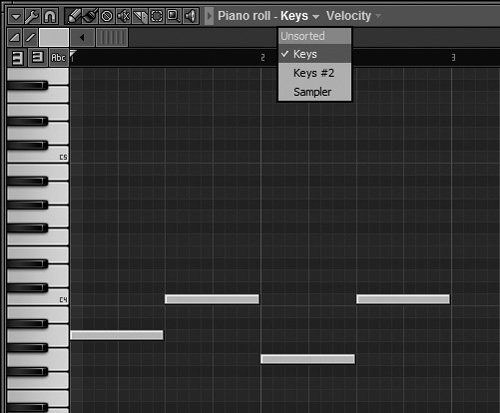
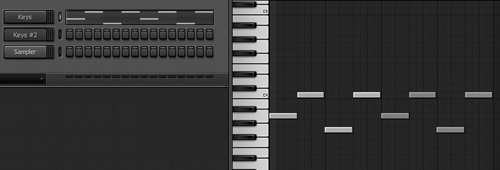
When you have more than one channel active in a pattern, you can use the Target Channel drop-down inside the Piano roll to navigate through the different Piano rolls of a pattern. To try this out, right-click on the second FL Keys channel (still in the second pattern) and select Piano Roll. Click at the top of the Piano roll where it says Keys #2 and select Keys (see Figure 5.16). This is a speedy way to cycle through different active channels in one pattern.
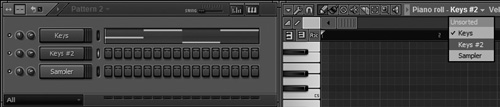
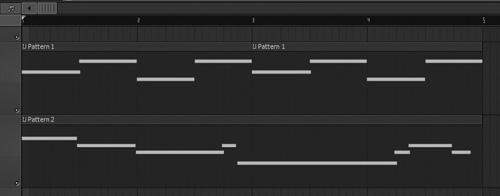
Using the same Target Channel drop-down, let’s change the Piano roll back to the second FL Keys channel so we can record on top of our original notes that we copied into the Piano roll of the original FL Keys channel (see Figure 5.17). I want to point out here that the original recorded notes are still in the Piano roll of the first FL Keys channel in Pattern 1. I am taking you through these menus to better understand navigating them, and after you record a second part, you can delete the original notes in the first FL Keys Piano roll. This gives you two patterns that work well together that you can separately place in the Playlist.
Press Record, select Automation and Score, press the spacebar, and record a new piece that is four bars this time. Wait! The first channel didn’t keep playing after the first two bars (see Figure 5.18). No problem! First, undo the “recorded stuff,” as FL Studio puts it, by pressing Ctrl+Z. Now open the first FL Keys Piano roll so you have your first four notes visible. Highlight them (Ctrl-click and drag) and then, while in Pencil mode (P), hold Shift and click and drag any note to duplicate all selected notes for dragging to the next bar. Now you have four bars of the music to work with (see Figure 5.19).
Change the Piano roll back to Keys #2, and you are ready to record more notes into this new channel using the same method as your first recording. After you get the recording you want, you can delete the notes from the first Keys channel in the second pattern, and now you have two different patterns that play with each other and can be dropped on the Playlist.
Now we have taken a detailed look at recording MIDI and getting notes on the piano to make sound, as well as routing the sound that the MIDI notes create. There are many tools available with the Piano roll, and they were discussed in the “Piano Roll” section of Chapter 3, but the purpose of this section was to give you a look at building in the Piano roll with MIDI notes. These notes can represent any instrument and even individual sounds, which will usually display by name when the Name option is chosen from the Piano roll, but the concept is still the same. This is how you begin building your music using live MIDI recording and drawn notes. Even with drums, the same process will work, but sometimes if the sound samples are just right, then you can use the Stepsequencer to just play the notes as one-shot instances. MIDI information is not used only in the Piano roll to create music; it is also used to control nearly every knob and fader in FL Studio, which we will look at in the next section.
While we have dealt with MIDI as notes that are sent to the computer, we did not look at the other abilities of MIDI. Because MIDI is nothing more than information, it can be interpreted any way that FL Studio wants to. The examples that we will look at are creating automation using MIDI and how nearly everything can link to your keyboard or mouse movements. Then we’ll look at using the MIDI keyboard to control Live mode for creating new grooves and loops.
So with a little better understanding of what automation is, now we can look at the different ways to control knobs and faders using your keyboard or mouse. To have change occur, the changes need to be entered into FL Studio so it can repeat these changes at the correct point in your song. It is important to know that not all knobs will react in the same way, and the quickest way to tell what can be done with them is to hover over the knob that you want to automate and look at the hint bar. When you see a red dot (see Figure 5.20) in the hint bar when hovering over a knob or fader, that control can be automated. The automation can be recorded, and you are able to open up the event editor for additional modification. If you see a red MIDI-port image (see Figure 5.20), then the control can be linked to an external source, such as a MIDI keyboard. Most of the time you will see both images when hovering over controls of native FL Studio plug-ins.
Figure 5.20. The image on the left (red MIDI port) indicates an automatable control, while the image on the right (red dot) means that the control can be linked to an external source.
We will continue with our two takes of piano and focus on creating automation for the volume controls, so that you can see how powerful these tools are for altering your music. For this example, I will assume that you have two different patterns that you can place in the Playlist, so go ahead and place two instances of Pattern 1 and one instance of Pattern 2 across the Playlist (see Figure 5.21).
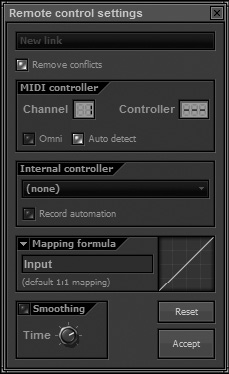
The first example we will look at will be linking an external controller to the volume control and setting up an automation recording. Start by deciding which knob you want to use on your MIDI keyboard. Right-click the channel volume of your first piano take and then select Link to Controller (see Figure 5.22).

The resulting box that pops up (see Figure 5.23) will allow you to remove any conflicts, so if there was an accidental link, it will be removed (as well as many other options). But for this example, just move a fader on your MIDI keyboard, and the dialog box will disappear, and the fader on your MIDI keyboard will now be linked to the Keys channel volume control.
Now right-click on the Record button and make sure that only Automation is selected (see Figure 5.24). This will make sure that you don’t record over any notes accidentally. Note that if the Recording dialog box pops up and you select Automation and Score, you will have to right-click the Record button again to deselect Score. Turn on your metronome and press R to start recording. You will hear the count-in, and then FL Studio will start recording the moves that you make with your MIDI keyboard fader. Try gradually increasing the volume starting at zero and press Stop when you reach the highest point in volume that you want. Turn off recording by clicking the Record button. Turn off the metronome, and now you have created volume automation!

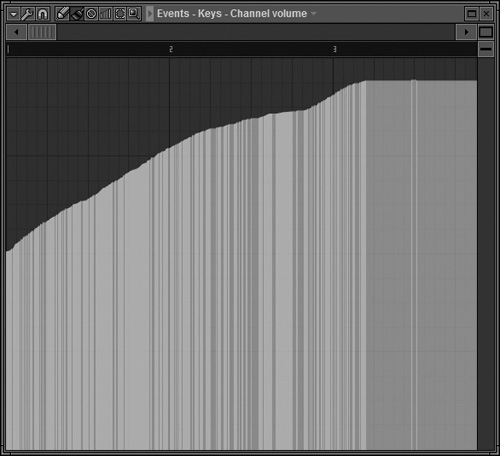
This automation can then be edited precisely by right-clicking the volume control that you just automated and selecting Edit Events (see Figure 5.25). A new window will open, giving you a visual representation of your automation in which the horizontal axis is time and the vertical axis is knob position (see Figure 5.26).

In this window you can do slight adjustments or complete reworkings of the automation that was recorded. Most of the tools will be familiar, but I want to mention the LFO option from the Tools menu (see Figure 5.27). This will create a pattern and will affect the changes of your automation, much like an LFO affects audio. Rather than the audio’s waveform being affected, though, only the volume will change, based on the curves drawn on the graph (see Figure 5.28).
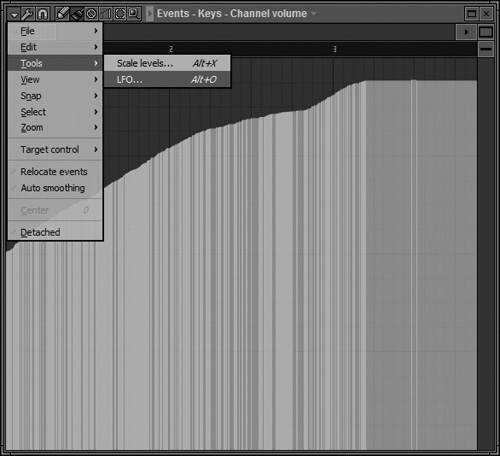

Another option is using your mouse to record the automation. To perform this, select Record Automation and move the control in the software (like the Volume knob we just controlled) using your mouse. Then turn off the recording, and you can still edit the automation by right-clicking the control in the software that you automated and selecting Edit Events. Initially the action is manual, but remember that this is just programming the automation so that it will re-create your volume changes every time the music plays back.
My personal favorite for creating automation is using the automation clips. These are placed into the Playlist, similar to audio and pattern clips, but rather than play audio or use MIDI to trigger sound, they tell FL Studio where the knob that you are automating should be positioned at that point in the song. This is a very effective way to always be able to access your automation quickly and visually see it without navigating multiple windows.
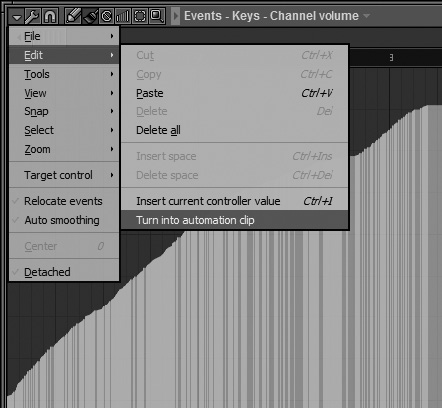
I want to mention that you can use your live automation recordings and turn them into automation clips by opening the Edit Events window and selecting Edit > Turn into Automation Clip from the main menu (see Figure 5.29). In this example, though, we will start from scratch and automate panning of a track using a new automation clip.
Begin by right-clicking the channel panning of either of your piano takes and choosing Create Automation Clip (see Figure 5.30). When you do this, press F5 to open your Playlist, and you will see the automation clip inserted into the first empty track (see Figure 5.31). The line running along the automation clip represents the panning, where dragging the line up to the top will be panning the sound to the right, and dragging the line all the way down will be panning the sound to the left.

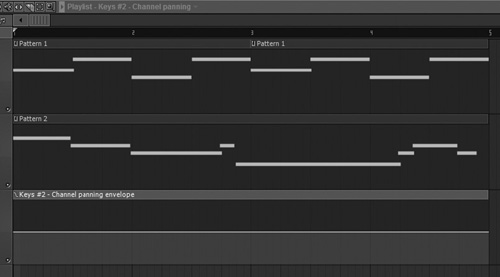
Try making the line start at the top and go to the bottom over the length of the clip (see Figure 5.32). The Pencil tool is best, and left-clicking will add points on the line, while right-clicking will remove them. You will notice that the piano sound starts in the right output and gradually moves to the left output as the clip plays.

Volume and panning were the two automatable controls that helped me grasp the concept of automation and how it works. Now that you have a good idea of what you can do using MIDI with automation as well as creating your own clips that you manually draw, remember that any automatable knob can perform these tasks. The key is experimenting with different parameters, such as filters or cutoffs, so that you understand how easy it is to make changes to your sound that you like and keep those changes happening. With a strong foundation of understanding, we will look at linking multiple controllers for automation purposes.
This option is great for setting up multiple links with your MIDI keyboard, because it allows you to create multiple links between your keyboard and the software with one selection. From the recording panel, select Multi-Link to Controllers and make sure that the box next to the graphic (see Figure 5.33) is bright orange (toggled on).
Before making any changes, it is good to understand what this button will be doing. It will read every change that you make (to any automatable parameter, such as panning or volume) in FL Studio and remember them all in sequential order. Then, as you move knobs or faders on your MIDI keyboard, they will sequentially control each knob that was moved in the software.
So if you want to control the volume of one track and then the volume and panning of a different track, select Multi-Link to Controllers and then move the first track’s volume. (The amount you move the knob doesn’t matter because you only need FL Studio to see which knob you want to control.) Then move the second track’s volume, and finally move the Pan knob for the second track. Now these will map to your keyboard in order, so in this example, the first fader on your MIDI keyboard that you move will be mapped to the volume of the first track, the second fader will be mapped to the volume of the second track, and moving the third fader will map to the panning of the second track. After moving the third fader, you can turn off the Multi-Link to Controllers button, and your mapping is finished! This is an example of temporary linking, where the links will work for the duration of the session and then stop when you close it.
If you find that you are using a particular fader on your MIDI controller to control the same plug-in or parameter, such as a master volume control, you can set a global link. These types of links will hold even in new sessions, so if you link a fader to control the panning of a plug-in, the next time you open that plug-in, your fader will still control the panning. To set it, adjust the parameter that you want to control, then right-click the Multi-Link to Controllers toggle switch, choose Override Generic Links, then move the fader on your controller to which you want to link the parameter.
It is important to know that temporary links will supersede global links, so even if you have a fader linked to the master volume control globally, if you temporarily link the same fader to a panning control, that fader will control the panning for the session and then revert back to the master volume control when you close your session.
This can be done for as many faders and knobs as your MIDI controller has, multiplied by 16, because each mapping can be different for the available 16 MIDI channels. You will need to consult the manufacturer of your keyboard for how to send different MIDI channels, but for now just know that you will have enough controls to move any fader you would want to automate. My favorite use for the Multi-Link feature is to select all of my volume controls in the Mixer and then link them to each knob on the keyboard. This was much faster than manually entering in each one, and it gave me hands-on individual track control similar to professional boards with just a MIDI keyboard!
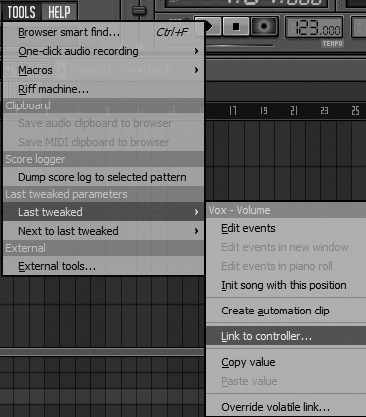
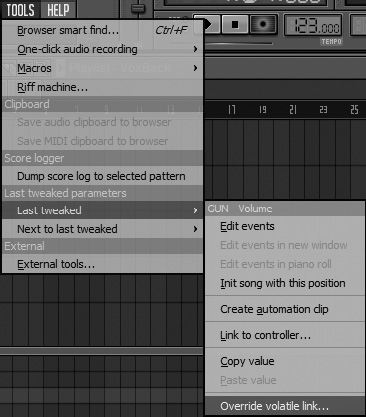
To finish this section, I want to mention two alternative ways of using linking in FL Studio. When you’re using external plug-ins, sometimes they will not have the easy right-click option that allows you to link the control to a MIDI keyboard fader. In these cases, you can move the knob that you want to link and then go to Tools > Last Tweaked > Link to Controller (see Figure 5.34). Lastly, move a knob on your MIDI controller or keyboard so it links with the software knob. Now that volume control you couldn’t right-click can be manually controlled. The same knob can be turned into an automation clip by instead moving the knob in the software instrument and then selecting Tools > Last Tweaked > Create Automation Clip.
The other way of using linking that I want to mention is the use of volatile links. This can be especially useful for anyone who owns a MIDI keyboard that only has a pitch bend and modulation wheel. What this setting will do is link any automatable software knob to a single fader or knob on your keyboard, and when you move a different software knob, that new knob will be controlled by the same hardware knob on your keyboard and will remove the previous link.
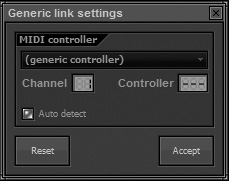
The reason this is great for those with only a modulation wheel on their MIDI keyboard is because when you select the modulation wheel to be the volatile link, it will remap to whatever you change in FL Studio. For example, move a knob in the software and go to Tools > Last Tweaked > Override Volatile Link (see Figure 5.35) and then move your modulation wheel on the MIDI keyboard. Now move the volume of one track using the mouse and then move the mod wheel, and you can see that it now controls the volume. Now use the mouse to change the panning of a track and move the mod wheel. This time the mod wheel controls the panning, but it doesn’t control the volume anymore. This behavior will repeat until you choose the Override option again and press Reset and then Accept. This will remove your mod wheel from the linking process (see Figure 5.36).
Up to this point, we have explored the many uses of MIDI in our software and how it works within it. You now know a decent amount about what automation is, how it can work with MIDI, and ways to link controllers to your hardware, so getting volume control for a track should be no problem. The final section in this chapter will look at how FL Studio reads MIDI information to play different pieces of music on the fly and how you can create and record your own live performances.
There are two main ways to create music live using FL Studio and play it back in different parts. The first option we can utilize is Live mode, and we begin by looking at the different ways in which Live mode triggers sound.
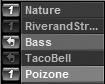
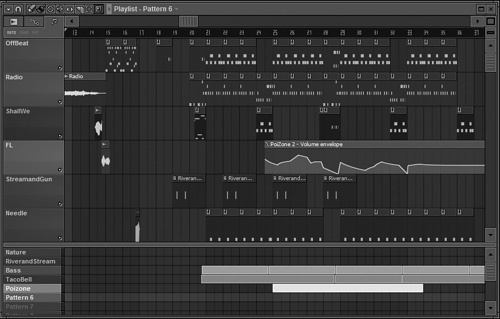
When Live mode is engaged, you can have your patterns play in a continuous loop or as a one-shot, where it plays the length of the pattern and stops. In Figure 5.37, you can see that both Poizone and the Nature pattern are set to play one time for the length of the loop and then stop playing, while Bass will continue to loop. To toggle patterns to be one-shot versus continuous loop, right-click them, and to activate them (turn the loop or one-shot on or off), left-click them so that any highlighted ones will play and those not highlighted will not.
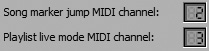
To use this well with your MIDI keyboard, you can leave all your patterns set to loop because you can make them one-shot by turning them off after triggering them to start playing. The MIDI keyboard will be mapped to the patterns automatically beginning with the middle C on your keyboard, and as you get higher on the keyboard, the keys will trigger higher-number patterns. The only thing to be aware of for setup is on the MIDI Options (F10) menu, where you set the Playlist Live Mode MIDI Channel (see Figure 5.38). In my example, I have set my keyboard to use Live mode on MIDI Channel 3. This means that for the keyboard to control Live mode, I need to set my MIDI keyboard to play on MIDI Channel 3.
A key thing to remember is that having other clips in the Playlist can mess you up, so clearing them all out is the best way to alleviate this. Make sure you save your project under a different name before starting Live mode, and add Live to the title so you don’t wonder where all of your clips went when you open it. Then delete all the information on your Playlist in the upper and lower regions.
Also make sure that you are in Song mode when using Live mode so that you are able to continuously change up your sounds or let them run as long as you’d like. Selecting a pattern to loop will do nothing when the song position marker isn’t moving, so make sure you hit Play before starting in with Live mode. When you hit Play, if no patterns are highlighted to play, then you will hear nothing until you highlight one, and it will play based on your current grid settings. In other words, if you have your grid set to a bar, then the pattern will begin at the start of the next bar, and any other patterns that are highlighted to play will wait until the next bar to play. I suggest you don’t turn off the grid settings, because it is very easy to get the beats and sounds completely out of sync.
The last thing I want to mention about Live mode is that if your patterns start off of the first bar and do not trigger right away, typically you will run into problems with everything sounding out of sync, so Live mode works best when the patterns are crisp and right on beat.
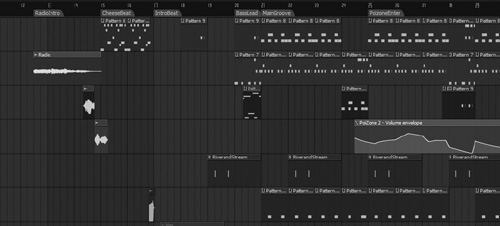
If you have an entire project set up in your Playlist, and each section has a marker indicating the different parts of the song, then you can use your MIDI keyboard to jump around to these different sections. In the project that I have created in Figure 5.39, you can see that there are multiple parts with an intro, different breaks, and instruments. Unlike Live mode, marker jumping will play portions of the song that you have already created rather than single patterns. You can spread out your patterns and sounds across the Playlist and make markers for each one to jump to, but it will only play that section, so it is best to just place markers in different spots of a song you have already made.
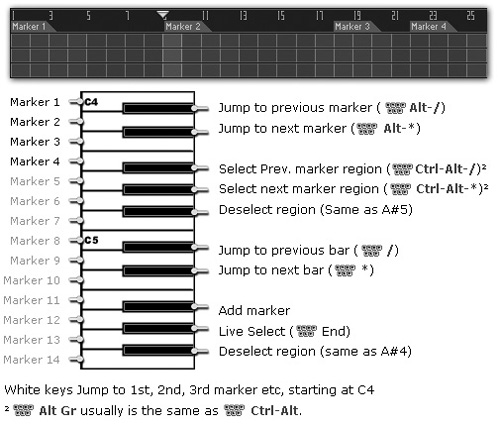
For this example we will assume that I have placed all of my markers at different points in my song, such as the intro, the breaks, and the main beat (see Figure 5.40). With this finished, I am ready to start using my keyboard to jump to different spots. Remember that you need to assign a MIDI channel to the marker jumping in the Options menu (F10). In this example I have my MIDI keyboard controlling marker jumping on MIDI Channel 2.
Although you can use the MIDI keyboard to control the marker placement, I find that it is easier to just insert the markers manually, rather than taking the time to memorize what key places markers or removes them. The white keys will sequentially jump the song position marker to the marker to which the keyboard is mapped (see Figure 5.41), and as in Live mode, you must press Play on the main transport to make any sound play.
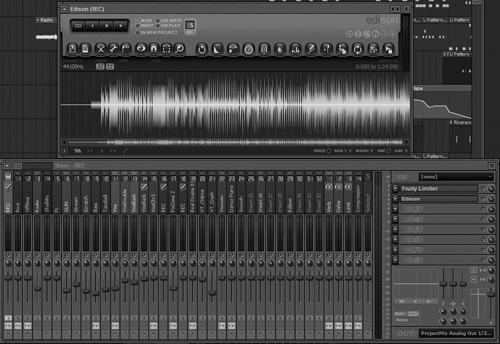
With your markers set and the song position jumping around from keys pressed on your keyboard, you can record your live performance! In the Mixer, select an empty track and insert Edison into the main Mixer channel (the one farthest to the left). Select Now for when to begin recording in Edison and press Record in Edison. Edison will pick up any sound that goes through the main Mixer, so everything you play will be recorded and captured in Edison. This is a great way to audition different parts of a song or to manually create a new version of your project (see Figure 5.42).
So we have looked at pretty much all things MIDI that will be used in FL Studio, and I have given you many examples of how to use it. We discussed automation, which at times may have seemed a tad repetitive, but only for you to fully understand how amazing of a leap automation in digital music is for technology. Now that you have a strong understanding of how to use MIDI and create notes and changes in the Piano roll, in the next chapter we will take a deeper look at the included instrument plug-ins and generators. It is my hope that you will be able to combine your knowledge from this chapter with the upcoming plug-in chapter so that you never get stuck again when trying to create a sound. We will look more closely at the settings of each plug-in and how they can be used to change sounds within the plug-in, as well as sounds affected by the plug-in.