
This section is dedicated to the plug-ins that do not come included as full versions with FL Studio when you purchase the Producer Edition. The easiest way to spot these is that they will have the word DEMO at the top of the plug-in, and if you open the help file (F1), there will be a green letter D next to the name of the plug-in. As you go through this chapter, keep in mind what your needs are when making music and if the plug-in would be useful to you. While I believe that you can make nearly any type of music using the stock tools of FL Studio, there are more tools available that will make your music-making much easier. The idea of this chapter is to give information to help you make an informed decision on what plug-ins you want to add to your arsenal of music-making tools, so for that reason, we won’t get bogged down in discussing every feature available for every plug-in. Rather, we will look at what these plug-ins can do and how they can be used to enhance your FL Studio experience.
The generators and instruments are what create sound and offer you ways to alter those sounds. The only exception is the Video Player, which we will also discuss. Remember that making a project your own can come down to setting that sound just right so that it has your trademark sound on it. With a limited supply of instruments, you may find yourself searching for something more. In some cases these plug-ins can take your existing sounds and samples, increase their flexibility within your music, and completely rearrange them to create a brand-new sound!
DirectWave (see Figure 8.1) is one of my favorite plug-ins available for FL Studio. The plug-in initially installs as a player version, so you are able to troll through the menus and use the DirectWave files that are available to gain an idea of this plug-in’s capabilities. Since it installs as a player, you can test out the included piano sample to hear the quality and try out some features. Try clicking on the Samplefusion drop-down menu to explore downloadable presets and sample banks.
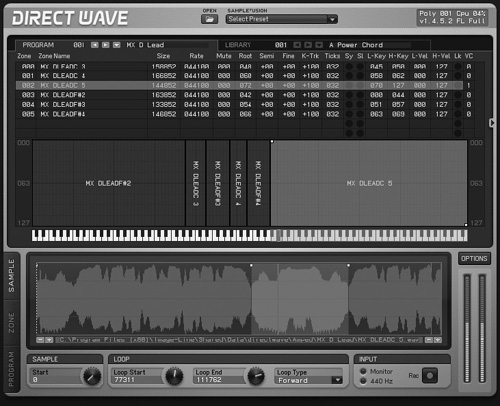
When you have Program selected at the top left of the plug-in, you can see the samples laid out across the virtual keyboard. If you are using a MIDI controller, when you play the notes on the keyboard, the graphic will show you what key you are pressing and how hard you are pressing that key.
Below this are the sample properties, where you can set looping points and a start point for the sample, and you can even record your own sample from the input selector. With this, you can record your own snare hit, adjust the sample so that it plays perfectly on time, and you have built your own sample that can be placed anywhere in the Playlist or played live through DirectWave. It makes those sample CDs seem like they aren’t worth the cost when it is this easy to make professional loops and sounds!
The Zone section (see Figure 8.2) allows you to apply tuning, filters, an LFO, phaser, delay, chorus, reverb, and even quantization to the sounds loaded into DirectWave. With the Current Selection versus Global option, you can individually add sounds and effects to each loaded sample in the Direct Player. This means that if you have one horn sound playing at C3, you can load that in, stretch it across a few octaves so it plays different notes rather than the single C3 note, and change filtering or effects for each note of that stretched sample.
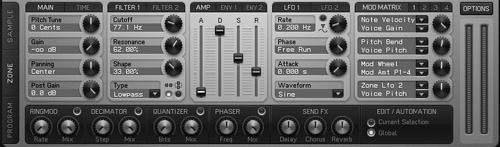
The Program section (see Figure 8.3) opens to reveal the different settings for the available effects that are built right into DirectWave. Here you can set your sounds to play with polyphony so that multiple notes can play at once or create a glide effect so that the note changes bend into each other. And they can be global settings or individual sounds, depending on your zone selection.

It is good to know that this player will only accept WAV and Ogg files, so those MP3s won’t directly import. However, you can always export them as WAV files so they can be immediately imported, but remember that the reason for not bothering with MP3 files is that they are low quality, and their compression removes most of a waveform’s digital information. This is why it is a good idea to try to find WAV-quality sounds for maximum quality and stretching ability.
There is a large list of acceptable programs that will import into DirectWave, including Battery, Kontakt, and ReCycle files, but remember that with the ability to record a sample inside of DirectWave, this means that if sound plays at all through FL Studio, you can use it!
A solid structure and fluid workflow make this plug-in ideal for electronic and hip-hop artists that love using pieces of music to create their projects. In many cases, loops are pre-cut so that keys on your MIDI keyboard will play parts of the sample, and you can create a new groove live using the slices individually. Try playing with the included sounds so that you can see what the DirectWave player is capable of, while keeping in mind that you can record your own samples to make instant loops, and you may find that this is a purchase you can’t live without.
The Fruity Video Player plug-in (see Figure 8.4) is pretty straightforward and allows you to play videos alongside the music in your project. This is great when you are trying to score a film or create a music sequence for a commercial.

FL Studio is not video editing software and will not export a video; it is only used to time your music with a video clip. The Video Player can set loop points so that the video repeats over a certain period, allowing you to fine-tune your musical cues. Another great feature is that you can actually pull audio out of a video clip and place it into FL Studio for further editing. Especially if you are going to be scoring a movie and you need to play longer clips, purchasing this plug-in is a must.
The moment Morphine (see Figure 8.5) opens up, many initial reactions don’t reach beyond “Whoa….” This synthesizer allows you to create an endless array of sounds and blend them into each other using a morph option similar to the one we saw in the DrumSynth Live plug-in, but Morphine has the ability to morph between four internal generators. The blending between generators can even be controlled by an envelope that is linked to the session tempo!
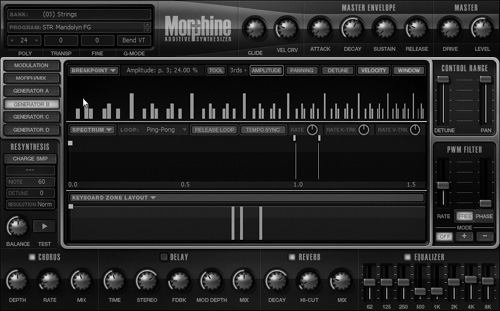
There really is very little that this plug-in is unable to do, and it is leaps and bounds beyond many others when you consider ability and control. Being based on additive synthesis, the simple sounds, such as basses and strings, sound great, but this plug-in caught my ear for its ability to create amazing soundscapes and atmosphere sounds. I used the morphing ability to start with a simple sine sound and blended it into a complex array of two combined atmosphere sounds. They moved seamlessly into one another, and the effort was minimal, with incredible results. In my opinion this speaks to nearly every artist, aside from those who only use live instruments. I can see placement of the available sounds in every genre of music out there, so it’s definitely worth your time to give this plug-in a try.
Ogun (see Figure 8.6) is another additive synthesizer that allows for a wide range of sound adjustments. Particularly specialized toward metallic sounds, Ogun is great for creating single-shot percussive sounds and droning high-frequency pads. It has an XY controller, allowing you to map out different parameters to be controlled, and it has built-in filter, envelope, chorus, delay, and reverb effects that you can place on your sounds. You can even create an envelope based on the input signal of an audio clip by dragging it into the graph in Ogun, and it will draw lines that ultimately affect your final output.

In the presets, you will find a decent list of available sounds that you can tweak to make your own, and most will tell you if they are mapped to the XY controller. Ogun is closely related to Autogun, and the two plug-ins can share presets. This is a great plug-in when you need that extra spice in your project and the typical synth sounds aren’t cutting it. Start by loading a preset and altering the XY controller and then drag an audio clip into the graph to affect how the synth will play. Remember that dragging an audio clip only affects the graph and does not morph with the sound that plays.
Poizone (see Figure 8.7) is a synth that can have up to 32 voices running at once and is incredibly flexible in its use. This is my favorite plug-in containing a built-in arpeggiator. The multitude of not just sounds but patterns of sounds that you can make is astounding. In many different forms of music today, you will hear arpeggiators running in the background, and in some cases they are the main hook.
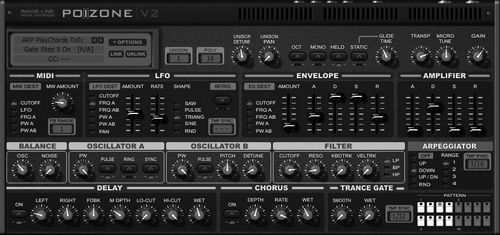
Navigating through the controls can seem daunting at first, but the layout is very user friendly once you understand what their purpose is. The setup includes two subtractive synthesis oscillators, a noise oscillator, delay, chorus, gating, and the ability to control the arpeggiation of your sound. Most of these controls are automatable, so you can cause the arpeggiating sound to change octaves and even directions mid-song. For electronic and pop artists, this will be an indispensable tool in your music-making.
There are a great deal of available presets to go through, so start by working with the single sounds and then move on to creating arpeggiating sounds that play in your project, and you may find that you can’t be without Poizone.
Sawer (see Figure 8.8) is another synthesizer that was modeled after a 1980s Soviet synth called a Polivoks. This synth is reminiscent of ’80s synth sounds in some respects, but due to the rarity of the synth that it was made to mimic, you will hear sounds that you most likely have never before heard.
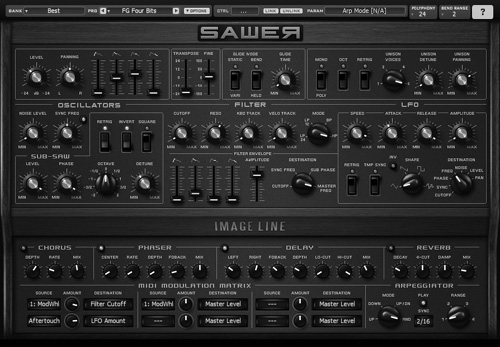
There are incredibly warm sounds capable of playing through this plug-in, as well as stripped, empty filler sounds for ambience. Sawer also has a built-in arpeggiator that you can use for any number of sounds that you create, or you can place it on any of the presets. Again, the number of knobs and faders can seem overwhelming, but taking it piece by piece, you see that it is a familiar set of ADSR envelopes, filters, glide knobs, oscillators, and effects that are common to adjusting the sounds. To investigate, start with a simple bass sound and then include arpeggiation and add a phaser. Try using one of the preset pads to add warmth and depth to one of your songs.
Sawer tends to be a CPU hog, so be certain that your system is powerful enough to run it successfully. Any dual- or quad-core system should have no issues. Sawer is for anyone looking for a synth that is rare in tone and very close to the original analog synth.
I must admit that once I started getting the hang of using Sytrus (see Figure 8.9), I really started having fun with the sound-designing abilities. This plug-in is nearly limitless in its ability to create sounds because of its ability to use a combination of frequency modulation (FM), ring modulation (RM), and subtractive synthesis. Anything from a long, spacey drone to an entire drum kit can be created in synth form using Sytrus.

Sytrus has six operators that act as oscillators for your sound. A number of different filters and envelopes can be placed on each operator, allowing you to create nearly any sound you could need using effects, frequency modulation, and ring modulation.
In my opinion, the best way to see what the controls do is to start with the default sine wave that sounds like a simple beep and adjust controls from there. You can even build a quick arpeggiator in the Vol > Env tab of any operator.
The key and seemingly confusing part is the matrix of Sytrus. The idea is that the top row feeds signal to the left row based on what knob you turn to activate, and then the output is controlled by the last vertical row. So if you turn the knob that is below Operator 3 and to the right of Operator 2, this means that Operator 2 is feeding signal to Operator 3. To get the output of Operator 3 to play, just turn the knob that is under OUT and to the right of Operator 3.
Again, this is only a starting point; for full exploration of Sytrus, press F1 with Sytrus selected, and a full explanation of every feature will be displayed. This plug-in creates high-quality sounds that you can manipulate and change using different operators that feed into each other. It is difficult to find a more flexible and powerful software synthesizer.
Words that come to mind when describing Toxic Biohazard (see Figure 8.10) are gritty, dirty, nasty, dark, and extreme. This is a very impressive instrument and sonic sequencer. There is an ongoing list filled with uses for this plug-in, and using nearly any of the presets, you can add a raw edge to your project that it may have been missing.

Many times when you are working on a project, it seems as if it is missing punch or impact, especially with electronic and hip-hop music. This plug-in has the ability to add that ferocity to your music while keeping the CPU usage low so there is no fear of inserting more than one instance into your projects.
Based on frequency modulation (FM) and subtractive synthesis, Toxic Biohazard has six ADSR generators that are each linked to an individual oscillator, giving you incredible flexibility over your sounds. The surrounding effects are very familiar, including chorus, reverb, delay, and a flanger, and there is even a built-in master EQ to polish your overall output.
The sequencer portion contained within the plug-in will allow you to build a complex or basic arpeggiator for your sound and instantly adjust how the arpeggiation reacts. To give it a good test run, try selecting a sequence from the Preset menu and changing the arpeggiation and then the actual sound that is being arpeggiated. There will be very few (if any) artists who will not be able to use this plug-in for creating sounds, fills, or even an entire groove.
These plug-ins don’t make sound, but the things they can do with it are astounding. In this section we’ll take a look at the missing plug-ins in your FL Studio experience that allow you to alter your audio for remixing, distorting, and even mastering. These plug-ins have different purposes, but keep in mind how you could use them in your current projects (including the ones you might have thought you finished).
Prior to having all of these digital recording toys, manipulation of sounds was all done manually, so if somebody wanted a sound to play backwards, he would have to actually set it to play in reverse and then record the result. If he wanted a stutter effect where the volume cut in and out, he would have to adjust the volume sliders manually to achieve the effect (although I doubt this technique was very popular way back when).
Grossbeat (see Figure 8.11) allows you to create these audio stutters and time-shifting changes using an array of envelopes and settings contained within one plug-in! The most impressive part of this plug-in is that it can operate on the audio-stream, so as your voice passes through the plug-in, you can make it scratch certain words by setting a time-adjustment curve in the graphic display.
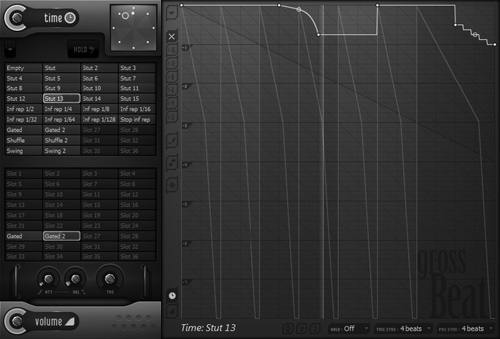
Any sound can be reversed, scratched, or stuttered using the controls in Grossbeat, and you can combine the time adjust with the gating effect. One thing to keep in mind is that Grossbeat affects sound based on where the time position marker is in the plug-in, so in order to hear any effect, your project must be playing.
Once you understand the playback direction on the graph, you can start recording vocals that have a tempo-based scratch to them, so the scratch will always happen precisely when you want it to. Combined with the gating effect, there is no genre of music that wouldn’t receive benefit from using this plug-in. Especially for those creating rap and hip-hop, this will become one of your most used polishing tools for your vocals and other percussive sounds. There is no better plug-in for creating that perfect scratch or stutter in your audio, and Grossbeat comes in at the top of my list for extra purchases.
The Hardcore plug-in (see Figure 8.12) takes thousands of dollars worth of guitar pedals and crams them into one easy-to-use plug-in. Guitar players who have used multiple effects pedals will be intimately familiar with this plug-in before launching it because of the graphic display. It is set up to look identical to a guitar pedal chain with a few extra abilities.
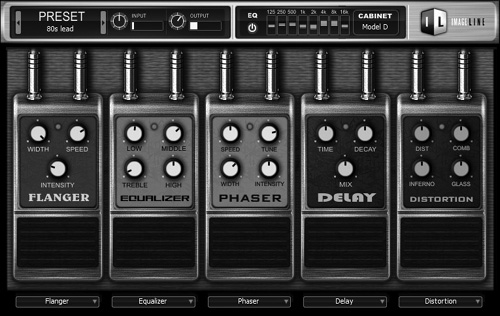
This plug-in is designed with guitar playing in mind, but don’t hesitate to experiment with vocals and other sounds or instruments. The built-in cabinet modeler replicates the recorded sound of different types of speaker stacks along with an EQ, so you can get that realistic guitar distortion or clean phasing. Remember that the purpose of this plug-in is to affect any sound, and it will not produce any sound without an input signal. Whether it is a live instrument, a mic, or a routed channel, this plug-in will create the effects that you look for in guitar pedals. This plug-in is a must for singer/songwriters, rock bands, and anyone who plays the guitar live. I have found this plug-in to be best suited for guitar sounds, but again there are no rules when making music, so experiment with adding this effect on different sounds.
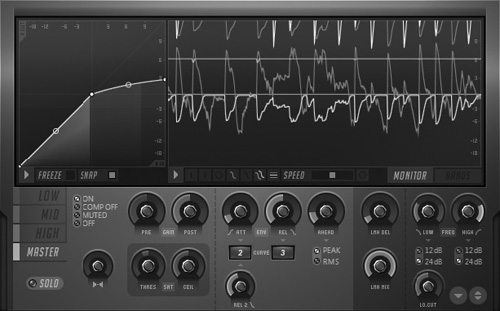
Have you ever listened to a track and wondered, “How do they get it up to the perfect volume without it getting too loud and causing clipping or distortion?” Maximus (see Figure 8.13) provides a prime example of how digital audio has made it easy for the home studio musician to create full, loud mixes that beef up weak parts and calm down volume spikes. The secret to this amazing plug-in is its use of three multi-band compressor/limiters that affect the low, mid, and high frequency ranges and a master compressor/limiter for your main output. This allows you to place compression on the lows to address those deep notes, such as bass and kicks, but place a different amount of compression on the mids and highs. Then you can place a final compressor/limiter on the entire output to pinpoint the mix for which you have been searching.
This borders on the argument of loudness versus dynamic range, where engineers make their mixes so loud that there are no perceivable soft parts—this is commonly referred to as the loudness wars. Many professionals argue against heavy compression because they assert that it takes away from the range at which a song should play, while proponents for making it louder claim that their mixes get heard more easily by record companies. Some bands even have their engineer mix their songs at a maximum volume so that all sections are the same volume, including the quiet breaks. I feel that this is a decision for you to make, and coupled with opinions from friends, you will find your happy medium.
Remember that it is all about experimentation through trial and error when trying to create what you think is the perfect mix. Maximus, although great for limiting and compression, is best suited for the master track in the Mixer because it addresses all of your volume problems for the entire project in one plug-in. One effective use of Maximus on a single track, however, is for de-essing vocals, which takes out the prominent sibilance in your words (S sounds that have heavy midrange frequency response). For the most part, though, this will be the last thing that you place on your final mix, and the intention of the plug-in is to bring your projects up to professional status. Everyone can and will benefit from this plug-in, and for those trying to get their songs on the radio, this can give your track that crisp edge it needs.
We have taken a look at everything that FL Studio has to offer, and I hope that you have gained a much stronger understanding of not just using, but effectively using the software to meet your needs. Remember that you can always refer back to sections in the event that you get lost or need a little extra info, but the best way to get better at using the program is to actually build projects inside of it. The more you try to use different effects, generators, and general abilities of the program, the more you will find that creating a project is no longer about creating a beat slowly from pieces, but it becomes a fluid workflow that is only hindered by your own imagination.
My strongest words of wisdom are practice, practice, practice! FL Studio has managed to create a program that competes with—and in many cases exceeds—the abilities of professional-level software available today.
I have worked on professional setups and duct-taped home studios, but regardless of how expensive the equipment was, the only concern was whether music could be made. With this software in your possession, you not only have the building and editing tools, but there are even a few that aid the completely tone deaf. Even the Randomizer can help you create the hook you need without having to do anything aside from hitting a button. FL Studio is truly limitless, and you will find that mastering the capabilities of the software will allow you to create more music than you ever thought possible. Now stop reading, and start making some music!