Vocals, guitar, piano, drums, bass, and a wide array of instruments require recording into FL Studio. There are ways to emulate these sounds, which we will look at in the next chapter, but for now, it’s time to focus on the real stuff. With audio recordings, there are no second chances or fixes once it is recorded, right? Wrong! Even recorded audio can be manipulated to fit a tempo or pitch, and with the powerful tools available from FL Studio, these tasks are easy to perform. Mammoth programs, such as Pro Tools, have time-stretching plug-ins, but that one plug-in can cost four times as much as FL Studio with everything included! Seriously, let that sink in a moment.
In this age of technology, wizards crunching numbers in a computer lab have been able to give us the tools for making music that no longer require a black American Express card to purchase what is needed. Many recording programs out there will give you the ability to record anything you like, but they lack in editing abilities, while others are limitless but, as previously mentioned, can simply cost too much money. FL Studio allows you to record, has the editing capabilities, and is at a price that will not devastate your funds. In this chapter we will explore recording audio into FL Studio and the many ways that we can easily manipulate the sound to our liking. We’ll start off with a little explanation of how to set things up, then demonstrate a few recording examples, and finally look at the creative ways we can edit our recordings.
This chapter focuses on recording audio and not MIDI, so the virtual instruments and generators will be discussed in the following chapter. Here we’ll take a look at recording vocals and real instruments, which is quickly becoming the only tangible medium remaining in much of music today. I love live bands, but much of the music that you hear in commercials and on the radio is nothing more than music created from scratch in a program with a live singer placed in the mix. The main things that we need are obvious—computer, interface (soundcard), mic, and something to record (vocals, guitar, and so on), but there are a few things to be aware of when getting set up. It is my goal to give you the necessary information for recording audio so you never get stuck wondering what to do next or why something isn’t recording.
As you might have noticed, there are a few versions of FL Studio available, and each comes with progressively more features. The key is choosing what you want to do with FL Studio and which (if any) limitations you are able to live with. In my opinion, because of the low cost of the entire program even at the highest level, I recommend getting the best that you can afford. You might not think you need a tool or a feature, only to find out down the road that it is exactly what you need. You can always upgrade, but learning the tools available right away will allow you to work quickly with no future roadblocks.
We could take a look at what everything can do, but that is the purpose of this entire book, so for now I will focus on the limitations of each version and provide a few examples of how it might affect you when choosing a purchase.
The Express version has no Piano roll and cannot record, but it is great if you only want to create loops and simple music riffs that you play live. The Express version also will not allow you to run FL Studio inside of another application, such as Pro Tools, so if you want to send audio into another program, you will have to export the WAV file of your project and then import it into the other software program. In this version you are also unable to have automation events for patterns, so if you want to affect everything in a pattern, you would have to individually change each channel parameter.
The Fruity edition is starting to look more like the FL Studio that we all know and love, but it still lacks the ability to record audio. In the Fruity edition, you have use of the Piano roll to make sounds and play instruments. These two versions will allow you to basically make beats, but the moment you want to record vocals or a real instrument, you will see just how incomplete these versions are.
The Producer edition is the standard FL Studio structure and contains everything you will need to record audio and make music. This is the version that I will be basing this entire book on and the minimal version you will want to be using. The Producer edition allows recording with Edison, so you will finally be able to lay down that vocal track you’ve had written down.
The Signature bundle is the most-for-your-money purchase because you get the Producer edition with hundreds of dollars worth of plug-ins added to the package. The added tools give you a larger arsenal for creating and editing sound in your projects and in my opinion is worth every penny. From a musician and an engineer’s perspective, I suggest the Producer edition as your minimum purchase because you will find that the inability to record audio can greatly hinder your music making.
So after that can-and-cannot section, let’s jump back into the audio recording aspect by taking a look at the interface we will be using. Sadly, I am unable to describe setup for every device made—that would be a painfully long book. So, I’ll give you an overview of what you need to focus on.
When you are recording, you need inputs on your interface so that the sound can pass into FL Studio and be digitally recorded. If you will be recording vocals, then you’re going to need a mic input of some sort on the interface. If you are recording an instrument that has a line output, then you can also use a mic, but you will usually get a cleaner sound by using a line input on you interface.
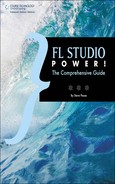
When you open the Mixer (F9), you can see the available inputs from the drop-down menu next to the word IN (see Figure 4.1). Each insert track has its own individual IN menu, allowing you to select as many inputs as your interface physically has. Most of us will only need one input so that we can record vocals or a bass riff, but if you want to record drums or a symphony with multiple parts to be mixed, then your interface will need more inputs. Consequently, you will need more mics and cables, too, although for me, getting more gear is a happy day.
On the other end of capability, if you are trying to use a USB microphone that uses the onboard soundcard of your computer, and you do not have an interface, you will witness a few drawbacks that are common to any recording software program that uses ASIO. Using ASIO4ALL will allow you to record with a simple USB mic or one that plugs into your computer’s sound-card and causes FL Studio to think that you are using ASIO. There are certain onboard soundcards that can cause latency when trying to monitor recording, so if this is necessary for you, consider upgrading to an interface that uses ASIO. So now the fun part: Let’s actually look at recording audio and your options for doing so.
This way of recording tends to be the most familiar to those of us who have seen or used other recording software programs. This is a great way to quickly get some audio laid out on your Playlist when you don’t need any editing. If you find that you need to make some changes to the audio, you can always load the audio into Edison, which we will discuss in the next section. Think of this method as shooting first and asking questions later, because what you record will drop directly onto the Playlist as an audio clip (see Figure 4.2). Initially, this fell into my comfort zone because the recording is in view and will play back in the song with no routing or adjusting. For singer/songwriters and full bands, this is a great way to get everything to show up as a collective grouping. From single- to multiple-clip recording, the setup and preparation are key to getting your recording done right.
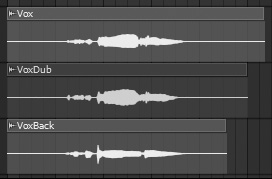
When a musician who is new to FL Studio’s architecture first glances at the Mixer and Playlist combo, he or she might see a few options for routing that are similar to other programs, but the way you can link tracks is much more expedient and dynamic. Take a look at Figure 4.3, and you will see that I have set up eight tracks for recording drums.
The first thing I did was name and color them by hitting F2 and going through them. I find it very helpful to name your tracks prior to recording so that you can quickly and easily find the audio you need. A quick way to scroll through the tracks is to select the Mixer (F9) and then hover over the tracks and roll the mouse wheel. At the bottom of these tracks is where I record-armed the track and saved the name of each file as the track is named. For example, when I record-arm a track (click the disk-shaped icon at the bottom of the track), a window opens to name and save the audio that is about to be recorded. If I am arming the kick track, I name the file Live Kick so I know that it is the live kick drum. This seems basic, but forgetting to name tracks and recordings can quickly slow down your creation process when you get stuck trying to find a certain audio clip.
In Figure 4.3 I have the Crash track selected (which you can tell by the little arrow at the top of the track), and I have the input set to my fourth analog input. Each named track has one of the eight inputs assigned to it, and these inputs can be found at the top right of the Mixer (see Figure 4.4). When you record-arm a track and do not have an input set, you will automatically be prompted to choose an input from a drop-down list, where you can select from stereo inputs at the top or mono inputs at the bottom. This is where many people run into problems with their interfaces, because when you select a stereo input for a mic input that is plugged into, for example, Input 1, it will only play back out of Channel 1. This causes you to hear your vocal recording in one speaker or one side of the headphones, because the recording is a combination of Input 1 (left speaker) and Input 2 (right speaker). By selecting Mono, you are taking that single input and playing it through both the left and the right speakers.
So now that we have all of our inputs selected, we’ll click the Record button and choose to record onto the Playlist. Keep in mind that there is a recording filter on the actual Record button, so make sure that audio is selected by right-clicking the Record button to see the filter. With the metronome turned on (Ctrl+M), we get our one-bar count-in (which can be changed to two bars by right-clicking the Countdown before Recording button) and have our drummer play a section. The results will show up in order (see Figure 4.5) and play back together as though it was a single microphone, but now you have control of each piece of the drum set, which makes mixing much easier. Recorded audio will not show up in the Playlist until you press Stop, but if it still does not show up, make sure that you have Auto Create Audio Clip selected (Mixer Main menu > Disk Recording > Auto Create Audio Clip).

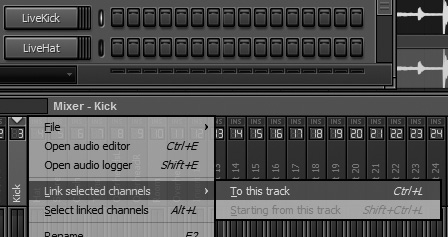
Link your channels to your Mixer if you have not yet done this, so that each fader in the Mixer will control different parts of your mix. With the channel selected in the Channel window, right-click on the Mixer track that you want to link to that audio clip, as shown in Figure 4.6.
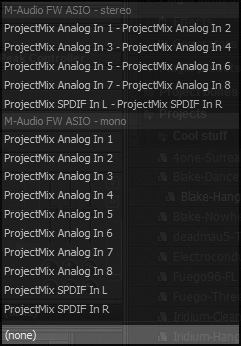
So what if you only have one mic, and you want to do a few recordings in this fashion? Not a problem at all! Again, record-arm a track and select your input. Usually it will be Input 1, but be certain that is where your mic is connected to the interface. Now click Record onto the Playlist and record the audio that you would like. The recording will begin where you have placed your play position marker and end where you choose, or it will record to the point where your selection stops. So if you have an area highlighted in red, the recording will stop once the play position marker reaches the end of the selection. This can be problematic if you are recording a vocal that goes beyond your selection, because it can get cut off (see Figure 4.7). My recommendation is to not bother with highlighting sections until you are ready to start mixing and editing—this way, it will record as long as you like. Some artists I have worked with came up with great vocal fills after they would sing a part, and if I was still recording, I could take that fill and place it in the mix as with the example of Figure 4.8, where the third vocal was a later portion of the first take.
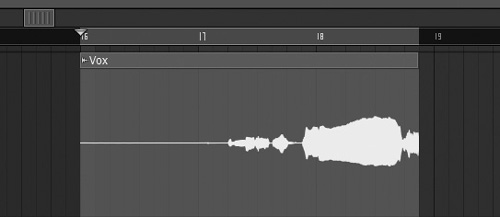
Figure 4.7. Selecting an area to record can cut off the end of your vocal if it goes beyond the selection.

One thing that should be mentioned is your recording levels and what constitutes a good level. The idea of recording is to record the sound loud enough so your preamp volume is not in the sound, but quiet enough to prevent distortion. In the tests that I ran with my soundcard, the input levels in FL Studio accurately matched those in the software control panel of my soundcard, so I could set levels using just my preamp without having to adjust for error of software. I found that recording between –20 dB and –10 dB gives me a clean recording with no distortion. By watching the meters in FL Studio, I saw that there were peaks between –14 dB and –8 dB, and this gave me clean recordings. There is no real golden rule, but a good start is recording loud enough so there is no preamp hiss and quiet enough to prevent distortion.
Here is the important thing to remember: If you have multiple tracks with the same input selected, and they are armed, you will record the same thing onto different tracks. This isn’t a huge deal, but your projects can quickly become cluttered with unnecessary channels and audio clips, so pay attention to your armed tracks. Once your audio has been recorded, remember to link the channels to the Mixer tracks. Keep in mind that this can be done later, but it is best to keep organized as you work and will make tweaking your song very easy.
So your question may be, is this the fastest way to record? Well, in a sense yes, but the clips are not immediately as flexible as recording into Edison, so in the long run you could potentially be slowed down a step if you have major editing to do on your audio. In my opinion, if you are recording multiple inputs all at once, Playlist is the way to go. FL creators swear by recording into Edison, and I have to agree that the features for solo recording, such as auto-inserted loop-point markers, can make your experience smoother than the Playlist options, but even the creators wouldn’t argue that eight Edisons opened up just for drums alone can clog up your project visually and productively. I use the Playlist record for many of my recordings. Especially when you have those pitch-perfect vocalists who do not need auto-tune (I was not blessed with this ability), drop that vocal on the Playlist, link to the Mixer, and move on. For loop recording, such as getting that perfect guitar solo or vocal line, try out Edison, but Playlist recording will lie in the comfort zone of those familiar with other recording programs and is my personal choice.
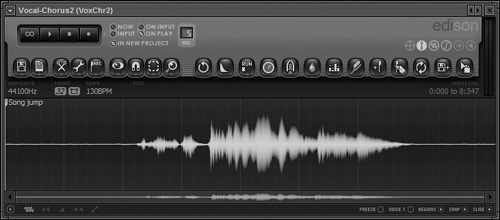
I mentioned multiple recordings in the Playlist, but for single, one-shot recordings, Edison is the tool to use (see Figure 4.9). It is great for those who require the ultimate in control for editing, stretching, and looping smaller recordings. It is important to know that your computer uses RAM to hold audio in the Edison window, so the more instances of Edison you have open, the greater the strain on your system. Try to imagine that the Edison is a place to hold your short recordings that you can edit individually. The Edison will tell the audio when to play and automatically place it at the point of the song you recorded, but you can also drag the audio itself out of the Edison and onto the Playlist.
Let’s take a few minutes to get a general overview of the features available in Edison.
The Edison transport (see Figure 4.10) is a simple and familiar set of buttons that is very similar to most transports in recording software. The first selection will loop the playback within the Edison; this is great for quickly listening to a portion of audio that you are working on to make sure it is just right. The Play button is self explanatory, but keep in mind that this Play button will only control playback of the audio contained in that instance of Edison.
There are no surprises with the Stop button, and the Record button next to it will cause recording to begin when you press Play on the main transport of FL Studio. What I like about this is that you can just hit Record, and the incoming audio will be put into RAM. Again, this is for clips under 10 minutes, so avoid Edison for long passages, such as recording an entire jam session that is a couple hours long, because it will use a large amount of your computer’s memory.
The toggle switches shown in Figure 4.11 allow you to adjust how Edison reacts when recording audio. Now means that the moment you press Record in Edison, it will start recording. This can be problematic because it will not automatically line up with the song when you try to drag the audio onto the Playlist.
On Input will cause recording to begin when Edison receives an audio signal, such as a voice or an instrument. To adjust how loud you want a signal to be for recording to start, drag your mouse over the level meter in Edison, and you will notice a green bar spanning the waveform window growing larger or smaller. The audio that stays below this level will not be recorded. When you have a bit of room noise, such as a loud computer, traffic outside, fans, and so on, then use this option so you don’t capture two minutes of your computer humming, but bear in mind that if that noise will be there regardless, sometimes it can come in handy with Edison’s noise reduction feature.
Input works in the same way, but rather than a continuous recording, the recording will stop when Edison receives silence. See Figure 4.12.
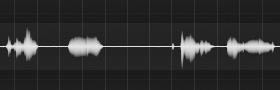
Figure 4.12. This image shows the sensitivity of the On Input and Input options that you see when dragging the mouse over the level meter. With this setting, the audio already recorded would have not made it into the Edison because the signal is below the threshold.
On Play is my option of choice because this means that recording will start when you press Play on the master transport. This ensures that your recording will line up with where you started recording, and it makes dragging the audio file over to the Playlist an easy task.
The In New Project option will essentially record over your last take in that instance of Edison, and the Max section allows you to set the maximum time that Edison will record before looping back around and recording over past recordings (in that instance).
The menu bar of Edison, as shown in Figure 4.13, is the control center for the plug-in. This is where you will find the options that make editing audio a breeze.
Many of these options will be familiar to you by now, so I will stick to broad definitions unless clarification is needed. The first button (File) has a series of options beginning with New, and this will open a new Edison window. Load Sample will allow you to bring in a file from anywhere on your computer, so if you have vocals that were recorded elsewhere, and you have them saved on another hard drive or even a flash drive, you can access them here.
Save Sample will allow you to save the sample as you have it inside Edison. Once you have the recording that you want, you can save it and then place it on the Playlist and close Edison so you can save on computer memory or keep it stored for a completely different project. If you have an awesome part that doesn’t seem to fit the song you are working on, you can save it, and the best part is that you can record any sound that goes through FL Studio.
The Export Regions option allows you to save portions of the sample inside Edison, and if there are markers set (which is automatic when loop recording), then the sample will automatically be split into different files based on the marker positions, and the files will be saved in relation to the marker names. So if you have three parts in a single Edison instance that you like, just set the markers, select the region, and export it, and all three parts will be saved separately.
Export Display will take a picture of the instance waveform and turn it into a JPEG image with information on the waveform in the image. The Settings option will open a dialog box that first has a drop-down allowing you to tell Edison what to play when you are using a MIDI keyboard for control.
Note Preview will play the entire Edison sample, Slice Preview will play slices of the audio, and Auto will decide whether to play the whole thing or slices, based on the note range and whether you have slices in that instance of Edison.
The Settings selection opens up a dialog box with options for setting your keyboard to play note previews or slices of audio. In this section you can also set Slave Playback to Host options, such as Ignore Host Selection, which will allow you to select an area in the Playlist for Edison to base its playback timing on. This means that if you have a selection in an Edison recording that takes three seconds to start making sound (there is silence or no vocals at the beginning), then that selection in Edison will take three seconds to play from the beginning of the area you selected in the Playlist instead of playing immediately or from the beginning of the Playlist. Ignore Own Selection will cause a selection that you make in Edison to tell the Playlist when and where to play. Going back to the main File menu, the final list is the 10 projects that you opened most recently, including any demos or tutorials.
The Edit Properties selection will open up the Sample Properties window, where you can adjust the information of the file, format, and tempo and set root notes for your sample so that plug-ins will have a root note to work with. The resolution can be changed from 16- to 32-bit floating, which is the standard format that FL Studio will use, but it takes up more space, and 16-bit is CD quality. The final option is great for making a mono signal into a stereo signal or vice versa. For example, if you want your mic recording (mono signal) to have a doubled signal, choose Stereo, and Edison will double the recording and place one on the left channel and one on the right channel.
The Edit section houses options that I won’t go into, but I will touch on the ones that are not repeats of items discussed already. The Undo Using Mix options will bring up a list that shows the last changes made, and you can go back to a certain point based on your selection. Disable Undo for Large Samples will come in handy when (even though I suggested against it) you are using large samples, so that FL doesn’t use memory on remembering changes that you made. This will prevent you from undoing any changes, though, so be warned!
The Paste options are great for cutting up your audio and moving it around. Paste Insert will take your copied selection or region and insert it where you make your selection, so everything underneath will be moved farther down the timeline. This is great for repeating a vocal or adding in a verse when you forgot to sing a part—not that you would ever do that, right?
Paste Mix options will allow you to apply envelope changes or EQ changes anywhere on the sample. Paste Stretch will open a window allowing you to make time-stretching adjustments to the sample about to be pasted. The Paste Replace (Drum) option will open a window allowing you to determine the decay of drum hits. This is useful when you have a drum sample with audio that cuts off on the end of it. Opening this tool has FL Studio redraw the decay into the sound so that cutoff sound is no longer present.
Trim will cut out everything outside of the selection you have in Edison. Click-Free (Smooth) Editing, which is on by default, will try to make sure there are no pops or clicks in the audio when different edits are made, such as cutting a sample in the middle of the audio.
I wanted to include an image of the Tools menu due to the number of options located in this section—and as you can see in Figure 4.14, there is plenty to choose from. Cancel All Envelopes is a quick way to trash your automation settings, so if you are unhappy with the way you wrote some volume changes, this option will clear them all out so you can start over.

Add Points at Selection will place control points that you can use to adjust your envelope settings to the beginning, middle, and end of the region you have selected. Add Points at Regions is similar, but it will add points at the region boundary. While you can always draw them in, this feature will allow you to quickly make a selection and have the points written in, so if you want a certain section to be, for example, lower in volume, use this option.
Flip Vertically will allow you to try out the reverse of the settings you made, so if you want a pan to start on the left instead of the right but pan at the same rate, use this switch. Scale Levels and Normalize Levels will bring up a dialog box allowing you to affect the envelope setting that you currently have.
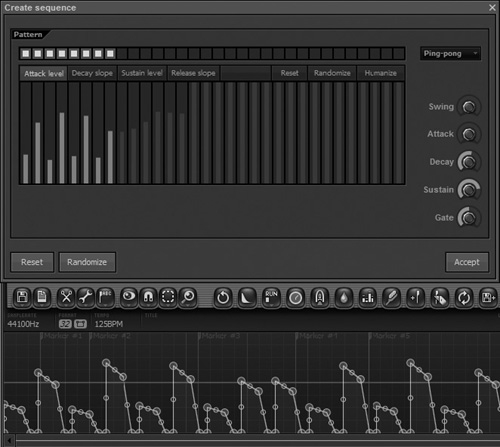
The last option available in the Envelope section (Create Sequence) will open up a window that allows you to adjust the envelope to react to steps similar to the Stepsequencer (see Figure 4.15).
This is a great option for quickly inserting a pan into a sample without having to draw every point.
The Amp section begins with Mixdown Amp Envelopes, which will take your envelope settings and apply them to the sample permanently (although you can still undo). The Amp option opens a window allowing you to make changes to a stereo sample and adjust separation and channel volume.
Reverse Polarity will flip the waveform upside down and invert the phase. Normalize and Lossy Normalize will boost your sample so that the loudest part of the audio is brought up to 100 percent of the maximum level and all audio is adjusted based on the amount that the loudest part is brought up.
Fades can be applied like any sample, and Declick will remove any clicks at the beginning of a sample, which can be useful for dealing with loops. Center will remove any DC offset, as discussed in Chapter 3.
The Time options will allow you to do the stretching that is needed to fit the audio in with the rest of your song. The stretching will be familiar, aside from the Claw Machine option. We have discussed the Claw Machine, but the important thing to note in the Edison is that beat markers must be set or a tempo must be recognized in the sample for this option to even be selectable. Adding beat markers will be discussed when we cover the Regions portion of the menu bar.
The Scratch feature allows you to use an envelope to “scratch” your audio similar to a DJ with records. Left to right represents time, while up and down represents the point where the sample will play. So for the sample to play normally, you need a line going diagonally upward from the bottom-left corner to the top-right corner. Drawing an upside-down V will produce a scratch sound, but as you will see in Chapter 6, “Instrument and Generator Plug-Ins,” Wave Traveller will be a much simpler option. The Channels section will allow you to make changes based on the left and right channels of the audio, and Synthesis will produce a white noise either in the region that is selected or throughout the entire Edison window if there is no selection.
The Scripting option allows you to write your own code for changes to the audio, but it is outside the scope of this book to delve into code and scripting. For those champions of coding, you can use Pascal and Visual Basic to write your scripts. The Noise Gating section will allow youto tell the audioin Edison when to play based on how loud or quiet it is. Remember that to set a threshold, just click and drag over the level meter so that you can see a green bar appear over the audio. Trim Side Noise will automatically cut out any audio that is below the threshold you set, and Trim All Noise & Slice Up will cut out audio falling below the threshold you set and create regions based on the leftover audio pieces. So if you record three words spoken apart from each other, such as “hit,” “that,” and “beat,” selecting this option will separate those words into three regions that you can instantly place anywhere that accepts audio in FL Studio.
The Spectral section houses options for opening convolution reverb, blur, equalize, and denoise tools, and each will open in its own window upon selection. The Regions list has familiar options aside from the Tune Loop selection, which will open a dialog box that lets you adjust loop settings when you are creating a loop out of the audio loaded into Edison.
Analysis allows you to convert the audio to score and dump it to the Piano roll, which is great for being able to “play” the pieces of sound on your MIDI keyboard or place them randomly in the Piano roll. This option is amazing because it will slice the loaded sample, figure out the pitch of each slice, and then map it to the Piano roll automatically! The Sequencing option will allow you to place the audio on the Playlist, but the Drag button is much easier and requires less menu navigation, in my opinion.
The Regions options (see Figure 4.16) will allow you to make changes to any regions you create in Edison. Think of the regions as parts of the audio that you decide will be different sections. So if you have a vocal recording that has a verse and a chorus in it, you can select the verse as one region and make the chorus another.

These options are great for breaking up your vocals for easy identification of parts when your recording is a little longer. The first option will add region markers at the beginning and end of an area that you select (see Figure 4.17), and the Add Marker option will just add a marker at the start of the section. Add a marker to define a point in time in the audio, such as a break, and use the region marker to define a section of audio. Set Loop will make your selected region loop on playback.

The next option (Set First Downbeat) is great for creating an essential tempo map of your audio. This means you will tell FL Studio where your downbeats in the audio should be. This helps your audio fit perfectly with the rest of your music and has it automatically lock to the tempo of your current project if there is no tempo information in the recorded audio (which there usually isn’t). I use this for vocalists who can’t seem to stay on beat but are still able to sing. Setting downbeat markers keeps their vocals right on point with the rest of the song because the audio adjusts itself to the project tempo when placed on the Playlist. Use the set downbeat marker and move it accordingly, and if the grid in Edison needs to be adjusted, you can Right-Shift+Right-Ctrl+click (and hold) on the grid in Edison and drag until the grid is lined up.
A great way to use Right-Shift+Right-Ctrl is to hold the keys down and then simply click to set a downbeat marker instantly! Using this combo will speed up the process of matching your audio to the tempo as well as perfect playback that is slightly out of time. After holding the combo and placing a downbeat marker, you can let go of the keys, move the downbeat marker to the proper spot, then press the key combo again and align the grid to the audio.
The Assign options allow you to play the regions that you create in Edison on a MIDI controller or keyboard. This is awesome for being able to play a vocal part that you want broken up or that you want to repeat quickly.
The Auto-Slice section will take your audio and slice it into regions based on the selection you make from the Auto-Slice menu. Dull auto-slicing just means that only a few regions will be created, Medium will give you a few more regions to work with, and Sharp means that you will have many region slices to work with. Remember that any can be erased, and you can always add regions if you are not happy with the auto-slice results.
The different grid slicing options will slice the audio, depending on which grid line size you select, and the audio itself will have no effect on the slice that is made.
Detect Beats will try to determine the downbeat and tempo by itself and will draw markers accordingly (see Figure 4.18). If the beat or groove is more ambient, FL Studio will have a tough time trying to figure out the beat, but you can add markers as needed. In Figure 4.18, I have imported a groove that I made by dragging it into Edison from the Browser and selecting Detect Beats. Now when I drag it into the Playlist, it is already matched with the tempo that I have set for my project. This is great for bringing in beats that you liked but didn’t think fit the song you were working on, which is why I suggest saving everything! You might run out of space, but that is what extra hard drives are used for, and many that have a terabyte of space are very affordable.
Detect Pitch Regions is a fantastic tool for monophonic sounds that will separate your audio into regions based on melody. Vocals can get tricky when the vocalist is wavy, has vibrato in the voice, or is simply off key, but instruments playing single notes work great for this. Detect Pitch Regions basically finds the notes in the audio and separates each into its own region. The regions are mapped to your MIDI controller so that pressing the keys will play the regions. The Assign to All option allows you to choose to map the regions to your whole keyboard, white notes only, black notes only, or none, where the keyboard does not play the regions.
If you are getting pops and clicks in your audio at slice points, you can select Zero-Cross Check All Regions. This moves region markers to a point where the audio is silent to prevent any problems. Freeze All will prevent you from making any mistakes by turning off editing abilities of regions.
The View section, shown in Figure 4.19, will help you select the appearance that you want to represent your audio and how precise your spectrum view will display. Spectrum will change your default view into a spectrum view where left to right is still time, but up and down represent the frequency that is playing, and volume is represented by the color of the spectrum.

Dual View will show both waveform and spectrum views together. The Display Settings options (see Figure 4.20) begin with Fancy mode, which will make the waveform smoother in appearance (see Figure 4.21). The Waveform Channels will affect the waveform appearance, with Mono combining the waveforms into one summed waveform and Multichannel having both left and right on top of each other (see Figure 4.22).


Figure 4.21. These two identical sounds show the difference between using Fancy mode (lower instance Edison) and turning it off (upper instance of Edison).

Figure 4.22. With Multichannel view selected in Edison, the color may be difficult to see in this image; however, the blue-colored line representing the left channel and the pink-colored line representing the right channel are easy to discern in the program.
The left and right channels are actually different colors—the left side is drawn on top of the right side, and you can see the difference by selecting Left to display the left side and Right to display the right side. However, remember that if they are the same signal on both sides, you will not see a difference. The left and right coloring is only apparent when the left and right are different (even slightly).
Spectrum Resolution will allow you to raise and lower the definition of frequencies in Spectrum mode. Natural Scale will make more room for the lower end of frequencies when working in Spectrum mode, so if you are using the Spectrum mode for analysis on a bass recording, select this option. Natural Weighting will change the spectrum view to better represent how we hear frequencies, so that those shrill mid-highs will be brighter and easier to spot in Spectrum mode.
The quality settings affect the look and response of the graphics in Edison, and the higher you go, the more computer power you will need.
The final selection from the Display Settings is the Spectrum Gradient, and each option will affect the colors of the spectrum. This one will be entirely up to your preference, and if you are using spectrum view, I suggest trying these out until you find one you like.
The Regions section contains toggle switches that will turn off either the region markers or the loop markers. This will not prevent a selected section from looping, but it will get those pesky markers out of view without removing them.
Time Format will allow you to see the position of your selected region in samples, min:sec, bar: beat, or auto-mode, which will decide for you. The Misc options will allow you to place the scroll bar above or below the audio in Edison. And by selecting Background Gradient, there will be a 3D effect placed on the background of the sample window.
The Snap settings are for telling your envelope points and region markers what to align with. When I say “envelope points,” I am referring to the points drawn on an envelope where they change their parameters—for example, where the volume starts to go up. Snap to Grid will make those points stay on the grid in the background of Edison, and Snap to Regions will keep the points linked to the regions you create.
The Samples option will cause the envelope to snap to samples, which is very precise and the way to go if you are planning on some heavy automation. Snap to Zero-Crossing is effective when you want changes in automation to happen where audio is absent so that there are no clicks and pops in your audio. Snap to Pitch will cause the envelope points to snap to positions in the audio where pitch changes are detected. If you are finding that your automation points are not lying where you want them, try experimenting with these different options.
The Selection and Zoom options are fairly self explanatory, but it is good to note that the up arrow will deselect your current selection, and Ctrl+A (when Edison is selected) will zoom in on the region that you have selected.
The collection of buttons shown in Figure 4.23 will be useful when you are performing direct changes to your audio and will allow you to individually manipulate each region. The Undo button works similarly to the main Undo button, but this one will only undo your undo that you just did when pressed twice. To go back further, right-click the Undo button, and the last 10 changes will be shown so that you can go back to a certain point.
The Fade-Out button will create a fade-out of your selected region when left-clicked, and when right-clicked, it will remove any clicks that are happening in the audio by adjusting the region to a zero-crossing.
The Script tool will allow you to run scripts that are written in Pascal or Virtual Basic, but again is outside the scope of this book. Any tools you need for audio manipulation can be found within FL Studio without using scripts.
Time Stretch will allow you to independently adjust the time and pitch of your audio so that you can get that desired speed or sound if you do not want it to snap to the grid. Here you can slow down your voice to make it deeper or speed it up to create a new vocal that has a different rhythm from the rest of the audio.
The Convolution Reverb option will open a dialog box that allows you to place reverb on a sample, but I suggest using the reverb plug-ins for adding reverb, because if you drag the audio onto the Playlist and end up not liking the reverb or thinking it is too heavy, you will have to start over with the original sample.
The Blur tool allows you to take your sample and smooth it out if you don’t like how harsh it is coming in or playing. The EQ tool will open a dialog box that allows you to create an EQ envelope for your audio, which is useful for quickly removing unwanted frequencies.
The Clean Up button will open a dialog box that allows you to remove clicks or random noise in your sample as well as adjust the frequency that plays in the sample. One example would be if a bass line is too thick and overpowering—you can open this tool and raise the frequency limit where you are hearing the most trouble. At first it seems a little backwards, because raising the bar will make the sound quieter, but think of it as a limiter that suppresses the sound.
The Add Marker button will add a simple marker at the beginning of your selected region when left-clicked, and if you right-click the button, it will add a region marker that surrounds your selection. Auto-Slice will slice up the region you have selected, so if you want the whole audio sample sliced, press the up arrow to deselect any selections and choose Auto-Slice.
The Loop Tuner will allow you to fine-tune any loops that you have made by adjusting any pops and clicks, the volume of the loop, and any crossfades that need to be applied to the loop. If you have a selection that you want to make a loop, just right-click this button, and the selection will be made into a loop automatically.
My favorite tool available in Edison is the Final button, which is a drag option. This allows you to drag the entire sample (when nothing is selected) or a specific part into any part of FL Studio that will take it. I usually use this to drag my sample onto the Playlist, but your imagination is the limit, because the sample can be dragged into any plug-in that will accept it. By far, the fastest way to place an audio selection onto the Playlist is by pressing Shift+C when Edison is selected.
The set of buttons shown in Figure 4.24 performs different tasks for working with Edison, beginning with the Scrub tool. By clicking and dragging, you can play the audio forward or backward by moving the mouse left or right.
The second button is the Slave Transport button, which will cause Edison to play when Play is pressed on the main FL Studio transport, but I find that this can be a nuisance when you’re trying to listen to different parts of a project, and I typically leave this option off, but keep in mind that it can be useful for auditioning different takes and loop recording.
Click-Free Editing will place a quick fade-in and fade-out on your selected regions to prevent pops and clicks and is the fastest way to do this without navigating through menus. Disable Auto-Scrolling prevents the view of your sample from moving when the play position marker goes outside of the viewable area. Mute Input is great when you need to quickly mute the mic that you are recording with to prevent hearing any room noise or outside sound when working with your audio sample.
The first button you see in Figure 4.25 is a menu button that will allow you access to all of the buttons that we discussed earlier. It’s nice when you are not familiar with the graphic buttons, but you know the name of the menu you are looking for.
The next button is the Edit Sample button, which will bring your waveform (or spectrum view) back into the Edison main window when looking at an envelope.
The next four buttons refer to the different envelopes available, including pan, volume, stereo separation, and an all-purpose envelope button that can be linked to any effects placed on the audio sample. As an example, open up the EQ setting, pull down the low frequency, and then accept the changes. Now select the All-Purpose Envelope button and have the horizontal line of the envelope start at the bottom and then come all the way to the top and then back to the bottom (like a V shape). Now select Paste Special Envelope, and the audio will be affected by the low-frequency removal when the line is above zero and will return to normal sound when the right side of the V shape is back down at zero. This is a great way to remove bass from a section of audio, and if you are comfortable doing it this way, then it can be very quick. But fear not, because there are simpler ways to do this when we get into automation in the next chapter.
The final set of selections in Edison, shown in Figure 4.26, consists of toggle switches that affect the way Edison will react to attempted changes and any selections. The Freeze option will prevent any changes to the audio; this is good for when you just need to listen to parts and have the itchy trigger finger that accidentally hits a quick key without noticing. You will also see the envelope better because this option will visually remove control points that can accumulate across the image of the envelope.
The Noise Threshold button will show or hide the noise threshold (green bar) that we discussed earlier. The Step Editing mode will allow you to click and drag the mouse over your envelopes and will draw points every step that it changes. This is a great way to get very defined envelopes.
The Snap button will turn on/off Snap editing and allow you to either freely make changes or confine your changes to a Snap setting, as discussed earlier. The Slide button is important to note, because if you notice, when you move an envelope point or region, the remaining ones move with it. By selecting Slide, only the regions and points you move will move. I usually keep this one turned on so that I don’t have to worry about adjusting more than one point if I choose to move one point in the sample.
Now that you have an in-depth understanding of Edison and all of its functions, the big question is “Should I use this?” In my opinion, yes and no. For short vocal passages, Edison is great, and the editing abilities are superb. Imagine that you have a vocal sample you want to record, but it is not getting there on the first take. With In New Project selected, you can quickly dump the previous version until you get the take just right or keep all of the takes and Edison will automatically split them into regions, allowing you to quickly shuffle through parts you like or dislike. Many will find use for the Beat Detect feature because it will take an audio sample and find the beat, and when you place it on the Playlist, it will automatically be matched to the project tempo without you having to do any stretching or use any plug-ins. Basically, Edison will allow you to perfect your audio before even placing it on the Playlist and prides itself on its loop recording abilities.
When I say no to Edison, I am referring to long audio passages that span well over 10 minutes. (Remember that multiple takes can use too much space as well.) Even the most robust of computers can fall prey to memory shortage when too much of the RAM is used on Edison. Aside from sample length, I also say no to using effects inside Edison, because there are many more options that are limitless when trying to add EQ or reverb to your audio. I suggest using Edison to adjust timing and placement of your audio rather than how it sounds. Recording onto the Playlist will ensure that the audio is placed properly, and regardless of the length, once it is recorded, it is using a minimal amount of memory compared to Edison. The Playlist has the stretching options needed, but if you are recording direct with your project playing, then there should be no need to adjust your timing (usually). If you are recording multiple instruments, just record to the Playlist, because handling tons of instances of Edison is nothing short of ridiculous and time consuming.
Your recording quality will be limited by a number of factors, and your surroundings play a vital role in the end result. It is important to be aware of everything around you when you need to get that perfect recording, and be sure to use your headphones for double-checking your recordings for quality. This can be especially important with vocals, because many noises can creep into your recording without any notice, and if your vocalist has gone home, then you will need to bring him or her back in and spend more time and money re-recording what should have been a great series of takes in the first place. The key is to make sure everything is properly set up and ready to record. Although this book is not devoted to recording and the theory involved, it is good to have a brief overview of what you should monitor.
Many things can cause problems when recording audio, and one of them is the power source. I have helped many people building studios who would get random buzzing sounds and static in their audio even when they recorded inputs that were turned all the way down. One instance was from someone using a power outlet that was on the other side of the wall from his main entertainment center, and another was a gentleman who had power coming directly in from a huge electrical line. In both cases the trouble was solved by adding a power conditioner to plug into the wall.
This is not to say that these are the only causes for this problem, because there are many more that purchasing a power conditioner will fix. So is it magic beans or not? Well, if you don’t have any noticeable problems, then it might not be worth the purchase, but if you use old electrical lines, then it may be worth considering. My house was built quite some time ago, and the lines are not pristine, so prior to buying a power conditioner, I would get a slight hiss in my recordings. When music is playing in a project, all the sounds hide amongst many others sonically, but when I solo a recording, the disparity between pre- and post-purchase makes it worth every penny.
This is a big part of how mixes that you make in your studio will sound the same on a radio, a stereo, and, although it is compressed, even an MP3 player. A big problem many people have is that when they create their perfect mix in the studio, it comes out lacking power everywhere else they play it. Acoustics and speakers play a vital role in being able to hear what your end result will be.
Again, I must stress that this is a brief mention of why this knowledge helps, and deeper insight can be found in the many books that address studio setup and acoustics.
The speakers you use should have flat response and not boost the low and high frequencies to properly hear what the mix will sound like when put it on a CD or an MP3 player. When you are sitting, the speakers should be an equal distance from your head sideways, but the distance toward you will depend on the size of them. You want the best part of the audio to surround your head. Many monitor speakers that you purchase will have a guide for setting this up, too.
Now you have perfect placement, but sometimes you can get a finished product that still doesn’t match what you mixed. This is from early reflections causing cancellations in your hearing. When two identical waveforms hit each other, you can get cancellation or phasing problems where one waveform is playing immediately after another. The problem occurs when a waveform bounces off of a surface and returns to your sweet spot too quickly. To avoid this, there are many ways to tune your studio professionally, and these tips and tricks can be found in the literature available. (There are tons!) For the home studio, something as simple as a heavy rug or comforter can stop these bouncing waveforms when placed a few inches off of a flat wall. The hot spots are the walls to your left and right where your speakers are, above your head, the floor, and your rear walls. There are more intricate explanations if you are interested in perfecting a studio, and I highly recommend searching deeper into this topic, because it helped me adjust the problems I was having with my mixes.
The last thing I want to point out is your computer. Having this in the same room as you are recording is not ideal, but it can be done. Many computers seem quiet until you open a music project and it starts putting in some work. The blaring fan can be heard in every recording and can end up affecting your overall project because when you have a few vocals going at once, that fan hum is boosted in volume for every recording playing. You can try to EQ out the fan, but many times it will adversely affect your vocals and give them a flat sound. Moving the fan behind a comforter or into another room is a frugal yet effective solution, but if you can afford it, they make boxes that quiet computers down to very low decibels. Beware of overheating your computer, but a proper enclosure for the computer can make a big difference when you record in your studio or room.
At this point, you have learned all you need to know about recording audio in FL Studio and the setups that can improve your overall finished product. In the next chapter, we will look at recording MIDI and the different ways you can easily manipulate the sound that is triggered. We will look at what MIDI is and how it is used so that you have a better understanding of what is going on behind the scenes, and then we will get into different devices that work with MIDI. There will be a detailed explanation of automation and how it can be used to control different parts of MIDI as well as audio, and then we’ll finish off with a look at Live mode.