
When it comes to not reading the manual and just wanting to get things going, I am just as guilty as the next person. “Pshh, I can do this! I don’t need to read that piece of paper, right?” Well, in short, no, you don’t have to read it. However, like a professional engineer friend of mine, Paul Wagner, would say, “It’s not so much can you, but should you?” Originally, he was speaking of someone who buys a system so new that nothing is compatible with it; however, in this situation, his words of advice still ring true. In this example, I know that we all can pop in the disc and hope for the best, and sometimes things will just work, but we should make sure that things are set up properly. Systems falling beneath specification minimums or improperly routed sound can lead to the audio having pops and clicks, being distorted, or there being no sound at all!
In this chapter, I will explain the minimum requirements to run FL Studio properly, specifically with the computer and then with your hardware. Many times, you will find that taking the time to set everything up correctly will save you a ton of headaches, not to mention many calls to the people in the technical support call centers. When I was working at M-Audio, one of the most common complaints that we would receive from customers was about software running poorly, and it was because they were using computers that were less powerful than a typical cell phone. When you check these specifications yourself, not only will you know whether your system is up to speed, but if you need a new computer, you will know what you’re looking for when you get to the computer store!
Something to bear in mind while looking at these minimum specifications is that they are intended for a computer running only FL Studio when it is properly installed, with no oddball programs running in the background. Different programs, plug-ins, and services can cause system performance to lag, and when it does, that can slow down workflow and even cause audio to drop out (no sound) or become distorted. Simple things, such as music players, can lock out the soundcard you are using and prevent FL Studio from being able to use the soundcard to play sound!
These are the minimum requirements as shown on the FL Studio website:
These are my personal recommendations to successfully run FL Studio:
This is one of the most important aspects to recording with FL Studio. Before music went digital, computers were used to sequence MIDI and not much else, so it was not important to have a powerful computer to run things. Now we are in the modern age, where an award-winning artist can write, perform, produce, and finish radio-ready projects all in an extra bedroom or even while riding in a car! Why is the computer important? It is the engine of your project and allows you to work as quickly as you possibly can. If you don’t like to wait for something to load, or you hate not being able to record multiple inputs (due to computer power, not literal soundcard limitations), it is good to pay attention to this section.
The debate rages on! When considering a computer, which one is best? To be honest, when both are optimized and have identical specifications, you will find that they perform almost identically. I have seen the good and the bad for both operating systems. It basically comes down to which operating system you prefer. In other words, if you like the way the Mac screen looks, or if Vista has that feature you can’t live without, stick with your comfort zone. No need to hop over to an operating system where you can’t even open up FL Studio! One thing to keep in mind is Boot Camp on a Mac. Although FL Studio supports Boot Camp on a Mac, that does not mean your soundcard does! It is very possible that your awesome, totally powerful computer can’t utilize the inputs and outputs of your soundcard because Boot Camp can’t see the soundcard. Check with the manufacturer of the soundcard to ensure that it supports Boot Camp if you are planning on using a Mac with FL Studio.
If the computer is your engine, the processor represents how powerful your engine is. Remember that in the digital audio world, more power makes life easier. I understand that we don’t all have money to simply toss around like it’s going out of style, but consider the statement “You get what you pay for.” Although not 100-percent accurate, it does tend to ring true in most cases. A stronger processor allows you to run more effects and record more tracks simultaneously. A great thing about FL Studio is the real-time capabilities. In most cases you can make adjustments on the fly, such as adding low-pass filters, altering the pitch, and so on. Having to wait for these things to process or hearing a pause or click in the audio can be a little bothersome and can disrupt the creation process.
In my personal experience, I have noticed that the Celeron processor is notorious for performing poorly with audio applications. Many times while troubleshooting setups, I’ve run into someone with pops and clicks in his recordings, and after extensive system searching, optimizing, and turning off all background programs, it ended up being the processor’s inability to run audio applications well. Don’t get too down, though, because your music can have pops and clicks when playing in the program, and when you want to render the song to disk, FL Studio will slow rendering to remove the pops and clicks, allowing the processor to catch up. This means that when you burn it to a CD, the final sound playing on the stereo or in the car will not have the problem sounds your processor may have been causing. You can always make it work, regardless of how well, but for a better working environment, keep the processor in mind and always remember to optimize the computer.
The RAM (random access memory) in your computer is basically short-term memory of everything happening in FL Studio. For example, when you are working with a track, the audio that is there or the effects that are processing audio require RAM. FL Studio will utilize the amount of RAM you have, but the computer draws its memory usage from the physical RAM as well as the hard drive space used to create virtual memory. The computer will use both physical and virtual RAM as memory, but the more physical RAM you have, the more likely the computer will use it. You want FL Studio to be using the physical memory rather than the hard drive space because it is faster and performs better. While my personal recommendation was a gig of RAM, don’t be afraid to go even further and grab more. RAM is easy to install, and it is just a simple stick that plugs into your motherboard. A stick of RAM (commonly called a gig stick when it is a 1-GB stick) is fairly inexpensive and will boost FL Studio’s performance. Any program in a 32-bit environment can utilize up to 2 GB of RAM, but FL Studio allows you to increase that ceiling to 3 GB by installing the extended memory file. Again, this goes hand in hand with the physical versus virtual RAM usage, so installing more RAM than this limit can still benefit your performance. This can make FL Studio run faster, but use caution whenever changing anything about how programs react in your operating system. The instructions for this can be found in the help file (F1). If you are not sure how to install physical RAM, let a pro do it, because I have seen someone plug in a stick backwards, and the computer screen went blank upon booting. The RAM and processor go hand in hand when you’re putting together your setup, and if you stay above the minimums, you should be able to perform most (if not all) functions seamlessly in FL Studio.
Not all hard drives are created equal, and typically this is last on a checklist of “why things might be running slowly or oddly,” but it is something to pay attention to. For optimal performance, I would suggest using an internal hard drive that runs at 7200 rpm. It is best to check with the manufacturer on these specs. Most will run at this speed, but there are some older ones that move along at 5400, and this can cause slow writing and reading (that is, writing to the drive and reading from the drive).
Is it possible to use an external hard drive? Yes, it is! I have been successfully using a USB external hard drive for months to run FL Studio directly from it. I did run into some wait times for things to load and occasional pauses in audio when changing effects parameters, but that was due to the particular unit I was using. If you have to use an external hard drive, use FireWire 800—it is extremely fast compared to USB. But the true victor in external drives is an eSATA drive. These perform like an internal drive and are just as fast, but they have the ability to be removed without taking an entire computer with you.
When recording your tracks, the more music you make, the more takes you have. These files build up quickly and start taking up massive amounts of space. Having a backup drive for speedy file transfer is a great solution (see Figure 2.1).

Figure 2.1. Here you can see that I have my C drive basically empty, aside from important operating files, while I have an entire drive dedicated to audio, and it has plenty of room for recording.
Ideally, never record to the same drive (or partition) that your system files are on. This way, you can leave your system files plenty of room. When the system drive (usually the C drive) fills up and has less than 10 to 15 percent free space, the entire system starts running slowly. By separating these, you don’t have to worry about system space, but if you have an immense drive, you shouldn’t experience any trouble regardless of where you save your files and recordings. The hard drive can affect your performance, but the important point to focus on is what you need from the hard drive. Audio files take up lots of room, so if you will be recording a ton and saving all of your takes, it is probably a good idea to get a larger internal hard drive. If that won’t work, try an external FireWire hard drive and save your audio in there. Another solution could be to save your work on the external hard drive and drag the files onto the main drive when you want to work with that particular project. If your workflow stays streamlined and there are no hiccups in the creative process, you may find the effort well worth it.
This part of your setup to me is extremely important, and although you can use the onboard soundcard of your computer, I highly recommend getting a soundcard that supports ASIO, which I will further explain in a couple paragraphs. To begin, you have many options when considering a purchase, and when I say “interface,” a more generalized term would be the soundcard. Sometimes this can be a card plugged right into a PCI slot in the computer that has some inputs and outputs. Other times this can be a FireWire device that is no more than a cable plugged into the computer, and the interface itself is a unit that sits on your desk with all the controls right there, rather than inside a software application. My personal suggestion is a soundcard that gives you the ins and outs you want with ASIO support. Getting a soundcard that only has outputs (which is pretty rare) means that you won’t be able to record! Take time with this one, and we’ll explore some things to consider when getting your soundcard.
I don’t advocate spending more than you need unless you are made of money, in which case it helps to get the top-of-the-line soundcard so it will last you for years to come. Most of us, though, can get a fully functional music-making station at a fraction of the cost of a modern professional studio. What will you be doing with FL Studio is the most important question to ask when considering your device of choice. If you are recording vocals and only use one mic, you can stick with a less-expensive device that has a single mic input and a stereo output for mixing. If you are recording multiple inputs at once, then you will need to get a device with those capabilities, but keep in mind that more inputs equal more parts, which means that it will be more expensive. Also remember to make sure your device will work with what you have. (For example, PCI devices will not work on a laptop because there is no PCI slot.) You will find a difference in prices, varying from less than $100 to well over $1,000, which allows for a great deal of selection and will help you get the exact interface you need.
What began as endless, tangled messes of cables and connectors has simplified into single cords! The connection you choose to work with will not make or break your projects, but there are a few good things to know about each.
These days, many USB devices are available that simply plug into the computer and have built-in microphone preamps and speaker outputs. All you need is that device and a set of headphones or speakers, and you are ready to go. This is a great option for the mobile music maker or on-the-spot recorder. USB devices can be plugged into a laptop, and you can even come up with the latest chart-topper while on a cross-country road trip! USB devices are hot pluggable, meaning that they can be plugged into the computer when the computer is on and running. I don’t recommend trying to plug in the device with FL Studio open, though, as the program most likely will not see the device until the application is restarted.
It’s worth mentioning that when I refer to USB devices, I am mostly referring to USB 2.0. This is a standard that was developed in 2000, but due to computer manufacturers’ lack of support, it really didn’t gain popularity until 2004. There are still computers that will only put out USB 1.1, and this is something to take note of. USB 1.1 runs much slower than 2.0, and many devices simply won’t work with the older USB speeds. Some devices will just lose functionality on inputs and outputs, or their sample rates will not be able to run at their maximum capability.
The Edirol UA-1EX, shown in Figure 2.2, is great for plugging a smaller dynamic mic with a 1/8-inch output (the same size as your iPod headphone jack) right into the interface. This little device is able to record at a higher quality than your CDs or MP3s can even play, but it is good to keep in mind that the quality of recording will be limited when using a 1/8-inch mic. A convenient feature is that it uses USB, and most computers have many USB ports to choose from, so finding where to plug it in is pretty straightforward.

PCI audio devices are great for transfer rate, and with the addition of PCI Express to the family of cards, those speeds have risen dramatically. Many interfaces still use PCI or PCI-X (both are not PCI Express) due to their design and production happening well before PCI Express was available. Also, many older computers do not have PCIe slots and only use PCI or PCI-X. When considering this type of interface, it is best to check with the manufacturer of your computer to see what type of interfaces it supports. (In other words, what slot does it have? This is important because if you only have PCIe slots, you won’t be able to use PCI or PCI-X audio cards.) PCI cards have a large range in price, but there are many that won’t completely clean you out.
The M-Audio Delta 44 (see Figure 2.3) plugs into the PCI slot on your desktop computer and is pretty stationary. It has four inputs and four outputs, allowing you to have two stereo inputs and route out two separate stereo outputs. This is great if you want to create different mixes for your artists. With this particular soundcard, though, there are no mic ins to send into the program. If that is the case, then you can give yourself nice analog control with a little mixer like the Behringer Xenyx series (see Figure 2.4). This way, you can mix multiple ins on the Behringer and send them into the different inputs on the breakout box of the PCI device.
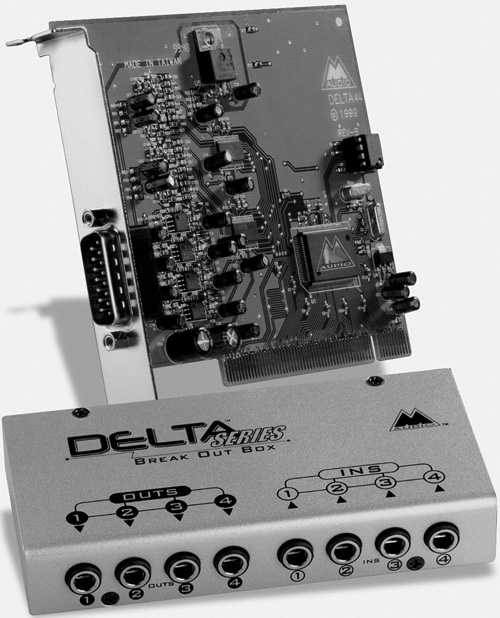
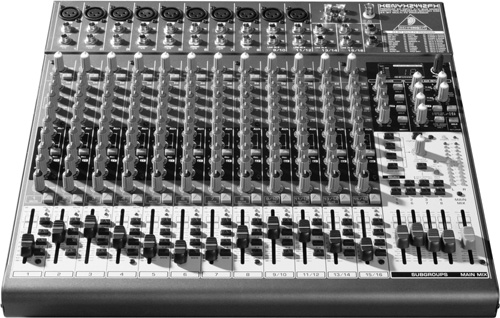
Figure 2.4. The Behringer Xenyx series is a mixer that allows you to control many inputs and multiple outputs to send into your soundcard.
My initial draw to the PCI card was the functionality and quality alongside its value. With the array of USB devices now competing with the cards, it is more of a preference and need debate rather than performance and reliability. Many USB devices have all the inputs and outputs you could need and do not require any extra hardware for the music you want to create. You will probably hear me say this again, but all types of audio interfaces can have problems, and when it comes down to it, cost can and should be a factor. There are overpriced cards out there that claim the best conversion quality and can run at very high sample rates with high bit depth, but unless you have taken the time to acoustically tune your room so there is low noise and no reflections, it is not worth paying the price, in my opinion.
FireWire devices offer a better transfer rate, and when considering computers, remember that all information—audio or otherwise—is just data to the computer. USB claims speeds up to 480 Mbps where FW 400, as you might guess, runs at 400 Mbps. Here’s the funny thing: That 480 Mbps speed is burst! In other words, it doesn’t sustain those speeds; it only reaches those speeds in occasional “bursts.” In every benchmark test when the two were run side by side, FW 400 destroyed USB 2.0 in transfer rates. This does not mean that buying a USB interface will cause your performance to suffer, because the device you purchase will be designed to work with the number of inputs that it has. If you are recording drums or many vocals at once, and you need many inputs, I advise going with a FireWire device, such as the M-Audio ProjectMix I/O (see Figure 2.5). This device has eight mic inputs and has an ADAT connection to send in even more channels. This is on the more expensive end of things, but it can be a great asset with its capabilities.
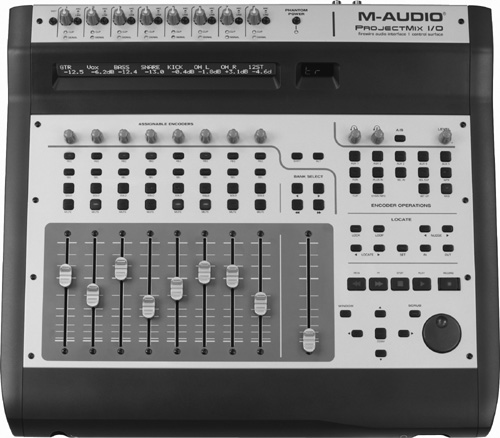
Figure 2.5. The M-Audio ProjectMix I/O has tons of inputs and outputs and gives you the ability to touch the controls of individual tracks instead of mouse clicking.
FireWire has exponentially grown in popularity with the superior transfer rates and general abilities. I highly recommend searching around what it has to offer and seeing whether it fits your needs. Although there may be other forms of connections involving a device and computer, I will keep this section detailed to the most common types of interfaces used by amateur and professional musicians.
I know by now you’ve heard me mention ASIO plenty of times, and it is for good reason. ASIO (audio stream input output) is a soundcard driver protocol for digital audio that was developed by Steinberg Media Technologies. Now, what does that mean to us? Better audio performance on a PC. Mac users, this will not apply to you, because your computer uses Core Audio and does not require ASIO. The main idea behind ASIO is to bypass Windows’ internal mixer. Instead of the signal going from your device to the computer, then processing through multiple layers and going into the program, only to be run through the gauntlet again before making its way back to the device where you can actually hear it, ASIO bypasses the unnecessary layers. It allows the device to talk directly to the program and vice versa.
Is latency that bad, though? A good example is the “Row, Row, Row Your Boat” song that we all sang as children. “Row, row, row your boat, gently down the stream …” Then the next group repeats the line on top of the first group. So as the first group continues with “Merrily, merrily, merrily, merrily, life is but a dream,” the second group begins its “Row, row, row….” The audio that you record is the first group singing, and the actual signal that plays back over your speakers is the second group when not using ASIO. I must admit that it is not as bad as an entire line of a song (usually), but the delay is there when using Windows generic soundcards. You want your sound to get to you quickly because when that happens, you have the perception that you are in the music rather than recording a vocal and then having to nudge it around to fit to the music or beat of the song you are working on.
So where is the line drawn with latency? Again, this sort of comes down to preference, but for the untrained ear, if your card can handle it without introducing pops and clicks, a good setting (in the Audio Settings menu, F10) is 512 samples, which introduces about 12ms of delay. At 1028 samples, the delay is still almost inaudible, but at 2048, the delay starts to be clearly heard because of the 47ms delay that occurs. There is latency for all programs because it creates the working buffer for the program, which is basically how it allows you to use it and make changes while updating information. Finding that happy balance between latency and how hard your computer works to minimize it will make your FL Studio experience much more worthwhile.
This has been discussed a bit, but I want to get into a few things you need to know when dealing with the ins and outs of your device. Starting in the playback (or output) department, it’s important to find something that will suit your particular needs. So, will it be speakers or headphones? Will your neighbors hate you or love you? I would suggest both, because speakers give you a better spatial awareness when mixing and tend to sound closer to what the final product will play like on most systems. Headphones are great for mixing the subtleties in sound and nice for creation when you are trying to quietly put something together.
So with these in mind, it is good to know whether your device has these outputs. Take a look at the device you will be using. Typically, all devices will have a headphone out that you can plug a set of headphones into. Regardless of what type of headphone jack it is, there should be a connector that can make it work (unless you are using a USB headset, which is a different beast altogether and will not connect to a usual 1/4-inch or 1/8-inch jack).
The speakers are a great addition in your setup, provided you choose to use them. Many artists find the creation portion of music can work best with headphones, and incredible compositions can be made, but a final mix always needs to be tested on speakers. Your interface needs to work with your speakers, or you may find yourself needing to purchase more gear—which is a great excuse to go drool in the electronics store, but not necessary if you do a little research. Many interfaces will send out a line signal and require speakers that are self powered. Self-powered means that there is a power supply coming out of the back of one or both of the speakers, and this in turn plugs into an AC outlet on your wall, as shown in Figure 2.6. This will work fine with almost any interface, and at most you would need a converter just so the speakers can plug into your audio interface (in other words, a 1/4-inch adapter that converts into an RCA plug). Speakers that don’t directly plug into the wall will require an amp to properly output sound.
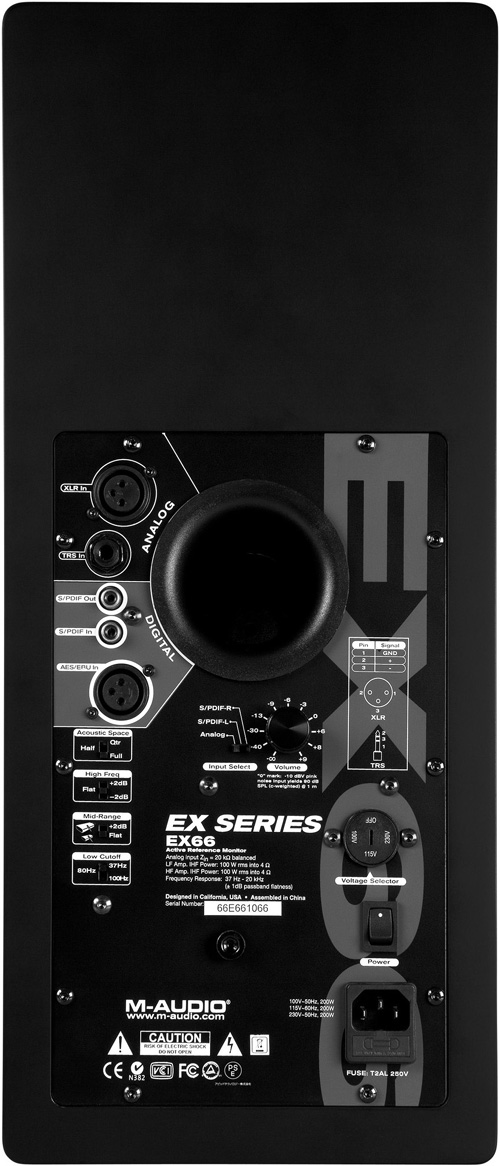
Figure 2.6. You can see on the back of this speaker that it is self powered and has a port for its own cable that plugs directly into the wall.
Some interfaces have built-in power, but many meant for digital recording will only have non-powered outputs.
Now let’s talk about the inputs and what you need to think about when considering signal going into your device. To begin with, what signal do you want to send into the computer for recording? Remember that unless you are recording live bands, most of the music created in FL Studio happens inside the computer, so all of that does not really come into play when considering inputs. What you need to consider are vocals, instruments, and other things that might be recorded. Vocal artists will need a microphone input, but there are many devices that can communicate with your interface (soundcard), such as keyboards with built-in sound or even a turntable for adding in scratch noises. Remember that a great deal of scratching can be emulated in FL Studio, but we’ll get into that later in the plug-ins section.
Let’s say that you are a singer/songwriter, aspiring hip-hop artist, or electronic music creator, and all you really need is a microphone input and an instrument input. This broadens the range of devices that you can use and, more importantly, afford! Many devices available have mic and instrument inputs that you can plug into and start working right away.
Things to be aware of when dealing with microphones include the following:
Is it a condenser, dynamic, or ribbon mic?
Does the mic require phantom power?
What type of connection does the mic use?
Does the mic have its own power supply?
These are all important because there is nothing worse than having everything set up, only to realize that your mic won’t work with your device. Many USB devices do not supply phantom power, which is basically an electrical current that powers the mic and allows it to receive signal. Therefore, if you plug a condenser microphone into a device with no phantom power, it will not send signal into FL Studio. Remember that just because the mic cable fits, that doesn’t mean it will always work. Pay close attention to what type of mic you need when looking to buy your interface based on the type of mic you want to use. I have received the best sound using condenser microphones, which do require phantom power.
If you’re using a guitar, many devices implement their own built-in DI to allow you to simply plug in the guitar and play. This is important to note because the guitar is a high-impedance (Hi-Z) device, whereas line-level inputs are low impedance. The DI allows a high-impedance device to work properly with the unit and converts the sound to a low-impedance signal. Impedance is basically the amount of resistance to a signal that a device has. This resistance plays a part in the quality and sustained strength of the signal when it reaches its destination. It is useful to understand impedance because you might be plugging a high-impedance device into a low-impedance input, which can cause poor audio quality. A good friend and fantastic engineer, Preston Shepard, once told me this great analogy: The guitar signal is like water flowing through a 1-inch PVC pipe. The water is moving along very nicely with good force, and that would be high impedance. Connect the end of the 1-inch pipe so that the water flows into a 10-foot-tall pipeline (low-impedance device), and the water trickles through with no power. This is why when you plug a guitar directly into a line-level input, you get a weak, quiet, and often distorted sound. If the device says “instrument input,” you are usually good to go with plugging your guitar in.
With keyboards and all other devices that send out a line-level signal, most devices will have an input for these to just plug in directly. These are the easy ones, and you can literally just plug and play.
What is a MIDI interface? It is a device that sends MIDI signal to the computer and allows for many different capabilities within FL Studio. I will dig a little deeper into what MIDI is in Chapter 5, “Recording and Using MIDI.” Just know for now that MIDI is not audio, and audio signal will not travel over a MIDI cable. Most of the time you will see a MIDI interface in the form of a piano keyboard. Another familiar MIDI device is a drum pad device, where typically 16 touch-sensitive pads are arranged in a four-by-four setup. These are great because when set up properly, the harder you hit them, the louder the sound will be! Using a MIDI interface is a great way to add that “real” feeling to your music.
So is the MIDI interface required? Not at all, especially with FL Studio’s Piano roll and humanizing abilities. There is even an option to play notes with your typing keyboard! I have found much more enjoyment and flexibility in FL Studio when using my keyboard or drum pads, especially when making music that uses virtual instruments. After some practice, you will find that a keyboard or drum pad at your side helps the creation and perfection processes of songwriting.
Creating music can be seriously hamstrung when settings are wrong or disabled, so it is good to know how to set up your session and what the different portions of the Preferences menu do. I have found myself fumbling with different programs and unable to get my keyboard to play notes in the software because the menus were so spread apart and impossible to find. FL Studio makes it convenient for you to set up everything from a single window with side menus. You can access this window by pressing F10 on your typing keyboard. Although this tends to be the not-so-fun information, learning what each piece does can dramatically improve the speed with which you create and mix music!
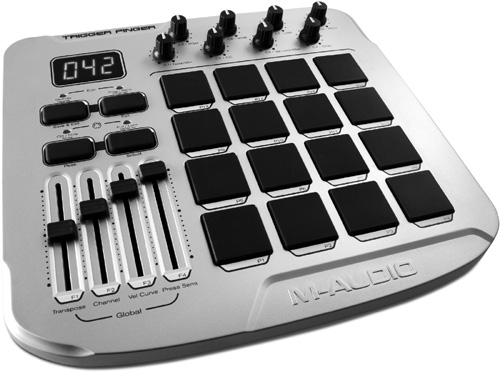

Figure 2.8. The Axiom series of keyboards is a piano-style MIDI controller with incorporated drum pad style.
Figure 2.9 shows the tab where all of your devices that send or receive MIDI should be displayed. Here you can set up all of the MIDI routing and machine control you need. You’ll find a better explanation of MIDI in Chapter 5, but for right now, you just need to know that this is the main station where MIDI gets passed around. At first glance you may see a large number of devices or none at all, depending upon your setup. Typically, if you have no MIDI devices hooked up, all you will see is Microsoft GS Wavetable Synth.
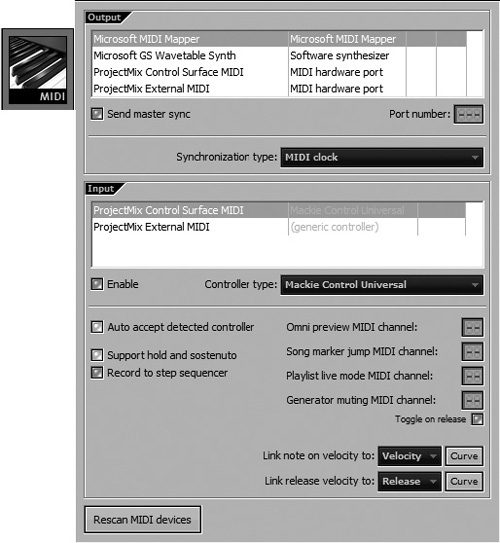
The Output section of the MIDI settings (see Figure 2.10) is not as widely used as the Input section. Most of the time, someone will have a MIDI keyboard or drum pad that just needs to send in MIDI and turn it into sound using one of the plug-ins. This section covers those that need MIDI to speak to an external source. This would typically be used to make an external synth make noise, and that noise in turn can be played back into FL Studio. To set this up properly, just select your device from the Output menu and choose the port number on your device to which you want FL Studio to send data. The Send Master Sync button by default is not highlighted. This is if you want FL Studio to send a master sync signal to a MIDI device.

Note:
For this to work, you need to navigate to Options > Enable MIDI Master Sync and make sure that it is checked!
The drop-down menu next to Synchronization Type is just for selecting what format of synchronization you want to use with your external device.
The Input section is where you would set an external device to send MIDI into FL Studio. If you plan to play some music on a piano or drum pad that sends MIDI, this is your setup section! When your device is properly installed, plugged in, and—yes, I have to say it—turned on, it will appear in the Input window.
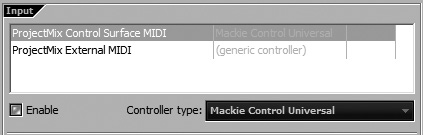
Within this section are an Enable button and a Controller Type drop-down menu, as shown in Figure 2.11. When you select your device, click Enable—this will tell FL Studio to start communicating with it. The Controller Type drop-down menu allows you to pick from a predefined list if there are more controls available on your device. If you see the device you are using, select it from the list, because this will ensure that the controls on your device closely match those in FL Studio. However, if it is a piano-style keyboard or drum pad, and you just want to control some virtual instruments, then the option Generic Controller will work fine.
This area contains some more advanced features that FL Studio has to offer and can be a great way to improve your workflow when you understand what they do (see Figure 2.12). When Auto Accept Detected Controller is enabled, it means that when you assign a control to a button, fader, or knob on your MIDI device, you will not be prompted to accept the change; it will map automatically. When using multiple MIDI controllers, it is best to leave this option disabled so assignments don’t get incorrectly mapped. A great example of leaving this enabled is if your MIDI keyboard has faders and sliders, and it is the only device sending MIDI in, then you would leave Auto Accept Detected Controllers enabled so that you can quickly map faders on your keyboard to faders in FL Studio.
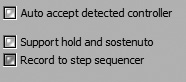
Support Hold and Sostenuto is an option that allows FL Studio to use foot-pedal messages to sustain notes played on a MIDI device. If you are using a foot pedal to add that extra layer of sound to your MIDI performance, then this option should be enabled. The last on/off button in the group is the Record to Stepsequencer option. This basically will record your performances directly into the Stepsequencer itself, rather than placing the notes on the Piano roll. Although you may find that you are able to work more quickly just using the Stepsequencer, this limits your flexibility, and I would just leave it disabled.
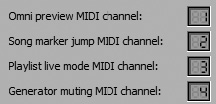
The next section (shown in Figure 2.13) is where your workflow can speed up immensely if you are using a MIDI keyboard. Omni Preview MIDI Channel allows keys on your MIDI keyboard to audition a channel from your Stepsequencer. Song Marker Jump MIDI Channel allows your keyboard to control where your song plays from based on markers that you place. Playlist Live Mode MIDI Channel will cause keys on your keyboard to audition patterns in the Playlist when you have Live mode selected. I will discuss Live mode alongside marker jumping and setup in Chapter 5. For now, just know that these settings cause your keyboard to perform speedy playback and song navigation. Generator Muting MIDI Channel will make your keyboard keys mute channels in the Stepsequencer. You need to consult the manufacturer of your MIDI device to see how to set up MIDI channels. However, once you have done this, a great practical example would be to have these settings:
Omni Preview: MIDI Channel 1
Song Marker Jump: MIDI Channel 2
Playlist Live Mode: MIDI Channel 3
Generator Muting: MIDI Channel 4
So with these settings in mind, suppose you have learned what each key does, or you might even have something taped to the keys or stickers to remind you of what each key will control. You will also need to know how to change MIDI channels on your MIDI device. If you are in the middle of a song, but you are getting writer’s block, you can use these settings to speed up your creation. Suppose you have a pattern playing in the Stepsequencer that you like, but it is missing something. You have a few options of samples and tracks loaded into different channels in the Stepsequencer. With your keyboard sending MIDI out of Channel 1, you can play the pattern or section in the song that you want to add to and press keys on the keyboard to quickly listen to different options for adding to the music. Now if you need to hop over to a different part of the song, you can switch to Channel 2 on your MIDI keyboard and begin hopping over to different points in the song until you find the section that you want to work on. Now that you are in a different section, perhaps you want to layer some patterns on top of each other. With Live mode enabled and your keyboard sending out of MIDI Channel 3, now you can play different combinations of patterns that you have created in order to create something even fresher. However, suppose you get a new idea for a combination of channels from a pattern in the Stepsequencer, but it seems a little too busy, and something needs to go. With the keyboard sending out of Channel 4, now you can turn off channels quickly as the pattern loops and find which channels can be removed or muted.
Below these options is the Toggle on Release button (see Figure 2.14), which will tell FL Studio how you want buttons pressed on your MIDI controller to react with the virtual buttons and knobs inside the program. Basically, this means that buttons on your keyboard will act like on/off switches in FL Studio (when Toggle on Release is disabled), forcing you to press once for on and again for off. Or, when the option is enabled, you press and hold for on, and as soon as you let go of the button, the switch will be off. One interesting use for this would be tapping a mute switch to create a manual stutter effect on a vocal. It’s good to know where this switch is if you make a large number of manual changes to your sound.
The final set of options (shown in Figure 2.15) contains the options for Link Note On Velocity To, Link Release Velocity To, and Rescan MIDI Devices. The Link Note On Velocity To option means that you are telling FL Studio how hard to play the notes that come in from your MIDI keyboard. When None is selected from the drop-down menu, all notes that come into FL Studio will be played at a constant velocity of 100. This can be useful if you are in need of droning notes that don’t change volume, but typically the best option is leaving it on velocity, because this means that however hard you play your keyboard is how hard the notes will register in FL Studio, with the MIDI scale running from 0 to 127. Mod X and Mod Y are options that can be selected when the velocity is controlled by a plug-in. Set the Mod X or Y curve on the plug-in and then select Mod X or Y from the menu, and the note velocity that is played on your keyboard will be dependent on the plug-in settings.
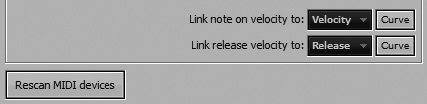
Figure 2.15. The Link Note On Velocity To, Link Release Velocity To, and Rescan MIDI Devices options.
Link Release Velocity To refers to how fast or slow the velocity on a note will be released.
When the option is set to None, much like the Note On option, a fixed release velocity of 100 will be assigned to all incoming MIDI notes. Depending on the instrument that you are using, this could be beneficial if you needed the same feel on every instrument, but I suggest leaving this option on Release, because it will allow whatever you play on your MIDI keyboard to register in FL Studio exactly as you played it. The final option in the MIDI settings is Rescan MIDI Devices. Remember that if you opened up FL Studio before turning on your keyboard, usually it will not register the device until you click Rescan MIDI Devices. After doing this, the device should show up in the window. This button is also useful if the MIDI device randomly disappears, which I have seen when someone uses a loose USB cable.
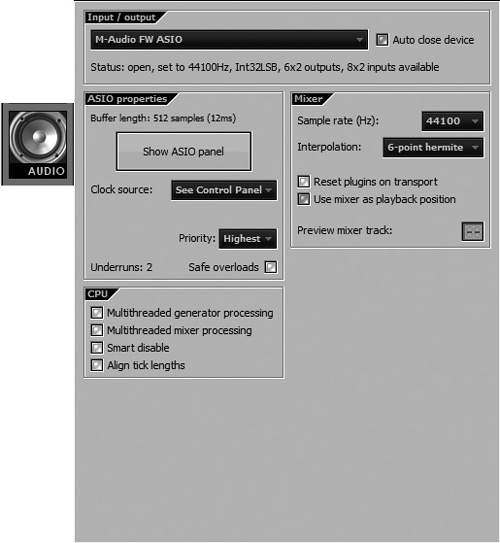
This portion of the Settings menu can vary, depending on the interface and setup that you are using. This is the section that allows you to change and configure many options involving the device you are using to record and play back sound. You’ll notice that in Figure 2.16, the Show ASIO Panel option allows you to bring up your interface’s control panel. Most of the ASIO properties, including buffer and in/out routing, are set in the control panel of your interface. It is best to take a little time and figure out what each of the settings on your soundcard does, because this will help ensure that you have the proper settings all around. Regardless of how the control panel shows up on your computer screen (or in the Audio Settings window for some soundcards), the important thing to pay attention to is buffer. Sometimes it shows up as buffer size or buffer settings, but the idea is the same. This setting will tell your computer how much audio to load prior to playing in order to avoid skipping in the playback. This means that when you set a very low buffer (such as 128 samples or 256 samples), there is minimal audio preloaded, and things are played instantly. This is tied in with latency, which we discussed earlier (in the “Row, Row, Row Your Boat” analogy), and the lower you set the buffer, the lower the latency. So when you play a note on a MIDI keyboard, it records instantly and plays back instantly.
So why not just place the buffer as low as it can go and make music? Because the computer you’re using might not be able to handle the strain! It takes processing power to convert audio from the digital information inside FL Studio to the analog sound that we hear. It takes even more power when you record because the signal has to convert from analog to digital and then back to analog if you want to hear yourself while recording. If the computer can’t make all the necessary conversions at the speed you want, it will start missing pieces of the conversion, and when it plays back, you will get pops and clicks in the audio or even total silence. If your computer can take the strain, I would insist on dropping the buffer to as low as 10ms so that everything runs in time and on point.
On the other end of things, a high buffer setting will allow audio to play with no audible pauses, but the response time will suffer. Imagine that you are recording your voice, and you have a high buffer set in the options. When you record the chorus and sing through the whole part, you will find that when played back, it doesn’t match up perfectly because there was a delay in writing the music to the track. When the buffer is set to 2,048 samples, you will start to notice a delay because that amount of delay adds 47ms of delay to your sound. This means that it will take 47ms for you to hear a sound from the time a key is pressed on a MIDI keyboard to when it plays on your speakers or in your headphones. Also, if you set the buffer setting too high, then the computer will unnecessarily load too much audio into memory, and that can cause audio skipping as well. The best thing to do is to raise the buffer to a high setting, such as 2,048, and slowly lower the setting in increments until you hear audio skipping (if at all) and then raise it up one setting.
The common settings that you will see in the upper-left window of the audio settings are Priority and Safe Overloads (see Figure 2.17). Priority is similar to buffer because it affects how the computer will deal with the audio. When the Priority is highest, that means the computer will devote most of its attention to running the audio in the program. This is great to ensure no pops or clicks in the audio, but when you reach the maximum amount of CPU usage (the computer can’t process information much faster), then you will see more freezing because the computer saves no processing power for the graphic portion of FL Studio, commonly called the GUI (graphical user interface). Lowering the priority will have the computer save room for other processes besides audio and prevent freezing. Again, this is one to test out, as a high Priority will give you better results.

When activated, Safe Overloads acts in almost the same way and minimizes the chance for a lockup. When deactivated, it gives full attention to the audio. Underrun means that your sound-card is not keeping up with what you want FL Studio to play and is great for testing settings. If you have a high Underrun count, try changing settings to a lower buffer or spreading Priority around.
The Mixer tab, shown in Figure 2.18, houses some more audio options and begins with Sample Rate. The sample rate is the number of samples taken per second to properly reconstruct an analog signal in the digital realm. Noise, sound, and music that we hear are vibrations in the air, and we measure them in waves. For a computer to see these, a measurement is taken at different points of the waveform to re-create the waveform in digital form. Put simply, the computer needs to “draw” the sound for itself. The higher the sample rate, usually the more accurate the representation of the original sound you will get. If you are mixing a multitude of instruments and quality of sound is paramount, then using a high sample rate can be beneficial.

I wouldn’t bother going above 48,000, though, because most of the music that you will make still needs to be brought down to 44,100 so it can play on a CD.
Why 44,100 for a Sample Rate? Nyquist-Shannon Theorem!
So why such a seemingly odd number for a sample rate as the standard for CDs to play? Well, the work of Harry Nyquist back in the early twentieth century paved the way for Claude E. Shannon to prove the theorem in 1949. They theorized that an analog signal can be perfectly replicated if it is twice the frequency of the highest frequency heard in the original sound. So this means that if you have a sound that resonates at 250 Hz, then it should be sampled at 500 samples per interval in order to reconstruct the waveform digitally. Rather than have a ton of sample rates floating around, they standardized CDs to run at 44.1k samples/interval. The reason for this is because humans hear roughly between 20 Hz and 20 kHz (20,000 Hz), so when the highest sample is doubled and given a little room, we get a 44,100 sample rate. This allows for a clean and error-free digital construction of the analog waveform.
Beneath Sample Rate is the option for changing your interpolation. For most PCs, you will find that the Linear setting works fine, but if you are in possession of a more powerful computer, try 6-Point Hermite, because this will produce higher-quality transpositions and pitch shifts when running the program. This means that when you stretch a sound to be higher pitched/speedier or compress it to be deeper sounding/slower, the resulting sound will not have artifacts (noises in the audio), whereas Linear can sometimes have high-pitched noises when a note is stretched to a great degree. The 64-512 Point Sinc settings are for extremely high-powered computers, for when a stretched sound must not have any unwanted sound. The problem is that the creators of FL Studio even mention that the 512 will most likely slow your computer to a crawl, if not freeze it completely! A good thing to know is that these controls are for real-time processing, as opposed to when you render your final mix, where the Interpolation controls are meant for the quality of the rendered audio, so this only affects how long it takes the song to turn into a playable MP3, Ogg, or WAV file.
It is important to know that these settings only affect notes that are transposed. Reset Plugins on Transport is an option that even suggests turning itself off when you hover over it with the mouse cursor. When this is checked, the plug-ins reset with the start and stop of a song, but this can cause pops in the audio when you’re moving around quickly through a song. I would leave this particular option unchecked. Use Mixer as Playback Position is really only for when your Playlist song position cursor is jumping around or not doing what it is supposed to do. Preview Mixer Track allows you to set a different Mixer track aside from the master out (default) to hear audio previews from the Browser and metronome.
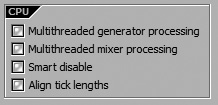
The final set of options, shown in Figure 2.20, help FL Studio perform better on the system that you have. Multithreaded Generator Processing and Multithreaded Mixer Processing both allow you to utilize a multi-core processor to its fullest by spreading out the processing over the different processors. Put simply, the work is spread out amongst the workers. Remember that this does not work when you have a single-processor computer. Smart Disable is one of the many awesome features that FL Studio offers. This turns off your plug-ins when they aren’t being used and saves a good deal of CPU power. Even if you have a powerful computer, I see no reason to have this off, as I’ve noticed no problems when I’ve had it enabled. Align Tick Lengths can help third-party plug-ins run smoother.
In the Settings menu shown in Figure 2.21, you can see a collection of general options. The first on the list, Associate Project Files with Application, is another in the family of questionable options. When you deselect this and try to double-click on a project when FL Studio is not open, Windows will ask you what program to use to open the project. When selected, Show Channel Activity Meters will show with light meters that there is signal coming into a channel in the Stepsequencer. Auto Name Channels will name the channels in the Stepsequencer based on the name of the audio clip or instrument you place in it. Auto Zip Empty Channels means that when you have unused channels with no data on them, they will be minimized. This is great if you have a smaller, single display screen and need a little more room to work. When enabled, Auto Select Linked Modules will make the plug-in selected highlight the particular track that it is using in the Mixer. If it is not selected, then you will be able to keep multiple windows open. Deselecting this option is great to see multiple effects running at once and easily navigate between settings. Use Both Mouse Buttons in Stepsequencer is great to have enabled because it allows you to left-click selections to make them disappear. This far surpasses the clumsiness of having to select an Erase tool and then go back to a Draw tool! Use Tablet PC or Digitizing Stylus should be selected when you are using a tablet PC. Alternate Meter Scale will change the peaks of your meters from –3 dB to –1.2 dB. Ultrasmooth Visual Feedback will improve the movement appearance of your song cursor, and on a similar thread, Smooth Scrolling works to improve the look of transitions when working in FL Studio.
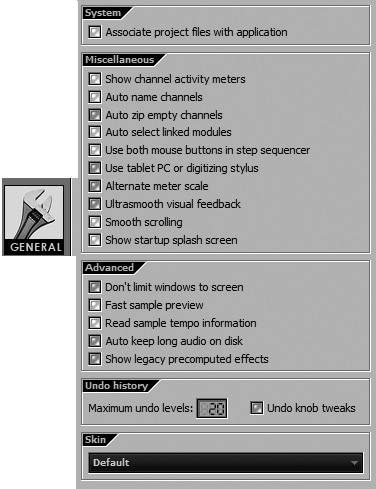
In the advanced options, you’ll find a few useful settings, including Don’t Limit Windows to Screen. This is great when you have multiple computer monitor screens and would like to move windows around so that you can work effectively. Fast Sample Preview will play your selections from the Browser when previewing sounds or music instantly without using memory, but if the computer is unable to keep up with streaming that audio, you can get pops and clicks in the audio. Leave this enabled if you are not having trouble. Read Sample Tempo Information is for importing files that have been perfectly fit to match a tempo and that information is embedded in them. This is great for dragging and dropping samples into your project that don’t need to be adjusted and automatically fit to the tempo of the song. Auto Keep Long Audio on Disk will force long pieces of music or sound to stream from disk instead of loading into RAM. This is handy when you have long pieces of music in a project, and you don’t want to have to wait for the entire thing to load to open your project. Remember that this means if you select this and then jump into a project and hit Play, that long portion of audio may have not yet loaded. Show Legacy Precomputed Effects allows older projects with older effects to run in the new version of FL Studio.
As you may have guessed, this section leans toward helping FL Studio run better on your computer. The Maximum Undo Levels option is no exception, because it takes memory to remember what you have done in the project. Setting this higher will take up memory, but lowering it will reduce the number of times you can back up. Undo Knob Tweaks is the same idea, but now when you move faders or knobs on a plug-in, that is remembered and counted as one of your undo levels. The way I like to do it is to get to a certain point in the song where I am satisfied but not sure which way to go musically. At this point, I save the project under another name and continue working, so that if I get a different idea, I reopen the original and try a different musical path. The Skin setting will allow you to change the skins, but it can be a hassle when you are first learning the program. I would leave it on Default when you are first getting into the program.
The File section is a simple area that allows you to specify where certain files are located. In the upper section, you are able to select more folders that you want to appear in the Browser of FL Studio. This is nice when you have your samples, instruments, or loops on a different drive or hidden somewhere on your desktop, as you can see in Figure 2.22. The lower window is for telling FL Studio where you keep your VST plug-ins. If none of your plug-ins is showing up, this is a good place to check to make sure that FL Studio is looking in the right place! Just click the folder icon and point to the folder that contains the VST instruments, and everything should work fine.

At the bottom left of the Settings window, above the Bugs tab, is a button marked Project. Selecting this will bring up a final list of options available in this window. The first option is the Info button and allows you to alter information about the project, including title, genre, and author, and even offers a space to enter any pertinent information to the project. Underneath that is a place where you can include an online link to a website, and further down, the Show It on Opening option can be selected if you want this information to pop up when the project is opened. At the bottom of the list, there is information telling you when you started the project and, if you dare to look, how much time you have spent on it. The time spent can be reset by clicking the Reset Working Time button next to it.
The General tab of the project settings, shown in Figure 2.24, includes an option to place the data of your project in a specific folder, which is handy for keeping your own personal organizational style. The Time Signature section allows you to alter the meter of the song, so if you want that swing 3/4 sound, then this is where you would change it. Most songs are written in 4/4, but it is still a good idea to familiarize yourself with the feel of different time signatures. Timebase (PPQ) will tell FL Studio how precisely to measure when placing or editing audio. The default setting of 96 is good for almost any situation, and raising it will cause your computer to work harder and is only needed if you cannot place an audio clip or sound on the Playlist exactly where you want to. The Circular Panning Law option is something to test out, because this one comes down to endlessly debated preference. The basic idea is that with Circular Panning Law enabled, when you pan sound from left to right, the perceived volume remains the same, while when it is disabled, the sound gets louder when dead center, and the difference between center and panned hard right or hard left is much more noticeable.


Although some of these settings may seem a little foreign or oddly placed, the intention is to help you run FL Studio at its best. Taking the time to change and play with these settings will help you run projects with no glitches, but also give you a better understanding of what is going on behind the scenes, so to speak. In the next chapter, we’ll look at the interface of FL Studio and go into what each menu does and why it can be helpful in producing great music with minimal effort.