
Most of the songs on the radio and professionally produced CDs have that shimmer to the sound, and everything seems to fit sonically. Many of the sounds will have reverb to help the music sit nicely in your mix, and some have delay so that voices repeat a few lines after the initial lyrics are sung, but where does it all come from? The final phase of FL Studio—the effects plug-ins! At this point, you have a running project, and everything is at the right point in the timeline, but it just doesn’t sound right. That’s fine, because we are going to take an in-depth look into the effects plug-ins and their capabilities. Ideally, after this chapter, you will be able to use almost everything that FL Studio has to offer and will possess a thorough understanding of what tools to use when you are looking for a particular sound. Many of these will deal with frequency and range of sound, so the best way to work is to open up a plug-in as you read about it. Link the sound from any channel to a Mixer track and insert the plug-in to see what it will sound like. Although I will be explaining what they do and generally what will change about the output after the sound runs through the plug-in, your ears will always be your best guide when using these tools.
The EQUO plug-in (see Figure 7.1) allows you to affect individual frequencies of the sound that is playing through the Mixer track EQUO is placed on. Don’t think of this as a final EQ on your tracks, think of it as a dynamic EQ adjuster for while the song is playing. This plug-in allows you to affect the volume of frequencies and even the frequency amount in each side of a stereo output. So you could drop the bass in just your left ear, leaving the right side playing normally. EQUO is great for creating a sweeping effect using automation clips. Remember that you can automate nearly everything, so it’s as easy as right-clicking a knob and choosing Create Automation Clip. So let’s look at what the controls do and then apply our new knowledge!
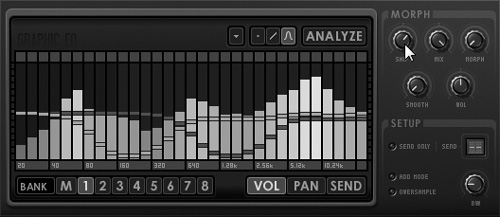
The left side of EQUO is a graph that has low frequency on the left and high frequency on the right. At the top of this graph is a drop-down menu with Random, Flat, and Interpolate options. Random will generate a random EQ curve for the selected bank. Remember that if you have master selected (M), this will only affect the final output and will not be used for the sweeping effect for which this plug-in was intended. Flat will bring the EQ line back to the middle (default), where there will be no noticeable effect, and Interpolate will automatically draw the in-between curves on Banks 2–7 when you draw a curve on Bank 1 and then a curve on Bank 8. I enjoy this option because when you have a certain sweep in mind and you know the start and the end of the sweep, the Interpolate option will draw the curves that are necessary in between to create a smooth transition between the first and last bank curves.
The mode buttons to the right of the drop-down are Pencil, which allows you to move single frequency blocks up and down; Line, where you can click and drag straight lines to make a curve; and the Curve option, which is the default behavior. When you click and hold the Analyze button, it will draw a curve based on the audio that is playing through EQUO. The Bank Select down at the bottom allows you to draw a different curve for the bank you select. The Volume, Pan, and Send buttons will allow you to change frequency volume for a bank, the frequency amount in the left or right channel using Pan, and the frequency send amount for the bank that you have selected.
The Morph knobs are where all the action happens for the frequency changes. The Shift knob will slide the currently drawn curve to the left or right, depending upon the position of the knob (see Figure 7.2). This is the knob that you will want to automate.

The Mix knob will determine how much of the curve is added to or subtracted from the original sound. It will be turned to the right by default so that the curve you draw will have maximum effect on the sound playing through EQUO. Turning it to the left will affect the sound in reverse, so if you have a pan curve that drops the bass on the left side when the Shift knob is turned, the Mix knob, when turned to the left, will cause the bass to drop in the right side. I find it best to leave this knob alone unless you want to create a frequency sweep that goes from one extreme to the other. Remember that when the Mix knob is in the middle, that means the curve you have drawn will not affect the sound output.
The Morph knob will blend between Banks 1 through 8, where the knob turned left is the first bank, and the knob turned right is the eighth bank. This is also a desirable knob to automate.
The Send Only option allows you to mute the Mixer track output to the master, and then you can select a send track on which to place the sound. Remember that 1–4 means Send 1, 2, 3, or 4, so select accordingly. If you have music or a different instrument on the track to the right of EQUO and you choose to send to one, the send output will play on that track. This can cause trouble because you can’t see why the EQUO is playing on that send through internal routing, so use caution with this option.
Add mode means that the effected signal will be combined with the original output, rather than just the effect playing through EQUO’s output. This is good for when you need the original curve to play with your effected sound. So if you have a curve that cuts out the midrange, with Add mode on, when the curve passes over the higher frequency to cut it out, the higher frequency will still play (see Figure 7.3).
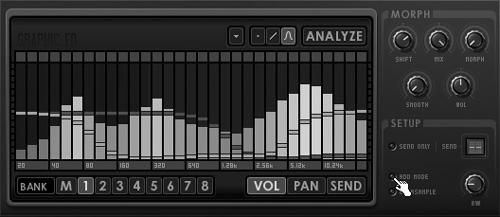
Oversample will improve the quality of sound that comes out of EQUO, and the Bandwidth knob will adjust the amount that the curve will affect the sound. So if you raise the bandwidth, your EQ curve will have a more subtle effect on the audio playing through EQUO.
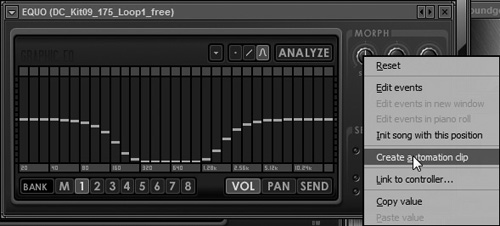
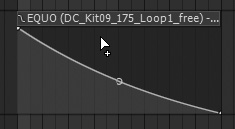
In one of your Mixer tracks, open up an instance of EQUO, select Band 1, and draw a simple dip in the middle of the graph. Because we are only dealing with Band 1, make sure the Morph knob is all the way to the left and the Mix knob is all the way to the right. Now right-click on the Shift knob and choose Create Automation Clip (see Figure 7.4). In the Playlist, you will see an automation clip appear in the first empty space available (see Figure 7.5). Draw a line that starts from the top and gradually drops to the bottom over time. Now hit Play, switch back to the EQUO window, and you can see the plug-in making the changes to the sound and how the frequency is affected.
This is only scratching the surface, and you can create eight different banks and automate the Morph knob for a completely custom sound. This effect is great for muffling a drum beat in the beginning of a song, and then as the main verse starts, you can bring all the frequencies up to normal. One thing to note is that you should get your EQ settings where you want them using the Fruity Parametric EQ before making changes with this plug-in.
Fruity 7 Band EQ (see Figure 7.6) is a simple EQ that has preset frequency values so you can only alter the amounts of those specific frequencies. There is no tension control, so you can’t etch out a specific tone, but for general quick EQ that calls for mild precision, this is as simple as they come. Think of the same graph that we dealt with in EQUO, and you will get the idea. This is one of the fastest ways to automate a quick bass removal by linking the low-frequency knob to an automation clip. Remember that you can always use the integrated Mixer track EQ for the speediest EQ changes, but this is easy to forget about, and a plug-in is easier to turn off for comparing settings than having to go back and completely readjust the built-in EQ. This plug-in is great for understanding what specific frequencies are affected when you raise or lower them, but I think that you will find the other EQ options to be much more flexible.
Have you ever made a song and had the bass seem lifeless and lacking that “force to be reckoned with” feel? Fruity Bass Boost (see Figure 7.7) is the plug-in that can give your sound that needed boost. This is an even lighter version of an EQ and only deals with one specific frequency that you choose. You can then boost that frequency to give your bass or even kick drum a warmer, heavier sound. Keep in mind that you will most likely need to lower the volume so that the sound doesn’t become distorted. When boosting a frequency signal, typically the volume increases as well, but I want to mention here that boosting a frequency is not always the way to go. Usually, cutting unwanted frequencies and using multi-band compression to boost bass frequencies is key to a great mix. Finding the right tone takes practice, but the more you pay attention to which frequency works with which sounds, the easier it will be to apply those effects to future projects.
This will distort any audio signal that it passes through and is great for getting a crunch sound to your guitar if you’re playing directly into FL Studio (see Figure 7.8). The PreBand setting will control the amount of frequency filtering on the distortion, so when you only need distortion for the low or high end, this is where you set it. The Color knob will tell the PreBand what frequency to affect (how much to boost the distortion of that particular frequency). The PreAmp knob is essentially the distortion itself and the amount that audio is overdriven. The × 100 knob will literally multiply the preamp by 100, which is great for distorting an instrument but will typically yield terrible results when you apply this much distortion to a collection of tracks or sounds.

PostFilter allows you to further fine-tune the frequency response of the sound after it has gone through the distortion, and the PostGain is essentially the final volume control. If the sound is clipping, lower this knob, because lowering the PreAmp will remove distortion in your sound. Try plugging in a guitar or even singing into this plug-in for gritty sounds that usually require an effects box.
Chorus (see Figure 7.9), which is similar to Unison found on many synths, will take a sound, delay it, and detune it slightly so that it seems as if two or more sounds are playing. When you copy a vocal and place the two on top of each other, it just sounds like a louder vocal. The Chorus effect takes that vocal and modifies it slightly so that you can hear the difference and they sit together better in the mix. While this is great for vocals, you also can add chorus to anything you want to thicken up. Try duplicating a vocal and placing the Chorus effect on one, then panning one copy to the left and one copy to the right. You may get some results that will surprise you.
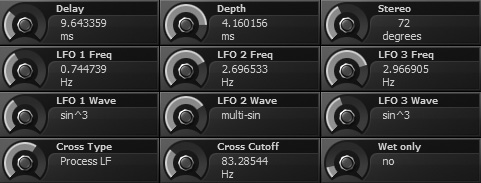
The Delay knob will determine the delay between chorus voices, while the Depth knob will affect the chorus modulation. This one takes a little tinkering to fully hear what is going on, but when you adjust the delay to a low setting and the depth to a high setting, you will get a thicker, heavier chorus effect.
The Stereo knob will adjust the left and right modulation effect from the chorus and, in changing values, will affect the stereo image of your sound. The LFO controls allow you to set a modulation speed and type of wave that the LFO uses.
Cross Type is an important knob because it will determine what range of sound the chorus will affect—Process HF will work on higher sounds, such as flutes and female soprano voices, and Process LF will be better suited for bass and baritone male voices. The Cross Cutoff determines at what point in the frequency spectrum the sound is affected by the chorus. This is basically the fine-tuning of the Process knob.
Wet Only should be turned on when you are using the chorus as a send track to affect sound. So if you have vocals that are going to the main output, but you want a little chorus, add the Fruity Chorus to a send track and then route the vocal track to the send track and select Wet Only. This will make sure that the chorus track only plays the affected audio through the master and doesn’t add in the original sound, which can cause clipping.
Fruity Compressor (see Figure 7.10) is the simple version of FL Studio’s compressor and is a great tool for understanding how compression works. The use of compression is highly debated, especially today, with engineers pushing (or being told to push) songs to their absolute maximum volume. The use of heavy compression takes away the dynamic range of a song. In other words, parts of the song that are supposed to be soft play at the same volume as the loud parts. This doesn’t mean your volume knob no longer has an effect; it just means that the music that is playing will no longer have quiet parts and loud parts, but it will be a wall of sound that will always play at the volume level you set.

Compression is a way of automating the volume of a signal by reducing the dynamic range of a sound. It seems counterintuitive that compressing something can make it louder, but compression more accurately compresses sound so that you are able to turn it up. When a sound has quiet and loud parts, if you turn up the whole sample to better hear the quiet parts, the loud parts get too loud and can cause distortion. Compression lowers the distance in volume between the loudest and softest notes so that as you turn up the volume, the loud parts do not clip, but you are able to hear the quieter parts more clearly. Those in favor of heavy compression argue that it brings their song up to one constant volume or gives their music a distinct sound that no other has, which in their opinion sounds better. It is my personal opinion that compression, when used properly, can give a song the punch it needs and fix slight volume problems, but there should be no rules to how you use it, because if everyone thinks it sounds good, you can argue that! However, I am not the final say on what you like, and as with anything in FL Studio, experiment and see what you find appealing.
To understand what this plug-in does, it is usually best to start with a drum track that has cymbals, a kick, and a snare so that you have a range of volume within the sample. Place the Fruity Compressor on the drum track as you go through the settings so you can hear the difference when adjusting. The Threshold knob determines at what volume the compressor should start affecting the sound. With the threshold all the way up, there will be no compression because there is no volume ceiling that the sound needs to hit in order to activate the compressor.
The Ratio knob is the amount of compression, where the number on the left is how loud (in decibels) the sound needs to go above the Threshold setting to allow a 1−dB increase. So if your threshold is set at − 10 −dB, and the ratio is set at 15:1, then a sound that plays 30 dB louder than your −10-dB threshold will cause the compressor to only allow a 2−dB increase in the volume of the sound (because a 15−dB increase only allows a 1−dB increase in the output, so a 30−dB increase allows 2 −dB). The gain is the volume control of the output after it has been run through the compressor.
The Attack and Release are similar to the ADSR envelopes that we discussed, but rather than a sound, the compression is affected. The Attack controls the amount of time before compression starts. For long, droning notes that gradually increase in volume, like a break in a song, where a single pad plays a long note and gets louder, a long attack means that the compression will kick in slowly. For sounds such as a kick drum, it is usually necessary to apply a quick attack so that the compressor catches the drum before it clips the audio.
The Release switch is how fast the compressor stops affecting the sound, so in the example of a drum kick, if there is a long release, after the drum kick hits, the compressor will still be active and can affect other sounds in the track, such as a hi-hat that gets compressed undesirably. For kicks and quick-burst sounds, a faster release works great, but don’t be afraid to experiment with these settings, because adjusting the attack and release to extremes may give your music a crazy breathing effect.
The Type knob will allow you to switch the knees of the compression. The knee is the time it takes the compression to reach the maximum setting that you determine (from the Ratio knob), starting from a 1:1 compression ratio. Hard means that once the threshold is passed, the compressor kicks in full, medium allows 6 dB where the compression is applied, vintage allows 7 dB, and soft will apply the compression over 15 dB of sound. So if you have a soft knee, the compression of the sound will increase to your set ratio gradually over 15 dB.
Sidechain Compression
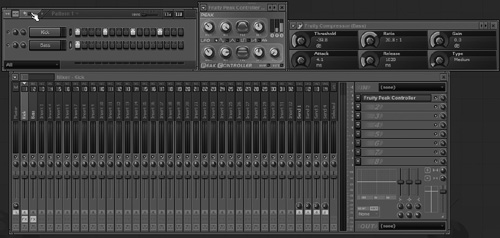
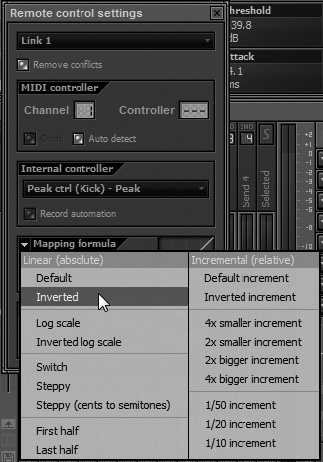
I want to give you an example of how useful compression can be. Sidechaining by itself is nothing more than using one signal to affect another signal. The ducking effect created from sidechaining compression can be heard in many popular songs today, and the idea is to sidechain the signal from one sound source to control the compression of another signal. In Benny Benassi’s “Satisfaction,” the bass seems to breathe with the kick drum. This effect is actually pretty easy to achieve in FL Studio, and this section will demonstrate how. Start by loading a simple bass instrument and a kick instrument and then linking them to individual tracks in the Mixer. Place some kicks in the Stepsequencer and a single note in the bass channel, as in Figure 7.11. Now insert a Fruity Compressor on the bass track in the Mixer and a Fruity Peak Controller on the kick track in the Mixer. Feel free to experiment with the Ratio, Attack, and Release controls on the compressor, but first right-click the Threshold knob in the compressor and select Link to Controller. From the dialog box that pops up, select Peak Control - Peak for the internal controller and then select Inverted for the mapping formula (see Figure 7.12). This will cause the bass to quiet when the kick hits rather than play with the kick. Adjust the Peak Controller settings so that the peak tension is raised up, the Base knob has a low setting, and the decay is set near the middle. Make sure that Mute is not selected on the Peak Controller in the bottom right; otherwise, the kick will be muted. Press Play, and you will hear the bass being compressed from the signal of the kick drum.
Fruity Delay (see Figure 7.13) is what will give any sound that feeling of slowly fading away. It works great on vocals when you want a line to repeat for emphasis. You can automate the controls here, too, and have the tempo increase while the volume drops so that the voice repeats faster and faster while dropping in volume. Putting delay on instrument pieces such as a hi-hat can produce an interesting backbeat that is better than what you initially made.

The Input knob will affect the volume of the original sound and how loud it plays into the plug-in. Feedback is the volume of the echoes created by the delay. Be careful, because turning Feedback all the way up will cause the echo to repeat endlessly. Consider that this could be used to create the rhythm of a song with just the constant repeating sound and then automated to stop repeating at the end of the song. There are many creative ways to utilize this plug-in.
Similar to other plug-ins, the Cutoff will affect the frequency of the echoes that come out of Fruity Delay. Tempo by default is set to Auto so that the echoes will automatically lock to the tempo. This is usually the desirable setting so everything is crisp, but feel free to change this setting and try automating it, because many different types of music incorporate specific tempo-synced delay for interesting percussion and melody.
Steps will affect how often the echoes play, and Mode will affect the stereo image of the echo. The Normal setting plays the output like the original, and Inv. Stereo will swap the left and right channels so that the right channel will echo on the left and vice versa. Ping Pong will alternate between using the left and right inputs to echo, so if you have a constant hi-hat in the left channel, it will still play in the left channel, but it will echo in the left, then right, then left, and so on.
A more compact and very similar plug-in, Fruity Delay 2 (see Figure 7.14) is the refined uncle of Fruity Delay (1). The input controls are the same, where volume is the amount of input from the original signal and panning will determine how much of each side of the input has delay. So if you pan it to the left, you will only get echo out of the left side because that is all that is coming into the echo. Normal, Inverted, and Ping Pong will work as described in Fruity Delay, and the second Volume knob and Cutoff knob both affect the output of the delay plug-in. Remember that, when turned all the way up, the Volume knob for the output means that the delay will continue endlessly.

The time wheel locks to the tempo, so the values you choose here will be based on fractions of the original beat. This ensures that echoes are in time with your project and allows you to make different echoes without worrying if they get out of tempo. The Stereo Offset knob (OFS) will cause the left and right outputs to offset each other. Although this can deliver a wider sound, overkill with this can make your audio sound distorted or just plain wrong, so use caution when adjusting this.
The Dry knob will determine how much of the original input comes out of the plug-in output. If you have the delay on a send track, then turn the Dry knob to the left so that only echo plays out. This way, you can determine the amount of dry signal you want by using the regular volume control in the Mixer.
Now we are getting into a much more flexible delay plug-in. The Fruity Delay Bank plug-in (see Figure 7.15) allows you to have multiple echoes running, which can come in handy when you’re creating soundscapes or sound designing for a film. Multiple delays can give the perception that a sound is everywhere in the mix but dynamically moving around. This is definitely a plug-in to experiment with when you start getting ideas for delays in your music. For the basic delays, the prior plug-ins discussed will work great, but if you’re looking for more, this is the plug-in for you.

The tabs at the top of the plug-in represent the different delays you can have running, and they will have identical settings for each one. At the top right is a set of controls that will be global to the delay effects. The Oversample feature is like many of the oversampling options on other plug-ins and will increase the quality of the audio that comes out of the delay plug-in. The Wet and Dry levels will affect the amount of delayed sound (Wet) versus the amount of original sound (Dry) that plays out of the output. The In knob will determine how much of the original signal (volume-wise) will play into the delay plug-in. Turn this up if your sound isn’t getting enough delay response. The Feedback knob will determine the overall feedback of the delay plug-in and affects all running delays.
The next series of sections in this plug-in will look the same regardless of which tab you select. Just know that if they are turned on, they are active even if the tab is not selected. This is good to keep in mind in case you are getting a rogue delay signal, because you may have left a delay turned on that you didn’t want.
The In section houses the On switch for the selected delay, so if you highlight this with Tab 2 selected, then the second delay will be activated. By default, only the first delay is turned on, so that you aren’t overwhelmed by a wall of sound when sending signal into the plug-in.
The Solo switch will isolate the selected delay so you can fine-tune each delay one at a time. The Volume and Panning knobs will affect the input signal, not the output, so remember that this is for getting your incoming signal up to a certain level or panned to a certain side before applying the delay. Unless you are having trouble getting the delay plug-in to react to the sound, I would leave these alone and adjust the output settings for panning, but feel free to experiment with how the plug-in reacts to different input levels.
The Filter section allows you to apply filtering to your signal and decide whether you want the signal to be affected prior to the delay effect or after. Selecting the Post option will cause the filter to be placed on the signal after it has gone through the delay effect. This comes down to preference and listening, because the difference between pre and post can give your music interesting results for final mixes.
If you mouse over where it says Off, you can click and drag through a list of different filters to place on your signal. Try selecting an HP (high-pass) filter and then automating the Cut (cutoff) knob. This can give your delay a disappearing effect when the automation causes the knob to go from 0 to 100%. The numbers next to the filter select will essentially determine the severity of the cutoff filter, with 3 being the most intense.
The Gain knob will control the output volume of the filter (not the signal) all the way up to 200%, so you can really boost that effect if you need to. The Cut knob is the one I suggested automating because it controls the cutoff frequency amount for the feedback of the delay, so if you have an LP (low-pass) filter selected, and you slowly turn up the knob to 100%, the high end will drop out, leaving a murky, muffled delay.
The Res knob will increase the volume of certain frequencies that are close to your selected cutoff amount and can produce a shiny ring sound, but to best understand this one, try adjusting the Res knob to hear the difference.
The Feedback section will control your actual echoes that play from the initial signal. So if a vocalist says “Hey” into the mic, and it runs through this plug-in, every subsequent “Hey” that repeats after the first one can be controlled in this section.
Echo processing just determines whether the first echo will have effect on it. So if you need the first echo to be lower than the rest of the vocals, and you want it to hide more in the music, make sure that Process First Echo is selected. I have to admit that it is very hard to see the difference between the two visually, but clicking the box with the vertical lines will cause the image to change slightly. The important part in the image is the second line, and if the second line is the same height as the first line, that means the first echo will mimic the original signal before going through processing.
Next to this little toggle switch is a series of different feedback modes, including Inverted (INV), Normal (NORM), and Ping Pong (P.PONG). The Off setting will disable your feedback, which essentially removes the echoes. Remember that this is there so you can apply filtering on one tab with no echo and then place a different echo on another tab, all using the same plug-in.
The Tempo-Based Time switch will cause the echoes to sync with the set tempo of your project. In most cases you should leave this on, because it will make producing that tight echo sound incredibly easy. However, for more ambient echoes that don’t stick to the tempo, turn this off and experiment!
The Time fader will affect the time between each echo, and with multiple echoes going, the Tempo-Based Time switch makes incorporating multiple echoes easy. The Offset fader (OFS) will determine how far apart (left to right) the echo seems on playback and is another control that I highly recommend experimenting with.
The Separation fader (SEP) will offset the left or right channel to give the sound a richer, wider sound by delaying the echo of one side. This section also has a Volume and a Pan knob and affects the actual feedback (echoes).
Don’t get confused by all the Volume and Panning knobs—they are just there to affect specific sections of the plug-in so that you can decide where in the signal path the panning or volume should change. For example, if you only want echo playing out of the left side for this tab (selected delay effect), then you can adjust the Pan knob in the Feedback section, and that particular echo with play out of the left side. The difference is that if you adjusted the input panning to the left, then only the signal from the left side would have an echo (which you can pan either left or right). So if a great vocal was mostly in the right side, panning the input to the left would mean that most of that vocal would not play in the delay echo because it is using the signal from the left side.
The Feedback Filtering has the same set of controls that the Filter section had, only these control the already affected echoes (feedback signal). The Grain section allows you to slice your echoes into small audio pieces. You can then adjust how far apart these grains play using the Division slider (DIV) and how smooth the grains sound by using the Shape slider (SH). Try automating the DIV slider after finding a good SH setting and go from off to 10 on the DIV slider over a span of time. It may not be what you are looking for, but changing up the grain division can add that little extra spice that may have been missing from a project.
The Output to Next Delay Bank knob (NEXT) allows you to send the signal from the selected tab (bank) into the next one for further processing. The Pan and Volume knobs will affect the overall output of that selected tab (bank) to the main output. A lot is happening with this plug-in, so take a little time to create different delays, because you will find that you can create a much richer mix using multiple echoes.
Fruity Fast Distortion (see Figure 7.16) is a very simple distortion plug-in that can quickly add that needed grit to any signal. Although it can be used with a guitar, I found that stacking two of them will produce a better sound but can really muffle the original signal. However, try using it on a bass guitar for a fuzzy, warm sound or on any single-note instrument. With vocals, I noticed that it helps create that screaming radio sound that many bands use, so try running your vocals with this—you might like the results.
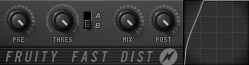
The Pre wheel is basically the amount of distortion, so moving it to the right will boost the distortion. The Threshold knob will determine what frequency is affected by the distortion, but to simplify, turn right to increase the amount of distortion.
The A/B switch changes between the two distortion types. I found that A is calmer and works nicely with instruments, while B is grittier and has a nastier breakup of sound when boosted.
Mix will determine how much of the original signal plays with the distorted sound. So if you only want distortion, turn it to the right.
Post is the volume of the distorted sound, so if the sound is perfect but clipping and too loud, turn this knob down, because turning down the Pre will remove distortion.
Fruity Flanger (see Figure 7.17) will give your audio that spacey sound that is similar to someone singing a single note while opening and closing his or her mouth. This tool is particularly popular with DJs as a transition effect. When mixing from one song to another, a flanger is placed on the outgoing song, and it seems to widen and dissipate from the mix when combined with lowering volume levels. In FL Studio, the Flanger is a great way to add body to your sound and make it move within the mix. While DJs use it to transition between songs, you can use it when transitioning between a chorus and a verse or any number of places in your project.
The Flanger basically takes the input signal (the track that you put the Flanger on) and creates multiple copies that are slightly delayed to cause phase cancellation. So certain frequencies in the signal get removed because at certain points the sound wave is cancelled by a sound wave that is an opposite shape. It is hard to imagine that two sounds can create silence, but that is what phase cancellation is all about. When you have two identical waveforms playing, they will just make the sound louder, but if one is inverted, then all sound will cease. There is a lot of math involved, which I will spare you, but it is good to have the basic idea of what is happening with this plug-in and why it makes the cool sound that it does.
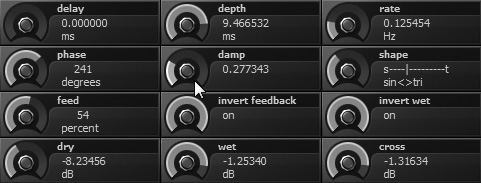
The Delay knob will determine the minimum delay between the copied signals, so if you want a separated, wild sound, raise the delay, but for a crisp flanger, keep it at 0. The Depth is the modulation of the flanger delay, so increasing this will give your effect a chunkier sound. The Rate is the modulation speed of the effect, and you can hear the difference by turning this knob while running the effect.
Phase will allow you to manipulate the stereo sound of the effect. Using a lower setting here will give you a stereo sound that is simple and barely noticeable, while increasing it will create a widening effect on your audio. Damp will pull out some of the higher frequencies of the final output when you increase the value, and Shape will determine the shape of the oscillation. So if you want a choppier, more abrupt flanger, move this setting more toward the Triangle (TRI) setting.
Feed will set your feedback amount, but be careful when boosting this one, because it can easily cause clipping when not adjusted properly. Invert Feedback and Invert Wet will invert both of their respective signals and allow you to create a different sound, depending upon the other settings of the Flanger. These two settings are good to experiment with, but leaving at least one turned on will ensure that you still get more of a flange effect as opposed to a chorus effect. The Chorus effect will produce a copy of the original signal that simply plays slightly delayed and has no modulation. Dry and Wet are the output volume controls for the Flanger effect (wet) and the original sound (dry), while Cross is a version of the wet signal that has had its left and right channels inverted.
Fruity Flangus (see Figure 7.18) is a simple version of Fruity Flanger, but it produces results just as stunning. This is a great tool to use for a quick flanger effect when you start understanding where and when to use the Flanger in your music. One thing I want to point out is that there are no rules, and if it sounds good, then by all means insert the effect and make it work!
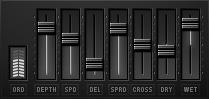
The first setting is the Order window (ORD), which can be adjusted by clicking and dragging up or down. This will add thickness to the flanger as you increase the amount of flangers running and give a smoother sound to the effect overall. The Depth slider will give your output sound a deeper feel to it by increasing the amplitude of pitch oscillation for the flangers. The Speed (SPD) slider will determine the speed of the pitch oscillation, and the Delay slider (DEL) will control the delay applied to the flangers.
The Spread slider (SPRD) is a smoothing tool for the flangers, so if you are hearing something that you don’t like about how the flangers are working with each other, try adjusting this setting. The Stereo Cross slider (CROSS) allows you to send more of the left channel into the final output when slid up or more of the right channel to the final output when slid down and will be a mixture of both when sitting in the middle.
The Dry and Wet sliders are similar to other plug-ins, but when both sliders are in the middle, no sound will play. The top (100% dry or wet) is the signal being sent to the output normally, while the bottom of the slider (–100%) is the inverted signal being sent to the output.
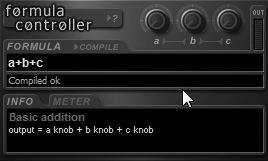
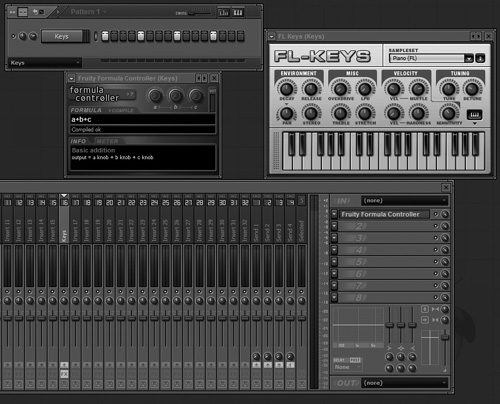
The Fruity Formula Controller plug-in (see Figure 7.19) is an internal controller and allows you to link different controls to nearly any parameter in FL Studio. We have taken a look at linking using the Peak Controller, so now we will look at using this controller, which allows for a greater deal of flexibility. Bear in mind that this controller can get deep into mathematics, but for the purposes of this book, we will stay on the music-making path without getting too deep into mathematical functions. For a complete list of the syntax, functions, and objects that are supported by the Formula Controller, press F1 when the Fruity Formula Controller is highlighted in FL Studio.
This plug-in should be inserted onto an effects track, and once it is placed, then you can right-click most knobs or sliders and link them to the Formula Controller. One of my favorite uses of this program is the ability to use your mouse like a fader or a slider. We will take a look at creating panning for a track using the mouse and the Fruity Formula Controller.
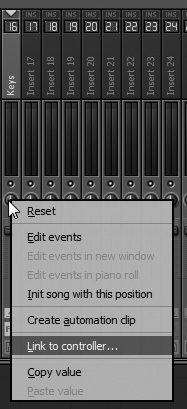
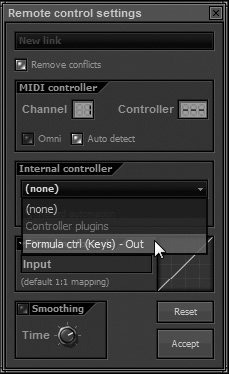
Begin by placing an instance of FL Keys in an empty sampler channel and then inserting an instance of the Fruity Formula Controller on the FL Keys track in the Mixer (see Figure 7.20). (Remember to link the channel in the Channel window and the track in the Mixer using Ctrl+L.) Now right-click on the Pan button in the FL Keys Mixer track and choose Link to Controller (see Figure 7.21). From the Remote Control Settings window that comes up, choose Formula Ctrl (Keys) - Out from the drop-down menu in the Internal Controller section (see Figure 7.22) and then click Accept.
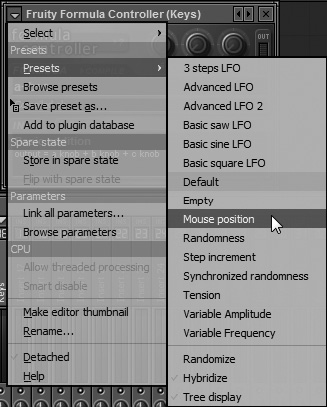
Now the Pan knob is linked to the Fruity Formula Controller, but we don’t have the Fruity Formula Controller set to respond to anything yet. Now go to the Fruity Formula Controller and, from the Presets menu, select Mouse Position (see Figure 7.23). When you move the mouse, you will see that the Pan knob moves with it. This is a great way to give your mixes that human touch to automation, because you can record the results as you change parameters live. The mouse can act like your very own XY joystick controller!
To control a different parameter, you can insert another instance of the controller, but this time after linking the parameter to the new Fruity Controller, make sure that the formula says mouseX instead of mouseY in the Formula section of the Fruity Formula Controller. Now this parameter will be controlled by the X movement of the mouse (left to right), while the first setting (Y movement up and down) remains the same.
The knobs can be made to control custom parameters of your project, and the formulas for combining them again are located in the Help file. The different formulas can be typed into the Formula section, and if they are acceptable, after pressing Compile, you will get a message stating “Compiled OK,” which lets you know that your formula worked.
The Meter tab will display the reaction of the plug-in in a graphical representation. Don’t let the math part scare you, because the presets are typically what you will need, but I encourage you to try and enter in some of your own formulas and combinations. The possibilities are endless with this plug-in because you can link nearly anything, so your imagination is really your only limit. There are a few more controllers that we will take a look at, but definitely experiment with all of them and see which best suits your needs.
We took a look at compression with the Fruity Compressor and what it can do for your music, so you should have a good foundation of knowledge on the subject at this point. The Fruity Limiter (see Figure 7.24) is similar, but it contains more features for fine-tuning a final mix or perfectly dialing in compression or limiting of your project. I prefer this plug-in when compressing pretty much any sound that needs it, and it works great as a final limiter for your overall mix. For compression of certain frequencies, such as compressing the bass in someone’s voice without affecting the rest of the vocal, you will want the multiband compressor, which we will look at later, but for now let’s take a look at compressing and limiting signal with this powerful plug-in.
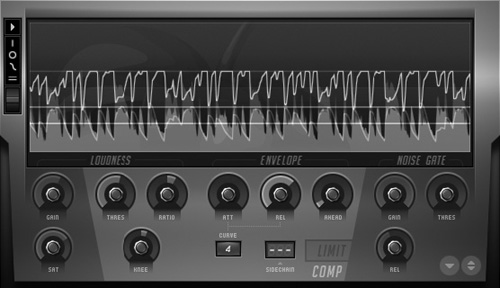
A good thing to understand is how the Fruity Limiter works and the order of operations that happens within it. When a signal goes into the Fruity Limiter, the first thing to affect the sound is the compressor, then the gain controls, then the limiter with the gate controls, and lastly the saturation setting before being sent to the output. It is good to know how this works just so you know why certain settings can change the sound based on the order in which they are adjusted.
The Limiter opens up on the limiter settings, which is not surprising being that it is the name of the plug-in, but to keep with the signal flow of the plug-in, we will start by looking at the compression settings. So that you aren’t confused and stuck looking at the limiter settings, change it to compression settings by clicking the letters COMP that lie below the LIMIT letters on the plug-in.
The first knob you see is the Gain knob, which will affect the output of the compressor after compression has been placed on the input signal. So keeping with our signal path, this gain will determine the amount of signal that goes into the limiter. The Threshold, Ratio, and Knee knobs will set the compression parameters as discussed with the Fruity Compressor, and the Saturation knob is actually a threshold setting for saturation, so lowering it will increase the amount of saturation placed on your signal. This particular setting is very subtle and good to play with when precision-tuning your mixes.
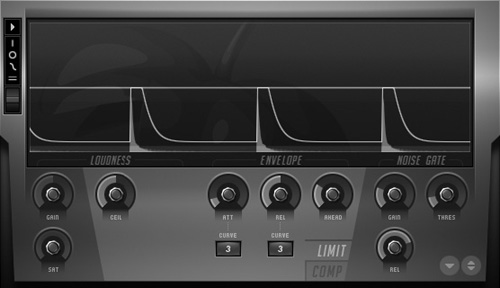
The Envelope section is again an envelope for the compression, where the Attack and Release relate to the compression of the signal, but the severity of the attack and release slope is controlled by the Curve setting. Curve 1 will produce a steep slope, while Curve 8 will produce a relaxed slope.
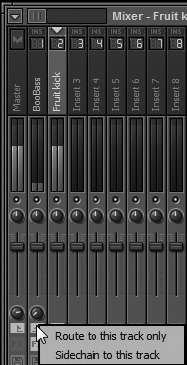
The Sidechain box allows you to select a track to control the compression envelope. We discussed one way of creating sidechain compression earlier, but this option allows you to place a Fruity Limiter on a Mixer track and then select a different track to control the compression. Imagine that you have two tracks—one bass and one drums. In this example we will place the limiter on the bass track and then select the drum track, right-click the send on the bass track, and select Sidechain to This Track (see Figure 7.25). The reason for this is so that the kick will show up as an option in the sidechain list for the bass when we right-click the sidechain box (see Figure 7.26). Now when you adjust the compression threshold and ratio, it will start to affect the bass based on the signal coming in from the kick. Another cool thing to consider is that if you disable the send of the kick track to the master output, then you will only hear the bass affected by the kick signal, but the kick itself will not play.

Now let’s look at the limiter settings, because the noise gate settings will still follow these in the signal path of the plug-in. Gain and Saturation will work in the same manner, but the Ceiling knob is the one to pay attention to here. The Ceiling setting will determine where the overall volume needs to be attenuated, or pulled down to prevent clipping or getting too loud. So if there is a part in your music that gets too loud for a brief moment, you can bring down the ceiling, and when the loud part plays, the actual volume will remain under the ceiling that you set. This is great for that final mix when you just need to make sure that no rogue sounds cause your audio to clip and you need to ensure that all of your songs play at the same volume.
The Envelope settings will react similarly to the Envelope settings of the compressor and will affect how the limiter reacts to the input signal. To only use this plug-in as a compressor without limiting, raise the ceiling to its maximum setting.
The final set of controls is the Noise Gate controls. These are very effective with single sounds because you can create a gate that stops sound from playing after it drops below a certain level (volume). The Gain control in this section will determine how much gating effect is placed on the output signal. The Threshold knob will tell the limiter when to let sound play and at what volume to stop playing it. The Release time affects how quickly the gate will close, so if you want the sound to gradually fade out, you can put a longer release on the gate, and this will produce that effect.
Try taking a single-hit sound and placing reverb on it (see Figure 7.27). Now open an instance of the Fruity Limiter and adjust the Gate effects. This is the best way to hear the gate in action. Typically, when there are a lot of sounds playing, the effect is not noticeable because there is always sound triggering the gate to open.
The last section that I want to mention is all visual. The selections to the left of the Limiter will display the input and output peaks, analysis and gain envelopes, and level markers, and the bottom icon will allow you to adjust the scroll speed of the plug-in. One thing to take note of is that this plug-in will drain more power from your computer than the Fruity Compressor, but in my opinion, if your computer can handle it, this is the way to clean up your final mixes.
The Fruity Love Philter plug-in (see Figure 7.28) is arguably the most powerful effect plug-in available from FL Studio and can create a multitude of effects on your sound. Much like the Fruity Delay Bank, this filter has eight filter settings that can play into each other, allowing you to create an infinite amount of filtering, gating, and delay effects.

At the top of the plug-in are the different banks you can use to create your effects. By default the first two are turned on, so keep that in mind when adjusting your filter settings. Also remember that they play in order, so if you turn off the first bank, no audio will play out because this is essentially stopping the audio chain.
To hear a single bank, use the Solo switch in the Input section. The Filter section is similar to filters that we have dealt with already, with the x1, x2, and x3 settings causing the filters to be more severe as the multiplier goes up. The Waveshaper section (WS) will add distortion to the input signal, and the Amp setting will determine the amount of distortion, while Mix will mix the affected signal and the original signal.
The Out section applies to the currently selected filter, where Next will determine how much signal is sent to the next filter, Pan will determine the panning output of that filter, and Volume will determine the volume of that specific filter.
Below these settings are articulators similar to the ones that we explored with the Slicex plug-in. Most are familiar, aside from the Waveshaper (WS) and Waveshaper Mix (WMIX) selections. The Waveshaper selection allows you to create a distortion curve where the X-axis is the input and the Y-axis is the output, and the Waveshaper Mix will determine the blend between affected signal and original signal.
Try creating your own distortion curve for the Waveshaper and make sure that you enable the Waveshaper. You will most likely find many uses for this part of the plug-in, especially when using random sounds in your audio. This distortion can make a sound purposely jump out of a mix when you need it to stand out for a brief period in your project.
Beneath these articulators are settings that determine how the different modulators will affect the selected parameter (for example, using an LFO to determine panning of the selected filter). You can draw your own pattern using the pattern selection, and if you click and drag over the pattern number, it will change between the available 10 pattern slots that you can draw. The Mod X and Y selections will dictate how the XY controller that is also part of the plug-in will control the selected parameter. So in Figure 7.29, you can see that the panning has a sharp bend to the left when the X controller is moved from left to right along the X-axis.
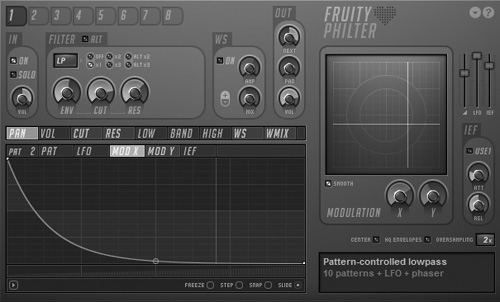
Figure 7.29. Setting the response curve of panning based on the position of the XY controller on the X-axis.
The IEF selection acts like a smoothing device for your envelope, and the harder your envelope attacks and releases, the more response you will see from this setting. An envelope follower will take the incoming signal and create an envelope based on the volume levels of the signal. So as the volume of the input increases, the changing envelope created will affect the selected parameter (such as panning or volume).
At the bottom left of the Envelope area is a menu that allows you to make some changes to the envelope itself (see Figure 7.30). The first set of options will allow you to open, save, copy, and paste an envelope state. This is great for when you have taken the time to build your own envelope and want to recall it for different projects. Flip Vertically will invert the current envelope that you have, and Scale Levels will allow you to pinpoint the envelope center point and tension of the curves and change the values of the envelope points.

Normalize will work similar to how it does with audio, but rather than the volume reaching a peak amplitude target, the envelope’s highest and lowest levels will reach that target. This quickly adjusts your envelope to create a more extreme effect. Decimate Points will let you determine the number of control points on your envelope, Filter will allow you to fine-tune the filter of your envelope, and Smooth Up will smooth abrupt changes and calm down any spikes in the envelope lines. Create Sequence will allow you to create a sequence for your envelope using the Envelope Sequencer tool, and Analyze Audio File will mimic the volume envelope of an input sound file.
To the right of this menu and below the envelope, you can choose Freeze to stop any editing of any envelopes, so when you have the sound you want, select this option so you don’t accidentally change something that you didn’t want changed. Step allows you to freely draw curves in the envelopes, while Snap will cause the envelope points to snap to the closest step when drawing your envelope curve. We discussed Slide before, but to reiterate, this option keeps the distance between control points relative to each other when moving them around. Disable this if you need to move a control point without the rest of them moving with it.
The XY controller is a built-in controller to which you can link different parameters, as in the example in Figure 7.29, where the panning of Filter Bank 1 is linked to the X-axis movement of the XY controller. The Input Envelope Follower section (IEF) has a toggle switch where you can have the output of the first filter be the signal that creates the envelope for your selected parameter. So if IEF is selected for panning, then choosing this option means that the output from the first filter will determine how the envelope controls the panning. Keep in mind that the IEF can work for any bank because it bases the created envelope off of the input signal so you can apply that envelope to the first bank as well. You can fine-tune the reaction of the IEF by adjusting the Attack and Release knobs. This is a big one to experiment with, because you can create a multitude of perfectly timed effects. Because the modulation is based on the input signal of the first filter or the general input, the modulation of the envelope will react to that signal, which basically keeps it in time with itself.
The final set of controls is at the top right, and the three faders allow you to control overall volume output, LFO amount, and IEF level. The big thing with this plug-in is to take your time. This is a very complex plug-in, but once you start to understand how the sound flows through it, you will be able to add incredible depth to your projects and will never be limited by what you can do with envelopes in FL Studio.
The Fruity LSD effect (see Figure 7.31) acts like a generator for MIDI files. It still needs to be inserted into a Mixer track as an effect, but it can receive MIDI and play sound using your soundcard’s synthesizer. In my case, my Project Mix is just an audio interface, so the synth that is used is Microsoft’s built-in MIDI synth. To get it to work properly, I had to open an instance of MIDI out and then send that MIDI signal to the LSD effect, and after properly routing the signal, I was able to hear the built-in synth play sounds based on the MIDI notes I placed in the Piano roll of the MIDI out instrument.
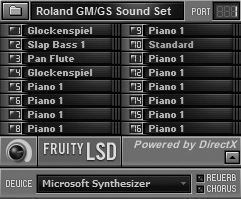
The LSD is typically what you will use to play MIDI files if they have specific instruments assigned to the MIDI notes. The Bank button at the top will open a window allowing you to change the DLS bank so that you can use a different bank for creating your sounds. Leave this setting as is if you do not have a DLS file that you want to specifically use.
The Port window is where you link the MIDI out port and the LSD port so that the MIDI signal sent from the MIDI out generator properly makes it to the LSD effect plug-in. Don’t use Port 0, though, because that is the main MIDI out of FL Studio and can cause a heap of trouble when trying to get your MIDI sounds to play properly. The 16 available channels contain instruments that can be changed by clicking on them and selecting from the list that pops up, but remember that if your MIDI out instrument is sending a certain instrument, then the LSD will automatically switch back to that instrument. So, change the instrument in the MIDI out, and the LSD plug-in will follow suit.
The last control is the main volume output of Fruity LSD. The drop-down menu will allow you to select the device you want to use for synthesis, and in my case I am only able to select the Microsoft Synthesizer. The Reverb and Chorus buttons are both global effects, but keep in mind that the chorus will not work with the Microsoft Synthesizer. As I like to reiterate, MIDI is not sound, so MIDI alone will not produce music without a synth using the MIDI information to trigger sound.
The Fruity Multiband Compressor (see Figure 7.32) is my favorite tool for adjusting problem areas with certain frequencies. I prefer using multiband compression to an EQ in many different cases. Vocals is a big one—I don’t like to remove frequencies with vocals, because it can create a muddy or lifeless sound. When you use a multiband compressor, you are merely attenuating certain frequency ranges so that they are not as pronounced by using compression. This plug-in works similarly to a compressor, but rather than compress the entire sound, the Multiband Compressor specifies certain frequencies that will receive amounts of compression. This is great when a sound is perfect but just has a little too much high end on it. By using the Multi-band Compressor, it will calm the high-frequency response and give the sound a more relaxed EQ that brings the offending sound (frequency) down in volume.

The first thing to think about when looking through the settings here is that the compression controls are no different than the compression controls for the Fruity Limiter or Fruity Compressor, but the three sets of the same controls that you see apply to the specific frequency ranges. They compress the lows, the mids, or the highs. The Limiter button is a quick setting that will not allow the Multiband Compressor output to go over 0 dB, which prevents clipping, but it is best to deal with your levels prior to adding a limiter so that the overall mix doesn’t sound squished.
The Filter Type button will toggle between a Butterworth IIR filter (IIR) and a LinearPhase filter (FIR). The FIR setting is recommended for use with mastering your audio, and I invite you to investigate deeper into the filters, but be prepared for quite a bit of complicated math.
The Speed slider will determine the pace that the compressor visualization runs or, when all the way left, will display the frequency ranges. These frequency ranges for compression can be set by turning the frequency knobs located beneath the graphic display. These will tell the compressor what specific frequencies to compress when certain sections are active. Adjust these when the compression seems to be happening to too much or too little of a frequency range. For example, if you need heavy compression in the low end of your sound, but you don’t want to cut out too much midrange, then try moving the low-frequency knob to the left a bit so that the low-frequency compression will happen to a smaller frequency range.
We know how the different knobs will affect the compression of the different frequency ranges, and now we know how to set those ranges, but what if we need to listen in to one frequency or have no effect on another? The buttons at the top of each compression section include Active (compression is working), Muted (the output of that frequency is turned off), and Bypass (the output is the original and is not affected by the compression for that frequency range). So if you need to listen to a specific range to find what needs to be compressed, then mute all but the needed range, and then you can adjust the frequency range knobs to include or exclude the sound you want.
If you need absolutely no compression on a certain frequency—for example, you only need compression of the lows—then you can bypass the mid and high frequencies, and only the selected low range will have compression applied to it. Trust me when I say that practicing with this plug-in will come in handy, because this is the plug-in that will add that extra crispness to your projects and can boost your mixes to a professional-sounding level when used properly.
The Fruity NoteBook (see Figure 7.33) is a cool plug-in that you will see used in many of the tutorial projects as well as the projects from the “cool stuff” folder, all found in the Browser (F8). This can be used to explain portions of a project, to display notes on a project for anotherartist who may be remixing your project, to leave yourself project notes for reminders, or even as a fun way to pass the time. All you have to do is right-click the page turner button and choose Create Automation Clip, and the line will represent pages as it goes up the Y-axis. Drawin your control points to tell the NoteBook when to change pages. I found that I was even able to create a small animation using typing characters and quick page turning, but I was forced to come to terms with my nerdiness and move on. This is a great plug-in for conveying messages that react to your automation clip and making projects appear well put together when the page turning is in time with the music. If the pages are turning too quickly, you can use the automation clip channel Min/Max settings to slow down the page turning in the Piano roll automation clip editor.
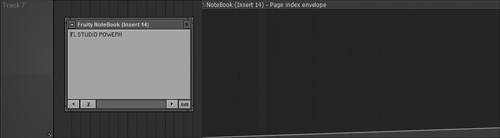
One final tip is that you can right-click the control points in the automation clip for the NoteBook to select Hold Point mode from the list. This will allow you to edit the automation in steps. Remember that none of this is necessary for improving your music—it is just for fun or function and will in no way affect the sound of your project.
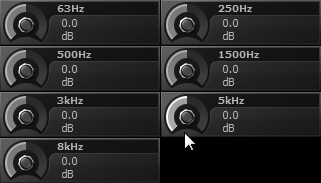
This is the light version of FL Studio’s parametric EQ, but it works great for quick EQ changes to your audio (see Figure 7.34). This plug-in is not resource intensive, so it will not be a drain on your computer when active. This makes it easy to dial in your EQing, because you can stack instances of this plug-in to give you greater control over your EQ settings.

The sliders will affect the amount of frequency that is played to the main output for the track that has the parametric EQ. The top row contains different band settings, allowing you to create a low pass or high pass so only those frequencies play. Here you can automate the controls to achieve that old radio effect by taking out the bass and some of the higher frequencies for the effect and then bringing the levels back to normal when you want the sound to play as it originally sounded.
The larger knobs below the sliders will affect where the frequency is pinpointed, so if you need to boost the midrange in a different area, move one of these knobs until the pinpoint is at the frequency you want. The smaller knobs beneath those are the bandwidth knobs, commonly referred to as the Q. This determines how much of a certain frequency is affected by the height of the sliders, so if you are trying to isolate a certain frequency and notch out an undesirable sound, you can turn this knob to the right, and it will create a narrow area that drops when you lower the Frequency slider.
The graphic representation of the EQ can be used by left-clicking to move the center point of a frequency (dragging left to right) and right-clicking (and moving left to right) to change the bandwidth, while both will move the Frequency slider amount up and down. Remember to experiment using automation with this plug-in, because you may find that creating the sound you want only requires a little EQ adjustment that you are able to draw in the Playlist.
Fruity Parametric EQ 2 (see Figure 7.35) is the big brother to the Fruity Parametric EQ and will do the same essential functions as the parametric EQ, but it offers high-quality options that will strain performance. Don’t fear using this plug-in, though, because unless you are near the minimum requirements or you have a ton of plug-ins running, it shouldn’t be an issue.
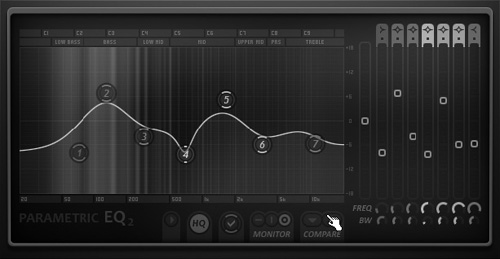
A huge advantage to using this EQ is that you can see incoming and outgoing frequencies represented by spectral monitoring, so when a frequency is playing with intensity, there will be more graphics playing with the music in that specific range. So if you have a deep kick drum and you place the Parametric EQ 2 on that track, then you will see activity in the low end of the spectrum from the spectral monitor. The top-right multicolored buttons will allow you to select the band type and slope for the particular “token” that is represented by the same color on the graph. Below that are the Frequency sliders, and below that are the frequency center points and the bandwidth.
This section will most often be used to adjust the bandwidth because the actual tokens in the spectrum on the left side can be clicked and dragged to any point. For intricate adjustments, hold the Ctrl key while adjusting knobs, and you will get more precise value changes.
At the bottom are the Options menu, which will open up information on the plug-in, and the high-precision Monitor setting, which will increase the resolution of the spectral monitoring. (Keep in mind that this affects performance slightly.)
The HQ button will also affect performance, but it will increase the overall audio output quality. View Band Tokens will remove the large tokens, but you will still be able to see the frequency center points. The Monitor switch allows you to change between no visual monitoring and a visual of the input or output signal.
A great way to use this plug-in is to just drag the tokens to roughly where you want the EQ to be and then fine-tune using the bandwidth and band types. The EQ can also be automated using the sliders on the right, so getting a dynamic change in frequency is actually very simple.
The Fruity Peak Controller (see Figure 7.36) is another one of the internal controllers available in FL Studio, and a useful example can be found in the “Sidechain Compression” sidebar earlier in this chapter, but here we will look more closely at the features and abilities of this plug-in.
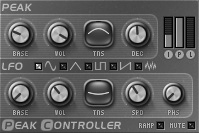
The Fruity Peak Controller can be looked at as a plug-in that uses the signal of an input, its own internal LFO (see “What Is an LFO?” in Chapter 6), or the combination of both to control something. One of the more common uses is the sidechain compression that we discussed, but it can control nearly every parameter in FL Studio. The peak control is the upper half, and the LFO settings make up the bottom half of the effect plug-in.
The first thing to pay attention to with this plug-in is the Mute switch, because it will silence the input signal. This is on by default, so unless you are only using a signal to control a parameter (such as a kick drum used to compress a bass signal, but the kick is never heard), then uncheck this option to unmute the track that has the peak controller.
The Peak Control section in the upper part has a Base knob that will determine the base value of the peak controller. This is useful when you need to specify a range that the peak controller will react to, such as a volume range of an instrument that will send signal.
The Volume knob will determine how the peaks of volume from the input signal will affect the controller. So if the input volume is not producing the desired effect, try raising or lowering the Volume knob to have more or less signal affecting the peak controller.
The green box with the line running through it is the tension level. This will affect how the input volume reacts to the peak controller and can give you sharper or duller response, depending on what you need.
The Decay knob will determine how long it takes the peak controller to stop controlling a parameter after the input signal stops or drops below the base range.
The three bars to the left are visual representations of what is going on with the peak controller. The first bar is the input signal, the second bar is the peak controller value, and the third is the LFO. Think of the peak controller and LFO bars as knob positions. When they are at the top, they are at maximum, and when they are at the bottom, they are at minimum. So if you have the input signal going up and down, the peak controller value will also go up and down, and for whatever you have linked to it, that knob will go from its highest point to its lowest point. This is just a generalization, and the settings that you make will determine how the peak controller values react to the input signal, but this is the basic idea.
The LFO section allows you to use an LFO to affect the controller value, so if you need a panning effect to continuously go from left to right, then you can set up an LFO and link the panning to the LFO (not the peak) of the Fruity Peak Controller. In this case you are not using the input signal at all.
The five LFO shapes to choose from include Sine, Triangle, Square, Saw, and Random. The Base knob is similar to the peak control Base knob and will set a range for the controller to react to the LFO, while the Volume knob will adjust the amplitude of the LFO.
The Tension section is identical to the peak tension and will determine the curve that is used to link LFO values to the LFO controller values, so try adjusting this knob for a more dramatic effect. The Speed wheel will determine the speed of the LFO, and the Phase wheel will tell the LFO where to start.
The Ramp switch helps to remove clicks and pops if you are hearing them in your audio from abrupt changes from the controller.
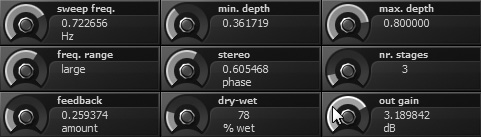
The Fruity Phaser (see Figure 7.37) is very similar to the Fruity Flanger because it also uses multiple delayed versions of the incoming signal, but the phaser creates a sweeping effect that has more impact on your sound.
Adding a phaser to a vocal right before a breakdown or to an instrument that plays in the background can produce impressive results. Again, remember that adding that little extra to your projects can push them well above the rest of the music out there, and I highly recommend experimenting with this plug-in!
The Sweep Frequency knob allows you to choose the frequency of the LFO that will control the phaser. The available values of this knob depend on the frequency range setting. The Min and Max Depth settings will determine the range in which the phaser operates, and the Frequency Range, as mentioned before, will determine the available values for the Sweep Frequency knob, where a small setting allows for a range of 0 to 2 Hz, and a large setting allows for a range between 0 and 10 Hz.
The Stereo knob will set the synchronization of the left- and right-channel LFOs, which can create a wider sound in your mix. The Stages knob will determine the number of phasing stages active on your sound. For a subtle effect, keep this number low, and for really wild phasing, you can crank this number up to 23.
Feedback is the amount of signal that gets returned to the phaser, and when turned up to a higher number, it can create a more intense effect on the sound. The Dry-Wet knob will mix between the original sound and the processed output (wet). The Out Gain knob will increase the volume of the output signal, so if the effect is right but not quite loud enough, turn it up here. Remember that this will not affect the phaser effect, and it only controls the output volume of the already affected signal.
Reverb is a way to create space in your music. If you have ever recorded your voice and played it back, in the mix it sounds like it is a person talking right next to you, rather than blending in with the rest of the music. In a large auditorium, when you yell, you hear your voice repeat because sound waves bounce off of surfaces and reflect until they are absorbed by the walls. Each time the sound waves bounce off of a surface, that surface takes some of the volume off of the sound. If you were to yell in a small room versus a large room, you would get very different reverberations because the sound waves travel at a constant speed, so when they bounce off of a surface more quickly (as is the case in a small room) and return to you, you get the sense that you are in that small room. Even in pitch black, you can tell roughly how big a room is by yelling and listening for the sound waves to bounce back.
The Fruity Reeverb plug-in (see Figure 7.38) takes the sound and adds that reverb so that it sounds more natural and closer to a live sound. Reverb is great for many different instruments as well as vocals and can be used on any sound that you feel needs it. Before plug-ins like these and their hardware counterparts existed, to get reverb in the vocals, record companies would set up a speaker in a long underground tunnel that ran beneath the studio. A mic was placed in the tunnel to record the vocals as they played through the speaker, and they bounced all over the tunnel. This was mixed with the original vocal recording and is the premise of how reverb works today.

We no longer need tunnels and a wild array of equipment; we can create our reverb simply by adding this plug-in to a track. In my personal opinion, unless you need specific reverb for a specific sound, you can insert reverb on one of the send tracks and send any of the tracks to the reverb track to add reverb to it. This also helps create a uniform reverb sound with your mix.
The LowCut and HighCut will allow you to EQ the reverb output, so if you are getting a booming sound in the reverb, adjust the LowCut to a higher setting until the deeper sound is gone.
Predelay allows you to tell the reverb to wait a specified amount of time before activating the first reverberation. This can help you create a huge room sound, but it can also cause the sound to overlap and create an unpleasant result. Usually I leave this set to a low value or zero unless I specifically need a sound to wait before starting to reverberate.
The RoomSize setting will shape the sound of the reverb and is great for creating a big room sound or giving your sound a more intimate (small room) feel. Diffusion will cause you to go from being able to hear the individual reflections to hearing a seeming white noise where the reflections are indistinguishable.
The Color setting will affect how much bass is in the reverb, where a bright room takes out some of the bass and a warm room leaves it in. The Decay is how long the reverb will play until it is inaudible, but it is good to note that a small room with a long reverb (decay) will not sound natural, so adjust between RoomSize and Decay accordingly.
HighDamping emulates a room that absorbs the higher frequencies and gives the reverb a warmer, murky sound, so if you want all of your high end in the reverb, set this all the way to the right, and the damping will turn off.
The Dry knob will determine how much of the original signal plays through, and it is good to remember to lower this to zero if you’re using the reverb on a send track so that you only have reverb playing out of the send.
The Reverb knob will set the amount of reverb (wet signal) that will play through the output of the plug-in. Reverb will make any vocal sound better within reason, so try experimenting with adding subtle amounts to different parts of your projects, and you will see how useful this effect is in music. Keep in mind that reverb is an effect that is easily overdone and can be the culprit of washed out, muddy tracks when every track has reverb on it.
Now that we have taken a good look at what reverb is and how it works, we can look at the updated version of FL Studio’s reverb effect. The Fruity Reeverb 2 effect (see Figure 7.39) is particularly helpful in understanding how the settings of the reverb work because of the room graphic spinning on the left side of the plug-in. The size of it changes (representing room size), the number of walls varies (representing diffusion), and the colors even change (indicating a frequency change or adjustment in delay).

The Mid/Side switch will allow you to toggle between MID processing, which is a left and right signal summed into a mono signal, and SIDE processing, which will allow for stereo control of the signal. Keep in mind that if you have a mono signal coming into the reverb, choosing SIDE will not do anything, so a vocal recorded with one mic will usually require the MID setting. For most of your reverb needs, the MID processing will work just fine.
The knobs bear a striking resemblance to those in Fruity Reverb and control the same reverb adjustments. Remember that these settings don’t affect the dry sound; they only affect the wet output of the reverb.
HighCut (H.CUT) will take out the brightness of the reverb and give the audio a clouded sound. The LowCut (L.CUT) knob will remove the low-frequency noise in the reverb, so if your reverb has a deep thundering sound or even a random low bass note, adjust the LowCut to a higher setting until the noise is gone.
The Predelay (DEL) knob for this plug-in has a switch next to it that will allow you to make the predelay adhere to the project tempo. This can create a cool effect when you choose this and then have a long predelay setting, because the following reverb will wait a set amount of time, but those numbers will be linked to the tempo. This means that if you have a setting of 2 for the Predelay knob and then you increase it to 6, the reverb will delay a great deal more, but it will still be in sync with the tempo when it plays. Using the predelay with a sharp-sounding or fast and short synth can give the instrument a call-and-response type of sound, because the note plays and then the reverb follows later, while keeping in time. To really get creative, you can even create an automation clip of the predelay so the reverb responds to the initial sound at different times.
The Room Size knob (SIZE) will give the reverb a bigger sound, while the Diffusion knob (DIFF) will control the number of reflections in the reverb. As the reflections go higher, the sound blends into a white noise, and each reflection disappears into another.
The Bass Response knob (BASS) will give your reverb a warmer or thinner sound by increasing or decreasing the lower frequencies. The Bass Crossover knob (CROSS) will pinpoint the lower frequencies that the Bass Response will boost or quiet. So if you wanted a more intense and bass-filled reverb, you could turn up the BASS knob and set the CROSS knob to roughly 50 Hz.
The Decay knob (DEC) controls how long you hear the reverb, and the High Dampening knob (DAMP) will determine how quickly the high frequencies leave the reverb sound. So if you want your reverb to last a bit, but you want the higher sounds to leave quickly, this knob should be turned to the left. If you don’t want any of the high end to get cut out of the reverb, turn it all the way to the right, and it will turn the dampening off.
The Dry slider will control the amount of original signal (dry) that is mixed with the final output of the plug-in. The Early Reflections slider (ER) will determine when the first reflections occur in the reverb, and the Wet slider will control the amount of processed signal (amount of reverb) that will play through the output.
The Stereo Separation knob will allow you to widen the reverb sound or bring it into the center. Take the time to explore this plug-in, because you will find many uses for it when trying to get that natural sound to your mixes, especially with band recordings and vocals.
The Fruity Scratcher (see Figure 7.40) is a cool plug-in to quickly scratch a sound that you might have by using your mouse to perform the scratching. You can set the sensitivity, so the speed that your mouse moves won’t matter. You will get the most use out of this when scratching vocals, instrument hits, or other short sounds. Loading a full song into here works, but not very well, so stick with shorter samples.
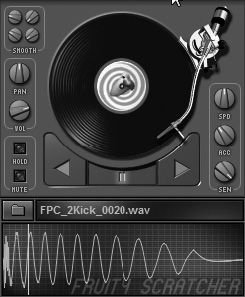
The four smoothing options will allow you to adjust the sound that the Scratcher outputs when affecting the signal. So for a grittier, less natural sound, try lowering these knobs.
The Pan and Volume knobs both affect the master output of the plug-in, and the Hold light will indicate when the record is being held, or it can be clicked to stop the sound from playing. The Mute switch will turn off the output of the effect, which can be helpful when you are getting sound trailing from the record not completely stopping.
The record itself can be controlled to scratch the sample by left-clicking and dragging up and down or by left-clicking on the waveform where the sample is located and dragging left to right.
The green buttons beneath the record are reverse playback, pause, and forward playback controls. When in Play mode, the sound will still stop if you click on the record and begin to scratch, but it will continue playing after you release the mouse button.
The Speed button (SPD) will determine how fast the sample plays back, and the Acceleration knob (ACC) will control how fast the turntable accelerates up to the speed you set. The Sensitivity (SEN) is where you set how fast the turntable will move based on the mouse movement, so if you feel like you are flying over a sample too quickly, lower this knob.
The lower portion of the plug-in is where you can see the waveform of the sample that you will be scratching. The folder icon allows you to load any sample that you have on your computer in the event that the sound you need is outside of FL Studio. Within FL Studio, you can drag any sound into the sample window. This is a great tool for simple scratching, but for serious manipulation and precise scratching, use the WaveTraveller.
The Fruity Squeeze (see Figure 7.41) is a fun plug-in that can add mild character or completely destroy the input signal and create a broken transistor sound where it cuts in and out. This is a fun one to randomly add to vocals or the entire mix to create a brief grit effect.
Squarize will cause the sound to get grittier and choppier as you turn up the dial, while lowering this will smooth out the effect. The Preserve knob will control how much of the sound (in samples) is left unaffected by the plug-in, and the Impact knob will determine how much of the sound (in samples) is pushed to a nominal level.
The Relation knob allows you to select the ratio of impact samples to preserve samples, and adjusting this will move the Impact knob based on the Preserve setting. The Amount knob will determine how much effect the other Puncher settings will have on the sound, so if you have this turned all the way up, you won’t hear any change when adjusting the Puncher settings.
The Filter settings allow you to place a filter on the plug-in output, and you can select the filter type by clicking in the small box and dragging up and down and then adjusting the Frequency and Resonance knobs to taste.
The Pre and Post switch will allow you to insert the filter before the puncher (Pre) or after the puncher (Post). The Mix slider will control the amount of original signal versus processed signal that plays out of the main output of the plug-in, and the Gain slider will control the final output volume. Keep this one at the ready, because there are plenty of situations in which the broken sound can come in handy when putting together creative electronic music or even sound designing for a movie.
Both of these plug-ins allow you to affect the stereo image of your sound, and we will look at the simple version first. The Stereo Enhancer (see Figure 7.42) will allow you to create a basic stereo widening effect by using phase offset between the left and right channels. The Stereo Separation knob will determine the amount of separation placed on your sound, where all the way to the left will be a mono output, the middle will leave the sound unaffected, and the extreme right will add maximum separation.

When Pre is selected, the phase offset effect will be applied prior to the other parameters affecting the sound in the plug-in, whereas Post will cause the phase offset to be applied after the sound has been altered.
The Phase Offset setting will allow you to delay the phase of the left and right channels up to 500ms. For a simple stereo widening effect, move this knob slightly left or right rather than a large amount. (Try a setting between 20 and 40 ms.)
The Invert switch will allow you to invert the phase of the left or right channel and turn off the inversion effect when None is selected. The Pan and Volume knobs are for the main output of the plug-in. This plug-in can be placed on a mono signal, such as a guitar that was recorded through a mic or with a direct input, and by bumping the Phase Offset a small amount, you can give your guitar a richer sound.
The Fruity Stereo Shaper (see Figure 7.43) is a more flexible version of the Stereo Enhancer and definitely takes time to fully understand. The idea is that the stereo image of a sound is made up of left, center, and right, where the center channel is the combined left and right channels mixed into a mono signal that will output as left and right but be identical, thus creating the “center” feel to the sound.
The Matrix sliders from left to right will control the right channel amount that feeds into the left channel, the left channel volume, the right channel volume, and the left channel amount that feeds into the right channel. Pre and Post settings will cause the Delay and Phase knobs to have effect prior to the stereo matrix (Pre) or after the sound passes through the stereo matrix (Post).
The Delay knob will delay the left or right channel, depending on which way it is turned, and the Phase knob will control the phase offset of the left and right channels. The Sidechain Out option can be used to send a sidechained signal to a selected Mixer track so that the difference in signal between the original sound and the processed sound plays through the sidechain track.
The presets for this plug-in will typically be all that you need to create the sound you desire, but make sure you experiment with the settings so that you familiarize yourself with how the phases can create the stereo-widening effect. To dig deeper into the math involved with this plug-in, press F1 while the plug-in is highlighted, and you can see the formulas used to create the stereo imaging. For a speedy stereo widening of a guitar or vocal, select Delay from the Preset menu, and you will immediately hear a difference.
The Fruity Vocoder (see Figure 7.44) is a popular effect used on vocals in many different types of music today. The Vocoder by itself will not do anything, because it processes two or more incoming signals to create the plug-in output. The two signals include the modulator (the sound used for vocoding), which is usually a human voice, and the carrier (the sound being vocoded), which is usually a synthesizer. The way it all works is that the Vocoder detects certain frequencies in the modulator and filters the carrier based on these detections. This causes the carrier to take on characteristics of the modulated sound. This is how we can get synths to have a voice in them or give our voices a synthy sound, however you see it. First we’ll take a look at the features of the Vocoder, and then we’ll look at a specific example using our own voice.
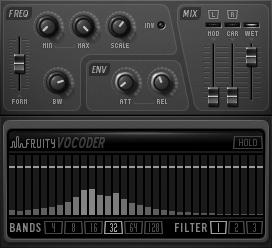
The Formant slider will affect the pitch of the vocoder-modulator to vocoder-band relationship. Slide this up and down for a more feminine or masculine sound. Adjust these Min and Max knobs to set a frequency range for the output of the plug-in.
The Scale knob will determine where the frequency center point is, so sliding this left will give your output more low end, and sliding it right will give you more high end.
Invert will switch the modulator frequencies, so if you are getting a low-frequency response, a quick way to get a high response is to select Invert, and the frequency of the modulator will invert.
The Bandwidth knob will determine the number of frequencies that are allowed to output from the carrier sound and can be great for tweaking the output to get just the right sound.
The Envelope knobs are fade-in (Attack) and fade-out (Release) controls for the envelopes of the different frequencies to which the modulator responds. The Mix sliders allow you to change the amount of dry signal from the modulator and carrier that plays in the final output, and by clicking the L and R buttons, you can quickly swap the modulator and the carrier to get a completely different sound.
The Hold button will allow you to freeze the modulator signal while the carrier signal still holds. Automating this can create an awesome stopping effect with a vocal that holds the words, but the carrier that is creating the melody continues playing.
The Bands selection will determine the output quality of your overall sound, but a low Bands setting can give your modulator a gritty sound to it and is worth experimenting with.
The last set of options allows you to select between different filters, and selecting a larger number will produce more rigid frequency response.
Let’s look at how we can do this with our own projects! Start by naming three tracks in the Mixer (F2), where the first track is Modulator, the second is Carrier, and the third is the Vocoder (see Figure 7.45).

Now turn off the send to the master for the Modulator and Carrier tracks and route both the Modulator and Carrier to the Vocoder. The way that the Vocoder works is that it combines the left input as the modulator and the right input as the carrier, so after routing these, pan the Modulator track to the left and the Carrier track to the right.
Now insert an instance of the Vocoder on the Vocoder track, and everything will be routed properly. In an empty sampler channel, insert an instance of 3xOSC and link the 3xOSC channel to the Carrier track (Shift+L when the track and channel are highlighted).
Now draw a few notes in the Piano roll of the 3xOSC (see Figure 7.46). When you hit Play, you should see signal in the Vocoder track, but you won’t hear any sound because there is no modulator to help produce an output.
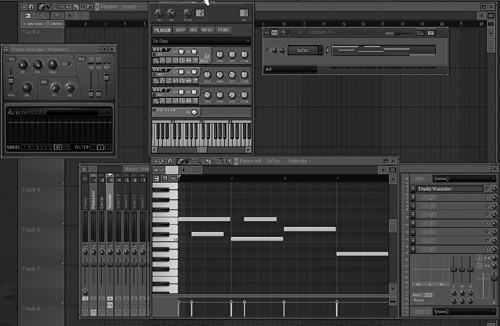
Figure 7.46. Drawing notes in the Piano roll of 3xOSC that will ultimately affect the Modulator signal.
Now on the Modulator track, select the input that you are using for a mic and press Play. Now when you speak into the mic, you can hear that your voice is causing the 3xOSC to mold with your voice. Try adding more instruments and linking them to the Carrier track for even more complex sounds.
Remember that this is only one example of how to use the Vocoder, and I suggest trying multiple instruments separately and combining them to get new sounds. Try adjusting the band settings to get a choppier sound with low bands and a more defined sound with higher bands. This plug-in can give your vocals that awesome effect that is very popular in many different types of music, and each instrument you use will affect the vocals differently. You can even sing in a monotone voice and use the Carrier (instrument) to give melody to your voice from the notes drawn in the Piano roll.
Wave Candy is a visualization plug-in that allows you to analyze your sound based on looking at an oscilloscope, spectrum analyzer, peak meter, and vectorscope (see Figure 7.47). The visualizations will give you accurate readings of what the different frequencies in your mix are doing and can be very useful in the mixing and mastering stages of music creation in FL Studio.
Remember that this is a visualization plug-in, so your sound will not be affected by the plug-in—rather, the appearance of the plug-in will be affected by the sound. With all visualizations, you have options to adjust the window of Wave Candy so that it is small, opaque, or even has a blurred effect when using Vista. You can also set the background color of the visualization in the Background section of the plug-in. The only options that change when selecting between the different visualizations will be specific to the chosen visualization. These options will allow you to fine-tune the accuracy of the visualization as it relates to the sound playing through the plug-in. When you are first experimenting with this plug-in, a great place to start is by inserting it on the Selected Mixer channel.
The Fruity Wave Shaper is a distortion effect that determines how strong a signal will play based on the input and the curve setting that you create on the graph (see Figure 7.48). The X-axis represents the input, while the Y-axis represents the output. When signal is playing into the plug-in, you will see a thin white line that moves to the right as the input signal gets louder.
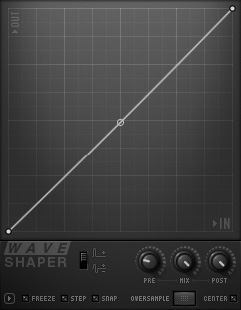
A quick way to understand the relationship between the X and Y axes is to place the Wave Shaper on your master track and then adjust the curve. Start by dragging the middle point down so that the curve takes a while to move up the Y-axis (see Figure 7.49).
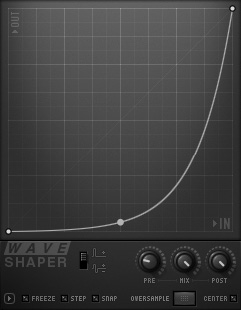
The input increases while the output stays the same longer, rather than the two increasing at the same rate. Because it takes more power from the input signal to get the same output, distortion is introduced into the overall sound.
The Unipolar mode will cause the bottom of the graph to be 0 dB for the signal, and the Bipolar setting will cause the middle of the graph to be 0 dB, allowing for offsetting the signal in reverse by dropping it below the 0-dB setting.
The Pre knob will determine how much signal goes into the plug-in from the original. Mix will control the amount of input signal versus processed (wet) signal, and Post is the final volume output.
The bottom row includes a Freeze option, which will prevent further editing of the curve; Step, which will allow freehand drawing of a curve; and Snap, which will cause any control points that you draw to snap to the graph grid lines.
Oversample will improved the quality of the effect and can remove pops and clicks in some instances, and the Center toggle switch will remove DC offset from the output of the plug-in. This is one of the stranger plug-ins from FL Studio, but don’t be afraid to randomly place it on a vocal or an instrument and automate the Mix knob to create warped effects on your sounds.
The Fruity XY Controller (see Figure 7.50) is another of FL Studio’s internal controllers that you can map to nearly any parameter in FL Studio. What I love about this plug-in is that if you have a joystick controller (even one resembling a videogame controller) and it connects to your computer, you can map the X-axis controls of the XY Controller to the X-axis controls of your joystick, and the same applies to the Y-axis. This makes creating a simple surround-stereo fade-in/out very easy and practical because you can link the Y-axis to volume and the X-axis to panning. By linking these controls, you can spin the position of the crosshairs in the XY in a circle, and the sound will respond as if you are creating a surround pan, because as you increase the Y-axis, the volume gets louder (as if you are getting closer), and as you increase the X-axis, the signal will pan right (as though the signal is moving to your right side).

Remember that this is only an example for when you link the volume and panning of the same track—the X and Y axes can be linked to anything! The X and Y buttons in the plug-in will determine which settings you are affecting when adjusting the Level, Min/Max, and Tension settings.
The Speed wheel and Acceleration wheel both affect the movement speed of the crosshairs on the XY Controller graph, but the Speed wheel determines the overall top speed of the cursor, and Acceleration will control how fast that top speed is reached. If you want to use a joystick or an external controller that has XY capability, highlight the joystick box, and a menu will pop up allowing you to select your joystick. After selecting your joystick, you can choose which parts of the joystick will control the X and Y axes, and the joystick Speed knob will set the sensitivity of the plug-in to your joystick.
Remember that if you are using a MIDI keyboard that has faders, you can link the X-axis Level knob to one fader and the Y-axis Level knob to another fader, which will give you the same control without the need for a joystick.
The final cool feature that I want to mention with the XY Controller is that you can change the background as I did in Figure 7.50 by right-clicking anywhere in the graph and selecting a background from the menu.
The Soundgoodizer (see Figure 7.51) is a multi-band maximizer that uses presets from Maximus for bringing out the best in your sound, and the best part is that it is simple! The settings for the Soundgoodizer are based on presets for the Maximus plug-in, which we will briefly discuss in the next chapter. The four available presets should each be tried when you are trying to boost the overall sound, because the best judge of what sounds good is your own ears.
Clicking and dragging the dial in the middle of the Soundgoodizer will add or subtract the effect. I have found that placing this on a master track is a quick way to brighten up or thicken your mix, and it works well for creating more depth with many different sounds, including vocals. Try adding the Soundgoodizer to what you considered to be a final mix, and the results may surprise you.
The Vocodex plug-in (see Figure 7.52) operates with the same idea as the Fruity Vocoder, but it allows for more flexibility and options. In this version you can use a single track, set the input of the track to be your mic and use a preset from the immediate section in the Vocoder menu, and use your MIDI keyboard (or even the Typing Keyboard to Piano Keyboard option—Ctrl+T) to instantly affect your vocals! (See Figure 7.53.) This is possible because the Vocodex plug-in has a built-in synth that acts as a carrier for the modulation signal (your voice).


Figure 7.53. Selecting the immediate option for live effect of the modulator using notes played on a MIDI keyboard.
If you want to get more precise using the Piano roll or the Stepsequencer, then you will want to add a Mod track like in the Fruity Vocoder example, but this time have the output of the Mod track sidechain to the Vocoder. (With the Mod track selected, right-click on the Send button on the Vocodex track and choose Sidechain to This Track.)
Remember to disable the Mod send to the master track so that the original signal doesn’t make it to the mix, because if you want the original to blend in, you can use the settings of the Vocodex. Now send the output of your carrier (instrument or channel making the sound) to Vocodex by linking that channel to the Vocodex Mixer track directly rather than using the Send knob. The more you use this plug-in, the more you will get familiar with its features and realize just how powerful it is.
Many of the features have similar effects that have been discussed in other effects plug-ins descriptions and the “Fruity Vocoder” section, but there are a few settings that are specific to Vocodex. The first slider that you see is a Soundgoodizer slider (SG) that is integrated into the plug-in. If your output has the perfect tone and frequency but is peaking too loud and causing clipping, the Soundgoodizer can help add the right compression to prevent these audio spikes.
The L.R. Encoding toggle switch will cause Vocodex to act like the Fruity Vocoder and will use the left channel as the modulator and the right channel as the carrier if this is easier or makes more sense to you. Once you understand how the Vocodex works, though, I doubt you will ever need this selection.
The Noise slider will add general noise to the carrier signal if it is not rich enough. Increase this slider value when you want the different sounds of your voice, such as S and T sounds, to output with more clarity.
You’ll learn much about this plug-in by changing settings and listening to the end result, because the settings are all going to be your preference. Much like the Vocoder plug-in, try sending in multiple carriers to create a more complex effect on the modulator (your voice) and play with the Bands settings to get different responses for the overall output. Vocodex has the ability to create almost any vocoder effect that you will hear in today’s music, and with your experimentation and exploration, it will create sounds never before heard that you can call your very own!
We have taken a detailed look at the effects plug-ins that FL Studio has to offer, and by now you should be developing a good idea of where to use the plug-ins and how to create the sounds you need. I have to remind you that with these, experimentation and an attentive ear are key to successfully using these plug-ins with your own projects. A great way to build a foundation of knowledge is to try to copy effects from other songs using the tools you have, and naturally you will come up with your own settings that you can save for future projects.
In the next chapter we will take a brief look at the plug-ins that are not included with the purchase of FL Studio so that you can decide whether they are right for you and whether they would suit your needs. The idea is to give you the basic knowledge of what they do and how they work so you can make a purchase based on need rather than curiosity.